
Chapter 15
Checking Your Work
In This Chapter
Sweeping through the bank accounts with a stiff broom
Getting debtors and creditors spick and span
Ensuring your tax codes are as clean as a whistle
Mopping up control accounts
Digging for dirt
One of the services I offer as part of my consultancy business is a 12-step bookkeeping health check, where I go through a client’s set of accounts from top to bottom, identifying possible problems.
Clients sometimes wonder how I can sit down in front of a set of seemingly perfect accounts containing many thousands of transactions, and in a few minutes uncover a whole list of mistakes. Contrary to popular opinion, I don’t have any psychic gifts or special powers, just a bag of tricks that I’ve honed over many years.
I’ve guarded these techniques carefully over the years, but in this chapter, I share the whole kit and caboodle with you. Best of all (and unlike other kinds of health checks that I’d rather not think about right now), there’s no physical exercise, diets or grisly confessions involved.
Starting With the Bank Accounts
The first three steps of my 12-step health check involve verifying bank balances. Not only do I check that every account is reconciled, but I also check for stale transactions and strange-looking dates.
![]() Bank accounts are a great starting point when you’re checking accounts; if a bank account balance isn’t correct, then you can be sure the accounts themselves aren’t correct.
Bank accounts are a great starting point when you’re checking accounts; if a bank account balance isn’t correct, then you can be sure the accounts themselves aren’t correct.
Step one: Checking that everything reconciles
Earlier in this tome, I devote an entire chapter (Chapter 11, to be precise) to the scintillating topic of bank reconciliations. Bank reconciliations form the guts of the whole accounting business, because until you’re sure that all bank accounts balance, you can’t rely on a single report.
Ask yourself the following:
Is every business bank account reconciled, including savings accounts and credit cards?
Is every loan account reconciled?
Does every clearing account, such as Undeposited Funds, Electronic Clearing or Payroll Clearing, return to zero at the end of the period?
Is your answer yes? Then well done, step one of your health check is complete.
![]() If you’re doing this health check at the end of a financial year, you may want to photocopy the bank statement page that includes the balance as at the last day of the year (30 June in Australia, 31 March in New Zealand), and attach this photocopy to your printed bank reconciliation for that period, proving that each account is properly reconciled.
If you’re doing this health check at the end of a financial year, you may want to photocopy the bank statement page that includes the balance as at the last day of the year (30 June in Australia, 31 March in New Zealand), and attach this photocopy to your printed bank reconciliation for that period, proving that each account is properly reconciled.
Step two: Hunting for stale transactions
The languorous summer holidays are drawing to a close as I write this, and this morning I thought I’d be a good mum and spring clean my son’s bedroom before term began. As soon as I fished Finbar’s school bag out from under his bed, I regretted my maternal zeal. Sure enough, still at the bottom of the bag from six weeks ago was an entire packed lunch, complete with a banana (what was I thinking?) and a ready-to-explode fermenting juice bottle.
Truth is, if you leave anything lying around for long enough, it begins to stink. And accounts are no exception. Step two of the bookkeeping health check involves hunting for trouble, making sure that no bank accounts show any unreconciled transactions more than a couple of months old.
1. Go to your bank reconciliation reports and highlight all unreconciled transactions that are more than eight weeks old.
Transactions that are more than eight weeks old and still haven’t cleared through the bank account are called stale transactions.
![]() 2. Investigate every stale transaction and figure out why it hasn’t cleared.
2. Investigate every stale transaction and figure out why it hasn’t cleared.
Possible causes include
• Duplicate entries — if you enter something twice, the duplicate shows as uncleared
• A cheque that got lost in the post
• A supplier who is so wealthy they can’t be bothered to go to the bank
• A mistake — maybe this transaction never occurred, or you allocated this transaction to the wrong bank account
• A customer payment received in cash, and the cash was never banked
• An end-of-year adjustment entry to the bank made by your accountant
3. Fix the problem! Delete duplicate transactions, reverse stale cheques or contact suppliers for cheques not yet banked.
All done? When you’re confident you have no stale transactions hiding in your accounts, and no stale toast hiding in the cracks of your sofa, then step two of your bookkeeping health check is complete.
Step three: Drilling down on dates
The third step of your bookkeeping health check is to track down any transactions with dates that have gone astray. This step is only relevant if you’re using accounting software, which sorts transactions automatically according to date.
Future-dated transactions
So the new (calendar) year starts and you stagger into work in a kind of haze (being at the beach would be so much more fun), and you start doing the books. Trouble is, the dates are an unholy mixture of the old year and the new, and before you know it (well, you don’t know it actually, because you’re in that delicious haze), you end up dating a transaction for the December not just gone, but the December that’s still 11 months away.
![]() Future-dated transactions, especially if you date a transaction completely the wrong year, can be costly, because for every wrongly dated transaction, you potentially get a missed tax deduction.
Future-dated transactions, especially if you date a transaction completely the wrong year, can be costly, because for every wrongly dated transaction, you potentially get a missed tax deduction.
If you’re lucky, your accounting software may have a future-dated transaction report (both MYOB and QuickBooks have this nifty feature, but not all other software does). If this report doesn’t exist in the software you’re using, your best bet is to generate a Profit & Loss report for the next 12 months, starting with the current date. This report should come up blank, with no income and no expenses. If not, chances are any figures on this report are caused by future-dated transactions.
Prepaid transactions (payment date before invoice date)
![]() The other kind of dating error (that expression ‘dating error’ elicits a few quirky memories) that causes problems is if you get a customer or a supplier payment that’s dated earlier than the invoice or bill to which this payment belongs.
The other kind of dating error (that expression ‘dating error’ elicits a few quirky memories) that causes problems is if you get a customer or a supplier payment that’s dated earlier than the invoice or bill to which this payment belongs.
For example, imagine I record a customer payment dated 29 June for an invoice dated 2 July, and my financial year ends on 30 June. From an accounting perspective, a customer can’t pay for a sale that hasn’t happened yet. The customer payment affects my debtors balance at year end, but the income doesn’t hit the accounts until the following financial year. Ugly.
If you’re lucky, your accounting software may have a prepaid transaction report. If this report doesn’t exist in the software you’re using, the easiest way to spot prepaid transactions is to check your debtors and creditors control accounts, a process I cover in step eight of this health check.
Spring Cleaning Your Debts
Do you use your accounting software or bookkeeping system to keep track of how much customers owe you, or that you owe to suppliers? If so, it pays to make sure that the information about your debts is completely spot-on.
![]() The report showing how much customers owe is usually called an Aged Receivables report or an Aged Debtors report, and the report showing how much you owe to suppliers is usually called an Aged Payables report or an Aged Creditors report. The terminology doesn’t matter, so long as the report itself is right.
The report showing how much customers owe is usually called an Aged Receivables report or an Aged Debtors report, and the report showing how much you owe to suppliers is usually called an Aged Payables report or an Aged Creditors report. The terminology doesn’t matter, so long as the report itself is right.
Step four: Getting debtors spick and span
Step four of your bookkeeping health check involves getting a debtor listing that’s 100 per cent perfect. In other words, if a customer name appears on your Aged Receivables report, you — or anyone else for that matter — want to be completely sure that this customer owes exactly that amount.
Take action now:
Tidy up amounts that you know are wrong: If a customer shows in your Aged Receivables report but you know they don’t really owe money, fix the account now. (This problem is often caused by customers paying in cash and then the owner pocketing the cash, sweet cash, without banking a single cent. In this situation, the solution is to credit the customer’s account, allocating this credit to Owner’s Drawings.)
Write off piddly amounts: Get rid of any pesky accounts where there are only a few cents owing. You’re never going to phone a customer and chase ’em for five cents, are you? (Refer to Chapter 9 for how to write off bad debts, but for small balances, simply create a credit note, and code this note back to sales.)
![]() Check the dates of all customer deposits: Customer deposits normally show as a liability in an account called something like Customer Deposits Held. Any customer deposits that are more than a few weeks old usually indicate that a deposit has been received and the job completed, but nobody has remembered to convert the sales order to a final invoice.
Check the dates of all customer deposits: Customer deposits normally show as a liability in an account called something like Customer Deposits Held. Any customer deposits that are more than a few weeks old usually indicate that a deposit has been received and the job completed, but nobody has remembered to convert the sales order to a final invoice.
Investigate any old amounts over 90 days: If accounts are genuinely overdue, chase the money now (for money-chasing tips, skip to Chapter 20). Or, if an account shows as overdue because there’s a dispute or possibly a bookkeeping error, spend the time trying to resolve the problem.
Step five: Sweeping through the creditors
Just like the clutter that piles up on the kitchen bench and on the telephone table (guess what I’m looking at right now), you quickly get clutter building up in your Aged Payables report. By clutter, I mean amounts that show as owing but which you know are really odd unallocated credits, duplicate bills and other similar rubbish.
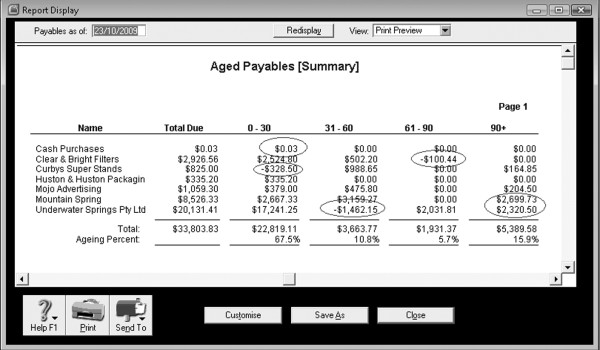
Step five of your bookkeeping health check means showing no mercy. In Figure 15-1, I show an Aged Payables report that’s looking a bit sad, and I’ve circled all the transactions that I reckon need a bit of attention.
Get rid of bills that you know you don’t owe: If a bill shows as owing in your Aged Payables report but you’re sure you’ve paid the bill, check that you haven’t entered the bill twice (and if so, delete or reverse the duplicate). Or, if you recorded this bill payment in the cash journal, rather than matching the payment against the bill, either reverse the cash journal payment, or reverse the bill.
Write off small amounts: If you have old amounts where you only owe a few cents and the supplier isn’t chasing you for the money, raise a credit to write off the balance, allocating this credit to the same account used originally.
Enter credit notes: If you didn’t pay a bill because there was a dispute, and the supplier has agreed you don’t have to pay, record a credit note to bring the account to zero.
Investigate all minus amounts: Sure, you may have a credit outstanding with a supplier, but any minus amounts in your Aged Payables report warrant investigation.
Deal with cash payments correctly: If a bill shows as owing but was actually paid for in cash by the owner, raise a credit for the bill, allocating the credit to Owner’s Drawings or to Directors’/Shareholders’ Loan.
![]() Look into amounts over 90 days old: Investigate every single bill that’s more than 90 days outstanding. Unless the business you do the books for is a woeful payer, any bill that’s more than 90 days old is likely to be an error.
Look into amounts over 90 days old: Investigate every single bill that’s more than 90 days outstanding. Unless the business you do the books for is a woeful payer, any bill that’s more than 90 days old is likely to be an error.
All done? Now why don’t you make your way over to my house and deal with all my clutter . . .
Figure 15-1: Engage the brain and look through Aged Payables reports with a critical eye.
Putting GST under the Griller
![]() Steps six and seven of your bookkeeping health check involve checking GST. Step six focuses on whether transactions have been coded correctly and is usually a fairly straightforward process, particularly if you already have your head around what gets taxed, and what doesn’t. (For more info about this topic, refer to Chapter 7.)
Steps six and seven of your bookkeeping health check involve checking GST. Step six focuses on whether transactions have been coded correctly and is usually a fairly straightforward process, particularly if you already have your head around what gets taxed, and what doesn’t. (For more info about this topic, refer to Chapter 7.)
The seventh step of the health check from hell is probably the most technical of all the checks in this chapter, and involves reconciling the GST liability account or accounts in the Balance Sheet. If you find yourself quailing when you arrive at this topic, you may prefer to ask the company accountant to give you a hand.
Step six: Hunting for coding mistakes
The sixth step of the bookkeeping health check involves verifying whether you’ve shown the correct amount of GST on every transaction. If you use accounting software, check that all transactions have the correct tax code; if you do books by hand or using a spreadsheet, check that all transactions show the correct amount of tax in the GST column.
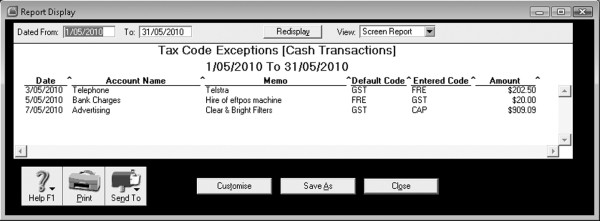
![]() In both MYOB and QuickBooks, I find the quickest way to spot tax code errors is to generate a Tax/GST Code Exceptions report (this report forms part of the Company Data Auditor in MYOB, and the Data Auditor in QuickBooks). This smart little report identifies any transactions where the tax code for an account differs from the tax code on the transaction. For example, if you have GST as the default tax code for your Telephone Expense account, but you allocate a transaction to Telephone Expense and use a code with no tax, then this transaction appears on your Tax/GST Code Exceptions report, similar to Figure 15-2.
In both MYOB and QuickBooks, I find the quickest way to spot tax code errors is to generate a Tax/GST Code Exceptions report (this report forms part of the Company Data Auditor in MYOB, and the Data Auditor in QuickBooks). This smart little report identifies any transactions where the tax code for an account differs from the tax code on the transaction. For example, if you have GST as the default tax code for your Telephone Expense account, but you allocate a transaction to Telephone Expense and use a code with no tax, then this transaction appears on your Tax/GST Code Exceptions report, similar to Figure 15-2.
Figure 15-2: Review GST codings for every transaction.
![]() Just because a transaction appears on a Tax/GST Code Exceptions report, you haven’t necessarily made a mistake. For example, the default tax code for your Plant & Equipment asset account is going to be a code with GST, which makes sense because capital equipment almost always includes GST. However, maybe you occasionally buy second-hand gear from private sellers on eBay, and these purchases don’t attract GST. The fact that these purchases then appear as a tax exception doesn’t mean you made a mistake.
Just because a transaction appears on a Tax/GST Code Exceptions report, you haven’t necessarily made a mistake. For example, the default tax code for your Plant & Equipment asset account is going to be a code with GST, which makes sense because capital equipment almost always includes GST. However, maybe you occasionally buy second-hand gear from private sellers on eBay, and these purchases don’t attract GST. The fact that these purchases then appear as a tax exception doesn’t mean you made a mistake.
![]() If you use a spreadsheet or handwritten books, the easiest way to check your GST amounts is to look for inconsistencies. For example, take a month’s transactions, total all the expenses you know attract GST (such as advertising, computer gear, telephone and so on), and then multiply this total by 10 per cent (in Australia) or 12.5 per cent (in New Zealand) to arrive at how much the total GST should be for that month. Check this figure against the actual GST total.
If you use a spreadsheet or handwritten books, the easiest way to check your GST amounts is to look for inconsistencies. For example, take a month’s transactions, total all the expenses you know attract GST (such as advertising, computer gear, telephone and so on), and then multiply this total by 10 per cent (in Australia) or 12.5 per cent (in New Zealand) to arrive at how much the total GST should be for that month. Check this figure against the actual GST total.
When you’re sure you have the amount of GST correct on every transaction, you can progress to balancing your GST accounts. Are you having an unbelievable amount of fun? I hope so.
![]() GST payments and refunds
GST payments and refunds
Recording GST payments and refunds is a tricky business.
In Australia, your Business activity statement is usually a combination of GST collected, GST paid and PAYG withholding tax, and may also include fringe benefits tax, PAYG instalment tax and other oddball taxes such as wine equalisation tax or luxury car tax. In New Zealand, your GST return is usually a combination of GST collected and GST paid, and may also include customs GST and other benefits.
When you record a transaction for a GST payment or refund, you first have to work out what taxes are involved, and you then have to split the transaction across the various related tax accounts.
For example, this month I made a payment for GST which was for $4,000 in total. When I look up the paperwork, I can see that this payment was made up of $3,000 in GST collected, a $1,200 credit for GST paid, $500 in PAYG withholding tax and $1,700 in PAYG instalment tax. I split this single payment across the four associated accounts, entering GST collected and PAYG taxes as positive amounts, and GST paid as a minus amount. (Some accounting software packages, including QuickBooks, combine GST collected and GST paid into a single account called GST Payable; other software packages have one account called GST Collected and another for GST Paid.)
Step seven: Balancing GST liability accounts
![]() If you’re working with accounting software, making sure that the balance of your GST liability accounts is correct is a vital part of your bookkeeping health check. On the other hand, if you do books by hand or use a spreadsheet, and you don’t generate your own Balance Sheet reports, you can safely skip this step.
If you’re working with accounting software, making sure that the balance of your GST liability accounts is correct is a vital part of your bookkeeping health check. On the other hand, if you do books by hand or use a spreadsheet, and you don’t generate your own Balance Sheet reports, you can safely skip this step.
So the theory behind this health check is this: Every time you record a transaction that includes GST, this transaction impacts on your GST liability accounts. When you pay GST, this payment makes the balance of your GST liability account or accounts go down. In other words, the balance of your GST liability account or accounts is a running balance of how much you owe.
The mechanics of your health check depend on whether you report for GST on an accrual or a cash basis.
If you report for GST on an accrual basis, here’s what to do:
1. Print a Balance Sheet for the last day of the reporting period on your most recent Business activity statement or GST return.
For example, if your most recent Business activity statement or GST return was for the month of June, then print a Balance Sheet dated 30 June.
2. On your Balance Sheet, look at the balance of your GST Collected and GST Paid accounts, or your GST Payable account.
You may have two liability accounts — one called GST Collected and another called GST Paid — or you may have a single GST liability account called GST Payable.
3. Look up the amounts you declared for GST Collected and GST Paid in your most recent Business activity statement or GST return.
In the land of The Wallabies, you’re looking at boxes 1A and 1B on your activity statement. In the land of the All Blacks, you’re looking at boxes 10 and 14 on your GST return.
4. Compare the figures from Step 2 against the figures from Step 3. Guess what? They should match.
![]() If you only have one combined liability account for GST, then you compare this balance against the net balance of GST Collected less GST Paid.
If you only have one combined liability account for GST, then you compare this balance against the net balance of GST Collected less GST Paid.
If the two figures don’t match and the difference is more than $100 or so, take further action. I suggest you go right back to the beginning of the financial year, and do this health check for each GST period — you should be able to pinpoint where the rot set in. If the problem relates back to before the beginning of the financial year, your best approach is usually to talk to the company accountant.
![]() If you report for GST on a cash basis, things take a much trickier turn, because you have to allow for the GST that you haven’t paid yet (because you haven’t received payments from customers for outstanding invoices or you haven’t paid suppliers for outstanding accounts). I’m a little hesitant sharing this procedure with you, because the whole deal is unashamedly tricky, but if you can master reconciling GST on a cash basis, you know that you’re truly ahead of the pack.
If you report for GST on a cash basis, things take a much trickier turn, because you have to allow for the GST that you haven’t paid yet (because you haven’t received payments from customers for outstanding invoices or you haven’t paid suppliers for outstanding accounts). I’m a little hesitant sharing this procedure with you, because the whole deal is unashamedly tricky, but if you can master reconciling GST on a cash basis, you know that you’re truly ahead of the pack.
1. Look up the amounts you declared for GST Collected and GST Paid in your most recent Business activity statement or GST return.
In Australia, you’re looking at boxes 1A and 1B on your activity statement. In the land of the long white cloud, you’re looking at boxes 10 and 14 on your GST return.
2. Print an Aged Receivables report and an Aged Payables report, and calculate how much GST is included in the totals of each of these reports.
For example, if I’m owed $11,000 and I charge GST at a rate of 10 per cent and I charge GST on all my sales, then I can calculate that my receivables include $1,000 in GST.
![]() If you’re using MYOB, two neat reports that help pave the way are the Receivables with Tax report (called the Receivables Summary with GST in New Zealand) and the Payables with Tax report (called the Payables Summary with GST in New Zealand).
If you’re using MYOB, two neat reports that help pave the way are the Receivables with Tax report (called the Receivables Summary with GST in New Zealand) and the Payables with Tax report (called the Payables Summary with GST in New Zealand).
3. Add the amount of tax on receivables (see Step 2) to GST Collected (see Step 1), and add the amount of tax on payables (see Step 2) to GST Paid (see Step 1).
Or, if you only have one combined liability account for GST, add the net tax from receivables and payables to the net balance of GST Collected less GST Paid.
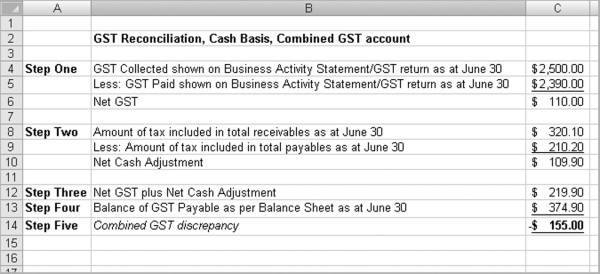
Figures 15-3 and 15-4 show how this whole drama works. Figure 15-3 shows how to reconcile GST if you have two separate GST liability accounts; Figure 15-4 shows how to reconcile GST if you have a combined GST liability account.
4. Print a Balance Sheet for the same period, and look at the balance of your GST Collected and GST Paid accounts, or your GST Payable account.
For example, if your most recent Business activity statement or GST return was for the month of June, then print a Balance Sheet dated 30 June.
5. Compare the figures from Step 4 against the figures from Step 3. If the stars are in your favour, these figures should match.
![]() If the two figures don’t match and the difference is more than $100 or so, take further action. I suggest you go right back to the beginning of the financial year, and do this health check for each GST period. This way you can hopefully see where the problem began. If the problem relates back to before the beginning of the financial year, your best approach is usually to talk to the company accountant.
If the two figures don’t match and the difference is more than $100 or so, take further action. I suggest you go right back to the beginning of the financial year, and do this health check for each GST period. This way you can hopefully see where the problem began. If the problem relates back to before the beginning of the financial year, your best approach is usually to talk to the company accountant.
Figure 15-3: Reconciling GST on a cash basis when you have separate GST liability accounts.

Figure 15-4: Reconciling GST on a cash basis when you have combined GST liability accounts.
Understanding Control Accounts
In a perfect world, if you look at your Aged Receivables report and the total amount owing from customers is $33,000, then the corresponding balance of Accounts Receivable in your Balance Sheet should also be $33,000. (Note: Some accountants use the term Trade Debtors rather than Accounts Receivable.) This is because your Aged Receivables report shows the detail of how much customers owe you, and your Accounts Receivable account tracks the total amount that customers owe you.
In accountant-speak, your Accounts Receivable account is called a control account. A control account is a general ledger account where the balance reflects the total of balances in other related accounts. In this example, Accounts Receivable is the general ledger control account, and the individual customer balances are the related accounts. Accounts Payable is another common control account, where the individual supplier balances are the related accounts.
In this section, I explain how to play the matching game of four key control accounts:
Accounts Receivable: I match the total of individual customer balances against the balance of my Accounts Receivable account. (See ‘Step eight: Balancing debtors and creditors’ for details.)
Accounts Payable: I match the total of individual supplier balances against the balance of my Accounts Payable account. (See ‘Step eight: Balancing debtors and creditors’ for details.)
Inventory: I match the total value of individual stock item balances against the balance of my Inventory account. (See ‘Step nine: Giving inventory the once over’ for details.)
Payroll Liabilities: I match the individual amounts owing in wages tax and super for each employee against the total outstanding in the corresponding payroll liability accounts. (See ‘Step ten: Priming the payroll’ for details.)
Step eight: Balancing debtors and creditors
Step eight of your bookkeeping health check involves checking that your debtor and creditor control accounts balance. Here’s how:
1. Print an Aged Receivables or Aged Payables report dated the last day of the month just gone.
The name of this report varies, depending on what software you use. For example in MYOB, you’re looking for the Receivables or Payables Reconciliation Summary report; in QuickBooks, the A/R or A/P Ageing Summary report is the baby you’re after.
2. Print a Balance Sheet for the last day of the month just gone, and circle the balance of Accounts Receivable and Accounts Payable.
![]() These accounts are also sometimes called Trade Debtors or Trade Creditors.
These accounts are also sometimes called Trade Debtors or Trade Creditors.
3. Compare the grand total of the report from Step 1 with the balance of your control account in Step 2.
In other words, compare the grand total of your Aged Receivables report against the balance of Accounts Receivable in the Balance Sheet, and compare the grand total of your Aged Payables report against the balance of Accounts Payable in the Balance Sheet.
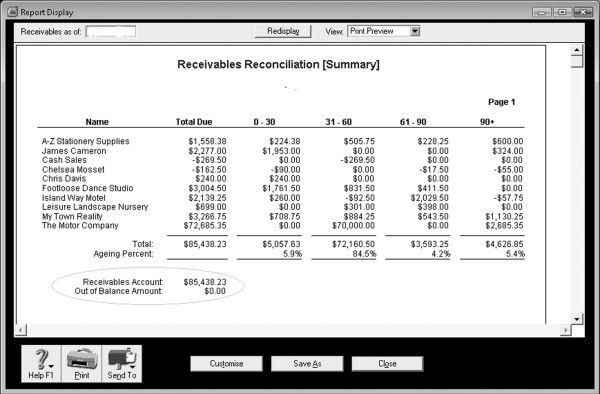
In Figure 15-5, you can see how the Reconciliation Summary report in MYOB does this comparison for you.
4. If the two balances are the same, you can sleep easy tonight.
Figure 15-5: The Reconciliation Summary report in MYOB compares receivables against the Balance Sheet and shows the difference.
And, I can almost hear you ask breathlessly, what if the two balances aren’t the same? Then things get a little tougher:
1. If the two balances differ, start at the beginning of the financial year and move forward month by month, generating the two reports for the end of each month. After you find the month in which the difference arose, see whether you can pinpoint the exact day when it happened.
You’re working on a process of elimination here. After you narrow down an out-of-balance amount to within a certain month, repeat the process for the days of that month (say, the 7th, 14th and so on), working towards identifying the first day that this out-of-balance amount appeared.
2. Look at the transactions in the corresponding general ledger account for that date. The offending transaction will probably leap out at you.
For example, if your Accounts Receivable control account went out of balance by $150 on 28 February, then look for a transaction for that amount on that date in this account.
3. Fix the transaction.
Exactly how you fix this transaction depends on the cause of the problem — see the sidebar ‘A rotten potato spoils the barrel’ for more details. Ask the company accountant for advice if you’re still not sure.
4. Move forward through the months again, checking that there are no other incorrect transactions.
![]() Remember, the aim of the game is to get the grand total of individual balances in the Aged Receivables or Aged Payables report to match the total of Accounts Receivable or Accounts Payable in the Balance Sheet. Don’t rest until you succeed!
Remember, the aim of the game is to get the grand total of individual balances in the Aged Receivables or Aged Payables report to match the total of Accounts Receivable or Accounts Payable in the Balance Sheet. Don’t rest until you succeed!
Step nine: Giving inventory the once over
Sometimes inventory can be the very messiest part of the whole bookkeeping game. I talk about inventory transactions in Chapter 13, but in this chapter, I focus on how to make sure that your inventory is clean as a whistle.
Checking your inventory account
First things first: Check that the total value of all the individual stock items matches up with the value of the inventory account in your Balance Sheet.
1. Print an inventory valuation report dated the last day of the month just gone.
The name of this report varies, depending on what software you use. For example, in MYOB, you’re looking for the Inventory Value Reconciliation report; in QuickBooks, the Inventory Valuation Summary report is the one you’re after. Make sure that this report shows items at cost price. (For more detail about the different ways of costing inventory, skip back to Chapter 13.)
2. Scan the report for weird stuff.
![]() Open your eyes wide and you usually spot all kinds of sinister stuff. Look out for items with negative quantities (unless you’re operating on some metaphysical plane, stock existing in the negative usually indicates a problem). Also, scan the report for costs that defy commonsense, such as a bunch of spinach having a cost value of $300, or a new washing machine having a cost value of two bucks.
Open your eyes wide and you usually spot all kinds of sinister stuff. Look out for items with negative quantities (unless you’re operating on some metaphysical plane, stock existing in the negative usually indicates a problem). Also, scan the report for costs that defy commonsense, such as a bunch of spinach having a cost value of $300, or a new washing machine having a cost value of two bucks.
3. Print a Balance Sheet for the last day of the month just gone, and circle the balance of Stock on Hand.
This account is also sometimes simply called Inventory.
4. Compare the grand total of the report from Step 1 with the balance of your control account in Step 3.
In other words, compare the grand total of your inventory valuation report against the balance of Stock on Hand in the Balance Sheet.
5. If the two balances are the same, congratulations. If the two balances differ, proceed to my troubleshooting tactics.
No need to tremble in your books. Read on, and all shall be revealed . . .
Troubleshooting your inventory account
Okay, so the total value of individual stock items isn’t matching up with the value of your inventory account. Time to pull on some of the more deadly tactics from my bag of tricks.
1. If the two balances differ, start at the beginning of the financial year and move forward month by month, generating the two reports for the end of each month. After you find the month in which the difference arose, see whether you can pinpoint the exact day when it happened.
You’re working on a process of elimination here. After you narrow down an out-of-balance amount to within a certain month, repeat the process for the days of that month (say, the 7th, 14th and so on), working towards identifying the first day that this out-of-balance amount appeared.
2. Look at the transactions in your inventory account for that date. The offending transaction will probably leap out at you.
![]() Transactions that cause trouble are usually transactions that have been allocated directly to your Inventory asset account. Look for an inventory adjustment, or a cheque, supplier bill or general journal coded to the inventory account. If the transaction is an item purchase, double-check what accounts this item links to.
Transactions that cause trouble are usually transactions that have been allocated directly to your Inventory asset account. Look for an inventory adjustment, or a cheque, supplier bill or general journal coded to the inventory account. If the transaction is an item purchase, double-check what accounts this item links to.
3. Fix the transaction.
Exactly how you fix this transaction depends on the cause of the problem. If you’re not sure how to reallocate a transaction, ask the company accountant for advice or allocate the transaction to a suspense account.
4. Move forward through the months again, checking that no other incorrect transactions exist.
![]() The aim of the game is to get the total cost of individual stock items in your inventory valuation report to match the total of Stock on Hand in the Balance Sheet. Don’t rest until you succeed!
The aim of the game is to get the total cost of individual stock items in your inventory valuation report to match the total of Stock on Hand in the Balance Sheet. Don’t rest until you succeed!
Step ten: Priming the payroll
Up to step ten in your bookkeeping health check? You’re a champion. Maybe now is the time to put your feet up, pour yourself a mellow glass of red and have a snooze. Oops, maybe that’s just what I feel like doing.
No, keep going. What you need to do next is the following:
Check that your PAYG Withholding Tax Payable (Australia) or PAYE Tax Payable (New Zealand) account reconciles. For the fine details, refer to Chapter 12.
Check that your Superannuation Payable (Australia) or KiwiSaver Payable (New Zealand) account reconciles. Again, for the lowdown, refer to Chapter 12.
Doing a Mini-Audit
Auditing a set of books is more of a mindset, rather than a skill. I suggest you get into the mood by imagining that you’re actually an auditor. Ladies: Tie back your hair, remove any jewellery and strip your face of make-up. Gentlemen: You can probably just get away with not brushing your teeth.
Change into some tight black clothes (synthetic fibres preferred), and don your most severe expression. Lovely. You look like a real auditor now.
Step eleven: Scanning transaction reports
Over the years, I’ve developed a sniffer-dog instinct for trouble. I can go through a set of books, scanning pages of transactions at a time, and hit on mistakes the same way that the beagle found my chocolate cookies at Sydney airport the other week.
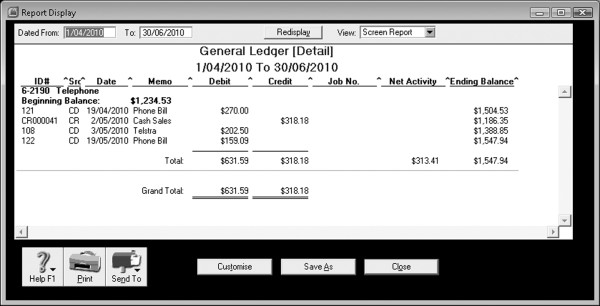
The eleventh step of your health check involves scanning every single account for errors. If I’m working with accounting software, I usually display a General Ledger detail report, or something similar, and scroll down through the report on screen. A General Ledger report typically lists transactions in date order, sorted by account name, similar to Figure 15-6.
I explain the tricks of the trade so that you can do spot errors like a pro:
![]() Look for debits or credits appearing in the wrong column: Income always appears in the credit column in transaction reports and, if you see an amount in the debit column, chances are this is a mistake. Similarly, if you see an amount appearing in the credit column for an expense account, this amount is also likely to be a mistake. (Check out Figure 15-6 to see whether you spot the obvious blooper.)
Look for debits or credits appearing in the wrong column: Income always appears in the credit column in transaction reports and, if you see an amount in the debit column, chances are this is a mistake. Similarly, if you see an amount appearing in the credit column for an expense account, this amount is also likely to be a mistake. (Check out Figure 15-6 to see whether you spot the obvious blooper.)
Count the number of transactions for regular payments such as leases or rent: For example, if you’re checking a year’s work in one hit and you know that rent gets paid monthly, you should have 12 rent transactions. If you see more or less, go looking for blood.
Figure 15-6: Look out for debit transactions in income accounts or credit transactions in expense accounts.
Drill down on inconsistent amounts: Expense accounts tend to have similar amounts in each one. Maybe bank charges are normally less than $20, but electricity expense is usually over at least a couple of hundred bucks a time. So if you see an amount in an expense account that’s significantly higher or lower than the other amounts around it, drill down to see what’s cooking.
Keep human nature in mind: Keep your eyes open for stuff that’s obviously personal but has been allocated to a business account. Likely suspects are travel and accommodation (the usual spot to allocate private meals and holidays); staff training (also known as private school fees); security expenses (dog food for dear Fido) and home office expenses (you name it, I’ve seen everything allocated to this account, from contraception to whisky).
Read the names of who received payments: Sometimes you can pick up account misallocations just by looking at the payee’s name. For example, if you see a payment made to Telecom sitting in the Electricity Expense account, chances are you’ve spotted a mistake.
Double-check anything to do with the buying or selling of new assets, or the taking out of loans: For more on these tricky kinds of transactions, head back to Chapter 14.
![]() A clean house is a sign of what?
A clean house is a sign of what?
When I do a bookkeeping health check for a client that uses accounting software, I like to go the whole hog and make sure not only that transactions are shipshape, but also that the data itself is in order. I ask three questions:
When did you last verify and/or optimise your accounting data? (Some accounting software, such as MYOB, not only requires that you verify data, but that you optimise it as well.)
Have you got audit trail tracking switched on?
When did you last back up? And can you promise, promise, promise that this backup is stored offsite? (If I’m feeling tough, I make ’em sign in blood.)
Step twelve: Analysing summary results
I talk more about understanding Profit & Loss reports in Chapter 17, but for now, I’m going to focus on looking at a Profit & Loss report with a view to spotting problems.
![]() Compare this year’s results against last year’s results. If something is notably different between the two years, investigate why.
Compare this year’s results against last year’s results. If something is notably different between the two years, investigate why.
Check the gross profit margin is relatively constant between this year and last year’s, and from month to month. (I explain more about gross margins in Chapter 17.)
Look for negative balances. If an income or expense account shows up as a minus, investigate why.
Look at the bottom line. Are you rolling in money? If not, why not?