Chapter 7
Tab Bars and Pickers
In the previous chapter, you built your first multiview application. In this chapter, you're going to build a full tab bar application with five different tabs and five different content views. Building this application will reinforce a lot of what you learned in Chapter 6. Now, you're too smart to spend a whole chapter doing stuff you already sort of know how to do, so we're going to use those five content views to demonstrate a type of iOS control that we have not yet covered. The control is called a picker view, or just a picker.
You may not be familiar with the name, but you've almost certainly used a picker if you've owned an iPhone or iPod touch for more than, say, 10 minutes. Pickers are the controls with dials that spin. You use them to input dates in the Calendar application or to set a timer in the Clock application (see Figure 7–1). On the iPad, the picker view isn't quite as common, since the larger display lets you present other ways of choosing among multiple items, but even there, it's used in the Calendar application.
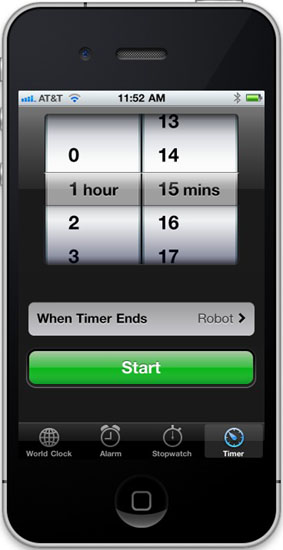
Figure 7–1. A picker in the Clock application
Pickers are a bit more complex than the iOS controls you've seen so far, and as such, they deserve a little more attention. Pickers can be configured to display one dial or many. By default, pickers display lists of text, but they can also be made to display images.
The Pickers Application
This chapter's application, Pickers, will feature a tab bar. As you build Pickers, you'll change the default tab bar so it has five tabs, add an icon to each of the tab bar items, and then create a series of content views and connect each view to a tab.
The application's content views will feature five different pickers:
- Date picker: The first content view we'll build will have a date picker, which is the easiest type of picker to implement (see Figure 7–2). The view will also have a button that, when tapped, will display an alert that shows the date that was picked.

Figure 7–2. The first tab will show a date picker.
- Single-component picker: The second tab will feature a picker with a single list of values (see Figure 7–3). This picker is a little more work to implement than a date picker. You'll learn how to specify the values to be displayed in the picker by using a delegate and a data source.

Figure 7–3. A picker displaying a single list of values
- Multicomponent picker: In the third tab, we're going to create a picker with two separate wheels. The technical term for each of these wheels is a picker component, so here we are creating a picker with two components. You'll see how to use the data source and delegate to provide two independent lists of data to the picker (see Figure 7–4). Each of this picker's components can be changed without impacting the other one.

Figure 7–4. A two-component picker, showing an alert that reflects our selection
- Picker with dependent components: In the fourth content view, we'll build another picker with two components. But this time, the values displayed in the component on the right will change based on the value selected in the component on the left. In our example, we're going to display a list of states in the left component and a list of that state's ZIP codes in the right component (see Figure 7–5).

Figure 7–5. In this picker, one component is dependent on the other. As we select a state in the left component, the right component changes to a list of ZIP codes in that state.
- Custom picker with images: Last, but most certainly not least, we're going to have some fun with the fifth content view. We'll demonstrate how to add image data to a picker, and we're going to do it by writing a little game that uses a picker with five components. In several places in Apple's documentation, the picker's appearance is described as looking a bit like a slot machine. Well, then, what could be more fitting than writing a little slot machine game (see Figure 7–6)? For this picker, the user won't be able to manually change the values of the components, but will be able to select the Spin button to make the five wheels spin to a new, randomly selected value. If three copies of the same image appear in a row, the user wins.

Figure 7–6.Our fifth component picker. Note that we do not condone using your iPhone as a tiny casino.
Delegates and Data Sources
Before we dive in and start building our application, let's look at what makes pickers more complex than the other controls you've used so far. With the exception of the date picker, you can't use a picker by just grabbing one in the object library, dropping it on your content view, and configuring it. You also need to provide each picker with both a picker delegate and a picker data source.
By this point, you should be comfortable using delegates. We've already used application delegates and action sheet delegates, and the basic idea is the same here. The picker defers several jobs to its delegate. The most important of these is the task of determining what to actually draw for each of the rows in each of its components. The picker asks the delegate for either a string or a view that will be drawn at a given spot on a given component. The picker gets its data from the delegate.
In addition to the delegate, pickers need to have a data source. In this instance, the name data source is a bit of a misnomer. The data source tells the picker how many components it will be working with and how many rows make up each component. The data source works like the delegate, in that its methods are called at certain, prespecified times. Without a data source and a delegate, pickers cannot do their job; in fact, they won't even be drawn.
It's very common for the data source and the delegate to be the same object, and just as common for that object to be the view controller for the picker's enclosing view, which is the approach we'll be using in this application. The view controllers for each of our application's content panes will be the data source and the delegate for their picker.
NOTE: Here's a pop quiz: is the picker data source part of the model, view, or controller portion of the application? It's a trick question. A data source sounds like it must be part of the model, but in fact, it's actually part of the controller. The data source isn't usually an object designed to hold data. In simple applications, the data source might hold data, but its true job is to retrieve data from the model and pass it along to the picker.
Let's fire up Xcode and get to it.
Setting Up the Tab Bar Framework
Although Xcode does provide a template for tab bar applications, we're going to build ours from scratch. It's not much extra work, and it's good practice.
Create a new project, selecting the Window-based Application template again. Make sure the check box that says Use Core Data for storage is unchecked, and set the Product popup to iPhone. When prompted for a name, type Pickers.
We're going to walk you through the process of building the whole application, but at any step of the way, if you feel like challenging yourself by moving ahead of us, by all means, go ahead. If you get stumped, you can always come back. If you don't feel like skipping ahead, that's just fine. We love the company.
Creating the Files
In the previous chapter, we created a root view controller (root controller for short) to manage the process of swapping our application's other views. We'll be doing that again this time, but we won't need to create our own root view controller class. Apple provides a very good class for managing tab bar views, so we're just going to use an instance of UITabBarController as our root controller.
First, we need to create five new classes in Xcode: the five view controllers that the root controller will swap in and out.
Expand the Classes and Resources folders in the Groups & Files pane. Next, single-click the Classes folder, and press ![]() N or select
N or select File ![]()
New File….
Select Cocoa Touch Classin the left pane of the new file assistant, and then select the icon for UIViewController subclass. In the middle-right pane named Options, just above the description of the selected template, you should see a check box labeled With XIB for user interface (see Figure 7–7). Make sure that's checked (and only that one; the Targeted for iPad and UITableViewController subclass options should be unchecked) before clicking Next.

Figure 7–7. When creating a subclass of UIViewController, Xcode will create the accompanying .xib file for you if you select the With XIB for user interface check box.
Name the first of your five new classes DatePickerViewController.m, making sure to check Also create “DatePickerViewController.h”. As always when naming a new class file, carefully check your spelling. A typo here will cause your new class to be named incorrectly.
After you click the Finish button, three new files will appear in your Classes folder: DatePickerViewController.h, DatePickerViewController.m, and DatePickerViewController.xib. The nib file doesn't belong in the Classes folder, so drag DatePickerViewController.xib down to the Resources folder.
Repeat those steps four more times, using the names SingleComponentPickerViewController.m, DoubleComponentPickerViewController.m, DependentComponentPickerViewController.m, and CustomPickerViewController.m.
Adding the Root View Controller
We're going to create our root view controller, which will be an instance of UITabBarController, in Interface Builder. Before we can do that, however, we should declare an outlet for it. Single-click PickersAppDelegate.h, and add the following code to it:
#import <UIKit/UIKit.h>


@interface PickersAppDelegate : NSObject <UIApplicationDelegate> {

    UIWindow *window;

    UITabBarController *rootController;

}
@property (nonatomic, retain) IBOutlet UIWindow *window;

@property (nonatomic, retain) IBOutlet UITabBarController *rootController;

@end
Before we move to Interface Builder to create our root view controller, let's add the following code to PickersAppDelegate.m:
#import "PickersAppDelegate.h"


@implementation PickersAppDelegate

@synthesize window;

@synthesize rootController;


- (BOOL)application:(UIApplication *)application didFinishLaunchingWithOptions:(NSDictionary *)launchOptions {


    // Override point for customization after app launch

    [self.window addSubview:rootController.view];

    [self.window makeKeyAndVisible];
return YES;
}


- (void)dealloc {

    [rootController release];

    [window release];

    [super dealloc];

}


@end
There shouldn't be anything in this code that's a surprise to you. We're doing pretty much the same thing we did in the previous chapter, except that we're using a controller class provided by Apple instead of one we wrote ourselves. Make sure you save both files before continuing.
Tab bars use icons to represent each of the tabs, so we should also add the icons we're going to use before editing the nib file for this class. You can find some suitable icons in the project archive that accompanies this book in the 07 Pickers/Tab Bar Icons/ folder. Add all five of the icons in that folder to the project. You can just drag the folder from the Finder and drop it on the Resources folder in the project navigator. When asked, select Recursively create groups for any added folders, and Xcode will add a Tab Bar Icons subfolder to the Resources folder.
The icons you use should be 24-by-24 pixels and saved in .png format. The icon file should have a transparent background. Generally, medium-gray icons look the best on a tab bar. Don't worry about trying to match the appearance of the tab bar. Just as it does with the application icon, iOS will take your image and make it look just right.
Editing MainWindow.xib
Now, let's edit MainWindow.xib and add in our tab bar controller. Double click MainWindow.xib to open the file in Interface Builder. Drag a Tab Bar Controller from the object library (see Figure 7–8) over to the nib's main window.

Figure 7–8. The Tab Bar Controller in the library
Once you drop the tab bar controller onto your nib's main window, a new window representing the UITabBarController will appear (see Figure 7–9), and you'll see a new icon in the Interface Builder dock. This tab bar controller will be our root controller. As a reminder, the root controller controls the very first view that the user will see when your program runs and is responsible for switching the other views in and out. Since we'll connect each of our views to one of the tab bar tabs, the tab bar controller makes a logical choice as a root controller.

Figure 7–9. The tab bar controller's window. Notice the tab bar at the bottom of the window, with two individual tabs.
Our next step is to customize our tab bar to reflect our needs. We'll need five tabs, each representing one of our five pickers.
In Interface Builder, switch the main window over to list view by clicking the middle View Mode icon. Open the disclosure triangle to the left of Tab Bar Controller to reveal the Tab Bar and two View Controller entries. Open the disclosure triangles to the left of each View Controller to show the Tab Bar Item associated with each controller (see Figure 7–10). By opening everything, you'll have a better understanding of what's happening as we customize this tab bar.

Figure 7–10. The Tab Bar Controller, opened all the way to show the items nested within
Let's add three more Tab Bar Items to the tab bar. As you'll see, the View Controllers will be added automatically when we drag over a new Tab Bar Item.
Bring up the library (Tools ![]()
Library). Locate a Tab Bar Item and drag it onto the tab bar (see Figure 7–11). Notice the insertion point. This tells you where on the tab bar your new item will end up. Since we will be customizing all of our tab bar items, it doesn't matter where this one lands.
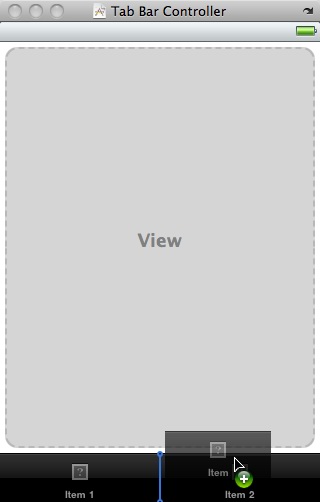
Figure 7–11. Dragging a Tab Bar Item from the library onto our Tab Bar. Notice the insertion point that shows you where your new item will end up.
Now drag out two more Tab Bar Items, so you have a total of five. If you take a look at your dock, you'll see that your tab bar now consists of five View Controllers, each with its own Tab Bar Item. Open the disclosure triangle to the left of each View Controller so you can see all of them (see Figure 7–12).

Figure 7–12. The Tab Bar Controller, opened all the way to show the five View Controllers and their associated Tab Bar Items
Our next step is to customize each of the five view controllers. In the nib's main window, select the first of the fiveView Controllers (not the associated Tab Bar Item), and then bring up the attributes inspector (Tools ![]()
Attributes Inspector). This is where we associate each tab's view controller with the appropriate nib.
In the attributes inspector, leave the Title field blank (see Figure 7–13). Tab bar view controllers don't use this title for anything. The check box labeled Wants Full Screen can be used to indicate that the view that comes up when you select that tab will overlap and hide the tab bar. If you check this check box, you must provide an alternative mechanism for navigating off that tab. We will leave this value unchecked for all of our tabs. Finally, specify a NIB Name of DatePickerViewController. Do not include the .xib extension. Leave the Resize View From NIB check box checked. This won't apply to our app, since we'll design our views to be the size we want and to not need resizing.

Figure 7–13. We've selected the first of our five view controllers and associated the nib named DatePickerViewController.xib with the controller. Note that we left off the extension .xib. This is automatically added to the nib name.
While you're here, press ![]() 4. This will bring up the identity inspector for this view controller. Change the class to DatePickerViewController, and press return or tab to set it.
4. This will bring up the identity inspector for this view controller. Change the class to DatePickerViewController, and press return or tab to set it.
Now repeat this same process for the next four view controllers. In the attributes inspector for each, make sure the check boxes are correctly configured, and enter the nib names SingleComponentPickerViewController, DoubleComponentPickerViewController, DependentComponentPickerViewController, and CustomPickerViewController, respectively. For each view controller, make sure you also use the identity inspector to change the class to be the same as the name you type in the NIB Name field. Be sure you visit the attributes inspector and then the identity inspector for each view controller.
Caution: Be sure you hit return after you enter a name in the NIB Name field of an inspector so the class name takes. If you switch inspectors without pressing return, your change may not take effect.
You've just made a lot of changes. Check your work and save it. Let's customize the five Tab Bar Items now, so they have the correct icon and label.
In the nib's main window, click the first Tab Bar Item. Now press ![]() 1 to return to the attributes inspector (see Figure 7–14).
1 to return to the attributes inspector (see Figure 7–14).

Figure 7–14. The Tab Bar Item attributes inspector
The first field in the Tab Bar Item section is labeled Badge. This can be used to put a red icon onto a tab bar item, similar to the red number placed on the Mail icon that tells you how many unread e-mail messages you have. We're not going to use the Badge field in this chapter, so you can leave it blank.
Under that, there's a popup button called Identifier. This field allows you to select from a set of commonly used tab bar item names and icons such as Favorites and Search. If you select one of these, the tab bar will provide the name and icon for the item based on your selection. We're not using standard items, so leave this set to Custom.
The next two fields down are where we can specify a title and custom tab icon for a tab bar item. Change the Title from Item 1 to Date. Next, click the Image combo box, and select the clockicon.pngimage. If you are using your own set of icons, select one of the .png files you provided instead. For the rest of this chapter, we'll assume you used our resources. Adjust your thinking as necessary.
If you look over at the Tab Bar Controller window, you'll see that the leftmost tab bar item now reads Date and has a picture of a clock on it (see Figure 7–15). Don't worry about the titles of the other tab items. You're going to change them right now.

Figure 7–15. Our first tab bar item has changed to a title of Date and an icon of a clock. Cool!
Repeat this process for the other four tab bar items:
- Change the second Tab Bar Item to a Title of Single, and specify an Image of singleicon.png.
- Change the third Tab Bar Item to a Title of Double, and specify an Image of doubleicon.png.
- Change the fourth Tab Bar Item to a Title of Dependent, and specify an Image of dependenticon.png.
- Change the fifth Tab Bar Item to a Title of Custom, and specify an Image of toolicon.png.
Figure 7–16 shows our finished tab bar.
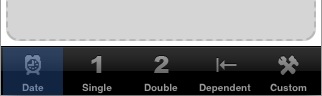
Figure 7–16. Our finished tab bar, with all five titles and icons in place
NOTE: Don't worry about the view controller Title fields. We don't use them for this application. It doesn't matter whether they are blank or contain text. However, we do use the tab bar item Title fields. Don't confuse the two.
Before we move on to our next bit of nib editing, save your nib file.
Connect the Outlet, Then Run It
All that we have left to do in this nib file is to control-drag from the Pickers App Delegate icon to the Tab Bar Controller icon. Select the rootController outlet, and then save the nib file.
At this point, the tab bar and the content views should all be hooked up and working. Return to Xcode, compile and run, and your application should launch with a tab bar that functions. Click each of the tabs in turn. Each tab should be selectable.
There's nothing in the content views now, so the changes won't be very dramatic. But if everything went OK, the basic framework for your multiview application is now set up and working, and we can start designing the individual content views.
TIP: If your simulator bursts into flames when you click one of the tabs, don't panic! Most likely, you've either missed a step or made a typo. Go back and check all the nib file names, make sure the connections are right, and make sure the class names are all set correctly.
If you want to make double sure everything is working, you can add a different label or some other object to each of the content views and then relaunch the application. Then you should see the content of the different views change as you select different tabs.
Implementing the Date Picker
To implement the date picker, we'll need a single outlet and a single action. The outlet will be used to grab the value from the date picker. The action will be triggered by a button and will put up an alert to show the date value pulled from the picker. Single-click DatePickerViewController.h, and add the following code:
#import <UIKit/UIKit.h>


@interface DatePickerViewController : UIViewController {

    UIDatePicker       *datePicker;

}

@property (nonatomic, retain) IBOutlet UIDatePicker *datePicker;

- (IBAction)buttonPressed;

@end
Save this file, and then double click DatePickerViewController.xib to edit the content view for our first tab.
The first thing we need to do is size the view so it accounts for the tab bar. Single-click the View icon and press ![]() 1 to bring up the attributes inspector. In the Simulated User Interface Elements section, set the Bottom Bar popup to Tab Bar. This will cause Interface Builder to automatically reduce the view's height to 411 pixels and show a simulated tab bar.
1 to bring up the attributes inspector. In the Simulated User Interface Elements section, set the Bottom Bar popup to Tab Bar. This will cause Interface Builder to automatically reduce the view's height to 411 pixels and show a simulated tab bar.
Next, find a Date Picker in the library, and drag one over to the View window. Place the date picker at the top of the view, right up against the bottom of the status bar. It should take up the entire width of your content view and a good portion of the height. Don't use the blue guidelines for the picker; it's designed to fit snugly against the edges of the view (see Figure 7–17).
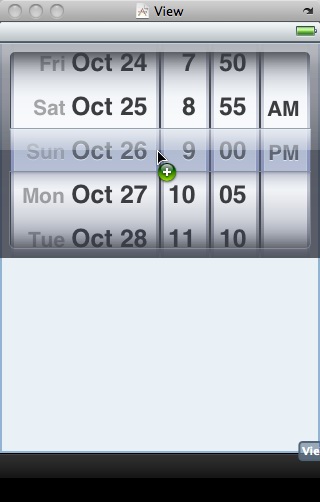
Figure 7–17. We dragged a Date Picker from the library. Note that it takes up the entire width of the view and that we placed it at the top of the view, just below the status bar.
Single-click the date picker if it's not already selected, and go back to the attributes inspector. As you can see in Figure 7–18, a number of attributes can be configured for a date picker. We're going to leave most of the values at their defaults (but feel free to play with the options when we're finished to see what they do). The one thing we will do is limit the range of the picker to reasonable dates. Look for the heading that says Constraints, and check the box that reads MinimumDate. Leave the value at the default of 1/1/1970. Also check the box that reads Maximum Date, and set that value to 12/31/2200.
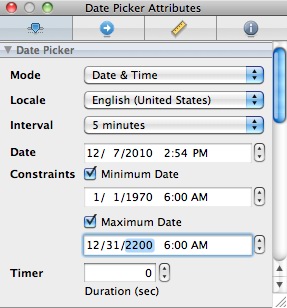
Figure 7–18. The attributes inspector for a date picker. We'll set the minimum and maximum dates, but leave the rest of the settings at their default values.
Next, grab a Round Rect Button from the library, and place it below the date picker. Double-click the button and give it a title of Select.
With the button still selected, press ![]() 2 to switch to the connections inspector. Drag from the circle next to the Touch Up Inside event over to the File's Owner icon, and connect to the
2 to switch to the connections inspector. Drag from the circle next to the Touch Up Inside event over to the File's Owner icon, and connect to the buttonPressed action. Then control-drag from the File's Owner icon back to the date picker, and select the datePicker outlet. Finally, save your changes to the nib file, since we're finished with this part of the GUI.
Now we just need to implement DatePickerViewController. Return to Xcode and click DatePickerViewController.m and start by adding the following code at the top of the file:
#import "DatePickerViewController.h"


@implementation DatePickerViewController

@synthesize datePicker;


- (IBAction)buttonPressed {

    NSDate *selected = [datePicker date];

    NSString *message = [[NSString alloc] initWithFormat:

        @"The date and time you selected is: %@", selected];

    UIAlertView *alert = [[UIAlertView alloc]

              initWithTitle:@"Date and Time Selected"

                    message:message

                delegate:nil

          cancelButtonTitle:@"Yes, I did."

          otherButtonTitles:nil];

    [alert show];

    [alert release];

    [message release];

}


- (void)viewDidLoad {
    NSDate *now = [[NSDate alloc] init];

    [datePicker setDate:now animated:NO];

    [now release];

}

...
Next, add one line to the existing viewDidUnload: method:
- (void)viewDidUnload {

    [super viewDidUnload];

    // Release any retained subviews of the main view.

    // e.g. self.myOutlet = nil;

    self.datePicker = nil;

}
Also add one line to the existing dealloc method:
- (void)dealloc {

    [datePicker release];

    [super dealloc];

}
Here, we first synthesize the accessor and mutator for our datePicker outlet, and then we add the implementation of buttonPressed and override viewDidLoad. In buttonPressed, we use our datePicker outlet to get the current date value from the date picker, and then we construct a string based on that date and use it to show an alert sheet.
In viewDidLoad, we create a new NSDate object. An NSDate object created this way will hold the current date and time. We then set datePicker to that date, which ensures that every time this view is loaded from the nib, the picker will reset to the current date and time.
Go ahead and build and run to make sure your date picker checks out. If everything went OK, your application should look like Figure 7–2 when it runs. If you choose the Select button, an alert sheet will pop up, telling you the date and time currently selected in the date picker.
NOTE: The date picker does not allow you to specify seconds or a time zone. The alert displays the time with seconds and in Greenwich Mean Time (GMT). We could have added some code to simplify the string displayed in the alert, but isn't this chapter long enough already? If you're interested in customizing the formatting of the date, take a look at theNSDateFormatter class.
Implementing the Single-Component Picker
Our next picker lets the user select from a list of values. In this example, we're going to create an NSArray to hold the values we want to display in the picker.
Pickers don't hold any data themselves. Instead, they call methods on their data source and delegate to get the data they need to display. The picker doesn't really care where the underlying data lives. It asks for the data when it needs it, and the data source and delegate (which are often, in practice, the same object) work together to supply that data. As a result, the data could be coming from a static list, as we'll do in this section. It also could be loaded from a file or a URL, or even made up or calculated on the fly.
Declaring Outlets and Actions
As always, we need to make sure our outlets and actions are in place in our controller's header file before we start working on the GUI. In the Groups & Files pane, single-click SingleComponentPickerViewController.h. This controller class will act as both the data source and the delegate for its picker, so we need to make sure it conforms to the protocols for those two roles. In addition, we need to declare an outlet and an action. Add the following code:
#import <UIKit/UIKit.h>


@interface SingleComponentPickerViewController : UIViewController

        <UIPickerViewDelegate, UIPickerViewDataSource> {

            UIPickerView    *singlePicker;

            NSArray         *pickerData;

}

@property (nonatomic, retain) IBOutlet UIPickerView *singlePicker;

@property (nonatomic, retain) NSArray *pickerData;

- (IBAction)buttonPressed;

@end
We start by conforming our controller class to two protocols, UIPickerViewDelegate and UIPickerViewDataSource. After that, we declare an outlet for the picker and a pointer to an NSArray, which will be used to hold the list of items that will be displayed in the picker. Finally, we declare the action method for the button, just as we did for the date picker.
Building the View
Save your source code, thendouble click SingleComponentPickerViewController.xib to edit the content view for the second tab in our tab bar. Select the View icon and press ![]()
![]() 3 to bring up the attributes inspector. Set the Bottom Bar to Tab Bar in the Simulated User Interface Elements section. Next, bring over a Picker View from the library (see Figure 7–19), and add it to your nib's View window, placing it snugly into the top of the view, as you did with the date picker view.
3 to bring up the attributes inspector. Set the Bottom Bar to Tab Bar in the Simulated User Interface Elements section. Next, bring over a Picker View from the library (see Figure 7–19), and add it to your nib's View window, placing it snugly into the top of the view, as you did with the date picker view.

Figure 7–19. Dragging a Picker View from the library onto our second view
After placing the picker, control-drag from File's Owner to the picker view, and select the singlePickeroutlet. Next, single-click the picker if it's not already selected, and press ![]() 2 to bring up the connections inspector. If you look at the connections available for the picker view, you'll see that the first two items are dataSource and delegate. Drag from the circle next to dataSource to the File's Owner icon. Then drag again from the circle next to delegate to the File's Owner icon. Now this picker knows that the instance of the
2 to bring up the connections inspector. If you look at the connections available for the picker view, you'll see that the first two items are dataSource and delegate. Drag from the circle next to dataSource to the File's Owner icon. Then drag again from the circle next to delegate to the File's Owner icon. Now this picker knows that the instance of the SingleComponentPickerViewController class in the nib is its data source and delegate, and will ask it to supply the data to be displayed. In other words, when the picker needs information about the data it is going to display, it asks the SingleComponentPickerViewController instance that controls this view for that information.
Drag a Round Rect Button to the view, double-click it, and give it a title of Select. Press return to commit the change. In the connections inspector, drag from the circle next to Touch Up Inside to the File's Owner icon, selecting the buttonPressed action. Now you've finished building the GUI for the second tab. Save the nib file, and let's get back to Xcode for some coding.
Implementing the Controller as Data Source and Delegate
To make our controller work properly as the picker's data source and delegate, we'll start with some code you should feel comfortable with, and then add a few methods that you've never seen before.
Single-click SingleComponentPickerViewController.m, and add the following code at the beginning of the file:
#import "SingleComponentPickerViewController.h"


@implementation SingleComponentPickerViewController

@synthesize singlePicker;

@synthesize pickerData;


- (IBAction)buttonPressed {

    NSInteger row = [singlePicker selectedRowInComponent:0];

    NSString *selected = [pickerData objectAtIndex:row];

    NSString *title = [[NSString alloc] initWithFormat:

                       @"You selected %@!", selected];

    UIAlertView *alert = [[UIAlertView alloc] initWithTitle:title

                                       message:@"Thank you for choosing."

                                      delegate:nil

                             cancelButtonTitle:@"You're Welcome"

                             otherButtonTitles:nil];

    [alert show];

    [alert release];

    [title release];

}


- (void)viewDidLoad {

    NSArray *array = [[NSArray alloc] initWithObjects:@"Luke", @"Leia",

           @"Han", @"Chewbacca", @"Artoo", @"Threepio", @"Lando", nil];

    self.pickerData = array;

    [array release];

}

...
These two methods should be familiar to you by now. The buttonPressed method is nearly identical to the one we used with the date picker.
Unlike the date picker, a regular picker can't tell us what data it holds, because it doesn't maintain the data. It hands off that job to the delegate and data source. Instead, we need to ask the picker which row is selected and then grab the corresponding data from our pickerData array. Here is how we ask it for the selected row:
NSInteger row = [singlePicker selectedRowInComponent:0];
Notice that we needed to specify which component we want to know about. We have only one component in this picker, so we simply pass in 0, which is the index of the first component.
NOTE: Did you notice that there is no asterisk between NSInteger and row in our request for the selected row? Throughout most of the iOS SDK, the prefix NS often indicates an Objective-C class from the Foundation framework, but this is one of the exceptions to that general rule. NSInteger is always defined as an integer datatype, either an int or a long. We use NSInteger rather than int or long, because when we use NSInteger, the compiler automatically chooses whichever size is best for the platform for which we are compiling. It will create a 32-bit int when compiling for a 32-bit processor and a longer 64-bit long when compiling for a 64-bit architecture. Currently, there is no 64-bit iOS device, but who knows? Someday in the future, there likely will be. You might also write classes for your iOS applications that you'll later want to recycle and use in Cocoa applications for Mac OS X, which does run on both 32- and 64-bit machines.
In viewDidLoad, we create an array with several objects so that we have data to feed the picker. Usually, your data will come from other sources, like a property list in your project's Resources folder. By embedding a list of items in our code the way we've done here, we are making it much harder on ourselves if we need to update this list or if we want to have our application translated into other languages. But this approach is the quickest and easiest way to get data into an array for demonstration purposes. Even though you won't usually create your arrays like this, you will almost always cache the data you are using into an array here in the viewDidLoad method, so that you're not constantly going to disk or to the network every time the picker asks you for data.
TIP: If you're not supposed to create arrays from lists of objects in your code as we just did in viewDidLoad, how should you do it? Embed the lists in property list files, and add those files to the Resources folder of your project. Property list files can be changed without recompiling your source code, which means there is no risk of introducing new bugs when you do so. You can also provide different versions of the list for different languages, as you'll see in Chapter 19. Property lists can be created using the Property List Editor application (/Developer/Applications/Utilities/Property List Editor.app) or directly in Xcode, which offers a template for creating a property list in the Resource section of the new file assistant, and supports the editing of property lists in the editor pane. Both NSArray and NSDictionary offer a method called initWithContentsOfFile: to allow you to initialize instances from a property list file, as we'll do later in this chapter when we implement the Dependent tab.
Next, insert the following new lines of code into the existing viewDidUnload and dealloc methods:
...

- (void)viewDidUnload {

    [super viewDidUnload];

    // Release any retained subviews of the main view.

    // e.g. self.myOutlet = nil;
    self.singlePicker = nil;

    self.pickerData = nil;

}


- (void)dealloc {

    [singlePicker release];

    [pickerData release];

    [super dealloc];

}

...
Notice that we set both singlePicker and pickerData to nil. In most cases, you'll set only outlets to nil and not other instance variables. However, setting pickerData to nil is appropriate here because the pickerData array will be re-created each time the view is reloaded, and we want to free up that memory when the view is unloaded. Anything that is created in the viewDidLoad method can be flushed in viewDidUnload because viewDidLoad will fire again when the view is reloaded.
Finally, insert the following new code at the end of the file:
#pragma mark -

#pragma mark Picker Data Source Methods

- (NSInteger)numberOfComponentsInPickerView:(UIPickerView *)pickerView {

    return 1;

}


- (NSInteger)pickerView:(UIPickerView *)pickerView

       numberOfRowsInComponent:(NSInteger)component {

    return [pickerData count];

}


#pragma mark Picker Delegate Methods

- (NSString *)pickerView:(UIPickerView *)pickerView

       titleForRow:(NSInteger)row

       forComponent:(NSInteger)component {

    return [pickerData objectAtIndex:row];

}


@end
At the bottom of the file, we get into the new methods required to implement the picker. The first two methods after dealloc are from the UIPickerViewDataSource protocol, and they are both required for all pickers (except date pickers). Here's the first one:
- (NSInteger)numberOfComponentsInPickerView:(UIPickerView *)pickerView {

    return 1;

}
Pickers can have more than one spinning wheel, or component, and this is how the picker asks how many components it should display. We want to display only one list this time, so we return a value of 1. Notice that a UIPickerView is passed in as a parameter. This parameter points to the picker view that is asking us the question, which makes it possible to have multiple pickers being controlled by the same data source. In our case, we know that we have only one picker, so we can safely ignore this argument because we already know which picker is calling us.
The second data source method is used by the picker to ask how many rows of data there are for a given component:
- (NSInteger)pickerView:(UIPickerView *)pickerView

       numberOfRowsInComponent:(NSInteger)component {

    return [pickerData count];

}
Once again, we are told which picker view is asking and which component that picker is asking about. Since we know that we have only one picker and one component, we don't bother with either of the arguments, and simply return the count of objects from our sole data array.
After the two data source methods, we implement one delegate method. Unlike the data source methods, all of the delegate methods are optional. The term optional is a bit deceiving, because you do need to implement at least one delegate method. You will usually implement the method that we are implementing here. However, if you want to display something other than text in the picker, you must implement a different method instead, as you'll see when we get to the custom picker.
- (NSString *)pickerView:(UIPickerView *)pickerView
titleForRow:(NSInteger)row
forComponent:(NSInteger)component {
return [pickerData objectAtIndex:row];
}
In this method, the picker is asking us to provide the data for a specific row in a specific component. We are provided with a pointer to the picker that is asking, along with the component and row that it is asking about. Since our view has one picker with one component, we simply ignore everything except the row argument and use that to return the appropriate item from our data array.
Go ahead and compile and run again. When the simulator comes up, switch to the second tab—the one labeled Single—and check out your new custom picker, which should look like Figure 7–3.
When you're done reliving all those Star Wars memories, come on back to Xcode and we'll show you how to implement a picker with two components. If you feel up to a challenge, this next content view is actually a good one for you to attempt on your own. You've already seen all the methods you'll need for this picker, so go ahead and take a crack at it. We'll wait here. You might want to start off with a good look at Figure 7–4, just to refresh your memory. When you're finished, read on, and you'll see how we tackled this problem.
Implementing a Multicomponent Picker
The next content pane will have a picker with two components, or wheels, each independent of the other. The left wheel will have a list of sandwich fillings, and the right wheel will have a selection of bread types. We'll write the same data source and delegate methods that we did for the single-component picker. We'll just need to write a little additional code in some of those methods to make sure we're returning the correct value and row count for each component.
Declaring Outlets and Actions
Single-click DoubleComponentPickerViewController.h, and add the following code:
#import <UIKit/UIKit.h>
#define kFillingComponent 0
#define kBreadComponent 1
@interface DoubleComponentPickerViewController : UIViewController
<UIPickerViewDelegate, UIPickerViewDataSource>
{
UIPickerView *doublePicker;
NSArray *fillingTypes;
NSArray *breadTypes;
}
@property(nonatomic, retain) IBOutlet UIPickerView *doublePicker;
@property(nonatomic, retain) NSArray *fillingTypes;
@property(nonatomic, retain) NSArray *breadTypes;
-(IBAction)buttonPressed;
@end
As you can see, we start out by defining two constants that will represent the two components, which is just to make our code easier to read. Components are assigned numbers, with the leftmost component being assigned zero and increasing by one each move to the right.
Next, we conform our controller class to both the delegate and data source protocols, and we declare an outlet for the picker, as well as for two arrays to hold the data for our two picker components. After declaring properties for each of our instance variables, we declare a single action method for the button, just as we did in the previous two content panes. Save this, and double click DoubleComponentPickerViewController.xib to open the nib file for editing.
Building the View
Select the View icon, and use the object attributes inspector to set the Bottom Bar to Tab Bar in the Simulated User Interface Elements section.
Add a picker view and a button to the view, change the button label to Select, and then make the necessary connections. We're not going to walk you through it this time, but you can refer to the previous section if you need a step-by-step guide, since the two applications are identical in terms of the nib file. Here's a summary of what you need to do:
- Connect the
doublePickeroutlet on File's Owner to the picker. - Connect the DataSource and Delegate connections on the picker view to File's Owner (use the connections inspector).
- Connect the Touch Up Inside event of the button to the
buttonPressedaction on File's Owner (use the connections inspector).
Make sure you save your nib and close it before you dive back into the code. Oh, and dog-ear this page (or use a bookmark, if you prefer). You'll be referring to it in a bit.
Implementing the Controller
Select DoubleComponentPickerViewController.m,and add the following code at the top of the file:
#import "DoubleComponentPickerViewController.h"
@implementation DoubleComponentPickerViewController
@synthesize doublePicker;
@synthesize fillingTypes;
@synthesize breadTypes;
-(IBAction)buttonPressed
{
NSInteger fillingRow = [doublePicker selectedRowInComponent:
kFillingComponent];
NSInteger breadRow = [doublePicker selectedRowInComponent:
kBreadComponent];
NSString *bread = [breadTypes objectAtIndex:breadRow];
NSString *filling = [fillingTypes objectAtIndex:fillingRow];
NSString *message = [[NSString alloc] initWithFormat:
@"Your %@ on %@ bread will be right up.", filling, bread];
UIAlertView *alert = [[UIAlertView alloc] initWithTitle:
@"Thank you for your order"
message:message
delegate:nil
cancelButtonTitle:@"Great!"
otherButtonTitles:nil];
[alert show];
[alert release];
[message release];
}
- (void)viewDidLoad {
NSArray *fillingArray = [[NSArray alloc] initWithObjects:@"Ham",
@"Turkey", @"Peanut Butter", @"Tuna Salad",
@"Nutella", @"Roast Beef", @"Vegemite", nil];
self.fillingTypes = fillingArray;
[fillingArray release];
NSArray *breadArray = [[NSArray alloc] initWithObjects:@"White",
@"Whole Wheat", @"Rye", @"Sourdough", @"Seven Grain",nil];
self.breadTypes = breadArray;
[breadArray release];
}
...
Also, add the following lines of code to the existing dealloc and viewDidUnload methods:
...
- (void)viewDidUnload {
[super viewDidUnload];
// Release any retained subviews of the main view.
// e.g. self.myOutlet = nil;
self.doublePicker = nil;
self.breadTypes = nil;
self.fillingTypes = nil;
}
- (void)dealloc {
[doublePicker release];
[breadTypes release];
[fillingTypes release];
[super dealloc];
}
...
And add the delegate and data source methods at the bottom:
#pragma mark -

#pragma mark Picker Data Source Methods
- (NSInteger)numberOfComponentsInPickerView:(UIPickerView *)pickerView {
return 2;
}
- (NSInteger)pickerView:(UIPickerView *)pickerView
numberOfRowsInComponent:(NSInteger)component {
if (component == kBreadComponent)
return [self.breadTypes count];
return [self.fillingTypes count];
}
#pragma mark Picker Delegate Methods
- (NSString *)pickerView:(UIPickerView *)pickerView
titleForRow:(NSInteger)row
forComponent:(NSInteger)component {
if (component == kBreadComponent)
return [self.breadTypes objectAtIndex:row];
return [self.fillingTypes objectAtIndex:row];
}
@end
The buttonPressed method is a bit more involved this time, but there's very little there that's new to you. We just need to specify which component we are talking about when we request the selected row using those constants we defined earlier, kBreadComponent and kFillingComponent.
NSInteger breadRow = [doublePicker selectedRowInComponent:
kBreadComponent];
NSInteger fillingRow = [doublePicker selectedRowInComponent:
kFillingComponent];
You can see here that using the two constants instead of 0 and 1 makes our code considerably more readable. From this point on, the buttonPressed method is fundamentally the same as the last one we wrote.
viewDidLoad: is also very similar to the one we wrote for the previous picker. The only difference is that we are loading two arrays with data rather than just one. Again, we're just creating arrays from a hard-coded list of strings—something you generally won't do in your own applications.
When we get down to the data source methods, that's where things start to change a bit. In the first method, we specify that our picker should have two components rather than just one:
- (NSInteger)numberOfComponentsInPickerView:(UIPickerView *)pickerView {
return 2;
}
This time, when we are asked for the number of rows, we need to check which component the picker is asking about and return the correct row count for the corresponding array.
- (NSInteger)pickerView:(UIPickerView *)pickerView
numberOfRowsInComponent:(NSInteger)component {
if (component == kBreadComponent)
return [self.breadTypes count];
return [self.fillingTypes count];
}
Then, in our delegate method, we do the same thing. We check the component and use the correct array for the requested component to fetch and return the correct value.
- (NSString *)pickerView:(UIPickerView *)pickerView
titleForRow:(NSInteger)row
forComponent:(NSInteger)component {
if (component == kBreadComponent)
return [self.breadTypes objectAtIndex:row];
return [self.fillingTypes objectAtIndex:row];
}
That wasn't so hard, was it? Compile and run your application, and make sure the Double content pane looks like Figure 7–4.
Notice that each wheel is completely independent of the other wheel. Turning one has no effect on the other. That's appropriate in this case. But there will be times when one component is dependent on another. A good example of this is in the date picker. When you change the month, the dial that shows the number of days in the month may need to change, because not all months have the same amount of days. Implementing this isn't really hard once you know how, but it's not the easiest thing to figure out on your own, so let's do that next.
Implementing Dependent Components
We're picking up steam now. For this next section, we're not going to hold your hand quite as much when it comes to material we've already covered. Instead, we'll focus on the new stuff. Our new picker will display a list of US states in the left component and a list of ZIP codes in the right component that correspond to the state currently selected in the left.
We'll need a separate list of ZIP code values for each item in the left-hand component. We'll declare two arrays, one for each component, as we did last time. We'll also need an NSDictionary. In the dictionary, we're going to store an NSArray for each state (see Figure 7–20). Later, we'll implement a delegate method that will notify us when the picker's selection changes. If the value on the left changes, we will grab the correct array out of the dictionary and assign it to the array being used for the right-hand component. Don't worry if you didn't catch all that; we'll talk about it more as we get into the code.
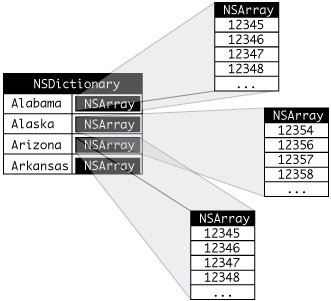
Figure 7–20. Our application's data. For each state, there will be one entry in a dictionary with the name of the state as the key. Stored under that key will be an NSArray instance containing all the ZIP codes from that state.
Add the following code to your DependentComponentPickerViewController.h file:
#import <UIKit/UIKit.h>
#define kStateComponent 0
#define kZipComponent 1
@interface DependentComponentPickerViewController : UIViewController
<UIPickerViewDelegate, UIPickerViewDataSource> {
UIPickerView *picker;
NSDictionary *stateZips;
NSArray *states;
NSArray *zips;
}
@property (retain, nonatomic) IBOutlet UIPickerView *picker;
@property (retain, nonatomic) NSDictionary *stateZips;
@property (retain, nonatomic) NSArray *states;
@property (retain, nonatomic) NSArray *zips;
- (IBAction) buttonPressed;
@end
Now it's time to build the content view. That process will be almost identical to the previous two component views we built. If you get lost, flip back to the “Building the View” section for the single-component picker, and follow those step-by-step instructions. Here's a hint: start off by double clickingDependentComponentPickerViewController.xib, and then repeat the same basic steps you've done for all the other content views in this chapter. When you're finished, save the nib and return to Xcode.
OK, take a deep breath. Let's implement this controller class. This implementation may seem a little gnarly at first. By making one component dependent on the other, we have added a whole new level of complexity to our controller class. Although the picker displays only two lists at a time, our controller class must know about and manage 51 lists. The technique we're going to use here actually simplifies that process. The data source methods look almost identical to the one we implemented for the DoublePicker view. All of the additional complexity is handled elsewhere, between viewDidLoad and a new delegate method called pickerView:didSelectRow:inComponent:.
Before we write the code, we need some data to display. Up to now, we've created arrays in code by specifying a list of strings. Because we didn't want you to have to type in several thousand values, and because we figured we ought to show you the correct way to do this, we're going to load the data from a property list. As we've mentioned, both NSArray and NSDictionary objects can be created from property lists. We've included a property list called statedictionary.plist in the project archive, under the 07 Pickers folder.
Copy that file into the Resources area in your Xcode project. If you single-click the plist file in the project window, you can see and even edit the data that it contains (see Figure 7–21).

Figure 7–21. The statedictionary.plist file, showing our list of states. Within Hawaii, you can see the start of a list of ZIP codes.
Now, let's write some code. Add the following to DependentComponentPickerViewController.m, and then we'll break it down into more digestible chunks:
#import "DependentComponentPickerViewController.h"
@implementation DependentComponentPickerViewController
@synthesize picker;
@synthesize stateZips;
@synthesize states;
@synthesize zips;
- (IBAction) buttonPressed {
NSInteger stateRow = [picker selectedRowInComponent:kStateComponent];
NSInteger zipRow = [picker selectedRowInComponent:kZipComponent];
NSString *state = [self.states objectAtIndex:stateRow];
NSString *zip = [self.zips objectAtIndex:zipRow];
NSString *title = [[NSString alloc] initWithFormat:
@"You selected zip code %@.", zip];
NSString *message = [[NSString alloc] initWithFormat:
@"%@ is in %@", zip, state];
UIAlertView *alert = [[UIAlertView alloc] initWithTitle:title
message:message
delegate:nil
cancelButtonTitle:@"OK"
otherButtonTitles:nil];
[alert show];
[alert release];
[title release];
[message release];
}
- (void)viewDidLoad {
NSBundle *bundle = [NSBundle mainBundle];
NSString *plistPath = [bundle pathForResource:
@"statedictionary" ofType:@"plist"];
NSDictionary *dictionary = [[NSDictionary alloc]
initWithContentsOfFile:plistPath];
self.stateZips = dictionary;
[dictionary release];
NSArray *components = [self.stateZips allKeys];
NSArray *sorted = [components sortedArrayUsingSelector:
@selector(compare:)];
self.states = sorted;
NSString *selectedState = [self.states objectAtIndex:0];
NSArray *array = [stateZips objectForKey:selectedState];
self.zips = array;
}
...
Next, add the following lines of code to the existing viewDidUnload and dealloc methods:
- (void)viewDidUnload {
[super viewDidUnload];
// Release any retained subviews of the main view.
// e.g. self.myOutlet = nil;
self.picker = nil;
self.stateZips = nil;
self.states = nil;
self.zips = nil;
}
- (void)dealloc {
[picker release];
[stateZips release];
[states release];
[zips release];
[super dealloc];
}
And, finally, add the delegate and data source methods at the bottom of the file:
...
#pragma mark -

#pragma mark Picker Data Source Methods

- (NSInteger)numberOfComponentsInPickerView:(UIPickerView *)pickerView {

    return 2;
}
- (NSInteger)pickerView:(UIPickerView *)pickerView
numberOfRowsInComponent:(NSInteger)component {
if (component == kStateComponent)
return [self.states count];
return [self.zips count];
}
#pragma mark Picker Delegate Methods
- (NSString *)pickerView:(UIPickerView *)pickerView
titleForRow:(NSInteger)row
forComponent:(NSInteger)component {
if (component == kStateComponent)
return [self.states objectAtIndex:row];
return [self.zips objectAtIndex:row];
}
- (void)pickerView:(UIPickerView *)pickerView
didSelectRow:(NSInteger)row
inComponent:(NSInteger)component {
if (component == kStateComponent) {
NSString *selectedState = [self.states objectAtIndex:row];
NSArray *array = [stateZips objectForKey:selectedState];
self.zips = array;
[picker selectRow:0 inComponent:kZipComponent animated:YES];
[picker reloadComponent:kZipComponent];
}
}
@end
There's no need to talk about the buttonPressed method, since it's fundamentally the same as the previous one. We should talk about the viewDidLoad method, though. There's some stuff going on there that you need to understand, so pull up a chair, and let's chat.
The first thing we do in this new viewDidLoad method is grab a reference to our application's main bundle.
NSBundle *bundle = [NSBundle mainBundle];
What is a bundle, you ask? Well, a bundle is just a special type of folder whose contents follow a specific structure. Applications and frameworks are both bundles, and this call returns a bundle object that represents our application. One of the primary uses of NSBundle is to get to resources that you added to the Resourcesfolder of your project. Those files will be copied into your application's bundle when you build your application. We've added resources like images to our projects, but up to now, we've used those only in Interface Builder. If we want to get to those resources in our code, we usually need to use NSBundle. We use the main bundle to retrieve the path of the resource in which we're interested.
NSString *plistPath = [bundle pathForResource:@"statedictionary"
ofType:@"plist"];
This will return a string containing the location of the statedictionary.plist file. We can then use that path to create an NSDictionary object. Once we do that, the entire contents of that property list will be loaded into the newly created NSDictionary object, which we then assign to stateZips.
NSDictionary *dictionary = [[NSDictionary alloc]
initWithContentsOfFile:plistPath];
self.stateZips = dictionary;
[dictionary release];
The dictionary we just loaded uses the names of the states as the keys and contains an NSArray with all the ZIP codes for that state as the values. To populate the array for the left-hand component, we get the list of all keys from our dictionary and assign those to the states array. Before we assign it, though, we sort it alphabetically.
NSArray *components = [self.stateZips allKeys];
NSArray *sorted = [components sortedArrayUsingSelector:
@selector(compare:)];
self.states = sorted;
Unless we specifically set the selection to another value, pickers start with the first row (row 0) selected. In order to get the zips array that corresponds to the first row in the states array, we grab the object from the states array that's at index 0. That will return the name of the state that will be selected at launch time. We then use that state name to grab the array of ZIP codes for that state, which we assign to the zips array that will be used to feed data to the right-hand component.
NSString *selectedState = [self.states objectAtIndex:0];
NSArray *array = [stateZips objectForKey:selectedState];
self.zips = array;
The two data source methods are practically identical to the previous version. We return the number of rows in the appropriate array. The same is true for the first delegate method we implemented. The second delegate method is the new one, and it's where the magic happens.
- (void)pickerView:(UIPickerView *)pickerView
didSelectRow:(NSInteger)row
inComponent:(NSInteger)component {
if (component == kStateComponent) {
NSString *selectedState = [self.states objectAtIndex:row];
NSArray *array = [stateZips objectForKey:selectedState];
self.zips = array;
[picker selectRow:0 inComponent:kZipComponent animated:YES];
[picker reloadComponent:kZipComponent];
}
}
In this method, which is called any time the picker's selection changes, we look at the component and see whether the left-hand component changed. If it did, we grab the array that corresponds to the new selection and assign it to the zips array. Then we set the right-hand component back to the first row and tell it to reload itself. By swapping the zips array whenever the state changes, the rest of the code remains pretty much the same as it was in the DoublePicker example.
We're not quite finished yet. Compile and run your application, and check out the Dependent tab (see Figure 7–22). Do you see anything there you don't like?
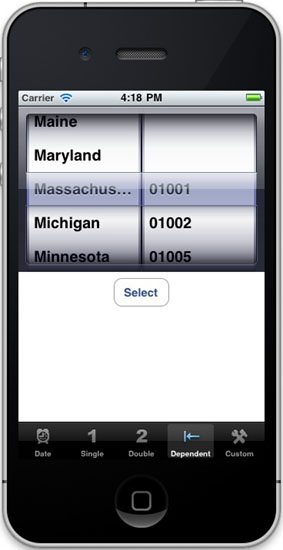
Figure 7–22. Do we really want the two components to be equal size? Notice the clipping of a long state name.
The two components are equal in size. Even though the ZIP code will never be more than five characters long, it has been given equal billing with the state. Since states like Mississippi and Massachusetts won't fit in half of the picker, this seems less than ideal. Fortunately, there's another delegate method we can implement to indicate how wide each component should be. We have about 295 pixels available to the picker components in portrait orientation, but for every additional component we add, we lose a little space to drawing the edges of the new component. You might need to experiment a bit with the values to get it to look right. Add the following method to the delegate section of DependentComponentPickerViewController.m:
- (CGFloat)pickerView:(UIPickerView *)pickerView
widthForComponent:(NSInteger)component {
if (component == kZipComponent)
return 90;
return 200;
}
In this method, we return a number that represents how many pixels wide each component should be, and the picker will do its best to accommodate this. Save, compile, and run, and the picker on the Dependent tab will look more like the one shown in Figure 7–5.
By this point, you should be pretty darn comfortable with both pickers and tab bar applications. We have one more thing to show you about pickers, and we plan to have a little fun while doing it. Let's create a simple slot machine game.
Creating a Simple Game with a Custom Picker
Next up, we're going to create an actual working slot machine. Well, OK, it won't dispense silver dollars, but it does look pretty cool. Take a look back at Figure 7–6 before proceeding so you know what we're building.
Writing the Controller Header File
Add the following code to CustomPickerViewController.h for starters:
#import <UIKit/UIKit.h>
@interface CustomPickerViewController : UIViewController
<UIPickerViewDataSource, UIPickerViewDelegate> {
UIPickerView *picker;
UILabel *winLabel;
NSArray *column1;
NSArray *column2;
NSArray *column3;
NSArray *column4;
NSArray *column5;
}
@property(nonatomic, retain) IBOutlet UIPickerView *picker;
@property(nonatomic, retain) IBOutlet UILabel *winLabel;
@property(nonatomic, retain) NSArray *column1;
@property(nonatomic, retain) NSArray *column2;
@property(nonatomic, retain) NSArray *column3;
@property(nonatomic, retain) NSArray *column4;
@property(nonatomic, retain) NSArray *column5;
- (IBAction)spin;
@end
We're declaring two outlets, one for a picker view and one for a label. The label will be used to tell users when they've won, which happens when they get three of the same symbol in a row.
We also create five pointers to NSArray objects. We'll use these to hold the image views containing the images we want the picker to draw. Even though we're using the same images in all five columns, we need separate arrays for each one with its own set of image views, because each view can be drawn in only one place in the picker at a time. We also declare an action method, this time called spin.
Building the View
Even though the picker in Figure 7–6 looks quite a bit fancier than the other ones we've built, there's actually very little difference in the way we'll design our nib. All the extra work is done in the delegate methods of our controller.
Make sure you've saved your new source code, and then double clickCustomPickerViewController.xib in the project navigator to edit the GUI. Set the Simulated User Interface Elements to simulate a tab bar at the bottom of the view, and then add a picker view, a label below that, and a button below that. Use the blue guideline toward the bottom of your view to place the bottom of your button, and center the label and button. Give the button a title of Spin.
Now, move your label so it lines up with the view's left guideline and touches the guideline below the bottom of the picker view. Next, resize the label so it goes all the way to the right guideline and down to the guideline above the top of the button.
With the label selected, bring up the attributes inspector. Set the Alignment to centered. Then click the text color well to change the text color and set the color to something festive, like a bright fuchsia (we don't actually know what color that is, but it does sound festive).
Next, bring up the font palette (Font ![]()
Show Fonts). Select your label and use the font palette to change its font size to 48. Note that you can't use the font palette to change the color of the text. The attribute inspector's text color well rules the day here. After getting the text the way you want it, delete the word Label from it, since we don't want any text displayed until the first time the user wins.
After that, make all the connections to outlets and actions. You need to connect the File's Owner's picker outlet to the picker view, the File's Owner's winLabel outlet to the label, and the button's Touch Up Inside event to the spin action. After that, just make sure to specify the delegate and data sourcefor the picker.
Oh, and there's one additional thing that you need to do. Select the picker, and bring up the attributes inspector. You need to uncheck the check box labeled User Interaction Enabled toward the bottom of the View settings so that the user can't manually change the dial and cheat. Once you've done all that, save the changes you've made to the nib file.
Adding Image Resources
Now we need to add the images that we'll be using in our game. We've included a set of six image files (seven.png, bar.png, crown.png, cherry.png, lemon.png, and apple.png) for you in the project archive under the 07 Pickers/Custom Picker Images folder. As you did with the tab bar images, add the entire folder of images to the Resources folder of your project. It's probably a good idea to copy them into the project folder when prompted to do so.
Implementing the Controller
We have a bunch of new stuff to cover in the implementation of this controller. Add the following code at the beginning of CustomPickerViewController.m file:
#import "CustomPickerViewController.h"
@implementation CustomPickerViewController
@synthesize picker;
@synthesize winLabel;
@synthesize column1;
@synthesize column2;
@synthesize column3;
@synthesize column4;
@synthesize column5;
- (IBAction)spin {
BOOL win = NO;
int numInRow = 1;
int lastVal = -1;
for (int i = 0; i < 5; i++) {
int newValue = random() % [self.column1 count];
if (newValue == lastVal)
numInRow++;
else
numInRow = 1;
lastVal = newValue;
[picker selectRow:newValue inComponent:i animated:YES];
[picker reloadComponent:i];
if (numInRow >= 3)
win = YES;
}
if (win)
winLabel.text = @"WIN!";
else
winLabel.text = @"";
}
- (void)viewDidLoad {
UIImage *seven = [UIImage imageNamed:@"seven.png"];
UIImage *bar = [UIImage imageNamed:@"bar.png"];
UIImage *crown = [UIImage imageNamed:@"crown.png"];
UIImage *cherry = [UIImage imageNamed:@"cherry.png"];
UIImage *lemon = [UIImage imageNamed:@"lemon.png"];
UIImage *apple = [UIImage imageNamed:@"apple.png"];
for (int i = 1; i <= 5; i++) {
UIImageView *sevenView = [[UIImageView alloc] initWithImage:seven];
UIImageView *barView = [[UIImageView alloc] initWithImage:bar];
UIImageView *crownView = [[UIImageView alloc] initWithImage:crown];
UIImageView *cherryView = [[UIImageView alloc]
initWithImage:cherry];
UIImageView *lemonView = [[UIImageView alloc] initWithImage:lemon];
UIImageView *appleView = [[UIImageView alloc] initWithImage:apple];
NSArray *imageViewArray = [[NSArray alloc] initWithObjects:
sevenView, barView, crownView, cherryView, lemonView,
appleView, nil];
NSString *fieldName =
[[NSString alloc] initWithFormat:@"column%d", i];
[self setValue:imageViewArray forKey:fieldName];
[fieldName release];
[imageViewArray release];
[sevenView release];
[barView release];
[crownView release];
[cherryView release];
[lemonView release];
[appleView release];
}
srandom(time(NULL));
}
...
Next, insert the following new lines into the viewDidUnload and dealloc methods:
...
- (void)viewDidUnload {

    [super viewDidUnload];

    // Release any retained subviews of the main view.
// e.g. self.myOutlet = nil;
self.picker = nil;
self.winLabel = nil;
self.column1 = nil;
self.column2 = nil;
self.column3 = nil;
self.column4 = nil;
self.column5 = nil;
}
- (void)dealloc {
[picker release];
[winLabel release];
[column1 release];
[column2 release];
[column3 release];
[column4 release];
[column5 release];
[super dealloc];
}
...
Finally, add the following code to the end of the file:
...

#pragma mark -

#pragma mark Picker Data Source Methods

- (NSInteger)numberOfComponentsInPickerView:(UIPickerView *)pickerView {

    return 5;

}


- (NSInteger)pickerView:(UIPickerView *)pickerView

    numberOfRowsInComponent:(NSInteger)component {

    return [self.column1 count];

}
#pragma mark Picker Delegate Methods

- (UIView *)pickerView:(UIPickerView *)pickerView

       viewForRow:(NSInteger)row

          forComponent:(NSInteger)component reusingView:(UIView *)view {

    NSString *arrayName = [[NSString alloc] initWithFormat:@"column%d",

        component+1];

    NSArray *array = [self valueForKey:arrayName];

    [arrayName release];

    return [array objectAtIndex:row];

}


@end
There's a lot going on here, huh? Let's take the new stuff method by method.
The spin Method
The spinmethod fires when the user touches the Spin button. In it, we first declare a few variables that will help us keep track of whether the user has won. We'll use win to keep track of whether we've found three in a row by setting it to YES if we have. We'll use numInRow to keep track of how many of the same value we have in a row so far, and we will keep track of the previous component's value in lastVal so that we have a way to compare the current value to the previous value. We initialize lastVal to -1 because we know that value won't match any of the real values.
    BOOL win = NO;

    int numInRow = 1;

    int lastVal = -1;
Next, we loop through all five components and set each one to a new, randomly generated row selection. We get the count from the column1 array to do that, which is a shortcut we can use because we know that all five columns have the same number of values.
    for (int i = 0; i < 5; i++) {

        int newValue = random() % [self.column1 count];
We compare the new value to the previous value and increment numInRow if it matches. If the value didn't match, we reset numInRow back to 1. We then assign the new value to lastVal so we'll have it to compare the next time through the loop.
        if (newValue == lastVal)

            numInRow++;

        else

             numInRow = 1;

        lastVal = newValue;
After that, we set the corresponding component to the new value, telling it to animate the change, and we tell the picker to reload that component.
        [picker selectRow:newValue inComponent:i animated:YES];

        [picker reloadComponent:i];
The last thing we do each time through the loop is look to see whether we got three in a row and set win to YES if we have.
Once we're finished with the loop, we set the label to say whether the spin was a win.
if (win)
winLabel.text = @"Win!";
else
winLabel.text = @"";
The viewDidLoad Method
The new version of viewDidLoad is somewhat scary looking, isn't it? Don't worry—once we break it down, it won't seem quite so much like the monster in your closet. The first thing we do is load six different images. We do this using a convenience method on the UIImage class called imageNamed:.
UIImage *seven = [UIImage imageNamed:@"seven.png"];
UIImage *bar = [UIImage imageNamed:@"bar.png"];
UIImage *crown = [UIImage imageNamed:@"crown.png"];
UIImage *cherry = [UIImage imageNamed:@"cherry.png"];
UIImage *lemon = [UIImage imageNamed:@"lemon.png"];
UIImage *apple = [UIImage imageNamed:@"apple.png"];
We've warned you in the past about using convenience class methods to initialize objects because they use the autorelease pool, but we're making an exception here for two reasons. First, this code fires only once, when the application launches. Second, it's just so darn convenient. By using this method, we avoid needing to determine the location of each image on the iPhone, and then use that information to load each image. It's probably saving us a dozen lines of code or more without adding meaningful memory overhead.
Once we have the six images loaded, we then need to create instances of UIImageView, one for each image, for each of the five picker components. We do that in a loop.
for (int i = 1; i <= 5; i++) {
UIImageView *sevenView = [[UIImageView alloc] initWithImage:seven];
UIImageView *barView = [[UIImageView alloc] initWithImage:bar];
UIImageView *crownView = [[UIImageView alloc] initWithImage:crown];
UIImageView *cherryView = [[UIImageView alloc]
initWithImage:cherry];
UIImageView *lemonView = [[UIImageView alloc] initWithImage:lemon];
UIImageView *appleView = [[UIImageView alloc] initWithImage:apple];
After we have the image views, we put them into an array. This array is the one that will be used to provide data to the picker for one of its five components.
NSArray *imageViewArray = [[NSArray alloc] initWithObjects:
sevenView, barView, crownView, cherryView, lemonView,
appleView, nil];
Now, we just need to assign this array to one of our five arrays. To do that, we create a string that matches the name of one of the arrays. The first time through the loop, this string will be column1, which is the name of the array we'll use to feed the first component in the picker. The second time through, it will equal column2, and so on.
NSString *fieldName = [[NSString alloc]
initWithFormat:@"column%d", i];
Once we have the name of one of the five arrays, we can assign this array to that property using a very handy method called setValue:forKey:. This method lets you set a property based on its name. So, if we call this with a value of "column1", it is exactly the same as calling the mutator method setColumn1:.
[self setValue:imageViewArray forKey:fieldName];
After that, we just do a little memory cleanup.
[fieldName release];
[imageViewArray release];
[sevenView release];
[barView release];
[crownView release];
[cherryView release];
[lemonView release];
[appleView release];
}
The last thing we do in this method is to seed the random number generator. If we don't do that, the game will play the same way every time you play it, which gets kind of boring.
srandom(time(NULL));
}
That wasn't so bad, was it? But, um, what do we do with those five arrays now that we've filled them with image views? If you scroll down through the code you just typed, you'll see that two data source methods look pretty much the same as before, but if you look down further into the delegate methods, you'll see that we're using a completely different delegate method to provide data to the picker. The one that we've used up to now returned an NSString *, but this one returns a UIView *.
Using this method instead, we can supply the picker with anything that can be drawn into a UIView. Of course, there are limitations on what will work here and look good at the same time, given the small size of the picker. But this method gives us a lot more freedom in what we display, although it is a bit more work.
- (UIView *)pickerView:(UIPickerView *)pickerView
viewForRow:(NSInteger)row
forComponent:(NSInteger)component
reusingView:(UIView *)view {
This method returns one of the image views from one of the five arrays. To do that, we once again create an NSString with the name of one of the arrays. Because component is zero-indexed, we add one to it, which gives us a value between column1 and column5 and which will correspond to the component for which the picker is requesting data.
NSString *arrayName = [[NSString alloc] initWithFormat:@"column%d",
component+1];
Once we have the name of the array to use, we retrieve that array using a method called valueForKey:, which is the counterpart to the setValue:forKey: method that we used in viewDidLoad. Using it is the same as calling the accessor method for the property you specify. So, calling valueForKey: and specifying "column1" is the same as using the column1 accessor method. Once we have the correct array for the component, we just return the image view from the array that corresponds to the selected row.
NSArray *array = [self valueForKey:arrayName];
return [array objectAtIndex:row];
}
Wow, take a deep breath. You got through all of it in one piece, and now you get to take it for a spin.
Final Details
Our game is rather fun, especially when you think about how little effort it took to build it. Now let's improve it with a couple more tweaks. There are two things about this game right now that really bug us:
- It's so darn quiet. Slot machines aren't quiet!
- It tells us that we've won before the dials have finished spinning, which is a minor thing, but it does tend to eliminate the anticipation. To see this in action, run your application again. It is subtle, but the label really does appear before the wheels finish spinning.
The 07 Pickers/Custom Picker Sounds folder in the project archive that accompanies the book contains two sound files: crunch.wavand win.wav. Copy that folder to your project's Resources folder. These are the sounds we'll play, respectively, when the users tap the Spin button and when they win.
To work with sounds, we'll need access to the iOS Audio Toolbox classes. Next, we need to add an outlet that will point to the button. While the wheels are spinning, we're going to hide the button. We don't want users tapping the button again until the current spin is all done. We'll also need a SystemSoundID to hold the crunchy sound made by the spinner and another to hold the binging sound that occurs when we win. Note that a SystemSoundID is a typedef'ed UInt32 and not an object, so no retain keyword, no asterisk in its declaration.
Add the following code to CustomPickerViewController.h:
#import <UIKit/UIKit.h>
#import <AudioToolbox/AudioToolbox.h>
@interface CustomPickerViewController : UIViewController
<UIPickerViewDataSource, UIPickerViewDelegate> {
UIPickerView *picker;
UILabel *winLabel;
NSArray *column1;
NSArray *column2;
NSArray *column3;
NSArray *column4;
NSArray *column5;
UIButton *button;
SystemSoundID crunchSoundID;
SystemSoundID winSoundID;
}
@property(nonatomic, retain) IBOutlet UIPickerView *picker;
@property(nonatomic, retain) IBOutlet UILabel *winLabel;
@property(nonatomic, retain) NSArray *column1;
@property(nonatomic, retain) NSArray *column2;
@property(nonatomic, retain) NSArray *column3;
@property(nonatomic, retain) NSArray *column4;
@property(nonatomic, retain) NSArray *column5;
@property(nonatomic, retain) IBOutlet UIButton *button;
@property(nonatomic) SystemSoundID crunchSoundID;
@property(nonatomic) SystemSoundID winSoundID;
-(IBAction)spin;
@end
After you type that and save the file, click CustomPickerViewController.xib to edit the nib. Once it's open, control-drag from File's Owner to the Spin button, and connect it to the new button outlet we just created. Save the nib.
Now, we need to do a few things in the implementation of our controller class. First, we need to synthesize the accessor and mutator for our new outlet, so open CustomPickerViewController.mand add the following line:
@implementation CustomPickerViewController
@synthesize picker;
@synthesize winLabel;
@synthesize column1;
@synthesize column2;
@synthesize column3;
@synthesize column4;
@synthesize column5;
@synthesize button;
@synthesize crunchSoundID;
@synthesize winSoundID;
...
We also need a couple of methods added to our controller class. Add the following two methods to CustomPickerViewController.m as the first two methods in the class:
-(void)showButton {
button.hidden = NO;
}
-(void)playWinSound {
AudioServicesPlaySystemSound (winSoundID);
winLabel.text = @"WIN!";
[self performSelector:@selector(showButton) withObject:nil
afterDelay:1.5];
}
The first method is used to show the button. We're going to hide the button when the user taps it, because if the wheels are already spinning, there's no point in letting them spin again until they've stopped.
The second method will be called when the user wins. The first line of this method plays our WIN! Sound, which will already have been loaded (you'll see how in a moment). Then we set the label to WIN!and call the showButton method, but we call the showButton method in a special way using a method called performSelector:withObject:afterDelay:. This is a very handy method available to all objects. It lets you call the method some time in the future—in this case, one and a half seconds in the future—which will give the dials time to spin to their final locations before telling the user the result.
We also need to make some changes to the spin: method. We will write code to play a sound and to call the playerWon method if the player won. Make the following changes to it now:
-(IBAction)spin {
BOOL win = NO;
int numInRow = 1;
int lastVal = -1;
for (int i = 0; i < 5; i++) {
int newValue = random() % [self.column1 count];
if (newValue == lastVal)
numInRow++;
else
numInRow = 1;
lastVal = newValue;
[picker selectRow:newValue inComponent:i animated:YES];
[picker reloadComponent:i];
        if (numInRow >= 3)

            win = YES;

    }
button.hidden = YES;
AudioServicesPlaySystemSound(crunchSoundID);
if (win)
[self performSelector:@selector(playWinSound)
withObject:nil
afterDelay:.5];
else
[self performSelector:@selector(showButton)
withObject:nil
afterDelay:.5];
winLabel.text = @"";
if (win)
winLabel.text = @"WIN!";
else
winLabel.text = @"";
}
The first line of code we added hides the Spin button. The next line plays an already loaded sound to let the player know they've spun the wheels. Then, instead of setting the label to WIN!as soon as we know the user has won, we do something tricky. We call one of the two methods we just created, but we do it after a delay using performSelector:afterDelay:. If the user won, we call our playerWon method half a second into the future, which will give time for the dials to spin into place; otherwise, we just wait a half a second and reenable the Spin button.
Next, we have to add a bit of code to viewDidLoad to load our two sounds.
- (void)viewDidLoad {
    UIImage *seven = [UIImage imageNamed:@"seven.png"];

    UIImage *bar = [UIImage imageNamed:@"bar.png"];

    UIImage *crown = [UIImage imageNamed:@"crown.png"];

    UIImage *cherry = [UIImage imageNamed:@"cherry.png"];

    UIImage *lemon = [UIImage imageNamed:@"lemon.png"];

    UIImage *apple = [UIImage imageNamed:@"apple.png"];
    for (int i = 1; i <= 5; i++) {

        UIImageView *sevenView = [[UIImageView alloc] initWithImage:seven];

        UIImageView *barView = [[UIImageView alloc] initWithImage:bar];

        UIImageView *crownView = [[UIImageView alloc] initWithImage:crown];

        UIImageView *cherryView = [[UIImageView alloc]

            initWithImage:cherry];

        UIImageView *lemonView = [[UIImageView alloc] initWithImage:lemon];

        UIImageView *appleView = [[UIImageView alloc] initWithImage:apple];
        NSArray *imageViewArray = [[NSArray alloc] initWithObjects:

            sevenView, barView, crownView, cherryView, lemonView,

            appleView, nil];
        NSString *fieldName = [[NSString alloc]

                      initWithFormat:@"column%d", i];
[self setValue:imageViewArray forKey:fieldName];
         [fieldName release];

         [imageViewArray release];

         [sevenView release];

         [barView release];

         [crownView release];

         [cherryView release];

         [lemonView release];

         [appleView release];

    }
NSString *path = [[NSBundle mainBundle] pathForResource:@"win" ofType:@"wav"];
AudioServicesCreateSystemSoundID((CFURLRef)[NSURL fileURLWithPath:path],
&winSoundID);
path = [[NSBundle mainBundle] pathForResource:@"crunch" ofType:@"wav"];
AudioServicesCreateSystemSoundID((CFURLRef)[NSURL fileURLWithPath:path],
&crunchSoundID);
    srandom(time(NULL));

}
The only thing left is to make sure we release our button outlet, and unload the sounds we loaded, assuming they are still in memory, so make the following changes to your dealloc and viewDidUnload methods:
...

- (void)viewDidUnload {

    [super viewDidUnload];

    // Release any retained subviews of the main view.

    // e.g. self.myOutlet = nil;

    self.picker = nil;

    self.winLabel = nil;

    self.column1 = nil;

    self.column2 = nil;

    self.column3 = nil;

    self.column4 = nil;

    self.column5 = nil;

    self.button = nil;


    if (winSoundID)

        AudioServicesDisposeSystemSoundID(winSoundID), winSoundID = 0;


    if (crunchSoundID)

        AudioServicesDisposeSystemSoundID(crunchSoundID), crunchSoundID = 0;

}


- (void)dealloc {

    [picker release];

    [winLabel release];

    [column1 release];

    [column2 release];

    [column3 release];

    [column4 release];

    [column5 release];

    [button release];


    if (winSoundID)

        AudioServicesDisposeSystemSoundID(winSoundID), winSoundID = 0;


    if (crunchSoundID)

        AudioServicesDisposeSystemSoundID(crunchSoundID), crunchSoundID = 0;


    [super dealloc];

}

...
Linking in the Audio Toolbox Framework
If you try to compile now, you'll get a linking error. It turns out that the problem is with those functions we called to load and play sounds. Yeah, they're not in any of the frameworks that are linked in by default. A quick command-double-click on the AudioServicesCreateSystemSoundID function takes us to the header file where it's declared. If we scroll up to the top of that header file, we see this:
/*=======================================================================

     File: AudioToolbox/AudioServices.h


     Contains: API for general high level audio services.


     Copyright: (c) 2006 - 2008 by Apple Inc., all rights reserved.

...
This tells us that the function we're trying to call is part of the Audio Toolbox, so we need to manually link our project to that framework.
Right-click (control-click if you have a single-button mouse) on the Frameworks folder in the Groups & Files pane in Xcode and select Existing Frameworks. . . from the Add submenu. Select AudioToolbox.framework from the list, as shown in Figure 7–23.
Figure 7–23. Selecting AudioToolbox.framework from the list of existing frameworks
Your application should now link properly and, when it runs, the Spin button should play one sound and a win should produce a winning sound. Hooray!
Final Spin
By now, you should be comfortable with tab bar applications and pickers. In this chapter, we built a full-fledged tab bar application containing five different content views from scratch. You learned how to use pickers in a number of different configurations, how to create pickers with multiple components, and even how to make the values in one component dependent on the value selected in another component. You also saw how to make the picker display images rather than just text.
Along the way, you learned about picker delegates and data sources, and saw how to load images, play sounds, create dictionaries from property lists, and link your project to additional frameworks. It was a long chapter, so congratulations on making it through! When you're ready to tackle table views, turn the page, and we'll keep going.