Chapter 5
Autorotation and Autosizing
The iPhone, iPad, and other iOS devices are all amazing pieces of engineering. Apple engineers found all kinds of ways to squeeze maximum functionality into a pretty darn small package. One example is the mechanism that allows applications to be used in either portrait (tall and skinny) or landscape (short and wide) mode, and to change that orientation at runtime if the phone is rotated. A prime example of this behavior, which is called autorotation, can be seen in iOS's web browser, Mobile Safari (see Figure 5–1).

Figure 5–1. Like many iOS applications, Mobile Safari changes its display based on how it is held, making the most of the available screen space.
In this chapter, we'll cover autorotation in detail. We'll start with an overview of the ins and outs of autorotation.
The Mechanics of Autorotation
Autorotation might not be right for every application. Several of Apple's iPhone applications support only a single orientation. Movies can be watched only in landscape mode, for example, and contacts can be edited only in portrait mode. However, that's not true for the iPad, for which Apple recommends that essentially all applications (with the possible exception of games that are designed around a particular layout) should support every orientation.
In fact, all of Apple's own iPad apps work fine in both orientations. Many of them use the different orientations to show you different views of your data. For example, the Mail and Notes apps use landscape orientation to show a list of items (folders, messages, or notes) on the left and the selected item on the right, and portrait orientation to let you focus on the details of just the selected item.
The bottom line is that if autorotation enhances the user experience, add it to your application. Fortunately, Apple did a great job of hiding the complexities of autorotation in iOS and in the UIKit, so implementing this behavior in your own iOS applications is actually quite easy.
Autorotation is specified in the view controller, so if the user rotates the device, the active view controller will be asked if it's OK to rotate to the new orientation (which you'll see how to do in this chapter). If the view controller responds in the affirmative, the application's window and views will be rotated, and the window and view will be resized to fit the new orientation.
On the iPhone and iPod touch, a view that starts in portrait mode will be 320 pixels wide and 480 pixels tall. On the iPad, portrait mode means 768 pixels wide and 1024 pixels tall. The amount of screen real estate available for your app will be decreased by 20 pixels vertically if your app is showing the status bar. The status bar is the 20-pixel strip at the top of the screen (see Figure 5–1) that shows things like signal strength, time, and battery charge.
When the phone is switched to landscape mode, the view rotates, along with the application's window, and is resized to fit the new orientation, so that it is 480 pixels wide by 320 pixels tall (iPhone and iPod touch) or 1024 pixels wide by 768 pixels tall (iPad). As before, the vertical space actually available to your app is reduced by 20 pixels if you're showing the status bar, which most apps do.
TIP: At this point, you may be wondering where the iPhone 4 and iPod touch's retina display fits into this scenario. The retina display is Apple's marketing term for the high-resolution screen on the iPhone 4 and iPod touch, which doubles the screen resolution to 640 by 960 pixels. Thanks to Apple's smart handling of the graphics, you typically won't need to think about that extra resolution (unless you really want to). The retina display screen has twice the physical resolution in both directions, but when you're building Cocoa Touch apps, you'll typically be dealing with the normal iPhone and iPod touch resolution of 320 by 480 pixels. Think of it as a “virtual resolution,” which iOS automatically maps to the physical screen resolution. We'll talk more about this in Chapter 14.
Most of the work in actually moving the pixels around the screen is managed by iOS. Your application's main job in all this is making sure everything fits nicely and looks proper in the resized window.
Your application can take three general approaches when managing rotation. Which one you use depends on the complexity of your interface. We'll look at all three approaches in this chapter.
With simpler interfaces, you can simply specify the correct autosize attributes for all of the objects that make up your interface. Autosize attributes tell the iOS device how your controls should behave when their enclosing view is resized. If you've worked with Cocoa on Mac OS X, you're already familiar with the basic process, because it is the same one used to specify how Cocoa controls behave when the user resizes the window in which they are contained.
Autosize is quick and easy, but not appropriate for all applications. More complex interfaces must handle autorotation in a different manner. For more complex views, you have two additional approaches. One approach is to manually reposition the objects in your view when notified that your view is rotating. The second approach is to actually design two different versions of your view in Interface Builder—one view for portrait mode and a separate view for landscape mode. In both cases, you will need to override methods from UIViewController in your view's controller class.
Let's get started, shall we? We'll look at autosizing first.
Handling Rotation Using Autosize Attributes
Start a new project in Xcode, and call it Autosize. We're going to stick with the same View-based Application template for this application, and once again choose iPhone as the target device. Before we lay out our GUI in Interface Builder, we need to tell iOS that our view supports autorotation. We do that by modifying the view controller class.
Specifying Rotation Support
Once your project is open in Xcode, expand the Classes folder, and single-click AutoSizeViewController.m. In the code that's already there, you'll see a method called shouldAutorotateToInterfaceOrientation: provided for you, courtesy of the template, but it's commented out. That's fine, as we'll be replacing this commented out version in just a minute.
...

/*

// Override to allow orientations other than the default portrait

// orientation.

- (BOOL)shouldAutorotateToInterfaceOrientation:(UIInterfaceOrientation)

        interfaceOrientation {

    // Return YES for supported orientations

    return (interfaceOrientation == UIInterfaceOrientationPortrait);

}

*/

...
This method is the system's way of asking your view controller if it's OK to rotate to a specific orientation. Four defined orientations correspond to the four general ways that an iOS device can be held:
UIInterfaceOrientationPortraitUIInterfaceOrientationPortraitUpsideDownUIInterfaceOrientationLandscapeLeftUIInterfaceOrientationLandscapeRight
In the case of the iPhone, the template defaults to supporting a single autorotate orientation, UIInterfaceOrientationPortrait. If we had instead created an iPad project here, the default version of the shouldAutorotateToInterfaceOrientation: method created by the template would be different. In that case, the method would just return YES, since Apple's recommendation to iPad app developers is to allow the device to be rotated to any of the four defined orientations.
When the iOS device is changed to a new orientation, this method is called on the active view controller. The parameter interfaceOrientation will contain one of the four values in the preceding list, and this method needs to return either YES or NO to signify whether the application's window should be rotated to match the new orientation. Because every view controller subclass can implement this differently, it is possible for one application to support autorotation with some of its views but not with others.
CODE SENSE
The default implementation of this method looks at interfaceOrientation and returns YES only if it is equal to UIInterfaceOrientationPortrait, which limits this application to one orientation, effectively disabling autorotation.
To enable rotation to any orientation, simply change the method to return YES for any value passed in, like so:
- (BOOL)shouldAutorotateToInterfaceOrientation:

    (UIInterfaceOrientation)interfaceOrientation {

    return YES;

}
In fact, as we mentioned earlier, that's precisely the way the method looks when you create an iPad project instead of an iPhone project.
In order to support some but not all orientations, we need to look at the value of interfaceOrientation and return YES for those that we want to support and NO for those we don't. For example, to support portrait mode and landscape mode in both directions but not rotation to the upside-down portrait mode, we use the following code:
- (BOOL)shouldAutorotateToInterfaceOrientation:

    (UIInterfaceOrientation)interfaceOrientation {

    return (interfaceOrientation !=

        UIInterfaceOrientationPortraitUpsideDown);

}
Go ahead and change the commented out shouldAutorotateToInterfaceOrientation: method to match the preceding version. As a general rule, UIInterfaceOrientationPortraitUpsideDown is discouraged by Apple on the iPhone, because if the phone rings while it is being held upside down, the phone is likely to remain upside down when it's answered. This doesn't apply to the iPad, where the meaning of “upside down” isn't so clear, and the device is meant to be turned around as much as you like.
Save your project. Now, let's look at setting autosize attributes in a nib file using Interface Builder.
Designing an Interface with Autosize Attributes
In Xcode, expand the Resources folder, and double-click AutosizeViewController.xib to open the file in Interface Builder. One nice thing about using autosize attributes is that they require very little code. We do need to specify which orientations we support, as we just did in our view controller code, but the rest of the autoresize implementation can be done right here in Interface Builder.
To see how this works, drag six Round Rect Buttons from the library over to your view, and place them as shown in Figure 5–2. Double-click each button, and assign a title to each one so you can tell them apart later. We've numbered ours from 1 to 6.

Figure 5–2. Adding six numbered buttons to the interface
Let's see what happens now that we've specified that we support autorotation but haven't set anyautosize attributes.
First, save your nib file. Then return to Xcode and build and run the app. Once the iPhone simulator comes up, select Hardware ![]() Rotate Left, which will simulate turning the iPhone to landscape mode. Take a look at Figure 5–3. Oh, dear.
Rotate Left, which will simulate turning the iPhone to landscape mode. Take a look at Figure 5–3. Oh, dear.
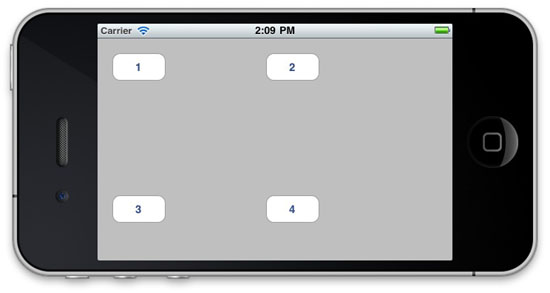
Figure 5–3. Well, that's not very useful, is it? Where are buttons 5 and 6?
Most controls default to a setting that has them stay where they are in relation to the left side and top of the screen. For some controls this would be appropriate. The top-left button, number 1, for example, is probably right where we want it. The rest of them, however, do not fare as well.
Quit the simulator and go back to Interface Builder. Let's get to work fixing the GUI so that it adapts to the screen size in a sensible way.
Using the Size Inspector's Autosize Attributes
Single-click the top-left button on your view, and then press ![]() 3 to bring up the size inspector, which should look like Figure 5–4.
3 to bring up the size inspector, which should look like Figure 5–4.
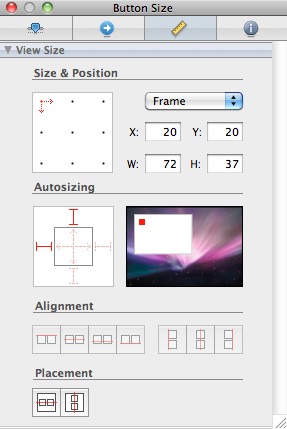
Figure 5–4. The size inspector allows you to set an object's autosize attributes.
The size inspector allows you to set an object's autosize attributes. Figure 5–5 shows the part of the size inspector that controls an object's autosize attributes.
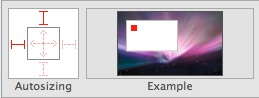
Figure 5–5. The Autosizing section of the size inspector
The box on the left in Figure 5–5 is where we actually set the attributes; the box on the right is a little animation that will show us how the object will behave during a resize. Note that the animation only plays when your cursor moves over the animation area. In the box on the left, the inner square represents the current object. If a button is selected, the inner square represents that button.
The red arrows inside the inner square represent the horizontal and vertical space inside the selected object. Clicking either arrow will change it from solid to dashed or from dashed back to solid. If the horizontal arrow is solid, the width of the object is free to change as the window resizes; if the horizontal arrow is dashed, the iPhone will try to keep the width of the object at its original value if possible. The same is true for the height of the object and the vertical arrow.
The four red “I” shapes outside the inner box represent the distance between the edge of the selected object and the same edge of the view that contains it. If the “I” is dashed, the space is flexible, and if it's solid red, the amount of space should be kept constant if possible.
Huh?
Perhaps this concept will make a little more sense if you actually see it in action. Take a look back at Figure 5–5, which represents the default autosize settings. These default settings specify that the object's size will remain constant as its superview is resized and that the distance from the left and top edges should also stay constant.
Move your cursor over the animation next to the autosize control, so you can see how it will behave during a resize. Notice that the inner box stays in the same place relative to the left and top edges of the parent view as the parent view changes in size.
Try this experiment. Click both of the solid red “I” shapes (to the top and left of the inner box) so they become dashed and look like the ones shown in Figure 5–6.

Figure 5–6. With all dashed lines, your control floats in the parent and keeps its size.
With all the lines set to dashed, the size of the object will be kept the same, and it will float in the middle of the superview as the superview is resized.
Now, click the vertical arrow inside the box and the “I” shape both above and below the box so that your autosize attributes look like the ones shown in Figure 5–7.

Figure 5–7. This configuration allows the vertical size of our object to change.
Here, we are indicating that the vertical size of our object can change and that the distance from the top of our object to the top of the window and the distance from the bottom of our object to the bottom of the window should stay constant. With this configuration, the width of the object wouldn't change, but its height would. Change the autosize attributes a few more times and watch the animation until you grok how different settings will impact the behavior when the view is rotated and resized.
Setting the Buttons' Autosize Attributes
Now, let's set the autosize attributes for our six buttons. Go ahead and see if you can figure them out. If you get stumped, take a look at Figure 5–8, which shows the autosize attributes needed for each button in order to keep them on the screen when the phone is rotated.
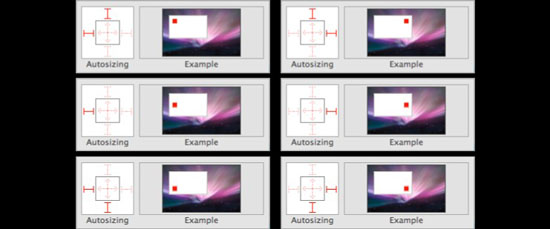
Figure 5–8. Autosize attributes for all six buttons
Once you have the attributes set the same as Figure 5–8, save the nib, go back to Xcode, and build and run. This time, when the iPhone simulator comes up, you should be able to select Hardware ![]() Rotate Left or Rotate Right and have all the buttons stay on the screen (see Figure 5–9). If you rotate back, they should return to their original position. This technique will work for a great many applications.
Rotate Left or Rotate Right and have all the buttons stay on the screen (see Figure 5–9). If you rotate back, they should return to their original position. This technique will work for a great many applications.

Figure 5–9. The buttons in their new positions after rotating
In this example, we kept our buttons the same size, so now all of our buttons are visible and usable, but there is an awful lot of unused space on the screen. Perhaps it would be better if we allowed the width or height of our buttons to change so that there will be less empty space on the interface? Feel free to experiment with the autosize attributes of these six buttons, and add some other buttons if you want. Play around until you feel comfortable with the way autosize works.
In the course of your experimentation, you're bound to notice that, sometimes, no combination of autosize attributes will give you exactly what you want. Sometimes, you are going to need to rearrange your interface more drastically than can be handled with this technique. For those situations, a little more code is in order. Let's take a look at that, shall we?
Restructuring a View When Rotated
In Interface Builder, single-click each of the buttons, and use the size inspector to change the W (for width) and H (for height) fields to 125, which will set the width and height of the buttons to 125 pixels. When you are finished, rearrange your buttons using the blue guidelines so that your view looks like Figure 5–10.
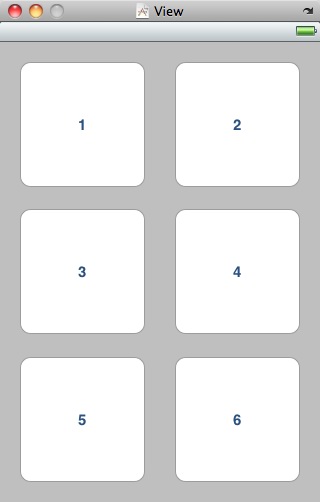
Figure 5–10. View after resizing all the buttons
Save your nib file and go back to Xcode and run your project again. Can you guess what's going to happen now when we rotate the screen? Well, assuming that you kept the buttons' autosize attributes to the settings shown in Figure 5–8, you probably won't be pleased. The buttons will overlap and look like Figure 5–11, because there simply isn't enough height on the screen in landscape mode to accommodate three buttons that are 125 pixels tall.

Figure 5–11. Not exactly what we want. Too much overlap. We need another solution.
We could accommodate this scenario using the autosize attributes by allowing the height of the buttons to change, but that's wouldn't make the best use of our screen real estate, because it would leave a large gap in the middle of the screen. If there was room for six square buttons in portrait mode, there should still be room for six square buttons in landscape mode—we just need to shuffle them around a bit. One way we can handle this is to specify new positions for each of the buttons when the view is rotated.
Declaring and Connecting Outlets
To change a control's attributes, we need an outlet that points to the object we want to change. This means that we need to declare an outlet for each of the six buttons in order to rearrange them. Add the following code to AutosizeViewController.h:
#import <UIKit/UIKit.h>


@interface AutosizeViewController : UIViewController {

    UIButton *button1;

    UIButton *button2;

    UIButton *button3;

    UIButton *button4;

    UIButton *button5;

    UIButton *button6;

}

@property (nonatomic, retain) IBOutlet UIButton *button1;

@property (nonatomic, retain) IBOutlet UIButton *button2;

@property (nonatomic, retain) IBOutlet UIButton *button3;

@property (nonatomic, retain) IBOutlet UIButton *button4;

@property (nonatomic, retain) IBOutlet UIButton *button5;

@property (nonatomic, retain) IBOutlet UIButton *button6;

@end
Save this file, and go back to Interface Builder. Control-drag from the File's Owner icon to each of the six buttons, and connect them to the corresponding outlet. Once you've connected all six, save the nib, and pop back over to Xcode
TIP: Notice our working pattern here. We add our outlet declarations to our header file and then save, so Interface Builder is aware of the outlets. We then edit the nib file to connect those outlets. We'll do this a lot. One of the biggest problems that new iOS developers run into is forgetting to save their header file before they switch back to Interface Builder to connect their outlets. If you forget to save before you select your nib file and switch to Interface Builder, when you control-drag from File's Owner to your interface object, Interface Builder won't include your unsaved outlets in the list it presents. The bottom line is that you should always save after you add your outlets. Make it a habit.
Moving the Buttons on Rotation
To move these buttons to make the best use of space, we need to override the method willAnimateRotationToInterfaceOrientation:duration: in AutosizeViewController.m. This method is called automatically after a rotation has occurred but before the final rotation animations have occurred.
Add the following code, and then we'll talk about what it's doing.
#import "AutosizeViewController.h"


@implementation AutosizeViewController

@synthesize button1;

@synthesize button2;

@synthesize button3;

@synthesize button4;

@synthesize button5;

@synthesize button6;


- (void)willAnimateRotationToInterfaceOrientation:(UIInterfaceOrientation)

    interfaceOrientation duration:(NSTimeInterval)duration {

    if (interfaceOrientation == UIInterfaceOrientationPortrait

            || interfaceOrientation ==

            UIInterfaceOrientationPortraitUpsideDown)

    {

        button1.frame = CGRectMake(20, 20, 125, 125);

        button2.frame = CGRectMake(175, 20, 125, 125);

        button3.frame = CGRectMake(20, 168, 125, 125);

        button4.frame = CGRectMake(175, 168, 125, 125);

        button5.frame = CGRectMake(20, 315, 125, 125);

        button6.frame = CGRectMake(175, 315, 125, 125);

    }

    else

    {

        button1.frame = CGRectMake(20, 20, 125, 125);

        button2.frame = CGRectMake(20, 155, 125, 125);

        button3.frame = CGRectMake(177, 20, 125, 125);

        button4.frame = CGRectMake(177, 155, 125, 125);

        button5.frame = CGRectMake(328, 20, 125, 125);

        button6.frame = CGRectMake(328, 155, 125, 125);

    }

}


- (BOOL)shouldAutorotateToInterfaceOrientation:

    (UIInterfaceOrientation)interfaceOrientation {

    return (interfaceOrientation !=

        UIInterfaceOrientationPortraitUpsideDown);

}


- (void)didReceiveMemoryWarning {

    [super didReceiveMemoryWarning];

    // Releases the view if it doesn't have a superview

    // Release anything that's not essential, such as cached data

}
- (void)viewDidUnload {

    // Release any retained subviews of the main view.

    // e.g. self.myOutlet = nil;

    self.button1 = nil;

    self.button2 = nil;

    self.button3 = nil;

    self.button4 = nil;

    self.button5 = nil;

    self.button6 = nil;

    [super viewDidUnload];

}


- (void)dealloc {

    [button1 release];

    [button2 release];

    [button3 release];

    [button4 release];

    [button5 release];

    [button6 release];

    [super dealloc];

}
The size and position of all views, including controls such as buttons, are specified in a property called frame, which is a struct of type CGRect. CGRectMake() is a function provided by Apple that lets you easily create a CGRect by specifying the x and y positions along with the width and height.
NOTE: The function CGRect() begins with the letters CG, indicating that it comes from the Core Graphics framework. As its name implies, the Core Graphics framework contains code related to graphics and drawing. In earlier versions of the iOS SDK, the Core Graphics framework was not included in Xcode project templates and needed to be added manually. That step is no longer necessary, since the Core Graphics framework is automatically included when you use any of the Xcode templates to create an iPhone or iPad application.
Save this code. Now build and run to see it in action. Try rotating, and watch how the buttons end up in their new positions.
Swapping Views
Moving controls to different locations, as we did in the previous section, can be a very tedious process, especially with a complex interface. Wouldn't it be nice if we could just design the landscape and portrait views separately, and then swap them out when the phone is rotated?
Well, we can. But it's a moderately complicated option, which you'll likely use only in the case of very complex interfaces.
While controls on both views can trigger the same actions, we will need to have two completely distinct sets of outlets—one for each of the views—and that will add a certain complexity to our code. It is by no means an insurmountable degree of complexity, and there are times when this option is the best one. Let's try it out.
To demonstrate, we'll build an app with separate views for portrait and landscape orientation. Although the interface we'll build is not complex enough to justify the technique we're using, keeping the interface simple will help clarify the process.
Create a new project in Xcode using the View-based Application template again (we'll start working with other templates in the next chapter). Call this project Swap. The application will start up in portrait mode, with two buttons, one on top of the other (see Figure 5–12).

Figure 5–12. The Swap application at launch. This is the portrait view and its two buttons.
Rotating the phone swaps in a completely different view, specifically designed for landscape orientation. The landscape view will also feature two buttons with the exact same labels (see Figure 5–13), so the user won't know they're looking at two different views.

Figure 5–13. Similar but not the same. This is the landscape view, with two different buttons.
When a button is tapped, it will become hidden. In a real application, there may be times when you want to hide or disable a button like this. As an example, you might create a button that kicks off a lengthy process and you don't want the user tapping the same button again until that process has finished.
Determining Outlets and Actions
Because each view has two buttons, and because an outlet can't point to more than one object, we need to declare four outlets: two for the landscape view buttons and two for the portrait view buttons. When using this technique, it becomes very important to put some thought into your outlet names to keep your code from becoming confusing.
But, oho! Is that someone in the back saying, “Do we really need outlets for all these buttons? Since we're deactivating the button that was tapped, can't we just use sender instead?” And in a single-view scenario, that would be exactly the right way to go about it.
Think about this. What if the user taps the Foo button and then rotates the phone? The Foo button on the other view is a completely different button, and it will still be visible, which isn't the behavior we want. We don't really want to advertise to the users that the object they're dealing with now isn't the same one they were dealing with a moment ago.
In addition to the outlets for the buttons, we need two more outlets to point to the two different versions of our view. When working with a single view only, our parent class's view property was all we needed. But since we're going to be changing the value of view at runtime, we need to make sure that we have a way to get to both views, hence the need for two UIView outlets.
Our buttons need to trigger an action, so we're definitely going to need at least one action method. We're going to design a single action method to handle the pressing of any of the buttons, so we'll just declare a single buttonPressed: action in our view controller class.
Declaring Actions and Outlets
Add the following code to SwapViewController.h to create the outlets we'll need when we go to Interface Builder.
#import <UIKit/UIKit.h>


#define degreesToRadians(x) (M_PI * (x) / 180.0)


@interface SwapViewController : UIViewController {

    UIView *landscape;

    UIView *portrait;


    // Foo

    UIButton *landscapeFooButton;

    UIButton *portraitFooButton;


    // Bar

    UIButton *landscapeBarButton;

    UIButton *portraitBarButton;

}

@property (nonatomic, retain) IBOutlet UIView *landscape;

@property (nonatomic, retain) IBOutlet UIView *portrait;

@property (nonatomic, retain) IBOutlet UIButton *landscapeFooButton;

@property (nonatomic, retain) IBOutlet UIButton *portraitFooButton;

@property (nonatomic, retain) IBOutlet UIButton *landscapeBarButton;

@property (nonatomic, retain) IBOutlet UIButton *portraitBarButton;

- (IBAction)buttonPressed:(id)sender;

@end
The following line of code is simply a macro to convert between degrees and radians:
#define degreesToRadians(x) (M_PI * (x) / 180.0)
We'll use this when calling a function that requires radians as an input. Most people don't think in radians, so this macro will make our code much more readable by letting us specify angles in degrees instead of radians. Everything else in this header should be familiar to you.
Now that we have our outlets implemented, let's go to Interface Builder and build the two views we need. Double click SwapViewController.xib in the Resources folder to open the file in Interface Builder.
Designing the Two Views
Ideally, what you're seeing in Interface Builder right now should feel very familiar to you. We'll need two views in our nib. We don't want to use the existing view that was provided as part of the template because its size can't be changed. Instead, we'll delete the default view and create two new ones.
In the main window, single-click the View icon, and press the Delete key. Next, drag two Views from the library over to the main window. After doing that, you'll have two icons labeled View. That might get a little confusing, so let's rename them to make it obvious what each one does.
To rename an icon in the nib's main window, you have to single-click the view to select it, wait a second or two, and then click the name of the icon. After another second, the name will become editable, and you can type the new name. Note that this trick works only in the icon view mode. Name one view Portrait and the other Landscape.
Now Control-drag from the File's Owner icon to the Portrait icon, and when the gray menu pops up, select the portrait outlet. Then, control-drag from File's Owner to the Landscape icon, and select the landscape outlet. Now control-drag a third time from File's Owner to Portrait, and select the view outlet to indicate which view should be shown at launch time.
Double-click the icon called Landscape, and press ![]() 3 to bring up the size inspector. Right now, the size of this view should be 320 pixels wide by 460 pixels tall. Change the values so that it is 480 pixels wide by 300 pixels tall, or you can press the little arrow icon in the right side of the view's title bar, which will automatically change the view's proportions to landscape. Now drag two Round Rect Buttons over from the library onto the Landscape view. The exact size and placement doesn't matter, but we made them nice and big at 125 pixels wide and 125 pixels tall. Double-click the left button, and give it a title of Foo ; then double-click the right one, and give it a title of Bar.
3 to bring up the size inspector. Right now, the size of this view should be 320 pixels wide by 460 pixels tall. Change the values so that it is 480 pixels wide by 300 pixels tall, or you can press the little arrow icon in the right side of the view's title bar, which will automatically change the view's proportions to landscape. Now drag two Round Rect Buttons over from the library onto the Landscape view. The exact size and placement doesn't matter, but we made them nice and big at 125 pixels wide and 125 pixels tall. Double-click the left button, and give it a title of Foo ; then double-click the right one, and give it a title of Bar.
Control-drag from the File's Owner icon to the Foo button, and assign it to the landscapeFooButton outlet; then do the same thing to assign the Bar button to the landscapeBarButton outlet.
Now, single-click the Foo button, and switch to the connections inspector by pressing ![]() 2. Drag from the circle that represents the Touch Up Inside event to the File's Owner icon, and select the buttonPressed: action. Repeat with the Bar button so that both buttons trigger the
2. Drag from the circle that represents the Touch Up Inside event to the File's Owner icon, and select the buttonPressed: action. Repeat with the Bar button so that both buttons trigger the buttonPressed: action method. You can now close the Landscape window.
Double-click the Portrait icon to open that view for editing. Drag two more Round Rect Buttons from the library, placing them one above the other this time. Again, make the size of each button 125 pixels wide and 125 pixels tall. Double-click the top button, and give it a title of Foo. Then, double-click the bottom button, and assign it a title of Bar.
Control-drag from the File's Owner icon to the Foo button, and assign it to the portraitFooButton outlet. Control-drag from the File's Owner icon once again to the Bar button, and assign it to the portraitBarButton outlet.
Click the Foo button, and drag from the Touch Up Inside event on the connections inspector over to the File's Owner icon, and select the buttonPressed: action. Repeat this connection with the Bar button.
Save the nib, and go back to Xcode.
Implementing the Swap and the Action
We're almost finished with our app. We just need to put the code in place to handle the swap and the button taps. Add the code that follows to your SwapViewController.m file.
NOTE:This code listing does not show commented-out methods provided by the stub. Feel free to delete the commented-out methods that were already in your controller class.
#import "SwapViewController.h"


@implementation SwapViewController

@synthesize landscape;

@synthesize portrait;

@synthesize landscapeFooButton;

@synthesize portraitFooButton;

@synthesize landscapeBarButton;

@synthesize portraitBarButton;


- (void)willAnimateRotationToInterfaceOrientation:(UIInterfaceOrientation)

    interfaceOrientation duration:(NSTimeInterval)duration {

    if (interfaceOrientation == UIInterfaceOrientationPortrait) {

       self.view = self.portrait;

       self.view.transform = CGAffineTransformIdentity;

       self.view.transform =

           CGAffineTransformMakeRotation(degreesToRadians(0));

       self.view.bounds = CGRectMake(0.0, 0.0, 320.0, 460.0);

    }

    else if (interfaceOrientation == UIInterfaceOrientationLandscapeLeft) {

      self.view = self.landscape;

      self.view.transform = CGAffineTransformIdentity;

      self.view.transform =

      CGAffineTransformMakeRotation(degreesToRadians(-90));

      self.view.bounds = CGRectMake(0.0, 0.0, 480.0, 300.0);

    }

    else if (interfaceOrientation ==

            UIInterfaceOrientationPortraitUpsideDown) {

      self.view = self.portrait;

      self.view.transform = CGAffineTransformIdentity;

      self.view.transform =

          CGAffineTransformMakeRotation(degreesToRadians(180));

      self.view.bounds = CGRectMake(0.0, 0.0, 320.0, 460.0);

    }

    else if (interfaceOrientation ==

            UIInterfaceOrientationLandscapeRight) {

        self.view = self.landscape;

        self.view.transform = CGAffineTransformIdentity;

        self.view.transform =

          CGAffineTransformMakeRotation(degreesToRadians(90));

        self.view.bounds = CGRectMake(0.0, 0.0, 480.0, 300.0);

    }
}


- (IBAction)buttonPressed:(id)sender {

    if (sender == portraitFooButton || sender == landscapeFooButton) {

        portraitFooButton.hidden = YES;

        landscapeFooButton.hidden = YES;

    } else {

        portraitBarButton.hidden = YES;

        landscapeBarButton.hidden = YES;

    }

}


- (BOOL)shouldAutorotateToInterfaceOrientation:(UIInterfaceOrientation)

    interfaceOrientation {

    return YES;

}


- (void)didReceiveMemoryWarning {

    // Releases the view if it doesn't have a superview

    [super didReceiveMemoryWarning];


    // Release anything that's not essential, such as cached data

}


- (void)viewDidUnload {

    // Release any retained subviews of the main view.

    // e.g. self.myOutlet = nil;

    self.landscape = nil;

    self.portrait = nil;

    self.landscapeFooButton = nil;

    self.portraitFooButton = nil;

    self.landscapeBarButton = nil;

    self.portraitBarButton = nil;

    [super viewDidUnload];

}


- (void)dealloc {

    [landscape release];

    [portrait release];

    [landscapeFooButton release];

    [portraitFooButton release];

    [landscapeBarButton release];

    [portraitBarButton release];


    [super dealloc];

}

@end
The first method in our new code is called willAnimateRotationToInterfaceOrientation:duration:. This is a method from our superclass that we've overridden that is called as the rotation begins but before the rotation actually happens. Actions that we take in this method will be animated as part of the first half of the rotation animation.
In this method, we look at the orientation that we're rotating to and set the view property to either landscape or portrait, as appropriate for the new orientation. We then call CGAffineTransformMakeRotation, part of the Core Graphics framework, to create a rotation transformation. A transformation is a mathematical description of changes to an object's size, position, or angle. Ordinarily, iOS takes care of setting the transform value automatically when the device is rotated. However, when we swap in our new view here, we need to make sure that we give it the correct value so as not to confuse the operating system. That's what willAnimateRotationToInterfaceOrientation:duration: is doing each time it sets the view's transform property. Once the view has been rotated, we adjust its frame so that it fits snugly into the window at the current orientation.
Next up is our buttonPressed: method, and there shouldn't be anything too surprising there. We look at the button that was tapped, hide it, and then hide the corresponding button on the other view.
You should be comfortable with everything else we wrote in this class. The new shouldAutorotateToInterfaceOrientation: method returns YES to tell the iPhone that we support rotation to any orientation, and the code added to the dealloc method is simple memory cleanup.
Now, compile and give it a run.
NOTE: If you accidentally click both buttons, the only way to bring them back is to quit the simulator and rerun the project. Don't use this approach in your own applications.
Rotating Out of Here
In this chapter, you tried out three completely different approaches to supporting autorotation in your applications. You learned about autosize attributes and how to restructure your views, in code, when the iOS device rotates. You saw how to swap between two completely different views when the device rotates, and you learned how to link new frameworks into your project.
In this chapter, you also got your first taste of using multiple views in an application by swapping between two views from the same nib. In the next chapter, we're going to start looking at true multiview applications. Every application we've written so far has used a single view controller, and all except the last used a single content view. A lot of complex iOS applications such as Mail and Contacts, however, are only made possible by the use of multiple views and view controllers, and we're going to look at exactly how that works in Chapter 6.