C H A P T E R 7
Speech
The microphone array is the hidden gem of the Kinect sensor. The array is made up of four separate microphones spread out linearly at the bottom of the Kinect. By comparing when each microphone captures the same audio signal, the microphone array can be used to determine the direction from which the signal is coming. This technique can also be used to make the microphone array pay more attention to sound from one particular direction rather than another. Finally, algorithms can be applied to the audio streams captured from the microphone array in order to perform complex sound dampening effects to remove irrelevant background noise. All of this sophisticated interaction between Kinect hardware and Kinect SDK software allows speech commands to be used in a large room where the speaker's lips are more than a few inches from the microphone.
When Kinect was first released for the Xbox 360, the microphone array tended to get overlooked. This was due in part to the excitement over skeleton tracking, which seemed like a much more innovative technology, but also in part to slow efforts to take advantage of the Kinect's audio capabilities in games or in the Xbox dashboard.
The first notion I had of how impressive the microphone array really is occurred by accident when my son, an avid player of first-person shooters on Xbox Live, broke his headset. I came home from work one day to find him using the Kinect sensor as a microphone to talk in-game with his team. He had somehow discovered that he could sit comfortably ten feet away from the television and the Kinect with a wireless game controller and chat away with his friends online. The Kinect was able not only to pick up his voice but also to eliminate background noises, the sound of his voice and the voice of his friends coming over our sound system, as well as in-game music and in-game explosions. This was particularly striking at the time as I had just come home from a cross-country conference call using a rather expensive conference-call telephone and we constantly had to ask the various speakers to repeat themselves because we couldn't hear what they were saying.
As independent developers have started working with Kinect technology, it has also become apparent that the Kinect microphone array fills a particular gap in Kinect applications. While the visual analysis made possible by the Kinect is impressive, it is still not able to handle fine motor control. As we have moved from one user interface paradigm to another – from command-line applications, to tabbed applications, to the mouse-enabled graphical user interface, and to the touch-enabled natural user interface – each interface has always provided an easy way to perform the basic selection action. It can even be said that each subsequent user interface technology has improved our ability to select things. The Kinect, oddly enough, breaks this trend.
Selection has turned out to be one of the most complicated actions to master with the Kinect. The initial selection idiom introduced on the Xbox 360 involved holding one's hand steady over a given location for a few seconds. A subsequent idiom, introduced in the game Dance Central, improved on this by requiring a shorter hold and then a swipe – an idiom eventually adopted for the Xbox dashboard. Other attempts by independent developers to solve this problem have included gestures such as holding an arm over one's head.
The problem of performing a select action with the Kinect can be solved relatively easily by combining speech recognition commands with skeleton tracking to create a hybrid gesture: hold and speak. Menus can be implemented even more easily by simply providing a list of menu commands and allowing the user to speak the command she wants to select – much as the Xbox currently does in the dashboard and in its Netflix Kinect-enabled application. We can expect to see many unique hybrid solutions in the future as independent developers as well as video game companies continue to experiment with new idioms for interaction rather than simply try to reimplement point-and-click.
Microphone Array Basics
When you install the Microsoft Kinect SDK, the components required for speech recognition are automatically chain installed. The Kinect microphone array works on top of preexisting code libraries that have been around since Windows Vista. These preexisting components include the Voice Capture DirectX Media Object (DMO) and the Speech Recognition API (SAPI).
In C#, the Kinect SDK provides a wrapper that extends the Voice Capture DMO. The Voice Capture DMO is intended to provide an API for working with microphone arrays to provide functionality such as acoustic echo cancellation (AEC), automatic gain control (AGC), and noise suppression. This functionality can be found in the audio classes of the SDK. The Kinect SDK audio wrapper simplifies working with the Voice Capture DMO as well as optimizing DMO performance with the Kinect sensor.
To implement speech recognition with the Kinect SDK, the following automatically installed libraries are required: the Speech Platform API, the Speech Platform SDK, and the Kinect for Windows Runtime Language Pack.
The Speech Recognition API is simply the development library that allows you to develop against the built-in speech recognition capabilities of the operating system. It can be used with or without the Kinect SDK, for instance if you want to add speech commands to a standard desktop application that uses a microphone other than the Kinect microphone array.
The Kinect for Windows Runtime Language Pack, on the other hand, is a special set of linguistic models used for interoperability between the Kinect SDK and SAPI components. Just as Kinect skeleton recognition required massive computational modeling to provide decision trees to interpret joint positions, the SAPI library requires complex modeling to aid in the interpretation of language patterns as they are received by the Kinect microphone array. The Kinect Language Pack provides these models to optimize the recognition of speech commands.
MSR Kinect Audio
The main class for working with audio is KinectAudioSource. The purpose of the KinectAudioSource class is to stream either raw or modified audio from the microphone array. The audio stream can be modified to include a variety of algorithms to improve its quality including noise suppression, automatic gain control, and acoustic echo cancellation. KinectAudioSource can be used to configure the microphone array to work in different modes. It can also be used to detect the direction from which audio is primarily coming as well as to force the microphone array to point in a given direction.
Throughout this chapter, I will attempt to shield you as much as I can from a low-level understanding of the technical aspects of audio processing. Nevertheless, in order to work with the KinectAudioSource, it is helpful at least to become familiar with some of the vocabulary used in audio recording and audio transmission. Please use the following glossary as a handy reference to the concepts abstracted by the KinectAudioSource.
- Acoustic Echo Cancellation (AEC) refers to a technique for dealing with acoustic echoes. Acoustic echoes occur when sound from a speaker is sent back over a microphone. A common way to understand this is to think of what happens when one is on the telephone and hears one's own speech, with a certain amount of delay, repeated over the receiver. Acoustic echo cancellation deals with this by subtracting sound patterns coming over a speaker from the sound picked up by the microphone.
- Acoustic Echo Suppression (AES) refers to algorithms used to further eliminate any residual echo left over after AEC has occurred.
- Automatic Gain Control (AGC) pertains to algorithms used to make the amplitude of the speaker's voice consistent over time. As a speaker approaches or moves away from the microphone, her voice may appear to become louder or softer. AGC attempts to even out these changes.
- BeamForming refers to algorithmic techniques that emulate a directional microphone. Rather than having a single microphone on a motor that can be turned, beamforming is used in conjunction with a microphone array (such as the one provided with the Kinect sensor) to achieve the same results using multiple stationary microphones.
- Center Clipping is a process that removes small echo residuals that remain after AEC processing in one-way communication scenarios.
- Frame Size - The AEC algorithm processes PCM audio samples one frame at a time. The frame size is the size of the audio frame measured in samples.
- Gain Bounding ensures that the microphone has the correct level of gain. If gain is too high, the captured signal might be saturated and will be clipped. Clipping is a non-linear effect, which will cause the acoustic echo cancellation (AEC) algorithm to fail. If the gain is too low, the signal-to-noise ratio is low, which can also cause the AEC algorithm to fail or not perform well.
- Noise Filling adds a small amount of noise to portions of the signal where center clipping has removed the residual echoes. This results in a better experience for the user than leaving silent gaps in the signal.
- Noise Suppression (NS) is used to remove non-speech sound patterns from the audio signal received by a microphone. By removing this background noise, the actual speech picked up by the microphone can be made cleaner and clearer.
- Optibeam - the Kinect sensor supports eleven beams from its four microphones. These eleven beams should be thought of as logical structures whereas the four channels are physical structures. Optibeam is a system mode that performs beamforming.
- Signal-to-Noise Ratio (SNR) is a measure of the power of a speech signal to the overall power of background noise. The higher the better.
- Single Channel – The Kinect sensor has four microphones and consequently supports four channels. Single channel is a system mode setting that turns off beamforming.
The KinectAudioSource class offers a high level of control over many aspects of audio recording, though it currently does not expose all aspects of the underlying DMO. The various properties used to tweak audio processing with the KinectAudioSource are known as features. Table 7-1 lists the feature properties that can be adjusted. Early beta versions of the Kinect for Windows SDK tried to closely match the API of the underlying DMO, which provided a greater level of control but also exposed a remarkable level of complexity. The release version of the SDK distills all the possible configurations of the DMO into its essential features and quietly takes care of the underlying configuration details. For anyone who has ever had to work with those underlying configuration properties, this will come as a great relief.

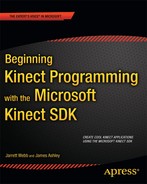
The EchoCancellationMode is one of those miraculous technical feats hidden behind an unassuming name. The possible settings are listed in Table 7-2. In order to use AEC, you will need to discover and provide an integer value to the EchoCancellationSpeakerIndex property indicating the speaker noise that will need to be modified. The SDK automatically performs discovery for the active microphone.
BeamAngleMode abstracts out the underlying DMO System Mode and Microphone Array Mode properties. At the DMO level it determines whether the DMO should take care of beamforming or allow the application to do this. On top of this, the Kinect for Windows SDK provides an additional set of algorithms for performing beamforming. In general, I prefer to use the Adaptive setting for beamforming, shelling out the complex work to the SDK. Table 7-3 explains what each of the BeamAngleMode settings does.

Adaptive beamforming will take advantage of the peculiar characteristics of the Kinect sensor to find the correct sound source much in the way the skeleton tracker tries to find the correct person to track. Like the skeleton tracker, Kinect's beamforming feature can also be put into manual mode, allowing the application to determine the direction it wants to concentrate on for sound. To use the Kinect sensor as a directional microphone, you will want to set the beam angle mode to Manual and provide a value to the KinectAudioSource's ManualBeamAngle property.
![]() Note There are some restrictions to the way features can be combined. Automatic gain control should be deactivated if AEC is enabled. Similarly, AGC should be deactivated if speech recognition will be used.
Note There are some restrictions to the way features can be combined. Automatic gain control should be deactivated if AEC is enabled. Similarly, AGC should be deactivated if speech recognition will be used.
Speech Recognition
Speech recognition is broken down into two different categories: recognition of commands and recognition of free-form dictation. Free-form dictation requires that one train software to recognize a particular voice in order to improve accuracy. This is done by having speakers repeat a series of scripts out loud so the software comes to recognize the speaker's particular vocal patterns.
Command recognition (also called Command and Control) applies another strategy to improve accuracy. Rather than attempt to recognize anything a speaker might say, command recognition constrains the vocabulary that it expects any given speaker to vocalize. Based on a limited set of expectations, command recognition is able to formulate hypotheses about what a speaker is trying to say without having to be familiar with the speaker ahead of time.
Given the nature of Kinect, open-ended dictation does not make sense with the technology. The Kinect SDK is for freestanding applications that anyone can walk up to and begin using. Consequently, the SDK primarily supports command recognition through the Microsoft.Speech library, which is the server version of the Microsoft speech recognition technology. On the other hand, if you really want to, the speech capabilities of the System.Speech library, the desktop version of Microsoft's speech recognition technology built into Windows operating systems, can be referenced and used to build a dictation program using the Kinect microphone. The results of combining Kinect with the System.Speech library for free dictation will not be great, however. This is because the Kinect for Windows Runtime Language Pack, the linguistic models adapted to vocalizations from an open space rather than a source inches from the microphone, cannot be used with System.Speech.
Command recognition with the Microsoft.Speech library is built around the SpeechRecognitionEngine. The SpeechRecognitionEngine class is the workhorse of speech recognition, taking in a processed audio stream from the Kinect sensor and then attempting to parse and interpret vocal utterances as commands it recognizes. The engine weighs the elements of the vocalization and, if it decides that the vocalization contains elements it recognizes, passes it on to an event for processing. If it decides the command is not recognized, it throws that part of the audio stream away.
We tell the SpeechRecognitionEngine what to look for through constructs called grammars. A Grammar object can be made up of single words or strings of words. Grammar objects can include wildcards if there are parts of a phrase whose value we do not care about; for instance, we may not care if a command includes the phrase “an” apple or “the” apple. A wildcard in our grammar tells the recognition engine that either is acceptable. Additionally, we can add a class called Choices to our grammar. A Choices class is like a Wildcard class in that it can contain multiple values. Unlike a wildcard, however, we specify the sequence of values that will be acceptable in our choices.
For example, if we wanted to recognize the phrase “Give me some fruit” where we do not care what the article before fruit is, but want to be able to replace fruit with additional values such as apple, orange, or banana, we would build a grammar such as the one in
Listing 7-1. The Microsoft.Speech library also provides a GrammarBuilder class to help us build our grammars.
Listing 7-1. A Sample Grammar
var choices = new Choices;

        choices.Add("fruit");

        choices.Add("apple");

        choices.Add("orange");

        choices.Add("banana");


        var grammarBuilder = new GrammarBuilder();

        grammarBuilder.Append("give");

        grammarBuilder.Append("me");

        grammarBuilder.AppendWildcard();

        grammarBuilder.Append(choices);


var grammar = new Grammar(grammarBuilder);
![]() Note Grammars are not case sensitive. It is good practice, however, to be consistent and use either all caps or all lowercase characters in your code.
Note Grammars are not case sensitive. It is good practice, however, to be consistent and use either all caps or all lowercase characters in your code.
Grammars are loaded into the speech recognition engine using the engine's LoadGrammar method. The speech recognition engine can, and often does, load multiple grammars. The engine has three events that should be handled: SpeechHypothesized, SpeechRecognized, and SpeechRecognitionRejected. SpeechHypothesized is what the recognition engine interprets the speaker to be saying before deciding to accept or reject the utterance as a command. SpeechRecognitionRejected is handled in order to do something with failed commands. SpeechRecognized is, by far, the most important event, though. When the speech recognition engine decides that a vocalization is acceptable, it passes it to the event handler for SpeechRecognized with the SpeechRecognizedEventArgs parameter. SpeechRecognizedEventArgs has a Results property described in Table 7-4.

Instantiating a SpeechRecognitionEngine object for the Kinect requires a very particular set of steps. First, a specific string indicating the ID of the recognizer that will be used with the speech recognition engine must be assigned. When you install the server version of Microsoft's speech libraries, a recognizer called the Microsoft Lightweight Speech Recognizer with an ID value of SR_MS_ZXX_Lightweight_v10.0 is installed (the ID may be different depending on the version of the speech libraries you install). After installing the Kinect for Windows Runtime Language Pack, a second recognizer called the Microsoft Server Speech Recognition Language - Kinect (en-US) becomes available. It is this second recognizer that we want to use with the Kinect. Next, this string must be used to load the correct recognizer into the SpeechRecognitionEngine. Since the ID of this second recognizer may change in the future, we use pattern matching to find the recognizer we want. Finally, the speech recognition engine must be configured to receive the audio stream coming from the KinectAudioSource object described in the previous section. Fortunately there is boilerplate code for performing these steps as illustrated in Listing 7-2.
Listing 7-2. Configuring the SpeechRecognitionEngine object
var source = new KinectAudioSource();


Func<RecognizerInfo, bool> matchingFunc = r =>

{

    string value;

    r.AdditionalInfo.TryGetValue("Kinect", out value);

    return "True".Equals(value, StringComparison.InvariantCultureIgnoreCase)

        && "en-US".Equals(r.Culture.Name

        , StringComparison.InvariantCultureIgnoreCase);

};

RecognizerInfo ri = SpeechRecognitionEngine.InstalledRecognizers().Where(matchingFunc).FirstOr

Default();

var sre = new SpeechRecognitionEngine(ri.Id);


KinectSensor.KinectSensors[0].Start();

Stream s = source.Start();


sre.SetInputToAudioStream(s,

                        new SpeechAudioFormatInfo(

                        EncodingFormat.Pcm, 16000, 16, 1,

                        32000, 2, null));

sre.Recognize();
The second parameter of the SetInputToAudioStream method indicates how the audio from the Kinect is formatted. In the boilerplate code in Listing 7-2, we indicate that the encoding format is Pulse Code Modulation, that we are receiving 16,000 samples per second, that there are 16 bits per sample, that there is one channel, 32,000 average bytes per second, and the block align value is two. If none of this makes sense to you, do not worry – that's what boilerplate code is for.
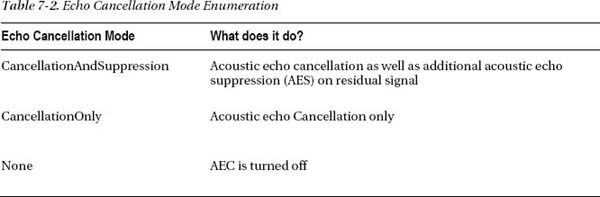
Once grammars have been loaded into the speech recognition engine, the engine must be started. There are multiple ways to do this. The recognition engine can be started in either synchronous or asynchronous mode. Additionally, it can be set up to perform recognition only once, or to continue recognizing multiple commands as they are received from the KinectAudioSource. Table 7-5 shows the options for commencing speech recognition.
In the following sections, we will walk through some sample applications in order to illustrate how to use the KinectAudioSource class and the SpeechRecognitionEngine class effectively.
Audio Capture
While the KinectAudioSource class is intended primarily as a conduit for streaming audio data to the SpeechRecognitionEngine, it can in fact also be used for other purposes. A simple alternative use – and one that aids in illustrating the many features of the KinectAudioSource class – is as a source for recording wav files. The following sample project will get you up and running with a primitive audio recorder. You will then be able to use this audio recorder to see how modifying the default values the various features of the Kinect SDK affects the audio stream that is produced.
Working with the Sound Stream
Even though you will be playing with the Kinect's audio classes in this chapter rather than the visual classes, you begin building projects for Kinect audio in much the same way.
- Create a new WPF Application project called AudioRecorder.
- Add a reference to
Microsoft.Research.Kinect.dll. - Add three buttons to your
MainWindowfor Play, Record, and Stop. - Set the
Titleproperty of the main window to “Audio Recorder”.
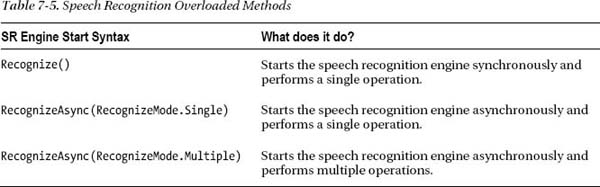
Your screen should look something like Figure 7-1 when your Visual Studio IDE is in design mode.

Figure 7-1. The Recorder window
Frustratingly, there is no native way to write wav files in C#. To aid us in writing such files, we will use the following custom RecorderHelper class. The class needs to use a struct called WAVFORMATEX, basically a transliteration of a C++ object, in order to facilitate the processing of audio data. We will also add a property to RecorderHelper called IsRecording allowing us to stop the recording process when we want to. The basic structure of the class, the WAVFORMATEX struct, and the property are outlined in Listing 7-3. We will also initialize a private byte array called buffer that will be used to chunk the audio stream we receive from Kinect.
Listing 7-3. RecorderHelper.cs
sealed class RecorderHelper

{

    static byte[] buffer = new byte[4096];

    static bool _isRecording;


    public static bool IsRecording

    {

        get {return _isRecording; }

        set{_isRecording = value; }

    }


    struct WAVEFORMATEX

    {

        public ushort wFormatTag;

        public ushort nChannels;

        public uint nSamplesPerSec;

        public uint nAvgBytesPerSec;

        public ushort nBlockAlign;

        public ushort wBitsPerSample;

        public ushort cbSize;

    }


    // ...

}
To complete the helper class, we will add three methods: WriteString, WriteWavHeader, and WriteWavFile. WriteWavFile, seen below in Listing 7-4, takes a KinectAudioSource object, from which we read audio data, and a FileStream object to which we write the data. It begins by writing a fake header file, reads through the Kinect audio stream, and chunks it to the FileStream object until it is told to stop by having the _isRecording property set to false. It then checks the size of the stream that has been written to the file and uses that to encode the correct file header.
Listing 7-4. Writing to the Wav File
public static void WriteWavFile(KinectAudioSource source, FileStream fileStream)

{

    var size = 0;

    //write wav header placeholder

    WriteWavHeader(fileStream, size);

    using (var audioStream = source.Start())

    {

        //chunk audio stream to file

        while (audioStream.Read(buffer, 0, buffer.Length) > 0 && _isRecording)

        {

            fileStream.Write(buffer, 0, buffer.Length);

            size += buffer.Length;

        }

    }


    //write real wav header

    long prePosition = fileStream.Position;

    fileStream.Seek(0, SeekOrigin.Begin);

    WriteWavHeader(fileStream, size);

    fileStream.Seek(prePosition, SeekOrigin.Begin);

    fileStream.Flush();

}


public static void WriteWavHeader(Stream stream, int dataLength)

{

    using (MemoryStream memStream = new MemoryStream(64))

    {

        int cbFormat = 18;

        WAVEFORMATEX format = new WAVEFORMATEX()

        {

            wFormatTag = 1,

            nChannels = 1,

            nSamplesPerSec = 16000,

            nAvgBytesPerSec = 32000,

            nBlockAlign = 2,

            wBitsPerSample = 16,

            cbSize = 0

        };

         using (var bw = new BinaryWriter(memStream))

        {


            WriteString(memStream, "RIFF");

            bw.Write(dataLength + cbFormat + 4);

            WriteString(memStream, "WAVE");

            WriteString(memStream, "fmt ");

            bw.Write(cbFormat);


            bw.Write(format.wFormatTag);

            bw.Write(format.nChannels);

            bw.Write(format.nSamplesPerSec);

            bw.Write(format.nAvgBytesPerSec);

            bw.Write(format.nBlockAlign);

            bw.Write(format.wBitsPerSample);

            bw.Write(format.cbSize);


            WriteString(memStream, "data");

            bw.Write(dataLength);

            memStream.WriteTo(stream);

        }

    }

}


static void WriteString(Stream stream, string s)

{

    byte[] bytes = Encoding.ASCII.GetBytes(s);

    stream.Write(bytes, 0, bytes.Length);

}
With the helper written, we can begin setting up and configuring the KinectAudioSource object in MainWindow.cs. We add a private Boolean called _isPlaying to help keep track of whether we are attempting to play back the wav file at any point in time. This helps us to avoid having our record and play functionality occur simultaneously. We also create a private variable for the MediaPlayer object we will use to play back the wav files we record, as well as a _recordingFileName private variable to keep track of the name of the most recently recorded file. In Listing 7-6, we also create several properties to enable and disable buttons when we need to: IsPlaying, IsRecording, IsPlayingEnabled, IsRecordingEnabled, and IsStopEnabled. To make these properties bindable, we make the MainWindow class implement INotifyPropertyChanged, add a NotifyPropertyChanged event and an OnNotifyPropertyChanged helper method.
Listing 7-5. Tracking Recording State
public partial class MainWindow : Window, INotifyPropertyChanged

{

    string _recordingFileName;

    MediaPlayer _mplayer;

    bool _isPlaying;


    public event PropertyChangedEventHandler PropertyChanged;


    private void OnPropertyChanged(string propName)

    {

        if (PropertyChanged != null)

            PropertyChanged(this, new PropertyChangedEventArgs(propName));

    }


    public bool IsPlayingEnabled

    {

        get { return !IsRecording; }

    }


    public bool IsRecordingEnabled

    {

        get { return !IsPlaying && !IsRecording; }

    }


    public bool IsStopEnabled

    {

        get { return IsRecording; }

    }


    private bool IsPlaying

    {

        get{return _isPlaying;}

        set

        {

            if (_isPlaying != value)

            {

                _isPlaying = value;

                OnPropertyChanged("IsRecordingEnabled");

            }

        }

    }


    private bool IsRecording

    {

        get{return RecorderHelper.IsRecording;}

        set

        {

            if (RecorderHelper.IsRecording != value)

            {

                RecorderHelper.IsRecording = value;

                OnPropertyChanged("IsPlayingEnabled");

                OnPropertyChanged("IsRecordingEnabled");

                OnPropertyChanged("IsStopEnabled");

            }

        }

    }


    // ...
The logic of the various properties may seem a bit hairy at first glance. We are setting the IsPlayingEnabled property by checking to see if IsRecording is false, and setting the IsRecordingEnabled property by checking to see if IsPlaying is false. You'll have to trust me that this works when we bind this in the UI as illustrated in Listing 7-7. The XAML for the buttons in the UI should look like this, though you may want to play with the margins in order to line up the buttons properly:
Listing 7-6. Record and Playback Buttons
<StackPanel Orientation="Horizontal">

    <Button Content="Play" Click="Play_Click" IsEnabled="{Binding IsPlayingEnabled}"

        FontSize="18" Height="44" Width="110" VerticalAlignment="Top" Margin="5"/>

    <Button Content="Record" Click="Record_Click"  IsEnabled="{Binding IsRecordingEnabled}"

        FontSize="18" Height="44" Width="110" VerticalAlignment="Top" Margin="5"/>

    <Button Content="Stop" Click="Stop_Click"  IsEnabled="{Binding IsStopEnabled}"

        FontSize="18" Height="44" Width="110" VerticalAlignment="Top" Margin="5"/>

</StackPanel>
In the MainWindow constructor, illustrated in Listing 7-8, we assign a new MediaPlayer object to the _mediaPlayer variable. Because the media player spins up its own thread internally, we need to capture the moment when it finishes in order to reset all of our button states. Additionally, we use a very old WPF trick to enable our MainWindow to bind to the IsPlayingEnabled and properties. We set MainPage's DataContext to itself. This is a shortcut that improves our code's readability, though typically the best practice is to place bindable properties into their own separate classes.
Listing 7-7. Self-Binding Example
public MainWindow()

{

    InitializeComponent();


    this.Loaded += delegate{KinectSensor.KinectSensors[0].Start();};

    _mplayer = new MediaPlayer();

    _mplayer.MediaEnded += delegate{ _mplayer.Close(); IsPlaying = false; };

    this.DataContext = this;

}
We are now ready to instantiate the KinectAudioSource class and pass it to the RecorderHelper class we created earlier, as illustrated in Listing 7-8. As an added precaution, we will make the RecordKinectAudio method threadsafe by placing locks around the body of the method. At the beginning of the lock we set IsRunning to true, and when it ends we set the IsRunning property back to false.
Listing 7-8. Instantiating and Configuring KinectAudioSource
private KinectAudioSource CreateAudioSource()

{

    var source = KinectSensor.KinectSensors[0].AudioSource;

    source.NoiseSuppression = _isNoiseSuppressionOn;

    source.AutomaticGainControlEnabled = _isAutomaticGainOn;


    if (IsAECOn)

    {

        source.EchoCancellationMode = EchoCancellationMode.CancellationOnly;

        source.AutomaticGainControlEnabled = false;

        IsAutomaticGainOn = false;

        source.EchoCancellationSpeakerIndex = 0;

    }


    return source;

}


private object lockObj = new object();

private void RecordKinectAudio()

{

    lock (lockObj)

    {

        IsRecording = true;


        using (var source = CreateAudioSource())

        {

            var time = DateTime.Now.ToString("hhmmss");

            _recordingFileName = time + ".wav";

            using (var fileStream =

            new FileStream(_recordingFileName, FileMode.Create ))

            {

                RecorderHelper.WriteWavFile(source, fileStream);

            }

        }

        IsRecording = false;

    }

}
As additional insurance against trying to write against a file before the previous process has finished writing against it, we also create a new wav file name based on the current time on each instance that this code is iterated.
The final step is simply to glue our buttons to the methods for recording and playing back files. The UI buttons call methods such as Play_Click and Record_Click which each have the proper event handler signatures. These in turn just shell the call to our actual Play and Record methods. You will notice in Listing 7-10 that the Record method brings together our LaunchNewThread method and our RecordKinectAudio methods in order to spin the KinectAudioSource object off on its own thread.
Listing 7-9. Record and Playback Methods
private void Record()

{

    Thread thread = new Thread(new ThreadStart(RecordKinectAudio));

    thread.Priority = ThreadPriority.Highest;

    thread.Start();

}


private void Stop()

{

    IsRecording = false;

KinectSensor.KinectSensors[0].AudioSource.Stop();

}


private void Play_Click(object sender, RoutedEventArgs e)

{

    Play();

}


private void Record_Click(object sender, RoutedEventArgs e)

{

    Record();

}


private void Stop_Click(object sender, RoutedEventArgs e)

{

    Stop();

}
You can now use Kinect to record audio files. Make sure the Kinect's USB cord is plugged into your computer and that its power cord is plugged into a power source. The Kinect green LED light should begin to blink steadily. Run the application and press the Record button. Walk around the room to see how well the Kinect sensor is able to pick up your voice from different distances. The microphone array has been configured to use adaptive beamforming in the CreateAudioSource method, so it should follow you around the room as you speak. Press the Stop button to end the recording. When the application has finished writing to the wav file, the Play button will be enabled. Press Play to see what the Kinect sensor picked up.
Cleaning Up the Sound
We can now extend the Audio Recorder project to test how the feature properties delineated earlier in Table 7-1 affect audio quality. In this section, we will add flags (see Listing 7-10) to turn noise suppression and automatic gain control on and off. Figure 7-2 illustrates the new user interface changes we will implement in order to manipulate sound quality.
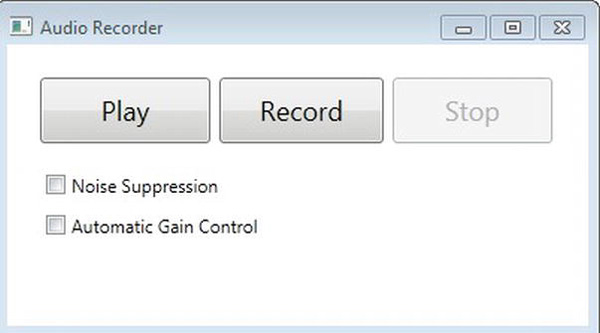
Figure 7-2. The Recorder window with feature flags in design view
Listing 7-10. Feature Flags
bool _isNoiseSuppressionOn;

bool _isAutomaticGainOn;
Using the OnPropertyChanged helper we created previously, we can create bindable properties around these fields. Create the properties in Listing 7-11.
Listing 7-11. Feature Properties
public bool IsNoiseSuppressionOn

{

    get

    {

        return _isNoiseSuppressionOn;

    }

    set

    {

        if (_isNoiseSuppressionOn != value)

        {

            _isNoiseSuppressionOn = value;

            OnPropertyChanged("IsNoiseSuppressionOn");

        }

    }

}


public bool IsAutomaticGainOn

{

    get{return _isAutomaticGainOn;}

    set

    {

        if (_isAutomaticGainOn != value)

        {

            _isAutomaticGainOn = value;

            OnPropertyChanged("IsAutomaticGainOn");

        }

    }

}
Next, add check boxes to the UI in order to toggle these features on and off at will. I spent several hours just trying out different settings, recording a message, playing it back, and then rerecording the message with a different set of feature configurations to see what had changed. Listing 7-12 shows what the XAML should look like. You will want to drag the check boxes around so they do not just stack on top of each other.
Listing 7-12. Feature Flag Check Boxes
<CheckBox Content="Noise Suppression"  IsChecked="{Binding IsNoiseSuppressionOn}"

                  Height="16" Width="110" />

<CheckBox Content="Automatic Gain Control" IsChecked="{Binding IsAutomaticGainOn}"

                  Height="16" Width="110" />

<CheckBox Content="Noise Fill" IsChecked="{Binding IsNoiseFillOn}"

Height="16" Width="110" />
Finally, we can use these flags to change the way the KinectAudioSource is configured in the CreateAudioSource method shown in Listing 7-13.
Listing 7-13. CreateAudioSource with Feature Flags
private KinectAudioSource CreateAudioSource()

{

    var source = KinectSensor.KinectSensors[0].AudioSource;

    source.BeamAngleMode = BeamAngleMode.Adaptive;


    // set features based on user preferences

    source.NoiseSuppression = _isNoiseSuppressionOn;

    source.AutomaticGainControlEnabled = _isAutomaticGainOn;


    return source;

}
Play with these flags to see how they affect your audio recordings. You will notice that noise suppression has by far the most obvious effect on audio quality. Automatic gain control has a more noticeable effect if you walk around the room as you record and experiment with raising and lowering your voice. The other features are much more subtle. I will leave it to the industrious reader to add additional checkboxes to the UI in order to find out what those features actually do.
Canceling Acoustic Echo
Acoustic echo canceling is not simply a feature of the KinectAudioSource class, but rather something at the core of the Kinect technology. Testing it out is consequently somewhat more complex than playing with the feature flags in the last section.
To test AEC, add another check box to the UI and type “AEC” into the check box's content attribute. Then create an IsAECOn property modeled on the properties used to set the feature flags. Use a private Boolean field called _isAECOn as the backing field for this property. Finally, bind the check box's IsChecked attribute to the IsAECOn property you just created.
As we did above, we will configure AEC in the CreateAudioSource method. It is a bit more involved however. Just above the line that says “return source,” add the code in Listing 7-14. First, the SystemMode property must be changed to specify both Optibeam and echo cancelation. Automatic gain control needs to be turned off since it will not work with AEC. Additionally, we will set the AutomaticGainOn property to false, if it is not false already, so the UI shows that there is a conflict. The AEC configuration next requires us to find both the microphone we are using as well as the speaker we are using so the AEC algorithms know which outgoing stream to subtract from which ingoing stream. You can now test the acoustic echo cancelation capabilities of the Kinect SDK by playing a media file while you record your own voice. A Cee Lo Green song played extra loud did the trick for me.
Listing 7-14. Toggle IsAECOn
if (IsAECOn)

{

    source.EchoCancellationMode = EchoCancellationMode.CancellationOnly;

    source.AutomaticGainControlEnabled = false;

    IsAutomaticGainOn = false;

    source.EchoCancellationSpeakerIndex = 0;

}
![]() Note In beta versions of the Kinect SDK, AEC used preliminary sampling of the sound from the speaker to determine the length of the echo and how best to eliminate it. This awkwardly required that sound be output through the speakers before AEC was turned on in order for it to work correctly. In V1, this peculiar issue has fortunately been fixed.
Note In beta versions of the Kinect SDK, AEC used preliminary sampling of the sound from the speaker to determine the length of the echo and how best to eliminate it. This awkwardly required that sound be output through the speakers before AEC was turned on in order for it to work correctly. In V1, this peculiar issue has fortunately been fixed.
Beam Tracking for a Directional Microphone
It's possible to use the four microphones together to simulate the effect of using a directional microphone. The process of doing that is referred to as beam tracking. We will start a new project in order to experiment with beam tracking. Here is what to do:
- Create a new WPF Application project called FindAudioDirection.
- Add a reference to
Microsoft.Research.Kinect.dll. - Set the Title property of the main window to “Find Audio Direction”.
- Draw a thin, vertical rectangle in the root grid of the
MainWindow
The rectangle will be used like a dowsing rod to indicate where the speaker is at any given point in time. The rectangle will have a rotate transform associated with it so we can swivel the object on its axis as illustrated in Listing 7-15. In my code, I have made the rectangle blue.
Listing 7-15. The Indicator
<Rectangle Fill="#FF1B1BA7" HorizontalAlignment="Left" Margin="240,41,0,39"

           Stroke="Black" Width="10" RenderTransformOrigin="0.5,0">

        <Rectangle.RenderTransform>


                        <RotateTransform Angle="{Binding BeamAngle}"/>

        </Rectangle.RenderTransform>

</Rectangle>
Figure 7-3 illustrates the rather straightforward user interface for this project. The remaining code is much like the code we used in the Audio Recorder project. We instantiate the KinectAudioSource object in pretty much the same way. The DataContext of MainWindow is set to itself again. We set the BeamAngleMode to Adaptive since it will track the user automatically.

Figure 7-3. The Speech direction indicator in design view
One change is that we need to add an event handler for the Kinect audio source's BeamChanged event, as shown in Listing 7-16. This will fire every time the SDK acknowledges that the user has moved from his previous position. We also need to create a BeamAngle double property so the RotateTransform on our blue rectangle has something to bind to.
Listing 7-16. MainWindow.cs Implementation
public partial class MainWindow : Window, INotifyPropertyChanged

{

    public MainWindow()

    {

        InitializeComponent();

        this.DataContext = this;

        this.Loaded += delegate {ListenForBeamChanges();};

    }


    private KinectAudioSource CreateAudioSource()

    {

        var source = KinectSensor.KinectSensors[0].AudioSource;

        source.NoiseSuppression = true;

        source.AutomaticGainControlEnabled = true;

        source.BeamAngleMode = BeamAngleMode.Adaptive;

        return source;

    }


    private KinectAudioSource audioSource;


    private void ListenForBeamChanges()

    {

        KinectSensor.KinectSensors[0].Start();

        var audioSource = CreateAudioSource();

        audioSource.BeamChanged += audioSource_BeamAngleChanged;

        audioSource.Start();

    }


    public event PropertyChangedEventHandler PropertyChanged;


    private void OnPropertyChanged(string propName)

    {

        if (PropertyChanged != null)

            PropertyChanged(this, new PropertyChangedEventArgs(propName));

    }


    private double _beamAngle;

    public double BeamAngle

    {

        get { return _beamAngle; }

        set

        {

            _beamAngle = value;

            OnPropertyChanged("BeamAngle");

        }

    }


// ...
The final piece that ties all of this together is the BeamChanged event handler. This will be used to modify the BeamAngle property whenever the beam direction changes. While in some places, the SDK uses radians to represent angles, the BeamChanged event conveniently translates radians into degrees for us. This still does not quite achieve the effect we want since when the speaker moves to the left, from the Kinect sensor's perspective, our rectangle will appear to swivel in the opposite direction. To account for this, we reverse the sign of the angle as demonstrated in Listing 7-17.
Listing 7-17. BeamChanged Event Handler
void audioSource_BeamChanged(object sender, BeamAngleChangedEventArgs e)

{

    BeamAngle = e.Angle * -1;

}
As you play with this project, try to talk constantly while walking around the room to see how quickly the adaptive beam can track you. Keep in mind that it can only track you if you are talking. A nearby television, I have discovered, can also fool the adaptive beam regarding your location.
Speech Recognition
In this section, we will finally combine the power of the KinectAudioSource with the cleverness of the SpeechRecognitionEngine. To illustrate how speech commands can be used effectively with skeleton tracking, we will attempt to replicate Chris Schmandt's pioneering work on NUI interfaces from 1979. You can find a video of his project, “Put That There,” on YouTube. The original script of the “Put That There” demonstration went something like this.
Create a yellow circle, there
Create a cyan triangle, there.
Put a magenta square, there.
Create a blue diamond, there.
Move that ... there.
Put that ... there.
Move that ... below that.
Move that ... west of the diamond.
Put a large green circle ... there.
We will not be able to replicate everything in that short video in the remaining pages of this chapter, but we will at least reproduce the aspect of it where Chris is able to create an object on the screen using hand manipulations and audible commands. Figure 7-4 shows what the version of Put That There that we are about to construct looks like.

Use the following guidance to start the Put That There application. In these steps, we will create the basic project, make it Kinect enabled, and then add a user control to provide an affordance for hand tracking.
- Create a new WPF Application project called PutThatThere.
- Add a reference to
Microsoft.Research.Kinect.dll. - Add a reference to
Microsoft.Speech. TheMicrosoft.Speechassembly can be found in C:Program Files (x86)Microsoft Speech Platform SDKAssembly. - Set the Title property of the main window to “Put That There”.
- Create a new
UserControlcalledCrossHairs.xaml.
The CrossHairs user control is simply a drawing of crosshairs that we can use to track the movements of the user's right hand, just like in Chris Schmandt's video. It has no behaviors. Listing 7-18 shows what the XAML should look like. You will notice that we offset the crosshairs from the container in order to have our two rectangles cross at the zero, zero grid position.
Listing 7-18. Crosshairs
    <Grid Height="50" Width="50" RenderTransformOrigin="0.5,0.5">

        <Grid.RenderTransform>


                        <TranslateTransform X="-25" Y="-25"/>


        </Grid.RenderTransform>

        <Rectangle Fill="#FFF4F4F5" Margin="20,0,20,0" Stroke="#FFF4F4F5"/>

        <Rectangle Fill="#FFF4F4F5" Margin="0,20,0,20" Stroke="#FFF4F4F5"/>

    </Grid>
In the MainWindow, change the root grid to a canvas. A canvas will make it easier for us to animate the crosshairs to match the movements of the user's hand. Drop an instance of the CrossHairs control into the canvas. You will notice in listing 7-20 that we also nest the root canvas panel inside a Viewbox control. This is an old trick to handle different resolution screens. The viewbox will automatically resize its contents to match the screen real estate available. Set the background of the MainWindow as well as the background of the canvas to the color black. We will also add two labels to the bottom of the canvas. One will display hypothesized text as the SpeechRecognitionEngine attempts to interpret it while the other will display the confidence with which the engine rates the commands it hears. The position of the CrossHairs control will be bound to two properties, HandTop and HandLeft. The content attributes of the two labels will be bound to HypothesizedText and Confidence, respectively. If you are not overly familiar with XAML syntax, you can just paste the code in Listing 7-19 as you see it. We are done with XAML for now.
Listing 7-19. MainWindow XAML
        xmlns:local="clr-namespace:PutThatThere"

        Title="Put That There"  Background="Black">

    <Viewbox>

        <Canvas x:Name="MainStage" Height="1080" Width="1920" Background="Black"

VerticalAlignment="Bottom">

      <local:CrossHairs Canvas.Top="{Binding HandTop}" Canvas.Left="{Binding HandLeft}" />

      <Label  Foreground="White"  Content="{Binding HypothesizedText}" Height="55" Width="965"

                    FontSize="32"  Canvas.Left="115" Canvas.Top="1025" />

      <Label Foreground="Green" Content="{Binding Confidence}" Height="55"  Width="114"

                   FontSize="32" Canvas.Left="0" Canvas.Top="1025"  />

     </Canvas>

</Viewbox>
In MainWindow.cs we will, as in previous projects in this chapter, make MainWindow implement INotifyPropertyChanged and add an OnPropertyChanged helper method. Consult Listing 7-20 if you run into any problems. We will also create the four properties that our UI needs to bind to.
Listing 7-20. MainWindow.cs Implementation
public partial class MainWindow : Window, INotifyPropertyChanged

{


    public event PropertyChangedEventHandler PropertyChanged;


    private void OnPropertyChanged(string propertyName)

    {

        if (PropertyChanged != null)

        {

            PropertyChanged(this, new PropertyChangedEventArgs(propertyName));

        }

    }


    private double _handLeft;

    public double HandLeft

    {

        get { return _handLeft; }

        set

        {

            _handLeft = value;

            OnPropertyChanged("HandLeft");

        }


    }


    private double _handTop;

    public double HandTop

    {

        get { return _handTop; }

        set

        {

            _handTop = value;

            OnPropertyChanged("HandTop");

        }

    }


    private string _hypothesizedText;

    public string HypothesizedText

    {

        get { return _hypothesizedText; }

        set

        {

            _hypothesizedText = value;

            OnPropertyChanged("HypothesizedText");

        }

    }


    private string _confidence;

    public string Confidence

    {

        get { return _confidence; }

        set

        {

            _confidence = value;

            OnPropertyChanged("Confidence");

        }

    }


    // ...
Add the CreateAudioSource method as shown in Listing 7-21. For CreateAudioSource, be aware that AutoGainControlEnabled cannot be set to true as this interferes with speech recognition. It is set to false by default.
Listing 7-21. CreateAudioSource and LaunchAsMTA
private KinectAudioSource CreateAudioSource()

{

    var source = KinectSensor.KinectSensors[0].AudioSource;

    source.AutomaticGainControlEnabled = false;

    source.EchoCancellationMode = EchoCancellationMode.None;

    return source;

}
This takes care of the basics. We next need to set up skeleton tracking in order to track the right hand. Create a field level variable for the current KinectSensor instance called _kinectSensor, as shown in Listing 7-23. Also declare a constant string to specify the recognizer identifier used for speech recognition with Kinect. We will start both the NUI runtime as well as the SpeechRecognitionEngine in the constructor for MainWindow. Additionally, we will create handlers for the NUI runtime skeleton events and set MainWindow's data context to itself.
Listing 7-22. Initialize the Kinect Sensor and the SpeechRecognitionEngine
KinectSensor _kinectSensor;

SpeechRecognitionEngine _sre;

KinectAudioSource _source;


public MainWindow()

{

    InitializeComponent();

    this.DataContext = this;

    this.Unloaded += delegate

    {

        _kinectSensor.SkeletonStream.Disable();

        _sre.RecognizeAsyncCancel();

        _sre.RecognizeAsyncStop();

    };

    this.Loaded += delegate

    {

        _kinectSensor = KinectSensor.KinectSensors[0];

        _kinectSensor.SkeletonStream.Enable(new TransformSmoothParameters());

        _kinectSensor.SkeletonFrameReady += nui_SkeletonFrameReady;

        _kinectSensor.Start();

        StartSpeechRecognition();

    };

}
In the code above, we pass a new TransformSmoothParameters object to the skeleton stream's Enable method in order to remove some of the shakiness that can accompany hand tracking. The nui_SkeletonFrameReady event handler shown below in Listing 7-23 uses skeleton tracking data to find the location of just the joint we are interested in: the right hand. You should already be familiar with other versions of this code from prior chapters. Basically, we iterate through any skeletons the skeleton tracker is currently following. We pull out the vector information for the right hand joint. We then extract the current relative X and Y coordinates of the right hand using SkeletonToDepthImage, and massage these coordinates to match the size of our screen.
void nui_SkeletonFrameReady(object sender, SkeletonFrameReadyEventArgs e)

{

    using (SkeletonFrame skeletonFrame = e.OpenSkeletonFrame())

    {

        if (skeletonFrame == null)

            return;


        var skeletons = new Skeleton[skeletonFrame.SkeletonArrayLength];

        skeletonFrame.CopySkeletonDataTo(skeletons);

        foreach (Skeleton skeletonData in skeletons)

        {

            if (skeletonData.TrackingState == SkeletonTrackingState.Tracked)

            {

                Microsoft.Kinect.SkeletonPoint rightHandVec =

                          skeletonData.Joints[JointType.HandRight].Position;


                Microsoft.Kinect.SkeletonPoint rightHandVec =

                          skeletonDataJoints[JointType.HandRight].Position

                var depthPoint = _kinectSensor.MapSkeletonPointToDepth(rightHandVec

                    , DepthImageFormat.Resolution640x480Fps30);

                HandTop = depthPoint.Y * this.MainStage.ActualHeight/480;

                HandLeft = depthPoint.X * this.MainStage.ActualWidth/640;

            }

        }

    }

}
This is all that is required to have hand tracking in our application. Whenever we set the HandTop and HandLeft properties, the UI is updated and the crosshairs change position.
We have yet to set up speech recognition. The StartSpeechRecognition method must find the correct recognizer for Kinect speech recognition and apply it to the SpeechRecognitionEngine. Listing 7-24 demonstrates how this occurs and also how we connect things up so the KinectAudioSource passes its data to the recognition engine. We add handlers for the SpeechRecognized event, the SpeechHypothesized event, and the SpeechRejected event. The specific values for SetInputToAudioStream are simply boilerplate and not really something to worry about. Please note that while the SpeechRecognitionEngine and the KinectAudioSource are disposable types, we actually need to keep them open for the the lifetime of the application.
Listing 7-24. StartSpeechRecognitionMethod
private void StartSpeechRecognition()

{

    _source = CreateAudioSource();


    Func<RecognizerInfo, bool> matchingFunc = r =>

    {

        string value;

        r.AdditionalInfo.TryGetValue("Kinect", out value);

        return "True".Equals(value, StringComparison.InvariantCultureIgnoreCase)

            && "en-US".Equals(r.Culture.Name, StringComparison.InvariantCultureIgnoreCase);

    };

    RecognizerInfo ri = SpeechRecognitionEngine.InstalledRecognizers()

           .Where(matchingFunc).FirstOrDefault();


    _sre = new SpeechRecognitionEngine(ri.Id);

    CreateGrammars(ri);

    _sre.SpeechRecognized += sre_SpeechRecognized;

    _sre.SpeechHypothesized += sre_SpeechHypothesized;

    _sre.SpeechRecognitionRejected += sre_SpeechRecognitionRejected;


    Stream s = _source.Start();

    _sre.SetInputToAudioStream(s,

                                new SpeechAudioFormatInfo(

                                    EncodingFormat.Pcm, 16000, 16, 1,

                                    32000, 2, null));

    _sre.RecognizeAsync(RecognizeMode.Multiple);

}
To finish Put That There, we still need to fill in the recognition event handlers and also put in grammar logic so the recognition engine knows how to process our commands. The rejected and hypothesized event handlers in Listing 7-25 for the most part just update the labels in our presentation layer and are fairly straightforward. The sre_SpeechRecognized event handler is slightly more complicated in that it is responsible for taking the commands passed to it and figuring out what to do. Additionally, since part of its task is to create GUI objects (in the code below this is shelled out to the InterpretCommand method), we must use the Dispatcher in order to run InterpretCommand back on the main GUI thread.
Listing 7-25. Speech Event Handlers
void sre_SpeechRecognitionRejected(object sender, SpeechRecognitionRejectedEventArgs e)

  {

      HypothesizedText += " Rejected";

      Confidence = Math.Round(e.Result.Confidence, 2).ToString();

  }


  void sre_SpeechHypothesized(object sender, SpeechHypothesizedEventArgs e)

  {

      HypothesizedText = e.Result.Text;

  }


  void sre_SpeechRecognized(object sender, SpeechRecognizedEventArgs e)

  {

      Dispatcher.BeginInvoke(new Action<SpeechRecognizedEventArgs>(InterpretCommand),e);

  }
We now come to the meat of the application: creating our grammar and interpreting it. The purpose of Put That There is to recognize a general phrase that begins with either “put” or “create.” This is followed by an article, which we do not care about. The next word in the command should be a color, followed by a shape. The last word in the command phrase should be “there.” Listing 7-26 shows how we take these rules and create a grammar for it.
First, we create any Choices objects that will need to be used in our command phrase. For Put That There, we need colors and shapes. Additionally, the first word can be either “put” or “create,” so we create a Choices object for them also. We then string our command terms together using the GrammarBuilder class. First, “put” or “create,” then a wildcard because we do not care about the article, then the colors Choices object, then the shapes Choices object, and finally the single word “there.”
We load this grammar into the speech recognition engine. As pointed out above, we also need a way to stop the recognition engine. We create a second grammar with just one command, “Quit,” and load this into the speech recognition engine also.
Listing 7-26. Building a Complex Grammar
private void CreateGrammars(RecognizerInfo ri)

{

    var colors = new Choices();

    colors.Add("cyan");

    colors.Add("yellow");

    colors.Add("magenta");

    colors.Add("blue");

    colors.Add("green");

    colors.Add("red");


    var create = new Choices();

    create.Add("create");

    create.Add("put");


    var shapes = new Choices();

    shapes.Add("circle");

    shapes.Add("triangle");

    shapes.Add("square");

    shapes.Add("diamond");


    var gb = new GrammarBuilder();

    gb.Culture = ri.Culture;

    gb.Append(create);

    gb.AppendWildcard();

    gb.Append(colors);

    gb.Append(shapes);

    gb.Append("there");


    var g = new Grammar(gb);

    _sre.LoadGrammar(g);


    var q = new GrammarBuilder();

    q.Append("quit application");

    var quit = new Grammar(q);


    _sre.LoadGrammar(quit);

}
Once the speech recognition engine determines that it recognizes a phrase, the real work begins. The recognized phrase must be parsed and we must decide what to do with it. The code shown in Listing 7-27 reads through the sequence of word objects passed to it and begins building graphic objects to be placed on the screen.
We first check to see if the command “Quit” was passed to the recognized method. If it was, there is no reason to continue. Generally, however, we are being passed more complex command phrases.
The InterpretCommands method checks the first word to verify that either “create” or “put” was uttered. If for some reason something else is the first word, we throw out the command. If the first word of the phrase is correct, we go on to the third phrase and create a color object based on the term we receive. If the third word is not recognized, the process ends. Otherwise, we proceed to the fourth word and build a shape based on the command word we receive. At this point, we are done with the interpretation process since we needed the fifth word just to make sure the phrase was said correctly. The X and Y coordinates of the current hand position are retrieved and a specified shape of a specified hue is created at that location on the root panel of MainWindow.
Listing 7-27. Interpreting Commands
private void InterpretCommand(SpeechRecognizedEventArgs e)

{

    var result = e.Result;

    Confidence = Math.Round(result.Confidence,2).ToString();


    if (result.Words[0].Text == "quit")

    {

        _isQuit = true;

        return;

    }

    if (result.Words[0].Text == "put" || result.Words[0].Text == "create")

    {

        var colorString = result.Words[2].Text;

        Color color;

        switch (colorString)

        {

            case "cyan": color = Colors.Cyan;

                break;

            case "yellow": color = Colors.Yellow;

                break;

            case "magenta": color = Colors.Magenta;

                break;

            case "blue": color = Colors.Blue;

                break;

            case "green": color = Colors.Green;

                break;

            case "red": color = Colors.Red;

                break;

            default:

                return;

        }


        var shapeString = result.Words[3].Text;

        Shape shape;

        switch (shapeString)

        {

            case "circle":

                shape = new Ellipse();

                shape.Width = 150;

                shape.Height = 150;

                break;

            case "square":

                shape = new Rectangle();

                shape.Width = 150;

                shape.Height = 150;

                break;

            case "triangle":

                var poly = new Polygon();

                poly.Points.Add(new Point(0, 0));

                poly.Points.Add(new Point(150, 0));

                poly.Points.Add(new Point(75, -150));

                shape = poly;

                break;

            case "diamond":

                var poly2 = new Polygon();

                poly2.Points.Add(new Point(0, 0));

                poly2.Points.Add(new Point(75, 150));

                poly2.Points.Add(new Point(150, 0));

                poly2.Points.Add(new Point(75, -150));

                shape = poly2;

                break;

            default:

                return;

        }

        shape.SetValue(Canvas.LeftProperty, HandLeft);

        shape.SetValue(Canvas.TopProperty, HandTop);

        shape.Fill = new SolidColorBrush(color);

        MainStage.Children.Add(shape);

    }

}
In a strange way, this project gets us back to the origins of NUI design. It is a concept that was devised even before mouse devices had become widespread and inaugurated the GUI revolution of the 90s. Both gestural and speech metaphors have been around for a long time both in the movies and in the laboratory. It is a relief to finally get them into people's homes and offices nearly thirty years after Chris Schmandt filmed Put That There. And with luck, there it will stay.
Summary
As with the skeleton tracking capabilities of Kinect, the audio capabilities of Kinect provide powerful tools not previously available to independent developers. In this chapter, you delved into the often-overlooked audio capabilities of the Kinect sensor. You learned how to manipulate the advanced properties of the KinectAudioSource. You also learned how to install and use the appropriate speech recognition libraries to create an audio pipeline that recognizes speech commands.
You built several audio applications demonstrating how to use Kinect's built-in microphone array. You configured the Kinect to implement beamforming and tracked a user walking around the room based only on his voice. You also combined the speech recognition power of Kinect with its skeleton tracking capabilities to create a complex multi-modal interface. Using these applications as a starting point, you will be able to integrate speech commands into your Kinect-based applications to create novel user experiences.