
Chapter 10
Networking
WHAT YOU WILL LEARN IN THIS CHAPTER
- How to connect to the web using HTTP
- How to consume XML web services
- How to consume JSON web services
- How to connect to a Socket server
In Chapter 8, you learned about how your application can talk to the outside world through the use of SMS messaging and e-mails. Another way to communicate with the outside world is through the wireless network available on your Android device. Therefore, in this chapter you will learn how to use the HTTP protocol to talk to web servers so that you can download text and binary data. You will also learn how to parse XML files to extract the relevant parts of an XML document — a technique that is useful if you are accessing web services. Besides XML web services, this chapter also covers JSON (JavaScript Object Notation), which is a lightweight alternative to XML. You will make use of the classes available in the Android SDK to manipulate JSON content.
Finally, this chapter also demonstrates how to write an Android application to connect to servers using TCP sockets. Using sockets programming, you can write sophisticated, interesting networked applications.
CONSUMING WEB SERVICES USING HTTP
One common way to communicate with the outside world is through HTTP. HTTP is no stranger to most people; it is the protocol that drives much of the web’s success. Using the HTTP protocol, you can perform a wide variety of tasks, such as downloading web pages from a web server, downloading binary data, and more.
The following Try It Out creates an Android project so you can use the HTTP protocol to connect to the web to download all sorts of content.
TRY IT OUT: Creating the Base Project for HTTP Connection
codefile Networking.zip available for download at Wrox.com
1. Using Eclipse, create a new Android project and name it Networking.
2. Add the following statement in bold to the AndroidManifest.xml file:
<?xml version="1.0" encoding="utf-8"?>
<manifest xmlns:android="http://schemas.android.com/apk/res/android"
    package="net.learn2develop.Networking"
    android:versionCode="1"
    android:versionName="1.0" >

    <uses-sdk android:minSdkVersion="14" />
    <uses-permission android:name="android.permission.INTERNET"/>

    <application
        android:icon="@drawable/ic_launcher"
        android:label="@string/app_name" >
        <activity
            android:label="@string/app_name"
            android:name=".NetworkingActivity" >
            <intent-filter >
                <action android:name="android.intent.action.MAIN" />

                <category android:name="android.intent.category.LAUNCHER" />
            </intent-filter>
        </activity>
    </application>

</manifest>
3. Import the following packages in the NetworkingActivity.java file:
package net.learn2develop.Networking;

import android.app.Activity;
import android.os.Bundle;
import java.io.IOException;
import java.io.InputStream;
import java.net.HttpURLConnection;
import java.net.URL;
import java.net.URLConnection;
import android.util.Log;
public class NetworkingActivity extends Activity {
    /** Called when the activity is first created. */
    @Override
    public void onCreate(Bundle savedInstanceState) {
        super.onCreate(savedInstanceState);
        setContentView(R.layout.main);
    }
}
4. Define the OpenHttpConnection() method in the NetworkingActivity.java file:
public class NetworkingActivity extends Activity {
    private InputStream OpenHttpConnection(String urlString) throws IOException
    {
        InputStream in = null;
        int response = -1;

        URL url = new URL(urlString);
        URLConnection conn = url.openConnection();

        if (!(conn instanceof HttpURLConnection))
            throw new IOException("Not an HTTP connection");
        try{
            HttpURLConnection httpConn = (HttpURLConnection) conn;
            httpConn.setAllowUserInteraction(false);
            httpConn.setInstanceFollowRedirects(true);
            httpConn.setRequestMethod("GET");
            httpConn.connect();
            response = httpConn.getResponseCode();
            if (response == HttpURLConnection.HTTP_OK) {
                in = httpConn.getInputStream();
            }
        }
        catch (Exception ex)
        {
            Log.d("Networking", ex.getLocalizedMessage());
            throw new IOException("Error connecting");
        }
        return in;
    }

    /** Called when the activity is first created. */
    @Override
    public void onCreate(Bundle savedInstanceState) {
        super.onCreate(savedInstanceState);
        setContentView(R.layout.main);
    }
}
How It Works
Because you are using the HTTP protocol to connect to the web, your application needs the INTERNET permission; hence, the first thing you did was add the permission in the AndroidManifest.xml file.
You then defined the OpenHttpConnection() method, which takes a URL string and returns an InputStream object. Using an InputStream object, you can download the data by reading bytes from the stream object. In this method, you made use of the HttpURLConnection object to open an HTTP connection with a remote URL. You set all the various properties of the connection, such as the request method, and so on:
    HttpURLConnection httpConn = (HttpURLConnection) conn;
            httpConn.setAllowUserInteraction(false);
            httpConn.setInstanceFollowRedirects(true);
            httpConn.setRequestMethod("GET");
After trying to establish a connection with the server, the HTTP response code is returned. If the connection is established (via the response code HTTP_OK), then you proceed to get an InputStream object from the connection:
    httpConn.connect();
            response = httpConn.getResponseCode();
            if (response == HttpURLConnection.HTTP_OK) {
                in = httpConn.getInputStream();
            }
Using the InputStream object, you can then start to download the data from the server.
Downloading Binary Data
A common task you need to perform is downloading binary data from the web. For example, you may want to download an image from a server so that you can display it in your application. The following Try It Out shows how this is done.
TRY IT OUT: Downloading Binary Data
1. Using the same project created earlier, replace the default TextView with the following statements in bold to the main.xml file:
<?xml version="1.0" encoding="utf-8"?>
<LinearLayout xmlns:android="http://schemas.android.com/apk/res/android"
    android:layout_width="fill_parent"
    android:layout_height="fill_parent"
    android:orientation="vertical" >

<ImageView
    android:id="@+id/img"
    android:layout_width="wrap_content"
    android:layout_height="wrap_content"
    android:layout_gravity="center" />

</LinearLayout>
2. Add the following statements in bold to the NetworkingActivity.java file:
import android.widget.ImageView;
import android.graphics.Bitmap;
import android.graphics.BitmapFactory;
import android.os.AsyncTask;

public class NetworkingActivity extends Activity {
    ImageView img;

    private InputStream OpenHttpConnection(String urlString) throws IOException
    {
        InputStream in = null;
        int response = -1;

        URL url = new URL(urlString);
        URLConnection conn = url.openConnection();

        if (!(conn instanceof HttpURLConnection))
            throw new IOException("Not an HTTP connection");
        try{
            HttpURLConnection httpConn = (HttpURLConnection) conn;
            httpConn.setAllowUserInteraction(false);
            httpConn.setInstanceFollowRedirects(true);
            httpConn.setRequestMethod("GET");
            httpConn.connect();
            response = httpConn.getResponseCode();
            if (response == HttpURLConnection.HTTP_OK) {
                in = httpConn.getInputStream();
            }
        }
        catch (Exception ex)
        {
            Log.d("Networking", ex.getLocalizedMessage());
            throw new IOException("Error connecting");
        }
        return in;
    }

    private Bitmap DownloadImage(String URL)
    {
        Bitmap bitmap = null;
        InputStream in = null;
        try {
            in = OpenHttpConnection(URL);
            bitmap = BitmapFactory.decodeStream(in);
            in.close();
        } catch (IOException e1) {
            Log.d("NetworkingActivity", e1.getLocalizedMessage());
        }
        return bitmap;
    }

    private class DownloadImageTask extends AsyncTask<String, Void, Bitmap> {
        protected Bitmap doInBackground(String... urls) {
            return DownloadImage(urls[0]);
        }

        protected void onPostExecute(Bitmap result) {
            ImageView img = (ImageView) findViewById(R.id.img);
            img.setImageBitmap(result);
        }
    }

    /** Called when the activity is first created. */
    @Override
    public void onCreate(Bundle savedInstanceState) {
        super.onCreate(savedInstanceState);
        setContentView(R.layout.main);
        new DownloadImageTask().execute(
            "http://www.mayoff.com/5-01cablecarDCP01934.jpg");
    }
}
3. Press F11 to debug the application on the Android emulator. Figure 10-1 shows the image downloaded from the web and then displayed in the ImageView.

How It Works
The DownloadImage() method takes the URL of the image to download and then opens the connection to the server using the OpenHttpConnection() method that you have defined earlier. Using the InputStream object returned by the connection, the decodeStream() method from the BitmapFactory class is used to download and decode the data into a Bitmap object. The DownloadImage() method returns a Bitmap object.
To download an image and display it on the activity, you call the DownloadImage() method. However, starting with Android 3.0, synchronous operations can no longer be run directly from a UI thread. If you try to call the DownloadImage() method directly in your onCreate() method (as shown in the following code snippet), your application will crash when it is run on a device running Android 3.0 and later:
    /** Called when the activity is first created. */
    @Override
    public void onCreate(Bundle savedInstanceState) {
        super.onCreate(savedInstanceState);
        setContentView(R.layout.main);
        //---download an image---
        //---code will not run in Android 3.0 and beyond---
        Bitmap bitmap =
            DownloadImage("http://www.mayoff.com/5-01cablecarDCP01934.jpg");
        img = (ImageView) findViewById(R.id.img);
        img.setImageBitmap(bitmap);
    }
Because the DownloadImage() method is synchronous — that is, it will not return control until the image is downloaded — calling it directly will freeze the UI of your activity. This is not allowed in Android 3.0 and later; all synchronous code must be wrapped using an AsyncTask class. Using AsyncTask enables you to perform background tasks in a separate thread and then return the result in a UI thread. That way, you can perform background operations without needing to handle complex threading issues.
To call the DownloadImage() method asynchronously, you need to wrap the code in a subclass of the AsyncTask class, as shown here:
    private class DownloadImageTask extends AsyncTask<String, Void, Bitmap> {
        protected Bitmap doInBackground(String... urls) {
            return DownloadImage(urls[0]);
        }
        protected void onPostExecute(Bitmap result) {
            ImageView img = (ImageView) findViewById(R.id.img);
            img.setImageBitmap(result);
        }
    }
Basically, you defined a class (DownloadImageTask) that extends the AsyncTask class. In this case, there are two methods within the DownloadImageTask class: doInBackground() and onPostExecute().
You put all the code that needs to be run asynchronously in the doInBackground() method. When the task is completed, the result is passed back via the onPostExecute() method. In this case, you use the ImageView to display the image downloaded.
RUNNING SYNCHRONOUS OPERATIONS IN A UI THREAD
To be specific, if you set the android:minSdkVersion attribute in your AndroidManifest.xml file to a value of 9 or less and then run your application on an Android 3.0 or later device, your synchronous code will still work in a UI thread (though not recommended). However, if the android:minSdkVersion attribute value is set to 10 or above, your synchronous code will not work in a UI thread.
NOTE Chapter 11 discusses the AsyncTask class in more detail.
To call the DownloadImageTask class, create an instance of it and then call its execute() method, passing it the URL of the image to download:
    @Override
    public void onCreate(Bundle savedInstanceState) {
        super.onCreate(savedInstanceState);
        setContentView(R.layout.main);
        new DownloadImageTask().execute(
            "http://www.mayoff.com/5-01cablecarDCP01934.jpg");
    }
If you want to download a series of images asynchronously, you can modify the DownloadImageTask class as follows:
...
import android.widget.Toast;
...
    private class DownloadImageTask extends AsyncTask
    <String, Bitmap, Long> {
        //---takes in a list of image URLs in String type---
        protected Long doInBackground(String... urls) {
            long imagesCount = 0;
            for (int i = 0; i < urls.length; i++) {
                //---download the image---
                Bitmap imageDownloaded = DownloadImage(urls[i]);
                if (imageDownloaded != null)  {
                    //---increment the image count---
                    imagesCount++;
                    try {
                        //---insert a delay of 3 seconds---
                        Thread.sleep(3000);
                    } catch (InterruptedException e) {
                        e.printStackTrace();
                    }
                    //---return the image downloaded---
                    publishProgress(imageDownloaded);
                }
            }
            //---return the total images downloaded count---
            return imagesCount;
        }

        //---display the image downloaded---
        protected void onProgressUpdate(Bitmap... bitmap) {
            img.setImageBitmap(bitmap[0]);
        }

        //---when all the images have been downloaded---
        protected void onPostExecute(Long imagesDownloaded) {
            Toast.makeText(getBaseContext(),
                  "Total " + imagesDownloaded + " images downloaded" ,
                  Toast.LENGTH_LONG).show();
        }
    }
Note that in this example, the DownloadImageTask class has one more method: onProgressUpdate(). Because the task to be performed inside an AsyncTask class can be lengthy, you call the publishProgress() method to update the progress of the operation. This will trigger the onProgressUpdate() method, which in this case displays the image to be downloaded. The onProgressUpdate() method is executed on the UI thread; hence it is thread-safe to update the ImageView with the bitmap downloaded from the server.
To download a series of images asynchronously in the background, create an instance of the BackgroundTask class and call its execute() method, like this:
    @Override
    public void onCreate(Bundle savedInstanceState) {
        super.onCreate(savedInstanceState);
        setContentView(R.layout.main);

        /* new DownloadImageTask().execute(
            "http://www.mayoff.com/5-01cablecarDCP01934.jpg");
       */

        img = (ImageView) findViewById(R.id.img);
        new DownloadImageTask().execute(
                "http://www.mayoff.com/5-01cablecarDCP01934.jpg",
                "http://www.hartiesinfo.net/greybox/Cable_Car_
                  Hartbeespoort.jpg",
                "http://mcmanuslab.ucsf.edu/sites/default/files/
                  imagepicker/m/mmcmanus/
                  CaliforniaSanFranciscoPaintedLadiesHz.jpg",
                "http://www.fantom-xp.com/wallpapers/63/San_Francisco
                  _-_Sunset.jpg",
                "http://travel.roro44.com/europe/france/
                  Paris_France.jpg",
                "http://wwp.greenwichmeantime.com/time-zone/usa/nevada
                   /las-vegas/hotel/the-strip/paris-las-vegas/paris-
                   las-vegas-hotel.jpg",
                "http://designheaven.files.wordpress.com/2010/04/
                   eiffel_tower_paris_france.jpg");
    }
When you run the preceding code, the images are downloaded in the background and displayed at an interval of three seconds. When the last image has been downloaded, the Toast class displays the total number of images downloaded.
REFERRING TO LOCALHOST FROM YOUR EMULATOR
When working with the Android emulator, you may frequently need to access data hosted on the local web server using localhost. For example, your own web services are likely to be hosted on your local computer during development, and you’ll want to test them on the same development machine you use to write your Android applications. In such cases, you should use the special IP address of 10.0.2.2 (not 127.0.0.1) to refer to the host computer’s loopback interface. From the Android emulator’s perspective, localhost (127.0.0.1) refers to its own loopback interface.
Downloading Text Content
Besides downloading binary data, you can also download plain-text content. For example, you might want to access a web service that returns a string of random quotes. The following Try It Out shows how you can download a string from a web service in your application.
TRY IT OUT: Downloading Plain-Text Content
1. Using the same project created earlier, add the following statements in bold to the NetworkingActivity.java file:
import java.io.InputStreamReader;

    private String DownloadText(String URL)
    {
        int BUFFER_SIZE = 2000;
        InputStream in = null;
        try {
            in = OpenHttpConnection(URL);
        } catch (IOException e) {
            Log.d("Networking", e.getLocalizedMessage());
            return "";
        }

        InputStreamReader isr = new InputStreamReader(in);
        int charRead;
        String str = "";
        char[] inputBuffer = new char[BUFFER_SIZE];
        try {
            while ((charRead = isr.read(inputBuffer))>0) {
                //---convert the chars to a String---
                String readString =
                    String.copyValueOf(inputBuffer, 0, charRead);
                str += readString;
                inputBuffer = new char[BUFFER_SIZE];
            }
            in.close();
        } catch (IOException e) {
            Log.d("Networking", e.getLocalizedMessage());
            return "";
        }
        return str;
    }

    private class DownloadTextTask extends AsyncTask<String, Void, String> {
        protected String doInBackground(String... urls) {
            return DownloadText(urls[0]);
        }

        @Override
        protected void onPostExecute(String result) {
            Toast.makeText(getBaseContext(), result, Toast.LENGTH_LONG).show();
        }
    }

    /** Called when the activity is first created. */
    @Override
    public void onCreate(Bundle savedInstanceState) {
        super.onCreate(savedInstanceState);
        setContentView(R.layout.main);

        //---download text---
        new DownloadTextTask().execute(
           "http://iheartquotes.com/api/v1/random?max_characters=256&max_lines=10");
    }
2. Press F11 to debug the application on the Android emulator. Figure 10-2 shows the random quote downloaded and displayed using the Toast class.

How It Works
The DownloadText() method takes the URL of the text file to download and then returns the string of the text file downloaded. It basically opens an HTTP connection to the server and then uses an InputStreamReader object to read each character from the stream and save it in a String object. As shown in the previous section, you had to create a subclass of the AsyncTask class in order to call the DownloadText() method asynchronously.
Accessing Web Services Using the GET Method
So far, you have learned how to download images and text from the web. The previous section showed how to download some plain text from a server. Very often, you need to download XML files and parse the contents (a good example of this is consuming web services). Therefore, in this section you learn how to connect to a web service using the HTTP GET method. Once the web service returns a result in XML, you extract the relevant parts and display its content using the Toast class.
In this example, you use the web method from http://services.aonaware.com/DictService/DictService.asmx?op=Define. This web method is from a dictionary web service that returns the definition of a given word.
The web method takes a request in the following format:
GET /DictService/DictService.asmx/Define?word=string HTTP/1.1
Host: services.aonaware.com
HTTP/1.1 200 OK
Content-Type: text/xml; charset=utf-8
Content-Length: length
It returns a response in the following format:
<?xml version="1.0" encoding="utf-8"?>
<WordDefinition xmlns="http://services.aonaware.com/webservices/">
  <Word>string</Word>
  <Definitions>
    <Definition>
      <Word>string</Word>
      <Dictionary>
        <Id>string</Id>
        <Name>string</Name>
      </Dictionary>
      <WordDefinition>string</WordDefinition>
    </Definition>
    <Definition>
      <Word>string</Word>
      <Dictionary>
        <Id>string</Id>
        <Name>string</Name>
      </Dictionary>
      <WordDefinition>string</WordDefinition>
    </Definition>
  </Definitions>
</WordDefinition>
Hence, to obtain the definition of a word, you need to establish an HTTP connection to the web method and then parse the XML result that is returned. The following Try It Out shows you how.
TRY IT OUT: Consuming Web Services
1. Using the same project created earlier, add the following statements in bold to the NetworkingActivity.java file:
import javax.xml.parsers.DocumentBuilder;
import javax.xml.parsers.DocumentBuilderFactory;
import javax.xml.parsers.ParserConfigurationException;

import org.w3c.dom.Document;
import org.w3c.dom.Element;
import org.w3c.dom.Node;
import org.w3c.dom.NodeList;

    private String WordDefinition(String word) {
        InputStream in = null;
        String strDefinition = "";
        try {
            in = OpenHttpConnection(
"http://services.aonaware.com/DictService/DictService.asmx/Define?word=" + word);
            Document doc = null;
            DocumentBuilderFactory dbf =
                DocumentBuilderFactory.newInstance();
            DocumentBuilder db;
            try {
                db = dbf.newDocumentBuilder();
                doc = db.parse(in);
            } catch (ParserConfigurationException e) {
                // TODO Auto-generated catch block
                e.printStackTrace();
            } catch (Exception e) {
                // TODO Auto-generated catch block
                e.printStackTrace();
            }
            doc.getDocumentElement().normalize();

            //---retrieve all the <Definition> elements---
            NodeList definitionElements =
                doc.getElementsByTagName("Definition");

            //---iterate through each <Definition> elements---
            for (int i = 0; i < definitionElements.getLength(); i++) {
                Node itemNode = definitionElements.item(i);
                if (itemNode.getNodeType() == Node.ELEMENT_NODE)
                {
                    //---convert the Definition node into an Element---
                    Element definitionElement = (Element) itemNode;

                    //---get all the <WordDefinition> elements under
                    // the <Definition> element---
                    NodeList wordDefinitionElements =
                        (definitionElement).getElementsByTagName(
                        "WordDefinition");

                    strDefinition = "";
                    //---iterate through each <WordDefinition> elements---
                    for (int j = 0; j < wordDefinitionElements.getLength(); j++) {
                        //---convert a <WordDefinition> node into an Element---
                        Element wordDefinitionElement =
                            (Element) wordDefinitionElements.item(j);

                        //---get all the child nodes under the
                        // <WordDefinition> element---
                        NodeList textNodes =
                            ((Node) wordDefinitionElement).getChildNodes();

                        strDefinition +=
                            ((Node) textNodes.item(0)).getNodeValue() + ". n";
                    }

                }
            }
        } catch (IOException e1) {
            Log.d("NetworkingActivity", e1.getLocalizedMessage());
        }
        //---return the definitions of the word---
        return strDefinition;
    }

    private class AccessWebServiceTask extends AsyncTask<String, Void, String> {
        protected String doInBackground(String... urls) {
            return WordDefinition(urls[0]);
        }

        protected void onPostExecute(String result) {
            Toast.makeText(getBaseContext(), result, Toast.LENGTH_LONG).show();
        }
    }

    /** Called when the activity is first created. */
    @Override
    public void onCreate(Bundle savedInstanceState) {
        super.onCreate(savedInstanceState);
        setContentView(R.layout.main);

        //---access a Web Service using GET---
        new AccessWebServiceTask().execute("apple");
    }
2. Press F11 to debug the application on the Android emulator. Figure 10-3 shows the result of the web service call being parsed and then displayed using the Toast class.

How It Works
The WordDefinition() method first opens an HTTP connection to the web service, passing in the word that you are interested in:
    in = OpenHttpConnection(
"http://services.aonaware.com/DictService/DictService.asmx/Define?word=" + word);
It then uses the DocumentBuilderFactory and DocumentBuilder objects to obtain a Document (DOM) object from an XML file (which is the XML result returned by the web service):
    Document doc = null;
            DocumentBuilderFactory dbf =
                DocumentBuilderFactory.newInstance();
            DocumentBuilder db;
            try {
                db = dbf.newDocumentBuilder();
                doc = db.parse(in);
            } catch (ParserConfigurationException e) {
                // TODO Auto-generated catch block
                e.printStackTrace();
            } catch (Exception e) {
                // TODO Auto-generated catch block
                e.printStackTrace();
            }
            doc.getDocumentElement().normalize();
Once the Document object is obtained, you find all the elements with the <Definition> tag:
    //---retrieve all the <Definition> elements---
            NodeList definitionElements =
                doc.getElementsByTagName("Definition");
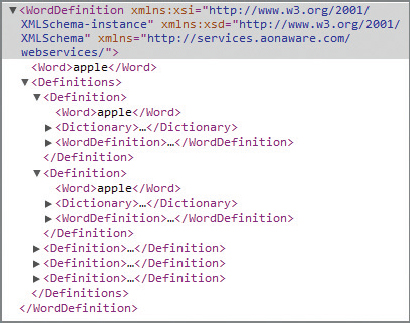
Figure 10-4 shows the structure of the XML document returned by the web service.
Because the definition of a word is contained within the <WordDefinition> element, you then proceed to extract all the definitions:
    //---iterate through each <Definition> elements---
            for (int i = 0; i < definitionElements.getLength(); i++) {
                Node itemNode = definitionElements.item(i);
                if (itemNode.getNodeType() == Node.ELEMENT_NODE)
                {
                    //---convert the Definition node into an Element---
                    Element definitionElement = (Element) itemNode;

                    //---get all the <WordDefinition> elements under
                    // the <Definition> element---
                    NodeList wordDefinitionElements =
                        (definitionElement).getElementsByTagName(
                        "WordDefinition");

                    strDefinition = "";
                    //---iterate through each <WordDefinition> elements---
                    for (int j = 0; j < wordDefinitionElements.getLength(); j++) {
                        //---convert a <WordDefinition> node into an Element---
                        Element wordDefinitionElement =
                            (Element) wordDefinitionElements.item(j);

                        //---get all the child nodes under the
                        // <WordDefinition> element---
                        NodeList textNodes =
                            ((Node) wordDefinitionElement).getChildNodes();

                        strDefinition +=
                            ((Node) textNodes.item(0)).getNodeValue() + ". n";
                    }                }
            }
The preceding code loops through all the <Definition> elements looking for a child element named <WordDefinition>. The text content of the <WordDefinition> element contains the definition of a word, and the definitions of a word are then concatenated and returned by the WordDefinition() method:
        //---return the definitions of the word---
        return strDefinition;
As usual, you need to create a subclass of the AsyncTask class to call the WordDefinition() method asynchronously:
    private class AccessWebServiceTask extends AsyncTask<String, Void, String> {
        protected String doInBackground(String... urls) {
            return WordDefinition(urls[0]);
        }

        protected void onPostExecute(String result) {
            Toast.makeText(getBaseContext(), result, Toast.LENGTH_LONG).show();
        }
    }
Finally, you access the web service asynchronously using the execute() method:
        //---access a Web Service using GET---
codecolormagenta">        new AccessWebServiceTask().execute("apple");
In the previous section, you learned how to consume XML web services by using HTTP to connect to the web server and then obtain the results in XML. You also learned how to use DOM to parse the result of the XML document. However, manipulating XML documents is a computationally expensive operation for mobile devices, for the following reasons:
- XML documents are lengthy. They use tags to embed information, and the size of an XML document can get very big pretty quickly. A large XML document means that your device has to use more bandwidth to download it, which translates into higher cost.
- XML documents are more difficult to process. As shown earlier, you have to use DOM to traverse the tree in order to locate the information you want. In addition, DOM itself has to build the entire document in memory as a tree structure before you can traverse it. This is both memory and CPU intensive.
A much more efficient way to represent information exists in the form of JSON (JavaScript Object Notation). JSON is a lightweight data-interchange format that is easy for humans to read and write. It is also easy for machines to parse and generate. The following lines of code show what a JSON message looks like:
[
    {
        "appeId":"1",
        "survId":"1",
        "location":"",
        "surveyDate":"2008-03 14",
        "surveyTime":"12:19:47",
        "inputUserId":"1",
        "inputTime":"2008-03-14 12:21:51",
        "modifyTime":"0000-00-00 00:00:00"
    },
    {
        "appeId":"2",
        "survId":"32",
        "location":"",
        "surveyDate":"2008-03-14",
        "surveyTime":"22:43:09",
        "inputUserId":"32",
        "inputTime":"2008-03-14 22:43:37",
        "modifyTime":"0000-00-00 00:00:00"
    },
    {
        "appeId":"3",
        "survId":"32",
        "location":"",
        "surveyDate":"2008-03-15",
        "surveyTime":"07:59:33",
        "inputUserId":"32",
        "inputTime":"2008-03-15 08:00:44",
        "modifyTime":"0000-00-00 00:00:00"
    },
    {
        "appeId":"4",
        "survId":"1",
        "location":"",
        "surveyDate":"2008-03-15",
        "surveyTime":"10:45:42",
        "inputUserId":"1",
        "inputTime":"2008-03-15 10:46:04",
        "modifyTime":"0000-00-00 00:00:00"
    },
    {
        "appeId":"5",
        "survId":"32",
        "location":"",
        "surveyDate":"2008-03-16",
        "surveyTime":"08:04:49",
        "inputUserId":"32",
        "inputTime":"2008-03-16 08:05:26",
        "modifyTime":"0000-00-00 00:00:00"
    },
    {
        "appeId":"6",
        "survId":"32",
        "location":"",
        "surveyDate":"2008-03-20",
        "surveyTime":"20:19:01",
        "inputUserId":"32",
        "inputTime":"2008-03-20 20:19:32",
        "modifyTime":"0000-00-00 00:00:00"
    }
]
The preceding block of lines represents a set of data taken for a survey. Note that the information is represented as a collection of key/value pairs; and each key/value pair is grouped into an ordered list of objects. Unlike XML, there are no lengthy tag names, only brackets and braces.
The following Try It Out demonstrates how to process JSON messages easily using the JSONArray and JSONObject classes available in the Android SDK.
TRY IT OUT: Consuming JSON Services
1. Using Eclipse, create a new Android project and name it JSON.
2. Add the following line in bold to the AndroidManifest.xml file:
<?xml version="1.0" encoding="utf-8"?>
<manifest xmlns:android="http://schemas.android.com/apk/res/android"
    package="net.learn2develop.JSON"
    android:versionCode="1"
    android:versionName="1.0" >

    <uses-sdk android:minSdkVersion="14" />
    <uses-permission android:name="android.permission.INTERNET"/>

    <application
        android:icon="@drawable/ic_launcher"
        android:label="@string/app_name" >
        <activity
            android:label="@string/app_name"
            android:name=".JSONActivity" >
            <intent-filter >
                <action android:name="android.intent.action.MAIN" />
                <category android:name="android.intent.category.LAUNCHER" />
            </intent-filter>
        </activity>
    </application>

</manifest>
3. Add the following lines of code in bold to the JSONActivity.java file:
package net.learn2develop.JSON;

import java.io.BufferedReader;
import java.io.IOException;
import java.io.InputStream;
import java.io.InputStreamReader;

import org.apache.http.HttpEntity;
import org.apache.http.HttpResponse;
import org.apache.http.StatusLine;
import org.apache.http.client.ClientProtocolException;
import org.apache.http.client.HttpClient;
import org.apache.http.client.methods.HttpGet;
import org.apache.http.impl.client.DefaultHttpClient;
import org.json.JSONArray;
import org.json.JSONObject;

import android.app.Activity;
import android.os.AsyncTask;
import android.os.Bundle;
import android.util.Log;
import android.widget.Toast;

public class JSONActivity extends Activity  {

    public String readJSONFeed(String URL) {
        StringBuilder stringBuilder = new StringBuilder();
        HttpClient client = new DefaultHttpClient();
        HttpGet httpGet = new HttpGet(URL);
        try {
            HttpResponse response = client.execute(httpGet);
            StatusLine statusLine = response.getStatusLine();
            int statusCode = statusLine.getStatusCode();
            if (statusCode == 200) {
                HttpEntity entity = response.getEntity();
                InputStream content = entity.getContent();
                BufferedReader reader = new BufferedReader(
                        new InputStreamReader(content));
                String line;
                while ((line = reader.readLine()) != null) {
                    stringBuilder.append(line);
                }
            } else {
                Log.e("JSON", "Failed to download file");
            }
        } catch (ClientProtocolException e) {
            e.printStackTrace();
        } catch (IOException e) {
            e.printStackTrace();
        }
        return stringBuilder.toString();
    }

    private class ReadJSONFeedTask extends AsyncTask<String, Void, String> {
        protected String doInBackground(String... urls) {
            return readJSONFeed(urls[0]);
        }

        protected void onPostExecute(String result) {
            try {
                JSONArray jsonArray = new JSONArray(result);
                Log.i("JSON", "Number of surveys in feed: " +
                        jsonArray.length());

               //---print out the content of the json feed---
               for (int i = 0; i < jsonArray.length(); i++) {
                   JSONObject jsonObject = jsonArray.getJSONObject(i);
                   Toast.makeText(getBaseContext(), jsonObject.getString("appeId") +
                           " - " + jsonObject.getString("inputTime"),
                            Toast.LENGTH_SHORT).show();
                }
            } catch (Exception e) {
                e.printStackTrace();
            }
        }
    }

    /** Called when the activity is first created. */
    @Override
    public void onCreate(Bundle savedInstanceState) {
        super.onCreate(savedInstanceState);
        setContentView(R.layout.main);
        new ReadJSONFeedTask().execute(
            "http://extjs.org.cn/extjs/examples/grid/survey.html");
    }
}
4. Press F11 to debug the application on the Android emulator. You will see the Toast class appear a couple of times, displaying the information (see Figure 10-5).

How It Works
The first thing you did in this project was define the readJSONFeed() method:
    public String readJSONFeed(String URL) {
        StringBuilder stringBuilder = new StringBuilder();
        HttpClient client = new DefaultHttpClient();
        HttpGet httpGet = new HttpGet(URL);
        try {
            HttpResponse response = client.execute(httpGet);
            StatusLine statusLine = response.getStatusLine();
            int statusCode = statusLine.getStatusCode();
            if (statusCode == 200) {
                HttpEntity entity = response.getEntity();
                InputStream content = entity.getContent();
                BufferedReader reader = new BufferedReader(
                        new InputStreamReader(content));
                String line;
                while ((line = reader.readLine()) != null) {
                    stringBuilder.append(line);
                }
            } else {
                Log.e("JSON", "Failed to download file");
            }
        } catch (ClientProtocolException e) {
            e.printStackTrace();
        } catch (IOException e) {
            e.printStackTrace();
        }
        return stringBuilder.toString();
    }
This method simply connects to the specified URL and then reads the response from the web server. It returns a string as the result.
To call the readJSONFeed() method asynchronously, you created a subclass of the AsyncTask class:
    private class ReadJSONFeedTask extends AsyncTask<String, Void, String> {
        protected String doInBackground(String... urls) {
            return readJSONFeed(urls[0]);
        }

        protected void onPostExecute(String result) {
            try {
                JSONArray jsonArray = new JSONArray(result);
                Log.i("JSON", "Number of surveys in feed: " +
                        jsonArray.length());

                //---print out the content of the json feed---
                for (int i = 0; i < jsonArray.length(); i++) {
                    JSONObject jsonObject = jsonArray.getJSONObject(i);
                    Toast.makeText(getBaseContext(), jsonObject.getString("appeId") +
                            " - " + jsonObject.getString("inputTime"),
                            Toast.LENGTH_SHORT).show();
                }
            } catch (Exception e) {
                e.printStackTrace();
            }
        }
    }
You called the readJSONFeed() method in the doInBackground() method, and the JSON string that you have fetched is passed in through the onPostExecute() method. The JSON string used in this example (and as illustrated earlier) is from http://extjs.org.cn/extjs/examples/grid/survey.html.
To obtain the list of objects in the JSON string, you used the JSONArray class, passing it the JSON feed as the constructor for the class:
    JSONArray jsonArray = new JSONArray(result);
            Log.i("JSON", "Number of surveys in feed: " +
                    jsonArray.length());
The length() method returns the number of objects in the jsonArray object. With the list of objects stored in the jsonArray object, you iterated through it to obtain each object using the getJSONObject() method:
    //---print out the content of the json feed---
            for (int i = 0; i < jsonArray.length(); i++) {
                JSONObject jsonObject = jsonArray.getJSONObject(i);

                Toast.makeText(this, jsonObject.getString("appeId") +
                        " - " + jsonObject.getString("inputTime"),
                        Toast.LENGTH_SHORT).show();
            }
The getJSONObject() method returns an object of type JSONObject. To obtain the value of the key/value pair stored inside the object, you used the getString() method (you can also use the getInt(), getLong(), and getBoolean() methods for other data types).
Finally, you accessed the JSON feed asynchronously using the execute() method:
codecolormagenta">        new ReadJSONFeedTask().execute(
            "http://extjs.org.cn/extjs/examples/grid/survey.html");
This example showed how you can consume a JSON service and quickly parse its result. A much more interesting example is to use a real-life scenario: Twitter. The following changes make the application fetch my latest tweets from Twitter and then display the tweets in the Toast class (see Figure 10-6):

    private class ReadJSONFeedTask extends AsyncTask<String, Void, String> {
        protected String doInBackground(String... urls) {
            return readJSONFeed(urls[0]);
        }

        protected void onPostExecute(String result) {
            try {
                JSONArray jsonArray = new JSONArray(result);
                Log.i("JSON", "Number of surveys in feed: " +
                        jsonArray.length());

                //---print out the content of the json feed---
                for (int i = 0; i < jsonArray.length(); i++) {
                    JSONObject jsonObject = jsonArray.getJSONObject(i);
                    /*
                    Toast.makeText(getBaseContext(), jsonObject.getString("appeId") +
                            " - " + jsonObject.getString("inputTime"),
                            Toast.LENGTH_SHORT).show();
                    */

                    Toast.makeText(getBaseContext(), jsonObject.getString("text") +
                            " - " + jsonObject.getString("created_at"),
                            Toast.LENGTH_SHORT).show();
                }
            } catch (Exception e) {
                e.printStackTrace();
            }
        }
    }

    /** Called when the activity is first created. */
    @Override
    public void onCreate(Bundle savedInstanceState) {
        super.onCreate(savedInstanceState);
        setContentView(R.layout.main);
        /*
        new ReadJSONFeedTask().execute(
            "http://extjs.org.cn/extjs/examples/grid/survey.html");
        */
        new ReadJSONFeedTask().execute(
            "https://twitter.com/statuses/user_timeline/weimenglee.json");
    }
So far, you have seen the use of HTTP to consume XML and JSON web services. While most web services use HTTP for communication, they inherently suffer from one huge disadvantage: They are stateless. When you connect to a web service using HTTP, every connection is treated as a new connection — the web server does not maintain a persistent connection with the clients.
Consider a scenario in which your application connects to a web service that books cinema seats. When seats are booked on the server by a client, all the other clients are not aware of this until they connect to the web service again to obtain the new seat allocations. This constant polling by the clients incurs unnecessary bandwidth and makes your application inefficient. A much better solution is to have the server maintain individual connections to each client, and send a message to each one whenever seats are booked by another client.
If you want your application to maintain a persistent connection to the server and be notified by the server whenever changes occur, you need to use a programming technique known as sockets programming. Sockets programming is a technique through which you use to establish a connection between a client and a server. The following Try It Out demonstrates how you can build an Android chat client application that connects to a socket server. Multiple applications can connect to the server and chat at the same time.
TRY IT OUT: Connecting to a Socket Server
1. Using Eclipse, create a new Android project and name it Sockets.
2. Add the following line in bold to the AndroidManifest.xml file:
<?xml version="1.0" encoding="utf-8"?>
<manifest xmlns:android="http://schemas.android.com/apk/res/android"
    package="net.learn2develop.Sockets"
    android:versionCode="1"
    android:versionName="1.0" >

    <uses-sdk android:minSdkVersion="14" />
    <uses-permission android:name="android.permission.INTERNET"/>

    <application
        android:icon="@drawable/ic_launcher"
        android:label="@string/app_name" >
        <activity
            android:label="@string/app_name"
            android:name=".SocketsActivity" >
            <intent-filter >
                <action android:name="android.intent.action.MAIN" />

                <category android:name="android.intent.category.LAUNCHER" />
            </intent-filter>
        </activity>
    </application>

</manifest>
3. Add the following lines in bold to the main.xml file, replacing the TextView:
<?xml version="1.0" encoding="utf-8"?>
<LinearLayout xmlns:android="http://schemas.android.com/apk/res/android"
    android:layout_width="fill_parent"
    android:layout_height="fill_parent"
    android:orientation="vertical" >

<EditText
    android:id="@+id/txtMessage"
    android:layout_width="fill_parent"
    android:layout_height="wrap_content" />

<Button
    android:layout_width="fill_parent"
    android:layout_height="wrap_content"
    android:text="Send Message"
    android:onClick="onClickSend"/>

<TextView
    android:id="@+id/txtMessagesReceived"
    android:layout_width="fill_parent"
    android:layout_height="200dp"
    android:scrollbars = "vertical" />

</LinearLayout>
4. Add a new Java Class file to the package and name it CommsThread. Populate the CommsThread.java file as follows:
package net.learn2develop.Sockets;

import java.io.IOException;
import java.io.InputStream;
import java.io.OutputStream;
import java.net.Socket;
import android.util.Log;

public class CommsThread extends Thread {
    private final Socket socket;
    private final InputStream inputStream;
    private final OutputStream outputStream;

    public CommsThread(Socket sock) {
        socket = sock;
        InputStream tmpIn = null;
        OutputStream tmpOut = null;
        try {
            //---creates the inputstream and outputstream objects
            // for reading and writing through the sockets---
            tmpIn = socket.getInputStream();
            tmpOut = socket.getOutputStream();
        } catch (IOException e) {
            Log.d("SocketChat", e.getLocalizedMessage());
        }
        inputStream = tmpIn;
        outputStream = tmpOut;
    }

    public void run() {
        //---buffer store for the stream---
        byte[] buffer = new byte[1024];

        //---bytes returned from read()---
        int bytes;

        //---keep listening to the InputStream until an
        // exception occurs---
        while (true) {
            try {
                //---read from the inputStream---
                bytes = inputStream.read(buffer);

                //---update the main activity UI---
                SocketsActivity.UIupdater.obtainMessage(
                    0,bytes, -1, buffer).sendToTarget();
            } catch (IOException e) {
                break;
            }
        }
    }

    //---call this from the main activity to
    // send data to the remote device---
    public void write(byte[] bytes) {
        try {
            outputStream.write(bytes);
        } catch (IOException e) { }
    }

    //---call this from the main activity to
    // shutdown the connection---
    public void cancel() {
        try {
            socket.close();
        } catch (IOException e) { }
    }
}
5. In the SocketsActivity.java file, add the following lines in bold:
package net.learn2develop.Sockets;

import java.io.IOException;
import java.net.InetAddress;
import java.net.Socket;
import java.net.UnknownHostException;

import android.app.Activity;
import android.os.AsyncTask;
import android.os.Bundle;
import android.os.Handler;
import android.os.Message;
import android.view.View;
import android.widget.EditText;
import android.widget.TextView;

import android.util.Log;

public class SocketsActivity extends Activity {
    static final String NICKNAME = "Wei-Meng";
    InetAddress serverAddress;
    Socket socket;

    //---all the Views---
    static TextView txtMessagesReceived;
    EditText txtMessage;

    //---thread for communicating on the socket---
    CommsThread commsThread;

    //---used for updating the UI on the main activity---
    static Handler UIupdater = new Handler() {
        @Override
        public void handleMessage(Message msg) {
            int numOfBytesReceived = msg.arg1;
            byte[] buffer = (byte[]) msg.obj;

            //---convert the entire byte array to string---
            String strReceived = new String(buffer);

            //---extract only the actual string received---
            strReceived = strReceived.substring(
                    0, numOfBytesReceived);

            //---display the text received on the TextView---
            txtMessagesReceived.setText(
                    txtMessagesReceived.getText().toString() +
                    strReceived);
        }
    };

    private class CreateCommThreadTask extends AsyncTask
    <Void, Integer, Void> {
        @Override
        protected Void doInBackground(Void... params) {
            try {
                //---create a socket---
                serverAddress =
                    InetAddress.getByName("192.168.1.142");
                    //--remember to change the IP address above to match your own--
                socket = new Socket(serverAddress, 500);
                commsThread = new CommsThread(socket);
                commsThread.start();
                //---sign in for the user; sends the nick name---
                sendToServer(NICKNAME);
            } catch (UnknownHostException e) {
                Log.d("Sockets", e.getLocalizedMessage());
            } catch (IOException e) {
                Log.d("Sockets", e.getLocalizedMessage());
            }
            return null;
        }
    }

    private class WriteToServerTask extends AsyncTask
    <byte[], Void, Void> {
        protected Void doInBackground(byte[]...data) {
            commsThread.write(data[0]);
            return null;
        }
    }

    private class CloseSocketTask extends AsyncTask
    <Void, Void, Void> {
        @Override
        protected Void doInBackground(Void... params) {
            try {
                socket.close();
            } catch (IOException e) {
                Log.d("Sockets", e.getLocalizedMessage());
            }
            return null;
        }
    }

    /** Called when the activity is first created. */
    @Override
    public void onCreate(Bundle savedInstanceState) {
        super.onCreate(savedInstanceState);
        setContentView(R.layout.main);

        //---get the views---
        txtMessage = (EditText) findViewById(R.id.txtMessage);
        txtMessagesReceived = (TextView)
                findViewById(R.id.txtMessagesReceived);
    }

    public void onClickSend(View view) {
        //---send the message to the server---
        sendToServer(txtMessage.getText().toString());
    }

    private void sendToServer(String message) {
        byte[] theByteArray =
                message.getBytes();
        new WriteToServerTask().execute(theByteArray);
    }

    @Override
    public void onResume() {
        super.onResume();
        new CreateCommThreadTask().execute();
    }

    @Override
    public void onPause() {
        super.onPause();
        new CloseSocketTask().execute();
    }
}
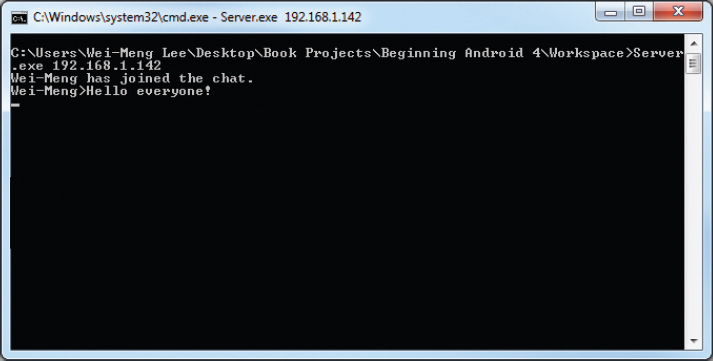
6. For testing, you will be using a socket server application that I have written (you can obtain this application through the source code download for this book at wrox.com). This application is a multi-user console application (for Windows) that simply listens at port 500 of the local computer and then broadcasts all the messages it receives to all the other clients connected to it. To run the server, open a Command window in Windows and type in the following command: C:>Server.exe Your_IP_Address. For example, if your computer had an IP address of 192.168.1.142, then you would enter the following:
C:>Server.exe 192.168.1.142
7. Before you deploy the application onto a real device, ensure that the device is connected to the same network as your computer running the server described in the previous step. In a common setup, your computer is connected to the wireless router (either wired or wirelessly) and your device is connected wirelessly to the same wireless router. Once this is done, press F11 to deploy the application onto the Android device.
8. Type a message and tap the Send Message button (see Figure 10-7).

9. You will be able to see the message received by the server, as shown in Figure 10-8.
How It Works
To handle the intricacies of sockets communication, you created a separate class and called it the CommsThread (for communication thread). This class extends the Thread class so that all the sockets communication can be performed on a different thread, separate from the main UI thread:
public class CommsThread extends Thread {
}
Within this class, you declared three objects:
    private final Socket socket;
    private final InputStream inputStream;
    private final OutputStream outputStream;
The first is a Socket object, which provides a client-side TCP socket. The InputStream object helps to read data from the socket connection. The OutputStream object helps to write data to the socket connection.
The constructor for the CommsThread class takes in a Socket instance and then tries to obtain an InputStream and OutputStream objects from the socket connection:
    public CommsThread(Socket sock) {
        socket = sock;
        InputStream tmpIn = null;
        OutputStream tmpOut = null;
        try {
            //---creates the inputstream and outputstream objects
            // for reading and writing through the sockets---
            tmpIn = socket.getInputStream();
            tmpOut = socket.getOutputStream();
        } catch (IOException e) {
            Log.d("SocketChat", e.getLocalizedMessage());
        }
        inputStream = tmpIn;
        outputStream = tmpOut;
    }
The run() method (which is called when you call the start() method of this thread) keeps listening for incoming data by reading perpetually using the InputStream object. When data is received, it updates the main activity’s UI by passing it a message containing the data received:
    public void run() {
        //---buffer store for the stream---
        byte[] buffer = new byte[1024];

        //---bytes returned from read()---
        int bytes;

        //---keep listening to the InputStream until an
        // exception occurs---
        while (true) {
            try {
                //---read from the inputStream---
                bytes = inputStream.read(buffer);

                //---update the main activity UI---
                SocketsActivity.UIupdater.obtainMessage(
                    0,bytes, -1, buffer).sendToTarget();
            } catch (IOException e) {
                break;
            }
        }
    }
The write() method helps to write data to the socket connection:
    //---call this from the main activity to
    // send data to the remote device---
    public void write(byte[] bytes) {
        try {
            outputStream.write(bytes);
        } catch (IOException e) { }
    }
Finally, the cancel() method closes the socket connection:
    //---call this from the main activity to
    // shutdown the connection---
    public void cancel() {
        try {
            socket.close();
        } catch (IOException e) { }
    }
In the SocketsActivity.java file, you created three subclasses that extended the AsyncTask class:
    private class CreateCommThreadTask extends AsyncTask
    <Void, Integer, Void> {
        @Override
        protected Void doInBackground(Void... params) {
            try {
                //---create a socket---
                serverAddress =
                    InetAddress.getByName("192.168.1.142");
                socket = new Socket(serverAddress, 500);
                commsThread = new CommsThread(socket);
                commsThread.start();
                //---sign in for the user; sends the nick name---
                sendToServer(NICKNAME);
            } catch (UnknownHostException e) {
                Log.d("Sockets", e.getLocalizedMessage());
            } catch (IOException e) {
                Log.d("Sockets", e.getLocalizedMessage());
            }
            return null;
        }
    }

    private class WriteToServerTask extends AsyncTask
    <byte[], Void, Void> {
        protected Void doInBackground(byte[]...data) {
            commsThread.write(data[0]);
            return null;
        }
    }

    private class CloseSocketTask extends AsyncTask
    <Void, Void, Void> {
        @Override
        protected Void doInBackground(Void... params) {
            try {
                socket.close();
            } catch (IOException e) {
                Log.d("Sockets", e.getLocalizedMessage());
            }
            return null;
        }
    }
The CreateCommThreadTask class asynchronously creates a socket connection with the server. For the socket server, the first string sent by the client after the connection is established will be treated as the nickname for the client. Hence, after the socket connection is started, you immediately send a message to the server containing the nickname you want to use for your client:
        //---sign in for the user; sends the nick name---
                sendToServer(NICKNAME);
The WriteToServerTask class enables you to send data to the server asynchronously, while the CloseSocketTask class closes a socket connection.
The sendToServer() method takes in a String argument and converts it into a byte array. It then calls the execute() method of the WriteToServerTask class to send the data to the server asynchronously:
    private void sendToServer(String message) {
        byte[] theByteArray =
                message.getBytes();
        new WriteToServerTask().execute(theByteArray);
    }
Finally, when the activity is paused, you close the socket connection; and when it is resumed, you establish the connection again:
    @Override
    public void onPause() {
        super.onPause();
        new CloseSocketTask().execute();
    }

    @Override
    public void onResume() {
        super.onResume();
        new CreateCommThreadTask().execute();
    }
In this chapter, you learned how your application can connect with the outside world through the use of the HTTP protocol. Using the HTTP protocol, you can download various types of data from web servers. One good application of this is to talk to web services, whereby you need to parse XML files. In addition to XML web services, you also saw how to consume JSON services, which are more lightweight than XML web services. Finally, you saw an alternative to HTTP: using sockets for communication. Sockets enable your application to remain connected to a server so that it can receive data as and when it becomes available. A very important lesson learned in this chapter is that all synchronous operations must be encapsulated using the AsyncTask class; otherwise, your application will not work on devices running Honeycomb or later.
EXERCISES
1. Name the permissions you need to declare in your AndroidManifest.xml file for an HTTP connection.
2. Name the classes used for dealing with JSON messages.
3. Name the class for performing background asynchronous tasks.
Answers to the exercises can be found in Appendix C.
• WHAT YOU LEARNED IN THIS CHAPTER
| TOPIC | KEY CONCEPTS |
| Establishing an HTTP connection | Use the HttpURLConnection class. |
| Accessing XML web services | Use the Document, DocumentBuilderFactory, and DocumentBuilder classes to parse the XML result returned by the web service. |
| Dealing with JSON messages | Use the JSONArray and JSONObject classes. |
| Sockets programming | Use the Socket class to establish a TCP connection. Use the InputStream and OutputStream objects for receiving and sending data, respectively. |
| The three methods in an AsyncTask class | The three methods are doInBackground(), onProgressUpdate(), and onPostExecute(). |