Chapter 6: Enriching Data Using the Azure ML AutoML Regression Model
In this chapter, we will cover how to train and enrich your data using a no-code, UI-based machine learning approach with Synapse Studio. We will learn how to configure and use an AutoML and cloud-based service of Azure ML to build your machine learning model with ease. Using AutoML, you will be able to develop a highly scalable, efficient, and robust model with a code-free experience. You will learn how to connect to an existing data source and train the model without writing a single line of code, using machine learning techniques within Synapse Studio.
You will also learn something very interesting – how to integrate Azure Cognitive Services so that you can bring the power of AI along with predictive analytics.
Apart from this, you will also get to learn how to use scalable machine learning models using SparkML and Machine Learning Library (MLlib). The Synapse runtime consists of many open source libraries, which you can leverage to build the Azure Machine Learning SDK.
We will cover the following recipes:
- Training a model using AutoML in Synapse
- Building a regression model from Azure Machine Learning in Synapse Studio
- Modeling and scoring using SQL pools
- An overview of Spark MLlib and Azure Synapse
- Integrating AI and Cognitive Service
Training a model using AutoML in Synapse
Azure Synapse Studio gives you the flexibility to develop a machine learning model on top of your dataset. In this recipe, you will learn how you can use the AutoML feature to train your model on the existing Spark tables. You can select the Spark table that you want to train the dataset on with the code-free experience of machine learning models using AutoML.
We will be using the regression model in this recipe. However, it is completely dependent on the problem that you are trying to solve, and you can choose from models including regression, classification, or Time Series Insights to fit your need.
Getting ready
We will be using the same Spark tables that we created in Chapter 2, Creating Robust Data Pipelines and Data Transformation.
We will need to do some setup to prepare for this recipe:
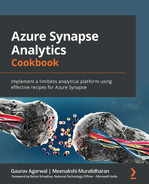
- We need to do this to get ready for the next steps. For more on how to create the Azure Machine Learning workspace, you can refer to https://docs.microsoft.com/en-us/azure/machine-learning/quickstart-create-resources:
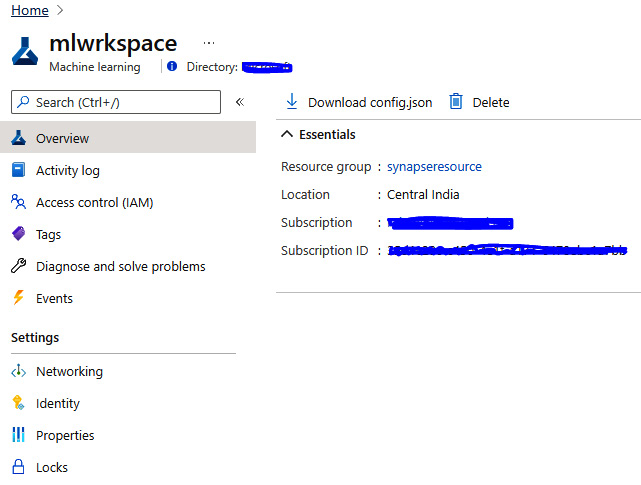
Figure 6.1 – The Azure Machine Learning workspace
- Make sure you have created the Azure Machine Learning linked service in the Azure Synapse workspace:
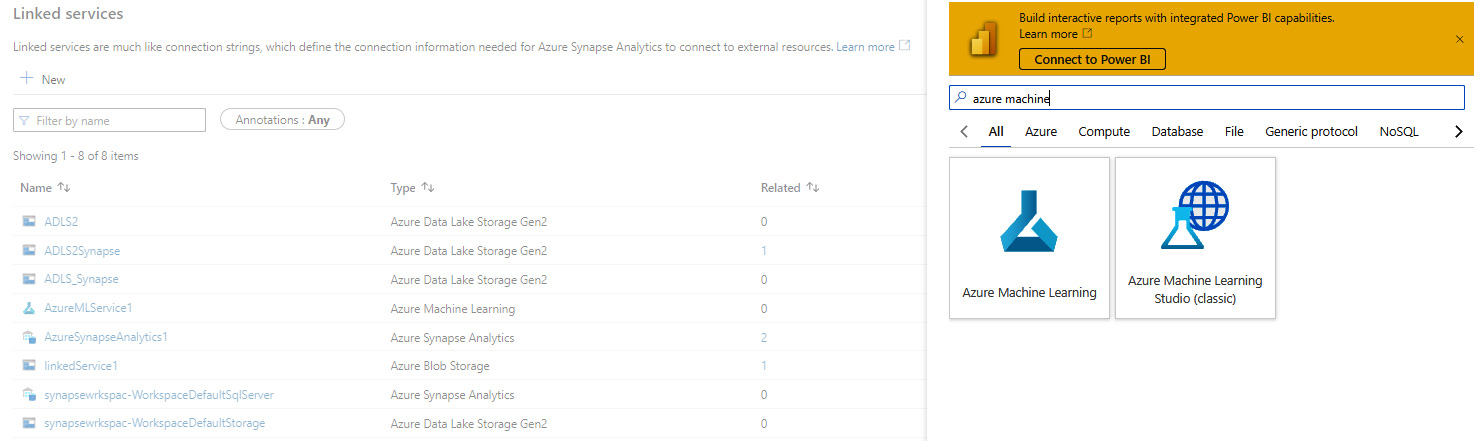
Figure 6.2 – Select Azure Machine Learning to link the service
- Ensure that you have provided the right permission to the Azure Synapse workspace, choosing either the Managed Identity or Service Principal authentication method:
- If you have set the authentication method as Managed Identity, make sure that you have provided the Managed Service Identity (MSI) role access control in the Synapse workspace to the Machine Learning workspace.
- If you have set the authentication method as Service Principal, you need to follow the standard procedure of app registration and role assignment for the Azure Machine Learning workspace:

Figure 6.3 – The Azure Machine Learning linked service
How to do it…
Let's begin this recipe and see how we can create the AutoML model with Azure Synapse Studio. We will be leveraging the existing Spark table to build the Azure Machine Learning model using AutoML:
- Create a new machine learning model under the Data tab by selecting the default (Spark) database and then Train a new model, as shown in Figure 6.4:
Figure 6.4 – Create a new machine learning model
- You now get to choose an automated machine learning model – Classification, Regression, or Time series forecasting. For our recipe, we will be choosing Regression, as shown in Figure 6.5:
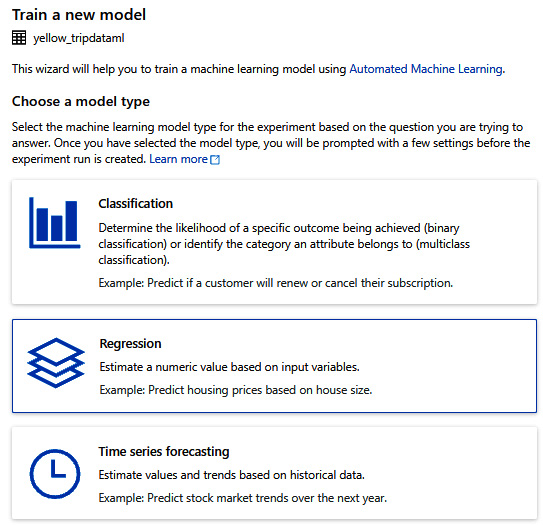
Figure 6.5 – Choosing an automated ML model
You can now configure the experiment-related parameters in the UI. Make sure you set Target column as an integer; otherwise, you will not be able to create the experiment:

Figure 6.6 – Configure the experiment
- Choose the primary metric. The model will estimate a numeric value based on the input variable you provide. Make sure you have set the Open Neural Network Exchange (ONNX) model compatibility to Enable so that you can call the trained model for scoring in a Synapse Spark pool. Click Create run to submit the experiment:

Figure 6.7 – The model variable input
How it works…
The AutoML run will be executed in the Azure Machine Learning workspace once you have submitted the experiment for execution. You can monitor the model execution from the Azure Machine Learning portal:

Figure 6.8 – The AutoML run started
The model training will be leveraging the existing Spark pool that you have created in Synapse Analytics as part of the Spark compute. However, for monitoring the Automated ML model training, you can go directly to the Azure Machine Learning portal to check the experiment execution and monitor it from there:

Figure 6.9 – View the experiment status in the Azure Machine Learning portal
You should be able to see all the child runs and their statuses from the Azure Machine Learning portal, along with other details such as the run name, the submitted time, and the run duration, as shown in Figure 6.10:
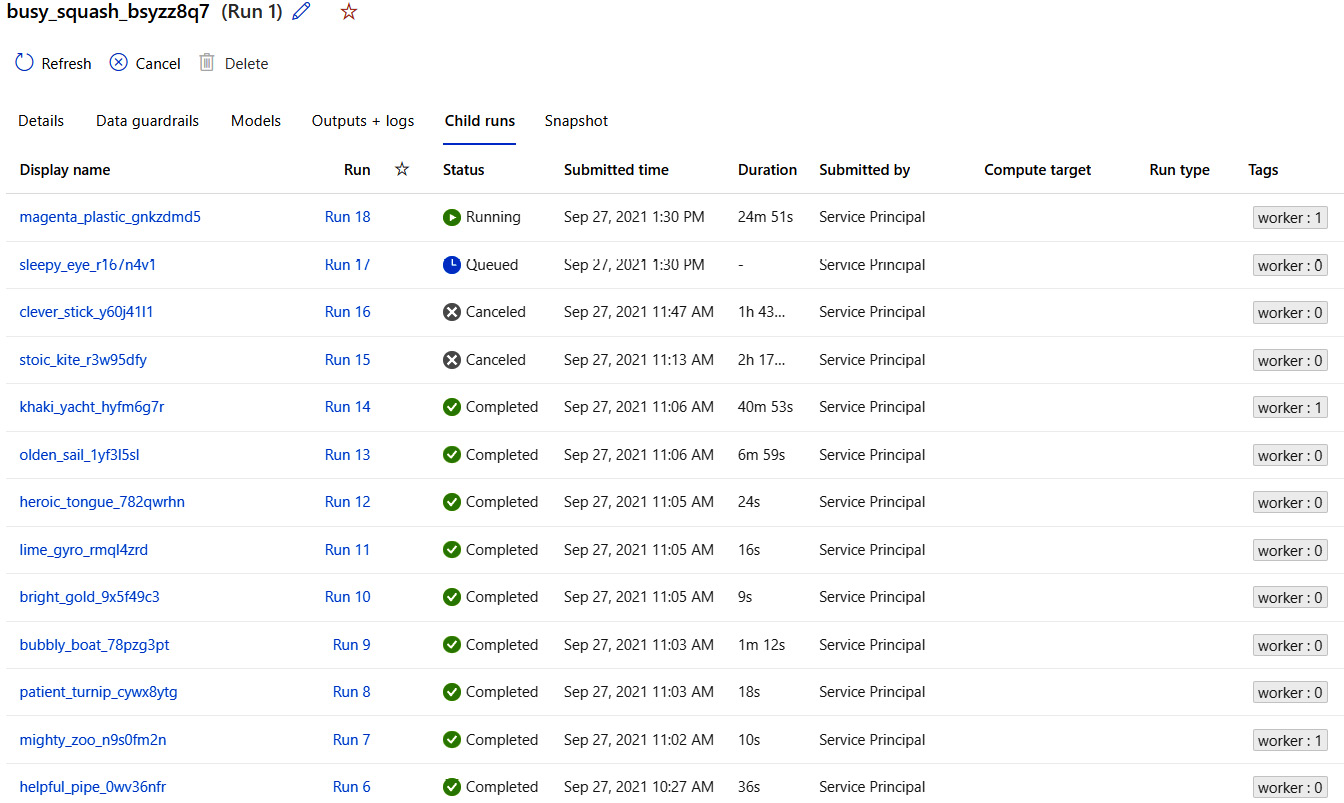
Figure 6.10 – The model training status run view
Building a regression model from Azure Machine Learning in Synapse Studio
Let's now look at how you can build a regression model with Azure Synapse Studio using a Jupyter notebook and then deploy the same on the Azure Machine Learning workspace. In the previous recipe, we saw how we can build and train a machine learning model with code-less experience.
It's time to explore how we can build the regression model with Synapse Studio using the notebook experience and deploy the Studio on the Azure Machine Learning workspace.
We will be leveraging the same Spark pool to build and train the model and deploy it from the Azure Synapse workspace to the Azure Machine Learning workspace, which is linked to Synapse.
We will perform this within the same notebook experience.
Getting ready
Make sure the following have been completed before you begin:
- The Azure Machine Learning workspace in the Azure Machine Learning service in Azure, as we did in the Training a model using AutoML in Synapse recipe.
- You will need to create the Azure Machine Learning linked service in the Azure Synapse workspace if not created already. For more details on how to create an Azure Machine Learning linked service, refer to this link: https://github.com/MicrosoftDocs/azure-docs/blob/main/articles/synapse-analytics/machine-learning/quickstart-integrate-azure-machine-learning.md.
- Ensure that you have provided the right permission to the Azure Synapse workspace, choosing either Managed Identity or Service Principal:
- If you have set the authentication method as Managed Identity, make sure you have provided the MSI role access control in the Synapse workspace to the Azure Machine Learning workspace.
- If you have set the authentication method as Service Principal, you need to follow the standard procedure of app registration and role assignment for the Azure Machine Learning workspace.
How to do it…
Let's get back to the same Synapse workspace, and under Develop, create a new notebook with the name AMLSparkNotebook:
- Import azureml.core, which includes the core package, classes, and module for Azure Machine Learning:
import azureml.core
from azureml.core import Experiment, Workspace, Dataset, Datastore
from azureml.train.automl import AutoMLConfig
from notebookutils import mssparkutils
from azureml.data.dataset_factory import TabularDatasetFactory
The notebook view is shown in Figure 6.11:
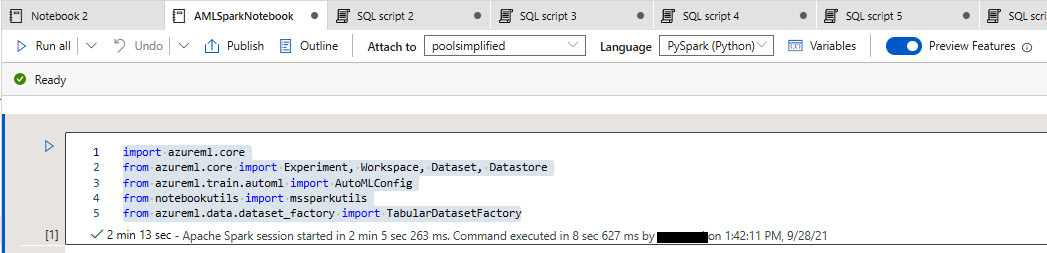
Figure 6.11 – The azureml.core import
- Link the Azure Machine Learning service using the linkedService_name function and define the experiment name and workspace. This will take the Azure Machine Learning workspace, which you have linked earlier, as the parameter. You can refer to the following code:
linkedService_name = "AzureMLService"
experiment_name = "synapsewrkspac-mybookexperiement"
ws = mssparkutils.azureML.getWorkspace(linkedService_name)
experiment = Experiment(ws, experiment_name)
Figure 6.12 shows the notebook:
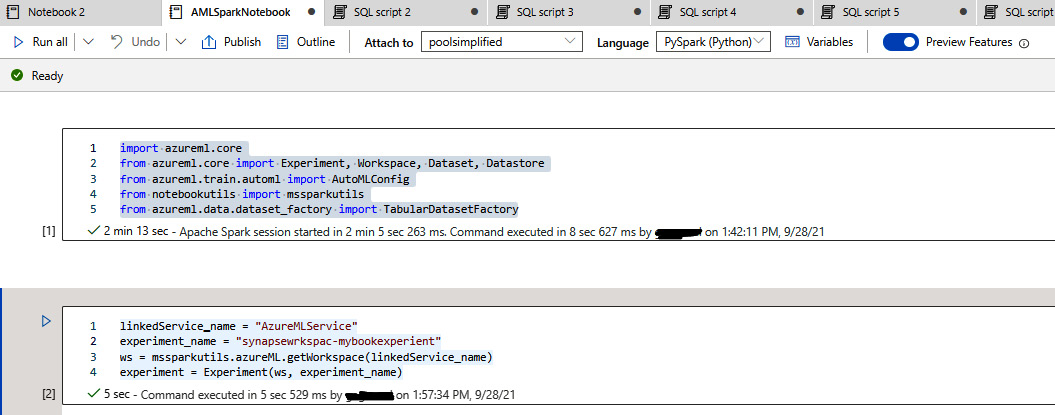
Figure 6.12 – Defining the experiment
- Define the dataset and specify the Spark table that you want to use to build the regression model and define the dataframe. Finally, the dataset will consist of the dataframe, datastore, and experiment name parameters:
df = spark.sql("SELECT * FROM default.yellow_tripdataml")
datastore = Datastore.get_default(ws)
dataset = TabularDatasetFactory.register_spark_dataframe(df, datastore, name = experiment_name + "-dataset")
Please refer to Figure 6.13 for dataset definition:

Figure 6.13 – Defining the dataset
- Define the AutoML configuration for your experiment. This will actually define what model you want to apply and the primary metric you wanted to use. Please make sure that you set enable_onnx_compatible_model as True so that you can call this model with the Synapse workspace for the SQL pool:
automl_config = AutoMLConfig(spark_context = sc,
task = "regression",
training_data = dataset,
label_column_name = "fare_amount",
primary_metric = "spearman_correlation",
experiment_timeout_hours = 1,
max_concurrent_iterations = 1,
enable_onnx_compatible_models = True)
You can refer to Figure 6.14 to understand how to define the automl configuration:
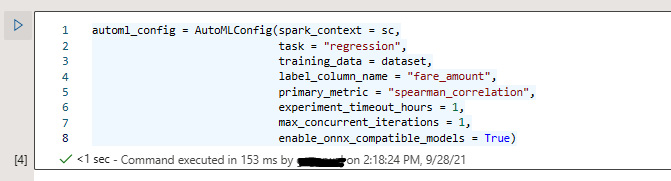
Figure 6.14 – The AutoML configuration
- You can now submit and run the experiment:
run = experiment.submit(automl_config)
displayHTML("<a href={} target='_blank'>Your experiment in Azure Machine Learning portal: {}</a>".format(run.get_portal_url(), run.id))
After you submit the Spark job, you will see the following output. You can click on the link generated by the run, as shown in Figure 6.15:

Figure 6.15 – Submit and run the experiment
- Finally, you can monitor the experiment run, model training, and the process of navigating to the Azure Machine Learning portal, as shown in Figure 6.16.

Figure 6.16 – The experiment run status
How it works…
This recipe leverages the power of the Spark pool that you have created to perform the data exploration and train your machine learning model. The notebook experience within Synapse makes it a one-stop shop for the developer and the data analyst to collaborate and perform their respective activities; this empowers the data scientist to create the AutoML model:

Figure 6.17 – The Spark history run status
The takeaway from this recipe is that you can combine a notebook and UI-based approach to build the machine learning model. The notebook can be published to the Synapse workspace, and you can load it anytime and customize the model as per your need.
Modeling and scoring using SQL pools
In this recipe, you will learn how to enrich your data, which is under SQL dedicated pools, and apply the existing machine learning model that we created in the Training a model using AutoML in Synapse section. This will help the data analyst and the data professional to directly select and run the existing machine learning model without worrying about writing the actual model.
This is the best way to utilize the model that you trained in the Training a model using AutoML in Synapse recipe and leverage it to predict the existing SQL pool tables with the help of the predict model wizard in the Synapse workspace.
Getting ready
To complete this recipe:
- Make sure you have created the Azure Machine Learning workspace in the Azure Machine Learning Service in Azure as we did in the Training a model using AutoML in Synapse recipe.
- You will need to have created the Azure Machine Learning linked service in the Azure Synapse workspace.
- Ensure that you have provided the right permission to the Azure Synapse workspace, choosing either Managed Identity or Service Principal:
- If you have set the authentication method as Managed Identity, make sure you have provided the MSI role access control in the Synapse workspace to the Azure Machine Learning workspace.
- If you have set the authentication method as Service Principal, you need to follow the standard procedure of app registration and role assignment for the Azure Machine Learning workspace.
- The model is trained and deployed in the Azure Machine Learning workspace, which we have already done in the Training a model using AutoML in Synapse recipe.
Now, let's begin the actual recipe.
How to do it…
Let's get back to the same Synapse workspace, and under Data tab, expand the SQL pool database and navigate to the table folder:
- Click on the action dots on the SQL pool table that you want to use to make a prediction with the model. Select Machine Learning | Predict with a model, as shown in Figure 6.17:
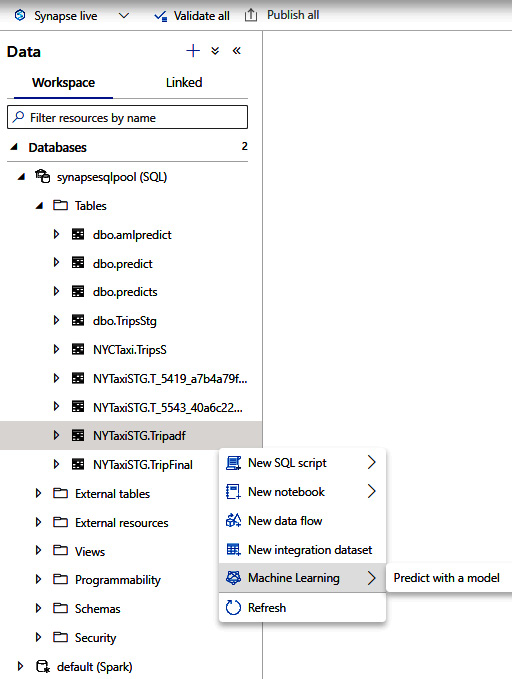
Figure 6.18 – Machine Learning – Predict with a model
- Once you select Predict with a model, it will take you to another blade where you need to select the Azure Machine Learning workspace from the drop-down box. This will show you the models that you have previously created in the same Azure Machine Learning workspace. Select and click Continue, as shown in Figure 6.19:
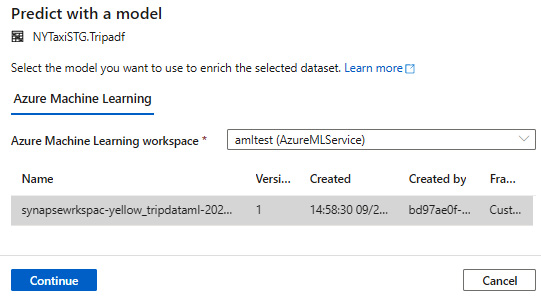
Figure 6.19 – Select a model from the linked Azure Machine Learning workspace
You need to map the table column with the machine learning model and define the model output as variable1. The mappings are mostly pre-populated, since the model is already deployed in the Azure Machine Learning workspace. Click Continue:
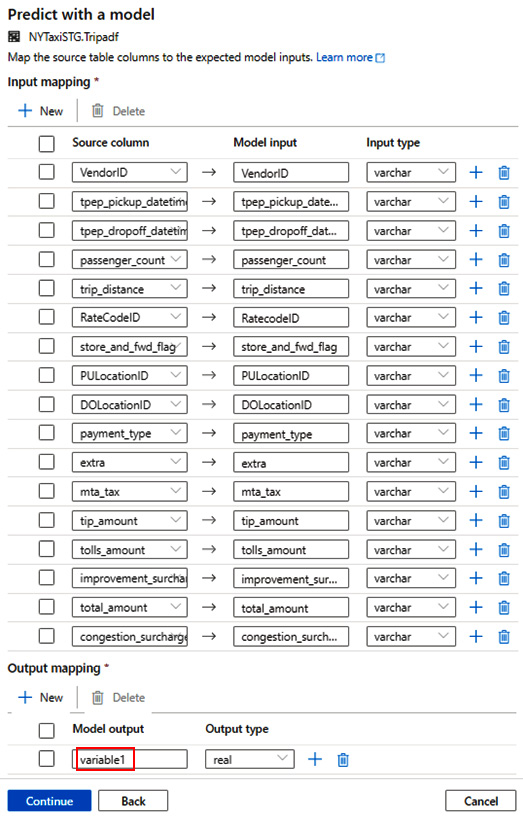
Figure 6.20 – Define the model output mapping
- You need to now define the stored procedure name, which will be created once you generate the SQL script. You also need to specify the target table for storing the machine learning model, and then click Deploy model + open script, as shown in Figure 6.21:

Figure 6.21 – Define the model output mapping
- This will generate the SQL script that will create the stored procedure. The stored procedure will internally call the predict Azure Machine Learning scoring model that you created previously in the linked Azure Machine Learning workspace:
CREATE PROCEDURE aml_model_procedure
AS
BEGIN
SELECT
CAST([VendorID] AS [varchar]) AS [VendorID],
CAST([tpep_pickup_datetime] AS [varchar]) AS [tpep_pickup_datetime],
CAST([tpep_dropoff_datetime] AS [varchar]) AS [tpep_dropoff_datetime],
CAST([passenger_count] AS [varchar]) AS [passenger_count],
CAST([trip_distance] AS [varchar]) AS [trip_distance],
CAST([RateCodeID] AS [varchar]) AS [RatecodeID],
CAST([store_and_fwd_flag] AS [varchar]) AS [store_and_fwd_flag],
CAST([PULocationID] AS [varchar]) AS [PULocationID],
CAST([DOLocationID] AS [varchar]) AS [DOLocationID],
CAST([payment_type] AS [varchar]) AS [payment_type],
CAST([extra] AS [varchar]) AS [extra],
CAST([mta_tax] AS [varchar]) AS [mta_tax],
CAST([tip_amount] AS [varchar]) AS [tip_amount],
CAST([tolls_amount] AS [varchar]) AS [tolls_amount],
CAST([improvement_surcharge] AS [varchar]) AS [improvement_surcharge],
CAST([total_amount] AS [varchar]) AS [total_amount],
CAST([congestion_surcharge] AS [varchar]) AS [congestion_surcharge]
INTO [NYTaxiSTG].[#Tripadf]
FROM [NYTaxiSTG].[Tripadf];
SELECT *
FROM PREDICT (MODEL = (SELECT [model] FROM aml_models WHERE [ID] = 'synapsewrkspac-yellow_tripdataml-20210927014551-Best:1'),
DATA = [NYTaxiSTG].[#Tripadf],
RUNTIME = ONNX) WITH ([variable1] [real])
END
GO
EXEC aml_model_procedure
You can refer to Figure 6.22 to check the output of the stored procedure:
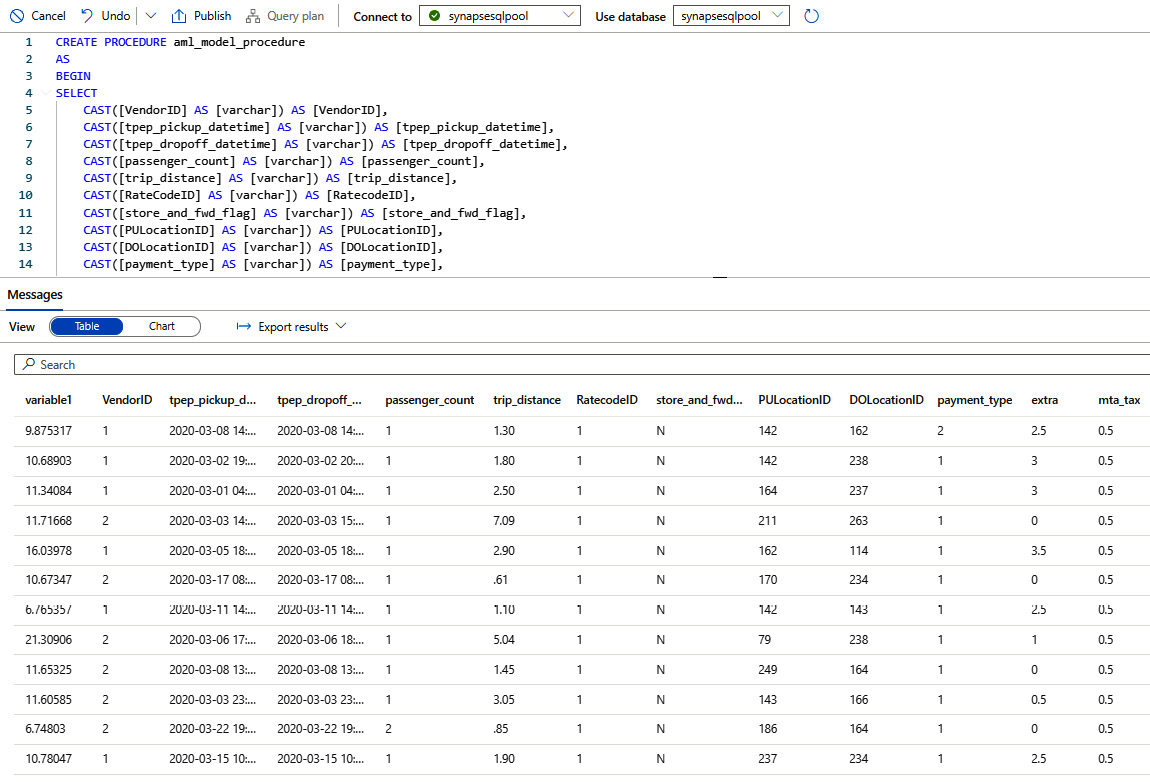
Figure 6.22 – Running the stored procedure
How it works…
Let's understand what we have done so far and how this works. The SQL dedicated pool has the capability to run and score with the existing machine learning model with a historical dataset. You can predict and score with familiar T-SQL scripts and call the model with the script. You saw how we can create a stored procedure and define a table output for scoring using the existing machine learning model.
You can refer to the following architecture to understand how exactly the overall recipe works and what we have done. However, this functionality is currently not supported in SQL serverless pool:
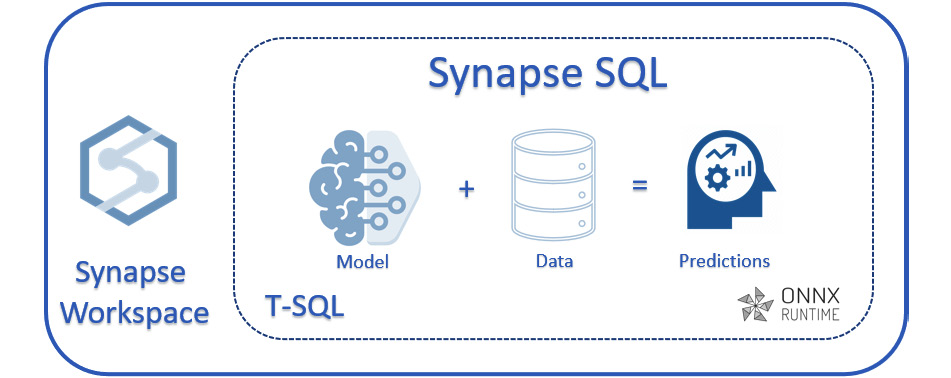
Figure 6.23 – Model, score, and predict
An overview of Spark MLlib and Azure Synapse
Azure Synapse Analytics provides you with a single collaborative platform for data processing in memory, leveraging the power of Apache Spark. This is an in-memory distributed platform in which you have the option to run scalable machine learning algorithms.
MLlib and Spark ML are two highly distributed and scalable environments for machine learning libraries. Some of the default machine learning libraries that are included are TensorFlow, scikit-learn, PyTorch, and XGBoost.
SynapseML (previously MMLSpark) is the Microsoft machine learning library for Apache Spark, which includes many distributed frameworks for Spark and provides seamless integration between the Microsoft Cognitive Toolkit (CNTK) or OpenCV. This enables high throughput with extraordinary performance because of the Spark cluster running behind.
Integrating AI and Cognitive Services
In this recipe, we will learn how we can integrate Azure Cognitive Services into the Synapse workspace.
With Azure Cognitive Services, we are now bringing together the power of AI to enrich our data with pre-trained AI models.
Getting ready
For this recipe, you will need the following:
- You need to have a linked service created for Azure Cognitive Services with the Synapse workspace.
- Either Anomaly Detector or Text Analytics Azure resources should be created.
- Key Vault configuration and a secrets access policy should be defined.
How to do it…
Let's go through the step-by-step process of integrating Cognitive Services with the Synapse workspace:
- Create a new Anomaly Detector resource, which we will be leveraging within the Synapse workspace:

Figure 6.24 – Create Anomaly Detector
- Create a new Key Vault instance and add the access policy so that you can grant access to the Azure Synapse workspace under Principal, as shown in Figure 6.25:

Figure 6.25 – The Key Vault access policy
- Create a new secret under Key Vault from the Anomaly Detector endpoint keys and keep the secret name handy for future reference, as shown in Figure 6.26:
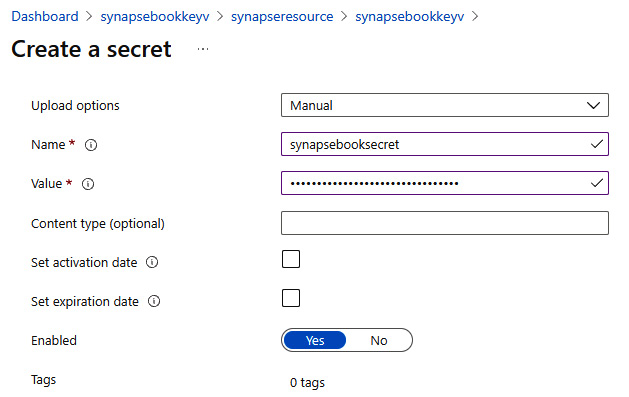
Figure 6.26 – A Key Vault secret
- Create a new linked service for Key Vault in the Synapse Analytics workspace, and specify the same Key Vault name that we created in the previous steps, as shown in Figure 6.27:
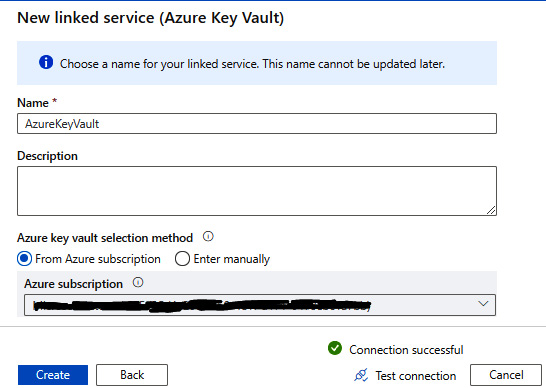
Figure 6.27 – The Key Vault linked service
- Create a new linked service for Cognitive Services in the Synapse Analytics workspace; select the existing Cognitive service, Azure Key Vault (AKV), which we created earlier, and the name of the secret, as shown in Figure 6.28:
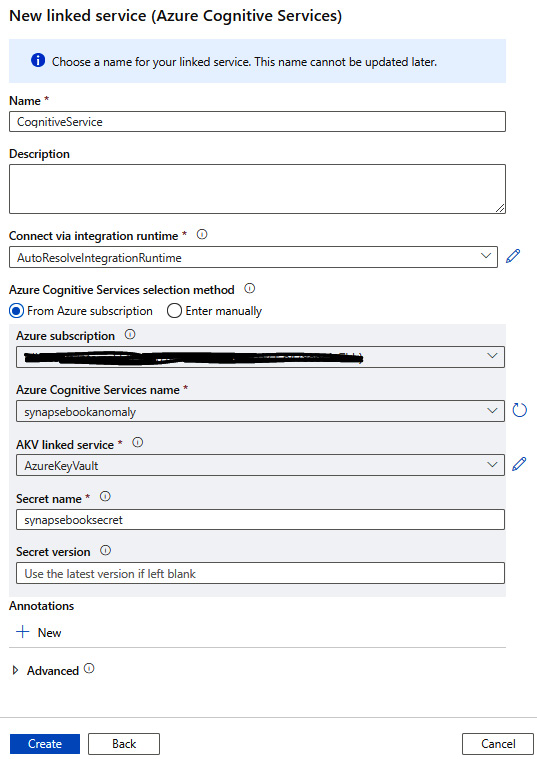
Figure 6.28 – The Cognitive linked service
How it works…
Let's understand how we will leverage the Anomaly Detector Cognitive Service on the Spark pool table to predict with the model. Azure Cognitive Services is a cloud-based service for the REST API that will help you to build various cognitive intelligence.
Here, we are leveraging the existing Cognitive Service, which we created in the How to do it… section.
You need to create a machine learning prediction model on the Spark table that you want to run the anomaly detection:
- Right-click and select the Spark table so that you can run the predict with the model, as shown in Figure 6.29:
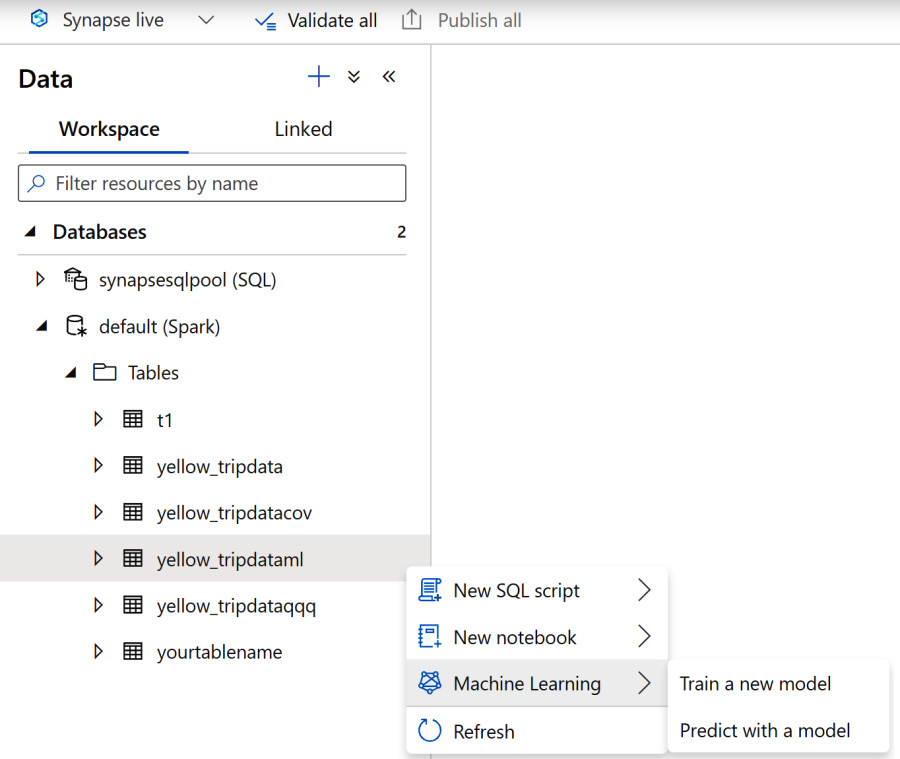
Figure 6.29 – Select the Spark table to predict with the model
- Select Anomaly Detector, which will allow you to enrich the selected dataset with the pre-trained Azure Cognitive Services, as shown in Figure 6.30:
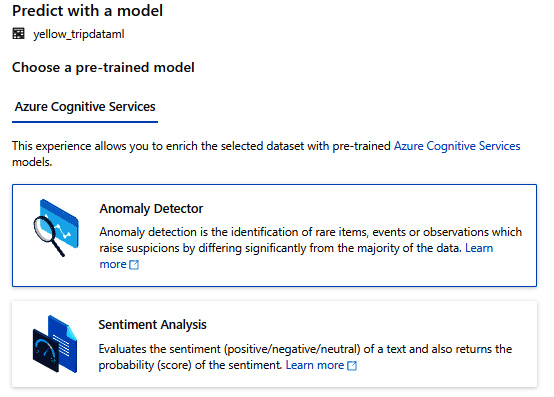
Figure 6.30 – Predict with Anomaly Detector
This will eventually connect with the existing Cognitive Service that we created in the Getting ready section in this recipe:
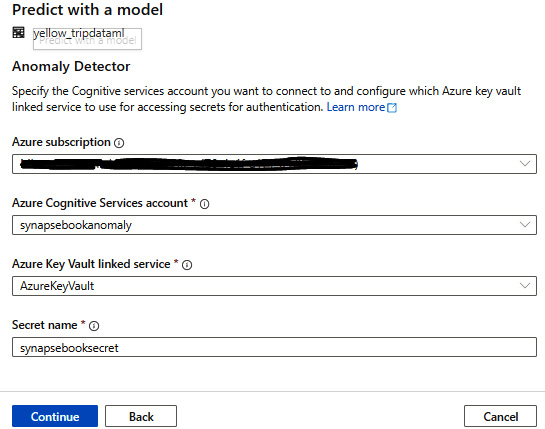
Figure 6.31 – The Anomaly Detector parameters
This will eventually generate the code for calling the Anomaly Detector pre-trained model, which you can run and modify as required:
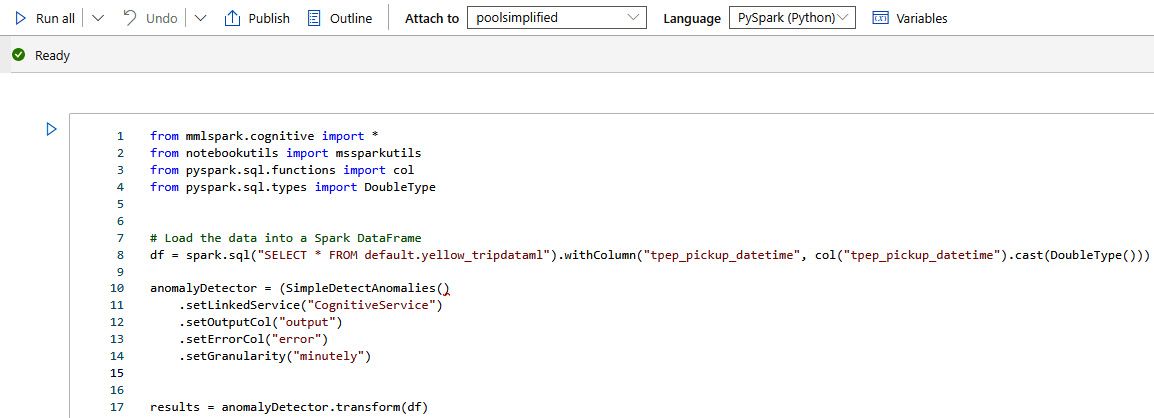
Figure 6.32 – The Anomaly Detector code generated