
1
Securing Azure AD Identities
Azure Active Directory (Azure AD) is a multi-tenant cloud-based identity and access management solution that is part of Microsoft’s Entra Identity platform product family.
You can read more about Entra and its integrated hybrid and multi-cloud identity and access solutions family at the following Microsoft site: https://www.microsoft.com/en-us/security/business/microsoft-entra.
In this chapter, you will learn how to secure and protect Azure AD identities.
We will break down this chapter into sections that cover how you can review your environments, including security posture, tenant-level identity and access management, password management and protection, security defaults, multi-factor authentication, and Conditional Access. We will then look at implementing Identity Protection and Identity Management services.
By the end of this chapter, you will have covered the following recipes to create secure Azure AD identities:
- Reviewing Azure AD Identity Secure Score
- Implementing Azure AD tenant Identity and Access Management
- Implementing Azure AD Password Protection
- Implementing Self-Service Password Reset
- Implementing Azure AD security defaults
- Implementing Azure AD multi-factor authentication
- Implementing Conditional Access policies
- Implementing Azure AD Identity Protection
- Implementing Azure AD Privileged Identity Management
Introduction to Azure Identity Services
Before we look at any recipes, we will first introduce some concepts surrounding Microsoft Identity services. This will assist us in establishing a foundation of knowledge to build upon. We will start by looking at Active Directory (AD).
What is AD?
AD provides Identity and Access Management (IAM) and Information Protection services for traditional Windows Server environments. It was first included with Windows Server 2000 as an installable service.
AD provides different services in its portfolio and is used as a generic and umbrella term in many cases.
These individual services in Azure AD include the following:
- AD Domain Services (AD DS)
- AD Federation Services (AD FS)
- AD Certificate Services
- AD Rights Management Services
In this next section, we will introduce Azure AD and look at its relationship with AD, a similar name but with different functions, capabilities, and use cases.
When is AD not AD? When it is Azure AD!
Before we go any further, we should clear one thing up: there is a common misconception that Azure AD must just be a cloud-based Software-as-a-Service (SaaS) version, but it is not!
It is easy enough why people (wrongly) think this may be the case; after all, Exchange Online and SharePoint Online are indeed exactly that, SaaS versions of their traditional infrastructure deployed platforms; if only it were that simple, though.
In many ways, Azure AD is like AD on the surface; they are both Identity Providers (IDPs) and provide IAM controls. Still, at the same time, they function differently and don’t yet provide a complete parity of capabilities, although quite close.
It is worth noting that Azure AD is constantly evolving to meet the requirements and demands of authentication and authorization of workloads and services to bring capabilities in line with those available in AD, such as Kerberos realms within Azure AD.
At the time of publishing this book, you cannot use Azure AD to 100% replace the provided capabilities of AD.
Depending on the scenario, it may be the case that your environments will never be 100% cloud-based for identity services. You may remain with Hybrid identity services – that is, both AD and Azure AD coexist in a connected and synchronized state.
What is Azure AD?
Azure AD is a SaaS identity management solution that is fully managed and provides functions such as an IDP and IAM for managing and securing access to resources based on Role-Based Access Control (RBAC).
As Azure AD is provided as a fully managed service, there is no installable component such as Windows Servers and Domain Controllers (DC); zero infrastructure needs to be deployed by you.
The primary cloud authentication protocol used by Azure AD is based around using OpenID, OAuth, and Graph, whereas AD uses Kerberos and NTLM.
What is Hybrid Identity?
The hybrid identity approach allows you to synchronize objects, such as user objects and their passwords, between AD and Azure AD directories.
The main driver for hybrid identity within an organization is legacy AD-integrated applications that do not support cloud identity authentication protocols.
This capability provides users access to AD authenticated, and Azure AD authenticated using a single Common Identity and password.
The password synced to Azure AD is a hash of the stored hashed password; passwords are never stored in Azure AD, only the password hash. This capability is referred to as same sign-on, meaning you will be prompted each time to enter the same credentials when you wish to authenticate to resources.
This capability should not be confused with single sign-on (SSO), which does not prompt you again when accessing resources. The following diagram shows the relationship between AD and Azure AD:

Figure 1.1 – AD and Azure as a relationship
Azure AD Connect is a free downloadable tool that synchronizes objects between AD and Azure AD’s IDP directories; this establishes hybrid identities. Azure AD Connect provides additional functionality and capabilities and allows for Self-Service Password Reset (SSPR) through additional configuration.
You can continue learning more, should you wish, about hybrid identities and Azure AD Connect, by going to https://learn.microsoft.com/en-us/azure/active-directory/hybrid/whatis-azure-ad-connect.
Technical requirements
For this chapter, the following are required for the recipes:
- A machine with a modern browser such as Edge or Chrome and internet access; this machine can be a client or server operating system. We will use a Windows 10 Microsoft Surface laptop with a Chrome browser for the recipe examples.
- An Azure AD tenancy; you may use an existing one or sign up for free: https://azure.microsoft.com/en-us/free.
- Access to the Global Administrator role for the tenancy.
- Some cloud-only test user created accounts as part of the Azure AD tenancy.
- You will require Azure AD Premium licenses or trial licenses. The following steps will guide you on activating a free trial if you do not already have a license:
- From the Azure portal, go to Azure AD | Licenses | All products, then click Try/Buy from the top toolbar.
- Select the AZURE AD PREMIUM P2 free trial and click Activate:

Figure 1.2 – Azure AD Premium P2 free trial activation
Reviewing Azure AD Identity Secure Score
Azure AD Identity Secure Score enables you to make informed decision-making to protect your Azure AD tenancy.
This recipe will teach you how to monitor and improve your Azure AD Identity Secure Score.
We will take you through reviewing the Azure AD Identity Secure Score dashboard for your Azure AD tenancy environments and look at the actionable insights available to improve your secure score and security posture.
Getting ready
This recipe requires the following:
- A device with a browser, such as Edge or Chrome, to access the Azure portal: https://portal.azure.com
- You should sign into the Azure portal with an account with the Global Administrator role
How to do it…
This recipe consists of the following tasks:
- Reviewing Identity Secure Score
- Updating the improvement actions status
Task – Reviewing Identity Secure Score
Perform the following steps:
- From the Azure portal, go to Azure Active Directory | Security | Identity Secure Score.
Alternatively, in the search bar, type azure ad identity secure score; click on Azure AD Identity Secure Score from the list of services shown.
- You will now see the Identity Secure Score blade.
- The top section of the Identity Secure Score screen represents your identity security posture:

Figure 1.3 – Secure Score screen
This area of the screen shows three aspects to review:
- Secure Score for Identity is a percentage of your alignment with Microsoft’s best practice security recommendations
- Comparison is your security posture management compared to other tenants of a similar size
- Score history is a trend graph over time
- The lower section of the Identity Secure Score screen provides a list of recommended and possible security Improvement actions.
Each recommended improvement action has a Score Impact, User Impact, Implementation Cost, Max Score possible, and Current Score:

Figure 1.4 – The Improvement actions screen
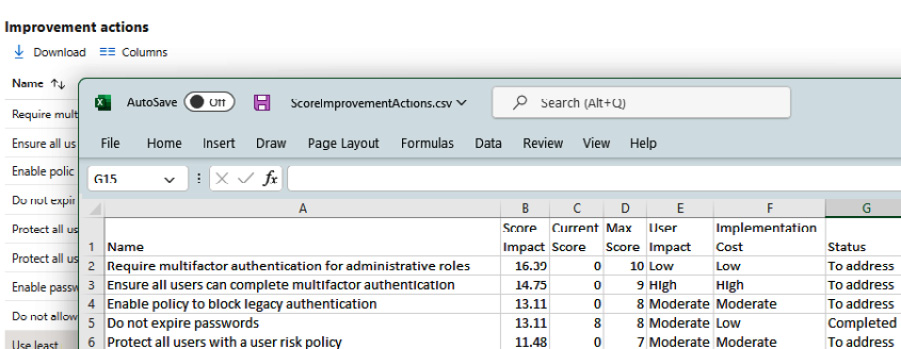
Figure 1.5 – Improvement actions download
- By clicking on an Improvement action, you can see further information:
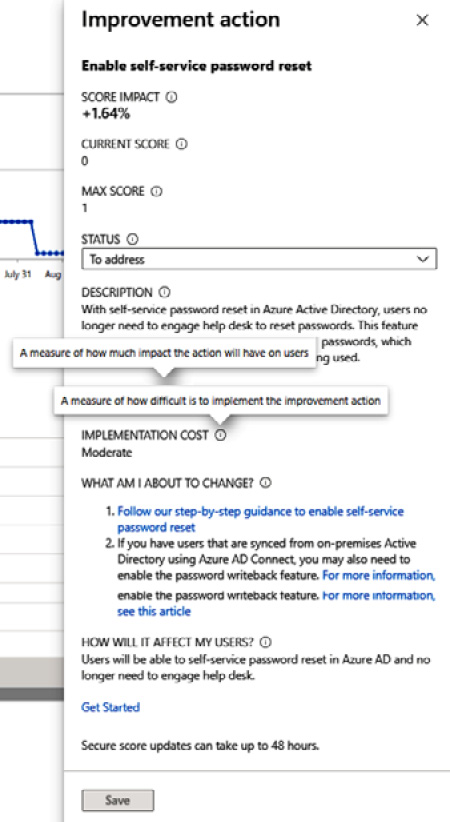
Figure 1.6 – Improvement actions information
With that, you have reviewed Identity Secure Score. In the next task, we will update the status of improvement actions.
Task – Updating the improvement actions status
- Select an Improvement action and click to open it.
- From the Improvement action screen, on the STATUS section, select the status you wish to update the action to and then click Save:

Figure 1.7 – Improvement actions status options
With that, you have updated the status of improvement actions. This concludes the hands-on tasks for this recipe.
How it works…
In this recipe, we reviewed the information presented in the Azure AD identities Secure Score and took action from available insights.
- The Azure ID Identity Secure Score overlaps with the identity score used for the Microsoft secure score, which means the recommendations will be the same.
- The Azure AD Identity Secure Score provides a value of between 1% and 100%, representing how well your Azure AD tenancy is secured based on Microsoft’s best practices and recommendations.
You can also see actionable improvement insights on how your score can be improved and each improvement’s impact on the secure score.
The dashboard and a score history timeline show a comparison of your environment’s Azure AD tenancy to a tenancy of the same size and industry average.
Your environment’s Azure AD tenancy identity settings are compared with best practice recommendations once a day (approx 1:00 A.M. PST); changes made to an improvement action may not be reflected in the score for up to 48 hours.
See also
Should you require further information, you can refer to the following Microsoft Learn articles:
- What is the identity secure score in Azure Active Directory?: https://learn.microsoft.com/en-us/azure/active-directory/fundamentals/identity-secure-score
- Azure Active Directory fundamentals documentation: https://learn.microsoft.com/en-us/azure/active-directory/fundamentals
Implementing Azure AD tenant Identity and Access Management
Account compromise is one of the biggest threat vectors to protect against, and those with privileged access roles will be the focus of attacks. There are often too many users assigned privileged accounts, with more access than is required for a user to carry out their role. There is often insufficient RBAC in place, and the principle of least privilege should be adopted for these privileged administrator roles.
While we need to limit the number of user accounts that have the Global Administrator role, there should also not be a single point of compromise for the Global Administrator role. Having more than one account with the Global Administrator role is important. It is crucial to have an emergency account in case of a breach or conditional access lockout of a Global Administrator role assigned. Global Administrator role accounts can use a buddy system to monitor each other’s accounts for signs of a breach.
This recipe will teach you to ensure you only have the users assigned with the least privileges required for their role and ensure you have a minimum of two accounts assigned the Global Administrator role.
We will take you through the steps to implement these tasks.
Getting ready
This recipe requires the following:
- A device with a browser, such as Edge or Chrome, to access the Azure portal: https://portal.azure.com
- You should sign in with an account that has the Global Administrator role
How to do it…
This recipe consists of the following tasks:
- Implementing least privileged administrative roles
- Designating more than one Global Administrator
Task – implementing least privileged administrative roles
- From the Azure portal, go to Azure Active Directory | Roles and administrators.
- From the All roles section, select the Global administrator role:

Figure 1.8 – Azure AD Roles and Administrators screen
- From the Assignments section, identify only the accounts required to have the Global Administrators role; ensure you have at least two or no more than five accounts with the Global Administrator role.
Select a user for users who no longer require the Global Administrator role and then click Remove assignments from the top toolbar:

Figure 1.9 – The Remove assignments screen
- From Azure Active Directory | Roles and administrators | All roles | Global administrator, we can now see that the user has been removed from the Global Administrator role:

Figure 1.10 – Global Administrator Assignments screen
- To reassign least privileged admin users to roles required to complete their tasks, navigate to Azure Active Directory | Users. Select and click the users to assign roles.
- From the User blade for the user selected to assign a directory role, go to Assigned roles from the Manage section and click Add assignments:

Figure 1.11 – The Assigned roles screen
- From the Directory roles pop-up screen, locate the directory role you wish to assign from the list of all available roles; select the directory role to assign and click Add:

Figure 1.12 – The Directory roles assignment screen
- Your user will now have the required least privileged admin role assigned and no longer have the highly privileged Global Administrator role:

Figure 1.13 – User administrator | Assignments
With that, you have learned how to use least privileged roles. In the next task, we will designate more than one Global Administrator for the tenancy.
Task – designating more than one Global Administrator
- From the Azure portal, go to Azure Active Directory | Roles and administrators | All roles | Global Administrator.
- From the Assignments blade, click Add assignments and locate the user(s) to add to the Global Administrators role:

Figure 1.14 – Global administrator – the Add assignments screen
- Select the user, and then click Add:
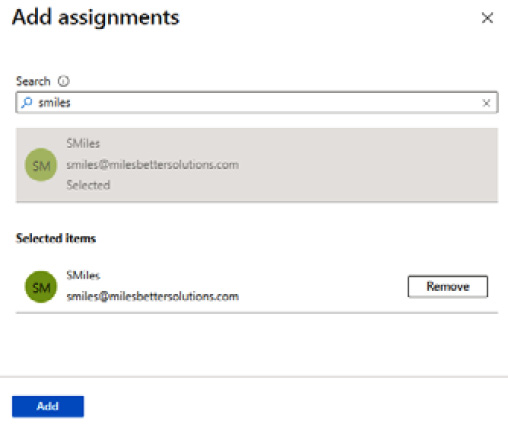
Figure 1.15 – Global administrator – The Add assignments screen

Figure 1.16 – Global administrator | Assignments
With that, you have created more than one Global Administrator role. This concludes the hands-on tasks for this recipe.
How it works…
In this recipe, we looked at limiting the number of users with the Global Administrator role and ensuring you only had the users assigned with the least required privileges for their role. In our example, we removed the Global Administrator role from a user and reassigned them to the User Administrator role, which was the least privileges required for their tasks.
We then ensured you had a minimum of two accounts assigned the Global Administrator role by adding a user to this role. The Microsoft recommendation is for a minimum of two users and no more than five for this role.
There’s more…
Azure AD user accounts with the highest privileged role of Global Administrator will be the primary goal for compromise by bad actors. This is because this role has access to every administrative setting in your environment’s Azure AD tenancy at the read and modify permission level.
Microsoft recommends that you assign user accounts with less privileged roles. This limits the user’s scope of permissions through RBAC to only be able to do what a user needs to do for their job function.
The following are some of the many roles that can be considered to reduce the use of the Global Administrator role but still have enough access for a user to be able to perform their duties:
- Application Administrator
- Authentication Administrator
- Azure DevOps Administrator
- Azure Information Protection Administrator
- Billing Administrator
- Compliance Administrator
- Conditional Access Administrator
- Directory Readers
- Exchange Administrator
- SharePoint Administrator
- Privileged Role Administrator
- Security Administrator
- User Administrator
Should you require further information on least privileged roles, you can refer to the following Microsoft Learn articles:
- Assigning Azure roles using the Azure portal: https://learn.microsoft.com/en-us/azure/role-based-access-control/role-assignments-portal
- Azure AD built-in roles: https://learn.microsoft.com/en-us/azure/active-directory/roles/permissions-reference
- What are the default user permissions in Azure Active Directory?: https://learn.microsoft.com/en-us/azure/active-directory/fundamentals/users-default-permissions
- Least privileged roles by task in Azure Active Directory: https://learn.microsoft.com/en-us/azure/active-directory/roles/delegate-by-task
See also
Should you require further information, you can refer to the following Microsoft Learn articles:
- Best practices for Azure AD roles: https://learn.microsoft.com/en-gb/azure/active-directory/roles/best-practices
- Restrict member users’ default permissions: https://learn.microsoft.com/en-gb/azure/active-directory/fundamentals/users-default-permissions#restrict-member-users-default-permissions
- Azure Active Directory fundamentals documentation: https://learn.microsoft.com/en-us/azure/active-directory/fundamentals
Implementing Azure AD Password Protection
Users often make poor choices when creating passwords, making them easy targets and victims of dictionary-based attacks.
This recipe will teach you how to implement Azure AD password protection in your environment’s AD tenancy. We will take you through customizing your smart lockout threshold and creating a global and custom banned password list.
Getting ready
This recipe requires the following:
- A device with a browser, such as Edge or Chrome, to access the Azure portal: https://portal.azure.com
- You should sign in with an account that has the Global Administrator role
- We will use Azure AD Premium licenses for this and future recipes
How to do it…
This recipe consists of the following task:
- Configuring password protection
Task – configuring password protection
- From the Azure portal, go to Azure Active Directory and then click Security under the Manage section from the side menu.
- Select Authentication Methods under the Manage section from the side menu.
- Select Password protection under the Manage section from the side menu.
- From the Custom smart lockout section, set the Lockout threshold and Lockout duration in seconds properties as required; review the information in the tooltips by clicking on the i symbol:

Figure 1.17 – Azure AD Premium P2 free trial activation
- From the Custom banned password section, select Yes, enter strings that are to be banned, and click Save; review the information in the tooltips by clicking on the i symbol. It can take several hours to apply the band password list:

Figure 1.18 – Azure AD Premium P2 free trial activation
With that, you have configured password protection. This concludes the hands-on tasks for this recipe.
How it works…
You only need to add key terms such as password or contoso and the algorithm will automatically consider and block all variants of common character substitutions, such as Pa$sw0rd1! or C@ntos0!.
The banned password list may have a maximum of 1,000 key terms. The minimum length of a term string is 4 characters, where 16 characters is the maximum and are case-sensitive.
This recipe looked at customizing your smart lockout threshold to protect against brute-force attack methods. We also looked at creating a global and custom banned password list to protect against dictionary and password spray attacks and enforce the use of strong passwords.
Both of these measures, when implemented, can offer significant protection for your environment’s Azure AD tenancy.
See also
Should you require further information, you can refer to the following Microsoft Learn articles:
- Eliminate bad passwords using Azure Active Directory Password Protection: https://learn.microsoft.com/en-us/azure/active-directory/authentication/concept-password-ban-bad
- Azure Active Directory fundamentals documentation: https://learn.microsoft.com/en-us/azure/active-directory/fundamentals
Implementing a Self-Service Password Reset
Users will sometimes forget their passwords; to prevent intervention by an Azure AD administrator, a self-service password reset (SSPR) can be implemented. This allows users to click on the Can’t access your account? link on the sign-in page for the portal or Microsoft Cloud service they are trying to access.
This recipe will teach you how to implement SSPR in your environment’s AD tenancy. We will take you through enabling SSPR for a selected scope and review the available settings, then carry out a user registration for SSPR and test its operation to confirm the function is working.
Getting ready
This recipe requires the following:
- A device with a browser, such as Edge or Chrome, to access the Azure portal: https://portal.azure.com
- You should sign in with an account that has the Global Administrator role
- Optionally, pre-create an Azure AD Security group called SSPR-Test-Group and add members to test with
How to do it…
This recipe consists of the following task:
- Configuring Self-Service Password Reset
Task – configuring Self-Service Password Reset
- From the Azure portal, go to Azure Active Directory and then click Password under the Manage section from the side menu.
- From Properties, under the Manage section from the side menu, choose Selected under Self-service password reset enabled; review the information in the tooltips on this page by clicking on the i symbol:

Figure 1.19 – Password reset | Properties
- Click on the No groups Selected hyperlink and then browse and select the group to enable SSPR. Then, click Save:

Figure 1.20 – Password reset selected groups
- From Authentication methods, under the Manage section from the side menu, select as required the Number of methods required to reset setting.
- Then, select as required the Methods available to users setting:

Figure 1.21 – Authentication methods
- From Registration, under the Manage section from the side menu, select Yes for Require users to register when signing in?.
- Select the Number of days before users are asked to re-confirm their authentication information setting as required.
- From Notifications, under the Manage section from the side menu, select Notify users on password resets? as required.
- From Notifications, under the Manage section from the side menu, select the Notify users on password resets? and Notify all admins when other admins reset their password? settings as required.
- From Customization, under the Manage section from the side menu, select the Customize helpdesk link? and Custom helpdesk email or URL settings as required.
- Review the settings configured from Administrator Policy in the Manage section from the side menu.
With that, you have configured SSPR. This concludes the hands-on tasks for this recipe.
How it works…
In this recipe, we looked at how we can implement SSPR when users forget their password for a portal or Microsoft Cloud service they are trying to access.
This prevents intervention from an Azure AD administrator, which reduces the burden on these roles and also protects against loss of productivity.
See also
Should you require further information, you can refer to the following Microsoft Learn articles:
- Tutorial: Enable users to unlock their accounts or reset passwords using Azure Active Directory SSPR: https://learn.microsoft.com/en-us/azure/active-directory/authentication/tutorial-enable-sspr
- Azure Active Directory fundamentals documentation: https://learn.microsoft.com/en-us/azure/active-directory/fundamentals
Implementing Azure AD security defaults
The perimeter vanishes with the rise in hybrid working and a remote workforce on unsecured devices outside of secure corporate networks. Now, it is commonplace to be targeted by identity-related attacks such as password spray and phishing. However, with basic security adoption, such as blocking legacy authentication and multi-factor authentication (MFA), 99.9% of these identity-related attacks can be stopped. However, we must balance security with productivity.
Because security can require skills and money, Microsoft is providing no-cost preconfigured secure settings by default to provide a basic level of security for everybody.
This recipe will teach you how to implement the Azure AD security defaults in your environment’s AD tenancy.
Getting ready
This recipe requires the following:
- A device with a browser, such as Edge or Chrome, to access the Azure portal: https://portal.azure.com
- You should sign into the Azure portal with an account with the Global Administrator, Security Administrator, or Conditional Access Administrator role
How to do it….
This recipe consists of the following task:
- Enabling security defaults
Task – enabling security defaults
- From the Azure portal, go to Azure Active Directory and click Properties in the Manage section from the side menu.
- Then, click the Manage Security Defaults hyperlink, select Yes under Enable security defaults, and click Save:

Figure 1.22 – The Enable security defaults screen
With that, you have enabled security defaults. This concludes the hands-on tasks for this recipe.
How it works…
In this recipe, we looked at enabling security defaults in your environment’s Azure AD tenancy.
The security defaults are Microsoft-recommended security mechanisms with preconfigured security settings that, once enabled, are automatically enforced in your tenant to protect against the most common identity-based attacks.
The following are the enforced settings:
- Azure MFA for all users and administrators
- Blocking of legacy authentication protocols
- Protection of privileged access activities, such as Azure portal access
See also
Should you require further information, you can refer to the following Microsoft Learn articles:
- Security defaults in Azure AD: https://learn.microsoft.com/en-us/azure/active-directory/fundamentals/concept-fundamentals-security-defaults
- Azure Active Directory fundamentals documentation: https://learn.microsoft.com/en-us/azure/active-directory/fundamentals
Implementing Azure AD multi-factor authentication
We must adopt a zero-trust strategy in the perimeter-less world of cloud services and hybrid working more than ever. This means that we must assume breach and never trust, always verify.
Azure AD MFA provides an additional layer of defense; we never trust a single authentication method and must assume that the traditional password method has been compromised. Microsoft studies show that when you implement MFA, your accounts are more than 99.9% less likely to be compromised.
This recipe will teach you how to implement Azure AD MFA in your environment’s AD tenancy.
Getting ready
This recipe requires the following:
- A device with a browser, such as Edge or Chrome, to access the Azure portal: https://portal.azure.com.
- You should sign into the Azure portal with an account with the Global Administrator role.
- You will require Azure AD Premium licenses or trial licenses.
- If you have Security Defaults enabled, you will automatically have MFA enabled for all users and administrators using the free benefits of Azure AD. Using one of the paid Azure AD Premium licenses provides additional capabilities, such as the additional authentication methods of verification codes, text messages, or phone calls, as well as the following:
- Azure AD Premium P1: This license includes Azure Conditional Access for MFA
- Azure AD Premium P2: This license adds risk-based Conditional access to MFA through Information Protection
How to do it…
This recipe consists of the following task:
- Configuring MFA
Task – configuring MFA
- From the Azure portal, go to Azure Active Directory, click Security in the Manage section from the side menu, and then click Multifactor authentication.
- From the Multifactor authentication | Getting started blade, click the Additional cloud-based multifactor authentication settings hyperlink under the Configure section heading:

Figure 1.23 – Multifactor authentication | Getting started
- Two tabs are available from the new multi-factor authentication page that opens; select the user’s tab and then users to enable MFA:
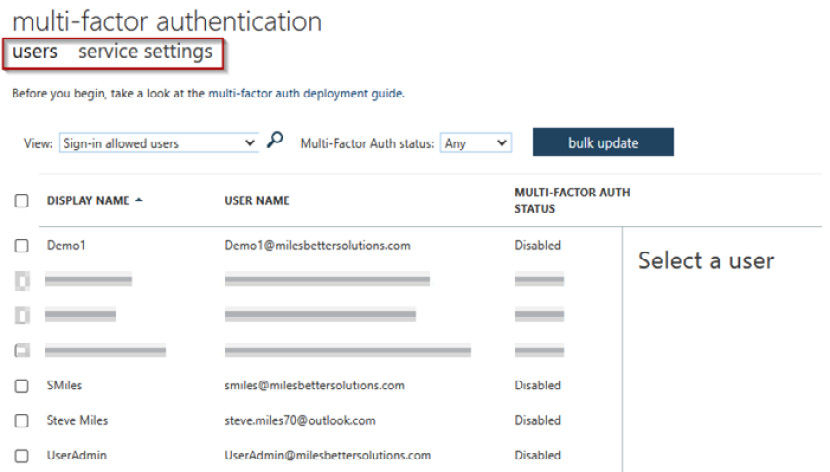
Figure 1.24 – MFA configuration screen
- From the user pane on the right, click on the Manage user settings hyperlink in the quick steps section:

Figure 1.25 – MFA selected user pane
- On the Manage user settings pop-up screen, select any of the three options as required and then select save:

Figure 1.26 – Manage user settings pop-up screen
- Click Enable on the user pane screen from Step 4 of this recipe. From the About enabling multi-factor auth pop-up screen that appears, read the provided links, click enable multi-factor auth, and click close on the Updates successful screen.
- To disable a user for MFA, select the user from the user pane, click Disable in the quick steps section, select Yes on the pop-up screen, and click Close:
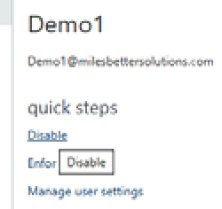
Figure 1.27 – Disabling MFA for a user
- You may bulk update enabling users for MFA by selecting the bulk update button and uploading a CSV file; a template file will be provided that you can download.
- Once the user tab configuration is complete, select the service settings tab in the multi-factor authentication browser window:

Figure 1.28 – The service settings tab’s settings
- From the service settings screen, set the required options and click save. Note the verification options section.
With that, you have configured MFA. This concludes the hands-on tasks for this recipe.
How it works…
In this recipe, we looked at how to enable Azure AD MFA in our environment’s Azure AD tenancy to provide an additional layer of security for users to sign to protect their identity from compromise.
Azure AD MFA requires us to provide one or more additional factors as a method to authenticate in addition to the password factor.
We can use the following authentication factors:
- Something we know (password)
- Something we own (device)
- Something we are (biometrics)
See also
Should you require further information, you can refer to the following Microsoft Learn articles:
- Secure Azure Active Directory users with Multi-Factor Authentication: https://learn.microsoft.com/en-us/training/modules/secure-aad-users-with-mfa/
- Features and licenses for Azure AD Multi-Factor Authentication: https://learn.microsoft.com/en-us/azure/active-directory/authentication/concept-mfa-licensing
- Azure Active Directory fundamentals documentation: https://learn.microsoft.com/en-us/azure/active-directory/fundamentals
Implementing Conditional Access policies
There must be a balance of protecting an organization’s resources while ensuring every user, wherever they are, is empowered to be productive whenever.
To further strengthen our Azure AD identities, we can use insights from identity-driven signal data to make informed access control decisions and then use those decisions to enforce access policies.
MFA works alongside Conditional Access to provide further granular control of access.
Conditional Access is based on an IF/THEN approach. This approach means that IF signal information collected from the sign-in process matches certain criteria, THEN decisions are made based on the information as to whether access will be allowed or blocked.
Conditional Access will also determine whether the user will be required to perform additional authentication methods or take other actions, such as resetting their password. This is represented in the following diagram:

Figure 1.29 – Conditional Access concept
The following are some common Conditional Access policies:
- Require MFA for all users
- Require MFA for Microsoft portals/services access
- Require password reset for risky users
- Block the use of legacy authentication protocols
- Require hybrid-joined or compliant devices
- Allow or deny from specific locations
This recipe will teach you how to implement Conditional Access policies in your environment’s AD tenancy. We will take you through enabling conditional access policies and configuring them to restrict user access to apps based on if a set of conditions have been met.
Getting ready
This recipe requires the following:
- A device with a browser, such as Edge or Chrome, to access the Azure portal: https://portal.azure.com.
- You should sign into the Azure portal with an account with the Global Administrator role.
- You will require Azure AD Premium licenses or trial licenses.
- If you have Security Defaults enabled, you will automatically have MFA enabled for all users and administrators using the free benefits of Azure AD. Using one of the paid Azure AD Premium licenses provides additional capabilities such as the additional authentication methods of verification codes, text messages, or phone calls, as well as the following:
- Azure AD Premium P1: This license includes Azure Conditional Access for MFA
- Azure AD Premium P2: This license adds risk-based Conditional access to MFA
How to do it…
This recipe consists of the following task:
- Configuring Conditional Access
Task – configuring Conditional Access
- From the Azure portal, go to Azure Active Directory, click Security in the Manage section from the side menu, and then click Conditional Access in the Protect section.
- Click + New Policy from the top toolbar in the Conditional Access Policies blade:

Figure 1.30 – Conditional Access | Policies
- Select a Name for your policy from the New conditional access policy blade.
- From the Assignments section, select which users and groups this policy will apply to:

Figure 1.31 – User settings
- From the Cloud apps or actions section, select whether this policy will apply to Cloud apps or Actions; we will select Cloud apps:

Figure 1.32 – Apps setting
- From the Include tab, we will click Select apps, search for Azure Management, tick the check box next to Microsoft Azure Management app in the list, and click Select. Note the warning dialog box about not locking yourself out:

Figure 1.33 – App selection
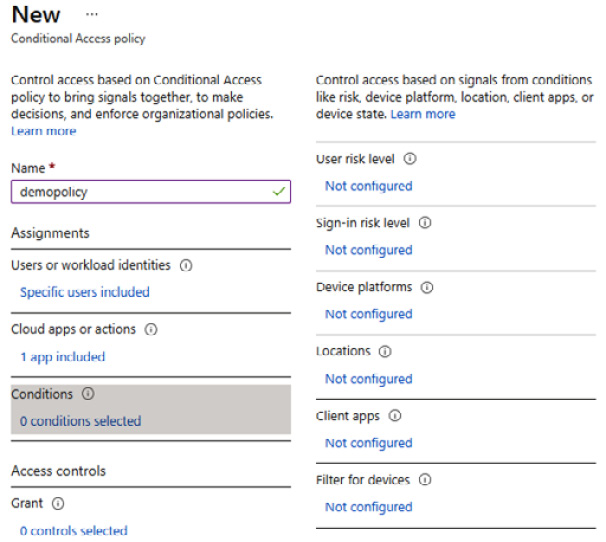
Figure 1.34 – Conditions settings
- From Grant, under the Access controls section, click on 0 controls selected, set it to Grant access, tick Require multifactor authentication, and then click Select:

Figure 1.35 – Access settings
- In the Enable policy section, leave it set to Report-only, then click Create.
- Your policy will now appear in the policies list:

Figure 1.36 – Access policies list
With that, you have configured Conditional Access. This concludes the hands-on tasks for this recipe.
How it works…
In this recipe, we looked at how we can implement Conditional Access policies in addition to MFA to layer on an additional layer of defense while maintaining the users’ productivity needs.
We configured a Conditional Access policy to a set of selected users (or groups) that required MFA when they accessed the Azure portal; this was enabled by selecting the Microsoft Azure Management app.
See also
Should you require further information, you can refer to the following Microsoft Learn articles:
- What is Conditional Access?: https://learn.microsoft.com/en-us/azure/active-directory/conditional-access/overview
- Azure AD Conditional Access documentation: https://learn.microsoft.com/en-us/azure/active-directory/conditional-access
- Conditional Access: Cloud apps, actions, and authentication context: https://learn.microsoft.com/en-us/azure/active-directory/conditional-access/concept-conditional-access-cloud-apps
- Azure Active Directory fundamentals documentation: https://learn.microsoft.com/en-us/azure/active-directory/fundamentals
Implementing the Azure AD Identity Protection service
We need solutions that provide remediation actions based on threat intelligence insights. Using policies, we can detect and respond to identity-based threats automatically; this allows us to react quicker and does not rely on human operator intervention.
This recipe will teach you how to implement Azure AD Identity Protection in your environment’s AD tenancy.
We will take you through setting up risk policies, MFA registration policies, investigation, reports, and how to remediate identified risks.
Getting ready
This recipe requires the following:
- A device with a browser, such as Edge or Chrome, to access the Azure portal: https://portal.azure.com
- You should sign in to the Azure portal with an account with the Global Administrator role
- You will require Azure AD Premium licenses or trial licenses
How to do it…
This recipe consists of the following task:
- Configuring Identity Protection
Task – configuring Identity Protection
Perform the following steps:
- From the Azure portal, go to Azure Active Directory, click Security in the Manage section from the side menu, and then click Identity Protection in the Protect section.
- From the Identity Protection blade, click User risk policy:

Figure 1.37 – User risk policy
- From Assignments, click All users, review the available options, and select as required. You can set it to include or exclude.
- From User risk, select the risk level controls options to be enforced: High, Medium and above, or Low and above. Then, click Done.
- Click Block access from the Access section under Controls and select the controls to be enforced. You can set it to Block or Allow access and Require password change. Then, click Done:

Figure 1.38 – User risk policy settings screen
- Select On under Enforce policy, and then click Save.
- Complete the same steps but this time for Sign-in risk policy:

Figure 1.39 – Sign-in risk policy settings screen
With that, you have configured Identity Protection. This concludes the hands-on tasks for this recipe.
How it works…
This recipe looked at how to implement Azure AD Identity Protection.
A risk policy will monitor for identity risks, which, when detected, enforce remediation measures, which are the controls that have been set, such as blocking or allowing access and requiring a password change by the user.
See also
Should you require further information, you can refer to the following Microsoft Learn articles:
- Manage Azure AD Identity Protection: https://learn.microsoft.com/en-us/training/modules/manage-azure-active-directory-identity-protection
- Azure Active Directory fundamentals documentation: https://learn.microsoft.com/en-us/azure/active-directory/fundamentals
Implementing Azure AD Privileged Identity Management
To protect your environment’s Azure AD tenancy and improve your security posture, you should implement a robust privileged identity protection strategy for roles and resources.
This recipe will teach you to implement Azure AD Privileged Identity Management (PIM) in your environment’s AD tenancy.
We will take you through configuring a user to be assigned a privileged access role in your Azure AD tenancy so that the user’s activity may be controlled.
Getting ready
This recipe requires the following:
- A device with a browser, such as Edge or Chrome, to access the Azure portal: https://portal.azure.com
- You should sign into the Azure portal with an account with the Global Administrator role
- You will require Azure AD Premium licenses or trial licenses
How to do it…
This recipe consists of the following task:
- Configuring Privileged Identity Management
Task – configuring Privileged Identity Management
- From the Azure portal, search for Azure AD Privileged Identity Management and select access.
- From Azure AD Privileged Identity Management, select Azure Resources and click Discover resources:

Figure 1.40 – The Privileged Identity Management screen
- Select your Subscription from the Azure resources blade and click Manage resource from the top toolbar. Click OK on the pop-up screen, then close the Discovery page:

Figure 1.41 – The Azure resources blade
- Click the subscription listed on the Azure resources page; the Overview page will open. From the left menu, click Roles in the Manage section:

Figure 1.42 – Manage resources screen
- From the Roles blade, click + Add assignments from the top toolbar.
- From the Select role drop-down menu, select a role you want to be controlled via PIM. In our example, we will select the Azure Arc Kubernetes Admin role:

Figure 1.43 – Select role
- Click the No member selected under Select member(s) hyperlink and search and select a user from your Azure AD tenant to be assigned this role:

Figure 1.44 – Select member(s)*
- Click Next >.
- Select eligible under assignment type from the setting tab and set the assignment start and end date/times properties. Then, click Assign.
- You will now see information from the Overview page regarding this new assignment:

Figure 1.45 – Assignments on the Overview page

Figure 1.46 – Assignments
- You should receive an email notification regarding this assignment; you can update or remove this assignment and create an access review for ongoing governance:

Figure 1.47 – Assignment notification email
With that, you have configured Privileged Identity Management. This concludes the hands-on tasks for this recipe.
How it works…
In this recipe, we looked at how to configure Privileged Identity Management. We assigned a user the Azure Arc Kubernetes Admin role.
See also
Should you require further information, you can refer to the following Microsoft Learn articles:
- Plan and implement privileged access: https://learn.microsoft.com/en-us/training/modules/plan-implement-privileged-access
- Azure Active Directory fundamentals documentation: https://learn.microsoft.com/en-us/azure/active-directory/fundamentals