
CHAPTER
24
Importing Third-Party Libraries
This chapter requires the following:
- Arduino Uno
- Adafruit Si1145 breakout board
As you have seen throughout this book, the Arduino libraries add an impressive amount of functionality to the platform. They facilitate the use of a large number of electronic components and breakout boards. In some cases, using a shield is as simple as selecting the correct library, but this isn't always the case. The Arduino ecosystem has grown immensely over the years; it has been used for an unbelievably large amount of projects. Not all use “standard” components; some need more specific hardware.
When you import a library, the Arduino has access to more functionality. For example, the SD library enables you to easily write to large storage formats with an Arduino, something that would otherwise be difficult to do. This is done by adding functions, pieces of code that help you talk to hardware, or performing software calculations and actions. Libraries facilitate this by importing these functions and making them available to the sketch. Sketches can, of course, add existing standard Arduino libraries, but they can also add libraries written by third parties.
Libraries
So what exactly is a library? Sketches are written in a form of C, and a library is simply an extension, written in either C or C++. When you create a function in your sketch, you can call it inside the same sketch. A library has a collection of functions that can be reused in multiple sketches. When you import a library: functions are made available, and you can call one, several, or all the functions in the library as needed. You could also call none of the functions, but that would be a bit of a waste.
There are several advantages to libraries; by hiding away all the long functions, your sketch is made simpler. For example, if talking to a new external component, the library can tell your sketch how to read the data from the component. First, pull this output high, then send some binary data, wait for a few milliseconds, retrieve binary data, sort that data, perform some calculations, and then return the data. All this, just to return the temperature or the ultraviolet index? Well, you always need to follow the same process, but it can be taken care of by a function. By putting all this code in a function, your sketch is clearer, and you even use less memory because the sketch can call one piece of code several times, instead of having different copies of the same function in memory. It also makes maintenance easier; if you have several sketches that use the same functions, updating the library makes those changes immediately available to the sketches that use them.
Finding Libraries
Often, the most difficult part of using an external library is finding it in the first place, and even that isn't hard. Some hardware manufacturers develop libraries designed specifically for their shields or breakout boards, and these are available on the company's site. For example, Adafruit often has a tutorial for the breakout boards that it sells, showing how to connect it and typically with some example code. On these pages, you often find a link to download the library they created to interface with the component.
Some electronic components do not require breakout boards but are still complex enough to merit their own library. In Chapter 10 you saw how to create a wireless device that helps keep houseplants happy. The DHT-11 humidity sensor is a rather complex device, and the code was a little difficult. I don't expect every Arduino user to write code like that. To help beginners use these devices, a DHT-11 library exists. The same goes for other electronic components. To use these libraries, you need to search online to see if there is something available.
Libraries are, put simply, source code files. There are sites that are dedicated to hosting open source projects and handling source code. These sites allow other users to retrieve the source code and to suggest modifications and corrections if required. A single open source project can have hundreds of developers, each proposing a change or adding their code to an existing project. One such site is GitHub (http://github.com).
NOTE GitHub gets its name from the open-source code management program, Git. It allows users to use this application to download the source code, upload changes, and to create parallel versions. Although the site is optimized for Git, you do not need to use this program; projects can be downloaded as a Zip file.
On the top of the screen, GitHub allows you to make a search of the available projects. Give it a try. This chapter will use Silicon Lab's SI1145 UV sensor. Enter Arduino si1145 in the search field, and then press Search. There are dozens of responses, but you can change the order of the results, either by stars (the amount of popularity a project has), forks (the amount of times this library has been used to create another project), or recently updated (the last time the project was updated). Best Match, the default setting, uses all three to create the best solution and displays those results first.
NOTE Adafruit also uses Github for its libraries.
One of the best sources of information, not only for libraries but for everything to do with Arduino, is the Arduino Forum.
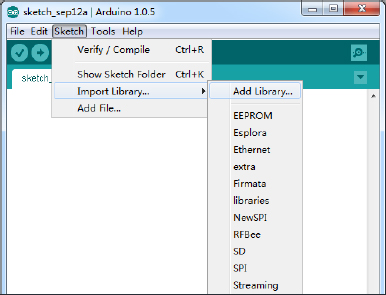
Importing a Library
To import a third-party library, you can use the Arduino IDE. When you go into the Sketch ![]() Import Library menu, you have the choice of importing a standard Arduino library, but there is also an Add Library menu item, as shown in Figure 24-1.
Import Library menu, you have the choice of importing a standard Arduino library, but there is also an Add Library menu item, as shown in Figure 24-1.
Clicking this menu item opens a new window, prompting you to select a Zip file or folder containing the library you want to import. A Linux computer shows a window like the one in Figure 24-2.

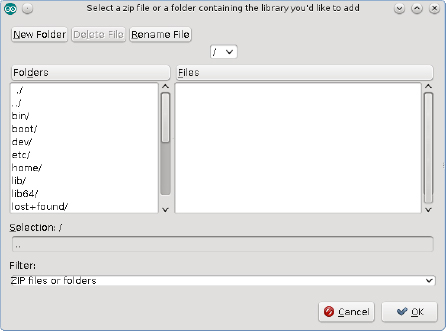
The Arduino IDE can recognize two different formats: either a compressed Zip file or a folder. You must either select a zipped archive or the folder you want to import.
If the Arduino IDE can import the library, a message displays informing that the import has completed and that the library is now accessible from the Add Library menu. If the Arduino IDE cannot import the library, a message displays in the information bar at the bottom of the application with a brief explanation of the issue.
NOTE The Arduino IDE can import libraries with properly formatted names—it can handle only ASCII characters such as letters and numbers, and a library cannot start with a number. Also, dashes (“-”) are not supported, but underscores (“_”) are. Check the library's name before you try to import it.
It is also possible to manually import a library. To do this, first start by downloading the library you want to import. It will normally be available in a compressed format, so after downloading the compressed file you must decompress it. The result should be a folder with the name of the library you want to import. Inside this folder, there should be one or more files: the .cpp file is the source code, and the .h file is the header file. (It may also contain other files.) You will need to copy (or move) the folder that contains these two files.
To manually import a library, you must first quit the Arduino IDE if it is running. Next, locate the Arduino library folder. On Windows machines, it is most likely placed in your Documents or My Documents folder, inside a subfolder called Arduino. On Macintosh, it will be in your Documents folder, again in a subfolder called Arduino. Inside the Arduino folder will be another folder called “libraries.” This folder may or may not contain subfolders, depending on if you have already imported other libraries or not. Copy and paste your decompressed archive into this folder, and the next time you start the Arduino IDE your library will be visible under the Sketch ![]() Import Library menu item.
Import Library menu item.
Using an External Library
Now that you have imported your library, it is time to use it. But where do you start? You can import your library just like you would import any standard Arduino library. New libraries appear at the bottom of the Import Library menu, as shown in Figure 24-3.
This imports the library, but that is all it does. So how exactly do you get your hardware to work? Most libraries come with at least one example application, sometimes several. This is the case with the SI1145 written by Ladyada, Adafruit's founder. Here is an extract of her example sketch:
Float UVindex = uv.readUV();
// the index is multiplied by 100 so to get the
// integer index, divide by 100!
UV index /= 100.0;
Serial.print(“US: ”); Serial.println(UVindex);
This example code is extremely simple. A single function is called: readUV. Ladyada also explains why the returned data is divided by 100. This function is called on a uv object. This object is created at the beginning of the sketch, as follows:
Adafruit_SI1145 uv = Adafruit_SI1145();
After that, another function is called inside the setup() function:
uv.begin();
And that's it. Everything you need to use the SI1145.
If there are no examples available, then all is not lost. With the open source nature of Arduino, most libraries are also open source, so you can read the contents of the library. These files are written in C++ but are easily readable and can be opened with any text editor. Opening the SI1145 library header (the .h file) shows the following lines in the source code:
class Adafruit_SI1145 {
public:
  Adafruit_SI1145(void);
  boolean begin();
  void reset();
  uint16_t readUV();
  uint16_t readIR();
  uint16_t readVisible();
  uint16_t readProx();
private:
  uint16_t read16(uint8_t addr);
  uint8_t read8(uint8_t addr);
  void write8(uint8_t reg, uint8_t val);
  uint8_t readParam(uint8_t p);
  uint8_t writeParam(uint8_t p, uint8_t v);
  uint8_t _addr;
};
The class name is a reference to a C++ class. This becomes an object in your sketch. This object contains both variables and functions. It consists of several parts. The private section includes functions and variables that will be visible only inside the class. The sketch cannot see them and cannot modify the variables, or call these functions. What the sketch can see are the members of the public part. As you can see, the previous function is found here, readUV(), but there are others: readIR(), readVisible(), and readProx(). Although the function of readVisible() seems obvious, readProx() isn't clear and wasn't used in the example sketch. Header files rarely have comments, so you may not know immediately what this function does. This is a declaration; it tells the compiler that somewhere in the .cpp file there is a function called readProx(), so that is where you need to look for the answer.
This is the first few lines of the function found in the C++ file:
// returns “Proximity” - assumes an IR LED is attached to LED
uint16_t Adafruit_SI1145::readProx(void)
{
  return read16(0x26);
}
Just a few lines of comments, and you can tell what the function does. So this function calculates the Heat index, the human-felt equivalence temperature—an interesting addition that could be useful for weather stations.
Example Application
For this example, you will import a third-party library to use a piece of hardware.
The Si1145 from Silicon Labs is a digital UV sensor. Targeted for the wearable market, it is compact, light, and ultra-low-powered. It is a highly professional solution, but like most professional solutions, it does come at a price. That price is configuration. This device is not like the LM35 temperature sensor that requires a simple analog read; it requires a little bit of configuration before you can use it. When set up, it provides a highly reliable readout. It doesn't just read UV; it can read visible light, infrared light, and when used with an infrared LED, it is also a proximity sensor. All in all, a highly advanced sensor that is great fun to use.
The Si1145 is difficult to use on a typical Arduino project. The component is surface-mounted, meaning it cannot be placed directly on a breadboard. It is designed to be as small as possible to keep electronic projects small, and as such, it is difficult to solder the component to a board by using household equipment. It takes some skill and a good setup to solder this component by hand. Also, it is powered by 3.3 V, not the 5 V that an Arduino typically uses. To make this device easier to use, Adafruit has developed a breakout board for the Si1145 sensor, adding standard-sized pins, allowing it to be used on a breadboard, and voltage shifters, making it compatible with 5-volt Arduinos. To make it even easier to use, Adafruit has also created a nicely designed and easy-to-use library.
The first thing you require is the Adafruit Si1145 library. You can find the Si1145 breakout board information page here:
https://learn.adafruit.com/adafruit-si1145-breakout-board-uv-ir-visible-
sensor/overview
From that page, you can visit the “Wiring and Test” link where you will find a link to Adafruit's GitHub repository:
https://github.com/adafruit/Adafruit_SI1145_Library
On that page, there are a few things to note. Figure 24-4 displays the webpage.
Repositories can be in a constant state of change; developers can add, change, or delete portions of code, and although some projects are updated daily, others may be updated hourly. You can see the contents of the repository, the filenames, folders, and the last time they were updated. At the bottom, the contents of README.txt are displayed, giving some important information on the project. To the right, there is some statistical information, the number of bug reports, and different ways to connect to the server to retrieve the source code. Some of these involve using the Git software package, but the easiest way is to click the Download Zip button on the bottom right. This takes a snapshot of the current project, compresses it into a Zip file, and downloads the compressed file to your computer.

Now that the Zip file has been downloaded, it has to be imported. For now, try to import the library as it is currently; the filename is Adafruit_SI1145_Library-master.zip. Open the Arduino IDE, go to the Sketch ![]() Import Library
Import Library ![]() Add Library menu item, as shown in Figure 24-5.
Add Library menu item, as shown in Figure 24-5.
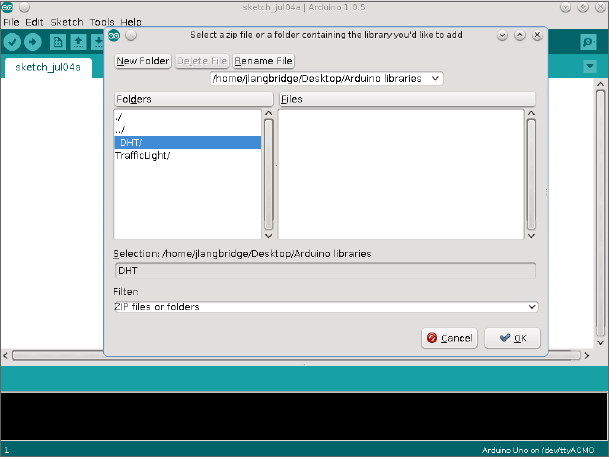
A new window opens. Select the Zip file that you downloaded. Didn't work, did it? You should have an error message at the bottom of the screen.
This is one of the problems when importing libraries: the naming convention. The Arduino IDE cannot read the dash in the filename, so why was it there? Adafruit did not name its library like that; if you look at the Adafruit and Github pages, the repository name is Adafruit_SI1145_Library, no dash. The dash is added by a Git convention, adding -master to the end of the compressed filename. Git repositories can have several “branches,” different areas of code that can be modified independently from the rest of the code. This is used from time to time to test new functionality, and if everything goes to plan, that branch is then merged back into the main repository, called master.
The Zip file cannot be used as it is. You cannot simply rename the Zip file because it contains a folder with a dash in the name. To import this library, you have to try something else: extract the contents. Most operating systems have native support for Zip files. Extract the contents of the Zip file to a location on your hard drive. The result should be a folder name called Adafruit_SI1145_Library-master. Rename this folder Adafruit_SI1145_Library. Now, import this folder. As before, go to the Sketch ![]() Import Library
Import Library ![]() Add Library menu item. Select the folder (without going inside the folder) and press OK. If everything goes well, you will have a new message on your Arduino IDE, like the one shown in Figure 24-6.
Add Library menu item. Select the folder (without going inside the folder) and press OK. If everything goes well, you will have a new message on your Arduino IDE, like the one shown in Figure 24-6.

Now that your library has been imported, you can use it. It becomes available immediately and is listed in the Import Library menu. This library also adds an example, available for use immediately in the File ![]() Examples menu. Note that for both the Import Library and the Example menu items, external libraries are separated from standard libraries.
Examples menu. Note that for both the Import Library and the Example menu items, external libraries are separated from standard libraries.
Now, load the Si1145 example sketch shown here:
1   /***************************************************
2     This is a library for the Si1145 UV/IR/Visible Light Sensor
3
4     Designed specifically to work with the Si1145 sensor in the
5     adafruit shop
6     ----> https://www.adafruit.com/products/1777
7
8     These sensors use I2C to communicate, 2 pins are required to
9     interface
10    Adafruit invests time and resources providing this open source
       code,
11    please support Adafruit and open-source hardware by purchasing
12    products from Adafruit!
13
14    Written by Limor Fried/Ladyada for Adafruit Industries.
15    BSD license, all text above must be included in any redistribution
16   ****************************************************/
17
18  #include <Wire.h>
19  #include “Adafruit_SI1145.h”
20
21  Adafruit_SI1145 uv = Adafruit_SI1145();
22
23  void setup() {
24    Serial.begin(9600);
25
26    Serial.println(“Adafruit SI1145 test”);
27
28    if (! uv.begin()) {
29      Serial.println(“Didn't find Si1145”);
30      while (1);
31    }
32
33    Serial.println(“OK!”);
34  }
35
36  void loop() {
37    Serial.println(“===================”);
38    Serial.print(“Vis: ”); Serial.println(uv.readVisible());
39    Serial.print(“IR: ”); Serial.println(uv.readIR());
40
41    // Uncomment if you have an IR LED attached to LED pin!
42    //Serial.print(“Prox: ”); Serial.println(uv.readProx());
43
44    float UVindex = uv.readUV();
45    // the index is multiplied by 100 so to get the
46    // integer index, divide by 100!
47    UVindex /= 100.0;
48    Serial.print(“UV: ”); Serial.println(UVindex);
49
50    delay(1000);
51  }
Now, it's time to have a closer look at that sketch. On lines 1 to 16, the author begins with a comment. This is a general explanation of the example, what component it is used for, and some licensing information for the software. The BSD license allows you to use the source code for your projects. You can use this library as long as you credit the original author and agree not to take legal action against them if it does not work as expected.
On line 18, the Wire library is imported. This is used to communicate through the I2C protocol, and this is how the Si1145 communicates. On line 19, the Adafruit SI1145 library is imported.
On line 21, an Adafruit_SI1145 object is created called uv. This is the object that will be used to access the sensor's information.
On line 23, setup() is declared. Like most test sketches, it opens up the serial port to allow for simple debugging. On line 28, begin() is called to the uv object. Typically, begin() functions are called to initialize hardware pins, to set voltages to a required state, or to send configuration data to microchips. The Si1145 is an I2C device, so there is no need to configure the I2C bus; it is done via the Wire library. It has a fixed address, so there is no configuration required. It does not require any external pins so that isn't done either. What it does require is a lot of parameters to be sent to the device for it to function correctly. This is what begin() does. For this library, it also detects if the device is present, a nice addition. It is all too easy to incorrectly connect a device. The function returns true if the sensor is present, making sure that you have set everything up correctly before proceeding with the rest of the sketch.
On line 36, loop() is declared, and this is where the fun begins. Several functions are called: readVisible() on line 38, readIR() on line 39, and readUV() on line 44. The readVisible() function returns the current ambient light level, and readIR() returns the current infrared light level. Adafruit's Si1145 breakout board does not come with an IR LED, but it has a connector if you want to use one. For those who do, another function is available (but commented out in the example): readProx() on line 42.
This is an example of a well-designed library; one that is easy to import includes board detection in the begin() function, and works well with a fantastic piece of hardware. The Si1145 is an excellent sensor, and Adafruit has worked hard to create a good breakout board and a great library to go with it.
Exercises
You have seen that with this library, you can use new hardware with only a few lines of code. The Si1145 is a powerful device, capable of replacing a light-dependent resistor (LDR) in most applications, with the advantage of including a proximity sensor. Of course, having a device that can give the exact UV level is a huge advantage for wearable devices that can be used for skin protection, both for adults and children. You can monitor when you have had enough sun, or when it is unsafe for children to play outside. Try to add this device onto one of the projects that you have created while reading this book. A UV sensor is always a great addition to weather stations and nice to have for outdoor sensors.
Summary
In this chapter, you have seen what a third-party library is, where you can find one, and how to run example programs, all of which is designed to get you up and running. You have seen how to get information about the different functions the library has—what they do and the values they return. You have seen how to import them into the Arduino IDE and how to use them in your own applications. Libraries are typically used to add functionality from shields, and in the next chapter you will see how to design and create your own shield for use in your projects.