Lesson 1. Preparing Your First DVD Project
None
Media
Media > TigerBasic folder
Time
This lesson takes approximately 60 minutes to complete.
Goals
Learn the six steps of DVD authoring
Learn about the DVD-Video specification
Learn what assets can be used for DVDs
Work with the Basic view
Assemble a simple DVD project
Use the Palette window
Create a basic menu
Create a slideshow with audio
Burn a disc
Welcome to the world of DVD authoring! As an interactive medium, DVD-Video gives you, the DVD author, a unique opportunity to plan and create an experience for the user. The experience you create includes not only things to see and hear, but also choices for users to make along the way. Apple DVD Studio Pro 4 provides elegant, simple, and powerful tools to help you create this user experience.
In the first lesson in this course, you’ll learn some fundamental facts about the scope and limitations of what a DVD-Video disc can be. Then you’ll jump right into the DVD Studio Pro interface and author an entire disc. By the end of this lesson, you’ll have a fully burned disc that’s ready for viewing. So fire up that Mac and let’s go!
DVD Creation Process
DVD authoring involves six steps:
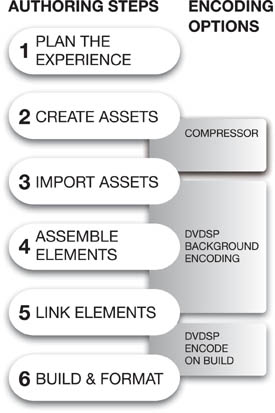
- Planning your user experience by means of a storyboard.
A storyboard is a visual diagram that shows the main elements of your project and how they are linked.
- Creating your assets, which are the actual media files that will form the content of the disc.
Video, audio, and image files are all examples of assets. These assets can either be created using content creation software, such as Apple’s Final Cut Pro or Logic, or Adobe Photoshop, or pulled directly into the computer from other sources, such as videotape, an audio CD, or a digital still camera.
- Importing your assets into DVD Studio Pro.
- Assembling these assets into items that make up a DVD-Video disc.
Disc items are containers that hold assets. Examples of items are menus, tracks, and slideshows.
- Linking these items to form the user experience.
This step involves referring to your storyboard to ensure that the experience flows correctly—and creating menus, submenus, and, most important, buttons that link up every item on the disc and guide the user through the experience.
- Building and formatting the disc.
In this step, the computer takes all your authoring work and creates the files that wind up on the disc itself.
Those of you who are already familiar with the authoring process may be thinking, “Hey, what about encoding?” Encoding is the process of converting your assets from whatever file format they’re in to the file format necessary for DVD authoring. Unique to DVD Studio Pro is the choice you have when you do your encoding.
Traditionally, encoding is done between steps 2 and 3, and is accomplished most efficiently with programs such as Compressor.
You also have the choice of importing assets directly into DVD Studio Pro without changing the nature of the assets at all. If you choose this method, you have two further choices. You can choose to let DVD Studio Pro encode your assets in the background as you work, or you can encode just before step 6, in a process called encode on build. The best part of choosing the second of these two in-program encoding methods is that all the lonely, computer-only, time-intensive parts of the process are relegated to the final step, and we authors can go outside and play.
The DVD-Video Specification
Although DVD-Video is not nearly as flexible as other interactive formats, such as museum kiosks or Web sites, DVD-Video does include many unique features. These features are defined as part of a list of technical guidelines referred to as the DVD-Video specification. There’s lots of gobbledygook in this specification, so let’s just concentrate on the cool stuff:
DVD-Video discs can contain up to 99 tracks of content. Each track can include up to 9 streams of video, 8 streams of audio, 32 subtitles, and multiple languages, all of which makes DVDs ideal for multinational and multicultural experiences. The user can switch between the multiple video, audio, and subtitle streams at any time. Tracks can have chapter markers, which allow the user to navigate directly to specific places on the track. You can also control the playback of a track’s chapter markers via stories, which essentially function as playlists for the content between chapter markers.
DVDs have an item called a slideshow, which can contain up to 99 still images that advance either automatically or manually, with or without music playing in the background.
Menus are the main interactive item of a DVD, and you can have tens of thousands of them on a disc! Menus can contain up to 36 buttons to link up your disc items.
If this isn’t enough, you can also write scripts that customize the user experience even further by instructing the DVD-playing device to do specific tasks based on user input or environmental conditions.
Even with all these features, the DVD creation process is rather simple, in part because the specification is rigid and limited. Theoretically, every set-top DVD player should be able to play any DVD that is created according to this specification, without the need for special plug-ins or other software. The uniformity in DVD discs and players ensures universal compatibility.
Finally, DVD Studio Pro allows access to every corner of the DVD-Video specification, and it even has a few tricks up its sleeve that allow you to enhance the user experience beyond the limits of the specification, without violating any specification rules.
DVD-Video File Formats
A requirement of DVD-Video is that the assets it contains must be encoded into very specific file formats. The DVD specification calls for the following, and only the following, file formats when authoring a disc:
• Video files must be in MPEG-2 (Motion Picture Experts Group, version 2) or, less commonly, MPEG-1 formats.
• Audio files must be in PCM (Pulse Code Modulated, also known as AIFF and WAV files), AC-3 (Dolby Digital), or MP2 (MPEG1-Layer 2. Yep, that’s an audio file format) formats. Alternatively, audio files may also be in DTS (Digital Theater System) format.
• Still images must be in MPEG-2 still image format.
These limited choices for encoded asset file formats are all that the DVD-Video specification allows. However, file format flexibility is one place where DVD Studio Pro really shines. Working together with the magic of QuickTime, DVD Studio Pro allows you to import any of the following file formats listed, and will encode them into the file formats we just listed:
• Video—MPEG-2, MPEG-1, QuickTime (all codecs supported)
• Audio—AC-3, PCM (AIFF and WAV), MP2, MP3
• Images—TIFF, PCT, JPEG, BMP, TGA, PSD (Photoshop)
DVD Studio Pro also accepts the following file formats for automating the creation of subtitle streams and chapter markers:
• Subtitle—STL, SON, SCR, TXT
• Markers—TXT
With the flexibility that DVD Studio Pro gives you to import any QuickTime movie file, a multitude of audio formats, and a number of different still image formats, you can move from the content creation process into the authoring process without pause.
The DVD-Video Disc
The DVD-Video specification was created by an assembly of manufacturers and content distributors known as the DVD Forum. One of the greatest accomplishments of this group was creating a list of disc formats so confusing that it boggles the mind. We won’t go there. We’re interested in just two of the many (try 38) formats that exist.
DVD-5 This is a single-sided, single-layered disc that can hold 4.7 GB of data. We can burn these discs on our Macs today. All Mac SuperDrives burn onto a physical disc called DVD-R (pronounced “DVD dash R”). More recently, we also have the ability, via third-party burners, to burn onto a physical disc called DVD+R (“DVD plus R”). There are small differences between the -R and +R formats, although it seems that -R discs are compatible with a broader range of DVD players, and -R discs are the only ones to use in a Mac SuperDrive. A DVD-5 disc can hold roughly 1 to 2 hours of video content.
DVD-9 This is a single-sided, dual-layered disc that can hold 8.54 GB of data. This is the disc that you typically get when you rent a DVD movie from your local video store. You can burn dual-layer DVDs on Macs that have dual-layer DVD drives. This is convenient when you are authoring a DVD-9 project and want to test the DVD before creating a disc image or outputting to DLT for duplication (mass manufacturing). A DVD-9 disc can hold roughly 2 to 4 hours of video content.
Accessing Features of DVD-Video
A DVD-Video disc uses a remote control device to activate the interactive features of a DVD and operate the player. Whether the user uses a software player in a computer or a hardware player in his or her living room, all of the remote control buttons are essentially the same, although the names may differ slightly between players.
For example, the usual playback control buttons, such as Play, Stop, Forward, and Reverse, are universal. Also, keys for Menu and Title are required to return to a previous menu or to jump to the top menu of a disc. To allow users to navigate through buttons on DVD menus, all remotes have Up, Down, Left, Right, and Enter buttons. There are also buttons for choosing between alternate video, audio, and subtitle streams of the particular track that is playing. The names for these buttons may differ, but they are usually Angle for video streams, Audio for audio streams, and Subtitle for subtitle streams. You can cycle through the available streams by pressing the corresponding button as many times as is required to choose the desired stream.

As you author your disc, pay careful attention to how the user will navigate through the experience with his or her remote control. In DVD Studio Pro, you can set each of the remote control’s features either for the entire disc or for individual disc items, such as tracks and menus. Best of all, you can test how the different buttons function using DVD Studio Pro’s Simulator. The Simulator allows you to preview the actual functionality of the disc when it is finished, and it includes a remote control to approximate the functions of a DVD player. The Simulator is an important feature that you will be using often to test your progress as you create the various items for your DVD.
Note
The DVD-Video specification was designed to support standard-definition (SD) content. DVD Studio Pro also supports authoring of DVDs that contain high-definition (HD) content that complies with the HD DVD-Video specification. The basic DVD creation process covered in this lesson applies to both SD and HD projects, with the exception of the discussion of project assets. HD DVDs support different compression formats and resolutions than SD DVDs. The lesson on encoding discusses this topic in more detail, and the final lesson discusses how to convert an SD project into an HD project in DVD Studio Pro.
Exploring the Interface
OK, enough background information. It’s time to make a DVD! Let’s launch the application and dig right in.
- Launch DVD Studio Pro by double-clicking its application icon in the Applications folder of your hard drive.
Tip
Since we’ll be using DVD Studio Pro so often during the course of this book, it’s a good idea to place its icon in your Dock (if it’s not already there). After the program has launched, click and hold on its icon in the Dock, and choose Keep In Dock from the contextual menu that pops up.
If this is your first time launching DVD Studio Pro, you will encounter a dialog that asks you to choose the application configuration, which is the way that DVD Studio Pro displays its interface.
If you were adventurous enough to launch DVD Studio Pro for the first time before cracking open this book, the interface should open to whatever configuration you last selected. We want to start in the Basic configuration, to explore the interface in its most essential form.
- In the Choose Application Configuration dialog, click the Basic button, make sure the NTSC radio button is selected, and click OK.
If you’ve launched the application before and are now seeing the main interface, choose Window > Configurations > Basic, or press F1.
The Basic view should open with the project window, which currently has “Untitled” in its title bar. The Palette is in the upper right, and the Inspector (which currently states “Disc” in its title bar) is in the lower right.


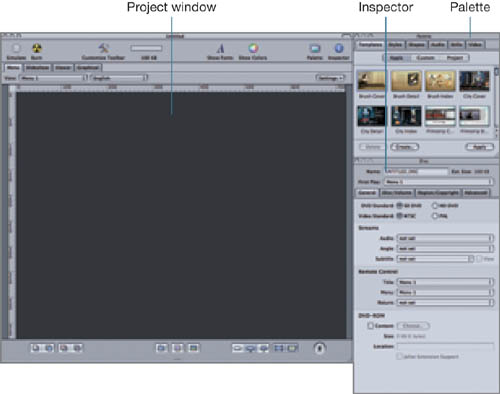
The Project Window
The project window is the main interface of DVD Studio Pro. It has a convenient toolbar at the very top, which lists often-used one-click tools.
Just below the toolbar are four tabs:
• Menu—Where you create and edit the menus of your DVDs
• Slideshow—Where you create and edit slideshows
• Viewer—Allows you to view moving and still items, such as tracks and slideshows
• Graphical—Shows a graphical representation of all the items of the DVD, and how they link up together
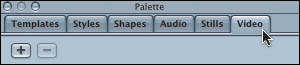
The Palette
The Palette has six tabs. The first three—Templates, Styles, and Shapes—contain thumbnail links to assets that have been created for you by the folks at Apple.
• The Templates tab contains entire prebuilt menus, complete with placeholders for still or moving images (called drop zones), buttons, and beautiful text and graphics.
• The Styles tab contains prebuilt styles for text, buttons, drop zones, and menu layouts.
• The Shapes tab contains a plethora of physical shape files that can be used to create drop zones or buttons.
The next three tabs—Audio, Stills, and Video—contain thumbnail links to assets.
• The Audio tab contains links to assets in your Music folder.
• The Stills tab contains links to assets in your Pictures folder.
• The Video tab contains links to your Movies folder.
In these tabs, you can also create links to folders anywhere on your hard drive or your network in order to bring in assets to your current project.
The important thing to remember about the Palette is that it’s a window of possibilities. What we see in the Palette are links to actual assets outside of your project, and you will drag and drop them from the Palette into your project window in order to add them to your current project.
The Inspector
Just below the Palette, you’ll find the Inspector. The Inspector is a chameleon of sorts. It reflects the properties of whatever is currently selected in your project, and its title bar tells you what asset or element it is currently “reporting” on. For instance, if you’re working on a button, the Inspector will bear the title “Button”; if you’re working on the disc as a whole, the Inspector will show the word “Disc” in its title bar; and so on. You use the Inspector to change the properties of items and elements. The Inspector is, in fact, the most-used window in the interface.
If you’re an iDVD user, DVD Studio Pro’s overall window configuration should seem similar to what you’re accustomed to in Apple’s consumer-level application. The project window is similar to iDVD’s main window; the Palette window is similar to the Themes area in iDVD’s Customize drawer; and the Inspector is similar to the Settings area.
Creating a Simple DVD in Basic View
Now that you’ve launched the application, selected Basic view, and gotten a quick tour of the interface, you’re ready to begin authoring your disc. First, you’ll need to bring some assets into your project. In this first exercise, you’ll create new links in the Audio, Stills, and Video tabs of the Palette in order to display and use the assets needed to create the disc.
- Go to the Palette window and click the Video tab.
- Click the Add (+) button in the top-left corner of the Palette to select a new folder that contains the video assets you want to add to the project.
- Navigate to the Media folder located in the DSP4 Book Files folder on your hard drive.
- Locate the Media > TigerBasic > TigerBasic_Assets > Tiger_Video folder, and click Add to place the folder in the video list in the Palette.
Note
If you can’t find the DSP4 Book Files folder, make sure you have installed the Media files for this book properly. For details, see “Getting Started.”
Once the folder is added to the Palette, you should be able to see a thumbnail image of the TigerMovie1 video file in the list at the bottom of the Palette. This thumbnail represents the first frame of the video.
Now let’s add some audio assets.
- Click the Audio tab in the Palette.
- Click the Add (+) button to select a folder with the audio assets you require.
- Select the Media > TigerBasic > TigerBasic_Assets > Tiger_Audio folder and click Add.
After you have selected this folder, the one file in that folder, TigerAudio, is displayed in the Audio palette.
Now let’s add some still image assets, which you can use later for a slideshow.
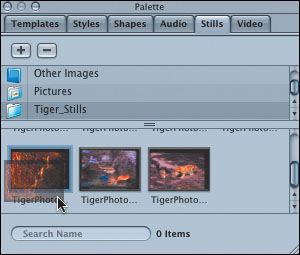
- Click the Stills tab in the Palette.
- Click the Add (+) button to select a folder with the image assets you require.
- Select the Media > TigerBasic > TigerBasic_Assets > Tiger_Stills folder and click Add.
The thumbnails for the seven JPEG images in the Tiger_Stills folder are displayed at the bottom of the Palette.
- Choose File > Save or press Command-S to save your project.
- Type the name TigerBasic_DVD in the Save As field in the dialog, but don’t click Save just yet.
- Click the disclosure triangle to the right of the Save As field.
Clicking open the disclosure triangle reveals all the features of the Save window.
DVD Studio Pro automatically appends a .dspproj extension to all project files, so that they can be identified by the operating system. By default, you will not see this extension added to the filename because the Hide Extension box is selected in the lower-left corner of the Save dialog. We’ll leave this as it is.
- Navigate to DSP4 Book Files > My_Projects.
- Click Save, and your new TigerBasic_DVD project is saved in the My_Projects folder.


Creating a Menu
The disc you are creating is simple. It has one main track, which will play the TigerMovie1 asset you just linked to in the Palette. You will also create a slideshow with all the still images you linked to. To allow your users to navigate between the track and slideshow, you will create a main menu with buttons that link to the track and slideshow.
The main menu is the first item that a user will encounter when playing the disc, and it should be eye-catching and easy to navigate. Although you can create your menus from scratch for more advanced projects, it is much quicker and easier to use menu templates, which construct the layout and design of a menu for you automatically. For the TigerBasic project, you’ll need to make only slight modifications to the template to customize your menu.
The layout of templates also provides a simple navigation flow for projects that are too small for a storyboard. (You’ll get some practice with storyboards later in this book.)
Applying an Apple Menu Template
DVD Studio Pro ships with many high-quality menu templates for you to use. In this next exercise, you will select and add one of these templates in order to create the main menu for your project.
- Click the Templates tab in the Palette.
- Double-click the first template thumbnail, Brush Cover.
When the template is applied, the Menu Editor of the project window looks like this:
- Choose File > Save to save your project.


Modifying an Apple Template
Applying a template was pretty easy, don’t you think? However, looking at the template, it may not seem like much. That’s because this particular menu template is a motion menu. Let’s take a quick look at it in motion to see all of its cool features.
- At the bottom right of the Menu Editor, click the Motion button (the circle with a small figure in it).
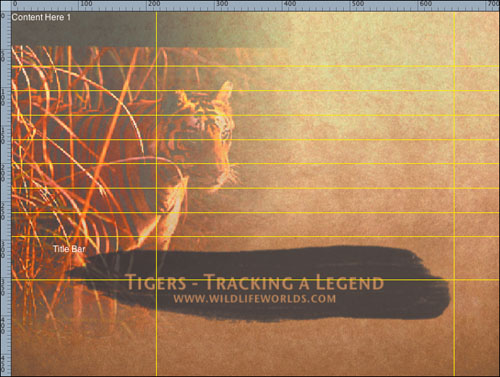
Suddenly, a brush stroke makes its way across the screen, from right to left, revealing a text field. At the end of the motion animation, a gray area with an arrow icon in it appears in the upper-left of the screen. Both of these elements are called drop zones.
The drop zone in the upper left indicates by its gray area and arrow icon that an asset can be “dropped” into its “zone” in order to create a fade effect. The purpose of the drop zone at the bottom of the menu is to eventually reveal the text. The placeholder text currently says, “TITLE INFORMATION HERE,” but not for long. Let’s change that text to the title of our disc.
- Click once directly on the text, then wait a moment and click it again to highlight the text.
- Type Tigers—Tracking a Legend for the title.
- Click away from the text box, somewhere close by on the menu’s surface, to deselect it.
- Holding down the Option key, drag and drop the text box down to create a copy of it just below the original.
As you drag the new text box down, automatic yellow alignment guides will indicate how the new text field is lining up with elements around it on the menu. Use them to make sure the copied text box is exactly below the original one.
- Click this new text box a second time to highlight its text.
- Type www.wildlifeworlds.com.
- Press Command-A to select all of the text you just typed, and then click the Show Fonts icon at the top of the Menu Editor.
- Use the Font window to change the size of the text to 18 point.
- Close the Font window.
OK, you’ve customized the text. Now you need to actually “drop” something into that drop zone in the upper left of the screen.
- In the Inspector, click the Stills tab.
- Scroll through the thumbnail list of the seven photos you recently linked, and find the fifth photo, the one with the tiger peeking out from the grass.
- Select this photo and drag it to the drop zone in the upper left of the menu, but don’t let go of the mouse button.
In a moment, the Drop palette will appear. As you hold down the mouse button, the Drop palette reveals a context-sensitive menu for dropping assets or menu elements onto the menu. An essential part of the DVD Studio Pro interface, the Drop palette saves you a lot of time.
The Drop palette takes a moment to come onto the screen, which gives you an opportunity to practice developing your patience (let’s call this Drop Patience).
- Make sure your pointer is located inside the first selection in the Drop palette, which is Set Asset. Then let go of the mouse button.
The image of the tiger now ominously reveals itself when the drop zone fades onto the screen.
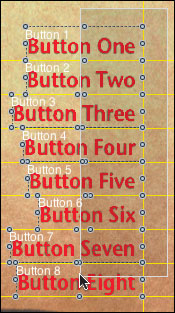
Finally, let’s tackle this template’s default buttons, which appear as the eight little areas in the upper-right corner of the screen. The buttons that come with this template are too numerous for our purposes, and besides, they’re a little boring. Let’s get rid of them in one swoop.
- Hold down the Command key, and drag a selection rectangle around all eight buttons. (Be careful to select just the buttons and not anything else on the menu. This is best accomplished by starting at the upper right of the buttons and dragging to the bottom left.)
As you select each button, handles appear around the boundaries of the buttons to indicate that they are selected.
- Press Delete to remove all the buttons.
Your menu should now look like the screen on the following page.
- Choose File > Save to save your project.


Creating Custom Buttons
Now that you’ve gotten rid of all the buttons that came with this template, you’ll need to create your own. In this exercise, you’ll import some beautiful shape-based buttons from the Palette. The new buttons contain their own drop zones. You’ll drop some assets into these drop zones to make them even more dynamic.
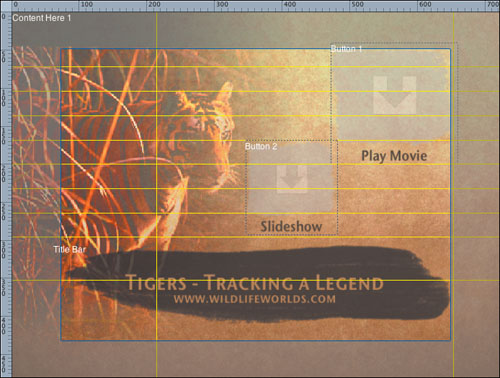
- In the Palette, click the Styles tab, then the Apple button, and finally the Buttons button to see all the available button styles.
- Click and drag the Brush Small 1 button onto the top right of the menu. Hold the mouse button down and wait for the Drop palette to appear.
- Select Create Button, Set Style (the first selection) in the Drop palette.
The new button is called Button 1 in your menu, as you can see in the upper-left corner of the button’s boundary.
- Back in the Palette, click and drag the Brush Small 2 button onto the menu, just to the left and below where you placed your first button, and hold down the mouse button.
The Drop palette appears.
- Select Create Button, Set Style from the Drop palette.
The new button, called Button 2, appears in your menu.
- Click the word “Button” at the bottom of Button 1, then click it again and rename it Play Movie.
- Click the word “Button” at the bottom of Button 2, and rename it Slideshow using the method described in step 7.
As you place elements like these onto the menu, you need to be aware of the overscan area of a television image. Simply put, there is more area to a television image than you can see on the average television set. The overscan area can be compared to the area of a tablecloth that falls off a table’s edge.
Fortunately, DVD Studio Pro has two overlays to make sure that all parts of the menu will be seen on a television: the action safe area for general images, and the title safe area for text. Let’s turn on the title safe area to make sure your newly placed buttons will show up properly when viewed on a television set.
- From the Settings pop-up menu in the upper-right corner of the Menu Editor, choose Title Safe Area.
An outline forms around the menu, indicating where it is safe to display text and any important elements of a menu.
- Reposition the Play Movie button by simply clicking in its center and dragging it, so that it is within the title safe area.
- Click the lower-left corner of the Slideshow button outline, and drag it up and to the right to reduce the size to about 60%.
- Move the Slideshow button up and to the right.
Your new menu template should now look similar to the one shown here:
- Choose File > Save to save your changes.
The new look for your menu is complete. Notice how different the customized menu is from that of the original template.


Connecting Assets to the Menu
You’ve imported assets and built a menu with the right title text and customized buttons. The next step is to connect all the assets to the menu buttons.
Creating a Track
- In the Palette, click the Video tab.
- Drag the TigerMovie1 thumbnail from the list below onto the Play Movie button in the Menu Editor.
- When the Drop palette appears, select Set Asset and Create Track, Connect to Track.
Your button is now linked to a newly created video track, which will play when this button is activated. Also, your video’s thumbnail image is dropped into the button. Finally, when the movie finishes playing in its track, the disc will jump back to the main menu. That’s four authoring steps that the Drop palette has automatically executed for you!
- Choose File > Save to save your changes.

Creating a Slideshow
You’ve got TigerMovie1 linked up. Now it’s time to get the slideshow working and hook up the audio.
- In the Palette, click the Stills tab.
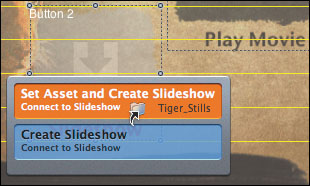
- From the list of folders in the Stills tab, drag the Tiger_Stills folder onto the Slideshow button in the Menu Editor.
- When the Drop palette appears, select Set Asset and Create Slideshow, Connect to Slideshow.
With one drag, the Slideshow button is now linked to a newly created slideshow. When the user selects and activates the Slideshow button, your DVD will play all seven of the images in the TigerStills folder.
Notice that the first image of the seven is used for the thumbnail image of the button. Additionally, when the slideshow finishes playing, the disc will jump back to the main menu. The Drop palette has again automatically executed four steps for you.
- Click the Slideshow tab in the project window to display the Slideshow Editor.
All slideshow images are now displayed in the Slideshow Editor.
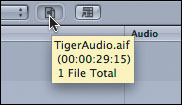
Next, let’s add some music to play while the slides are being displayed. To add audio to the slideshow, you simply drag and drop your audio file from the Audio palette onto the Overall Audio File area in the Slideshow Editor.
- In the Palette, click the Audio tab.
- Drag the audio file named TigerAudio onto the little speaker well at the top of the Slideshow Editor.
This audio file is set to play as background music for the slides in your slideshow.
- Move your pointer over the speaker well, and wait a moment.
A tooltip appears, showing you the contents of the speaker well.
Tooltips abound in DVD Studio Pro, just as in most of the other Apple Pro applications. If you can’t remember the function of a button in the interface, or if you’re just curious about the contents of an element, simply pause your pointer over it for a moment. The little yellow box that appears will usually tell you what you need to know.
- Go back to the Menu Editor by clicking the Menu tab.
- Choose File > Save to save your changes.


Simulating a Disc
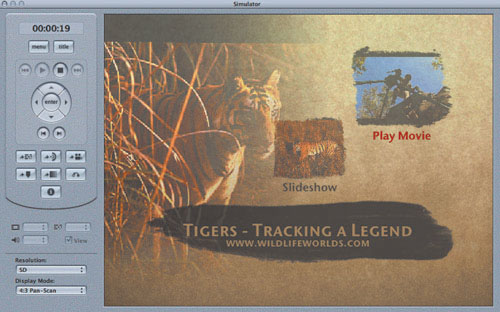
It’s time to test our disc! The Simulator allows you to test the project as if it were playing in a DVD player. This is an important feature, because it’s critical to be able to test a project before burning it to a disc.
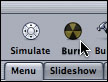
- Click the Simulate icon in the toolbar.
The Simulator opens. You can now test the functionality of your DVD project as if you were watching it on a DVD player.
- Select the Play Movie button in the main menu using the remote control buttons on the left side of the Simulator window.
- Watch the movie.
When it’s done, the main menu should appear again.
- Select the Slideshow button, this time by clicking it with your mouse, and watch the slideshow.
When the slideshow is done, the DVD should jump back to the main menu.
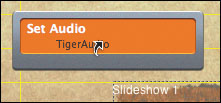
Now that you’ve taken a look at your disc’s basic functionality, it might seem that the main menu is a bit quiet. Let’s add the same audio file that we are using in the slideshow to the main menu. This way, users can listen to music as they decide what to do next.
- Close the Simulator by clicking the close button in the upper-left corner of the window. (Dismiss the Log window that appears automatically.)
- In the Palette, click the Audio tab.
- Drag the audio file named TigerAudio onto an empty space on your menu.
The Drop palette appears.
- Select Set Audio.
- Click the Simulate icon again.
Your menu now has audio. Navigate through the disc again to see that everything is linking correctly.

Building a Project and Burning a Disc
After you have tested your project with the Simulator and are satisfied with the results, you can go ahead and build the project and burn it to a DVD, or place it in a folder on your hard drive for later viewing and duplication. Building a project is the process that DVD Studio Pro undergoes as it combines the various assets and other elements into a finished DVD that can be viewed with a DVD player. In Lesson 9, you’ll learn more about outputting a project. For now, we’ll use the Burn button in the toolbar, which is identical in function to the Burn button in iDVD.
Note
You don’t need to proceed with this final exercise, but if you are interested in seeing what your finished project looks like on an actual DVD player and are willing to burn a disc to do so, by all means forge ahead!
- Click the Burn icon on the toolbar.
- When prompted by the interface, insert a blank DVD-R into your Apple SuperDrive or external DVD burner.
- Watch as the elements in your project are encoded, joined together, and output to a disc.
- Choose File > Save to save your project.
Congratulations! You’ve created a fully functional, nice-looking DVD with navigation, and you’ve learned the basics of DVD authoring in the process.
Lesson Review
1. All video files on a finished DVD-Video disc must be in what format?
2. What is the main function of the Inspector?
3. True or false: The built-in Apple templates cannot be modified in the Menu Editor.
4. How do you play a motion menu in the Menu Editor?
5. How do you create a copy of a menu element?
Answers
Keyboard Shortcuts
1. MPEG-2 video. In fact, every image asset, including still images, get transformed into MPEG-2 when the final disc is compiled.
2. It updates to show you the unique properties of any item selected in the workspace.
3. False. You can change button positions, text, and even the images in drop zones.
4. Click the Motion button in the bottom-right corner of the Menu Editor.
5. Hold Option and drag the menu element to a different part of the Menu Editor.