
Lesson 6: Using Remote XML Data
In this lesson, you will:
• Externalize your data
• Distinguish embedded and loaded data
• Create an HTTPService object that returns data as Objects
• Understand security issues involved with retrieving data into Flash Player
• Search XML with E4X expressions
• Create an HTTPService object that returns data as XML
• Build an XMLListCollection from your dynamic XML
• Display your data in a List
In this lesson, you will begin to connect the FlexGrocer application to XML data.
First, you will use a local XML file that you will embed in your application. This will demonstrate one technique used to move your XML data into a separate file. Then you will use the HTTPService class to load remote XML data into the Application. In this context, the word remote means that the data is remote to the application: in other words, not embedded. The data can exist on a remote server or in external files on the same server, but in either case the data is transmitted through HTTP.
You will work with this XML data in several formats, including functionality from the ECMAScript for XML (E4X) implementation that allows you to use XML as a native data type in ActionScript (it’s built into Flash Player just like Number, Date, or String).
Controls can be populated with this data to easily display complex datasets and enable the user to navigate the data quickly. Examples of these controls include List, ComboBox, and Tree. You will be using the List control in this lesson.

You will use XML Data to populate the application with live data.
Using Embedded XML
In this task, you will make two major changes: externalizing your data (defining it somewhere external to your Application class) and treating it as XML at runtime.
Currently the XML for your Milk product is hard-coded directly into the Application class in an <fx:Model> tag. Hard-coding XML is extremely convenient when you’re prototyping new code, but it clutters up your application and can make it difficult to see the important code as new and different types of data are needed.
Externalizing the Model
Your first task is to externalize the data in your application and reference it by filename.
- Open the FlexGrocer.mxml file.
Alternatively, if you didn’t complete the previous lesson or your code is not functioning properly, you can import the FlexGrocer.fxp project from the Lesson06/start folder. Please refer to the appendix for complete instructions on importing a project should you skip a lesson or if you have a code issue you cannot resolve.
- Make sure Flash Builder is in Source view.
To switch between Design view and Source view in Flash Builder, click the buttons in the menu bar near the top of the window.
- Expand the FlexGrocer project and the src folder inside the Package Explorer. Right-click the assets folder and choose New > File.

- Enter inventory.xml in the File name field. Click Finish.
You will move the XML specified in your Application file to the external file you just created (inventory.xml) to declutter your Application code.

- Click the Source tab on the bottom of the inventory.xml file.
When the new inventory file opens in Flash Builder, it will open by default in a type of design view for XML. Going to Source view here will allow you to interact with the XML directly as text.

- On the first line of the new file, you need to add an XML document type declaration that specifies that this file is a version 1.0 XML document encoded with utf-8.
<?xml version="1.0" encoding="utf-8"?>
This is the same declaration used at the top of each of your MXML files. If you don’t want to type it, you can copy it from the first line of the FlexGrocer.mxml file.
- Copy the groceries XML node from within the Model tag of your application. This is the XML that starts with
<groceries>and ends with</groceries>, including both of those tags. - Paste that XML node into the inventory.xml file directly below the document type declaration. Your inventory.xml file should look like this:
<?xml version="1.0" encoding="utf-8"?>
<groceries>
<catName>Dairy</catName>
<prodName>Milk</prodName>
<imageName>assets/dairy_milk.jpg</imageName>
<cost>1.20</cost>
<listPrice>1.99</listPrice>
<isOrganic>true</isOrganic>
<isLowFat>true</isLowFat>
<description>Direct from California where cows are happiest!</description>
</groceries> - Save the inventory.xml file. You will now use this external file in place of the hard-coded XML in the application.
- Switch back to your FlexGrocer.mxml file and delete the groceries XML from inside the Model. The tag should now be empty.
<fx:Model id="groceryInventory">
</fx:Model> - Inside the Model tag, add a
sourceattribute and set it toassets/inventory.xml.<fx:Model id="groceryInventory" source="assets/inventory.xml">
</fx:Model>Specifying the
sourcehere tells the Model tag to use your external file as its model. - Finally, change the Model tag to be self-closing. You now want the content in the source file, not content inside the Model tag, to be used for the inventory data.
<fx:Model id="groceryInventory" source="assets/inventory.xml"/>
- Save and run your application.
The product description and information should work just as they did before; however, the data is now coming from the inventory.xml file.
Choosing Between Objects and XML
When working in Flex with XML data, you have two choices: Work directly with the XML or convert the XML to an object, then use that object instead of the XML.
The Model tag you’ve been working with so far does the latter. It is using the XML you typed into the inventory.xml file as a template, from which it creates a series of generic objects. In this exercise you’ll see this structure in the debugger and then change the code to use XML directly.
- Open the FlexGrocer.mxml file.
Alternatively, if you didn’t complete the previous exercise or your code is not functioning properly, you can import the FlexGrocer-PreXMLTag.fxp project from the Lesson06/intermediate folder. Please refer to the appendix for complete instructions on importing a project should you skip a lesson or if you have a code issue you cannot resolve.
- Add a breakpoint inside the
handleCreationComplete()method by double-clicking in the marker bar just to the left of the code and line numbers. A small blue dot will appear in the marker bar indicating where the program execution will halt.
- Debug the FlexGrocer application.
In Flash Builder, you may be prompted to use the Debug perspective. This dialog box will only appear if you did not select the Remember Your Decision check box earlier. If prompted, select the Debug perspective now. Click Yes. Flash Builder will stop on the line where you set a breakpoint.
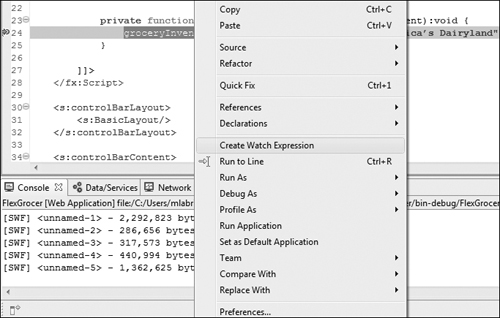
- Select groceryInventory and then right-click it. Choose Create Watch Expression.
Flash Builder will add groceryInventory to the Expressions view. If you can’t find the Expressions view, go to Window > Expressions.
- Expand the groceryInventory object by clicking the triangle to the left of it in the Expressions view. Note that the item type is
mx.utils.ObjectProxy.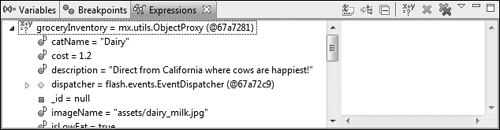
ObjectProxy instances are a special type of wrapper for Objects. They effectively enable Objects to dispatch events, which is important for data binding, as you will learn in future lessons.
The Model tag converted your XML to Objects. This is actually its intended purpose, to provide the developer with a quick way to define potentially hierarchical objects using XML. As mentioned previously, this is one of two ways that you can choose to deal with XML in Flex. The other is to leave it as XML and manipulate it directly. You will do that next.
- Click the red square to terminate this debugging session.
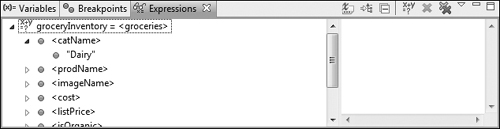
- Change the
<fx:Model/>tag to an<fx:XML/>tag.<fx:XML id="groceryInventory" source="assets/inventory.xml"/>
- Debug the FlexGrocer application again.
Flash Builder will stop on the line where you set a breakpoint.
- The watch expression you set for groceryInventory is still active. So, if you expand the view of this object in the Expressions view, you will see that it is no longer an ObjectProxy, but now XML.
- Click the Resume button (the green Play icon to the left of the red Terminate button), and your application will continue to run in the web browser.

- In your web browser, move your mouse pointer over the milk image, and you will see that the description appears as it did before.
The description still displays thanks to a feature of Flash Player called ECMAScript for XML (E4X). It allows you to access data inside XML in much the same way you access other objects, greatly simplifying the task of using XML and making your existing code able to use either objects or XML.
- Terminate your debugging session by clicking the red Terminate button. Remove your breakpoint before continuing.
Your application is now using XML directly instead of Objects for this data. The decision to use one or the other inside Flex is a recurring theme, as you will see in the following exercises.
Using XML Loaded at Runtime
In the previous exercise, you used an external XML file both as an Object and as XML to provide data for your application. However, in both cases, the data was embedded in the application. In other words, the data in your external inventory.xml file became part of the final SWF file produced by Flash Builder.
If the data in your inventory.xml file changes, you will need Flash Builder to recompile your FlexGrocer application before the changes become available to someone running the application. This is fine for demo software and potentially even certain pieces of data that do not change very often (for example, the states in the United States). However, it is not practical for most cases.
In this section you’ll learn to load data from an external source using the HTTPService so that your data can change independent of your application.
Simply stated, the HTTPService component allows your application to use data it retrieves at a given URL. By default, the data will be returned in an Object format (as it was when you embedded your file with the Model tag). You can choose the format in which you wish to use the data (for example, Object, XML, or text). In this section you’ll use the returned data in both the Object and XML formats.
The general steps for using HTTPService follow:
- Create an HTTPService object.
- Invoke the
send()method of the object. - Use the returned data.
Creating an HTTPService Object
You create the HTTPService object in the same way as other objects in MXML. When you create the object, you need to specify the URL that the service should access, and potentially specify a method that should be called when a result is retrieved. This is accomplished using the result event, which is broadcast when data is successfully returned by the HTTPService object. An example of using the HTTPService object is shown here:
<s:HTTPService id="unitData"
url="http://www.flexgrocer.com/units.xml"
result="resultHandler(event) "/>
The url property can be an HTTP URL, or even a file URL that points to a file on the file system.
Invoking the send() Method
When you wish to retrieve data from a given URL, you must send a request for that data. The HTTPService object contains a method to send this request, named send(). When you create the HTTPService and specify the URL, the HTTPService is ready to retrieve your data; however, it will not begin this process until you invoke the send() method. In many cases, you will want to retrieve data at application startup. In this lesson, you’ll use the creationComplete event of the Application tag to retrieve remote data.
Accessing the Returned Data
Data retrieved from the HTTPService can be accessed in two ways.
lastResult
The first is to access the data directly via the lastResult property of the named HTTPService object. To get to the data, build an expression with the following elements:
• The instance name of the HTTPService
• The lastResult property
• The dot path into the data you are trying to access
For example, in the next exercise you have an HTTPService defined as
<s:HTTPService id="unitRPC"
url="http://www.flexgrocer.com/units.xml"/>
and it will retrieve the following XML:
<?xml version="1.0" encoding="utf-8" ?>
<allUnits>
<unit>
<unitName>Bunch</unitName>
<unitID>4</unitID>
</unit>
<unit>
<unitName>Dozen</unitName>
<unitID>2</unitID>
</unit>
<unit>
<unitName>Each</unitName>
<unitID>1</unitID>
</unit>
<unit>
<unitName>Pound</unitName>
<unitID>3</unitID>
</unit>
</allUnits>
By default, it will turn that XML into a series of objects. So, to access the unit node data via the lastResult property, you would use the following code:
unitRPC.lastResult.allUnits.unit
This is the instance name of the HTTPService (unitRPC), followed by the lastResult property, followed by the path to the piece of data you care about (unit).
This method of accessing the returned data is a useful learning tool, so you will see another example later in this lesson, but in real applications you will rarely use this method because it can be clumsy and confusing. In practice, you will access the data via an event object inside an event handler.
result
If you’re using an HTTPService defined as follows,
<s:HTTPService id="unitRPC"
url="http://www.flexgrocer.com/units.xml"
result="unitRPCResult(event)"/>
then the unitRPCResult() handler will be called when the XML is successfully retrieved. The proper method signature for this result handler is
private function unitRPCResult(event:ResultEvent):void{
}
You can access the unit node data in the body of the function by specifying
event.result.allUnits.unit
The returned data is available in the result property of the event.
To reiterate, the two ways of accessing data returned from this HTTPService are unitRPC.lastResult, which can be used anywhere in the application, or event.result, which can be used only inside the event handler.
Being Aware of Security Issues
The Internet is not a secure place. It’s full of people “borrowing” information and attempting to access content they have no right to view. As Flash Player and your application must live in this world, many security restrictions are placed on what Flash Player is allowed to do on your system and how it is allowed to access data. The restriction that we are most concerned with in this section pertains to loading data from a remote server.
Flash Player uses a concept called sandboxes at the core of its security model. You can visualize this as a literal sandbox. All the children sitting in a single sandbox are allowed to interact and play with each other’s toys. However, when a child from another sandbox wanders over to play or retrieve a toy, he is met with scrutiny and distrust.
Internally, Flash Player keeps all the content from different domains (mysite.com versus yoursite.com) in different sandboxes. As part of the security measures imposed on these sandboxes, content loaded from one domain is not allowed to interact with content loaded from another domain.
Following this logic, if your application is at http://www.yoursite.com/yourApp.swf and it attempts to load an XML file at http://www.flexgrocer.com/units.xml, it will be denied and a security error will occur as these two items exist in different security sandboxes.
The Flash Player security model requires the owner of flexgrocer.com to allow you access to that data, or you will be denied by default. The owner of that domain can allow such access by creating a cross-domain policy file. This file, named crossdomain.xml, specifies which domains have access to resources from Flash Player. The file is placed on the root of the web server that contains the data to be accessed. Here is an example of a cross-domain policy file that would enable your application on www.yoursite.com to access the units.xml file on flexgrocer.com. The file would reside in the web server root of flexgrocer.com:
<cross-domain-policy>
<allow-access-from domain="www.yoursite.com"/>
</cross-domain-policy>
You can also use wildcards in a cross-domain policy file. This example allows anyone to access data:
<cross-domain-policy>
<allow-access-from domain="*"/>
</cross-domain-policy>
Browse the URL www.flexgrocer.com/crossdomain.xml to see the cross-domain file that allows you to retrieve data for this book. Also check www.cnn.com/crossdomain.xml to see who CNN allows to syndicate their content using Flash Player.
More information about the sandbox restrictions of Flash Player is available in the tech note on the Adobe site at www.adobe.com/cfusion/knowledgebase/index.cfm?id=tn_14213, along with a complete description of the cross-domain policy file, which can be found at www.adobe.com/devnet/articles/crossdomain_policy_file_spec.html.
Before deploying a cross-domain security file like this on a server, make sure you understand all the ramifications.
Retrieving XML Data via HTTPService
In this exercise, you will use an HTTPService object to retrieve data that contains the categories for grocery items—such as Dairy or Meat. You will also use the debugger to make sure that the data is returned correctly and will verify that you can see the data in the event object.
- Open a web browser and go to the following URL:
http://www.flexgrocer.com/category.xml.
Notice the structure of the XML. This is the data you will retrieve using the HTTPService.
<?xml version="1.0" encoding="utf-8" ?>
<catalog>
<category>
<name>Dairy</name>
<categoryID>4</categoryID>
</category>
<category>
<name>Deli</name>
<categoryID>5</categoryID>
</category>
<category>
<name>Fruit</name>
<categoryID>3</categoryID>
</category>
<category>
<name>Meat</name>
<categoryID>1</categoryID>
</category>
<category>
<name>Seafood</name>
<categoryID>6</categoryID>
</category>
<category>
<name>Vegetables</name>
<categoryID>2</categoryID>
</category>
</catalog> - Open the FlexGrocer.mxml file.
Alternatively, if you didn’t complete the previous exercise or your code is not functioning properly, you can import the FlexGrocer-PreHTTPService.fxp project from the Lesson06/intermediate folder. Please refer to the appendix for complete instructions on importing a project should you skip a lesson or if you have a code issue you cannot resolve.
- Inside the
<fx:Declarations>block, directly below the<fx:XML.../>tag, add an<s:HTTPService>tag. Give it anidofcategoryService, and specify http://www.flexgrocer.com/category.xml as theurlproperty. Specify a result handler namedhandleCategoryResultand be sure to pass the event object, as follows:<s:HTTPService id="categoryService"
url="http://www.flexgrocer.com/category.xml"
result="handleCategoryResult(event)"/>You are specifying the URL of the HTTPService to point to the XML you examined in step 1. In the next step, you will write an event handler with the name
handleCategoryResult(), which will be called when the data has been retrieved. - In the Script block below the existing functions, add a new private function with the name
handleCategoryResult()that returnsvoid. The method will accept a parameter namedevent, typed as aResultEvent. At this point the function is empty.private function handleCategoryResult(event:ResultEvent):void{
}If you chose ResultEvent in the pop-up list when you were typing, or if you pressed Enter when the ResultEvent was selected, then Flash Builder automatically added an import statement for you near the beginning of the Script block. If you do not see
import mx.rpc.events.ResultEvent;near the beginning of your Script block, then you must add it manually now. Learning to use the code completion features of Flash Builder as soon as possible will save you hours in the course of this book and thousands of hours in your lifetime as a Flex developer. - Find the
handleCreationComplete()method you wrote in Lesson 5, “Handling Events.” This method is called when thecreationCompleteevent of the application is dispatched. Presently this method changes some data in the groceryInventory object. Delete the line that readsgroceryInventory.description = "Cheese from America's Dairyland";
from inside your method. You will now replace this with code to request data.
- Call the
send()method of the categoryService object inside thehandleCreationComplete()method. Your method should read as follows:private function handleCreationComplete(event:FlexEvent):void {
categoryService.send();
}The categoryService object is the HTTPService that you defined in your declarations. Invoking its
send()method asks Flash Player to go out on the network and request the data found at http://www.flexgrocer.com/category.xml.
This is one of the most misunderstood aspects of programming in Flex. Data retrieval is asynchronous. Just because you called the
send()method does not mean that your XML data is ready to use. The act of callingsend()starts the process of getting that data. However, just as your web browser takes a moment to load a page, so this data will not be available and ready to use until theresultevent occurs. - Add a breakpoint on the closing bracket of the
handleCategoryResult()method by double-clicking in the marker bar just to the left of the code and line numbers. A small blue dot will appear in the marker bar indicating the spot where program execution will halt.Placing a breakpoint here gives you the chance to examine the data returned by the HTTPService.
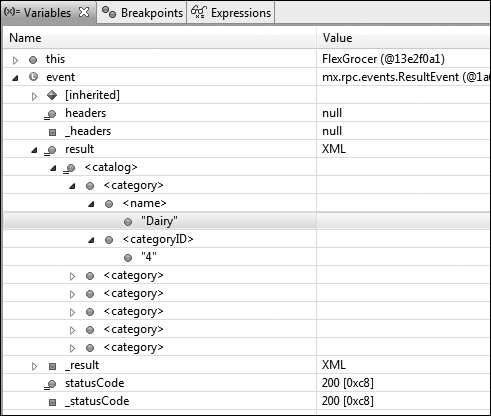
- Debug the application. Return to Flash Builder and make sure you are in the Debugging perspective. Double-click the Variables view tab. Drill down to the returned data by clicking the plus sign in front of event > result > catalog > category. Here you see the six category values in brackets [0], [1], [2], [3], [4], and [5] when you expand them.
If you dig far enough into the structure, you will eventually see categories such as Fruit, Meat, and Dairy.

- Double-click the Variables view tab to return it to its normal size. Terminate the debugging session by clicking the red Terminate button in the Debug or Console view. Finally, return to the Development perspective.
You have now used an HTTPService object to retrieve data, and you used debugging techniques to confirm that it has been returned to the application. Soon, you’ll put the data to use.
Searching XML with E4X
In this section, you will gain some understanding of working with XML in Flex. ActionScript 3.0 contains native XML support in the form of ECMAScript for XML (E4X). This ECMA standard is designed to give ActionScript programmers access to XML in a straightforward way. E4X uses standard ActionScript syntax with which you should already be familiar, plus some new functionality specific to E4X.
The XML class in ActionScript 3.0 is not the same as the XML class in ActionScript 2.0. That class has been renamed “XMLDocument” so that it does not conflict with the XML class now part of E4X. The old XML document class in ActionScript is not covered in this book. You shouldn’t need to use that class except when working with legacy projects.
In this task and through the rest of this lesson, you will use E4X functionality. The new E4X specification defines a set of classes and functionality for XML data. These classes and functionality are known collectively as E4X.
First, for a very basic, very quick review of XML terminology, examine the XML object as it would be defined in ActionScript:
private var groceryXML:XML = new XML();
groceryXML=
<catalog>
<category name="vegetables">
<product name="lettuce" cost="1.95">
<unit>bag</unit>
<desc>Cleaned and bagged</desc>
</product>
<product name="carrots" cost="2.95">
<unit>pound</unit>
<desc>Baby carrots, cleaned and peeled</desc>
</product>
</category>
<category name="fruit">
<product name="apples" cost="1.95">
<unit>each</unit>
<desc>Sweet Fuji</desc>
</product>
<berries>
<product name="raspberries" cost="3.95">
<unit>pint</unit>
<desc>Firm and fresh</desc>
</product>
<product name="strawberries" cost="2.95">
<unit>pint</unit>
<desc>Deep red and juicy</desc>
</product>
</berries>
</category>
</catalog>;
The following statements describe the XML object, with the XML terminology italicized:
• The root node is catalog.
• There are two category nodes, or elements; for our purposes these will be synonyms.
• The product node has two child nodes (children), called unit and desc.
• The product node has two attributes, name and cost.
If you scrutinize the XML in more detail, you will also see a <berries> node with both berry-related products nested inside. This is done intentionally to show the power of the E4X operators in the examples to follow.
One last concept that you must understand before continuing is the difference between XML and an XMLList. Put simply, valid XML always has a single root node. An XMLList is a list of valid XML nodes without its own root node. For example:
<root>
<node1/>
<node2>
<childNode/>
</node2>
<node3/>
</root>
represents valid XML. Further, each of the nodes is a valid piece of XML in and of itself. Conversely, the following structure:
<node1/>
<node2>
<childNode/>
</node2>
<node3/>
does not have a single root node and is not valid XML. It is however, a list of valid XML nodes, and we refer to this construct as an XMLList. This XMLList has a length of 3 as there are three nodes immediately inside it. Finally, if we were to examine the following XML:
<node1/>
We could say this is valid XML, as it has a single root node, and it is a valid XMLList of length 1. All the E4X operators you are about to learn return XMLLists as their output type.
Now that you understand the basic XML terminology, you can start using some of the powerful E4X operators. A small application has been written for you to test some of these operators.
- Import the E4XDemo.fxp project from Lesson06/independent folder into Flash Builder. Please refer to the appendix for complete instructions on importing a project.
A new project will appear in Flash Builder.
- Inside the new project, open the E4XDemo.mxml file.
- Run the E4XDemo application.
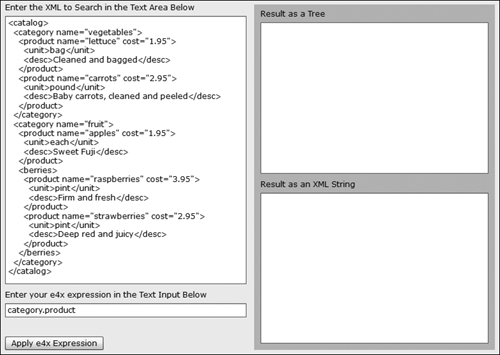
On the top left you see the XML shown earlier in this lesson. This application allows you to search that XML by entering an E4X expression into the text input on the bottom left and clicking the Apply e4x Expression button. The right side will display the resulting XMLList from that operation in two forms, as a tree of data on the top and as a formatted string on the bottom.
- Click the Apply e4x Expression button to apply the default expression
category.product.
In E4X expressions, the root node (in this case catalog) is part of the document and not used in statements.
This expression uses the dot (.) operator. This is one way to access data in the XML document. The dot operator behaves much like the dot in
object.propertynotation with which you are familiar. You use the dot operator to navigate to child nodes. The expression yields the following results:<product name="lettuce" cost="1.95">
<unit>bag</unit>
<desc>Cleaned and bagged</desc>
</product>
<product name="carrots" cost="2.95">
<unit>pound</unit>
<desc>Baby carrots, cleaned and peeled</desc>
</product>
<product name="apples" cost="1.95">
<unit>each</unit>
<desc>Sweet Fuji</desc>
</product>In this case, the expression
category.productindicates that you want all product nodes that are directly under category nodes. What was returned is an XMLList. Notice that the products that are children of the berries node did not appear.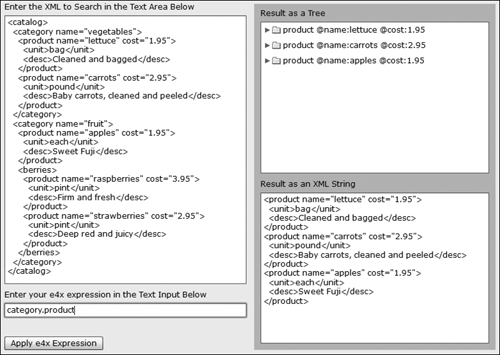
- Now enter the expression
category.product.unitand click the button to apply it.Here the dot operator again navigates the XML and returns the unit node for the three products retrieved in step 4.
<unit>bag</unit>
<unit>pound</unit>
<unit>each</unit> - Enter
category.product[1]and apply the expression. This demonstrates that you can apply array notation in E4X. Here you get the second product because the list is zero indexed.<product name="carrots" cost="2.95">
<unit>pound</unit>
<desc>Baby carrots, cleaned and peeled</desc>
</product>This again shows that E4X lets you use familiar notation to work with XML. In previous versions of ActionScript, you had to use specific methods to access data in XML.
- Enter
category.product.(unit=="bag")and apply the expression. This limits the returned products to those whose unit node is bag. You’ve limited the data returned by putting a filter in the expression.<product name="lettuce" cost="1.95">
<unit>bag</unit>
<desc>Cleaned and bagged</desc>
</product>The parentheses implement what is referred to as predicate filtering.
- Enter
category.product.(@cost=="1.95")and apply the expression. Two product nodes are returned.<product name="lettuce" cost="1.95">
<unit>bag</unit>
<desc>Cleaned and bagged</desc>
</product>
<product name="apples" cost="1.95">
<unit>each</unit>
<desc>Sweet Fuji</desc>
</product>You have now performed predicate filtering on an attribute—hence the use of the attribute operator (@) in the parentheses
(@cost=="1.95"). Also notice that if multiple nodes match the filter, you simply get multiple nodes returned—in this case both the lettuce and apples products. - Enter
category.product.(@cost=="1.95").(unit=="each")and apply the expression. This expression demonstrates that you can apply predicate filtering multiple times. This results in only one product being returned.<product name="apples" cost="1.95">
<unit>each</unit>
<desc>Sweet Fuji</desc>
</product> - Finally, to see the berry products get involved, enter
category..productas the expression. You see that all products are returned, regardless of where they are in the XML.<product name="lettuce" cost="1.95">
<unit>bag</unit>
<desc>Cleaned and bagged</desc>
</product>
<product name="carrots" cost="2.95">
<unit>pound</unit>
<desc>Baby carrots, cleaned and peeled</desc>
</product>
<product name="apples" cost="1.95">
<unit>each</unit>
<desc>Sweet Fuji</desc>
</product>
<product name="raspberries" cost="3.95">
<unit>pint</unit>
<desc>Firm and fresh</desc>
</product>
<product name="strawberries" cost="2.95">
<unit>pint</unit>
<desc>Deep red and juicy</desc>
</product>This is an example of the very powerful descendant operator, represented by two dots (..). This operator navigates to the descendant nodes of an XML object, no matter how complex the XML’s structure, and retrieves the matching nodes. In this case the descendant operator searched through the entire XML object and returned all the product nodes.
- Enter
category..product.(@cost>2)and apply the expression. This combines two operators and returns three products.<product name="carrots" cost="2.95">
<unit>pound</unit>
<desc>Baby carrots, cleaned and peeled</desc>
</product>
<product name="raspberries" cost="3.95">
<unit>pint</unit>
<desc>Firm and fresh</desc>
</product>
<product name="strawberries" cost="2.95">
<unit>pint</unit>
<desc>Deep red and juicy</desc>
</product>Here both predicate filtering and the descendant accessor are in use. E4X searched all the XML, regardless of position, and found three matches.
- Close the E4XDemo project by right-clicking the project name and choosing Close Project.
You have now seen a slice of the very powerful E4X implementation in ActionScript 3.0. For more information, see “Working with XML” in the Programming ActionScript 3.0 documentation that comes with Flex.
You can now return to the FlexGrocer project and begin working with dynamic XML.
Using Dynamic XML Data
As a Flex developer, you’ll have the opportunity to work with both XML and Objects. Over time you’ll decide which works better for your project in a specific situation. Starting with the next lesson and through the remainder of the book you will convert your XML to strongly typed objects, that is, objects with properties and methods defined well before the application executes. For the remainder of this lesson, however, you are going to work strictly with XML to display a list of categories.
While the techniques in this book are often presented in an improving fashion, meaning that those later in the book are often more-functional refactorings of earlier work, that is not the case with XML and Objects. These are simply two different techniques, each with advantages and disadvantages, that can be used to solve a problem.
As you saw in the previous exercise, XML is a quick and flexible way to present data. E4X expressions allow it to be searched and manipulated extremely quickly, and this makes it very powerful.
However, as you will no doubt discover, an application can fail due to a simple typographical error, something that typed objects can resolve at the expense of flexibility.
Currently the HTTPService tag in your FlexGrocer application is defaulting to returning dynamic Objects instead of XML when retrieving data. You are going to modify this property as well as store the returned data in an XMLListCollection for future use.
You will be working with the data retrieved from http://www.flexgrocer.com/category.xml. The structure of that XML file is listed here for your reference in this exercise.
<?xml version="1.0" encoding="utf-8" ?>
<catalog>
<category>
<name>Dairy</name>
<categoryID>4</categoryID>
</category>
<category>
<name>Deli</name>
<categoryID>5</categoryID>
</category>
<category>
<name>Fruit</name>
<categoryID>3</categoryID>
</category>
<category>
<name>Meat</name>
<categoryID>1</categoryID>
</category>
<category>
<name>Seafood</name>
<categoryID>6</categoryID>
</category>
<category>
<name>Vegetables</name>
<categoryID>2</categoryID>
</category>
</catalog>
- Open the FlexGrocer.mxml file.
Alternatively, if you didn’t complete the previous exercise or your code is not functioning properly, you can import the FlexGrocer-PreXMLCollection.fxp project from the Lesson06/intermediate folder. Please refer to the appendix for complete instructions on importing a project should you skip a lesson or if you have a code issue you cannot resolve.
- Inside the
<fx:Declarations>block, find the<s:HTTPService>tag. Add a new property to this tag namedresultFormatand specify the value ase4x.<s:HTTPService id="categoryService"
url="http://www.flexgrocer.com/category.xml"
resultFormat="e4x"
result="handleCategoryResult(event)"/>The
resultFormatproperty tells the HTTPService how it should provide any data retrieved from this request. By default it returns data as dynamic Objects wrapped in ObjectProxy instances. Changing this format toe4xinstead provides you with XML that you can manipulate using E4X operators. - Make sure that you have a breakpoint set on the closing bracket of the
handleCategoryResult()method. - Debug the application. Return to Flash Builder and make sure you are in the Debugging perspective. Double-click the Variables view tab. Drill down to the returned data by clicking the plus sign in front of event > result > catalog. Here you see the six category values all represented as XML. Expanding any of these nodes will provide you with more detail.
- Double-click the Variables view tab to return it to its normal size. Terminate the debugging session by clicking the red Terminate button in the Debug or Console view. Finally, return to the Development perspective.
- Near the top of your Script block, just under the import statements, add a new private variable named
categoriesof typeXMLListCollection. If you used code completion, Flash Builder has already imported theXMLListCollectionfor you. If you did not, then add an import formx.collections.XMLListCollectionbefore continuing.XMLListCollection is a special class that holds and organizes XMLLists. It allows for those XMLLists to be sorted and filtered. You’ll learn about collections in the next lesson.
- Directly above the variable you just created, you are going to add a metadata tag to indicate that the variable is bindable. Type
[Bindable]directly above the variable definition.[Bindable]
private var categories:XMLListCollection;The Bindable metadata tag tells Flex to watch this particular collection for changes. In the event of a change, the Flex framework should notify everyone using this data so they can update and refresh their display. You’ll continue to learn about this powerful feature as you progress through the book.
- Inside the
handleCategoryResult()method, you need to instantiate a new XMLListCollection and assign it to thecategoriesvariable you just created.private function handleCategoryResult( event:ResultEvent ):void {
categories = new XMLListCollection();
}After this line of code executes, the
categoriesvariable will contain a new XMLListCollection. However, that collection does not yet contain your data. - Pass the E4X expression
event.result.categoryinto the constructor of the XMLListCollection.private function handleCategoryResult( event:ResultEvent ):void {
categories = new XMLListCollection( event.result.category );
}This expression will return all the categories immediately inside the XML returned from the HTTPService call. By passing this to an XMLListCollection constructor, you are providing a way to further manage this data at runtime.
- Make sure you have a breakpoint set on the closing bracket of the
handleCategoryResult()method. - Debug the application. Return to Flash Builder and make sure you are in the Debugging perspective.
- Select the word categories and then right-click it. Choose Create Watch Expression.
Flash Builder will add categories to the Expressions view. If you cannot find the Expressions view, go to Window > Expressions.
- Expand the categories object by clicking the triangle to the left of it in the Expressions view.

The Expressions view says that the type of item is an
mx.collections.XMLListCollection. Inside the XMLListCollection, you’ll find items denoted by array syntax. Expanding these items will reveal each of your categories. - Remove all the items from the Expressions view by clicking the Remove All Expressions button (the double X) to the right of the word Expressions.
- Terminate your debugging session by clicking the red Terminate button and remove your breakpoint before continuing.
Using the XMLListCollection in a Flex Control
Your application now retrieves data from an HTTPService and stores it as an XMLListCollection. However, presently the only way to ensure that the application is working is to use the debugger. In this exercise you will display the category data in a horizontal list across the top of the application.
- Open the FlexGrocer.mxml file.
Alternatively, if you didn’t complete the previous exercise or your code is not functioning properly, you can import the FlexGrocer-PreList.fxp project from the Lesson06/intermediate folder. Please refer to the appendix for complete instructions on importing a project should you skip a lesson or if you have a code issue you cannot resolve.
- Add an
<s:List>control inside thecontrolBarContentsection of your Application. You can add this immediately after the existing Buttons.<s:controlBarContent>
<s:Button id="btnCheckout" label="Checkout" right="10" y="10"/>
<s:Button id="btnCartView" label="View Cart" right="90" y="10" click.
State1="handleViewCartClick( event )"/>
<s:Button label="Flex Grocer" x="5" y="5"/>
<s:List>
</s:List>
</s:controlBarContent> - Specify that the List will remain
200pixels from the left side of the controlBar and will have a height of40pixels.<s:List left="200" height="40">
</s:List> - Specify that the List will use a HorizontalLayout.
<s:List left="200" height="40">
<s:layout>
<s:HorizontalLayout/>
</s:layout>
</s:List>Previously you used horizontal and vertical layouts for groups, but List classes can also use these same layout objects to determine how their children should be arranged.
- Now indicate that the
dataProviderproperty of the List instance should be bound to thecategoriesvariable you defined and populated earlier.<s:List left="200" height="40" dataProvider="{categories}">
<s:layout>
<s:HorizontalLayout/>
</s:layout>
</s:List>This syntax tells the Flex framework that, in the event the
categoriesproperty changes, the list will need to be provided with the new value so that it can react. You will work extensively with List and dataProvider in future lessons. - Save and run the application.

Your new list runs across the top of the page, with the elements arranged horizontally. Unfortunately, instead of displaying category names, you are now displaying the XML associated with the category. Notice that the data you really want displayed is in the
<name/>node of the category XML. - Return to the FlexGrocer application and add a new property to your List called
labelField. Set this property equal toname.<s:List left="200" height="40" dataProvider="{categories}" labelField="name">
<s:layout>
<s:HorizontalLayout/>
</s:layout>
</s:List>The
labelFieldproperty tells the list which field (property) inside your data to use as the label for the list item. - Save and run the application.
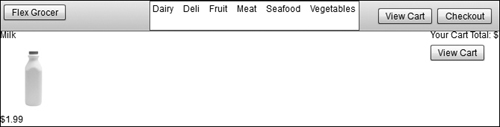
You now have a much more reasonable-looking list of category names that you will continue to use in the next lessons.
What You Have Learned
In this lesson, you have:
• Externalized your data as an XML file (pages 114–116)
• Used the external data first as an object and then as XML (pages 117–119)
• Used XML loaded at runtime (pages 119–123)
• Loaded remote XML data (pages 124–126)
• Learned about security sandboxes with remote data (pages 122–126)
• Explored E4X operators (pages 127–133)
• Used an XMLListCollection with your XML data (pages 134–137)