
2. Working with the Muse Environment
What You’ll Do
Working with the Welcome Screen
Accessing Tools in Design Mode
Showing and Hiding Design Mode Panels
Collapsing and Expanding Panels
Showing and Hiding Page Guides
Showing and Hiding Header and Footer Guides
Showing and Hiding Smart Guides
Showing and Hiding the Grid Overlay
Introduction
After purchasing, downloading, and installing Muse, the next step is to become familiar with the application’s interface. There are various interface modes, panels, and tools you can use to plan and design your websites.
In this chapter, you’ll learn how to locate and access Plan Mode, which is where you can create a sitemap to build your website’s page structure and hierarchy. Plan Mode is also where you can access master pages. With master pages, you can ensure that any repeating page elements, such as nav bars and footers, maintain their position throughout your site.
This chapter also explains how to enter Design Mode, where you can create and edit your website’s individual web pages and master pages. You’ll learn where the Design Mode tools are located and how you can access them quickly with keyboard shortcuts, as well as how to expand and collapse the Design Mode panel column. In addition, you’ll learn how to change the view percentage of the current page so that either its entire content area fits in the window, or the page is displayed at actual size as it would appear in a browser.
In the final sections of this chapter, you’ll learn how to show and hide rulers, page guides, header and footer guides, smart guides, and the page grid overlay.
Working with the Welcome Screen
By default, the Welcome Screen appears automatically each time you launch Muse or close the current website you are working on. By clicking the Site button, you can create a new website project (see Chapter 3, “Creating and Planning a Website”). You can also reopen any existing websites you’ve recently worked on by clicking any of the buttons located under the Open a Recent Site column. To access the Muse website, click the Learn More About Muse button on the right side of the window; to access Muse updates, click the update button in the lower-right corner.
Show and hide the Welcome Screen
![]() The Welcome Screen appears automatically each time you launch Muse or close all the websites you are currently working on.
The Welcome Screen appears automatically each time you launch Muse or close all the websites you are currently working on.
![]() To hide the Welcome Screen, click the close button in the upper left corner of the window.
To hide the Welcome Screen, click the close button in the upper left corner of the window.

You can choose not to show the Welcome Screen when launching Muse or closing a site. To do so, you must enable the Don’t Show Again option located in the lower-left corner of the Welcome Screen. After you enable this option, simply close the Welcome Screen as described in Step 2 above. From this point forward, the Welcome Screen does not appear when you launch Muse or close the current website.
You can also hide the Welcome Screen using Preferences. To do so, choose Muse > Preferences (Mac) or Edit > Preferences (Win) and uncheck the Show Welcome Screen option.
Viewing Sites in Plan Mode
In order to access any of the modes (Plan, Design, and Preview), you must first open a website project in Muse. You can do so by choosing File > Open Site, or by clicking any of the Open a Recent Site buttons in the Welcome Screen. When you first open a Muse site, it automatically displays in Plan Mode. After viewing the site in the other modes, you can return to Plan Mode by clicking the Plan button located in the upper-left of the interface, or by choosing the Plan Mode command from the View menu. In Plan Mode, you can create and edit a sitemap (see Chapter 3 “Creating and Planning a Website”).
Choose the Plan Mode command
![]() To open an existing website project, choose Open Site from the File menu.
To open an existing website project, choose Open Site from the File menu.

![]() In the Open dialog box that appears, navigate to the Muse file and click Select.
In the Open dialog box that appears, navigate to the Muse file and click Select.

The website automatically opens in Plan Mode.
![]() To return to Plan Mode after viewing the site in Design or Preview Mode, choose View > Plan Mode.
To return to Plan Mode after viewing the site in Design or Preview Mode, choose View > Plan Mode.

You can also return to Plan Mode by clicking the Plan button. To do so, click the Plan button located in the upper-left corner of the Muse interface, just above the Control panel.
See Chapter 3, “Creating and Planning a Website,” to learn more about creating a sitemap in Plan Mode.
Viewing Sites in Design Mode
In Design Mode, you can use the various tools and panels to create and edit your website’s individual pages. You can enter Design Mode at any time by choosing the Design Mode command from the View menu or by clicking the Design button located in the upper-left corner of the interface. To open a specific web page or master page in Design Mode, you must double-click the page’s thumbnail in the Plan Mode sitemap.
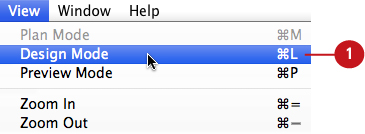
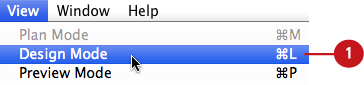
Choose the Design Mode command
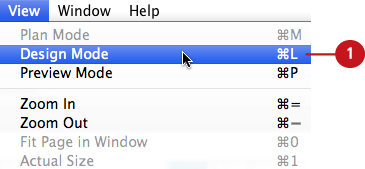
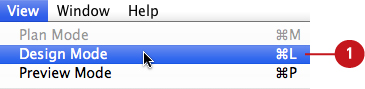
![]() To open a website project in Design Mode, choose Design Mode from the View menu.
To open a website project in Design Mode, choose Design Mode from the View menu.
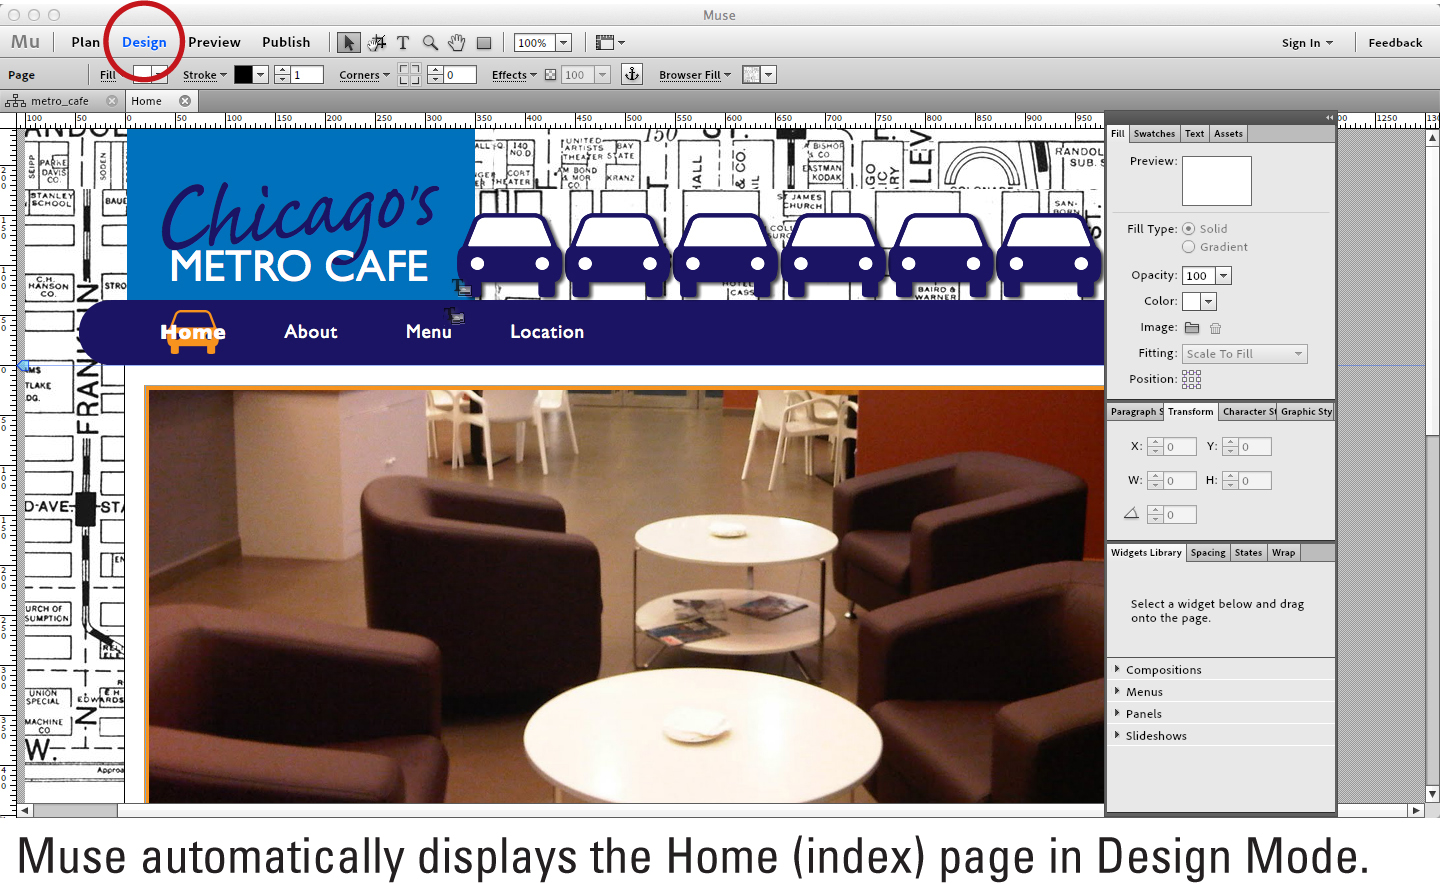
If you do not already have additional pages or master pages open in Design Mode, Muse automatically displays the Home (index) page.
To open a specific page or master page in Design Mode, you must double-click the page thumbnail from the Plan Mode sitemap.
You can also return to Design Mode by clicking the Design button. To do so, click the Design button located in the upper-left corner of the Muse interface, just above the Control panel.
Open a specific web page in Design Mode
![]() To open a specific web page in Design Mode, you must return to the sitemap in Plan Mode by choosing View > Plan Mode.
To open a specific web page in Design Mode, you must return to the sitemap in Plan Mode by choosing View > Plan Mode.

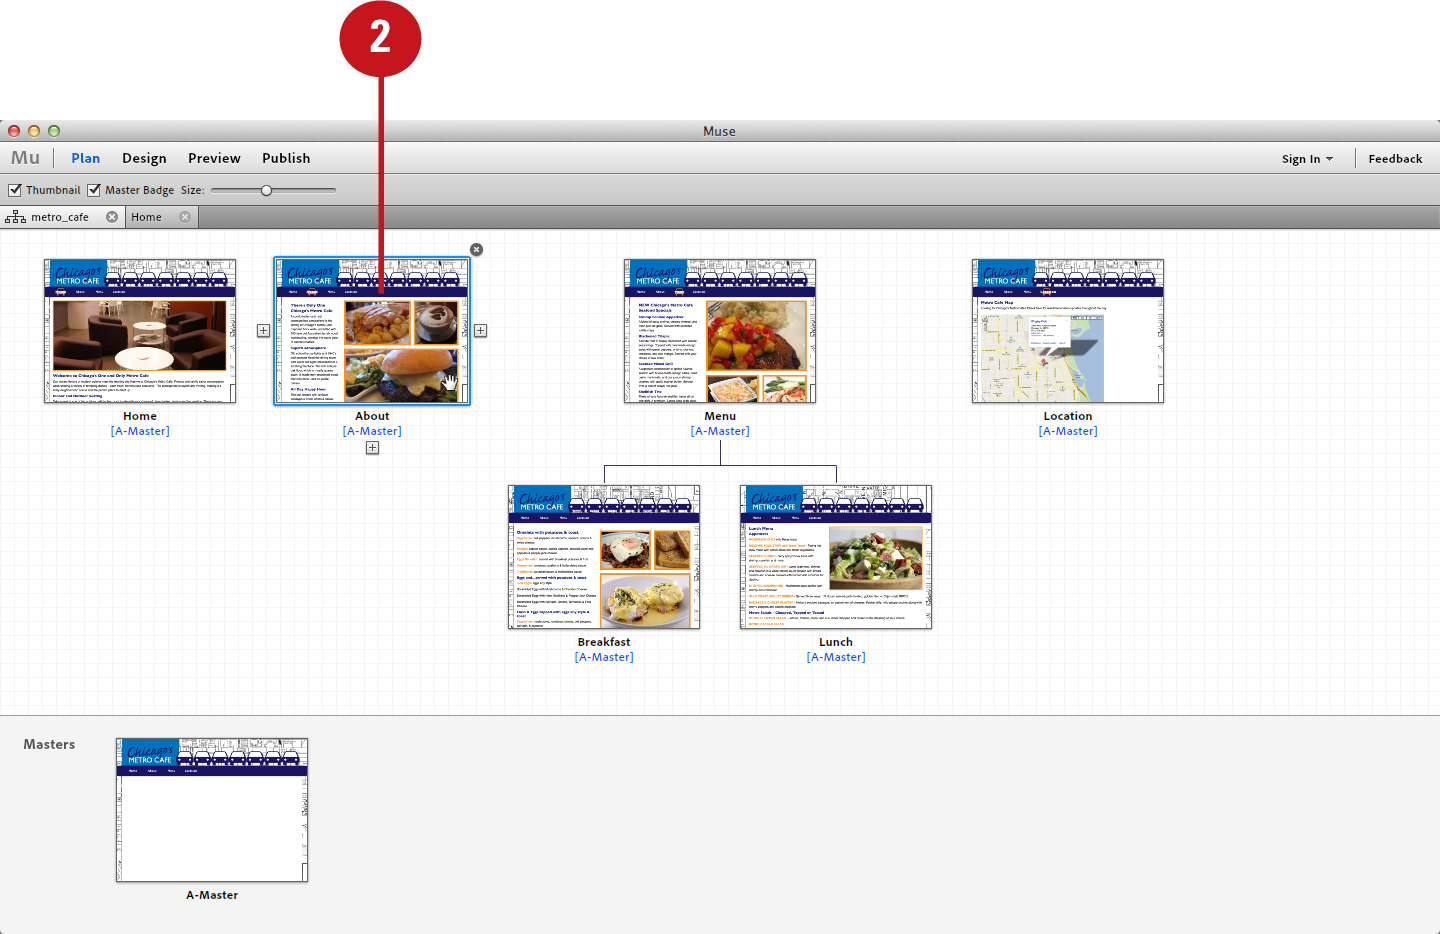
![]() Double-click the page thumbnail from the Plan Mode sitemap.
Double-click the page thumbnail from the Plan Mode sitemap.
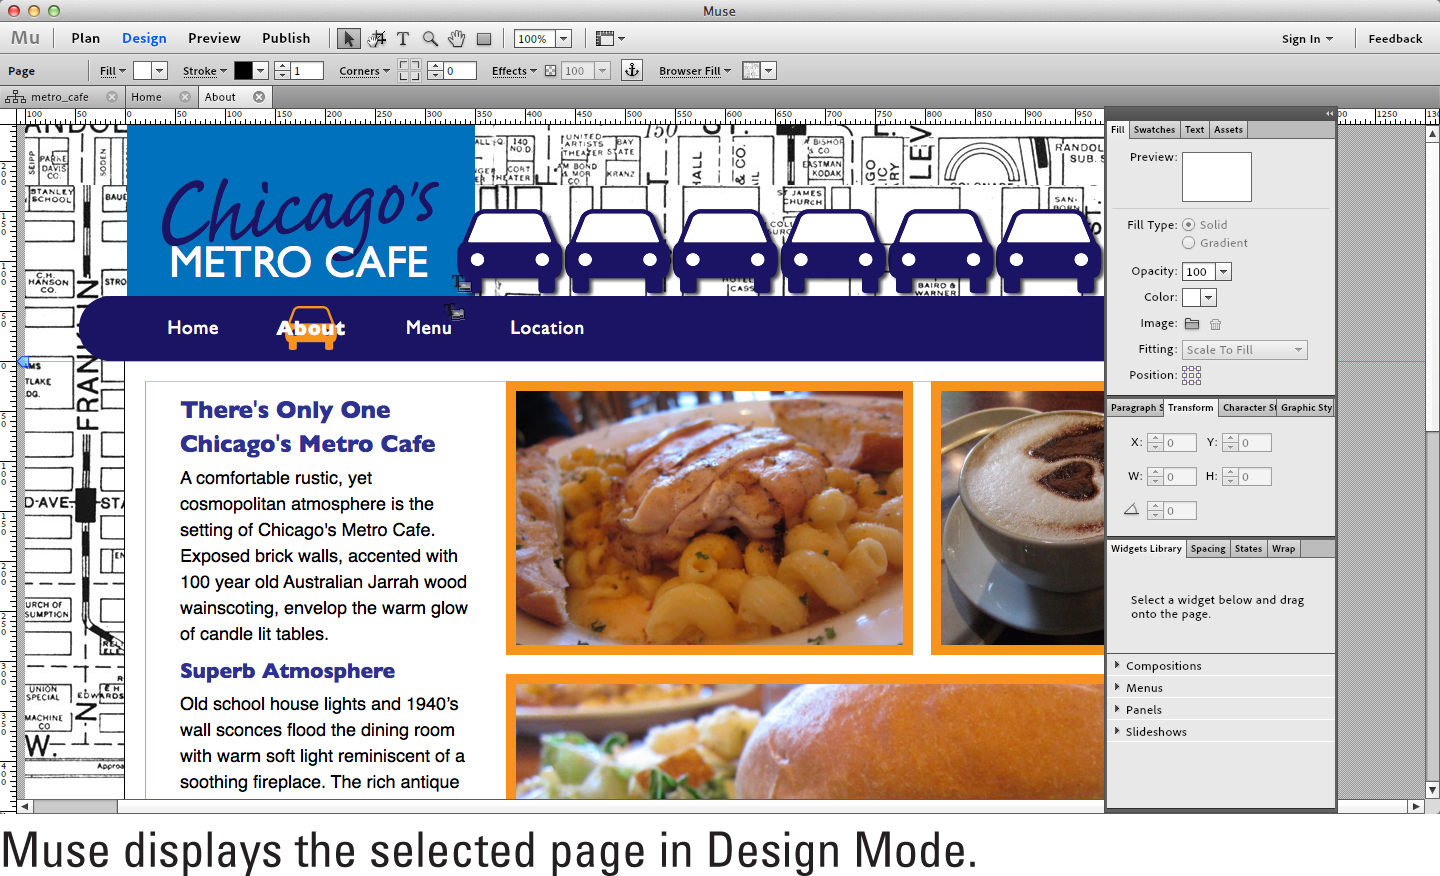
Muse displays the selected page in Design Mode.
You can also return to Plan Mode by clicking the sitemap tab in Design Mode. The sitemap tab displays the name of the website project on it, preceded by the sitemap icon. To return to the sitemap, click the sitemap tab located in the upper-left corner of the interface, just below the Control panel.
Accessing Tools in Design Mode
Design Mode contains its own set of tools. This exclusive tool set includes the Selection, Crop, Text, Zoom, Hand, and Rectangle tools. To work with a specific tool, you must first select it by clicking its icon. The tool icons are displayed in a row at the top of the Muse interface, to the right of the Mode buttons.
Click the tool icons
![]() Choose Design Mode from the View menu.
Choose Design Mode from the View menu.

![]() Hover the mouse cursor over any of the tool icons located at the top of the Muse interface. Muse displays the tool’s name in a tooltip, followed by its one-letter keyboard shortcut.
Hover the mouse cursor over any of the tool icons located at the top of the Muse interface. Muse displays the tool’s name in a tooltip, followed by its one-letter keyboard shortcut.
![]() To select a tool, click its icon.
To select a tool, click its icon.

You can also use keyboard shortcuts to select tools. Each tool has a one-letter keyboard shortcut assigned to it. To identify the keyboard shortcut, hover the mouse cursor over the tool’s icon and refer to the tooltip that appears. The letter displayed in parentheses is what you need to press in order to access the tool.
Showing and Hiding Design Mode Panels
The Design Mode panels are essential to creating dynamic web pages in Muse. There are various panels for working with color swatches, text, assets, styles, widgets, and more. You can show and hide these panels by choosing the Hide/Show Panels command under the Window menu. All of the panels (except for the Control panel) are automatically grouped together into a vertical panel column. By selecting a specific panel from the Window menu, you can bring it to the front of the panel group.
Choose the Window panel commands
![]() Choose Design Mode from the View menu.
Choose Design Mode from the View menu.

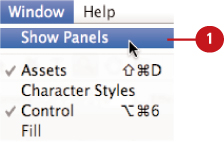
![]() If the vertical panel column is currently hidden, choose Show Panels from under the Window menu.
If the vertical panel column is currently hidden, choose Show Panels from under the Window menu.

![]() Choose a specific panel from the Window menu to bring it to the forefront of the panel group. Muse places a check mark next to the open panel in the Window menu list.
Choose a specific panel from the Window menu to bring it to the forefront of the panel group. Muse places a check mark next to the open panel in the Window menu list.

The Control panel is the only panel not grouped into the vertical panel column. When visible, it appears at the top of the interface just above the web pages and below the tools.
You can also bring a panel to the front of a group by clicking its panel tab. You do not have to rely on the Window commands to bring a specific panel to the front of a panel group. You can also do so by clicking the panel’s tab (where the panel’s name appears).

Collapsing and Expanding Panels
The vertical panel column is a free-floating window that can be positioned anywhere onscreen. You can reposition the panels by clicking and dragging the gray bar at the top of the column. Note that Muse does not allow you to drag panels out of their groups and free-float them individually onscreen. You can, however, collapse the entire column into a thin strip of panel icons. Doing so enables you to take up less room onscreen so that you can focus on your page design. When you are ready to work with the panels again, click any panel icon and the column automatically expands.
Click the collapse/expand arrow
![]() If the vertical panel column is currently hidden, choose Show Panels from under the Window menu.
If the vertical panel column is currently hidden, choose Show Panels from under the Window menu.
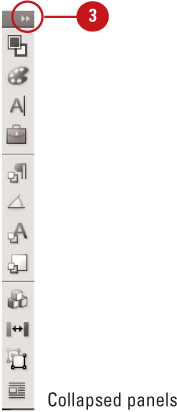
![]() To collapse the panels, click the left-facing arrow positioned in the upper-right corner of the vertical column.
To collapse the panels, click the left-facing arrow positioned in the upper-right corner of the vertical column.

Muse collapses the panel column into a thin strip of panel icons.
To identify collapsed panels, hover over each icon and refer to the name that appears in the tooltip.
![]() To expand the panels, click the right-facing arrow positioned in the upper-right corner of the vertical column.
To expand the panels, click the right-facing arrow positioned in the upper-right corner of the vertical column.
Muse expands the panel column to reveal all of the panel groups.
You cannot dock the vertical panel column to the sides of the screen. Unlike Adobe InDesign and Dreamweaver, Muse does not allow you to dock the panel column to the sides of your screen. It must remain free-floating at all times.
Changing the View Percentage
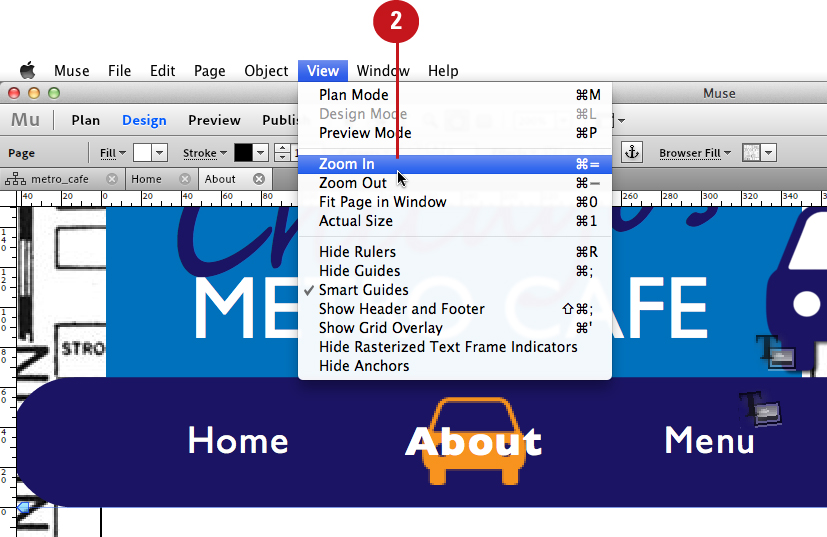
By default, the Design Mode view percentage is set to 100%. This is the actual size of the web page when displayed in a browser. However, Muse does allow you to change the view percentage at any time as you’re designing. Doing so enables you to zoom in or out of a specific page area. There are several ways to accomplish this task: by applying the Zoom command, by choosing a preset from the Zoom field, or by working with the Zoom tool.
Use the Zoom In/Zoom Out commands
![]() Choose Design Mode from the View menu.
Choose Design Mode from the View menu.

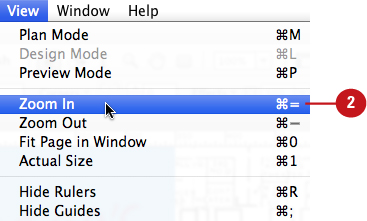
![]() Choose View > Zoom In to increase the zoom percentage; choose View > Zoom Out to decrease it.
Choose View > Zoom In to increase the zoom percentage; choose View > Zoom Out to decrease it.
Press Cmd+= (Mac) or Ctrl+= (Win) to apply the Zoom In command quickly; press Cmd+- (Mac) or Ctrl+- (Win) to apply the Zoom Out command quickly.
When applying the Zoom commands, Muse changes the view percentage for the current web page using 25% increments—but only up to 250%. From 250% onward, the zoom increments increase to 100%. The lowest zoom percentage you can apply using the Zoom Out command is 10%.
Use the Zoom percentage field
![]() Choose Design Mode from the View menu.
Choose Design Mode from the View menu.

![]() At the top of the interface, click the down-facing arrow to the right of the Zoom percentage field and choose a zoom preset, such as 50%, 75%, or 100%.
At the top of the interface, click the down-facing arrow to the right of the Zoom percentage field and choose a zoom preset, such as 50%, 75%, or 100%.

You can also type a percentage into the Zoom field. You can apply a specific zoom percentage (such as 85%) that is not available as a preset. To do so, double-click in the Zoom percentge field to highlight the current value, and then enter the desired value.
Use the Zoom tool
![]() Choose Design Mode from the View menu.
Choose Design Mode from the View menu.

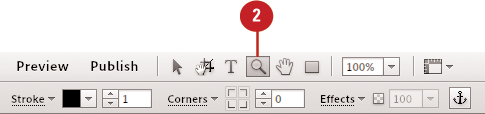
![]() At the top of the interface, click the Zoom tool icon.
At the top of the interface, click the Zoom tool icon.
![]() Hover the Zoom tool cursor (the magnifying glass) over the page area you’d like to zoom into and click. Continue clicking until you reach the preferred zoom percentage.
Hover the Zoom tool cursor (the magnifying glass) over the page area you’d like to zoom into and click. Continue clicking until you reach the preferred zoom percentage.

![]() To zoom out, hover the Zoom tool cursor over the page area you’d like to zoom out of and Option+click (Mac) or Alt+click (Win).
To zoom out, hover the Zoom tool cursor over the page area you’d like to zoom out of and Option+click (Mac) or Alt+click (Win).

Muse displays a minus symbol in the Zoom tool cursor when you hold down the Option/Alt modifier key.
When clicking with the Zoom tool, Muse changes the view percentage in 25% increments—but only up to 250%. From 250% onward, the zoom increments increase to 100%. The lowest zoom percentage you can apply using the Zoom tool is 10%.
You can also marquee over an area with the Zoom tool. To do so, click and drag over the area you’d like to zoom into and then click.
Fitting the Page in Window
The vertical page size is determined by the position of the first and fourth horizontal page guides. You can adjust the page size by repositioning these guides. By default, the Design Mode view percentage is set to 100%, which generally does not fit the entire page in the window. To fit the entire page, you must choose the Fit Page in Window command from the View menu.
Choose the Fit Page in Window command
![]() Choose Design Mode from the View menu
Choose Design Mode from the View menu
![]() To display the entire page in the window (not including the header), choose Fit Page in Window from the View menu.
To display the entire page in the window (not including the header), choose Fit Page in Window from the View menu.

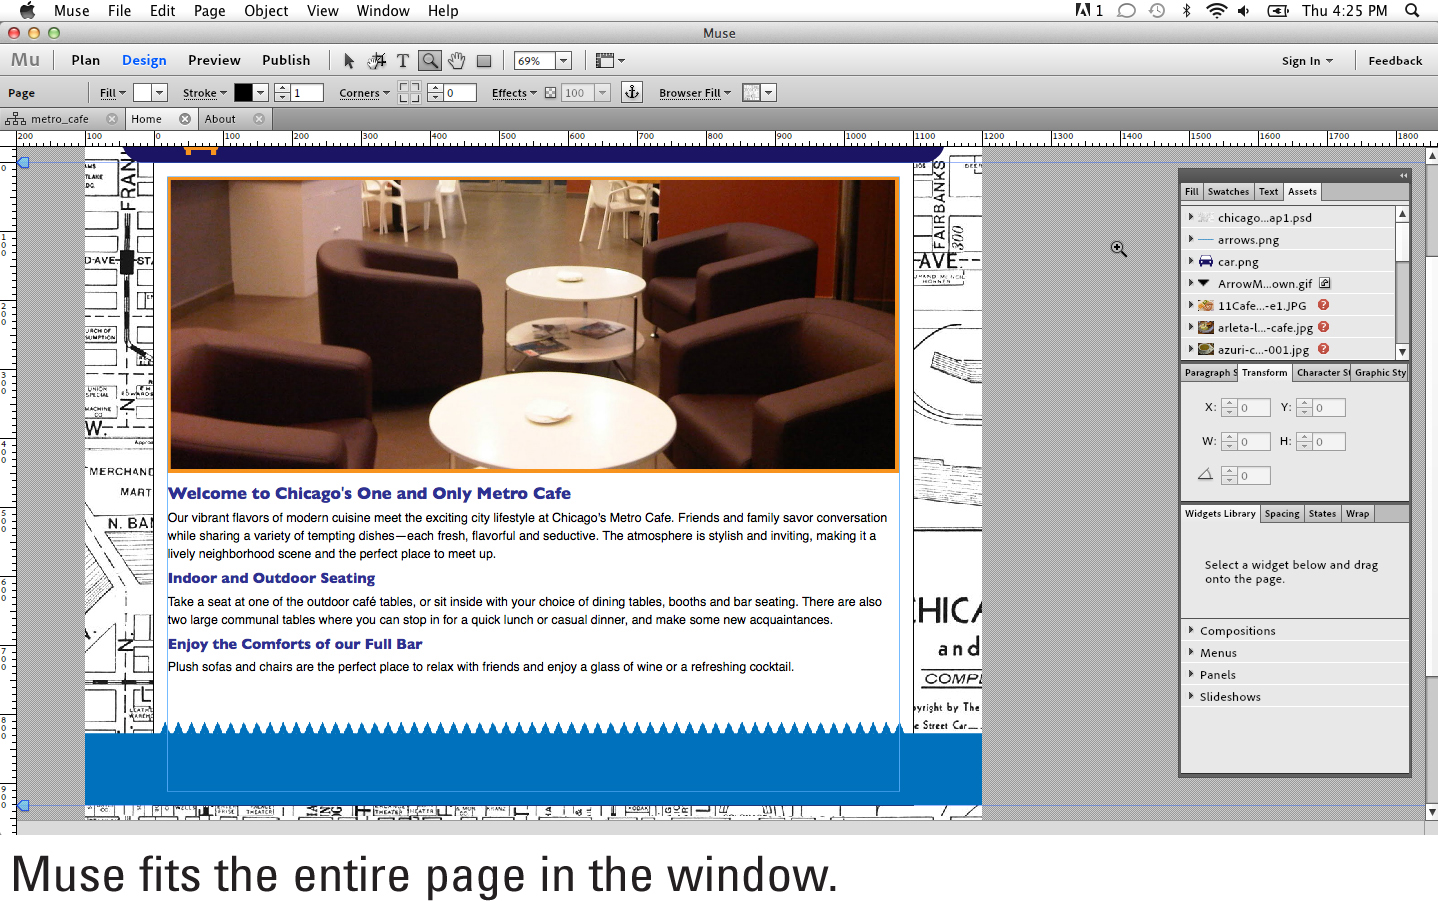
Muse changes the view percentage to fit the entire page in the window.
Viewing at Actual Size
By default, the Design Mode view percentage is set to Actual Size (100%). This is the actual size of the web page when displayed in a browser. If you should increase or decrease the view percentage while designing, you can return to actual size at any time by applying the Actual Size command.
Choose the Actual Size command
![]() Choose Design Mode from the View menu.
Choose Design Mode from the View menu.
![]() Choose View > Zoom In to increase the zoom percentage; choose View > Zoom Out to decrease it. Continue applying the command until you reach the preferred zoom percentage.
Choose View > Zoom In to increase the zoom percentage; choose View > Zoom Out to decrease it. Continue applying the command until you reach the preferred zoom percentage.
Press Cmd+= (Mac) or Ctrl+= (Win) to apply the Zoom In command quickly; press Cmd+- (Mac) or Ctrl+- (Win) to apply the Zoom Out command quickly.
![]() To display the page at actual size (100%), choose Actual Size from the View menu.
To display the page at actual size (100%), choose Actual Size from the View menu.
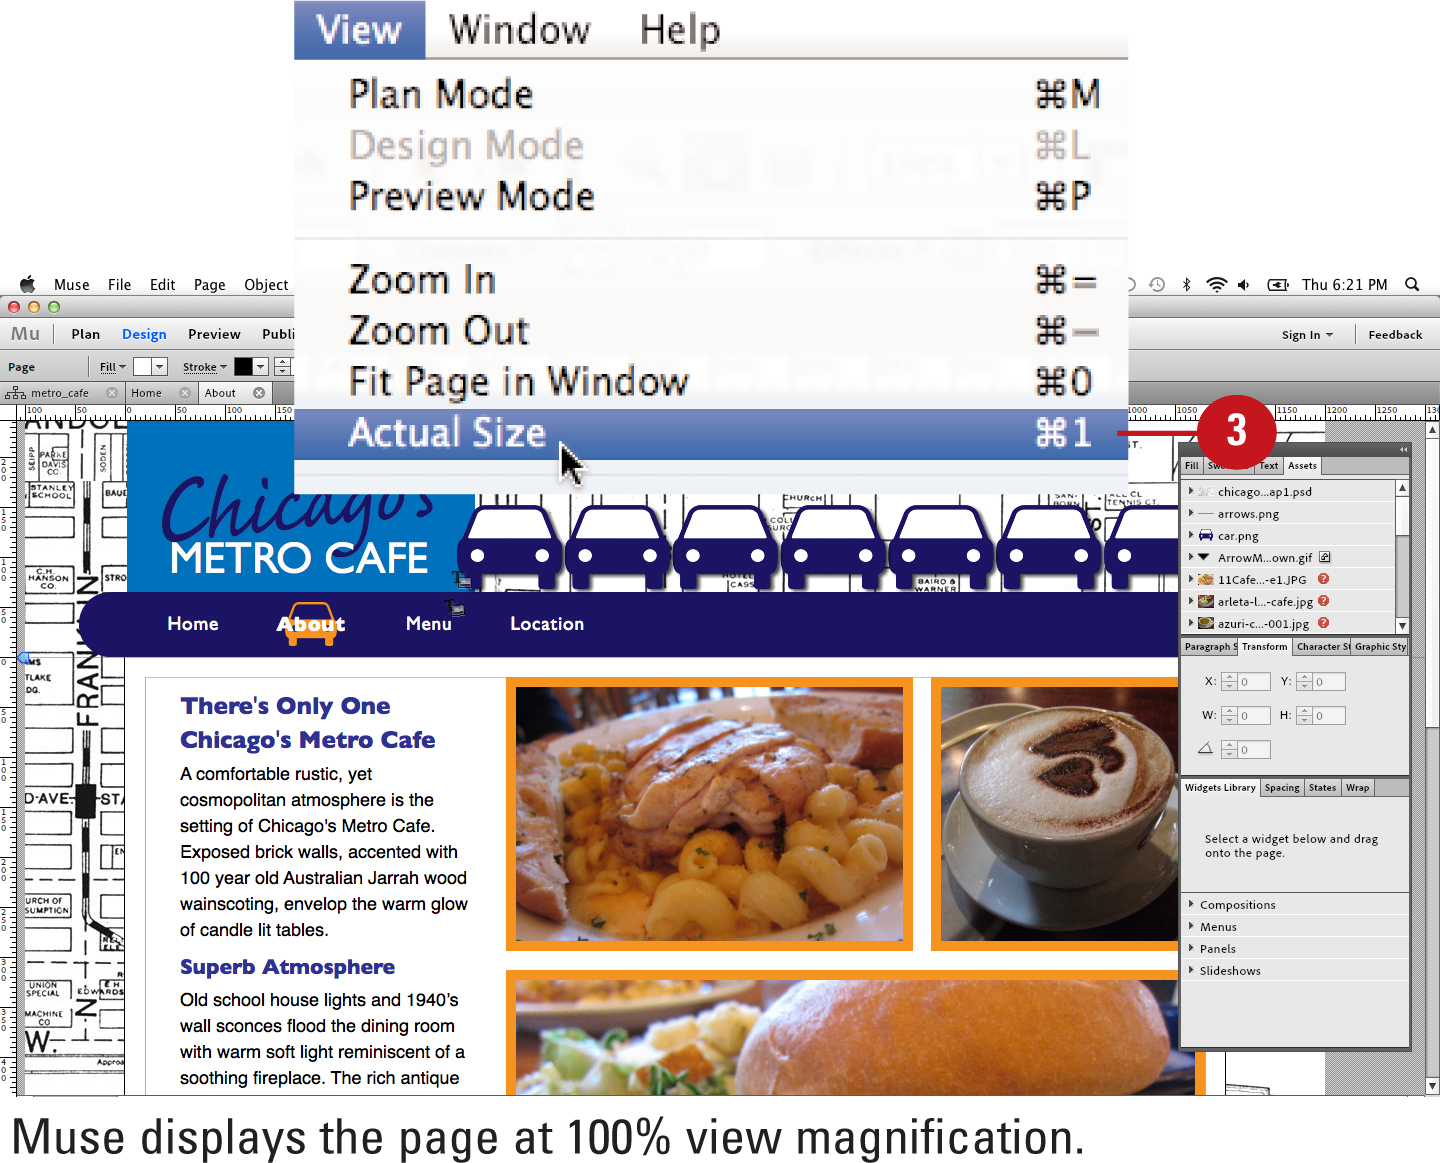
Muse changes the view percentage to display the page at actual size.
Showing and Hiding Rulers
You can use the Design Mode rulers to help position and align page objects, such as buttons, photos, and links. The horizontal ruler appears above the web pages, while the vertical ruler appears to the left of them. Each ruler displays pixels as the default unit of measurement (there is currently no preference for changing ruler measurement units). You can hide and show the rulers by applying the Show/Hide Rulers commands.
Choose the Show/Hide Rulers command
![]() Choose Design Mode from the View menu.
Choose Design Mode from the View menu.

![]() To make the rulers visible, choose Show Rulers from the View menu.
To make the rulers visible, choose Show Rulers from the View menu.
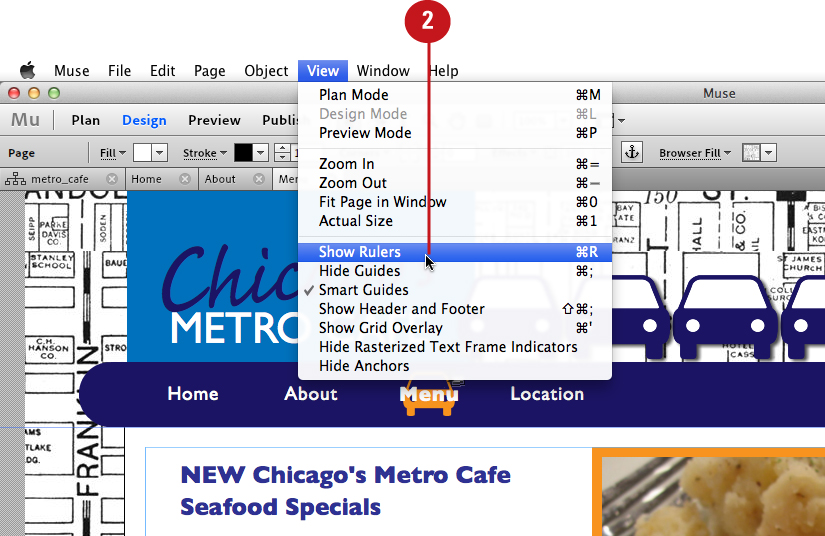
Muse displays the horizontal ruler above the web page and the vertical ruler to the left of the web page.
![]() To hide the rulers, choose Hide Rulers from the View menu.
To hide the rulers, choose Hide Rulers from the View menu.

You can also choose the Show/Hide Rulers command from the contextual menu. To do so, right-click or Control-click (Mac) in the ruler area (Hide Rulers) or anywhere on the web page (Show Rulers and Hide Rulers).
Showing and Hiding Page Guides
The first, fourth, and fifth horizontal guides on the page are referred to as page guides. You can drag the first guide up or the fourth guide down to extend the content area of the page. The fifth guide indicates the bottom of the browser. Note that unlike InDesign, there are no vertical page rulers, and you cannot drag additional page rulers out from the vertical or horizontal rulers. After the content area is set, you can hide the page guides by choosing the Hide Guides command.
Choose the Show/Hide Guides command
![]() Choose Design Mode from the View menu.
Choose Design Mode from the View menu.

![]() To make the guides visible, choose Show Guides from the View menu.
To make the guides visible, choose Show Guides from the View menu.

Press Cmd+; (semicolon) (Mac) or Ctrl+; (Win) to apply the Show/Hide Guides command quickly.
Muse displays the page guides in blue, each with a left-facing blue arrow next to the vertical ruler.
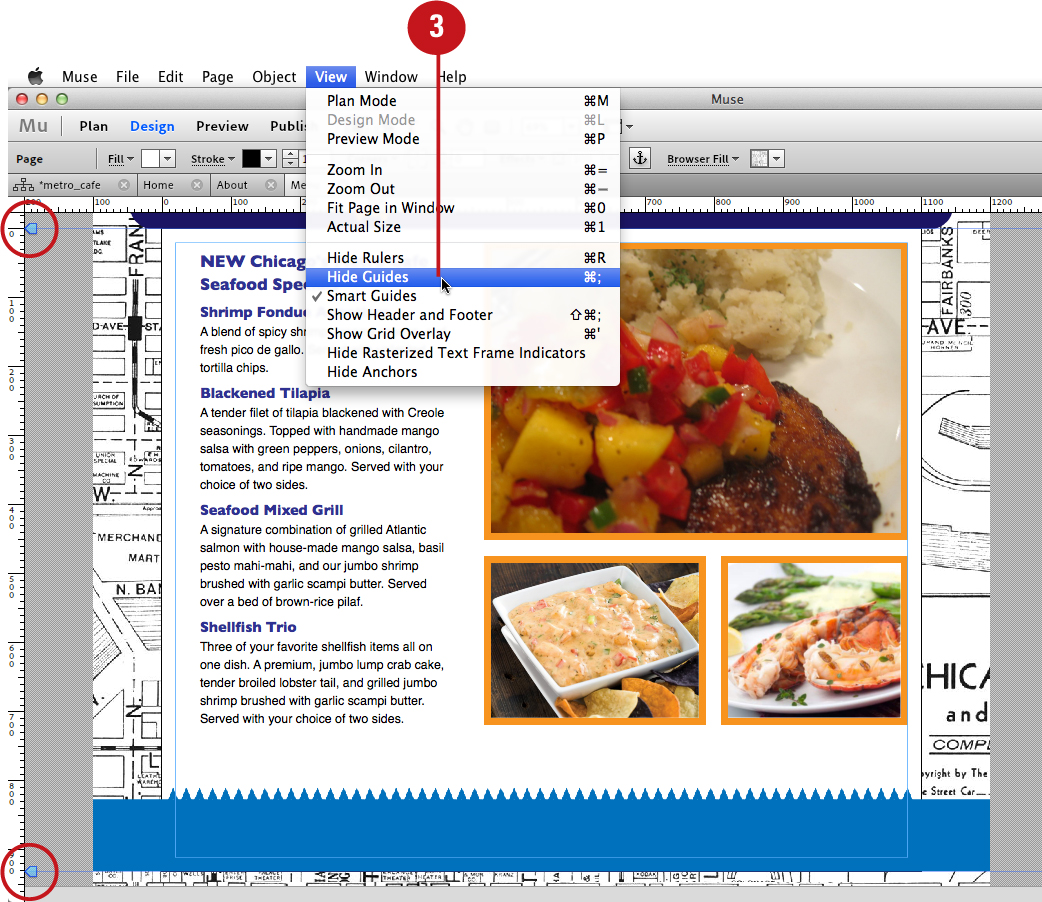
![]() To hide the guides, choose Hide Guides from the View menu.
To hide the guides, choose Hide Guides from the View menu.
You can also choose the Show/Hide Guides command from the contextual menu. To do so, right-click or Control-click (Mac) in the ruler area or anywhere on the web page.
Showing and Hiding Header and Footer Guides
The second and third guides on the page are referred to as header and footer guides. You can drag the second guide to determine the height of the header area. Drag the third guide to determine the height of the footer area. After these areas are set, you can hide these two guides by choosing the Hide Header and Footer command.
Choose the Show/Hide Header and Footer command
![]() Choose Design Mode from the View menu.
Choose Design Mode from the View menu.

![]() To make the header and footer guides visible, choose Show Header and Footer from the View menu.
To make the header and footer guides visible, choose Show Header and Footer from the View menu.

Press Shift+Cmd+; (semicolon) (Mac) or Shift+Ctrl+; (Win) to apply the Show/Hide Header and Footer command quickly.
![]() To hide the header and footer guides, choose Hide Header and Footer from the View menu.
To hide the header and footer guides, choose Hide Header and Footer from the View menu.

You can also choose the Show/Hide Header and Footer command from the contextual menu. To do so, right-click or Control-click (Mac) in the ruler area or anywhere on the web page.
Showing and Hiding Smart Guides
Smart guides can be used in conjunction with the rulers to position and align multiple page objects. As you reposition selected objects on the page, the smart guides automatically appear to let you know when the objects are aligned with others nearby. You can show and hide the smart guides by applying the Smart Guides command.
Choose the Smart Guides command
![]() Choose Design Mode from the View menu.
Choose Design Mode from the View menu.

![]() To make smart guides visible, choose Smart Guides from the View menu. Muse places a check mark next to the command in the menu.
To make smart guides visible, choose Smart Guides from the View menu. Muse places a check mark next to the command in the menu.

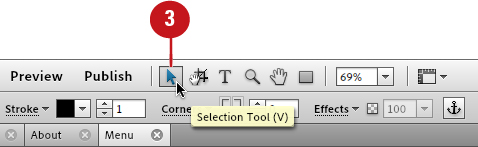
![]() Click the Selection Tool icon at the top of the interface.
Click the Selection Tool icon at the top of the interface.
![]() Click and drag any object on the page.
Click and drag any object on the page.

Muse displays smart guides when the selected object becomes aligned with another object nearby.
![]() To hide smart guides, choose Smart Guides from the View menu. Muse removes the check mark that was next to the command in the menu.
To hide smart guides, choose Smart Guides from the View menu. Muse removes the check mark that was next to the command in the menu.
Showing and Hiding the Grid Overlay
If you are ever unsure what the active design area is for the current web page, you can highlight it by turning on the grid overlay. When you do, Muse displays a light pink box (not a grid pattern) over the active areas of the page, not the header area or background. This is the area determined by the position of the first and fourth horizontal page guides. You can adjust the overall page size by repositioning these guides.
Choose the Show/Hide Grid Overlay command
![]() Choose Design Mode from the View menu.
Choose Design Mode from the View menu.
![]() To make the grid overlay visible, choose Show Grid Overlay from the View menu.
To make the grid overlay visible, choose Show Grid Overlay from the View menu.

Press Cmd+’ (apostrophe) (Mac) or Ctrl+’ (Win) to apply the Show/Hide Grid Overlay command quickly.
![]() To hide the grid overlay, choose Hide Grid Overlay from the View menu.
To hide the grid overlay, choose Hide Grid Overlay from the View menu.
