6. Working with Objects and Layers
What You’ll Do
Create Shapes and Lines
Create Multiple Objects in a Grid
Scale, Shear, and Rotate Objects
Create Inline Objects
Create Anchored Objects
Create and Delete Object Layers
Set Layer Options and Work with Layers
Introduction
A frame is a container that holds graphics, text, and shapes. There are three types of frames: unassigned, graphic, and text. The unassigned frame is useful for adding fill and stroke color to a layout. You use the Rectangle, Ellipse, Polygon, and Line tools to create unassigned frames, while you use the Rectangle Frame, Ellipse Frame and Polygon Frame tools to create a graphic frame. A dot appears in the middle of an unassigned frame, while diagonal lines appear in a graphic frame. You can create shapes using unassigned or graphic shapes. You use the Type tool to create a text frame, which appears with small ports to thread text between frames.
With the transformation tools in InDesign, you can quickly move, scale (resize), shear (distort), and rotate an object. InDesign provides several ways to transform objects: tools (Rotate, Scale, and Shear) on the Tools panel, options on the Transform and Control panels, and commands on the Transform submenu on the Object menu.
Layers give you the ability to separate individual elements of your design, and then control how those elements appear. You can think of Layers as a group of transparent sheets stacked on top of each other, where each layer contains a separate aspect of the total design. Having multiple layers allows you to adjust and move each element independently.
Creating Shapes
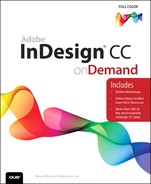
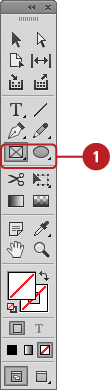
A frame is a container that holds graphics, text, and shapes. There are three types of frames: unassigned, graphic, and text. The unassigned frame is useful for adding fill and stroke color to a layout. You use the Rectangle, Ellipse, and Polygon tools to create unassigned frames, while you use the Rectangle Frame, Ellipse Frame and Polygon Frame tools to create a graphic frame. A dot appears in the middle of an unassigned frame, while diagonal lines appear in a graphic frame. You can create shapes using unassigned or graphic shapes. In addition to creating a polygon shape, you can also use the Polygon Frame tool to create a star shape for type. You can drag to create a frame box to the size you want using the tool tip which displays width and height. If you need a frame box to be an exact size, you can click a blank area with the Rectangle and Ellipse tools or set width and height settings on the Control panel.
Create a Rectangle or Elliptical Shape
![]() Select the Rectangle or Rectangle Frame tool or select the Ellipse or Ellipse Frame tool on the Tools panel.
Select the Rectangle or Rectangle Frame tool or select the Ellipse or Ellipse Frame tool on the Tools panel.
♦ To create a frame to an exact size, click a blank area, specify the width and height you want, and then click OK.

![]() Drag to create a rectangle or elliptical frame the size you want using the tool tip width and height.
Drag to create a rectangle or elliptical frame the size you want using the tool tip width and height.
♦ Draw from the center. Hold down Alt (Win) or Option (Mac) as you drag.
♦ Constrain to Square or Circle. Hold down Shift as you drag.
Did You Know?
You can show or hide frame edges. Click the View menu, point to Extras, and then click Show Frame Edges or Hide Frame Edges.
![]() Enter a Number of Sides value for the polygon.
Enter a Number of Sides value for the polygon.
![]() Leave the Star Inset value at 0% to create a polygon.
Leave the Star Inset value at 0% to create a polygon.
![]() Click OK.
Click OK.

![]() Drag to create a polygon frame box the size you want using the tool tip width and height.
Drag to create a polygon frame box the size you want using the tool tip width and height.
♦ As you drag, press the Up or Down arrow keys to increase or decrease the number of sides.
♦ Use the Alt (Win) or Option (Mac) key as you drag to draw from center, or the Shift key to draw a proportional shape.

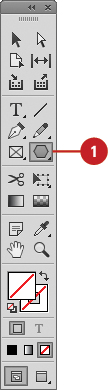
Create a Star Shape
![]() Double-click the Polygon or Polygon Frame tool on the Tools panel.
Double-click the Polygon or Polygon Frame tool on the Tools panel.

![]() Enter a Number of Sides value for the star.
Enter a Number of Sides value for the star.
![]() Enter a Star Inset value. The higher the amount, the sharper the points.
Enter a Star Inset value. The higher the amount, the sharper the points.
![]() Click OK.
Click OK.

![]() Drag to create a star frame box the size that you want using the tool tip width and height.
Drag to create a star frame box the size that you want using the tool tip width and height.
♦ As you drag, press the Up or Down arrow keys to increase or decrease the number of sides.
♦ Use the Alt (Win) or Option (Mac) key as you drag to draw from center, or the Shift key to draw a proportional shape.
Creating Lines
The Line tool draws perfectly straight lines in any direction you drag your mouse. In InDesign, a line is called a stroke and there is a variety of thicknesses, styles, colors, and fills that can be applied to it using the Control, Stroke, and Color panels. You can also create your own line style for specific types of dashed, dotted or artistic lines. You can draw lines at precise 45- or 90-degree angles by holding down the Shift key as you drag.
Draw a Line
![]() Click the Line tool on the Tools panel.
Click the Line tool on the Tools panel.
The pointer becomes a crosshair that you can drag on the pasteboard.

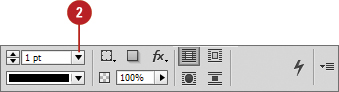
![]() Select a line Weight on the Control panel.
Select a line Weight on the Control panel.
![]() Drag to create a line the size you want using the tool tip length.
Drag to create a line the size you want using the tool tip length.
♦ As you drag, hold down the Shift key, and then drag to draw a 45-, 90-, or 180-degree line.

Creating Multiple Objects in a Grid
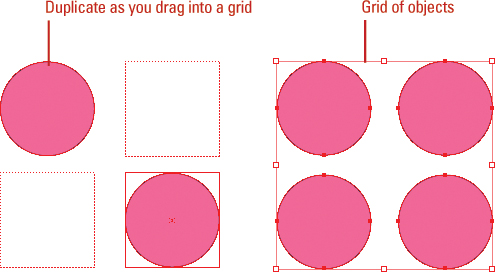
Instead of creating one shape at a time, you can create a grid of equally spaced frames or objects by using one or two shortcut keys while you drag. You can use any of the frame creation tools on the Tools panel, such as Rectangle, Rectangle Frame, Ellipse, Ellipse Frame, Polygon, Polygon Frame, Line, and Type, to create a grid. The arrow keys allow you to specify how many columns and rows of frames or objects you want to create. If you add the Ctrl (Win) or ![]() (Mac) keys, you can adjust the spacing between the frames. If multiple column guides appear on the current spread, InDesign uses the gutter width as the spacing between frames. In addition to creating a grid of shapes from scratch, you can also duplicate existing objects into a grid using a similar technique.
(Mac) keys, you can adjust the spacing between the frames. If multiple column guides appear on the current spread, InDesign uses the gutter width as the spacing between frames. In addition to creating a grid of shapes from scratch, you can also duplicate existing objects into a grid using a similar technique.
Create Multiple Objects in a Grid
![]() Select any of the frame creation tools on the Tools panel.
Select any of the frame creation tools on the Tools panel.
♦ The tools include Rectangle, Rectangle Frame, Ellipse, Ellipse Frame, Polygon, Polygon Frame, Line, and Type.

![]() Drag to create a frame the size you want using the tool tip width and height.
Drag to create a frame the size you want using the tool tip width and height.
♦ Columns. Press the Left and Right arrow keys to change the number of columns.
♦ Rows. Press the Up and Down arrow keys to change the number of rows.
♦ Space Between Frames. Hold down Ctrl (Win) or ![]() (Mac) and press the arrow keys.
(Mac) and press the arrow keys.


Did You Know?
You can duplicate objects in a grid. Select the Selection tool, select an object, hold down Alt (Win) or Option (Mac) and start to drag, release the Alt or Option key. Press the arrow keys to change the columns and rows. Drag a rectangle to specify the size of the grid.
Using the Selection Tool
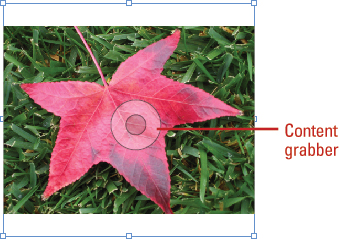
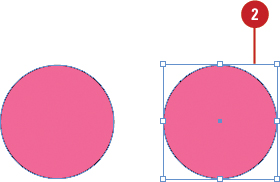
There are several ways to select objects in InDesign. The Selection tool selects entire objects, while the Direct Selection tool selects a point on an object or images inside objects. With the Selection tool, you can select an object’s stroke or fill. When you point to an object, InDesign displays the frame edge (or dashed line for a group) in the object’s layer color to make it easier to find before you select it, which is useful in Preview mode or with hidden frame edges. After you select one or more objects, you can add or subtract objects to/from the selection. In addition, you can use the Selection tool and drag a marquee to select parts of the object or drag over a portion of it to create a selection rectangle. When you work with graphics, you can double-click the content or graphic frame to select the other (it no longer switches to the Direct Selection tool) or use the content grabber to position the content frame (which replaces the Position tool). If you don’t want the content grabber to appear, you can hide it.
Select an Object with the Selection Tool
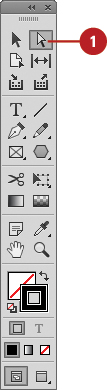
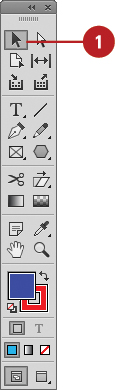
![]() Click the Selection tool on the Tools panel.
Click the Selection tool on the Tools panel.
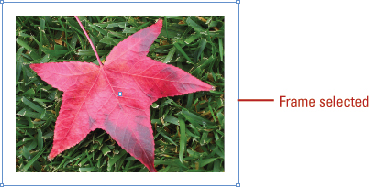
The pointer becomes a black arrow. When you point to a selectable object, a black dot appears on the bottom right.

![]() Position the arrow on the edge or fill (if present) of the object and then click to select it.
Position the arrow on the edge or fill (if present) of the object and then click to select it.
♦ You can also drag a marquee across all or part of the object to select the entire object.
Square resize handles appear on each corner and midpoint line of the object.
![]() To add or subtract objects from the selection, hold down the Shift key, and then click unselected objects to add or click selected objects to subtract them from the selection.
To add or subtract objects from the selection, hold down the Shift key, and then click unselected objects to add or click selected objects to subtract them from the selection.

Timesaver
Click the Edit menu, and then click Select All or press Ctrl+A (Win) or ![]() +A (Mac) to select everything on the page.
+A (Mac) to select everything on the page.
The pointer becomes a black arrow. When you point to a selectable graphic, a black dot appears on the bottom right, and a circle appears, known as the content grabber. For a group, the content grabber appears over each frame within it.
♦ To show or hide the content grabber, click the View menu, point to Extras, and then click Show Content Grabber or Hide Content Grabber.
![]() Use any of the following methods:
Use any of the following methods:
♦ Highlight Frame Edge. Point to an object’s edge to display it with the color of the object’s layer (or a dashed line for a group).
♦ Select and Move the Graphic within the Frame. Point to the graphic inside the frame, point to the content grabber (a circle), and then drag the graphic with the Hand cursor.
♦ Select the Frame or Graphic. Double-click the frame or graphic to select the other. For a group, double-clicking an item selects it. Double-clicking the item again, re-selects the group.

Did You Know?
You can delete an object. Select the object that you want to delete, and then press Delete, or click the Edit menu, and then click Clear.
Using the Direct Selection Tool
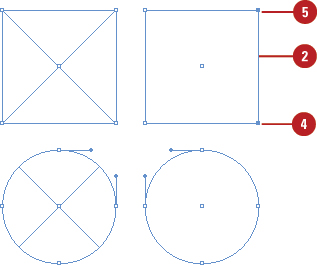
With the Direct Selection tool, you can select a point on an object or graphics inside an object. When you point to or select an object with the Direct Selection tool, path and anchor points appear on the corners of the frame to make it easier to identify and view. You no longer need to select an object to select an anchor point. You can hover over the object to show the anchor points and drag to change the shape of the frame. With the Direct Selection tool, you can also select a graphic. There are two bounding boxes around a graphic frame. One for the frame (blue) and another for the graphic (brown). You can select the frame or graphic. When you select the frame, anchor points appear. When you select the graphic, square resizing handles appear on each corner and midpoint line. When you select a graphic, the Direct Selection tool works like the Selection tool.
Select a Graphic with the Direct Selection Tool
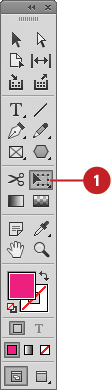
![]() Click the Direct Selection tool on the Tools panel.
Click the Direct Selection tool on the Tools panel.
The cursor becomes a white arrow. When you point to a graphic, the cursor changes to a hand.
Timesaver
Press A to select the Direct Selection tool.
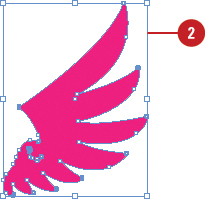
![]() Position the hand cursor on the graphic, then click to select it.
Position the hand cursor on the graphic, then click to select it.
Square resizing handles appear on each corner and midpoint line of the object.
![]() Use any of the following to work with the selected graphic:
Use any of the following to work with the selected graphic:
♦ To move the graphic in the frame, drag the graphic.
♦ To resize the graphic, drag the resize handles.

See Also
See “Selecting and Moving Frames and Graphics” on pages 160 for more information on using the Position tool.
Select an Object and Anchor Points with the Direct Selection Tool
![]() Click the Direct Selection tool on the Tools panel.
Click the Direct Selection tool on the Tools panel.
The cursor becomes a white arrow. When you point to a selectable point, a black dot appears near the white arrow. When you point to a selectable edge, a small line appears near the white arrow.
Timesaver
Press A to select the Direct Selection tool.
![]() Position the arrow on the edge or fill (if present) of the object and then point to (hover over) or click to select it.
Position the arrow on the edge or fill (if present) of the object and then point to (hover over) or click to select it.
♦ You can also drag a marquee across all or part of the object to select the entire object.
Small square anchor points appear on each corner.
![]() To move an anchor point, drag it to another location.
To move an anchor point, drag it to another location.
![]() To select an anchor point, click the small square point to select it.
To select an anchor point, click the small square point to select it.
The anchor point becomes solid.
![]() To add or subtract anchor points or segments from the selection, hold down the Shift key, and then click unselected items to add them or selected items to subtract them from the selection.
To add or subtract anchor points or segments from the selection, hold down the Shift key, and then click unselected items to add them or selected items to subtract them from the selection.
Did You Know?
Selecting graphics is different. Double-clicking graphics with the Selection tool no longer switches to the Direct Selection tool; it selects the content frame.
Resizing Objects
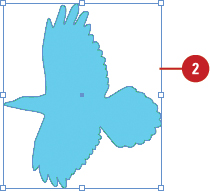
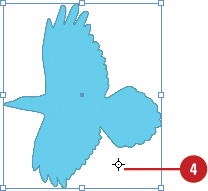
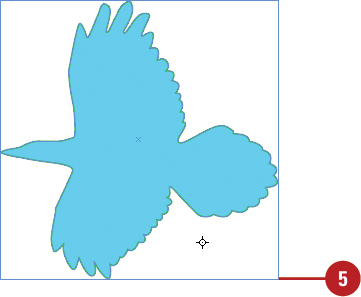
When an object is too big or small for its location, you can resize the object to fit. When you select one or more objects with the Selection tool, square resizing handles appears on the corner and midpoint, which you can drag to change the size of the object. If you’re working with multiple objects, you no longer have to group objects before you resize, scale, or rotate them with the Selection tool; a bounding box appears with resizing handles, which you can use to resize them all together. You can also use Live Distribute to resize the space between objects proportionally. Resizing an object is different than scaling an object. Resizing an object changes the width and height, but the scaling remains the same. Scaling an object changes the width and height by a percentage. If you need to resize an object to an exact size, you can select the object, and then enter specific values in the Control panel.
Resize Objects
![]() Select the Selection tool on the Tools panel.
Select the Selection tool on the Tools panel.

![]() Select one or more objects that you want to resize.
Select one or more objects that you want to resize.
![]() Drag a resizing handle to adjust the size of the objects using the tool tip width and height:
Drag a resizing handle to adjust the size of the objects using the tool tip width and height:
♦ Drag a corner handle to resize both width and height. You can also use one or more of the following keys as you drag:
♦ Resize from Center. Press the Alt (Win) or Option (Mac) key.
♦ Resize Proportionally. Press the Shift key.
♦ Scale. Press the Ctrl (Win) or ![]() (Mac) key.
(Mac) key.
♦ Resize Space Between Selected Objects. Press the Spacebar to resize the space between objects proportionally using Live Distribute.
♦ Drag a side handle to resize only the width or height.
![]() Release the mouse to resize the object to the size you want.
Release the mouse to resize the object to the size you want.
Moving Objects
Moving an object or group of objects is very easy. The simplest way is to drag the edge or fill (if present) of an object. If you want to constrain the movement of the object in multiples of 45 degrees, then use the Shift key as you drag. When you drag an object with Smart Guides enabled, Smart Guides appear automatically to make it easier for you to align objects with other objects. With the Smart Cursor enabled, the cursor displays the current X and Y coordinate values on the page.
Move an Object
![]() Select the Selection tool on the Tools panel.
Select the Selection tool on the Tools panel.
![]() Select one or more objects that you want to move.
Select one or more objects that you want to move.
![]() Drag the edge or fill (if present) of an object using the Smart Cursor X and Y coordinates.
Drag the edge or fill (if present) of an object using the Smart Cursor X and Y coordinates.
♦ To constrain the movement of the object to multiples of 45 degrees, hold down the Shift key as you drag.
♦ If you drag one of several overlapping objects, the selected object remains selected. To select a different object, click a portion of that different object.

Did You Know?
You can enable Smart Guides. Click the View menu, point to Grids & Guides, and then click Smart Guides to select it (a check mark indicates the item is selected).
You can turn on or off the Smart Cursor. Smart cursors display the X and Y values of objects you create, resize, or move them. To turn on or off smart cursors, click the Edit (Win) or InDesign (Mac) menu, point to Preferences, click Interface, select or deselect the Show Transformation Values check box, and then click OK.
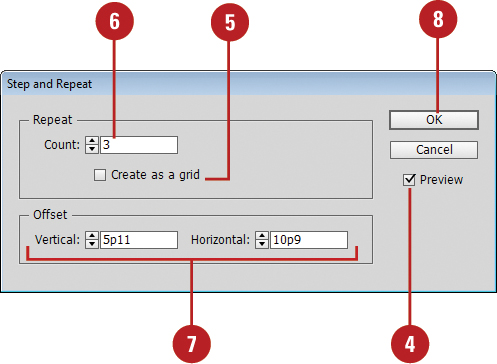
Duplicating Objects
Duplicating objects can be a powerful way of creating geometrical artwork. You can duplicate one or more selected objects by dragging them, using keys, copying to and pasting from the Clipboard, or using the Step and Repeat command. While you drag, you can also duplicate existing objects into a grid using keyboard shortcuts. The Step and Repeat command duplicates copies of an object and positions them at specific horizontal and vertical intervals. For example, you can create a span of objects across the page, or a grid of objects.
Duplicate and Copy Objects
![]() Select the Selection tool on the Tools panel.
Select the Selection tool on the Tools panel.
♦ If the object is in a group, select the Direct Selection tool on the Tools panel.
![]() Use any of the following methods:
Use any of the following methods:
♦ Copy and Paste. Select the object, click the Edit menu, and then click Copy. Click in the target document or area, click the Edit menu, and then click Paste or Paste in Place.
♦ Duplicate. Select the object, click the Edit menu, and then click Duplicate.
♦ Duplicate Between Documents. Open the documents side by side, and then drag the edge or fill of the object from one document to another.
♦ Duplicate as you Drag. Hold down Alt (Win) or Option (Mac), and then drag the edge or fill of the object.
♦ Duplicate as you Drag in a Grid. Hold down Alt (Win) or Option (Mac), start to drag the edge or fill of the object, release the Alt or Option key. Press the arrow keys to change the columns and rows. Drag a rectangle to specify the size of the grid.

![]() Select the object that you want to duplicate using the step and repeat process.
Select the object that you want to duplicate using the step and repeat process.

![]() Click the Edit menu, and then click Step and Repeat.
Click the Edit menu, and then click Step and Repeat.
![]() Select the Preview check box to view your results in the document window.
Select the Preview check box to view your results in the document window.
![]() Select the Create as a grid check box to duplicate objects into a grid.
Select the Create as a grid check box to duplicate objects into a grid.
![]() Enter a Repeat Count value with the number of duplicates you want to create in the top row.
Enter a Repeat Count value with the number of duplicates you want to create in the top row.
![]() Enter a Horizontal Offset value with the horizontal distance you want between the duplicate objects, and then enter a Vertical Offset value with the vertical distance you want between the duplicate objects.
Enter a Horizontal Offset value with the horizontal distance you want between the duplicate objects, and then enter a Vertical Offset value with the vertical distance you want between the duplicate objects.
![]() Click OK.
Click OK.

Did You Know?
You can create a grid with the Step and Repeat command. Select an object, click the Edit menu, and then click Step And Repeat. Enter the number of duplicates for the Repeat Count, enter zero for the Horizontal Offset, and then click OK. Select the entire row of objects, click the Edit menu, and then click Step And Repeat. Enter the number of rows for the Repeat Count, enter zero for the Vertical Offset, and then click OK.
Grouping and Combining Objects
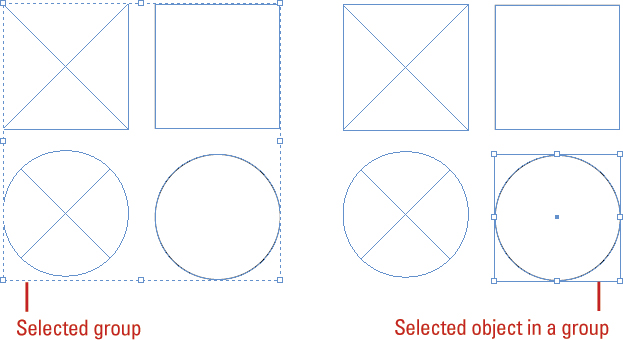
Selecting and grouping objects makes it easier to work with multiple objects as if they were a single object. You can easily select, cut, copy, paste, move, recolor, and transform a grouped object. You can group all types of objects, yet still edit individual objects within the group as needed without having to ungroup them first by using the Direct Selection tool. You can double-click an object in a group to select it and then double-click the selected object to reselect the group again. If you no longer need to group objects, you can ungroup them. You can also use the Paste In command to combine objects.
Create a Group
![]() Select the Selection tool on the Tools panel.
Select the Selection tool on the Tools panel.

![]() Use a selection method to select the objects that you want in the group.
Use a selection method to select the objects that you want in the group.

![]() Click the Objects menu, and then click Group.
Click the Objects menu, and then click Group.
♦ You can use the Group command again to group objects already in a group; this is known as a nested group.
Ungroup Objects
![]() Select the Selection tool on the Tools panel.
Select the Selection tool on the Tools panel.
![]() Select the grouped objects that you want to ungroup.
Select the grouped objects that you want to ungroup.

![]() Click the Objects menu, and then click Ungroup.
Click the Objects menu, and then click Ungroup.
♦ If you have nested groups within an object, you can use the Ungroup command again to ungroup them.
![]() Select the grouped object.
Select the grouped object.

Timesaver
Double-click to select an object in the group. Double-click the selected object to reselect the group.
![]() Click the Object menu, point to Select, and then click Content.
Click the Object menu, point to Select, and then click Content.
The topmost object in the group is selected.

![]() Click the Object menu, point to Select, and then click Previous Object or Next Object.
Click the Object menu, point to Select, and then click Previous Object or Next Object.
The previous or next object in the group is selected.
![]() To select the group again, click the Object menu, point to Select, and then click Container.
To select the group again, click the Object menu, point to Select, and then click Container.
Combine Objects
![]() Select the Selection tool on the Tools panel.
Select the Selection tool on the Tools panel.
![]() Select the object you want to combine into another object.
Select the object you want to combine into another object.

![]() Click the Edit menu, and then click Copy or Cut.
Click the Edit menu, and then click Copy or Cut.
![]() Select the object with which you want to combine other objects.
Select the object with which you want to combine other objects.
![]() Click the Edit menu, and then click Paste Into.
Click the Edit menu, and then click Paste Into.
Did You Know?
You can remove a combined object. Select the Direct Selection tool, select the pasted-in object, and then press Delete.
Aligning Objects
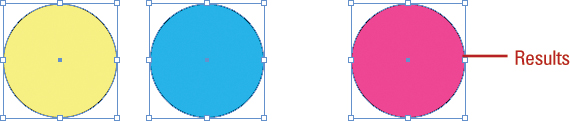
In addition to using grids and guides to align objects to a specific point, you can align a group of objects to each other. The alignment buttons on the Align and Control panels make it easy to align two or more objects relative to each other or to the page. Before you select an align command, specify how you want InDesign to align the objects. You can align the objects in relation to the page, margins, spread, or selection. In addition to the alignment buttons, you can also use the Gap tool to align and adjust the size of a gap between two or more objects. You can resize objects with commonly aligned edges at the same time, while keeping the gaps between them fixed.
Align Objects
![]() Select the Selection tool on the Tools panel.
Select the Selection tool on the Tools panel.

![]() Select two or more objects to align them.
Select two or more objects to align them.

![]() Select the Align panel.
Select the Align panel.
♦ Click the Window menu, point to Object & Layout, and then click Align.
![]() Click the Align To list arrow, and then select an align option:
Click the Align To list arrow, and then select an align option:
♦ Align to Selection. Aligns objects to themselves.
♦ Align to Key Object. Aligns objects to the key object.
♦ Align to Margins. Aligns objects to the margin size.
♦ Align to Page. Aligns objects to the page size.
♦ Align to Spread. Aligns objects to the spread size.
![]() If you want to align objects to an object, click the Object menu, and then click Lock to lock the object.
If you want to align objects to an object, click the Object menu, and then click Lock to lock the object.
![]() Use the alignment buttons on the Align or Control panel.
Use the alignment buttons on the Align or Control panel.
♦ Align Top or Bottom Edges.
♦ Align Left or Right Edges.
♦ Align Horizontal or Vertical Centers.

![]() Position the pointer between two objects.
Position the pointer between two objects.

![]() Use any of the following actions:
Use any of the following actions:
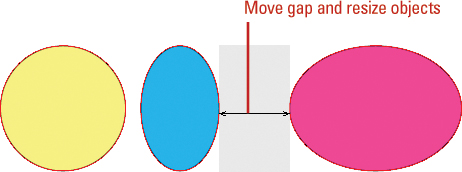
♦ Move Gap and Resize Objects. Drag to move the gap and resize all objects aligned along the gap.
♦ Move Gap Two Nearest Objects. Hold down Shift and then drag to move the gap between only the two nearest objects.
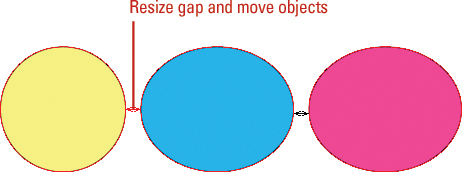
♦ Resize Gap and Not Move It. Hold down Ctrl (Win) or ![]() (Mac), and then drag to resize the gap instead of moving it. Hold down Shift to resize the gap between only the two nearest objects.
(Mac), and then drag to resize the gap instead of moving it. Hold down Shift to resize the gap between only the two nearest objects.
♦ Move Gap and Objects. Hold down Alt (Win) or Option (Mac), and then drag to move the gap and objects in the same direction. Hold down Shift to resize the gap between only the two nearest objects.
♦ Resize Gap and Move Objects. Hold down Ctrl+Alt (Win) or ![]() +Option (Mac), and then drag to resize the gap and move the objects. Hold down Shift to resize the gap between only the two nearest objects.
+Option (Mac), and then drag to resize the gap and move the objects. Hold down Shift to resize the gap between only the two nearest objects.

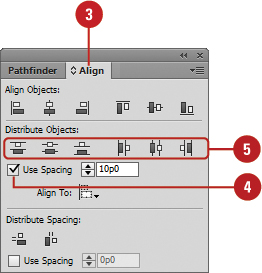
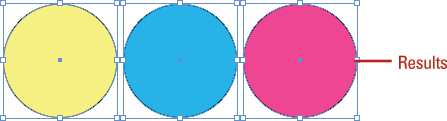
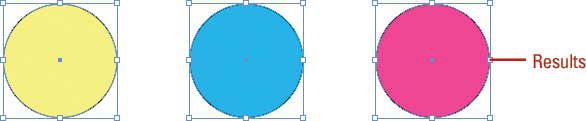
Distributing Objects
To evenly align several objects to each other across the document, either horizontally or vertically, select them and then choose a distribution option. For a quick alternative, you can use Live Distribute to evenly create space between objects proportionally. Resizing an object is different than scaling an object. Before you select an align command, specify how you want InDesign to align the objects. You can align the objects in relation to the page, margins, spread, or selection.
Distribute Objects
![]() Select the Selection tool on the Tools panel.
Select the Selection tool on the Tools panel.
![]() Select three or more objects to distribute them.
Select three or more objects to distribute them.
![]() Select the Align panel.
Select the Align panel.
♦ Click the Window menu, point to Object & Layout, and then click Align.

![]() To apply a spacing distance, select the Use Spacing check box, and then enter a spacing value for tops, centers, bottoms, or sides.
To apply a spacing distance, select the Use Spacing check box, and then enter a spacing value for tops, centers, bottoms, or sides.
![]() Use the distribution buttons on the Align panel.
Use the distribution buttons on the Align panel.
♦ Distribute Top or Bottom Edges.
♦ Distribute Left or Right Edges.
♦ Distribute Horizontal or Vertical Centers.
![]() Select two or more objects to distribute them.
Select two or more objects to distribute them.

Timesaver
Start to drag a resize handle and hold down the Spacebar while dragging.
![]() Select the Align panel.
Select the Align panel.
♦ Click the Window menu, point to Object & Layout, and then click Align.
![]() To apply a spacing distance, select the Use Spacing check box, and then enter a spacing value.
To apply a spacing distance, select the Use Spacing check box, and then enter a spacing value.
![]() Use the Distribute Horizontal Space or Distribute Vertical Space buttons on the Align panel.
Use the Distribute Horizontal Space or Distribute Vertical Space buttons on the Align panel.

Arranging Object Stack Order
Multiple objects on a document appear in a stacking order, like layers of transparencies. Stacking is the placement of objects one on top of another. In other words, the first object that you draw is on the bottom and the last object that you draw is on top. You can change the order of this stack of objects by using Bring to Front, Send to Back, Bring Forward, and Send Backward commands on the Arrange submenu from the Object menu.
Arrange a Stack of Objects
![]() Select the Selection tool on the Tools panel.
Select the Selection tool on the Tools panel.

![]() Select the objects you want to arrange.
Select the objects you want to arrange.

![]() Click the stacking option you want.
Click the stacking option you want.
♦ Click the Object menu, point to Arrange, and then click Bring to Front or Bring Forward to move an object to the top of the stack or up one location in the stack.
♦ Click the Object menu, point to Arrange, and then click Send to Back or Send Backward to move an object to the bottom of the stack or back one location in the stack.

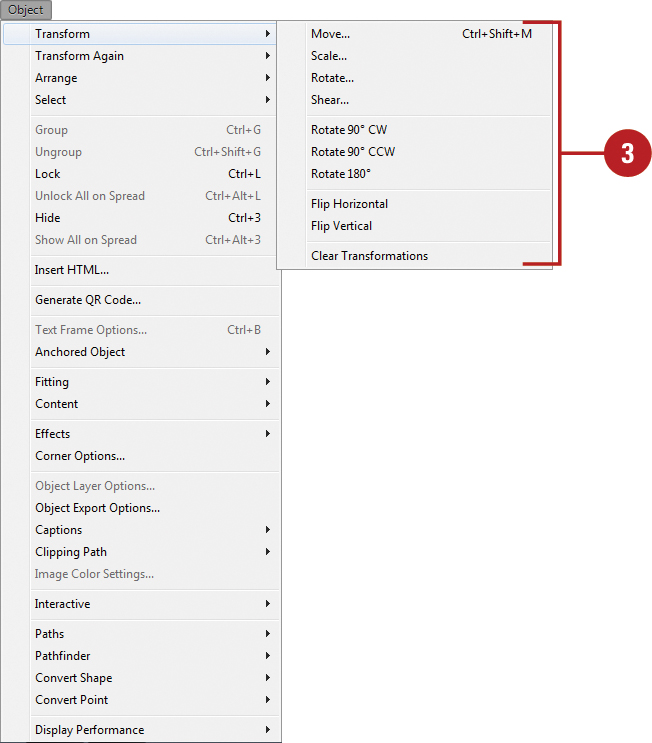
Transforming Objects
With the transformation tools in InDesign, you can quickly move, scale (resize), shear (distort), and rotate an object. InDesign provides several ways to transform objects: tools (Rotate, Scale, and Shear) on the Tools panel, options on the Transform and Control panels, and commands on the Transform submenu on the Object menu. All transformations are performed based on a reference point; center is the default, however, you can change it on the Control or Transform panel. When you perform a transformation on an object, InDesign remembers it, which allows you to repeat the last transformation by using commands on the Transform Again submenu on the Object menu. If you don’t like a transformation, you can use the Clear Transformation command to remove it.
Transform Objects
![]() Select the Selection tool on the Tools panel.
Select the Selection tool on the Tools panel.

![]() Select one or more objects to transform.
Select one or more objects to transform.

![]() Use any of the following methods:
Use any of the following methods:
♦ Transform Tools. Select a transform tool (Rotate, Scale, and Shear) on the Tools panel, and then drag to apply the transformation.
♦ Transform Panel. Click the Window menu, point to Object & Layout, and then click Transform. Enter desired values to apply the transformation.
♦ Transform Menu. Click the Object menu, point to Transform, and then select a transform option.
♦ Click Clear Transformations to remove a transformation.
♦ Transform Again. Select a different object to apply the same transformation. Click the Object menu, point to Transform Again, and then select a transform again option.
♦ Reference Point. Select an object, and then click a square reference point on the Control or Transform panel.
Repeating Object Transformations
When you perform a transformation on an object, InDesign remembers your choices, which allows you to repeat the transformation again on another object. With the commands on the Transform Again submenu on the Object menu, you can repeat transformations individually or as a sequence. Experiment with the different options to create varied results. If you don’t like a transformation, you can use the Clear Transformation command from the Transform submenu on the Object menu to remove it.
Repeat Object Transformations
![]() Select the Selection tool on the Tools panel.
Select the Selection tool on the Tools panel.
![]() Select one or more objects to transform.
Select one or more objects to transform.
![]() Use any of the transformation commands on an object.
Use any of the transformation commands on an object.

![]() Select a different object.
Select a different object.

![]() Click the Object menu, point to Transform Again, and then select one of the following commands:
Click the Object menu, point to Transform Again, and then select one of the following commands:
♦ Transform Again. Applies the last single transform command to the selection as a whole.
♦ Transform Again Individually. Applies the last single transform command to each object in the selection.
♦ Transform Sequence Again. Applies the last set of transform commands to the selection as a whole.
♦ Transform Sequence Again Individually. Applies the last set of transform commands to each object in the selection.
Using the Free Transform Tool
The Free Transform tool allows you to rotate, scale (resize), or shear (slant) an object. However, you cannot copy an object or move the reference point. As you drag to transform an object, you can use keyboard keys to alter the results of a transformation. Free Transform makes it easy to transform an object by using the mouse to visually get the results that you want. The Free Transform tool works just like the one in Illustrator and Photoshop. If you need to use exact values for a transformation, you can use the Control or Transform panel.
Transform an Object with the Free Transform Tool
![]() Select the Free Transform tool on the Tools panel.
Select the Free Transform tool on the Tools panel.
![]() Select one or more objects to transform.
Select one or more objects to transform.
![]() Use any of the following methods:
Use any of the following methods:
♦ Scale. Drag a corner handle to scale along two axes; drag a side handle to scale along one axis; Shift-drag to scale proportionally; hold down Alt (Win) or Option (Mac), and then drag to scale from the center. Or, hold down Shift to scale from the center proportionally.

♦ Rotate. Point slightly outside a corner handle (pointer changes to a double arrow), and then drag in a circular motion. To rotate in 45-degree increments, Shift-drag.
To rotate an object 180 degrees, drag a corner handle diagonally all the way across the object.

♦ Shear. Drag a side handle and then hold down Ctrl (Win) or ![]() (Mac) as you continue to drag. To constrain the movement, also press Shift. To shear from the center, add the Alt (Win) or Option (Mac) key.
(Mac) as you continue to drag. To constrain the movement, also press Shift. To shear from the center, add the Alt (Win) or Option (Mac) key.
Scaling Objects
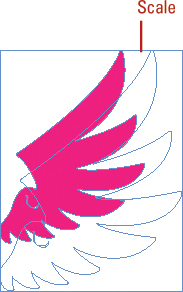
After you create an object, you can change its size by scaling it. To resize an object, either smaller or larger, you can use the Scale tool, which is under the Free Transform tool. In addition, you can scale and flip or scale and copy an object. You can transform the object from its center or the reference point. If you want to scale an object using exact percentages, you can use the Transform panel, which is available from the Object & Layout submenu on the Window menu.
Scale an Object
![]() Select the Selection tool on the Tools panel.
Select the Selection tool on the Tools panel.
![]() Select one or more objects to transform.
Select one or more objects to transform.
![]() Select the Scale tool on the Tools panel.
Select the Scale tool on the Tools panel.

![]() To move the reference point, click a new point.
To move the reference point, click a new point.
![]() Use any of the following methods:
Use any of the following methods:
♦ Scale. Drag away from or toward the object. Shift-drag to scale proportionally; hold down Alt (Win) or Option (Mac), and then drag to scale from the center. Or, hold down Shift to scale from the center proportionally.
♦ Scale and Flip. Drag across the entire object.
♦ Scale and Copy. Hold down Alt+Shift (Win) or Option+Shift (Mac), and then drag.
![]() To scale an object using exact percentages, use the Control or Transform panel.
To scale an object using exact percentages, use the Control or Transform panel.
Shearing Objects
The Shear tool on the Tools panel allow you to be creative as you transform objects by creating a slanted version of that object. With the Shear tool, which is under the Free Transform tool, you can transform the object from its center or the reference point. If you want to shear an object using exact angle values, you can use the Control panel or the Transform panel, which is available on the Object & Layout submenu on the Window menu.
Shear an Object
![]() Select the Selection tool on the Tools panel.
Select the Selection tool on the Tools panel.
![]() Select one or more objects to transform.
Select one or more objects to transform.
![]() Select the Shear tool on the Tools panel.
Select the Shear tool on the Tools panel.
![]() To move the reference point, click a new point.
To move the reference point, click a new point.
![]() Drag away from the object.
Drag away from the object.
![]() To shear an object using exact angle values, use the Control or Transform panel.
To shear an object using exact angle values, use the Control or Transform panel.
Rotating Objects
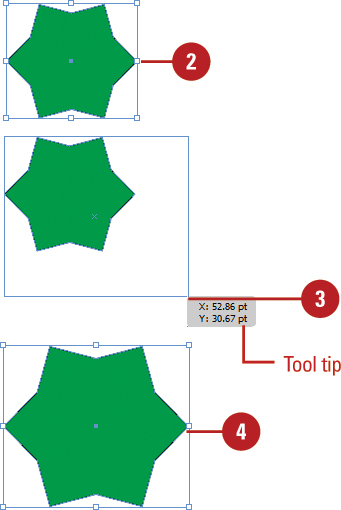
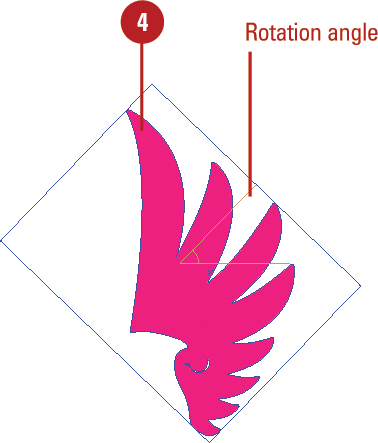
After you create an object, you can change its orientation by rotating it. For a freeform rotation, when you want to rotate the object in other than 90-degree increments, you can use the Selection or Rotate tool. You can transform the object from its center or the reference point. With the Selection tool, you can drag a corner handle just like in Illustrator to rotate around the center. With the Rotate tool, which is under the Free Transform tool, you drag the object to rotate around the reference point. As you drag a freeform rotation, rotation lines and a tool tip appear from the center or reference to indicate the rotation angle. To rotate an object in 90-degree increments or flip it horizontally or vertically, you can use easy access buttons on the Control panel. If you want to rotate an object with an exact angle value, you can use the Control or Transform panel, which is available on the Object & Layout submenu on the Window menu.
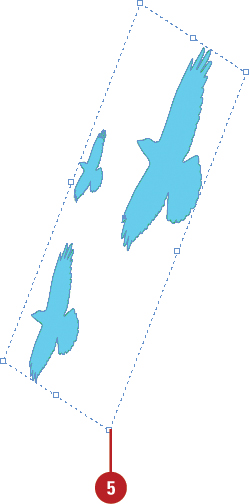
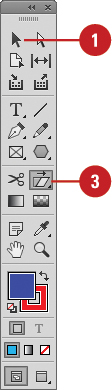
Free Rotate an Object Using the Selection Tool
![]() Select the Selection tool on the Tools panel.
Select the Selection tool on the Tools panel.

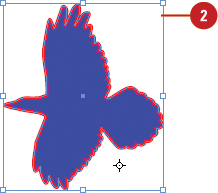
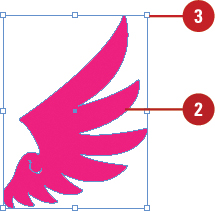
![]() Select one or more objects to transform.
Select one or more objects to transform.
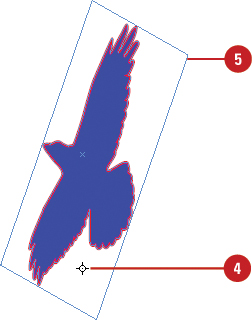
![]() Position the pointer just outside a corner handle (cursors changes to an arc with arrows).
Position the pointer just outside a corner handle (cursors changes to an arc with arrows).
![]() Drag in a circular motion. As you drag, rotation lines appears indicating the rotation angle.
Drag in a circular motion. As you drag, rotation lines appears indicating the rotation angle.
♦ To rotate in 45-degree increments, Shift-drag.
Did You Know?
You can can rotate a graphic using the Selection tool. Select the Selection tool on the Tools panel, select the graphic frame, position the pointer just outside a corner handle, and then drag to rotate the object. As you drag, rotation lines appear in the center of the content grabber indicating the rotation angle.
![]() Select one or more objects to transform.
Select one or more objects to transform.
![]() Select the Rotate tool on the Tools panel.
Select the Rotate tool on the Tools panel.
![]() To move the reference point, click a new point.
To move the reference point, click a new point.

![]() Drag in a circular motion.
Drag in a circular motion.
♦ To rotate in 45-degree increments, Shift-drag.

Rotate or Flip an Object in Increments
![]() Select the Selection tool on the Tools panel.
Select the Selection tool on the Tools panel.

![]() Select one or more objects to transform.
Select one or more objects to transform.

![]() Use any of the following methods:
Use any of the following methods:
♦ Rotate Value. Enter a Rotation Angle on the Control or Transform panel.
♦ Rotate 90° Intervals. Click the Rotate 90° Clockwise or Rotate 90° Counter-clockwise button on the Control panel.
♦ Flip. Click the Flip Horizontal or Flip Vertical button on the Control panel.

Locking and Unlocking Objects
After you’ve spent a lot of time laying out objects in your document, you may want to lock everything into place. The Lock command on the Object menu allows you to lock the position of one or more selected objects. When you lock an object, a lock icon appears on the edge of the object. With the Prevent Selection of Locked Objects option in General preferences, you can specify whether a locked object can still be selected and text or graphics inside the object can still be modified. However, the position of the object cannot be changed. If you want to move a locked object, you need to unlock it on the spread first.
Lock or Unlock Objects
![]() Select the Selection tool on the Tools panel.
Select the Selection tool on the Tools panel.

![]() Select one or more objects to lock or locked objects to be unlocked.
Select one or more objects to lock or locked objects to be unlocked.

![]() Click the Object menu, and then click Lock or Unlock All On Spread.
Click the Object menu, and then click Lock or Unlock All On Spread.
When you try to move the object, the cursor changes to a lock icon, and the object doesn’t move.
Set Lock Options
![]() Click the Edit (Win) or InDesign (Mac) menu, point to Preferences, and then click General.
Click the Edit (Win) or InDesign (Mac) menu, point to Preferences, and then click General.
![]() Select the Prevent Selection of Locked Objects check box to prevent locked objects from being changed, or deselect it to prevent it from being moved (yet you can still select it and modify text or graphics inside).
Select the Prevent Selection of Locked Objects check box to prevent locked objects from being changed, or deselect it to prevent it from being moved (yet you can still select it and modify text or graphics inside).
![]() Click OK.
Click OK.

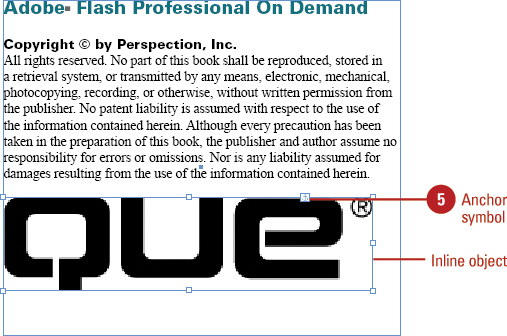
Creating Inline Objects
An inline object is a shape or graphic that is dragged or pasted as an anchored object within the text into a text frame. When you modify text, the anchored object adjusted as needed. When the object is placed in a text, you can adjust the object in the frame by using the Direct Selection tool or move the object in the text frame by using the Selection tool. You can also use any of the Text Wrap commands in the Text Wrap panel to wrap text around the object.
Create an Inline Object
![]() Click the View menu, point to Extras, and then click Show Anchored Object Control.
Click the View menu, point to Extras, and then click Show Anchored Object Control.
![]() Select the Selection tool on the Tools panel.
Select the Selection tool on the Tools panel.

![]() Select a text frame into which you want to paste a shape or graphic.
Select a text frame into which you want to paste a shape or graphic.
![]() Hold down the Shift key, and then drag the blue square where you want to create an inline object.
Hold down the Shift key, and then drag the blue square where you want to create an inline object.
An anchor symbol icon appears in place of the blue square.

![]() To move the anchored object, hold down the Shift key and drag the anchor symbol icon by using the Selection tool. To adjust the object in the text frame, drag the object by using the Direct Selection tool.
To move the anchored object, hold down the Shift key and drag the anchor symbol icon by using the Selection tool. To adjust the object in the text frame, drag the object by using the Direct Selection tool.
![]() To change anchor options, Alt+click (Win) or Option+click the anchor symbol icon. See page 199 for details on dialog box options.
To change anchor options, Alt+click (Win) or Option+click the anchor symbol icon. See page 199 for details on dialog box options.
Did You Know?
You can paste an inline object. Copy the object, click to place the insertion point where you want the inline object, and then paste the object.
You can place an inline graphic object. Click to place the insertion point where you want the inline graphic, click the File menu, click Place, select the graphic file, and then click Open.
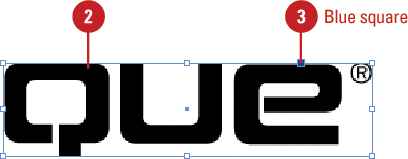
Creating Anchored Objects
An anchored object is an object, such as images or text boxes, that is attached to a text frame. When you move the text frame, the anchored object moves too. You can create an anchored object by using drag and drop or the Insert Anchored Object dialog box, which allows you to control how, where, and what type an object is placed in a text frame. When you specify options, an anchored object frame with an anchor symbol appears next to the text frame. If you no longer want the anchored object, you can release it from the text frame.
Create an Anchored Object Using Drag and Drop
![]() Click the View menu, point to Extras, and then click Show Anchored Object Control.
Click the View menu, point to Extras, and then click Show Anchored Object Control.
![]() Select an object that you want to anchor using the Selection tool.
Select an object that you want to anchor using the Selection tool.
![]() Drag the blue square where you want the object’s anchor.
Drag the blue square where you want the object’s anchor.
♦ Specify Options. Press Alt (Win) or Option (Mac) as you drag the blue square.
An anchor symbol icon appears in place of the blue square and a dashed line connects the objects, and the objects remain in place.

![]() To view anchor object markers:
To view anchor object markers:
♦ View Anchor Markers. Click the Type menu, and then click Show Hidden Characters.
♦ View Anchor Symbol. Click the View menu, point to Extras, and then click Show Frame Edges.
♦ View Dashed Line. Click the View menu, point to Extras, and then click Show Text Threads.
![]() To select anchored objects, select only one anchor object using the Selection tool, or select a range of text with multiple anchor markers using the Type tool.
To select anchored objects, select only one anchor object using the Selection tool, or select a range of text with multiple anchor markers using the Type tool.
![]() To release an anchored object from a text frame, select the object, click the Object menu, point to Anchored Object, and then click Release.
To release an anchored object from a text frame, select the object, click the Object menu, point to Anchored Object, and then click Release.
Create an Anchored Object with Specific Options
![]() Click to place the insertion point in the text where you want to place the anchored object by using the Type tool. (You can change this location later if you want.)
Click to place the insertion point in the text where you want to place the anchored object by using the Type tool. (You can change this location later if you want.)
![]() Click the Object menu, point to Anchored Object, and then click Insert.
Click the Object menu, point to Anchored Object, and then click Insert.
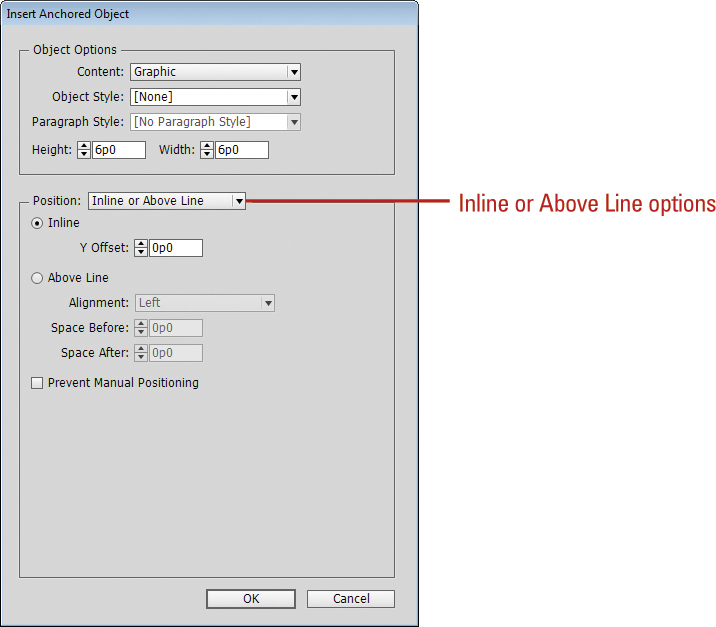
![]() Specify the following options you want:
Specify the following options you want:
♦ Object Options. Specify options for content type, object and paragraph style, and height and width.
♦ Position. Select the Custom or Inline or Above Line option, and then specify options that relate to your choice.
♦ Allow Drag Move. Deselect the Prevent Manual Positioning check box.
![]() Click OK.
Click OK.
An anchored object frame with an anchor symbol appears next to the text frame.

![]() To move anchored objects, select the object using a selection tool, and then drag it to new position.
To move anchored objects, select the object using a selection tool, and then drag it to new position.
![]() To change options for the anchored object, select it, click the Object menu, point to Anchored Object, and then click Options.
To change options for the anchored object, select it, click the Object menu, point to Anchored Object, and then click Options.
![]() To release an anchored object from a text frame, select the object, click the Object menu, point to Anchored Object, and then click Release.
To release an anchored object from a text frame, select the object, click the Object menu, point to Anchored Object, and then click Release.
Creating and Deleting Object Layers
You can think of Layers as a group of transparent sheets stacked on top of each other, where each layer can contain a separate aspect of the total design. Layers give you control over the design elements of your document. When you open a document, a default layer is already there for you to work on. Everything you create in the document appears on the default layer until you create a new one. Each object is given a generic name, such as <rectangle>, until you change it. Each layer uses an Expand/Collapse triangle in the Layers panel to show/hide the objects on it and their stacking order. You can quickly create a new layer or duplicate an existing one using a button in the Layers panel or selecting options in a dialog box. When you create a new layer, it’s given a generic name, such as Layer 1, and a color, which is used to highlight object frames and paths. When you duplicate a layer, any objects on the layer are also duplicated. When you no longer need a layer, you can quickly delete it. Remember that once you’ve deleted a layer and saved the document, there is no way to recover the deleted layer. However, while the document is open, you can use the Undo command to recover a deleted layer.
Create and Rename a New Layer
![]() Select the Layers panel.
Select the Layers panel.
♦ Click the Window menu, and then click Layers.
![]() Click the New Layer button on the panel.
Click the New Layer button on the panel.
♦ To create a new layer and specify the options you want, click the Options button, click New Layer, specify options, and then click OK.
A new layer appears in the panel.

![]() To rename the layer, double-click the layer, enter a name, and then click OK.
To rename the layer, double-click the layer, enter a name, and then click OK.

Did You Know?
You can create a new layer while you paste. Select the Layers panel, click the Options button, and then select Paste Remembers Layers. With this option selected, InDesign creates a new layer when you paste, or drag and drop objects from another document.
♦ Click the Window menu, and then click Layers.
![]() Drag the layer that you want to duplicate onto the New Layer button on the panel.
Drag the layer that you want to duplicate onto the New Layer button on the panel.
InDesign creates an exact copy of the layer and appends the word copy at the end of the original layer name.

![]() To rename the layer, double-click the layer, enter a name, and then click OK.
To rename the layer, double-click the layer, enter a name, and then click OK.
Delete Layers
![]() Select the Layers panel.
Select the Layers panel.
♦ Click the Window menu, and then click Layers.
![]() Select the layers that you want to delete.
Select the layers that you want to delete.
♦ Hold down the Ctrl (Win) or ![]() (Mac) key, and then click to select multiple items.
(Mac) key, and then click to select multiple items.
![]() Click the Delete Layer button.
Click the Delete Layer button.

![]() Click OK to delete any objects on the layer.
Click OK to delete any objects on the layer.
Did You Know?
You can delete all unused layers. Select the Layers panel, click the Options button, and then click Delete Unused Layers.
Setting Layer Options
When you create a layer, it’s given a generic name, (Layer 1, Layer 2, etc.) and a distinctive color. The color is used to highlight object frames and paths. To avoid confusion, it’s a good idea to specify names for layers in a document. You can quickly rename and set layer options by double-clicking the layer you want to change. In the Layer Options dialog box, you can set options for color, showing and hiding layers, locking and unlocking layers, printing layers, showing and hiding guides, locking and unlocking guides, and suppressing text wraps when a layer is hidden.
Set Layer Options
![]() Select the Layers panel.
Select the Layers panel.
♦ Click the Window menu, and then click Layers.
![]() Double-click an existing layer or select a layer, click the Options button, and then click Layer Options for.
Double-click an existing layer or select a layer, click the Options button, and then click Layer Options for.

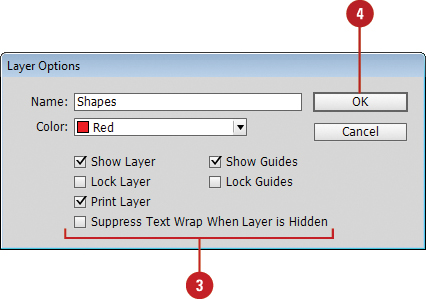
![]() Select or deselect any of the following options:
Select or deselect any of the following options:
♦ Name. Enter a name for the layer.
♦ Color. Specify a color for the layer. This color is used to highlight object frames and paths.
♦ Show Layer. Select to show the layer or deselect to hide it.
♦ Lock Layer. Select to lock the layer or deselect to unlock it.
♦ Print Layer. Select to print the layer or deselect to prevent printing.
♦ Suppress Text Wrap When Layer is Hidden. Select to prevent text wrapping on hidden layers.
♦ Show Guides. Select to show guides on the layer.
♦ Lock Guides. Select to lock guides on the layer.
![]() Click OK.
Click OK.
Showing and Hiding Layers and Objects
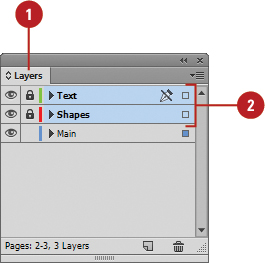
When you have a lot of objects in the document window, it can be hard to work with them. In the Layers panel, you can hide layers and objects to reduce the clutter and make it easier to work with the layers and objects that you want. Each layer uses an Expand/Collapse triangle in the Layers panel to show/hide the objects on it and their stacking order. When you click the visibility (first) column, an eye icon appears indicating the layer is visible. To hide a layer or object, you simply click the eye icon to remove visibility. When objects are hidden, they are not printed or exported, and cannot be selected. When you save, close, and reopen your document, any hidden objects remain hidden until you show them.
Show and Hide Layers and Objects in the Layers Panel
![]() Select the Layers panel.
Select the Layers panel.
♦ Click the Window menu, and then click Layers.
![]() Click the Expand/Collapse triangle to display the objects on the layer.
Click the Expand/Collapse triangle to display the objects on the layer.
![]() Use any of the following:
Use any of the following:
♦ Show/Hide Individual. Click the visibility (first) column for each layer or object that you want to show or hide.
♦ Show/Hide Multiple. Click and drag the visibility (first) column.
♦ Show/Hide Except One. Alt+click (Win) or Option+click (Mac) the visibility (first) column for a top-level layer to show/hide all the other top-level layers except the one you clicked.


Did You Know?
You can hide or show objects using the Object menu. Select the Selection tool, select the objects you want to hide, click the Object menu, and then click Hide or press Ctrl+3 (Win) or ![]() +3 (Mac). To show objects, click Show All On Spread or press Alt+Ctrl+3 (Win) or Option+
+3 (Mac). To show objects, click Show All On Spread or press Alt+Ctrl+3 (Win) or Option+![]() +3 (Mac).
+3 (Mac).
Locking Layers and Objects
When you don’t want an object to be moved or modified, you can lock it in the Layers panel. When you lock a layer or object, the objects remain visible in the document window. When you click the lock (second) column in the Layers, a padlock icon appears, indicating the layer is locked. When you lock a layer, all the objects on the layer are locked. You can also expand a layer in the Layers panel and lock/unlock individual objects. To unlock a layer or object, you simply click the padlock icon to remove it. You can lock/unlock individual layers and multiple layers.
Lock and Unlock Layers and Objects in the Layers Panel
![]() Select the Layers panel.
Select the Layers panel.
♦ Click the Window menu, and then click Layers.
![]() Click the Expand/Collapse triangle to display the objects on the layer.
Click the Expand/Collapse triangle to display the objects on the layer.
![]() Use any of the following:
Use any of the following:
♦ Lock/Unlock Individual. Click the lock (second) column for each layer that you want to lock or unlock.
♦ Lock/Unlock Multiple. Click and drag the lock (second) column.
♦ Lock/Unlock Except One. Alt+click (Win) or Option+click (Mac) the lock (second) column for a layer to lock/unlock all the other layers except the one you clicked.


See Also
See “Locking and Unlocking Objects” on page 196 for more information on locking and unlocking objects.
Merging Layers and Groups
If you have objects on multiple layers and want to consolidate them onto one layer, you can merge them together. You can merge two or more layers. However, you can’t merge an object with another object. If a layer is locked or hidden, you can still use it in a merge. Before you use the Merge Layers command, it’s a good idea to make a copy of your document as a backup to preserve a copy of the separate layers.
Merge Layers in the Layers Panel
![]() Select the Layers panel.
Select the Layers panel.
♦ Click the Window menu, and then click Layers.
![]() Select two or more layers that you want to merge.
Select two or more layers that you want to merge.
♦ Hold down the Ctrl (Win) or ![]() (Mac) key, and then click to select multiple items.
(Mac) key, and then click to select multiple items.
![]() Click the last layer into which you want to merge the selected layers.
Click the last layer into which you want to merge the selected layers.
![]() Click the Options button, and then click Merge Layers.
Click the Options button, and then click Merge Layers.


Did You Know?
You can reorder layers. Select the Layers panel, and then drag one layer above or below another layer to the new position that you want. A thick black line appears, indicating the new position.
Working with Objects on Layers
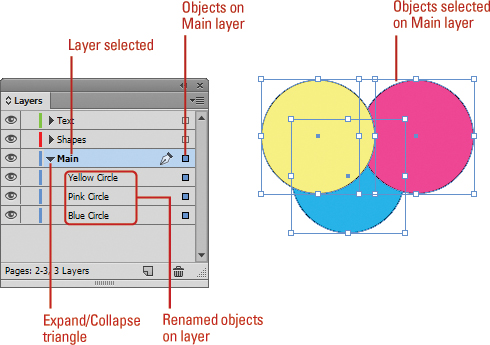
After you have created more than one layer, you can create objects on the new layers or move objects from one layer to another. To work with a layer, all you need to do is select an object on the layer in the document window or select a layer or object in the Layers panel. Each layer in the Layers panel uses an Expand/Collapse triangle to show/hide the objects on it and their stacking order. The color of an object’s frame indicates the layer on which it is located. Blue is the default color of the first layer when you create a new document. This makes it easy to identify objects and layers. When you select an object, a square object icon appears in the Layers panel. A quick way to move an object from one layer to another is to drag the object name or square object icon from one layer to another in the Layers panel.
Work with Objects on Layers
♦ Select a Layer with Objects. Select an object in the document window with the same color frame as the layer color.
♦ Select a Layer in the Layers Panel. Select the Layers panel, and then click a layer.
♦ Expand/Collapse a Layer in the Layers Panel. Select the Layers panel, and then click the Expand/Collapse triangle.
♦ Move an Object Between Layers. Select the Layers panel, select an object in the document window or Layers panel, and then drag the square object icon from the selected layer to another layer.
♦ Copy an Object Between Layers. Select an object in the document window, select the Layers panel, hold the Alt (Win) or Option (Mac) key, and then drag the object name or square object icon from the selected layer to another layer.
♦ Reorder Layers or Objects. Select the Layers panel, then drag a layer or object from one position to another. A thick black line appears, indicating the new position.
♦ Rename an Object. Select the layers panel, select the object, pause, and then click it again to highlight the name. Type a name, and then press Enter (Win) or Return (Mac).

Using the Measure Tool
The Measure tool allows you to find out the size of items or measure the distance between objects. The Measure tool displays measurement information in the Info panel. The panel shows you the horizontal and vertical position, distance and angle of the measurement line, and width and height of the bounding box.
Measure Distances and Angles with the Measure Tool
![]() Select the Info panel.
Select the Info panel.
♦ Click the Window menu, and then click Info.

![]() Click the Measure tool on the Tools panel.
Click the Measure tool on the Tools panel.

![]() Point to the start point of what you want to measure, and then drag to draw a line to the end point.
Point to the start point of what you want to measure, and then drag to draw a line to the end point.
![]() To create an angle, point to the start or end point, hold the Alt (Win) or Option (Mac) key, and then drag a new line to the angle you want.
To create an angle, point to the start or end point, hold the Alt (Win) or Option (Mac) key, and then drag a new line to the angle you want.
![]() To move a measurement line, drag the line (not the end points) to a new position.
To move a measurement line, drag the line (not the end points) to a new position.
![]() To adjust the start and end points on the measurement line, drag the start or end point to a new position.
To adjust the start and end points on the measurement line, drag the start or end point to a new position.
Using Live Screen Drawing
In previous versions of InDesign, you needed to pause before dragging to see the content as you draw. Now, you can see the content drawn as you drag without the pause using Live Screen Drawing. In the Interface preferences dialog box, you can can select the Live Screen Drawing option you want. If you prefer the old way, then you can select the Delayed option. If you want to see content as you draw, then select the Immediate option. If you don’t want either, then select Never.
Set Live Screen Drawing Options
![]() Click the Edit (Win) or InDesign (Mac) menu, point to Preferences, and then click Interface.
Click the Edit (Win) or InDesign (Mac) menu, point to Preferences, and then click Interface.
![]() Click the Live Screen Drawing list arrow, and then select any of the following:
Click the Live Screen Drawing list arrow, and then select any of the following:
♦ Never. Select to never show content as you draw.
♦ Immediate. Select to show content immediately as you draw.
♦ Delayed. Select to pause before you show content as you draw (like the behavior in InDesign CS4).
![]() Click OK.
Click OK.
