
Chapter 7
A Form for All Reasons
In This Chapter
![]() Creating forms the easy way with Form tools
Creating forms the easy way with Form tools
![]() Building a form with the Form Wizard
Building a form with the Form Wizard
![]() Adding the finishing touches
Adding the finishing touches
Access forms are similar to paper forms in their function — they’re used in part to collect data — but Access forms go beyond paper forms by having a direct connection to the database tables that store the collected information. In the “old days,” after you completed a paper form, some poor soul had to manually organize and file each form in a file cabinet or tabulate results by hand. With the advent of electronic databases such as Access, the data typed into an electronic form is simultaneously placed in the file cabinet (the table) connected to that form.
Like reports and queries, forms are named and stored in the database file. Forms are full-fledged Access objects, so you can customize them easily to meet the needs of your business.
This chapter shows what forms can do for you, shows you how to make forms, and provides tips for customizing forms so they’re exactly what you need.
Generating Forms
Depending on your needs, you can create forms in three ways:
![]() The Form tools make attractive forms with a click of the mouse.
The Form tools make attractive forms with a click of the mouse.
![]() The Form Wizard asks some questions and then creates an attractive form based on your answers.
The Form Wizard asks some questions and then creates an attractive form based on your answers.
![]() The Form Design and Blank Form buttons let you start with a blank form and build from the ground up.
The Form Design and Blank Form buttons let you start with a blank form and build from the ground up.
 Why use forms?
Access forms have all kinds of advantages over old-fashioned paper forms — and they’ll spoil you if you’re used to wandering through your data in Datasheet view (where the data appears in a spreadsheet format).
Here are the most important reasons for using Access forms to manage your data:
![]() Say goodbye to Datasheet view: Maintaining your data in Datasheet view isn’t much fun. The constant scrolling back and forth and up and down can drive you crazy. With a form, you focus on one record at a time with all of its data laid out on a single screen. Maintaining your data becomes a snap, and you can watch those datasheet-induced headaches disappear.
Say goodbye to Datasheet view: Maintaining your data in Datasheet view isn’t much fun. The constant scrolling back and forth and up and down can drive you crazy. With a form, you focus on one record at a time with all of its data laid out on a single screen. Maintaining your data becomes a snap, and you can watch those datasheet-induced headaches disappear.
![]() Modify at will: When your needs change, update the form in Design view. When you need to collect a new piece of data, just add a field to the appropriate table and to the form associated with that table.
Modify at will: When your needs change, update the form in Design view. When you need to collect a new piece of data, just add a field to the appropriate table and to the form associated with that table.
![]() See your data any way you want: Access lets you take one set of data and maintain it with as many different forms as you want. Create a special form for the data-entry department, another for your manager, and a third for yourself. Each form can display just the fields that those people need to see. Well-designed forms give the right information to the right people without revealing unnecessary data.
See your data any way you want: Access lets you take one set of data and maintain it with as many different forms as you want. Create a special form for the data-entry department, another for your manager, and a third for yourself. Each form can display just the fields that those people need to see. Well-designed forms give the right information to the right people without revealing unnecessary data.
![]() View the entries in a table or the results of a query: Forms pull information from tables or queries with equal ease.
View the entries in a table or the results of a query: Forms pull information from tables or queries with equal ease.
![]() Combine data from multiple tables: One form can display data from several related tables. Forms automatically use the relationships built into your database. So you can (for example) see a list of customers and their corresponding orders all on one form.
Combine data from multiple tables: One form can display data from several related tables. Forms automatically use the relationships built into your database. So you can (for example) see a list of customers and their corresponding orders all on one form.
The Form tools and the Form Wizard make it easy to create a form. I focus on using these two methods to build forms. Building forms from scratch in Design or Layout view is beyond the scope of this book.
The Form Wizard and Form tools are a time-saving gift from your friends at Microsoft. Use them to create your forms. They do the hard stuff so all you have to do is provide the finishing touches.
 Use these criteria to determine which form-building tool to use:
![]() Use the Form tools if
Use the Form tools if
• You want all fields in the selected table or query to appear on the report.
• You don’t want control over the type of style that is applied to the form.
![]() Use the Form Wizard (covered later in this chapter) if
Use the Form Wizard (covered later in this chapter) if
• You want to select specific fields for your form.
• You want to select fields from more than one table or query.
• You want choose from a list of layouts for your form.
Keeping it simple: Form tools
I have good and bad news about these tools:
![]() Good news: They’re fast, and they don’t ask any questions or talk back!
Good news: They’re fast, and they don’t ask any questions or talk back!
![]() Bad news: They’re extremely inflexible buggers.
Bad news: They’re extremely inflexible buggers.
You want a larger font and a different background color? Keep it to yourself. The Form tools decide what font, colors, and layout you get.
After you create a form with a Form tool, you can modify the form. In this chapter, the Customizing Form Parts section gives you the straight scoop.
Meet the Form tools
There are three kinds of Form tools:
![]() A simple form displays one record at a time.
A simple form displays one record at a time.
Suppose you have a Customers table and an Orders table related by a Customer ID field (see Chapter 4 for an explanation of table relationships). If you select the Customers table before you click the Simple Form tool, you get a form that displays not only customer data but also order data for that customer.
![]() Split forms display one record on the top half of the form and all records on the bottom half — think a single customer record on the top half and the remaining customers on the bottom half. Click a customer on the bottom half, and you’ll see that entire customer’s record on the top half.
Split forms display one record on the top half of the form and all records on the bottom half — think a single customer record on the top half and the remaining customers on the bottom half. Click a customer on the bottom half, and you’ll see that entire customer’s record on the top half.
Use a split form if you want to browse and edit multiple records in a user-friendly fashion. The split-screen format lets you easily browse records in the datasheet portion (bottom half) of the form and see and edit each record’s detail in the currently selected record portion (top half) of the form.
![]() Multiple Items shows all records from the data source in a beautiful datasheet-like format.
Multiple Items shows all records from the data source in a beautiful datasheet-like format.
Create a Multiple Items form if you want to see all records at a glance. This usually works best with tables that contain only a small number of fields; each field translates into a column on your screen.
To create a form using one of the Forms buttons, open your database and follow these steps:
1. From the Navigation pane, select the table or query that contains the data your new form should display.
2. Click the Create tab on the Ribbon.
Several button groups appear on the Ribbon, including the Forms group. (See Figure 7-1.)

Figure 7-1: The Create tab of the Ribbon holds the Forms buttons.
3. Click the form button of your choice from the Forms buttons.
The Simple Form button is labeled Form. The Multiple Items and Split Form buttons are on the More Forms drop-down list.
The sidebar Meet the Form tools shows the best Form tool for your data.
A beautiful form appears before your eyes (and in Figure 7-2)!
4. To finish your form, follow these steps:
a. Click the Save button on the Quick Access toolbar.
The Save As dialog box appears.
b. Type a name for the form in the dialog box, and click OK.
Your form name appears on the Navigation pane.
Granting most wishes: the Form Wizard
When you want to control field selection and the style of form design, use the Form Wizard.

Figure 7-2: Form based on the Customers table using the Split Form button.
As with all Access wizards, the Form Wizard steps you through the creation process. To use the Form Wizard, follow these steps:
1. Open your database file.
2. Click the Create tab on the Ribbon.
Several button groups appear on the Ribbon, including the Forms group.
3. Click the Form Wizard button. (Refer to Figure 7-1.)
The Form Wizard springs into action, as shown in Figure 7-3.
4. Using the Tables/Queries drop-down menu, select the source of the form’s fields:
a. Click the down arrow to list the database’s tables and queries.
b. Select the table or query that contains the fields you want to view with this form.
The Form Wizard lists the available fields.
5. Select the fields you want.
• To select individual fields, double-click each field you want in the Available Fields list. (Again, see Figure 7-3.)
• If you want to add all the fields from your table or query to your form, click the >> button in the middle of the screen.
Feel free to select fields from different tables, provided the tables are related properly. The wizard will not let you select fields from unrelated tables.
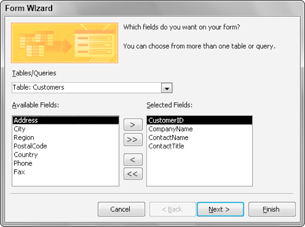
Figure 7-3: Select the data source and fields you want to see on the form.
To remove a field that you accidentally chose, double-click its name in the Selected Fields list. The field jumps back to the Available Fields side of the dialog box.
6. After you’ve selected all the fields you want to include on your form, click Next.
If you selected fields from more than one table, the Form Wizard takes a moment to ask how you want to organize the data in your form. If you choose to organize your data by the parent table (Chapter 4 shows how), you’ll be asked to show the child table data as either
• Subform: Shows data from both tables on one form.
• Linked form: Creates a button that, when clicked, will take you to a new form that displays the child table data.
7. When the wizard asks about the form layout, choose one of the following layouts and then click Next:
• Columnar: Records are shown one at a time.
• Tabular: Multiple records are shown at the same time with an attractive style applied to the form.
• Datasheet: Multiple records are shown at the same time in a rather unattractive spreadsheet-like way.
• Justified: Arranges the fields on the form in a tidy block of rows that have pronounced left and right margins.
Don’t know which layout is best? Check out the Giving forms the right look sidebar.
8. Enter a descriptive title in the What Title Do You Want for Your Form? box at the top of the Form Wizard screen.
There are good reasons to give your form a descriptive title instead of the default name (which is the name of the data source):
• Tables and forms that share the same name can become confusing.
• The name you type is used to save your form. Letters and numbers are allowed in form names. It’s a great opportunity to impose some order.
9. Click Finish to open the report in print preview.
Your new form appears onscreen, as shown in Figure 7-4.
The Form Wizard automatically saves the form as part of the creation process. You don’t need to manually save and name it. All saved forms display in the Forms section of the Navigation pane.

Figure 7-4: Lookin’ good. A form created by the Form Wizard.
Giving forms the right look
Depending on the data you select for your form (for example, whether you use more than one table), you have different options for displaying your data:
![]() Columnar: A classic, one-record-per-page form.
Columnar: A classic, one-record-per-page form.
Most data-entry forms are Columnar.
![]() Tabular: A multiple-records-per-page form.
Tabular: A multiple-records-per-page form.
This layout is best for tables with few fields, like the form based on the Shippers table (shown in the following figure). For tables with a larger number of fields, be prepared to scroll back and forth if you select Tabular.

![]() Datasheet: A spreadsheet-like grid.
Datasheet: A spreadsheet-like grid.
Essentially, this is an Access Datasheet view embedded in a form. It’s appropriate when an Excel-style presentation suits your needs.
![]() Justified: One record of data is laid out across the whole form over multiple rows (shown in the following figure).
Justified: One record of data is laid out across the whole form over multiple rows (shown in the following figure).
This layout may be especially useful when you have memo fields.

The rest of this chapter shows how to customize forms you’ve created with the Form Wizard and Form tools.
Customizing Form Parts
The Access 2013 Form tools and Form Wizard do a great job building forms. In fact, for the typical user, they do just about everything — but they don’t always do it all. So you may need to do some form-tweaking.
If you know some form-design basics, you can clean up most of the problems left behind by the Form tools and Form Wizard.
The rest of this chapter shows how to change the overall look of the form. In particular, you get a handle on moving, sizing, labeling, and formatting controls on your forms. (A control is any design element on a form — say, a line, label, or data-entry box — that affects the appearance of the form. More about that later in the chapter.)
Taking the Layout view
You can make form-design changes in either Design or Layout view.
The sidebar A form with a view explains these views.
These instructions concentrate on Layout view because it’s easier to use.
To enter Layout view, follow these steps:
1. On the Navigation pane, right-click the form you’d like to modify.
The shortcut menu appears.
2. Select Layout View from the shortcut menu.
A form with a view
Access forms have multiple personalities, all useful: They can be displayed in several ways, called views. Each view serves a purpose in using or maintaining the form.
Use the view buttons on the right side of the status bar to switch between these views. (The following figure shows the Form View tools on the status bar.)
![]()
Here are the most common views:
![]() Design: Sound familiar? Every Access object has its Design view.
Design: Sound familiar? Every Access object has its Design view.
In this view, you can modify the layout and appearance of the objects (called controls) on the form.
![]() Layout: Use this view to see data on the form and edit its layout and appearance simultaneously. Now if that isn’t fun, I don’t know what is!
Layout: Use this view to see data on the form and edit its layout and appearance simultaneously. Now if that isn’t fun, I don’t know what is!
This view is very helpful for stuff like sizing controls properly and choosing fonts.
![]() Form: Yes, a form has a Form view. Bizarre but true.
Form: Yes, a form has a Form view. Bizarre but true.
This view displays the data connected to the form, but unlike Layout view, the design of the form cannot be altered. End users of the database typically see all forms in Form view.
How can you tell whether you’re in Layout view or Form view? Look at the status bar in the lower-left corner of your screen. It tells you the current view for an open form.
The theme’s the thing
After building your new form with the Form Wizard or Form tools, you may not like the appearance that the tools have chosen for your form. Fear not! It’s easy to change the look of the form by using the Theme group of buttons. Here’s how:
1. From the Navigation pane, right-click the form that needs a new look and choose Layout View from the menu that appears.
The form opens in Layout view.
2. Click the Design tab on the Ribbon.
Several button groups appear on the Ribbon, including the Themes group. (See Figure 7-5.)

Figure 7-5: The Themes group on the Ribbon.
3. Click the Themes button.
An illustrated list (called a Gallery) of themes drops down.
4. Roll the mouse pointer slowly over each theme.
The form in the background changes to match the highlighted theme.
5. When you’ve found the theme you like, click it to select it from the drop-down list and apply it to the form.
Choose a theme with fonts and colors that are easy on the eyes. Form users will thank you for it!
Managing form controls
A control is any design element (such as a line, label or data-entry text box) that appears on a form. The Form Wizard and Form tools do a fine job of constructing forms but often don’t place or size them just right. This section discusses how to take charge of your controls.
Control types
The two most common control types display data pulled from an underlying table or query (as with a text box) or supply a design element to keep the data organized on the form (as with a line).
Here are the most common form controls:
![]() Text box: The box where you type your data.
Text box: The box where you type your data.
Text boxes are either bound (a way of saying linked) to a table field or unbound (containing a calculation derived from other fields in a table).
![]() Label: The descriptive text next to the text box or the title of the form.
Label: The descriptive text next to the text box or the title of the form.
![]() Combo box: A drop-down list of choices.
Combo box: A drop-down list of choices.
![]() List box: A box that contains a list of choices, from which the user can choose more than one item.
List box: A box that contains a list of choices, from which the user can choose more than one item.
![]() Check box: A square box attached to a field that can store only true/false, on/off, or yes/no answers. For example, a personnel table may have a field called Married. Either you are or you aren’t.
Check box: A square box attached to a field that can store only true/false, on/off, or yes/no answers. For example, a personnel table may have a field called Married. Either you are or you aren’t.
![]() Subform: A form inside another form.
Subform: A form inside another form.
Subforms usually display the “many” records of the “one” record when tables are in a one-to-many relationship. (For details on table relationships, see Chapter 4.)
If your form is columnar (most are) and you’ve created it with the Form Wizard or Form tools, all text boxes and labels on the form are anchored. Anchored controls behave as a group when you size them. Additionally, you can move anchored controls as long as they’re among the other controls in a group; you can’t move them if they’re outside the group.
Moving controls
To move a control, enter Layout view (as shown previously in this chapter) and then follow these steps:
1. Put the mouse pointer anywhere on the control that you want to move.
The mouse pointer changes to a four-headed arrow.
2. Hold down the left mouse button.
The control is selected, so a thick border appears around it. See Figure 7-6 for an example of a selected control.
To select additional controls such as a label corresponding to a text box, press and hold the Ctrl key while clicking the additional control. A thick border will appear around all selected controls.

Figure 7-6: A selected control on the Customers form.
3. Drag the control to its new location.
A line follows the mouse pointer as you drag up, down, left, or right.
4. When the control is in position, release the mouse button.
The control drops smoothly into place.
If you don’t like an adjustment you’ve made, press Ctrl+Z to undo the change and start over from scratch. Access has multiple undo levels, so play to your heart’s content; you can always undo any mistakes.
Sizing controls
Sometimes the Form Wizard and Form tools fall a bit short (literally) when they’re sizing your text boxes and labels. A common problem is that the last part of the information displayed in a label or text box is cut off.
To size a control, enter Layout view (as shown previously in this chapter) and then follow these steps:
1. Put the mouse pointer on the control that you want to size.
The mouse pointer changes to a four-headed arrow. If the controls are anchored, it doesn’t matter which control you roll the mouse pointer over.
2. Click to select the control.
A thick border appears around the control to indicate that the control is selected.
3. Move the mouse pointer to the edge of the selected control.
A double-arrow pointer shape appears.
4. Click and drag to resize the control.
Anchored controls size together horizontally within the same column and vertically within the same row. So when you change the width of one control in a column, all are changed to that same width. When you change the height of one control in a row, all in that row are changed to the same height.
Editing labels
The Form Wizard and Form tools use field names as control labels when they build your forms. If you abbreviated a field name (say, FName for First Name) when creating a table, that abbreviation will become the label for the control created by the Form Wizard and Form tools. So, if a label doesn’t quite say what it should, you’ll need to know how to edit the text in it.
To edit a label, enter Layout view (as shown previously in this chapter) and try this:
1. Put the mouse pointer anywhere on the label that you want to edit.
The mouse pointer changes to a four-headed arrow.
2. Click to select the label control.
A thick border indicates that the control is selected.
3. Click the word you’d like to edit.
A blinking cursor appears on the word.
4. Edit the word.
5. Click outside of the label control.
The label is deselected and the edit is preserved.
Deleting controls
Sometimes an Access form contains an unneeded or unwanted control:
![]() Maybe you selected an unwanted field while using the Form Wizard.
Maybe you selected an unwanted field while using the Form Wizard.
![]() Maybe you added a control (such as a line) and in retrospect decided it wasn’t needed.
Maybe you added a control (such as a line) and in retrospect decided it wasn’t needed.
![]() Maybe you’re just tired of looking at that control.
Maybe you’re just tired of looking at that control.
Here’s how you remove the control:
1. In Layout view, put the mouse pointer anywhere on the control that you want to delete.
The arrow mouse pointer changes to a four-headed arrow.
2. Click to select the control.
A thick border appears around the control, indicating that it is selected.
3. Tap the Delete key on your keyboard.
The unwanted control disappears into digital oblivion.
When you delete a text box, its corresponding label will also be deleted. When you delete a label, however, its corresponding text box (if there is one) won’t be deleted. Go figure!