
Flowers
While you can learn to paint intricate details, we will instead focus on fast and lively techniques that merely suggest flowers. You can spend more time adding details, but here we will focus on quick paintings that celebrate the fluid qualities of watercolor paints.

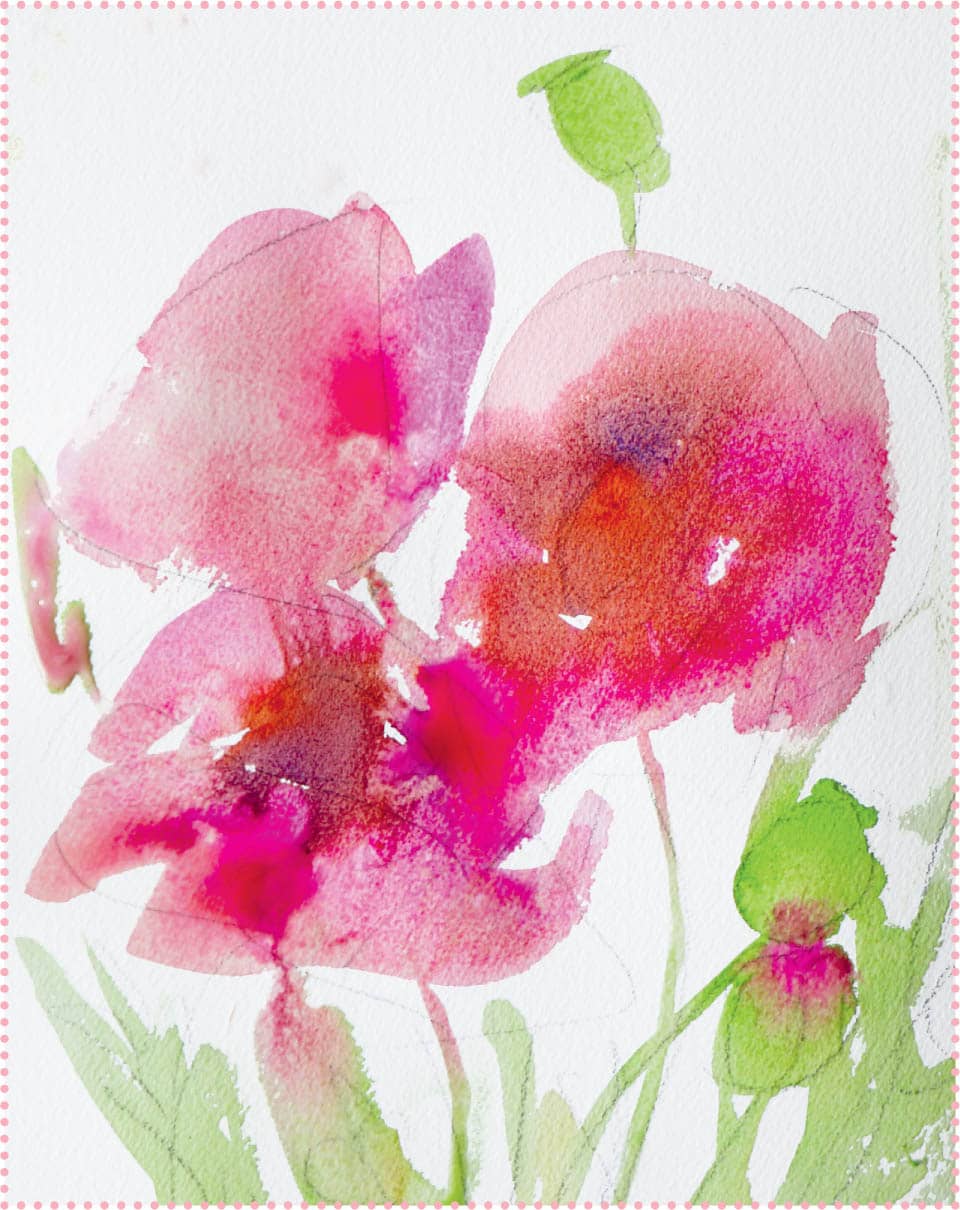
Choose any color you like. Poppies usually have a dark or yellow center. Create a quick pencil sketch of the flower. Start with the basic outline of the flower, followed by the seedpods and stems. Make each flower a little different to add variety and interest to your composition. Next add the stems and leaves. Poppy leaves are variegated with fringed edges. Don’t add too much detail—simply create a rough sketch to get started. Add a layer of paint to the flower petals. Here I used pink mixed with some yellow and a bit of green to tone and warm the cool pink color. Then I added some pink onto the wet paint. You want the colors to mix together a bit on the page. With watercolor, always add the petals before the leaves and stems. If I were to need more room for the flowers, I would have a hard time using watercolor paint to cover the stems and leaves. Add green paint to create stems, leaves, and seedpods. Keep them loose using quick strokes. Hold the paintbrush near the end of the handle. Gripping the brush close to the paper is more appropriate for controlled detail work. Add a dark or light center to your still-wet poppy centers. You can also add a touch of this center color to each upright closed or cup-shaped poppy where the stem meets the base of the petals. This gives a hint of the center color shining through the petals. Because we are working wet-into-wet, the dark or yellow center will bleed into the petal colors. Create a light wash of the dark or yellow center, which bleeds a bit into the petals. When the petals are mostly dry, add a second wash of darker or more yellow, which dramatically colors the center without bleeding into the petal paint.POPPIES
STEP 1:

STEP 2:

STEP 3:

STEP 4:
STEP 5:

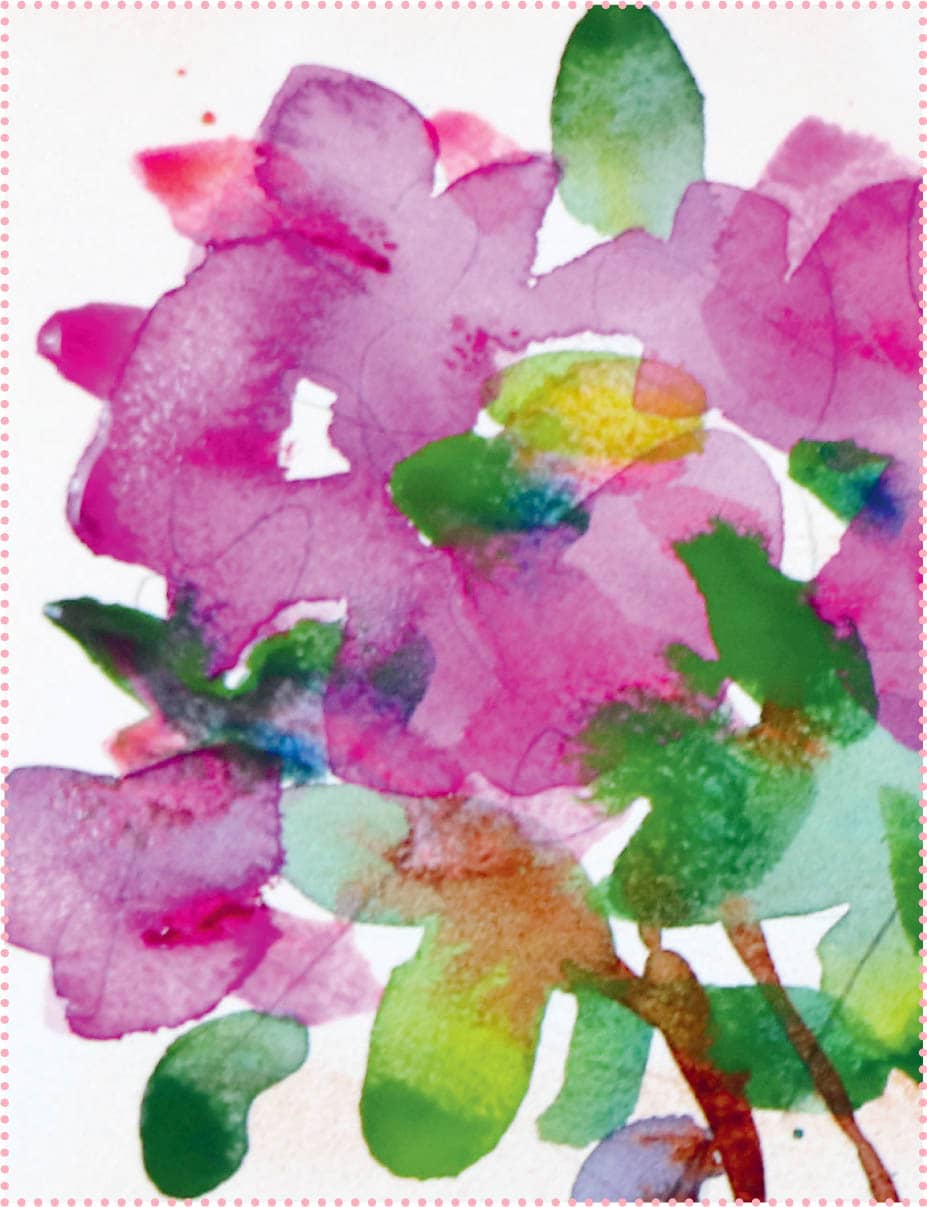
Azaleas are a quite dramatic because of the color and value contrasts between the flowers and leaves. They also provide the perfect opportunity for loose and quick painting, as you can suggest the flowers and leaves without painting each individual petal. Start with a basic pencil sketch, laying out where you want your flowers. The basic shape of azalea leaves are single, smooth undulate almond-shaped leaves. The leaves are quite dark and shiny. Next lay down bright washes of color for the flowers. Add water as needed to lighten the saturation of color. You can mix either yellow, green, or blue into some of the pink to tone down the color. For darker leaves, mix a dark blue, such as ultramarine blue or phthalo blue with a yellow, such as cadmium yellow. To make the darkest leaves, use more of the blue paint. To make the lighter-colored leaves, use more yellow in the green mixture. If the color seems too bright, tone it down with some of the pink or red paint on your palette. Working wet-into-wet will create some interesting effects, such as blooming (washed out areas with delineated color deposits) and blending of colors. Add more flowers as needed to balance out the composition. As mentioned earlier, use splatters of color and large brushstrokes near the base of the plants to add weight and color balance to the final painting.AZALEAS
STEP 1:
STEP 2:

STEP 3:

STEP 4:


Now let's try a tall spike-shaped flower. We are going to keep this painting very loose and simply suggest the shape of the flowers with watercolor. Start with a basic pencil sketch of the shapes on your watercolor paper. Notice I do not actually sketch any of the individual flowers. Use your flat brush to paint a first wash of cerulean blue, blue green, and blue pink or violet to create the flowers. While the paint is still wet, use your round brush to add dots of ultramarine violet or a similar color to create more pronounced flowers. These dots of paint will softly blend into the background. Use your round and flat brush to create stems and leaves with green paint. With your round brush, add some green to the tops of the flowers with smaller flower buds. Notice the pooling effect created with this amount of water and paint. Sometimes these pooling effects can add a softness to the painting. Let the paint dry completely.DELPHINIUMS
STEP 1:

STEP 2:

STEP 3:


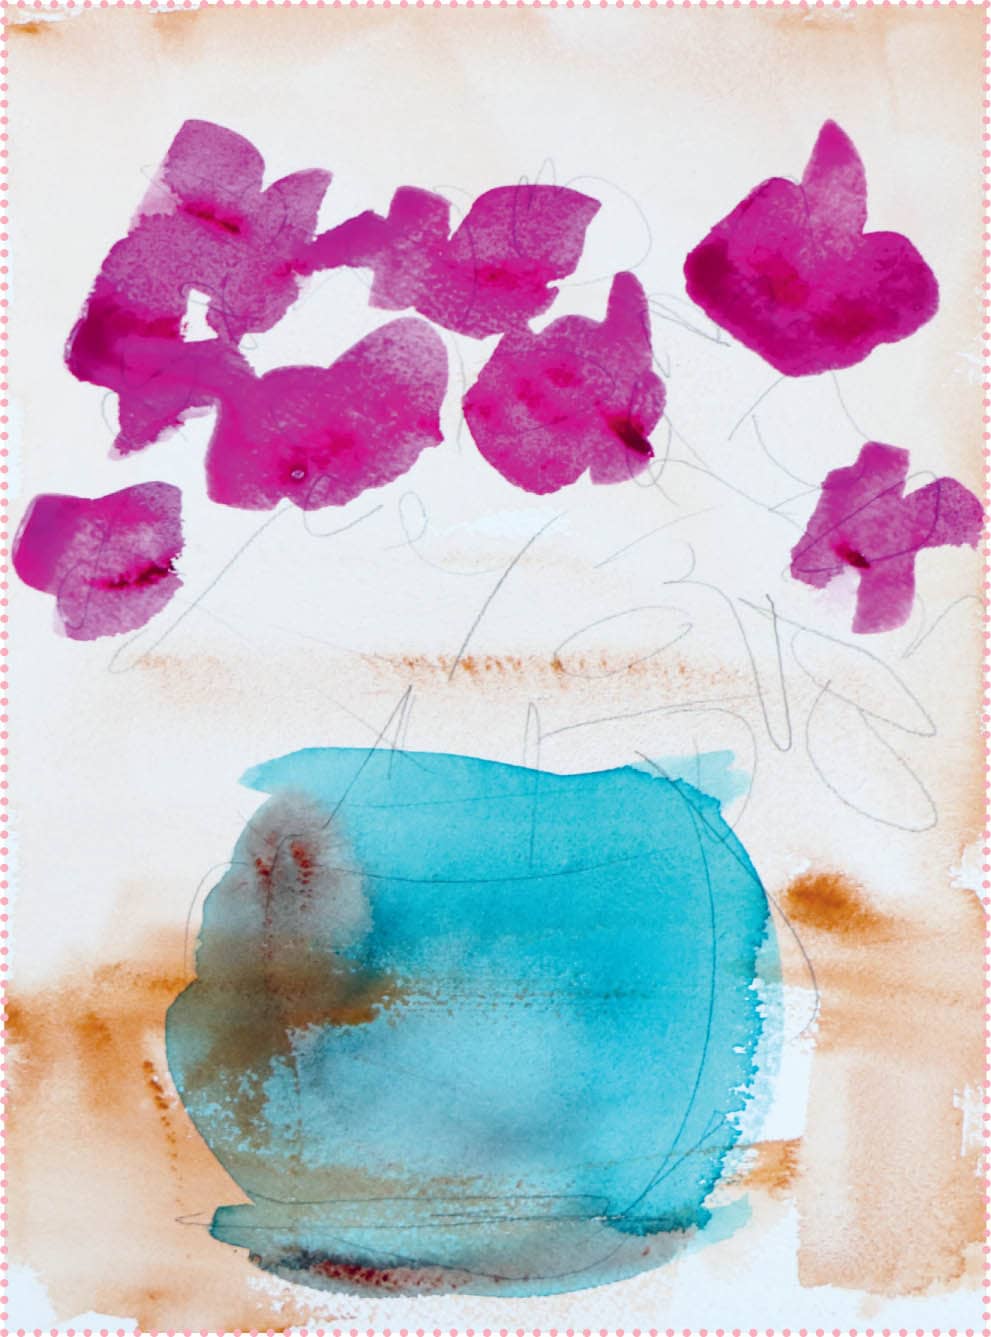
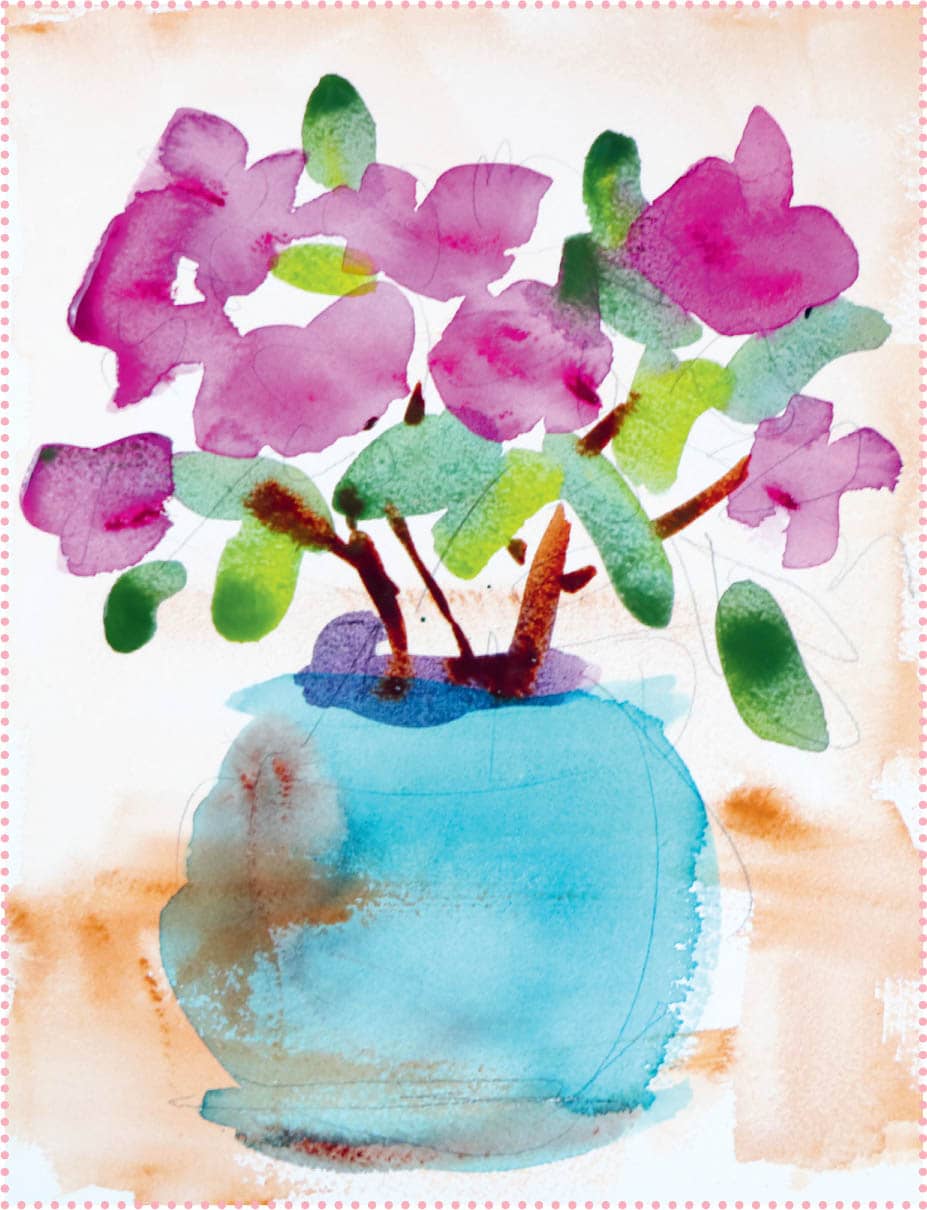
Now we will create a still life from what you have learned so far. With watercolors, there may be some extra drying time needed between the background layer and the flowers. Start by adding a light background to give your painting some depth. Use a flat brush and some pale yellow ochre (or color of your choice) mixed with a generous amount of water. Starting at the top of your paper, paint from left to right (or right to left if you are left-handed). Create a more saturated line about two-thirds down the paper, suggesting a horizon line that will become the table. Leave the center area blank for the flowerpot. Once completely dry, sketch the flowerpot, flowers, and leaves with a pencil. Use a flat brush and turquoise blue to paint a round flowerpot. Using a mixture of turquoise blue and dragon’s blood (or any transparent earth-red paint), add a darker shaded area to the left side of the flowerpot. Make sure to use clean water and replace whenever your water is no longer clear. Using a cool pink, such as permanent rose, and a flat brush, add watered-down pink flowers to the paper where you sketched the flowers in pencil. Let the flowers dry. Now add some leaves using a mixture of blue and yellow paint. Add some of the pink or transparent earth orange to create darker shades of green. Using a round brush, paint leaves in all directions around the flowers and close to the opening of the flowerpot. Leave some space between the leaves and flowerpot for the stems (step 5). Use the round brush and either a dark green or violet mixture to add a dark shadow for the opening of the flowerpot. Mix some of the pink with either a little blue or green and add some darker flower petals with the round brush. Now add some yellow to the pink and some of the green paint mixtures to make some warmer shades of pink and green for the flowers and leaves. Add a few more leaves and flower petals in these warmer tones with the round brush. Add another wash of the turquoise blue and transparent red mixture to the left side of the flowerpot. Add a shadow to the base of the flowerpot using a dark green. Let dry completely. Apply a dark shadow to the left side of the flowerpot and along the bottom. While the paint is still wet, immediately apply a spritz or mist of water using your spray bottle. This will soften the brushstrokes and blend them into the existing paint. Let dry completely before removing from your watercolor block.BOUQUET OF AZALEAS
STEP 1:

STEP 2:

STEP 3:
STEP 4:

STEP 5:
STEP 6:
STEP 7:

STEP 8:

STEP 9:

