
Chapter 5. Trusting Devices
Trusting devices in a zero trust network is extremely critical; it’s also an exceedingly difficult problem. Devices are the battlegrounds upon which security is won or lost. Most compromises involve a malicious actor gaining access to a trusted device; and once that access is obtained, the device cannot be trusted to attest to its own security. This chapter will discuss the many systems and processes that need to be put in place to have sufficient trust of devices deployed in the network. We will focus on the role that each of these systems plays in the larger goal of truly trusting a device. Each technology is complicated in its own right. While we can’t go into exhaustive detail on each protocol or system, we will endeavor to give enough details to help you understand the technology and avoid any potential pitfalls when using it.
We start with learning how devices gain trust in the first place.
Bootstrapping Trust
When a new device arrives, it is typically assigned an equal level of trust as that of the manufacturer and distributor. For most people, that is a fairly high level of trust (whether warranted or not). This inherited trust exists purely in meatspace though, and it is necessary to “inject” this trust into the device itself.
There are a number of ways to inject (and keep) this trust in hardware. Of course, the device ecosystem is massive, and the exact approach will differ on a case-by-case basis, but there are some basic principles that apply across the board. These principles reduce most differences to implementation details.
The first of those principles has been known for a long time: golden images. No matter how you receive your devices, you should always load a known-good image on them. Software can be hard to vet; rather than doing it many times hastily (or not at all), it makes good sense to do it once and certify an image for distribution.
Loading a “clean” image onto a device grants it a great deal of trust. You can be reasonably sure that the software running there is validated by you, and secure. For this reason, recording the last time a device was imaged is a great way to determine how much trust it gets on the network.
Secure Boot
There are of course ways to subvert devices in a manner that they retain the implant across reimaging and other low-level operations, as the implant in these cases are usually themselves fairly low level.
Secure Boot is one way to help fend against these kinds of attacks. It involves loading a public key into the device’s firmware, which is used to validate driver and OS loader signatures to ensure that nothing has been slipped in between. While effective, support is limited to certain devices and operating systems. More on this later.
Being able to certify the software running on a device is only the first step. The device still needs to be able to identify itself to the resources that it is attempting to access. This is typically done by generating a unique device certificate that is signed by your private certificate authority. When communicating with network resources, the device presents its signed certificate. This certificate proves not only that it is a known device, but it also provides an identification method. Using details embedded in the certificate, the device can be matched with data from the device inventory, which can be used for further decision making.
Generating and Securing Identity
In providing a signed certificate by which a device may be identified, it is necessary to store the associated private key in a secure manner. This is not an easy task. Theft of the private key would enable an attacker to masquerade as a trusted device. This is the worst possible scenario for device authentication.
A simple yet insecure way to do this is to configure access rights to the key in such a way that only the most privileged user (root or administrator) can access it. This is the least desirable storage method, as an attacker who gains elevated access can exfiltrate the unprotected key.
Another way to do this is to encrypt the private key. This is better than relying on simple permissions, though it presents usability issues because a password (or other secret material) must be furnished in order to decrypt and use the key. This may not pose a problem for an end-user device, as the user can be prompted to enter the password, though this is usually not feasible for server deployments; human interaction is required for every software restart.
The best way by far to store device keys is through the use of secure cryptoprocessors. These devices, commonly referred to as a hardware security module (HSM) or a trusted platform module (TPM), provide a secure area in which cryptographic operations can be performed. They provide a limited API that can be used to generate asymmetric encryption keys, where the private key never leaves the security module. Since not even the operating system can directly access a private key stored by a security module, they are very difficult to steal.
Identity Security in Static and Dynamic Systems
In relatively static systems, it is common for an operator to be involved when new hosts are provisioned. This makes the injection story easy—the trusted human can directly cut the new keys on behalf of the hosts. Of course, as the infrastructure grows, this overhead will become problematic.
In automating the provisioning and signing process, there is an important decision to make: should a human be involved when signing new certificates? The answer to this largely depends on your sensitivity.
A signed device certificate carries quite a bit of power, and serves to identify anything with the private key as an authentic and trusted device. Just as we go through measures to protect their theft locally, we must also protect against their frivolous generation. If your installation is particularly sensitive, you might choose to involve a human every time a new certificate is signed.
Laws and Certificate Authorities
Modern browsers widely support certificates issued by well known trusted certificate authorities from many countries, including the United States and many others in the European Union, but this trust is vulnerable to geopolitical tensions. For example, during the Russian-Ukraine war in 2022 Russia began offering its own trusted certificate authority to replace certificates that needed to be renewed by foreign countries. Without this action, Russian websites were unable to renew their certificates because sanctions prevent many countries’ signing authorities from accepting payments from Russia. This serves as a stark reminder that, because issuing authorities are bound by the laws of the land, they can pose their own difficulties.
If provisioning is automated, but still human-driven, it makes a lot of sense to allow the human driving that action to also authorize the associated signing request. Having a human involved every time is the best way to prevent unauthorized requests from being approved. Humans are not perfect though. They are susceptible to fatigue and other shortcomings. For this reason, it is recommended that they be responsible for approving only requests that they themselves have initiated.
It is possible to accomplish provisioning and signature authorization in a single step through the use of a temporal one-time password (TOTP). The TOTP can be provided along with the provisioning request and passed through to the signing service for verification, as shown in Figure 5-1. This simple yet strong mechanism allows for human control over the signing of new certificates while imposing only minimal administrative overhead. Since a TOTP can only be used once, a TOTP verification failure is an important security event.
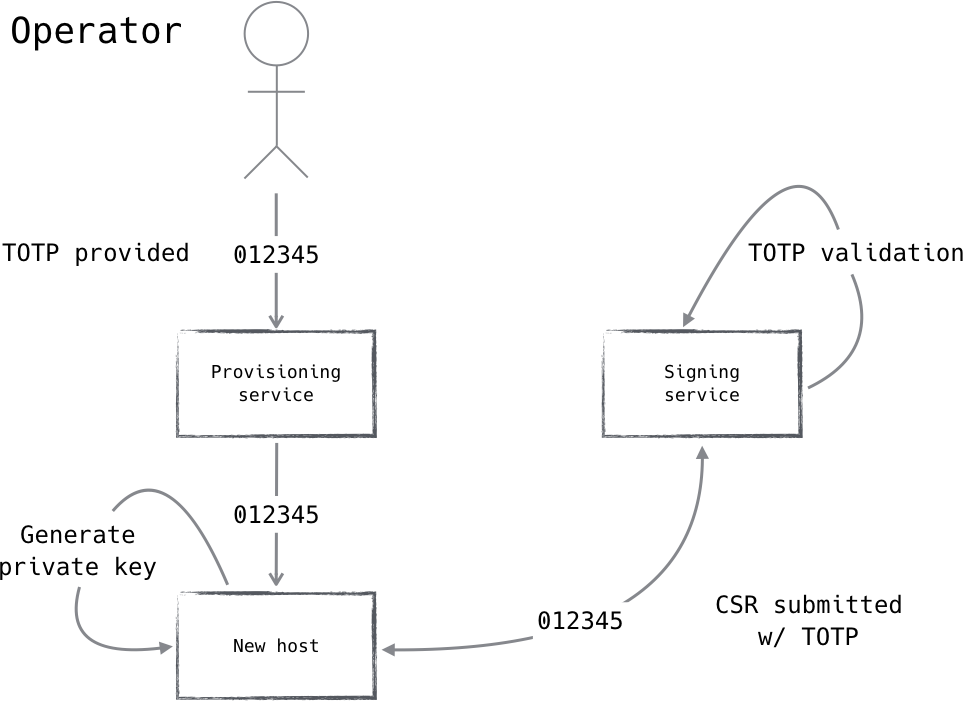
Figure 5-1. A human providing a TOTP can safely authorize the signature of a certificate.
It goes without saying that none of this applies if you want to fully automate the provisioning of new hosts. Frequently referred to as “auto-scaling,” systems that can grow and shrink themselves are commonly found in large, highly automated installations.
Allowing a system to scale itself decreases the amount of care and feeding required, significantly reducing administrative overhead and cost. Signing a certificate is an operation that requires a great deal of trust; and just as with other zero trust components, this trust must be sourced from somewhere. There are three common choices:
-
A human
-
The resource manager
-
The image or device
The human is an easy and secure choice for relatively static infrastructure or end user devices, but is an obvious nonstarter for automated infrastructure. In this case, you must choose the resource manager or the image...or both.
The resource manager is in a privileged position. It has the ability to both grow and shrink the infrastructure, and is likely able to influence its availability. It provides a good analog to a human in a more static system. It is in a position to assert, “Yes, I turned this new host on, and here is everything I know about it.” It can use this position to either directly or indirectly authorize the signing of a new certificate.
To make the job of resource manager easier, many cloud vendors such as Microsoft, Google, and others provide built-in support for identities that do not require credentials and can be used to authenticate against specific services in a well-defined manner. Learn more about Google’s service accounts at https://cloud.google.com/compute/docs/access/service-accounts#serviceaccount and Microsoft’s managed identities at https://docs.microsoft.com/en-us/azure/active-directory/managed-identities-azure-resources.
Depending on your needs, it might be desirable to not grant this ability wholly to the resource manager. In this case, credentials can be baked into an image. This is generally not advised as a primary mechanism, as it places too much responsibility on the image store; and protecting and rotating images can be fraught with peril. In a similar way, HSMs or TPMs can be leveraged to provide a device certificate that is tied to the hardware. This is better than baking material into the image, though requiring a TPM-backed device to sign a new certificate is still not ideal, especially when considering cloud-based deployments.
One good way to mitigate these concerns is to require both the resource manager and a trusted image/device. Generic authentication material baked into the image (or a registered TPM key) can be used to secure communication with the signing service and can serve as a component in a multifaceted authorization. The following are examples of components for authorization consideration:
-
Registered TPM key or image key
-
Correct IP address
-
Valid TOTP (generated by resource manager)
-
Expected certificate properties (i.e., expected common name)
By validating all of these points, the certificate signing service can be relatively certain that the request is legitimate. The resource manager alone cannot request a certificate, and since it does not have access to the hosts it provisions, the most an attacker could do is impact availability. Similarly, a stolen image alone cannot request a certificate, as it requires the resource manager to validate that it has provisioned the host and expects the request.
By splitting these responsibilities and requiring multiple systems to assert validity, we can safely (well, as safely as is possible) remove humans from the loop.
Resource Managers and Containers
Sometimes it all comes down to terminology. In host-centric systems, resource managers create auto-scaling systems, making decisions about when and where capacity is needed. In containerized environments, the same decisions are made and executed by a resource scheduler. For the purposes of zero trust application, these components are practically identical, and the principles apply equally to host-centric and container-centric environments.
Authenticating Devices with the Control Plane
Now that we know how to store identity in a new device or host, we have to figure out how to validate that identity over the network. Luckily, there are a number of open standards and technologies available through which to accomplish this. Here, we’ll discuss two of those technologies and why they are so important to device authentication: first we’ll cover X.509 before moving on to look at TPMs.
These technologies enjoy widespread deployment and support, though this was not always the case. While we discuss real-world approaches to securing legacy devices in Chapter 8, we’ll additionally explore here what the future might hold for zero trust support in legacy hardware.
X.509
X.509 is perhaps the most important standard we have when it comes to device identity and authentication. It defines the format for public key certificates, revocation lists, and methods through which to validate certification chains. The framework it puts forth aids in the formation of identity used for secure device authentication in nearly every protocol we’ll discuss in this book.
One of the coolest things about X.509 is that the public/private key pairs it uses to prove identity can also be used to bootstrap encrypted communication. This is just one of many reasons that X.509 is so valuable for internet security.
Please refer to RFC5280, RFC4519, and the ITU-T X.509 documentation for more information on the X.509 certificate format and supported attributes.
Certificate chains and certification authorities
For a certificate to mean anything, it has to be trusted. A certificate can be created by anyone, so just having one with the right name on it does not mean much. A trusted party must endorse the validity of the certificate by digitally signing it. A certificate without a “real” signature is known as a self-signed certificate and is typically only used for development/testing purposes.
It is the responsibility of the registration authority (a role commonly filled by the certificate authority) to ensure that the details of the certificate are accurate before allowing it to be signed. In signing the certificate, a verifiable link is created from the signed certificate to the parent. If the signed certificate has the right properties, it can sign further certificates, resulting in a chain. The certificate authority lies at the root of this chain.
By trusting a certificate authority (CA), you are trusting the validity of all the certificates signed by it. This is quite a convenience, because it allows us to distribute only a small number of public keys in advance—the CA public keys, namely. All certificates furnished from there on can be linked back to the known trusted CA, and therefore also be trusted. We spoke more about the CA concept and PKI in general in Chapter 2.
Device identity and X.509
The primary capability of an X.509 certificate is to prove identity. It leverages two keys instead of one: a public key and a private key. The public key is distributed, and the private key is held by the owner of the certificate. The owner can prove they are in the presence of the private key by encrypting a small piece of data, which can only be decrypted by the public key. This is known as public key cryptography, or asymmetric cryptography.
The X.509 certificate itself contains a wealth of configurable information. It has a set of standard fields, along with a relatively healthy ecosystem of extensions, which allow it to carry metadata that can be used for authorization purposes. Here is a small sample of typical information found within an X.509 certificate:
Certificate:
    Data:
        Version: 3 (0x2)
        Serial Number: 16210155439472130208 (0xe0f60a7cb39a38a0)
    Signature Algorithm: sha256WithRSAEncryption
        Issuer:C=US, ST=TX, L=Houston, O=Contoso Corp
        Validity
            Not Before: Aug 18 22:54:43 2022 GMT
            Not After : Aug 18 22:54:43 2025 GMT
        Subject: C=US, ST=TX, L=Dallas, O=Contoso Corp, CN=mgmt011134.contoso.corp
        Subject Public Key Info:
            Public Key Algorithm: rsaEncryption
                Public-Key: (2048 bit)
                Modulus:
                    00:af:ff:04:2e:69:96:40:eb:62:20:a8:db:61:06:
                    ………………………………
                    3f:bd:b1:49:50:26:07:ac:72:c7:9b:81:5d:54:19:
                    88:8b
                Exponent: 65537 (0x10001)
        X509v3 extensions:
            X509v3 Basic Constraints:
                CA:FALSE
            X509v3 Key Usage:
                Digital Signature, Key Encipherment
            X509v3 Subject Alternative Name:
                DNS:mgmt011134.contoso.corp,
                DNS:10.69.54.169,
                DNS:fdc0:8a12:793b:adf7:8da6:12cd:e34c:daf6
            X509v3 Extended Key Usage:
                TLS Web Client Authentication,
                TLS Web Server Authentication
    Signature Algorithm: sha256WithRSAEncryption
         1e:e1:ed:8a:40:85:ac:fb:85:78:9c:88:ee:75:30:76:14:79:
         …………
         8d:9f:44:ea
The Issuer field specifies who issued the certificate, and the Subject field specifies for whom this certificate is intended. Both the Issuer and Subject fields contain information such as Country (C), State (S), Locality Name (L), Organization (O), and Common Name (CN), among other fields.
The sample certificate above issued to a device and includes the following information:
-
Country (C): US. This is the device’s assigned country.
-
State (S): TX, short for Texas. This is the device’s assigned state.
-
Locality Name (L): Dallas. This is the device’s assigned city.
-
Organization (O): Contoso Corp. This is the device’s assigned organization.
-
Common Name (CN): This is the device name or unique identifier assigned to the device.
Additionally, the Subject Alternate Field contains additional information such as the device’s IPv4 and IPv6 addresse.
Since the certificate is signed and trusted, we can use this information to make authorization decisions. Leveraging the X.509 fields in this way means that device access may be authorized without a call to an external service, so long as the server knows who/what it should be expecting.
Warning
You may have seen the use of the Organization Unit (OU) field in an X.509 certificate. However, in June 2021, the CA/Browser Forum passed a ballot SC47 to depreciate the use of Organization Unit (OU) field from all public trust TLS/SSL certificates. This change was made because OU represents a much smaller unit within an Organization (O), making it difficult for CA to assert its identity consistently. The proposed change went into effect on September 1, 2022.
Public and private components
As mentioned earlier, X.509 deals with key pairs rather than a single key. While it is overwhelmingly common that these are RSA key pairs, they don’t necessarily have to be. X.509 supports many types of key pairs, and we have recently begun to see the popularization of other key types (such as ECDSA).
Private key storage challenges
X.509 is incredibly useful for device authentication, but it doesn’t solve all the problems. It still has a private key, and that private key must be protected. If the private key is compromised, the device’s identity and privacy will be vulnerable as well. While other zero trust measures help guard against the damage this might cause (like user/application authentication or authorization risk analysis), this is considered a worst case scenario and should be avoided at all costs.
Private keys can be encrypted when they are stored, requiring a password to decrypt. This is a good practice because it would require more than just disk access to successfully steal, but is only practical for user-facing devices. In the datacenter, encrypting the private key doesn’t solve the problem because you still have to store the password, or somehow transmit it to the server, at which point the password becomes just as cumbersome as the private key itself.
Hardware security modules (HSMs) go a good distance in attempting to protect the private key. They contain hardware that can generate a public/private key pair and store the private key in secure memory. It is not possible to read the private key from the HSM. It is only possible to ask the HSM to do an operation with it on your behalf. In this way, the private key cannot be stolen as it is protected in hardware. We’ll talk more about TPMs, a type of HSM, in the next section.
X.509 for device authentication
The application of X.509 to device authentication in a zero trust network is immense. It is a foundational cornerstone in proving device identity for just about every protocol we have and is instrumental in enabling end-to-end encryption. Every single device in a zero trust network should have an X.509 certificate.
There is one important consideration to make, however. We are using X.509 to authenticate a device, yet the heart of the whole scheme—the private key—is decidedly software-based. If the private key is stolen, the whole device authentication thing is a sham!
These certificates are often used as a proxy for true device authentication because the keys are so long and unwieldy that you would never write one down or memorize one. They are something that would be downloaded and installed, and because of that, they don’t tend to follow users around—they more typically follow devices. While it might be determined that the risk associated with the private key problem is acceptable, it still stands as a serious issue, particularly for zero trust. Fortunately, we can see some paths forward, and by leveraging TPMs it is possible to inextricably marry a private key to its hardware.
TPMs
A trusted platform module (TPM) is a special chip that is embedded in a compute device called a cryptoprocessor, these chips are dedicated to performing cryptographic operations in a trusted and secure way. They include their own firmware and are often thought of as a computer on a chip.
This design enables a small and lean hardware API that is easily audited and analyzed for vulnerability. By providing facilities for cryptographic operations, and excluding interfaces for retrieving private keys, we get the security we need without ever exposing secret keys to the operating system. Instead, they are bound to the hardware.
This is a very important property and the reason that TPMs are so important for device authentication in zero trust networks. Great software frameworks for identity and authentication (like X.509) do a lot for device authentication. But without a way to bind the software key to the hardware device it is attempting to identify, we can‐ not really call it device identity. TPMs solve this problem, providing the necessary binding.
Encrypting data using a TPM
TPMs generate and store what is known as a storage root key, or an SRK. This key pair represents the trust root for the TPM device. Data encrypted using its public key can be decrypted by the originating TPM only.
The astute reader might question the usefulness of this function in the application of bulk data encryption. We know asymmetric cryptographic operations to be very expensive, and thus not suitable for the encryption of relatively large pieces of data. Thus, in order to leverage the TPM for bulk data encryption, we must reduce the amount of data that the SRK is responsible for securing.
An easy way to do this is to generate a random encryption key, encrypt the bulk data using known-performant symmetric encryption (i.e., AES), and then use the SRK to encrypt the resulting AES key. This strategy, shown in Figure 5-2, ensures that the encryption key cannot be recovered, unless in the presence of the TPM that originally protected it.
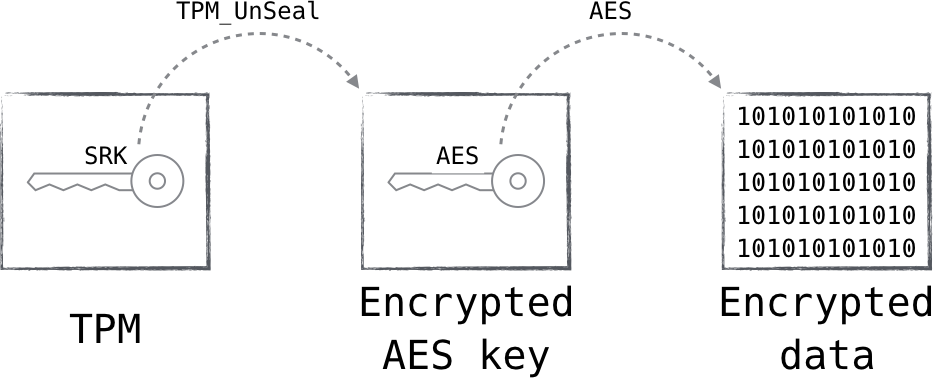
Figure 5-2. The data is encrypted with an AES key, which in turn is encrypted by the TPM
Most TPM libraries available for open consumption perform these steps for you, through the use of helper methods. It is recommended to inspect the internal operation of such methods before using them.
Intermediary keys and passphrases
Many TPM libraries (such as TrouSerS) create intermediary keys when encrypting data using the TPM. That is, they ask the TPM to create a new asymmetric key pair, use the public key to encrypt the AES key, and finally use the SRK to encrypt the private key. When decrypting the data, you must first decrypt the intermediate private key, use it to decrypt the AES key, then decrypt the original data.
This implementation seems strange, but there are some relatively sane reasons for it. One reason is that the additional level of indirection allows for more flexibility in the distribution of secured data. Both the SRK and intermediate keys support passphrases, so the use of an intermediary key enables the use of an additional, perhaps more widely known, passphrase.
This may or may not make sense for your particular deployment. For the purposes of “This key should only be decryptable on this device only,” it is OK (and more performant) to bypass the use of an intermediary key, if desired.
The most important application of TPM-backed secure storage is in protecting the device’s X.509 private key. This secret key serves to authoritatively prove device identity, and if stolen, so is the identity. Encrypting the private key using TPM means that while the key might still be taken from disk, it will not be recoverable without the original hardware.
Key Theft Is Still Possible
Encrypting the device’s private key and wrapping the key with the SRK does not solve all of the theft vectors. It protects the key from being directly read from disk, though an attacker with elevated privileges might still be able to read it from memory or simply ask the TPM to perform the operation for them. The following two sections provide additional information on how to further validate hardware identity (beyond X.509 identity).
Platform configuration registers
Platform configuration registers (PCRs) are an important TPM feature. They provide storage slots into which hashes of running software is stored. It starts with the hash of the BIOS, then the boot record, its configuration, and so on. This sequence of hashes can then be used to attest that the system is in an approved configuration or state. Here is a truncated example of the first few registers stored in the TPM:
PCR-00: A8 5A 84 B7 38 FC ...         # BIOS
PCR-01: 11 40 C1 7D 0D 25 ...         # BIOS Configuration
PCR-02: A3 82 9A 64 61 85 ...         # Option ROM
PCR-03: B2 A8 3B 0E BF 2F ...         # Option ROM Configuration
PCR-04: 78 93 CF 58 0E E1 ...         # MBR
PCR-05: 72 A7 A9 6C 96 39 ...         # MBR Configuration
This is useful in a number of ways, including in ensuring that only authorized software configurations are allowed to decrypt data. This can be done by passing in a set of known-good PCR values when using the TPM to encrypt some data. This is known as “sealing” the data. Sealed data can only be decrypted by the TPM which sealed it, and only while the PCR values match.
Since PCR values cannot be modified or rolled back, we can use TPM sealing to ensure that our secret data is not only locked to the device, but also locked to a specific software configuration and version. This helps to prevent attackers from using device access to obtain the private key, since only the unmodified and approved software can unlock it.
Remote attestation
We have learned many ways we can use embedded device security to protect private keys and other sensitive device-related data. The unfortunate truth is that so long as a private key is stored outside of a physical TPM, it is still vulnerable to theft. This fact remains because all it takes to recover the private key is to convince the TPM to unlock it once. This action discloses the actual private key—something that is not possible when it is stored on the TPM.
Luckily, the TPM provides a way for us to uniquely identify it. It’s another key pair called the endorsement key (EK), and each TPM has a unique one. The private component of an EK only ever exists on the TPM itself, and thus remains completely inaccessible by the operating system.
Remote attestation is a method by which the TPM generates something called a “quote,” which is then securely transmitted to a remote party. The quote includes a list of current PCR values, signed using the EK. A remote party can use this to assert both host identity (since the EK is unique to the TPM) and software state/configuration (since PCRs cannot be modified). We’ll talk more about how the quote can be transmitted in Chapter 8.
Why Not Just TPM?
You may find yourself wondering: why not use the TPM exclusively for device identity and authentication, and why include X.509 at all?
Currently, TPM access is cumbersome and non-performant. It can provide an X.509 certificate to confirm its identity, but it is limited in its interaction with the private key. For instance, the key used for attestation is only capable of signing data that originates in the TPM. For a protocol like TLS, this is a deal-breaker.
There have been some attempts to coerce the TPM attestation protocols into a more flexible form (like IETF draft https://datatracker.ietf.org/doc/draft-ietf-rats-tpm-based-network-device-attest which defines a TLS extension for device authentication via TPM), though none of them have gained widespread adoption at the time of this writing.
There are a few open source implementations of remote attestation, including one in the popular IKE daemon strongSwan. This opens the doors for leveraging TPM data to not only authenticate an IPsec connection, but also authorize it by using PCR data to validate that the host is running authentic and unmodified software.
TPMs for device authentication
It is clear that TPMs present the best option for strong device authentication in mature zero trust networks. They provide the linchpin between software identity and physical hardware. There are, however, a couple limitations.
Many datacenter workloads are heterogeneous and isolated, like virtual machines or containers, both of which need to resort to TPM virtualization to allow the isolated workload to accomplish similar goals. While there are implementations available (such as vTPM for Xen), trust must still be rooted in a hardware TPM, and designing a secure TPM-based system that is capable of live migration is challenging. Additionally, TPM support is still sparse despite its many uses and strengths. While TPM use would be expected in the context of device authentication in mature zero trust networks, it should not be considered a requirement. Adopting TPM support is no small feat, and there are much lower-hanging fruits in terms of zero trust adoption and migration.
Hardware-Based Zero Trust Supplicant?
The most common approach for supporting legacy devices in a zero trust network is to use an authentication proxy. The authentication proxy terminates the zero trust relationship and forwards the connection to the legacy host.
While it is possible to enforce policy between the authentication proxy and the legacy backend, this mode of operation is less than ideal and shares a handful of attack vectors with traditional perimeter networks. When dealing with legacy devices, it is desirable to push the zero trust termination point as close to the device as possible.
When possible, it is preferable to use a dedicated hardware device rather than an application proxy. This device can act as a zero trust supplicant, carrying a TPM chip, and plug directly into a legacy device’s Ethernet port. Pairing the two in your inventory management system can allow for seamless integration between legacy devices and a zero trust network.
There are many applications that would significantly benefit from such a device. SCADA and HVAC systems, for instance, come to mind.
Inventory Management
Authenticating a device’s identity and integrity goes a long way in providing strong zero trust security, but being able to identify a device as belonging to the organization is only part of the challenge. There are lots of other pieces of information we need in order to calculate policy and make enforcement decisions.
Inventory management involves the cataloging of devices and their properties. Maintaining these records is equally important for both servers and client devices. It is sometimes more helpful to think of these as network entities rather than physical devices. While they indeed are commonly physical devices, they might also be logical entities on the network.
For instance, it is conceivable that a virtual machine or a container could be considered a “device,” depending on your needs. They have lots of the same descriptive properties that a real server might have, after all. Lumping all of the virtual machine traffic from a single host into one policy gets us right back to the perimeter model. Instead, the zero trust model advocates that the workloads be tracked in order to drive the network policies they require. This inventory (or workload) database in this case can be specialized in order to accommodate the high rates of change that virtualized/ containerized environments experience. So, while the traditional inventory management system and the workload scheduler might be different systems, they can still work together; for the purposes of this book, the scheduler service may act as an inventory management system of sorts, as shown in Figure 5-3.
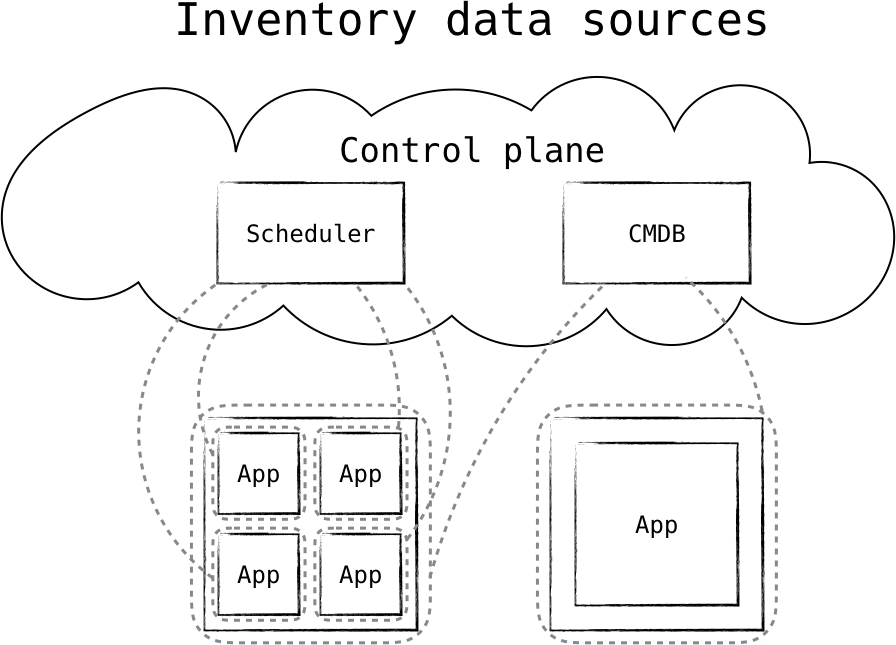
Figure 5-3. A scheduler and a configuration management database serve as inventory stores for the control plane
It is not uncommon to have more than one inventory management system. As an example, many companies have both asset management and configuration management software. Both of these store device metadata that is useful to us; they just store different sets, collected in different ways.
Configuration Management as an Inventory Database
Many configuration management systems, such as Chef or Puppet, offer modes in which data about the nodes they run on get persisted into a centralized database. Name, IP address, and the “kind” of server are examples of the type of information typically found in a CM-backed database. Using configuration management in this way is an easy first step toward developing an inventory database if you don’t have one already.
Knowing What to Expect
One of the great powers of a zero trust network is that it knows what to expect. Trusted entities can push expectations into the system, allowing all levels of access to be denied by default—only expected actions/requests are permitted.
An inventory database is a major component in realizing this capability. A huge amount of information about what to expect can be generated from this data; things like which user or application should be running on it, what locations we might expect it to be in, or even the kind of operating system are all pieces of information that can be used to set expectations.
In the datacenter, these expectations can be very strong. For instance, when provisioning a new server, we often know what IP address it will be assigned and what purpose it will serve. We can use that information to drive network ACLs and/or host based firewalls, poking holes for that specific IP address only where necessary. In this way, we can have all traffic denied, allowing only the very specific flows we are expecting. The more properties that can be expected, the better.
This is not such an easy prospect for client-facing systems, however. Clients operate in new and unexpected ways all the time, and knowing exactly what to expect from them and when is very difficult. Servers in the datacenter often have relatively static and long-lived connections to a well-defined set of hosts or services. By contrast, clients tend to make many short-lived connections to a variety of services, the timing, frequency, and patterns of which can vary organically.
In order to address the wild nature of client-facing systems, we need a slightly different approach. One way to do this is to simply allow global access to the service and to protect it with mutually authenticated TLS, forcing the client to provide a device certificate before it can communicate with it. The device certificate can be used to look the device up in the inventory database and determine whether or not to authorize it. The advantage is that lots of systems support mutually authenticated TLS already, and specialized client software is not strictly required. One can provide reasonably strong security without too badly hindering accessibility or usability.
A significant drawback to this approach, however, is that the service is globally reachable. Requiring client certificates is a great way to mitigate this danger. However, we have seen from vulnerabilities like Heartbleed that the attack surface of a TLS server is relatively large. Additionally, the existence of the resources can be discovered by simply scanning for them, since we get to speak TCP to the resource before we authenticate with it.
How can we ensure that we don’t engage clients that are not trusted? There has to be some untrusted communication, after all. What comes before the authentication?
Secure Introduction
The very first connection from a new device is a precarious one. After all, these packets must be admitted somewhere, and if they are not strongly authenticated, then there is a risk. Therefore, the first system that a new device contacts needs a mechanism by which it can authenticate this initial contact.
This arrangement is commonly known as secure introduction. It is the process through which a new entity is introduced to an existing one in a way that trust is transferred to it. There are many ways in which this can be affected; the method through which an operator passes a TOTP code to a provisioner in order to authorize a certificate request is a form of secure introduction.
The best (and perhaps only) way to do secure introduction is by setting an expectation. Secure introduction practically always involves a trusted third party. This is a system that is already introduced, and it holds the ability to introduce new systems. This trusted third party is the system that then coordinates/validates the specifics of the system to be introduced and sets the appropriate expectations.
Secure Introduction for Client Systems
Secure introduction of client-facing systems can be difficult due to the hard-to-predict nature of wild clients. When publicly exposing a client-facing endpoint is considered too risky, it is necessary to turn to more complicated schemes. The currently accepted approach is to use a form of signaling called pre-authentication, which announces a client’s intentions just prior to taking action. We’ll talk more about pre-authentication in Chapter 8.
What Makes a Good Secure Introduction System?
- Single-use
-
Credentials and privileges associated with the introduction should be single use, preventing an attacker from compromising and reusing the key.
- Short-lived
-
Credentials and privileges associated with the introduction should be short-lived, preventing the accumulation of valid but unused keys.
- Third-party
-
Leveraging a third party for introduction allows for separation of duty, prevents the introduction of poor security practice, and alleviates operational headaches.
While these requirements might at first seem rigorous, they can be met through fairly simple means. A great example can be found in the way Chef implements host introduction. Originally, there was a single secret (deemed the “validation certificate”) which was qualified to admit any host that possessed it as a new node. Thus, the introduction would involve copying this secret to the target machine (or baking it into the image), using it to register the new node, then deleting it.
This approach is neither single-use nor short-lived. Should the secret be recovered, it could be used by a malicious actor to steer application traffic to attacker-controlled hosts, or even trigger a denial of service.
Chef takes a different approach in later versions. Instead of having a static validation certificate, the provisioning system (via Chef client utility “knife”) communicates with the Chef server and creates a new client and associated client certificate. It then creates the new host, and passes in its client certificate. In this way, an expectation for the new client has been set. While these credentials are not short-lived, it remains as a superior approach.
Renewing & Measuring Device Trust
It is important to accept the fact that no level of security is perfect—not even yours. Once this fact is acknowledged, we can begin to mitigate its consequences. The natural progression is that the longer a device is operating, the greater its chances of being compromised. This is why device age is a heavily weighted trust signal.
For this reason, rotation is very important. We earlier spoke at length about the importance of rotation, and devices are no different. Of course, this “rotation” is manifested in different ways depending on your definition of “device.” If your infrastructure is run in a cloud, perhaps a “device” is a host instance. In this case, rotation is easy: just tear down the instance and build a new one (you are using configuration management, right?). If you’re running physical hardware, however, this prospect is a little more difficult.
Reimaging is a good way to logically rotate a device. It is a fairly low-level operation, and will succeed in removing the majority of persistent threats seen in the wild today. One can trust a freshly reimaged device more than one that has been running for a year. While reimaging does not address hardware attacks or other low-level attacks like those shown in Figure 5-4, it serves as a reasonable compromise in places where physical rotation is more difficult. Datacenter and supply chain security partially mitigate this concern.
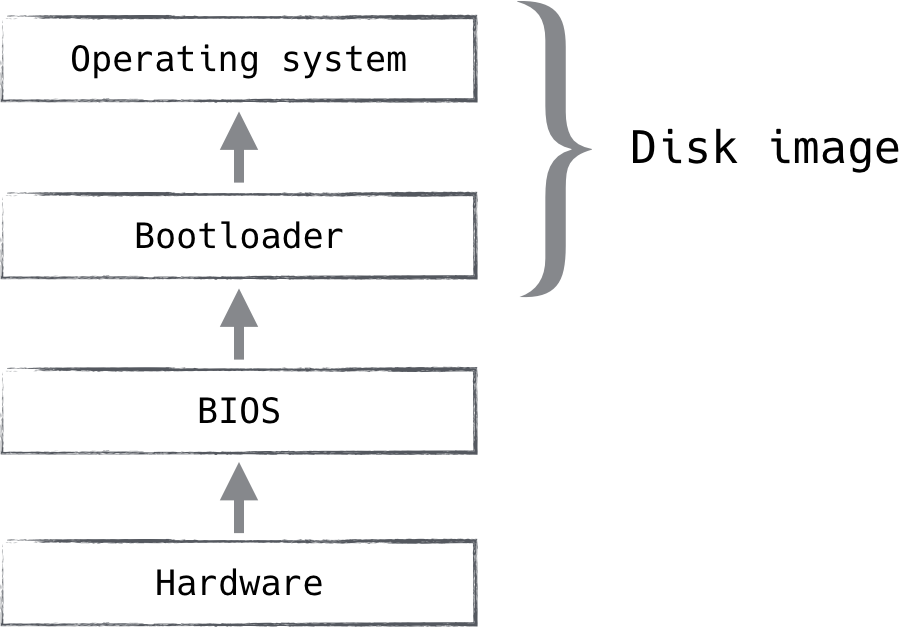
Figure 5-4. A disk image addresses the portions that house the vast majority of malware, but it’s certainly not the whole picture
When it comes to managing client devices, the story changes quite a bit. Reimaging a client device is extraordinarily inconvenient for users. They customize the device (and its contents) over time in ways that are difficult to effectively or securely preserve. Oftentimes, when given a new device, they want to transfer the old image! This is not great news for people trying to secure client devices.
The solution largely depends on your use case. The trade-off between security and convenience will be very clear in this area. Everyone agrees that client devices should be rotated and/or reimaged every so often, but the frequency is up to you. There is one important relationship to keep in mind: the less often a device is rotated or reimaged, the more rigorous your endpoint security must be.
Without the relatively strong assurances of device security that we get with rotation, we must look for other methods to renew trust in a device that has been operating for a long time. There are two general methods through which this can be done: local measurement or remote measurement.
Local Measurement
Local measurement can be one of two types: hardware-backed or software-backed. Hardware-backed measurement is more secure and reliable, but limited in capability. Software-backed measurement is much less secure and reliable, but practically unlimited in its measurement capabilities.
One good option for hardware-backed local measurement is leveraging the TPM for remote attestation. Remote attestation uses a hardware device to provide a signed response outlining the hashes of the software currently running on that machine. The response is highly reliable and very difficult to reproduce. However, it generally only gives a picture of the low-level software or specifically targeted software. If an attacker has managed to get an unauthorized process running in user space, the TPM will not be very useful in its detection; thus, it has limited capability. See “Remote attestation” on page XX [78] for more information.
Software-backed local measurement involves some sort of agent installed on the endpoint which is used to report health and state measurements. This could be anything from a managed antivirus client to policy enforcement agents. These agents go to great lengths in order to attest and prove validity of the measurements they report, but even cursory thought quickly reaches the conclusion that these efforts are generally futile. Software-backed measurements lack the protection provided by hardware measurements, and an attacker with sufficient privilege can subvert systems like this.
Remote Measurement
Remote measurement is the best of the two options for one simple reason: it benefits from separation of duty. A compromised host can report whatever it wants to, possibly falsifying information in order to conceal the attacker. This is not possible with remote or passive measurement, since a completely different system is determining the health of the host in question.
Traditionally, remote measurement is performed as a simple vulnerability scan. The system in question will be periodically probed by a scanning device, which observes the response. The response gives some information away, like what operating system might be running on that device, what services might be active there, and maybe even what version of those services.
The scan results can be cross-referenced with known-bad signatures, like malicious software or vulnerable versions of legitimate software. Detection of known-bad signatures can then influence the trust of the device appropriately.
There are a number of open source and commercial options available in the vulnerability scanning arena, including OpenVAS, Nessus, and Metasploit. These projects are all fairly mature and relied on by many organizations.
Unfortunately, vulnerability scanning comes with the same fundamental problem as local measurement: it relies on interrogation of the endpoint. It’s the difference between asking someone if they robbed a bank, and watching them rob a bank. Sure, sometimes you can get the robber to admit that they did it, but a professional would never fall for that. Catching them in the act is much more effective. See “Network Communication Patterns” on page XX [92] for more about how to solve this dilemma.
Device Compliance Change Signals
The OpenID Foundation is currently working on a new standard called the Shared Signals and Events (SSE) Framework, which aims to standardize the exchange of status signals about changes in device, user, and machine identities, as well as application and session status, between cooperating parties. The OpenID Continuous Access Evaluation Profile, in particular, provides specific semantics to signal device compliance change in the form of JSON, as shown in the example below.
    "iss": "https://idp.example.com/123456789/",
    "jti": "24c63fb56e5a2d77a6b512616ca9fa24",
    "iat": 1615305159,
    "aud": "https://sp.example.com/caep",
    "events": {
        "https://schemas.openid.net/secevent/caep/event-type/
        device-compliance-change": {
            "subject": {
                "device": {
                    "format": "iss_sub",
                    "iss": "https://idp.example.com/123456789/",
                    "sub": "e9297990-14d2-42ec-a4a9-4036db86509a"
                },
                "tenant": {
                    "format": "opaque",
                    "id": "123456789"
                }
            },
            "current_status": "not-compliant",
            "previous_status": "compliant",
            "initiating_entity": "policy",
            "reason_admin": {
                "en": "Location Policy Violation: C076E8A3"
            },
            "reason_user": {
                "en": "Device is no longer in a trusted location."
            },
            "event_timestamp": 1615304991643
        }
    }
}
Software Configuration Management
Configuration management is the process of tightly controlling and documenting all software changes. The desired configurations are typically defined as code or data, and checked into a revision control system, allowing changes to be audited, rolled back, and so on. There are many commercial and open source options available, the most popular of which being Chef, Puppet, Ansible, and CFEngine.
Configuration management software is useful in both datacenter and client deployments, and simply becomes required beyond a certain scale. Leveraging such software comes with many security wins, such as the ability to quickly upgrade packages after vulnerability announcements or to similarly assert that there are no vulnerable packages in the wild.
Beyond auditing and strict change control, configuration management can also be used as an agent for dynamic policy configuration. If a node can get a reliable and trusted view of the world (or part of it, at least), it can use it to calculate policy and install it locally. This functionality is practically limited to the datacenter though, since dynamic, datacenter-hosted systems are decidedly more static and predictable than client systems. We’ll talk more about this mode of zero trust operation later on.
The main difference between endpoint management and software configuration management is that endpoint management is focused on the security of individual devices, while software configuration management is focused on the security of the software that runs on those devices.
CM-Based Inventory
We have mentioned several times the idea of using a configuration management database for inventory management purposes. This is a great first step toward a mature inventory management system and can provide a rich source of information about the various hosts and software running in your infrastructure.
We like to think that CM-based inventory management is a “freebie” in that configuration management is typically leveraged for the bevy of other benefits it brings.
Using it as an inventory database most often comes about out of convenience. Maintaining this view is important: configuration management systems aren’t designed to act as inventory management systems...they’re designed to act as configuration management systems! Using it as such will surely bring a few rough edges, and you will eventually outgrow it. This is not to say don’t do it. It is better to actually realize a zero trust network by leveraging as much existing technology as possible than it is to never get there due to the high barrier to entry. Once we accept this fact, we can begin to leverage the wealth of data provided to us by the CM agents.
Searchable inventory
Some CM systems centrally store the data generated by their agents. Typically, this data store is searchable, which opens lots of possibilities for young zero trust networks. For instance, the agent can perform a search to retrieve the IP address of all web servers in datacenter A and use the results to configure a host-based firewall. Audits and report generation are greatly enhanced through searchable inventory as well. This applies not only to datacenter hosts, but also to clients. By storing the agent data and making it searchable, you can ensure that you changed the CM code to upgrade that vulnerable package, and that the package did indeed update where it said it did.
Secure Source of Truth
One important thing to remember when using CM systems in the zero trust control plane is that the vast majority of the data available to CM systems is self-reported. This is critical to understand, since a compromised machine could potentially misrepresent itself. This can lead to complete compromise of the zero trust network if these facts are not considered during its design.
Thinking back to trust management, the trusted system in this case is the provisioner. Whether it be a human or some automated system, it is in the best position to assert the critical aspects of a device, which include the following:
-
Device type
-
Role
-
IP address (in datacenter systems)
-
Public key
These attributes are considered critical because they are often used in making authorization or authentication decisions. If an attacker can update the device role, for instance, perhaps they can coerce the network to expose protected services. For this reason, restricting write access to these attributes is important. Of course, you can still use self-reported attributes for making decisions, but they should not be considered fact under any circumstance. It’s useful to think of self-reported attributes as hints rather than truth.
Using Device Data for User Authorization
The zero trust model mandates authentication and authorization of both the device and the user or application. Since device authentication typically comes before user authentication, it must be done without information gained through user authentication. This is not the case for user authentication.
When user authentication occurs, device authentication has already succeeded, and the network has knowledge of the device identity. This position can be leveraged for all kinds of useful contextual knowledge, enabling us to do much stronger user authentication than was previously attainable.
One of the more common lookups one might make is to check whether we would expect this user, given the type of device or place of issue. For instance, you are unlikely to see an engineer’s credentials being used from a mobile device that was issued to HR. So while the HR employee can freely access a particular resource using their own credentials, user authentication attempts using other credentials might be blocked.
Another good signal is user authentication frequency. If you have not seen a user login from one of their devices in over a year, and all of a sudden there is a request from that device furnishing the user’s credentials—well, I think it’s fair to be a bit skeptical. Could it have been stolen?
Of course, there is also a good chance that the request is legitimate. In a case like this, we lower the trust score to indicate that things are a little fishy. The lower score can then manifest itself in many ways, like still being trusted enough to read parts of the internal wiki, but not enough to log into financial systems.
Being able to make decisions like this is a big part of the zero trust architecture and underscores the importance of a robust inventory management database. While inventory management is strictly required for device authentication reasons, the contextual advantage given to user authentication is invaluable.
Trust Signals
This section serves as a reference for various trust signals that are useful in calculating device trust score and writing policy.
Time Since Image
Over time, the likelihood that a device has been compromised increases dramatically. Endpoint security practices aim to decrease the risk associated with long-lived or long-running devices. Still, these practices are far from perfect.
Imaging a device ensures that the contents of the hard drive match a known good. While not effective against some lower-level attacks, it provides a reasonably strong assurance of trust. In the moments immediately following the image restore, a tremendous amount of trust exists in the device, as only the hardware or the restore system itself would be able to taint the process. Over time though, that trust wears off as the system goes through prolonged exposure.
Historical Access
Device authentication patterns, similar to user authentication patterns, are important in understanding risk and act as a nice proxy for behavioral filtering. Devices which have not been seen in a while are more suspicious than ones that come and go frequently. Maybe suspicious is the wrong word, but it’s certainly unusual.
The request in question can also be tied to a resource, and it is wise to consider the device and the resource together in this context. For instance, a months-old device requesting access to a new resource is more suspicious than a request to a resource it has been accessing weekly for some time. This stands to say that the “first few” access attempts to a particular resource will be viewed with more skepticism than subsequent attempts.
Similarly, frequency can be analyzed to understand if a resource is being suspiciously over-utilized. A request from a device that has made 100 requests in the last day, but only 104 over the last month, is certainly more suspicious than one with 0 in the last day and 4 in the last month.
Location
While network location, including attributes like geo-location, IP Address, etc, are typically something we aim to not make strong decisions on with regard to the zero trust model, they still provides reliable trust signaling in many cases.
One such case might be a sudden location change. Since we are talking about device authentication, we can set some reasonable expectations about the way that device moves around. For instance, a device authentication attempt from Europe might be pretty suspicious if we have authorized that same device in the US office just a couple hours prior.
It should be noted that this is a bit of a slippery slope when it comes to the zero trust model. Zero trust aims to eliminate positions of advantage within the network, so using network location to determine access right can be considered a little contradictory. The authors recognize this and acknowledge that location-related data can be valuable while making authorization decisions. That said, it is important that this consideration not be binary. One should look for patterns in locations, and never make an absolute decision based solely on location. For instance, a policy which dictates that an application can only be accessed from the office is a direct violation of the zero trust model.
Network Communication Patterns
For devices that are connected to networks owned by the operator, there is an opportunity to measure communication patterns to develop a norm. Sudden changes from this norm are suspicious and can affect how much the system trusts such a device. Network instrumentation and flow collection can quickly detect intrusions by observing them on the network. Making authorization decisions informed by this detection is very powerful. One example might be shutting down database access to a particular web server because that web server began making DNS queries for hosting providers on another continent.
The same applies to client devices. Consider a desktop that has never before initiated an SSH connection but is now frequently SSHing to internet hosts. It is fair to say that this change in behavior is suspicious and should result in the device being less trusted than it was previously.
Machine Learning
Machine learning assists in calculating trust score by considering the entire context of the access request, including the user, device, and resource requested, as well as historical activity to identify anomalous requests. Machine learning models are typically trained over time to distinguish between anomalous and legitimate access patterns. As a result, machine learning can assist in reducing any potential blind spots in identifying malicious requests. However, as with other aspects of zero trust, relying solely on machine learning is not recommended; rather, using it in conjunction with other trust signals yields the best results.
Scenario Walkthrough
We’ll conclude this chapter by expanding on the previous chapter’s scenario walkthrough and learning about the role of device trust in the evaluation of Bob’s authorization request.
Let’s start with a close look at the device data store, as shown in Figure 5-5. The device data contains details specific to the device that you expect, such as the device model, operating system details, firmware-related information, and, most importantly, whether the device is in compliance with the organization’s policy and when the last compliance check was reported. Also, take note of the use of universally unique identifiers (UUID) to uniquely identify the machine and the use of International Mobile Equipment Identity (IMEI) to uniquely identify a mobile device.
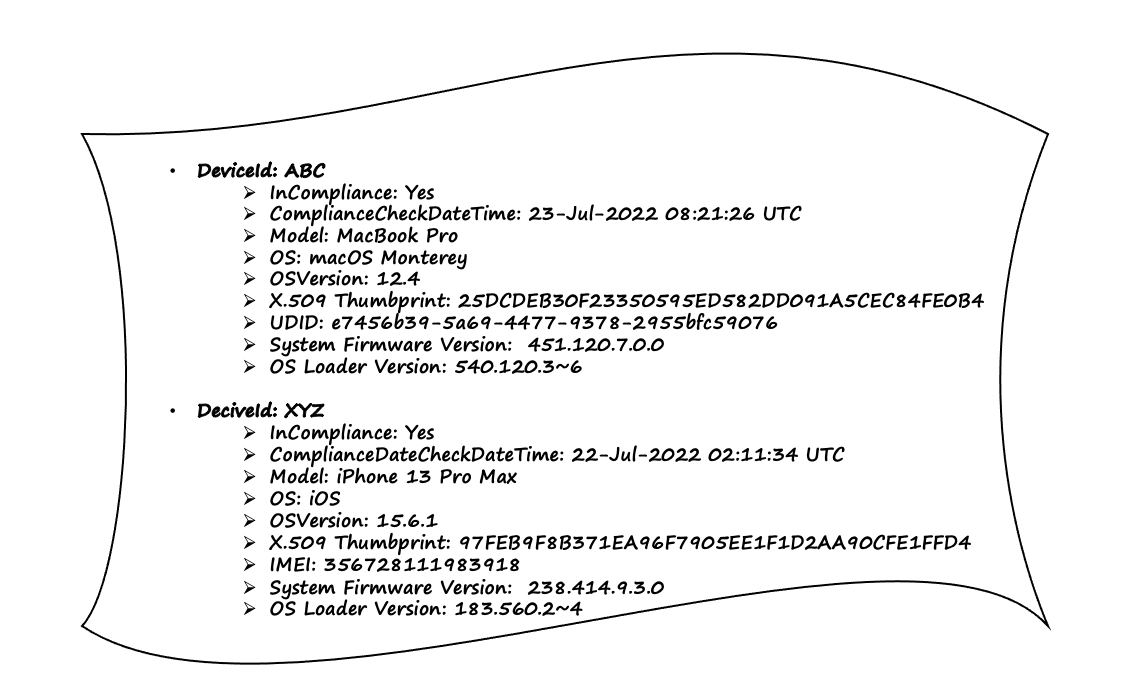
Figure 5-5. Data about devices, including their software, hardware, and complaint status, is recorded in a data store.
The attribute “InCompliance” may need some explanation because it is critical in driving device trust. It is used to indicate whether a device adheres to an organization’s compliance standards, and this is primarily driven by current state of device encryption, the installation of the most recent security patch, firmware version, and the execution of any other necessary software agents on the device, including but not limited to anti-malware software, etc. Organizations typically store device compliance status and the last time it was checked in the data store as part of device data. Furthermore, devices tend to fall out of compliance if a compliance check fails or if the device is not available for compliance checks after a certain period of time, such as 48 hours, but this duration is typically determined by the organization’s compliance policy.
Following that, we examine activity logs, as shown in Figure 5-6, which depicts activity from two of Bob’s registered devices. By logging device activities, the trust engine can examine them for anomalous behavior. It is common for attackers to use infected devices to perform network scanning and use that information to gain access to critical resources. The example activity logs shows only a few basic attributes such as device id, IP address, and geo-location, but this can easily be expanded to include more richer set of attributes such as application or api being accessed, result of the activity, and so on.
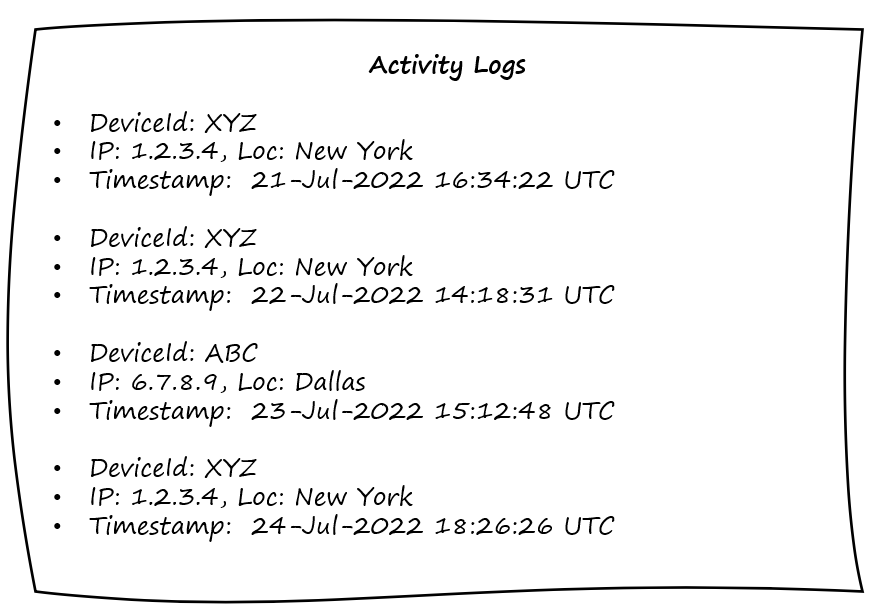
Figure 5-6. Activity logs record device activity and serve as an audit trail, which is useful for determining anomalous behavior from devices and calculating trust scores.
The user store, as shown in Figure 5-7, contains Bob’s user (identity) data, which includes his name, registered authentication methods, device id, geo-location, IP address, and name. One thing to keep in mind is that certain user attributes change less frequently than others. For example, user name tend to stay the same for the most part, whereas device Id may change every few years as part of a typical organization’s device refresh. There is always room for adding more user attributes, as well as challenges with maintaining user data, which we will discuss in Chapter 6 as part of the user trust discussion.
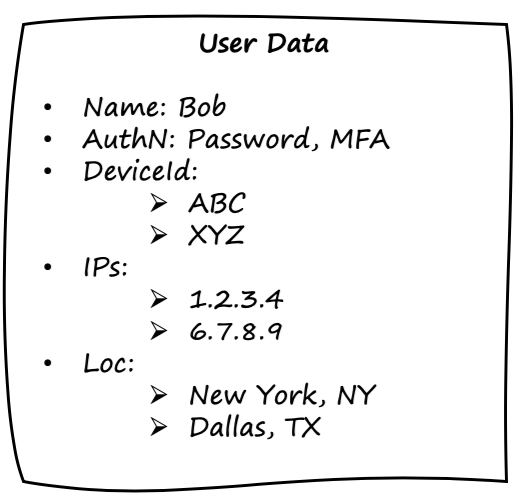
Figure 5-7. Bob’s user identity data includes his name, authentication methods registered, device id, geo-location, and IP address.
The trust engine, as shown in Figure 5-8, evaluates and assigns a trust score to access requests from Bob using both dynamic and static rules. It actively uses data from various entities within the data store and deploys machine learning to ensure that any blind spots are identified, as well as using static rules for specific conditions. In this case, the trust score is calculated dynamically using machine learning to detect anomalous behavior using activity logs, which store historical user and device activity logs. The machine learning model classifies the request as highly anomalous, with a trust score of 1 or 2, moderately anomalous, with a trust score of 3 or 4, or low anomalous, with a trust score of 5 or 6.
The trust engine also takes into account the user’s authentication method, specifically whether or not MFA is used to verify their identity. Requests with only a single factor receive a low trust score of 3, whereas requests with MFA receive a high trust score of 7. The final trust score is calculated by averaging all of the scores assigned to a request. Please keep in mind that how trust score is calculated in real-world zero trust implementations is heavily dependent on the software, but every request must receive a final trust score that the policy engine can use for decision making.
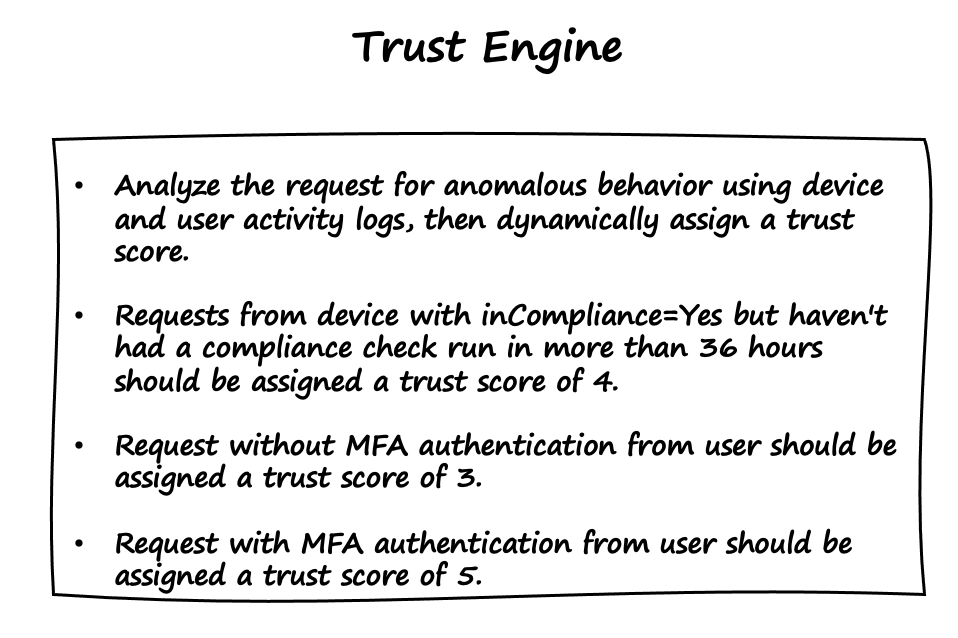
Figure 5-8. The trust engine evaluates and assigns a trust score to an access request using both dynamic and static rules.
Finally, as illustrated in Figure 5-9, we have a policy engine that defines rules based on the overall context of the authorization request, which includes the user, application, device, regulatory requirements, and trust score. The policy engine also takes the “deny all” approach. Essentially, unless the request is explicitly permitted by one of the rules, it will be denied access to the resource.
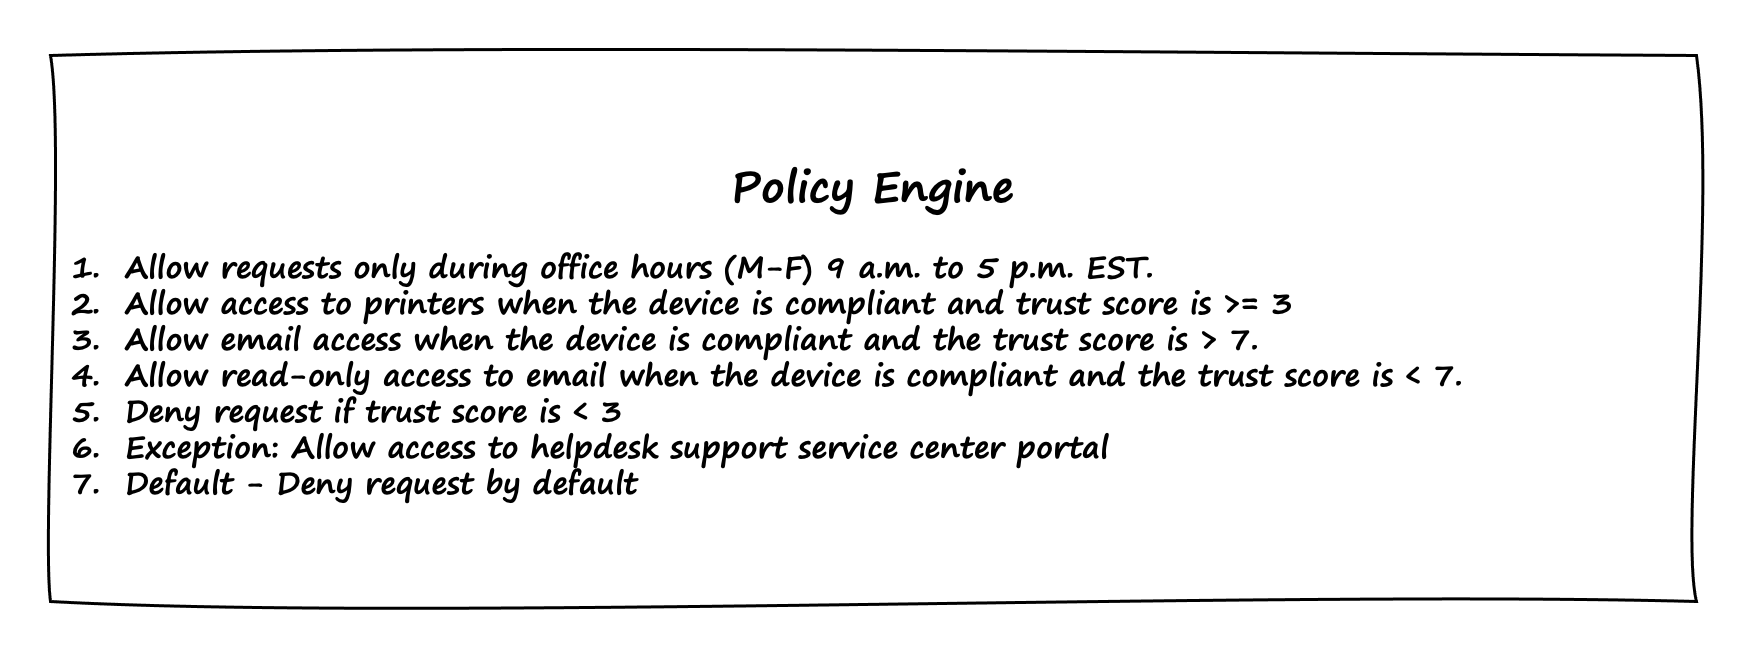
Figure 5-9. The policy engine is ultimately responsible for granting or denying access requests.
Let’s go through a few use cases.
Use case: Bob wants to send a document for printing
Here is what we know about Bob’s request:
-
Bob is requesting access to send a document to an organization’s printer.
-
Bob is using his laptop with the device id “ABC.”
-
Bob has used MFA and also used password as the first factor for authentication
-
Bob is making the request during office hours.
Request Analysis
-
Bob’s access request (action: print document, device-id: ABC,authentication: pwd/mfa, location: New York, IP:1.2.3.4, datetime: 24-july-2022-10:00am-est-timezone) reaches enforcement component.
-
The enforcement component forwards the access request to the policy engine for approval.
-
The policy engine receives the request and consults with the trust engine to determine the request’s trust score.
-
The trust engine evaluates request:
-
It finds no anomalies because the device access request pattern, as well as the IP address and location, appear to be consistent with historical data. It gives a high trust score of 6.
-
Bob has also completed MFA, so a trust score of 5 is assigned.
-
Device is in compliance and had its most recent compliance check in less than 36 hours.
Finally, the trust engine computes the average of trust scores, which is 5.5, and returns it to the policy engine.
-
-
Policy engine receives the trust score of 5.5 from the trust engine.
-
For authorization, the policy engine compares the request to all policy rules:
-
This first rule results in a grant (or allow) action because the request is made during the permissible office hours.
-
The second rule results in grant (or allow access to printer) action because the request has a trust score greater than 3.
-
The rules 3–4 do not apply to the current access request because it is specifically for a printer.
-
The fifth rule does not apply to the current request as trust score is greater than 3.
-
The sixth rule does not apply to the current request as the request is not for the help desk.
-
The seventh rule which is also a default rule will not be applicable. This rule is only executed when no other rules are executed.
-
The policy engine stops processing and makes the final decision to allow printer access.
-
-
The policy engine sends a allow action to the enforcement component
-
The enforcement component receives the policy engine’s result and allows Bob’s request to print the document.
Use case: Bob wants to delete an email
Here is what we know about Bob’s request:
-
Bob wants to delete an email from his inbox.
-
Bob is using his mobile phone with the device id “XYZ.”
-
Bob has used MFA and also used his password as the first factor for authentication
-
Bob is making the request during office hours.
Request Analysis
-
Bob’s access request (action: delete email, device-id: XYZ,authentication: pwd/mfa, location: Dallas, IP: 6.7.8.9, datetime: 24-july-2022-9:45am-est-timezone) reaches enforcement component.
-
The enforcement component forwards the access request to the policy engine for approval.
-
The policy engine receives the request and consults with the trust engine to determine the request’s trust score.
-
The trust engine evaluates request:
-
It finds no anomalies because the device access request pattern, as well as the IP address and location, appear to be consistent with historical data. It gives a high trust score of 6.
-
Bob has also completed MFA, so a trust score of 5 is assigned.
-
Device is in compliance but its most recent compliance check was performed more than 36 hours ago so a trust score of 4 is assigned.
Finally, the trust engine computes the average of trust scores, which is 5, and returns it to the policy engine.
-
-
Policy engine receives the trust score of 5 from the trust engine.
-
For authorization, the policy engine compares the request to all policy rules:
-
This first rule results in a grant (or allow) action because the request is made during the permissible office hours.
-
The second rule does not apply to the current access request since the request is not for the printer.
-
The third rule does not apply to the current access request because trust score is lower than 7.
-
The fourth does applies to the current access request as trust score is less than 7 which restricts email access to read-only (no deletion or sending of email is allowed)
-
The fifth rule does not apply to the current request as trust score is greater than 3.
-
The sixth rule does not apply to the current request as the request is not for the help desk.
-
The seventh rule which is also a default rule will not be applicable. This rule is only executed when no other rules are executed.
The policy engine stops processing and makes the final decision to only allow Bob read-only access to the email inbox with no delete permissions.
-
-
The policy engine sends an allow action (read-only access to email) to the enforcement component.
-
The policy engine’s decision is received by the enforcement component, which grants Bob read-only access to his email inbox but denies him the ability to delete emails. This is a good way to ensure that user Bob’s ability to be productive is not completely hampered, but privilege tasks such as email deletion are limited.
Summary
This chapter focused on how a system can trust a device. This is a surprisingly hard problem, so a lot of different technologies and practices need to be applied to ensure that trust in a device is warranted.
We started with looking at how trust is injected into a device from the human operators. For relatively static systems, we can have a person involved in providing the critical credentials; but for dynamic infrastructure, that process needs to be delegated. Those credentials are incredibly valuable, and so we discussed how to safely manage Them.
Devices eventually need to participate in the network, and so understanding how they authenticate themselves is important. We covered several technologies, such as X.509 and TPMs, which can be used to authenticate a device on the network. Using these technologies along with databases of expected inventory can go a long way toward providing the checks and balances that give devices trust.
Trust is fleeting and degrades over time, so we talked about the mechanisms for renewing trust. Additionally, we discussed the many signals that can be continually used to gauge the trustworthiness of a device over time and the mechanisms used to manage devices. Perhaps the most important lesson is that a device starts out in a trusted state and only gets worse from there. The rate at which its trust declines is what we’d like to keep a handle on.
The scenario walkthrough revisits Bob from the previous chapter, but this time the focus is on device trust and how the policy engine, along with other components such as the trust engine and data store, handle various use cases.
The next chapter looks at how we can establish trust in the users of the system.