IN THIS CHAPTER
Windows Management Instrumentation (WMI) is a common interface and object model to access information from and to manage operating systems, services, applications, devices, and so on. The basis for WMI is the Web-Based Enterprise Management (WBEM) standard, which is a derivation of the Common Information Model (CIM) standard. Both the WBEM and CIM standards are published by the Distributed Management Task Force (DMTF) and are used to define how managed IT elements are represented as a common set of objects.
Being Windows-based, DCOM is used to implement WMI. Using DCOM, WMI connections can easily be made to remote systems. This ability to manage systems remotely is one of the many reasons WMI is a useful automation interface. Other reasons include:
• WMI has the capability to be employed through a variety of different languages, allowing for flexibility when scripters use it to complete automation tasks.
• Many of Microsoft’s products provide WMI providers that can be used for management of that product. WMI providers implement functionality that is described in a WMI class. These classes, like a .NET class, define a set of members that can be used.
The last bullet underscores why WMI is important to all PowerShell users. At the time that this book was being written, a number of Microsoft products started to either include PowerShell as their management interface or had PowerShell support in their roadmaps. This meant that a number of Microsoft products still were not directly manageable through PowerShell or the .NET Framework. Coupled with the fact that PowerShell 1.0 did not have a built-in remoting capability, WMI was in many cases still the best interface for both managing a number of Microsoft products and remote machines.
Needless to say, this does not mean the PowerShell product team was not aware of these challenges. To address these issues the team worked tirelessly to expand PowerShell’s adoption within Microsoft and with third-party developers. The culmination of this work was an announcement in November of 2007 that Microsoft would make PowerShell part of its Common Engineering Criteria (CEC) for 2009. Microsoft’s CEC is a framework that Windows Server System products must meet to ensure they are developed around a common set of guidelines and requirements. By PowerShell’s inclusion in this framework, every server product released by Microsoft must ship with some form of PowerShell support during Microsoft’s financial year 2009 (July 1, 2008).
In addition to evangelizing PowerShell’s adoption in Microsoft’s product groups, the team is also working on addressing its lack of remoting support. In the PowerShell 2.0 CTP release, a new feature called PowerShell remoting was unveiled. Using this feature a PowerShell user can now run commands and cmdlets against remote machines. Details about this feature and how it can be used are reviewed in Chapter 17, “PowerShell 2.0 Features.” Please note that this feature is still under development, so it might undergo additional changes.
NOTE
Using WMI to manage remote machines is useful. However, making DCOM connections to a remote machine is not always possible (for example through a firewall). PowerShell 2.0’s remoting feature solves this problem by using Windows Remote Management (WSMAN), which interacts with remote machines using the WS-Management Simple Object Access Protocol (SOAP)-based protocol.
Although these developments are positive, WMI is still a useful interface for managing a number of different Microsoft products and remote machines. In fact, it can’t be underscored enough the importance of understanding how to use WMI from within PowerShell. For example, if you wanted to manage IIS 7.0 and Terminal Services on a Windows Server 2008 machine, both server roles provide a WMI provider that can be used. Considering that these interfaces are available, it is easy to use PowerShell’s capability to interface with WMI to complete any number of automation tasks.
The goal of this chapter is to instill upon you an understanding for how WMI is used within PowerShell. To accomplish this task, the chapter provides details for how PowerShell interacts with WMI and some of the differences between this interaction and Windows Script Host (WSH). After exploring these details, the chapter then examines the new features that are currently included in the PowerShell 2.0 CTP. Finally, a real-world scripting scenario is presented; it uses WMI and PowerShell to complete a management task.
To use WMI via WSH, you use a set of objects in the Scripting API for WMI with the WSH methods CreateObject and GetObject (or another scripting language’s methods for creating or connecting to COM objects). In this way, you can connect to a WMI object that might be a WMI class or an instance of a WMI class.
There are two methods to connect to a WMI object. The first is to create a SWbemServices object with the corresponding CreateObject method, and then connect to a WMI object by specifying that object’s path. For the purpose of this discussion, however, you should focus on the second method. This method uses a "winmgmts:" moniker string (a standard COM mechanism for encapsulating the location and binding of another COM object). These methods are similar, but the SWbemServices object method is often chosen for error handling and authentication reasons, and the moniker string is usually chosen for convenience because a connection can be made with a single statement.
The following VBScript example uses a moniker string, which connects to a remote machine and then returns the amount of installed RAM:
![]()
![]()
Saving the script as getmemory.vbs, and then running it by using cscript, produces the following results:
![]()
![]()
The following sections walk through this script to show you how it gets the installed memory information from the remote machine Jupiter.
First, you connect to the WMI service object under the rootcimv2 namespace on Jupiter, as shown here:
![]()
![]()
Next, you use the ExecQuery method of the WMI service object with the WMI Query Language (WQL) to create an object bound to an instance of the Win32_ComputerSytem class, as shown in this example:
![]()
![]()
Finally, using the colItems variable and a for loop, you step through the newly created object collection and retrieve memory information from the TotalPhysicalMemory property. After formatting the numeric value with the FormatNumber function, you write the amount of memory (in megabytes) installed on the remote machine to the cmd command prompt, as shown in the following code:
![]()
![]()
Using WMI in PowerShell has similar conceptual logic as in WSH. The main difference is that the PowerShell methods are based on WMI .NET instead of the WMI Scripting API. You have three methods for using WMI in PowerShell:
• WMI .NET (which is the .NET System.Management and System.Management.Instrumentation namespaces)
• The Get-WmiObject cmdlet
• The PowerShell WMI type accelerators: [WMI], [WMIClass], and [WMISearcher]. The first method, using the System.Management and System.Management.Instrumentation namespaces, isn’t discussed in this chapter because it’s not as practical as the other methods. It should be only a fallback method in case PowerShell isn’t correctly encapsulating an object within a PSObject object when using the other two methods.
The second method, the Get-WmiObject cmdlet, can be use to retrieve WMI objects and gather information about WMI namespaces and classes. This cmdlet is simple to use, because it usually involves specifying the name of WMI class or namespace you want interact with. For example, getting an instance of the local Win32_ComputerSystem class requires the name of the class, as shown here:
![]()
![]()
The next example, which is more robust, connects to the remote machine named Jupiter and gets an instance of the Win32_Service class in which the instance’s name equals Virtual Server. The result is an object containing information about the Virtual Server service on Jupiter:
![]()
![]()
The following command returns the same information as the previous one but makes use of a WQL query:
![]()
![]()
Finally, here’s an example of using Get-WmiObject to gather information about a WMI class:
![]()
![]()
Although using Get-WmiObject is simple, using it almost always requires typing a long command string. This drawback brings you to the third method for using WMI in PowerShell: the WMI type accelerators.
The [WMI] type accelerator for the ManagementObject class takes a WMI object path as a string and gets a WMI object bound to an instance of the specified WMI class, as shown in this example:
![]()
![]()
The [WMIClass] type accelerator for the ManagementClass class takes a WMI object path as a string and gets a WMI object bound to the specified WMI class, as shown in the following example:
![]()

![]()
The [WMISearcher] type accelerator for the ManagementObjectSearcher class takes a WQL string and creates a WMI searcher object. After the searcher object is created, you use the Get method to get a WMI object bound to an instance of the specified WMI class, as shown here:
![]()
![]()
In the first part of this chapter, you where presented with background information about WMI and a comparison between how WMI is used in WSH and PowerShell. In the next couple of sections, you learn how to work with WMI classes and class instances in relation to different examples. The end goal of these sections is to help you better understand how WMI can be employed to complete automation tasks from inside a PowerShell console session. The first step to gaining a working understanding of WMI is to examine how it is structured.
Like a .NET Framework namespace, a WMI namespace is a logical grouping of WMI classes and instances. To create this mapping, a WMI provider typically registers its own WMI namespace (and associated classes or instances) into the WMI repository. Table 11.1 shows a mapping between several providers and their associated namespaces:

Although the list shown in the table is not all inclusive, it does provide you with a sense of how WMI is structured into a hierarchical framework (WMI repository). In the past, you might use any number of different tools to learn what namespaces, classes, and instances are available to you in the WMI repository. For example:
• Scriptomatic—A HTA utility that can be used to write WMI scripts.
• MSDN’s WMI documentation—This is always a good source of information.
• wbemtest.exe—A GUI-based utility that enables you to access and manipulate the WMI repository.
• Third-party applications—There are a lot of utilities that have been developed to assist people with understanding the WMI repository and using it.
• PowerShell—By using the Get-WmiObject cmdlet directly from within a PowerShell console session.
Of the five options listed, you might as well just use PowerShell, because it has the capability to explore the WMI repository. Therefore, you have no reason to leave the console to complete this task. However, before starting down this exploration track, you must first understand that the top level namespace is called Root. Children of the Root namespace can be namespaces or WMI classes. Each namespace contains a class called __namespace. Creating an instance of this class gives you list of all the child namespaces under the parent namespace. For example:
![]()
![]()
The previous command example shows the Get-WmiObject cmdlet being used in conjunction with the Namespace parameter to create an instance of the __Namespace class. The table that is returned contains the namespaces that are under the Root namespace. To examine the child namespaces under one of the listed namespaces, modify the WMI path, as shown in the next command example:
![]()
![]()
Unfortunately, executing the previous command does not return anything. This indicates that there are no child namespaces under the MicrosoftIISv2 namespace. Instead, to return a list of classes under this namespace, execute the following command:
![]()
![]()
By using the List switch parameter, the resulting two column list contains all the classes that fall under the MicrosoftIISv2 namespace. The list is daunting, but after you find the right class, you can then employ that class to either gather information or complete a task. For example:
![]()
![]()
The prior command example uses the Get-WmiObject cmdlet in conjunction with the IIsWebService class to return information about the W3SVC service status on the local machine. Additionally, you can also use the IIsWebService class to interact with the W3SVC service, as shown in the following command:
![]()
![]()
The output doesn’t look good; however, in the previous example, the Get-WmiObject cmdlet in conjunction with the IIsWebService class is again used. This time around, the StopService method is used to stop the W3SVC service. To restart the service, you can again use a method from the IIsWebService class. If you are not familiar with the members of this class, like all other PSObject objects, you can use the Get-Member cmdlet to interrogate an object generated from this class. For example:
![]()
![]()
With the list of methods that is returned from the previous command example, you should be able to determine which method can be used to restart the W3SVC service.
If at this point in the section, do you feel that exploring or working with WMI in PowerShell can be cumbersome? If you do, you are not alone. However, the root cause for the clumsiness is WMI itself. Unfortunately, PowerShell 1.0, being a first generation product, just doesn’t do an end-all job at masking WMI’s strange structure and formatting from those that would prefer a more normalized form. Instead, it makes WMI, for the first time, easily accessible from the command line and scripts.
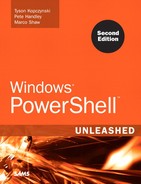
If you find using the PowerShell console too awkward to explore the WMI repository, there is a great utility that was created by Marc van Orsouw that can be used instead. This utility is called the “PowerShell WMI Explorer” and can be downloaded from his web site at http://thepowershellguy.com. As its name suggests, the utility enables you to explore WMI from PowerShell within a graphical interface. Amazingly, van Orsouw was able to build this entire utility using only one PowerShell script (WmiBrowser.ps1), and no additional DLLs, cmdlets, or files are needed. Figure 11.1 shows an example of the PowerShell WMI Explorer being executed.
WMI providers are just COM objects that monitor one or more managed objects. These managed objects can include a physical or logical component, such as the file system, a network adapter, the operating system itself, a process, a service, or even a hard disk drive. Like a Windows driver, a WMI provider acts as a gateway for data being returned from a managed object and messages that are sent from WMI to that object.
The physical structure of a WMI provider consists of a DLL and a Managed Object Format (MOF) file. MOF files are derived from DMTF’s CIM standard and contain definitions of classes and instances that are implemented by a provider. Both the DLL and MOF files for each provider can be found under the %WINDIR%System32Wbem directory. An example of default Windows provider is the Win32 provider. This provider defines the classes used to describe hardware or software available on Windows systems and the relationships among them.
WMI can be queried using a subset of the American National Standards Institute Structured Query Language (ANSI SQL). This subset is called the Windows Management Instrumentation Query Language (WQL). Although WQL is based on the standard SQL syntax, you cannot use it to perform updates, inserts, or deletes. Instead, you can query for classes, their instances, associations, and so on.
Because of its SQL inheritance, working with WQL is fairly easy, as shown in previous Get-WmiObject and [WMISearcher] examples. As a refresher, here is another example:
![]()
![]()
In the previous command, a WQL query statement is unused in conjunction with the [WMISearcher] type accelerator to retrieve all instances of the Win32_Process class that have a name equal to powershell.exe. The resulting object collection is then dumped into the $Procs variable. Next, the WMI Get method is used to initialize the resulting objects and return information about them. In this case, there is only one object in the collection, and the information about the object is displayed in a formatted list.
Interestingly, you can also use the Get-WmiObject cmdlet’s filter parameter to achieve the same information that is returned using a WQL query. An example of this is shown here:
![]()
![]()
In the previous command example, the filter parameter is used to retrieve all instances of the Win32_Process class that have a name equal to powershell.exe. The resulting object collection is then dumped into the $Procs variable. Next, the object collection is piped to the Format-List cmdlet, and name and processid are returned to the console. The major difference between this example and the [WMISearcher] type accelerator example is with the objects that are returned. With the [WMISearcher] example, the objects returned are instances of the ManagementObjectSearcher class. Therefore, the Get method is used to initialize the related Win32_Process objects. With the second example, the Get-WmiObject cmdlet returned objects that were instances of the ManagementObject class.
Throughout this chapter, you are shown how PowerShell interacts with WMI. In most cases, this interaction enables an administrator to rapidly use WMI to complete a task directly from the PowerShell console or a script. Nonetheless, there is room for improvement. Examples of this can be found within the unwieldy commands, structures, and data that can prove confusing to an administrator who isn’t as familiar with WMI’s internals as a developer.
Like other noted shortcomings, the PowerShell team is aware of the problems with the WMI implemtation in PowerShell and is actively working on solutions. Examples of this work can be found within some of the new WMI-related changes that are found in the PowerShell 2.0 CTP. The first of these changes is the fix for what proved a major shortcoming with the Get-WmiObject cmdlet in PowerShell 1.0. For example, if you attempted to use this cmdlet in conjunction with the IIsWebService class to manage the W3SVC service on a remote machine, you would encounter the following problem:
![]()
![]()
This is normal behavior for any of the IIS WMI classes because they require the AuthenticationLevel property defined as PacketPrivacy. The AuthenticationLevel property is an integer that defines the COM Authentication level that is assigned to an object. In the end, it determines how DCOM will protect information sent from WMI.
Although defining the AuthenticationLevel property in WSH was a simple line of code, in PowerShell 1.0’s version of the Get-WmiObject cmdlet, there was no method to define this property. Additionally, there wasn’t a way to change either the ImpersonationLevel property or enable all privileges, both of which are often requirements when working with WMI. To correct this problem, the product team has updated the Get-WmiObject cmdlet in the PowerShell 2.0 CTP to include new parameters to define the AuthenticationLevel and ImpersonationLevel properties and enable all privileges. Additionally, these parameters work with the new WMI cmdlets (Invoke-WMIMethod; Remove-WMIObject; and Set-WMIInstance) that were also introduced in the CTP. For example:
![]()
![]()
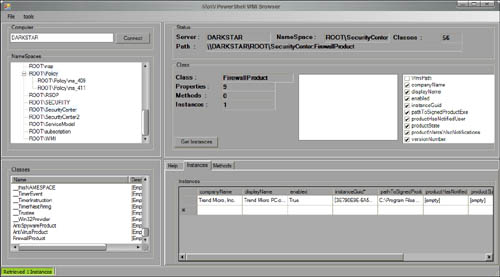
In the previous example, the Authentication parameter is used to define the AuthenticationLevel property. In this case, the value is defined as 6 (PacketPrivacy). The definitions for the rest of the allowed values for the Authentication property are shown in Table 11.2:
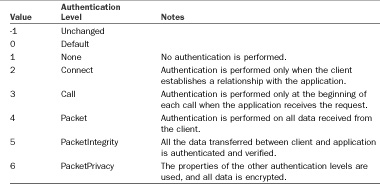
The AuthenticationLevel property is used to govern the degree to which a remote WMI service is allowed complete tasks on your behalf. The values that are supported by this property are defined in Table 11.3:
The Set-WMIInstance cmdlet was developed to reduce the number of steps needed to change a read-write WMI property (or property that allowed direct modification). For example, in PowerShell 1.0, the following set of commands might be used to change Windows Terminal Service’s ActiveSessionLimit:
![]()
![]()
By using the Set-WMIInstance cmdlet, you can complete the same task using a single command:
![]()
![]()
In the previous example, the class parameter is defined as a Win32_TSSessionSetting; however, the argument parameter is defined as a HashTable that contains the property and the value the property will be set to. Additionally, because this parameter requires an argument that is a HashTable, to define multiple property and value pairs, you need to separate the pairs with a semicolon, as shown here:
![]()
![]()
However, the true power of this cmdlet is to use the computername parameter to change read-write WMI properties on multiple machines at once. For example:
![]()
![]()
The arguments for the computername parameter can be a NetBIOS name, a fully-qualified domain name (FQDN), or an IP address. Additionally, each argument must be separated by a comma.
Two different types of methods exist with WMI: instance or static. With static methods, you must invoke the method from the class itself, whereas instance methods are invoked on specific instances of a class. In PowerShell 1.0, working with instance methods was fairly straightforward as you only needed to create an object of a particular instance of a WMI class. However, to work with a static method requires a fairly complex and unintuitive WQL statement, as shown in the following example:
![]()
![]()
You can also use the [WMIClass] type accelerator, as shown here:
![]()
![]()
If you wanted to use the Get-WMIObject cmdlet or were having problems with the [WMIClass] type accelerator, employing the use of the noted WQL statement wasn’t command line friendly. To fill this noted gap, the PowerShell product team introduced the Invoke-WMIMethod cmdlet in PowerShell 2.0.
As its name suggests, the purpose of the Invoke-WMIMethod cmdlet is to make it easier to directly invoke WMI methods. To use this cmdlet to invoke a static method, use the following command:
![]()
![]()
In the previous command example, the path parameter requires the name of the WMI class from which the method is to be invoked from. In this case, the method being invoked is the Create method as defined for the name parameter. If you were invoking an instance method, the argument for the path parameter would need to be the complete path to an existing WMI instance. For example:
![]()
![]()
The argumentList parameter is used to define any arguments that a method requires when it is invoked. In cases where the method requires multiple values or you want to pass multiple values, you must assign those values into an array. Then, the array must be defined as the argument for the argumentList parameter.
The last new cmdlet to be introduced in PowerShell 2.0 is the Remove-WMIObject cmdlet. This cmdlet is used to remove instances of a WMI objects. For example, to terminate a process in using WMI in PowerShell 1.0, you might use the following set of commands:
![]()
![]()
However, depending on the type of WMI object that you are trying to remove, several methods would need to be used. For instance, to delete a folder using WMI in PowerShell 1.0, use the following command:
![]()
![]()
Conversely, using the Remove-WMIObject cmdlet, you can remove instances of any type of WMI object. For example, to remove an instance of the Win32_Process class, use the following commands:
![]()
![]()
The following commands are used to remove a directory:
![]()
![]()
Before this script was developed, companyabc.com was in the process of switching most of its physical hardware-based application servers to virtual machines that were located on a Microsoft Virtual Server 2005 host. As part of this switch, the company wanted a simple yet effective method for monitoring the virtual machines on the virtual server host. However, an effective monitoring platform, such as Microsoft Operations Manager (MOM), wasn’t in place. The IT department suggested an automation script to meet the company’s short-term monitoring needs. In turn, the company developed one that administrators could use to perform the virtual machine monitoring.
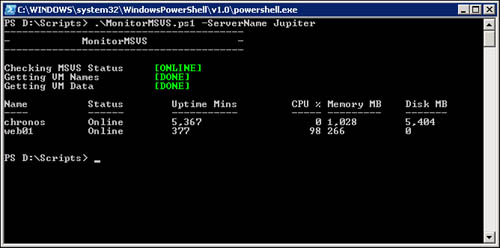
The MonitorMSVS.ps1 is a PowerShell conversion of an existing VBScript based script named MonitorMSVS.wsf. A working copy of both these scripts can be found at www.informit.com/title/9789780768687187. To execute this script, define the ServerName parameter, which should have its argument set to the name of the Virtual Server 2005 system hosting the virtual machines to be monitored. Here’s the command to run MonitorMSVS.ps1, with an example of the output shown in Figure 11.2:
![]()
![]()
NOTE
In the command to run the MonitorMSVS.ps1 script, the ServerName parameter is named in the command string, whereas in the example from Chapter 6, “The PowerShell Language,” the script’s parameters aren’t named in the command string. In PowerShell, you can name or partially name parameters when running a script, as shown here:
.MonitorMSVS.ps1 -S Jupiter
If you define the arguments in an order matching how parameters are defined in the script, the parameters don’t need to be named at all when running a script, as shown here:
.MonitorMSVS.ps1 Jupiter
The MonitorMSVS.ps1 script performs the following sequence of actions:
1. The script pings the specified Microsoft Virtual Server (MSVS) to verify that the server is operational.
2. The script connects to the Microsoft Virtual Server Administration Web site and retrieves a list of virtual machines on that MSVS host. The list of virtual machines is defined as the $Servers variable.
3. The script uses the Get-WmiObject cmdlet to retrieve a collection of instances of the VirtualMachine class, which is defined as the $VirtualMachines variable.
4. For each virtual machine object in the $Servers variable, the script adds the virtual machine’s current status as another member of that object. If the virtual machine is online (present in the $VirtualMachines collection), the script also adds current values for the Uptime, CpuUtilization, PhysicalMemoryAllocated, and DiskSpaceUsed properties as members of the virtual machine object.
5. The script returns the information to the PowerShell console by using the Format-Table cmdlet.
The first code snippet contains the header for the MonitorMSVS.ps1 script. This header includes information about what the script does, when it was updated, and the script’s author. Just after the header is the script’s only parameter ($ServerName):
![]()
![]()
The next code snippet contains the beginning of the script’s automation portion. First, the variable $URL is defined as the URL for the MSVS host’s Virtual Server Administration Web site. Then, like the MonitorMSVS.wsf script, MonitorMSVS.ps1 uses an ICMP ping to verify that the specified MSVS host is operational before continuing. However, the MonitorMSVS.ps1 script uses the Net.NetworkInformation.Ping class instead of WMI to conduct the ping. Either method, including ping.exe, could have been used, but Net.NetworkInformation.Ping requires less work and less code. The choice of a method doesn’t matter, however, as long as you try to predict where the script will fail and handle that failure accordingly.
![]()
![]()
If the MSVS host is operational, script writes to the console that the host is “ONLINE” and continues execution of the script. Conversely, if the MSVS host is not operations, the script writes to the console that the host is “OFFLINE” and halts execution of the script.
After the operational status of the MSVS host has been verified, the next step is to connect to the host and retrieve a list of virtual machines that are hosted. The following code snippet completes this task by improving the logic from the original MonitorMSVS.wsf script and showcasing one of PowerShell’s more impressive capabilities:
![]()
![]()
The MonitorMSVS.wsf script had a major flaw: The WMI query returned information only about virtual machines that were online at the time of the query. If a virtual machine happens to be off when the MonitorMSVS.wsf script runs, there’s no way to display that fact to users. A list of all virtual machines and their current status is helpful information for a script used as a monitoring tool.
To gain access to this information, the script must create a list of all virtual machines on the MSVS host. Such a list exists on the Microsoft Virtual Server Administration Web site. To access it, the script uses the Net.WebClient class to connect to the Microsoft Virtual Server Administration Web site remotely and download the HTML content from the Master Status Page.
NOTE
Because PowerShell can use the .NET Framework, it can access Web services as sources for external data or as applications. For example, you can use PowerShell to post and read blogs, check the availability of the Wii on bestbuy.com, or perform an automation task based on data or applications provided by your enterprise’s Web services. The possibilities are endless.
In the HTML content that is downloaded, the names of each virtual machine are embedded and repeated several times. To build the list, the script uses the regular expression type accelerator, [Regex], to strip each virtual machine name out of the HTML content and into $Servers variable. The resulting list in the $Servers variable then contains each virtual machine’s name, which is repeated several times. To shorten the list so that each virtual machine is listed only once, the script uses the Group-Object cmdlet. The final list, which contains the names of all virtual machines on the specified MSVS host, is then redefined in the $Servers variable.
Next, the script retrieves the virtual machines’ performance information from instances of the WMI VirtualMachine class by using the Get-WmiOjbect cmdlet. The next step is to merge the two resulting data sets: the virtual machine information ($VirtualMachines) and the list of virtual machines ($Servers). To do this, the script steps through each virtual machine object in the $Servers variable. If the virtual machine name is in both object collections, the Add-Member cmdlet is used to extend the virtual machine object in the $Servers variable so that it includes the performance information in the $VirtualMachines variable.
This object extension add an Online status indicator and related property information from $VirtualMachines. If the virtual machine is offline (not in both collections), the script extends the object to include an Offline status indicator. The concept of changing an object dynamically was introduced in Chapter 3, “Advanced PowerShell Concepts,” but this example illustrates the power of this feature used in an automation script. The following example shows the code for this process:
![]()
![]()
The last step is writing information in the $Servers variable to the PowerShell console with the Format-Table cmdlet. This cmdlet can add calculated properties; in this case, it’s used to change the labels of properties coming from $Servers. The format operator (-f) controls the formatting of these properties, as show in the next code snippet:
![]()
![]()
NOTE
For more information on the -f operator, refer to the Format method of the System.String class at http://msdn2.microsoft.com/en-us/library/system.string.format.aspx.
In this chapter, you gained a better understanding for WMI and how it is used in WSH and PowerShell. Additionally, you also saw how PowerShell attempts to make employing WMI easier when compared to WSH. This ease of use can be seen while either using the Get-WMIObject cmdlet, and the noted WMI type accelerators, which both reduce the amount of code needed to complete a WMI-based task. Less code is a wonderful thing considering that WMI is a useful and still relevant interface for completing automation tasks. After all, before PowerShell Remoting was introduced in PowerShell 2.0, WMI was the only interface for completing managing remote systems.
Continuing with the precedent set in PowerShell 1.0, to make WMI easy to use, you also learned that the PowerShell product team introduced several new features. Although the authentication and impersonation additions were aimed at correcting problems, the three new cmdlets (Set-WMIInstance, Invoke-WMIMethod, and Remove-WMIObject) were geared toward further improving the experience administrators had accessing and using WMI directly from the PowerShell command line.