
![]()
Authorizing Your Users
Security can be extremely important in a business application. Fortunately, LightSwitch allows you to carry out access control in a granular fashion. Using LightSwitch, you can restrict access to screens, screen commands, entities, and queries.
In this chapter, you’ll learn how to
- Define permissions and roles
- Set up an administrator, and allocate users to roles
- Restrict access to resources based on role membership
This chapter extends the HelpDesk application by including access-control rules. You’ll find out how to apply entity (table) level permissions to prevent engineers from updating, inserting, or deleting engineer records. You’ll also find out how to prevent engineers from updating an issue’s problem-description field, but still allow the other fields in the table to be updatable.
You’ll learn how to prevent an engineer from opening screens that are used by managers and to how to disable the autocomplete box on the issue screen that controls who the issue is assigned to. Finally, you’ll find out how to stop all users (regardless of role membership) from using the system between midnight and 3 a.m. You’ll also learn how to open different screens at startup depending on role membership.
The way to secure a LightSwitch application is to create permissions at design time. Permissions define what your users can do. Permissions are defined in your application’s metadata in the same way that screens and entities are defined by your application. Therefore, LightSwitch stores your permission definitions in your application’s LSML file.
At run time, the system administrator creates roles and assigns permissions to those roles. Roles allow you to group together permissions, and you can assign the same permission to multiple roles. At runtime, the system administrator creates users and assigns the roles to users. Each user can belong to one or more roles. Figure 17-1 illustrates this relationship.
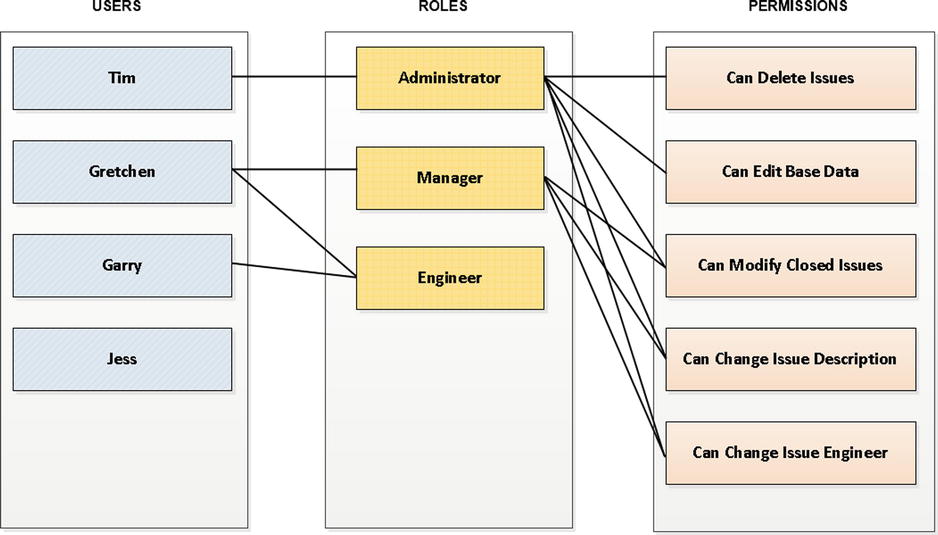
Figure 17-1. Permissions get assigned to roles, and roles get assigned to users
To restrict access to screens and data, you write code that checks whether the logged-in user belongs in a role that has been assigned the required permission.
Unlike permissions, roles and users are defined outside of your application. Therefore, a user of the application with appropriate permissions can create users and roles, but cannot define permissions. Figure 17-2 illustrates where permissions, roles, and users are defined.
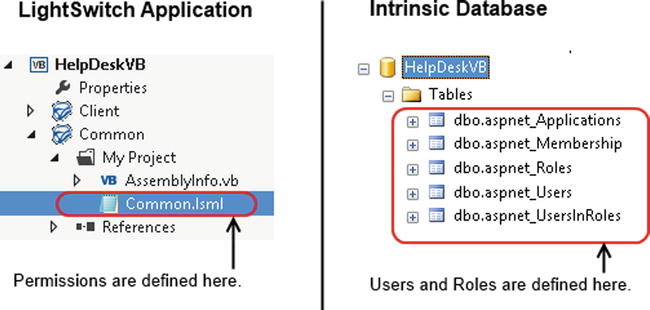
Figure 17-2. This is where permissions, roles, and users are defined
Defining Permissions
Permissions are defined through the permissions grid in the Access Control tab of your project’s properties.
Figure 17-3 shows the permissions that exist in the HelpDesk application and demonstrates the types of permissions that you could create.
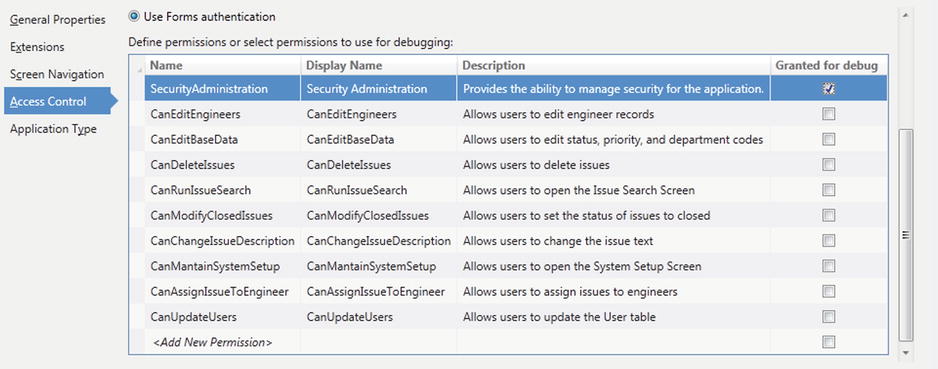
Figure 17-3. Adding permissions in the Access Control tab
In this application, only managers can add, edit, or update engineers. Therefore, the application defines a permission called CanEditEngineers that helps to enforce this rule. Also, only managers can edit application data such as priority and status codes. This will be controlled by a permission called CanEditBaseData.
![]() Note Either Windows Authentication or Forms Authentication must be selected. Otherwise, the Define Permissions grid will be disabled.
Note Either Windows Authentication or Forms Authentication must be selected. Otherwise, the Define Permissions grid will be disabled.
Setting Up Administrators Who Can Manage Users
Every LightSwitch application has a built-in permission called SecurityAdministration. Users who belong in roles that have been assigned this permission can add, edit, and maintain users and roles.
By default, LightSwitch also creates a role called Administrator that includes the built-in SecurityAdministration permission. So to create an administrator who can manage and create other users, you should create a user and add that user to the Administrator role.
Administrators maintain users and roles by using screens that are shown in a navigation menu group called Administration (although you can change the name of this navigation group if you prefer, just as with any other navigation group).
Debugging Permissions
When you debug a LightSwitch application, you won’t be prompted to log in, even if you’ve enabled authentication. So to test that your application works as expected, you can assign yourself permissions at debug time by checking the Granted For Debug check box, which appears next to each permission row (as shown in Figure 17-3).
If you tick this check box, you’ll be granted the permission while you’re debugging. With this option selected, you can test any code that you’ve written that uses the permission.
![]() Note If you enable the SecurityAdministration permission for use during debugging, you’ll be able to add, view, and edit roles and users. However, any roles or users that you add while debugging won’t be deployed with your application, and they have absolutely no effect on your debugging session permissions.
Note If you enable the SecurityAdministration permission for use during debugging, you’ll be able to add, view, and edit roles and users. However, any roles or users that you add while debugging won’t be deployed with your application, and they have absolutely no effect on your debugging session permissions.
Applying Table-Level Access Control
Applying access control at the Entity Set (or Table) allows you to control whether a user can add, view, edit, or delete records from a table. The access-control logic that you define on entity sets are applied by all screens that consume the data. This means that you can apply your access-control rules in one place, without the need to modify and carry out checks on every screen that consumes the data.
To create access-control code, open your table in the table designer and click on the Write Code button. Here, you’ll find a number of access-control methods, as shown in Figure 17-4. When you select a method, LightSwitch opens the code editor and creates a code stub in your data service class (that is: ServerUserCodeApplicationDataService.vb, or the equivalent data service file).
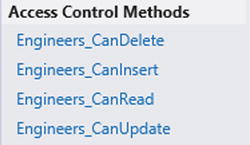
Figure 17-4. Entity set access-control methods
LightSwitch executes the access-control logic on the server. An advantage of this is that if a user attempts to read or update data outside of a screen (via the OData end point, for example), LightSwitch still enforces your access-control rules.
To prevent the current user from a performing an action, set the result of the relevant access-control method to false. For example, to prevent the current user from deleting engineers, set the return value of the Engineers_CanDelete method to false. The rest of this section shows you exactly how to prevent users from editing, reading, and saving data.
![]() Tip You can refer to the Save Pipeline flowchart (in Chapter 4, Figure 4-10) to remind yourself how the _Can methods fit into the server-side save process.
Tip You can refer to the Save Pipeline flowchart (in Chapter 4, Figure 4-10) to remind yourself how the _Can methods fit into the server-side save process.
Restricting users from editing data
In the HelpDesk application, only users who belong in roles that have been granted the CanEditEngineers permission can add, update, and delete engineer records. All other users can view engineers, but not edit any of their details.
To apply this rule, you’ll need to create code in the Engineer_CanDelete, Engineer_CanInsert, and Engineer_CanUpdate methods. Open the Engineer table in the table designer, click on the Write Code button, and create code in the three _Can methods that have been outlined. Amend your code as shown in Listing 17-1.
Listing 17-1. Setting Access-Control Permissions
VB:
File:HelpDeskVBServerUserCodeApplicationDataService.vb

Private Sub Engineers_CanDelete(ByRef result As Boolean)
    result = Application.User.HasPermission(
       Permissions.CanEditEngineers)
End Sub

Private Sub Engineers_CanInsert(ByRef result As Boolean)
    result = Application.User.HasPermission(
        Permissions.CanEditEngineers)
End Sub

Private Sub Engineers_CanUpdate(ByRef result As Boolean)
    result = Application.User.HasPermission(
        Permissions.CanEditEngineers)
End Sub

C#:
File:HelpDeskCSServerUserCodeApplicationDataService.cs

private void Engineers_CanDelete(ref bool result)
{
    result = Application.User.HasPermission(
        Permissions.CanEditEngineers);
}

private void Engineers_CanInsert(ref bool result)
{
    result = Application.User.HasPermission(
        Permissions.CanEditEngineers);
}

private void Engineers_CanUpdate(ref bool result)
{
    result = Application.User.HasPermission(
        Permissions.CanEditEngineers);
}
LightSwitch exposes a Permissions class that allows you to refer to each permission that you’ve defined in your application. With this class, you can refer to the CanEditEngineers permission by using the syntax Permissions.CanEditEngineers.
The HasPermission method accepts a permission and returns a Boolean result that indicates whether the logged-in user is assigned to a role that contains the permission that you’ve supplied. The code uses the return value to set the result of the _CanDelete, _CanInsert, and _CanUpdate methods.
If you’ve created access-control code that prevents a user from deleting, inserting, or updating records, LightSwitch automatically disables any built-in buttons (in data grids, for example) that carry out these functions. But if you’ve created your own screen command (for example, a button or link) to perform a data operation that’s disallowed, LightSwitch won’t automatically disable it. You’ll need to write code in the screen command’s _CanExecute method to perform this task.
An important point when you’re writing authentication code is that you should not perform access-control checks based on role membership. Because roles are defined by the administrator at runtime, you can’t guarantee that the role will exist. Therefore, always check against permissions, and leave the task of managing roles and role permissions to the application’s administrative user.
![]() Note It might seem strange that the access-control methods set the result through the method’s parameter rather than returning a Boolean result. This behavior is consistent with how LightSwitch exposes other entry points that return values. The primary reason is because LightSwitch often uses partial methods and partial methods can’t return values.
Note It might seem strange that the access-control methods set the result through the method’s parameter rather than returning a Boolean result. This behavior is consistent with how LightSwitch exposes other entry points that return values. The primary reason is because LightSwitch often uses partial methods and partial methods can’t return values.
Restricting Users from Reading Data
You can prevent users from reading data by setting the result of the entity set’s CanRead method to false. LightSwitch executes this method before it reads any data.
If a user tries to load a search or editable grid screen that uses a table where the CanRead method returns false, the data grid will display nothing except a red X. This behavior isn’t user friendly, so it’s good practice to also apply access-control checks at the screen level.
Using the CanRead method is very valuable, particularly if your table contains sensitive data. If you deny access to a table by using the CanRead method, those records are also hidden in the server pipelines. This means that your data cannot be exposed in any way (for example, via the OData end point).
If your server-side business logic requires access to data that the current user doesn’t have, you can override the restrictions by granting the necessary permissions in code. You would use the method Application.Current.User.AddPermissions.
![]() Note Unfortunately, you can call AddPermissions only from code in the save pipeline. If you try calling this method from any of the methods in the query pipeline (for example, PreProcessQuery), you’ll receive an exception. This behavior prevents you from denying all users read access to a table and to allow access only through queries. (queries would include permission-elevation logic that depend on the identity of the logged-on user.)
Note Unfortunately, you can call AddPermissions only from code in the save pipeline. If you try calling this method from any of the methods in the query pipeline (for example, PreProcessQuery), you’ll receive an exception. This behavior prevents you from denying all users read access to a table and to allow access only through queries. (queries would include permission-elevation logic that depend on the identity of the logged-on user.)
Restricting Users from Saving All Data
You can stop users from saving data by setting the return value of the SaveChanges_CanExecute method to false.
LightSwitch executes this method on the server after a user attempts to save data. Unlike the earlier access-control methods, this method extends to all tables in the data source. If SaveChanges_CanExecute returns false, the user won’t be able to save any data in any table at all.
The logic that you write in all the access-control methods that you’ve seen so far (for example, _CanRead or _CanUpdate) is not just restricted to permission checks. You can also deny access based on other business reasons. As an example, the code in Listing 17-2 shows how you can use this method to prevent users from updating the data in your application between the hours of midnight and 3 a.m.
Listing 17-2. Preventing Users from Saving Data
VB:
File:HelpDeskVBServerUserCodeApplicationDataService.vb

Private Sub SaveChanges_CanExecute(ByRef result As Boolean)
    'System is down for daily maintenance from midnight to 3am
    If Now.TimeOfDay.Hours >= 0 AndAlso
        Now.TimeOfDay.Hours <= 3 Then
        result = False
    Else
        result = True
    End If
End Sub

C#:
File:HelpDeskCSServerUserCodeApplicationDataService.cs

partial void SaveChanges_CanExecute(ref bool result)
{
    //System is down for daily maintenance from midnight to 3am
    if (DateTime.Now.TimeOfDay.Hours >= 0 &&
       DateTime.Now.TimeOfDay.Hours <= 3)
    {
        result = false;
    }
    else
    {
        result = true;
    }
}
Restricting Users from Editing a Property
In addition to implementing table-level access control, you can prevent users from editing a property by setting the result of the property’s _IsReadOnly method to false (as shown in Figure 17-5).
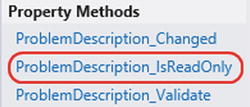
Figure 17-5. IsReadOnly method
As an example, the HelpDesk system allows all users to view issues. But only users who belong in roles that have been granted the CanChangeIssueDescription permission can modify the problem description. If a user hasn’t been granted this permission, the problem-description property should always be read only. Listing 17-3 shows the code that performs this access-control check.
Listing 17-3. Setting a Property’s IsReadOnly Method
VB:
File:HelpDeskVBCommonUserCodeIssue.vb

Private Sub ProblemDescription_IsReadOnly(ByRef result As Boolean)
    If Id = 0 Then
        result = False
    Else
        result =
           (Not Current.User.HasPermission(
            Permissions.CanChangeIssueDescription))
    End If
End Sub

C#:
File:HelpDeskCSCommonUserCodeIssue.cs

partial void ProblemDescription_IsReadOnly(ref bool result)
{
    if (Id == 0)
    {
        result = false;
    }
    else
    {
        result =
            !Application.User.HasPermission(
               Permissions.CanChangeIssueDescription);
    }
}
This code checks whether the user is adding a new issue by testing for an Id value of 0 ![]() . If the user is adding a new record, the code returns false to allow the user to create the problem description. Otherwise, it returns a result based on whether the logged-on user has the CanChangeIssueDescription permission
. If the user is adding a new record, the code returns false to allow the user to create the problem description. Otherwise, it returns a result based on whether the logged-on user has the CanChangeIssueDescription permission ![]() .
.
![]() Note The IsReadOnly method is run on the tier where the method’s result is being checked.
Note The IsReadOnly method is run on the tier where the method’s result is being checked.
Applying Screen-Level Access Control
By applying screen-level access control, you can create rules to prevent certain users from opening screens. If you've granted a user access to a screen, you can control the buttons and commands that the user can execute.
However, your access-control logic can be based on any condition, not just conditions that are permissions related. For example, you can disable the Logout button you created in Chapter 16 if your application isn’t using Forms authentication and running in a browser.
Restricting Users from Opening Screens
To control access to a screen, open your screen in the designer, click on the Write Code button, and select the screen’s _CanRun method. This generates a method stub in LightSwitch’s client Application class. To prevent users from opening a screen, set the result of the _CanRun method to false.
The HelpDesk application allows only users who belong in roles that have been assigned the CanEditEngineers permission to open the engineer management screen (from Chapter 9).
To apply this rule, open the screen in the designer and use the Write Code button to add the code shown in Listing 17-4.
Listing 17-4. Setting a Screen’s CanRun Method
VB:
File:HelpDeskVBClientUserCodeApplication.vb

Private Sub EngineersManagerGrid_CanRun(ByRef result As Boolean)
    result =
        Application.Current.User.HasPermission(
            Permissions.CanEditEngineers)
End Sub

C#:
File:HelpDeskCSClientUserCodeApplication.cs

partial void EngineersManagerGrid_CanRun(ref bool result)
{
    result =
        Application.Current.User.HasPermission(
            Permissions.CanEditEngineers);
}
If a user attempts to open a screen (for example, from a user-defined method) where the result of the _CanRun method returns false, the screen will not open.
To help keep things tidy, LightSwitch automatically filters the screens that are shown in the navigation menu. If a user doesn’t have rights to open a screen, LightSwitch hides the screen in the navigation menu.
EXERCISE 17.1 – AUTHORIZING USERS
Re-create the preceding example that prevents users without the CanEditEngineers permission from opening the Engineer Management screen. Test your code by enabling the CanEditEngineers permission’s Granted For Debug check box in your application property’s Access Control tab. When you run your application, you’ll be able to open the Engineer Management screen. Now uncheck the check box and rerun your application. Notice that LightSwitch hides the option to open your screen in the navigation panel.
Restricting Users from Clicking Links/Buttons
Screen buttons and links are bound to screen commands that are shown in the Screen Member list of the screen designer. To prevent a user from executing a command, set the result of the command’s _CanExecute method to false. You can open the code editor by clicking the link that you’ll find in the command’s Properties sheet (shown in Figure 17-6).
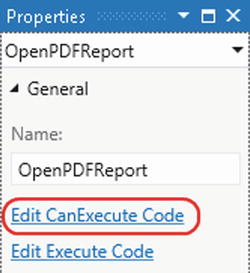
Figure 17-6. Securing screen commands
If a user doesn’t have sufficient permissions to execute a command, LightSwitch automatically hides any buttons or links that are bound to that command.
In this example, the add/edit issue detail screen (from Chapter 14) includes a link that opens a PDF report. This link should be visible only if the user belongs in a role that’s been assigned the CanViewReport permission. Listing 17-5 shows the code that carries out this rule.
Listing 17-5. Editing a Command’s CanExecute Method
VB:
File:HelpDeskVBClientUserCodeAddEditIssue.vb

Private Sub OpenPDFReport_CanExecute(
   ByRef result As Boolean)
    result = Application.User.HasPermission(Permissions.CanViewReport)
End Sub


C#:
File:HelpDeskCSClientUserCodeAddEditIssue.cs

partial void OpenPDFReport_CanExecute(ref bool result)
{
    result = Application.User.HasPermission(Permissions.CanViewReport);
}
![]() Tip Remember that although we’ve used the CanRun method to enforce permissions, you can use this method to guard screen commands based on other conditions. Let’s suppose you’ve created a method that generates Microsoft Word documents by using COM automation. If your application runs as a browser application (rather than a desktop application), you can hide the button that carries out the Word automation by writing code in the CanRun method that checks AutomationFactory.IsAvailable.
Tip Remember that although we’ve used the CanRun method to enforce permissions, you can use this method to guard screen commands based on other conditions. Let’s suppose you’ve created a method that generates Microsoft Word documents by using COM automation. If your application runs as a browser application (rather than a desktop application), you can hide the button that carries out the Word automation by writing code in the CanRun method that checks AutomationFactory.IsAvailable.
Applying Query-Level Permissions
There’s only one method that’s related to query-level access control: the CanExecute method. (See Figure 17-7.) The query pipeline calls this method prior to actually executing the query, and allows you to check the current user’s permissions. Just like entity set validation, LightSwitch will always execute the code in the query’s CanExecute method, even if a user calls the query from outside of a screen.

Figure 17-7. A query’s CanExecute method
Earlier in the book, you saw a query that allows managers to find the issues with the highest feedback ratings. To allow only the users with the CanViewReport permission to execute this query, add the code shown in Listing 17-6 to the query’s CanExecute method.
Listing 17-6. Editing a Query’s CanExecute Method
VB:
File:HelpDeskVBServerUserCodeApplicationDataService.vb

Private Sub IssuesWithHighestFeedback_CanExecute(ByRef result As Boolean)
    result =
        Application.User.HasPermission(Permissions.CanViewReport)
End Sub

C#:
File:HelpDeskCSServerUserCodeApplicationDataService.cs

partial void IssuesWithHighestFeedback_CanExecute(ref bool result)
{
    result =
        Application.User.HasPermission(Permissions.CanViewReport);
}
Specifying the Application Administrator
When you publish an application for the first time (which is discussed in Chapter 18), you need to specify the details of a user who will be the administrator of the program. The administrator needs to run the application before anyone else does, because the administrator needs to add roles, decide which permissions need to be added to those roles, and decide which roles are assigned to which users.
![]() Note If you've chosen Forms authentication as your authentication method, the first user who logs on needs to use the user name and password that you entered into the publishing wizard when you published the application.
Note If you've chosen Forms authentication as your authentication method, the first user who logs on needs to use the user name and password that you entered into the publishing wizard when you published the application.
Creating and Managing Roles
To create and manage roles, log in to your application with an account that belongs in a role that’s been granted the SecurityAdministration permission.
By default, you’ll find a link to the Roles screen (see Figure 17-8) in the Administration section of the navigation menu. This screen allows you to create roles and assign permissions to those roles. You can also use it to assign users to roles.
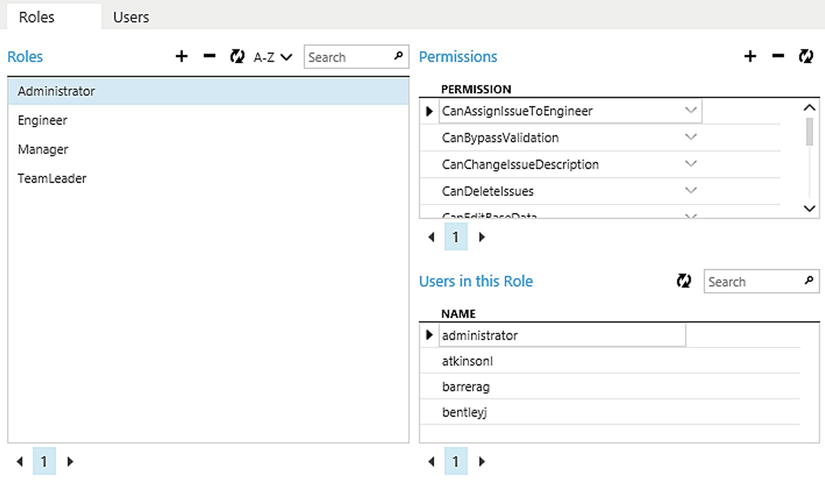
Figure 17-8. Roles screen
Custom Authorization Examples
Now that you understand how authorization works, this section demonstrates some practical examples of security and access control.
Associating Logins with Your Data
The HelpDesk application stores engineer details in a user-defined table that we’ve created ourselves. When a user logs in to a LightSwitch application using either Windows or Forms authentication, it’s simple enough to write code that determines the login name of the authenticated user.
But to allow login names to be associated with engineer records, you’ll need to create a field in your engineer table that stores the engineer’s login name.
If you know the engineer who is logged in, you can tailor your application to better suit the needs of your user. For example, you can set default values or open screens at startup depending on the data that you’ve stored in the Engineer table.
To allow administrators to assign login names to engineers, you’ll need to create a control that shows a list of available login names. Use the following steps to create a ComboBox picker that shows a list of login names:
- Open the Engineer table in the designer, and add a string property called LoginName.
- Open your engineer details screen.
- Use the Add Data button to add a new string property called LoginNameProperty. Uncheck the Is Required check box.
- Create a Rows Layout control, and name it LoginNameGroup. Set the Label Position value of this group to Collapsed.
- Within LoginNameGroup, add the engineer’s LoginName property and change the control type to a Label. Next, add a modal window and name it LoginPicker. Set the display name of your modal window to ‘...’ .
- Drag LoginNameProperty into your LoginNameGroup modal window, and change the control type to a custom control. Set the custom control type to a System.Windows.Controls.ComboBox.
- Add two buttons to your LoginNameGroup modal window, and name them CloseModalWindow and OkModalWindow.
- Add the code shown in Listing 17-7.
Listing 17-7. Adding a Username ComboBox
VB:
File: HelpDeskVBClientUserCodeEngineerDetail.vb

Imports System.Windows.Controls

Private cbo As ComboBox

Private Sub EngineerDetail_InitializeDataWorkspace(
   saveChangesTo As List(Of Microsoft.LightSwitch.IDataService))

   'Set assigned login details
   Dim items = DataWorkspace.SecurityData.UserRegistrations.Cast(
      Of Microsoft.LightSwitch.Security.UserRegistration)().ToList

   AddHandler FindControl("LoginNameProperty").ControlAvailable,
      Sub(sender As Object, e As ControlAvailableEventArgs)
         cbo = CType(e.Control, ComboBox)

         Microsoft.LightSwitch.Threading.Dispatchers.Main.BeginInvoke(
            Sub()
               cbo.ItemsSource = items
               cbo.DisplayMemberPath = "FullName"
            End Sub)
      End Sub

End Sub

Private Sub OkModalWindow_Execute()
   Microsoft.LightSwitch.Threading.Dispatchers.Main.BeginInvoke(
      Sub()
         Engineer.LoginName = cbo.SelectedItem.ToString
      End Sub)
End Sub

Private Sub CloseModalWindow_Execute()
   Me.CloseModalWindow("LoginPicker")
End Sub

C#:
File: HelpDeskCSClientUserCodeEngineerDetail.cs

using System.Windows.Controls;

private ComboBox cbo;

partial void EngineerDetail_InitializeDataWorkspace(
   List<IDataService> saveChangesTo)
{
    var items =
       DataWorkspace.SecurityData.UserRegistrations.Cast<
          Microsoft.LightSwitch.Security.UserRegistration>().ToList();

    this.FindControl("LoginNameProperty").ControlAvailable +=
       (object sender, ControlAvailableEventArgs e) =>
         {

             ComboBox cbo = (ComboBox)e.Control;
             Microsoft.LightSwitch.Threading.Dispatchers.Main.BeginInvoke(() =>
                {
                   cbo.ItemsSource = items;
                   cbo.DisplayMemberPath = "FullName";
                }
             );
          };
}

partial void OkModalWindow_Execute()
{
    Microsoft.LightSwitch.Threading.Dispatchers.Main.BeginInvoke(()=>
       {Engineer.LoginName = cbo.SelectedItem.ToString();});
}

partial void CloseModalWindow_Execute()
{
   this.CloseModalWindow("LoginPicker");
}
Figure 17-9 shows how your screen now looks.
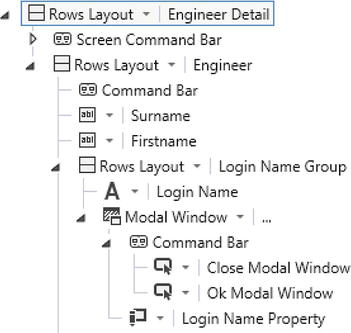
Figure 17-9. Login name picker screen
The code shown in Listing 17-7 produces a list of logins by querying LightSwitch’s DataWorkspace.SecurityData data source ![]() . It then sets the data source of the ComboBox control to this list
. It then sets the data source of the ComboBox control to this list ![]() . (If you need some help with this code, you can refer to the “Handling Silverlight Control Events” section in Chapter 7.)
. (If you need some help with this code, you can refer to the “Handling Silverlight Control Events” section in Chapter 7.)
At runtime, the user can open the modal window by clicking on the button that appears next to the login name. The modal window contains the ComboBox that allows the user to choose a login. When the user clicks on the OK button, the code assigns the login that’s selected in the ComboBox to the engineer’s LoginName property ![]() . The Close button calls code that closes the modal window without setting the LoginName property
. The Close button calls code that closes the modal window without setting the LoginName property ![]() . Figure 17-10 shows how your screen looks at runtime.
. Figure 17-10 shows how your screen looks at runtime.
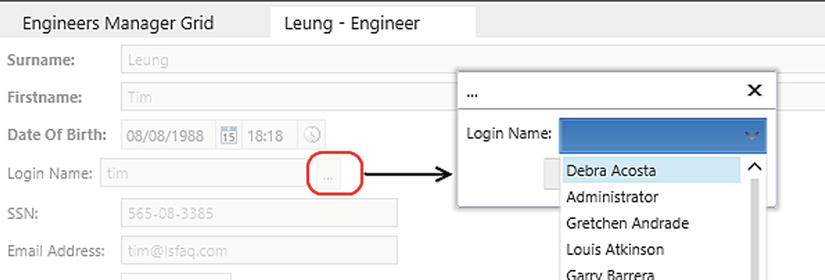
Figure 17-10. Opening the modal window with a login name drop-down list
Opening Screens Conditionally at Login
Now that you know how to determine the logged-in engineer, you can use this to customize the startup routine of your application.
When an engineer logs in to the HelpDesk application, the application opens the Engineer Dashboard page. If the engineer belongs in a role that has been assigned the CanViewAllIssues permission, the Manager Dashboard page opens instead. To create this example, carry out the following steps:
- Create a new screen by using the New Data Screen template, and call it StartUp. Leave the Screen Data drop-down list blank.
- Click the Write Code button, select the Startup_CanRun method, and add the code shown in Listing 17-8.
Listing 17-8. Opening Screens Conditionally
VB:
File:HelpDeskVBClientUserCodeApplication.vb
Private Sub Startup_CanRun(ByRef result As Boolean)

   If Application.Current.User.HasPermission(Permissions.CanViewAllIssues) Then
      Me.ShowEngineersManagerGrid()
   Else
      Using dw As DataWorkspace = Me.CreateDataWorkspace
         Dim currentEng As Engineer =
            dw.ApplicationData.Engineers.Where(
               Function(eng) eng.LoginName =
                  Application.Current.User.Name).FirstOrDefault()
         If currentEng IsNot Nothing Then
            Me.ShowEngineerDashboard(currentEng.Id)
         End If
      End Using
   End If

   result = False
End Sub

C#:
File:HelpDeskCSClientUserCodeApplication.cs

partial void Startup_CanRun(ref bool result)
{
    if (Application.Current.User.HasPermission(Permissions.CanViewAllIssues))
    {
        this.ShowEngineersManagerGrid();
    }
    else
    {
        using (DataWorkspace dw = this.CreateDataWorkspace())

        {
            Engineer currentEng =
                dw.ApplicationData.Engineers.Where(
                    eng => eng.LoginName ==
                        Application.Current.User.Name).FirstOrDefault();

            if (currentEng != null)
            {
                this.ShowEngineerDashboard(currentEng.Id);
            }
            result = false;
        }
    }
} - Open the properties of your application, and use the option in the Screen Navigation tab to set your startup screen to StartUp.
Notice how this code uses the screen’s CanRun method ![]() rather than the IntializeDataWorkspace or Activated method of the screen. If you used one of these screen methods, the user would see the startup screen appear, prior to the desired screen appearing.
rather than the IntializeDataWorkspace or Activated method of the screen. If you used one of these screen methods, the user would see the startup screen appear, prior to the desired screen appearing.
If the user has the CanViewAllIssues permission ![]() , the code opens the manager screen. If not, it looks up the engineer ID that relates to the logged-in user
, the code opens the manager screen. If not, it looks up the engineer ID that relates to the logged-in user ![]() . Because the code runs outside the context of a screen object, it needs to create a data workspace to perform this query. If it finds the engineer, it opens the Engineer Dashboard screen for the engineer
. Because the code runs outside the context of a screen object, it needs to create a data workspace to perform this query. If it finds the engineer, it opens the Engineer Dashboard screen for the engineer ![]() . Finally, the code sets the return value of the CanRun method to false
. Finally, the code sets the return value of the CanRun method to false ![]() to cancel the opening of the Startup screen.
to cancel the opening of the Startup screen.
Restricting Row-Level Access to Data
Engineers should be able to view only the issues that have been assigned to them. The safest way to enforce this rule is to apply your access-control check on the default All query. Any query that returns issues ultimately calls the default All query. Therefore, LightSwitch executes any code that you add here every time you return issue records from the server.
To apply this example, open the issue table in the table designer. Click the Write Code button, and select the Issues_Filter option. Add the code shown in Listing 17-9.
Listing 17-9. Restricting Row-Level Access to Data
VB:
File:HelpDeskVBServerUserCodeApplicationDataService.vb

Private Sub Issues_Filter(
   ByRef filter As System.Linq.Expressions.Expression(
      Of System.Func(Of Issue, Boolean)))

    If Not Application.User.HasPermission(Permissions.CanViewAllIssues) Then
       Dim currentUser As String = Application.User.Name

       Dim currentEng As Engineer =
           DataWorkspace.ApplicationData.Engineers.Where(
               Function(eng) eng.LoginName = currentUser).FirstOrDefault

        If currentEng IsNot Nothing Then
            filter = Function(e) e.AssignedTo.Id = currentEng.Id
        End If
    End If

End Sub

C#:
File:HelpDeskCSServerUserCodeApplicationDataService.cs

partial void Issues_Filter(ref Expression<Func<Issue, bool>> filter)
{
    if (!Application.User.HasPermission(Permissions.CanViewAllIssues))
    {
        string currentUser = Application.User.Name;

        Engineer currentEng =
            DataWorkspace.ApplicationData.Engineers.Where(
                eng => eng.LoginName == currentUser).FirstOrDefault();

        if (currentEng != null)
        {
            filter = e => e.AssignedTo.Id == currentEng.Id;
        }
    }
}
The code shown here obtains the currently logged-in engineer ![]() and applies the filter
and applies the filter ![]() to the entity set that the query returns. If the code doesn’t find an engineer record for the currently logged-in user, it doesn’t apply a filter and allows the user to see all issues. You might choose to change this behavior and prevent the query from returning any records.
to the entity set that the query returns. If the code doesn’t find an engineer record for the currently logged-in user, it doesn’t apply a filter and allows the user to see all issues. You might choose to change this behavior and prevent the query from returning any records.
It’s important to note that if an engineer retrieves issues via a navigation property, the data-retrieval process bypasses the default All query. If an engineer is allowed to view other engineer records on a screen that shows related issues, the engineer will be able to view issues that should not be visible.
Another important point is that if an engineer updates a record that has been updated by someone else, the concurrency error window that appears could contain data that shouldn’t be seen by the engineer.
![]() Caution If you need to restrict the data that a user can see, make sure to test your application to make sure that data leakage doesn’t occur in the way that was described earlier.
Caution If you need to restrict the data that a user can see, make sure to test your application to make sure that data leakage doesn’t occur in the way that was described earlier.
Setting Screen Control Properties by Permission
By testing for permissions, you can conditionally hide screen controls depending on the logged-in user.
The issue search screen allows users to filter issues by using multiple criteria options, including the engineer that’s assigned to the issue. If an engineer performs a search, the engineer should not be able to search issues that have been assigned to a different engineer.
To set the engineer autocomplete box to the logged-in engineer and make the autocomplete box read-only, open the Issue Search All screen, click on the Write Code button and select the InitializeDataWorkspace method. Enter the code that’s shown in Listing 17-10.
Listing 17-10. Modifying Screen Controls by Permission
VB:
File:HelpDeskVBClientUserCodeIssueSearchAll.vb

Private Sub IssueSearchAll_InitializeDataWorkspace(
   saveChangesTo As List(Of Microsoft.LightSwitch.IDataService))

   If Not Application.User.HasPermission(Permissions.CanViewAllIssues) Then
      Dim currentEng As Engineer =
          DataWorkspace.ApplicationData.Engineers.Where(
             Function(eng) eng.LoginName = Application.User.Name).FirstOrDefault

      If currentEng IsNot Nothing Then
         EngineerSelectionProperty = currentEng
         Me.FindControl("EngineerSelectionProperty").IsEnabled = False
      End If
   End If

End Sub

C#:
File: HelpDeskCSClientUserCodeIssueSearchAll.cs

partial void IssueSearchAll_InitializeDataWorkspace(
   List<IDataService> saveChangesTo)
{
   if (!Application.User.HasPermission(Permissions.CanViewAllIssues))
   {
      Engineer currentEng =
         DataWorkspace.ApplicationData.Engineers.Where(
            eng => eng.LoginName == Application.User.Name
               ).FirstOrDefault();

       if (currentEng != null)
       {
          EngineerSelectionProperty = currentEng;
          this.FindControl("EngineerSelectionProperty").IsEnabled = false;
       }
   }
}
If the user doesn’t have the CanViewAllIssues permission, the code obtains the currently logged-in engineer ![]() . It then sets the value of the AutoCompleteBox by setting the value of the underlying property and disables the control by setting the IsEnabled property to false
. It then sets the value of the AutoCompleteBox by setting the value of the underlying property and disables the control by setting the IsEnabled property to false ![]() .
.
Allowing Users to Bypass Validation
To allow certain users to bypass custom validation, you can add conditional logic so that LightSwitch applies validation rules only according to the permissions of the logged-on user.
To save you from having to modify every validation rule that you’ve defined in a table, you can simplify the task by writing code in the _AllowSaveWithErrors method. If you want to enable users to save records, even though they contain validation errors, set the return value of this method to true.
In the HelpDesk system, users who have the Can Bypass Validation permission can save engineer records without adhering to the validation rules. To implement this rule, open the Engineer table, click the Write Code button, and select the Engineer_AllowSaveWithErrors method. Enter the code as shown in Listing 17-11.
Listing 17-11. Bypassing Validation
VB:
File: HelpDeskVBCommonUserCodeEngineer.vb

Private Sub Engineer_AllowSaveWithErrors(ByRef result As Boolean)
   result =
      Application.User.HasPermission(Permissions.CanBypassValidation)
End Sub

C#:
File: HelpDeskCSClientUserCodeEngineer.cs

partial void Engineer_AllowSaveWithErrors(ref bool result)
{
    result = Application.User.HasPermission(Permissions.CanBypassValidation);
}
Although this code allows the user to bypass any custom validation that you’ve written, LightSwitch still honors any validation rules that are enforced by your data layer (for example, SQL Server check constraints).
Summary
LightSwitch allows you to define access-control rules on screens, screen commands, entities, and queries. LightSwitch authorization uses permissions, roles, and users. Permissions are defined by the developer and are stored in your application’s LSML file.
Roles and users and are created at runtime and stored in your Intrinsic database. At runtime, an administrator allocates permissions to roles and allocates users to roles. Each user can belong to one or more roles.
Entities, queries, screens, and commands expose _Can methods that allow you to write code to define access-control rules. To deny a user access to a resource, you would set the return value of the _Can method to false. The LightSwitch API includes methods that allow you to determine whether the logged-in user has been allocated a specific permission.
You’ve seen some examples of how to apply authorization code to the HelpDesk application. You also saw how to add a ComboBox control that allows managers to associate logins with engineer records. The code you saw populates the ComboBox control by calling methods in LightSwitch’s DataWorkspace.SecurityData data source.
You can perform conditional logic when a user starts your application by writing code in your application startup screen’s CanRun method.
To secure all access to a table, you can apply rules in the default All query for your table by writing code in the Filter method. Every LightSwitch query uses the entity set’s All query as the underlying data source, and any rules that you apply in the Filter method will be applied to child queries. The code that you add to the Filter method doesn’t apply to navigation properties, so it’s important to exercise some caution when you use this method.
Finally, you can allow users to bypass all of a table’s validation rules by setting the result of the entity set’s AllowSaveWithErrors method to true. The example in this chapter shows you how to create and grant a permission that allows a user to override all validation rules.