
Nothing can have value without being an object of utility. | ||
| --Karl Marx | ||
Your public servants serve you right. | ||
| --Adlai E. Stevenson | ||
You’ll see something new. Two things. And I call them Thing One and Thing Two. | ||
| --Dr. Theodor Seuss Geisel | ||
In this chapter you’ll learn:
<objective>How to declare a class and use it to create an object.
</objective> <objective>How to implement a class’s behaviors as methods.
</objective> <objective>How to implement a class’s attributes as instance variables and properties.
</objective> <objective>How to call an object’s methods to make them perform their tasks.
</objective> <objective>What instance variables of a class and local variables of a method are.
</objective> <objective>How to use a constructor to initialize an object’s data.
</objective> </feature><feature> <supertitle>Outline</supertitle> </feature>In this chapter, we begin by explaining the concept of classes using a real-world example. Then we present five complete working applications to demonstrate how to create and use your own classes. The first four begin our case study on developing a grade book class that instructors can use to maintain student test scores. The last example introduces the type decimal and uses it to declare monetary amounts in the context of a bank account class that maintains a customer’s balance.
Let’s begin with a simple analogy to help you understand classes and their contents. Suppose you want to drive a car and make it go faster by pressing down on its accelerator pedal. What must happen before you can do this? Well, before you can drive a car, someone has to design it. A car typically begins as engineering drawings, similar to the blueprints used to design a house. These engineering drawings include the design for an accelerator pedal to make the car go faster. The pedal “hides” the complex mechanisms that actually make the car go faster, just as the brake pedal “hides” the mechanisms that slow the car and the steering wheel “hides” the mechanisms that turn the car. This enables people with little or no knowledge of how engines work to drive a car easily.
Unfortunately, you can’t drive the engineering drawings of a car. Before you can drive a car, it must be built from the engineering drawings that describe it. A completed car will have an actual accelerator pedal to make the car go faster, but even that’s not enough—the car will not accelerate on its own, so the driver must press the accelerator pedal.
Now let’s use our car example to introduce the key programming concepts of this section. Performing a task in an application requires a method. The method describes the mechanisms that actually perform its tasks. The method hides from its user the complex tasks that it performs, just as the accelerator pedal of a car hides from the driver the complex mechanisms of making the car go faster.
In C#, we begin by creating an application unit called a class to house (among other things) a method, just as a car’s engineering drawings house (among other things) the design of an accelerator pedal. In a class, you provide one or more methods that are designed to perform the class’s tasks. For example, a class that represents a bank account might contain one method to deposit money in an account, another to withdraw money from an account and a third to inquire what the current account balance is.
Just as you cannot drive an engineering drawing of a car, you cannot “drive” a class. Just as someone has to build a car from its engineering drawings before you can actually drive it, you must build an object of a class before you can make an application perform the tasks the class describes. That’s one reason C# is known as an object-oriented programming language.
When you drive a car, pressing its gas pedal sends a message to the car to perform a task—make the car go faster. Similarly, you send messages to an object—each message is known as a method call and tells a method of the object to perform its task.
Thus far, we’ve used the car analogy to introduce classes, objects and methods. In addition to a car’s capabilities, it also has many attributes, such as its color, the number of doors, the amount of gas in its tank, its current speed and its total miles driven (i.e., its odometer reading). Like the car’s capabilities, these attributes are represented as part of a car’s design in its engineering diagrams. As you drive a car, these attributes are always associated with the car. Every car maintains its own attributes. For example, each car knows how much gas is in its own gas tank, but not how much is in the tanks of other cars. Similarly, an object has attributes that are carried with the object as it’s used in an application. These attributes are specified as part of the object’s class. For example, a bank-account object has a balance attribute that represents the amount of money in the account. Each bank-account object knows the balance in the account it represents, but not the balances of the other accounts in the bank. Attributes are specified by the class’s instance variables.
Notice that these attributes are not necessarily accessible directly. The car manufacturer does not want drivers to take apart the car’s engine to observe the amount of gas in its tank. Instead, the driver can check the fuel gauge on the dashboard. The bank does not want its customers to walk into the vault to count the amount of money in an account. Instead, the customers talk to a bank teller or check personalized online bank accounts. Similarly, you do not need to have access to an object’s instance variables in order to use them. You can use the properties of an object. Properties contain get accessors for reading the values of variables, and set accessors for storing values into them.
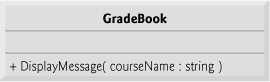
We begin with an example that consists of classes GradeBook (Fig. 4.1) and GradeBookTest (Fig. 4.2). Class GradeBook (declared in file GradeBook.cs) will be used to display a message on the screen (Fig. 4.2) welcoming the instructor to the grade-book application. Class GradeBookTest (declared in the file GradeBookTest.cs) is a testing class in which the Main method will create and use an object of class GradeBook. By convention, we declare classes GradeBook and GradeBookTest in separate files, such that each file’s name matches the name of the class it contains.
Example 4.1. Class declaration with one method.
 1   // Fig. 4.1: GradeBook.cs
 2   // Class declaration with one method.
 3   using System;
 4
 5   public class GradeBook
 6   {
 7      // display a welcome message to the GradeBook user
 8      public void DisplayMessage()
 9      {
10         Console.WriteLine( "Welcome to the Grade Book!" );
11      } // end method DisplayMessage
12   } // end class GradeBook
Example 4.2. Create a GradeBook object and call its DisplayMessage method.
 1   // Fig. 4.2: GradeBookTest.cs
 2   // Create a GradeBook object and call its DisplayMessage method.
 3   public class GradeBookTest
 4   {
 5      // Main method begins program execution
 6      public static void Main( string[] args )
 7      {
 8         // create a GradeBook object and assign it to myGradeBook
 9         GradeBook myGradeBook = new GradeBook();
10
11         // call myGradeBook's DisplayMessage method
12         myGradeBook.DisplayMessage();
13      } // end Main
14   } // end class GradeBookTest
To start, select File > New Project... to open the New Project dialog, then create a GradeBook Console Application. Rename the Program.cs file to GradeBook.cs. Delete all the code provided automatically by the IDE and replace it with the code in Fig. 4.1.
The GradeBook class declaration (Fig. 4.1) contains a DisplayMessage method (lines 8–11) that displays a message on the screen. Line 10 of the class displays the message. Recall that a class is like a blueprint—we need to make an object of this class and call its method to get line 10 to execute and display its message—we do this in Fig. 4.2.
The class declaration begins in line 5. The keyword public is an access modifier. Access modifiers determine the accessibility of an object’s properties and methods to other methods in an application. For now, we simply declare every class public. Every class declaration contains keyword class followed by the class’s name. Every class’s body is enclosed in a pair of left and right braces ({ and }), as in lines 6 and 12 of class GradeBook.
In Chapter 3, each class we declared had one method named Main. Class GradeBook also has one method—DisplayMessage (lines 8–11). Recall that Main is a special method that’s always called automatically when you execute an application. Most methods do not get called automatically. As you’ll soon see, you must call method DisplayMessage to tell it to perform its task.
The method declaration begins with keyword public to indicate that the method is “available to the public”—that is, it can be called from outside the class declaration’s body by methods of other classes. Keyword void—known as the method’s return type—indicates that this method will not return (i.e., give back) any information to its calling method when it completes its task. When a method that specifies a return type other than void is called and completes its task, the method returns a result to its calling method. For example, when you go to an automated teller machine (ATM) and request your account balance, you expect the ATM to give you back a value that represents your balance. If you have a method Square that returns the square of its argument, you’d expect the statement
int result = Square( 2 ); |
to return 4 from method Square and assign 4 to variable result. If you have a method Maximum that returns the largest of three integer arguments, you’d expect the statement
to return the value 114 from method Maximum and assign the value to variable biggest. You’ve already used methods that return information—for example, in Chapter 3 you used Console method ReadLine to input a string typed by the user at the keyboard. When ReadLine inputs a value, it returns that value for use in the application.
The name of the method, DisplayMessage, follows the return type (line 8). Generally, methods are named as verbs or verb phrases while classes are named as nouns. By convention, method names begin with an uppercase first letter, and all subsequent words in the name begin with an uppercase letter. This naming convention is referred to as Pascal case. The parentheses after the method name indicate that this is a method. An empty set of parentheses, as shown in line 8, indicates that this method does not require additional information to perform its task. Line 8 is commonly referred to as the method header. Every method’s body is delimited by left and right braces, as in lines 9 and 11.
The body of a method contains statements that perform the method’s task. In this case, the method contains one statement (line 10) that displays the message "Welcome to the Grade Book!", followed by a newline in the console window. After this statement executes, the method has completed its task.
Next, we’d like to use class GradeBook in an application. As you learned in Chapter 3, method Main begins the execution of every application. Class GradeBook cannot begin an application because it does not contain Main. This was not a problem in Chapter 3, because every class you declared had a Main method. To fix this problem for the GradeBook, we must either declare a separate class that contains a Main method or place a Main method in class GradeBook. To help you prepare for the larger applications you’ll encounter later in this book and in industry, we use a separate class (GradeBookTest in this example) containing method Main to test each new class we create in this chapter.
For each example in this chapter, you’ll add a class to your console application. To do this, right click the project name in the Solution Explorer and select Add > New Item... from the pop-up menu. In the Add New Item dialog that appears, select Code File, enter the name of your new file (GradeBookTest.cs) then click the Add button. A new blank file will be added to your project. Add the code from Fig. 4.2 to this file.
The GradeBookTest class declaration (Fig. 4.2) contains the Main method that controls our application’s execution. Any class that contains a Main method (as shown in line 6) can be used to execute an application. This class declaration begins in line 3 and ends in line 14. The class contains only a Main method, which is typical of many classes that simply begin an application’s execution.
Lines 6–13 declare method Main. A key part of enabling the method Main to begin the application’s execution is the static keyword (line 6), which indicates that Main is a static method. A static method is special because it can be called without first creating an object of the class (in this case, GradeBookTest) in which the method is declared. We explain static methods in Chapter 7, Methods: A Deeper Look.
In this application, we’d like to call class GradeBook’s DisplayMessage method to display the welcome message in the console window. Typically, you cannot call a method that belongs to another class until you create an object of that class, as shown in line 9. We begin by declaring variable myGradeBook. The variable’s type is GradeBook—the class we declared in Fig. 4.1. Each new class you create becomes a new type in C# that can be used to declare variables and create objects. New class types will be accessible to all classes in the same project. You can declare new class types as needed; this is one reason why C# is known as an extensible language.
Variable myGradeBook (line 9) is initialized with the result of the object-creation expression new GradeBook(). The new operator creates a new object of the class specified to the right of the keyword (i.e., GradeBook). The parentheses to the right of the GradeBook are required. As you’ll learn in Section 4.10, those parentheses in combination with a class name represent a call to a constructor, which is similar to a method, but is used only at the time an object is created to initialize the object’s data. In that section you’ll see that data can be placed in parentheses to specify initial values for the object’s data. For now, we simply leave the parentheses empty.
We can now use myGradeBook to call its method DisplayMessage. Line 12 calls the method DisplayMessage (lines 8–11 of Fig. 4.1) using variable myGradeBook followed by a member access (.) operator, the method name DisplayMessage and an empty set of parentheses. This call causes the DisplayMessage method to perform its task. This method call differs from the method calls in Chapter 3 that displayed information in a console window—each of those method calls provided arguments that specified the data to display. At the beginning of line 12, “myGradeBook.” indicates that Main should use the GradeBook object that was created in line 9. The empty parentheses in line 8 of Fig. 4.1 indicate that method DisplayMessage does not require additional information to perform its task. For this reason, the method call (line 12 of Fig. 4.2) specifies an empty set of parentheses after the method name to indicate that no arguments are being passed to method DisplayMessage. When method DisplayMessage completes its task, method Main continues executing at line 13. This is the end of method Main, so the application terminates.
Figure 4.3 presents a UML class diagram for class GradeBook of Fig. 4.1. Recall from Section 1.15 that the UML is a graphical language used by programmers to represent their object-oriented systems in a standardized manner. In the UML, each class is modeled in a class diagram as a rectangle with three compartments. The top compartment contains the name of the class centered horizontally in boldface type. The middle compartment contains the class’s attributes, which correspond to instance variables and properties in C#. In Fig. 4.3, the middle compartment is empty because the version of class GradeBook in Fig. 4.1 does not have any attributes. The bottom compartment contains the class’s operations, which correspond to methods in C#. The UML models operations by listing the operation name followed by a set of parentheses. Class GradeBook has one method, DisplayMessage, so the bottom compartment of Fig. 4.3 lists one operation with this name. Method DisplayMessage does not require additional information to perform its tasks, so there are empty parentheses following DisplayMessage in the class diagram, just as they appeared in the method’s declaration in line 8 of Fig. 4.1. The plus sign (+) in front of the operation name indicates that DisplayMessage is a public operation in the UML (i.e., a public method in C#). The plus sign is sometimes called the public visibility symbol. We’ll often use UML class diagrams to summarize a class’s attributes and operations.

In our car analogy from Section 4.2, we discussed the fact that pressing a car’s gas pedal sends a message to the car to perform a task—make the car go faster. But how fast should the car accelerate? As you know, the farther down you press the pedal, the faster the car accelerates. So the message to the car actually includes both the task to be performed and additional information that helps the car perform the task. This additional information is known as a parameter—the value of the parameter helps the car determine how fast to accelerate. Similarly, a method can require one or more parameters that represent additional information it needs to perform its task. A method call supplies values—called arguments—for each of the method’s parameters. For example, the Console.WriteLine method requires an argument that specifies the data to be displayed in a console window. Similarly, to make a deposit into a bank account, a Deposit method specifies a parameter that represents the deposit amount. When the Deposit method is called, an argument value representing the deposit amount is assigned to the method’s parameter. The method then makes a deposit of that amount, by increasing the account’s balance.
Our next example declares class GradeBook (Fig. 4.4) with a DisplayMessage method that displays the course name as part of the welcome message. (See the sample execution in Fig. 4.5.) The new DisplayMessage method requires a parameter that represents the course name to output.
Example 4.4. Class declaration with a method that has a parameter.
 1   // Fig. 4.4: GradeBook.cs
 2   // Class declaration with a method that has a parameter.
 3   using System;
 4
 5   public class GradeBook
 6   {
 7      // display a welcome message to the GradeBook user
 8      public void DisplayMessage( string courseName )
 9      {
10         Console.WriteLine( "Welcome to the grade book for
{0}!",
11            courseName );
12      } // end method DisplayMessage
13   } // end class GradeBook
Example 4.5. Create GradeBook object and pass a string to its DisplayMessage method.
 1   // Fig. 4.5: GradeBookTest.cs
 2   // Create a GradeBook object and pass a string to
 3   // its DisplayMessage method.
 4   using System;
 5
 6   public class GradeBookTest
 7   {
 8      // Main method begins program execution
 9      public static void Main( string[] args )
10      {
11         // create a GradeBook object and assign it to myGradeBook
12         GradeBook myGradeBook = new GradeBook();
13
14         // prompt for and input course name
15         Console.WriteLine( "Please enter the course name:" );
16         string nameOfCourse = Console.ReadLine();  // read a line of text
17         Console.WriteLine();  // output a blank line
18
19         // call myGradeBook's DisplayMessage method
20         // and pass nameOfCourse as an argument
21         myGradeBook.DisplayMessage( nameOfCourse );
22      } // end Main
23   } // end class GradeBookTest
Before discussing the new features of class GradeBook, let’s see how the new class is used from the Main method of class GradeBookTest (Fig. 4.5). Line 12 creates an object of class GradeBook and assigns it to variable myGradeBook. Line 15 prompts the user to enter a course name. Line 16 reads the name from the user and assigns it to the variable nameOfCourse, using Console method ReadLine to perform the input. The user types the course name and presses Enter to submit the course name to the application. Pressing Enter inserts a newline character at the end of the characters typed by the user. Method ReadLine reads characters typed by the user until the newline character is encountered, then returns a string containing the characters up to, but not including, the newline. The newline character is discarded.
Line 21 calls myGradeBook’s DisplayMessage method. The variable nameOfCourse in parentheses is the argument that’s passed to method DisplayMessage so that the method can perform its task. Variable nameOfCourse’s value in Main becomes the value of method DisplayMessage’s parameter courseName in line 8 of Fig. 4.4. When you execute this application, notice that method DisplayMessage outputs as part of the welcome message the name you type (Fig. 4.5).
Software Engineering Observation 4.1

Normally, objects are created with new. One exception is a string literal that’s contained in quotes, such as "hello". String literals are references to string objects that are implicitly created by C#.
When you declare a method, you must specify in the method’s declaration whether the method requires data to perform its task. To do so, you place additional information in the method’s parameter list, which is located in the parentheses that follow the method name. The parameter list may contain any number of parameters, including none at all. Each parameter is declared as a variable with a type and identifier in the parameter list. Empty parentheses following the method name (as in Fig. 4.1, line 8) indicate that a method does not require any parameters. In Fig. 4.4, DisplayMessage’s parameter list (line 8) declares that the method requires one parameter. Each parameter must specify a type and an identifier. In this case, the type string and the identifier courseName indicate that method DisplayMessage requires a string to perform its task. At the time the method is called, the argument value in the call is assigned to the corresponding parameter (in this case, courseName) in the method header. Then, the method body uses the parameter courseName to access the value. Lines 10–11 of Fig. 4.4 display parameter courseName’s value, using the {0} format item in WriteLine’s first argument. The parameter variable’s name (Fig. 4.4, line 8) can be the same or different from the argument variable’s name (Fig. 4.5, line 21).
A method can specify multiple parameters by separating each parameter from the next with a comma. The number of arguments in a method call must match the number of required parameters in the parameter list of the called method’s declaration. Also, the types of the arguments in the method call must be consistent with the types of the corresponding parameters in the method’s declaration. (As you’ll learn in subsequent chapters, an argument’s type and its corresponding parameter’s type are not always required to be identical.) In our example, the method call passes one argument of type string (nameOfCourse is declared as a string in line 16 of Fig. 4.5), and the method declaration specifies one parameter of type string (line 8 in Fig. 4.4). So the type of the argument in the method call exactly matches the type of the parameter in the method header.
The UML class diagram of Fig. 4.6 models class GradeBook of Fig. 4.4. Like Fig. 4.4, this GradeBook class contains public operation DisplayMessage. However, this version of DisplayMessage has a parameter. The UML models a parameter a bit differently from C# by listing the parameter name, followed by a colon and the parameter type in the parentheses following the operation name. The UML has several data types that are similar to the C# types. For example, UML types String and Integer correspond to C# types string and int, respectively. Unfortunately, the UML does not provide types that correspond to every C# type. For this reason, and to avoid confusion between UML types and C# types, we use only C# types in our UML diagrams. Class Gradebook’s method DisplayMessage (Fig. 4.4) has a string parameter named courseName, so Fig. 4.6 lists the parameter courseName : string between the parentheses following DisplayMessage.
Notice the using directive in Fig. 4.5 (line 4). This indicates to the compiler that the application uses classes in the System namespace, like the Console class. Why do we need a using directive to use class Console, but not class GradeBook? There’s a special relationship between classes that are compiled in the same project, like classes GradeBook and GradeBookTest. By default, such classes are considered to be in the same namespace. A using directive is not required when one class in a namespace uses another in the same namespace—such as when class GradeBookTest uses class GradeBook. For simplicity, our examples in this chapter do not declare a namespace. Any classes that are not explicitly placed in a namespace are implicitly placed in the so-called global namespace.
Actually, the using directive in line 4 is not required if we always refer to class Console as System.Console, which includes the full namespace and class name. This is known as the class’s fully qualified class name. For example, line 15 could be written as
System.Console.WriteLine( "Please enter the course name:" ); |
Most C# programmers consider using fully qualified names to be cumbersome, and instead prefer to use using directives.
In Chapter 3, we declared all of an application’s variables in the application’s Main method. Variables declared in the body of a method are known as local variables and can be used only in that method. When a method terminates, the values of its local variables are lost. Recall from Section 4.2 that an object has attributes that are carried with it as it’s used in an application. Such attributes exist before a method is called on an object and after the method completes execution.
Attributes are represented as variables in a class declaration. Such variables are called fields and are declared inside a class declaration but outside the bodies of the class’s method declarations. When each object of a class maintains its own copy of an attribute, the field that represents the attribute is also known as an instance variable—each object (instance) of the class has a separate instance of the variable. In Chapter 10, we discuss another type of field called a static variable, where all objects of the same class share one variable.
A class normally contains one or more properties that manipulate the attributes that belong to a particular object of the class. The example in this section demonstrates a GradeBook class that contains a courseName instance variable to represent a particular GradeBook object’s course name, and a CourseName property to manipulate courseName.
In our next application (Figs. 4.7–4.8), class GradeBook (Fig. 4.7) maintains the course name as an instance variable so that it can be used or modified at any time during an application’s execution. The class also contains one method—DisplayMessage (lines 24–30)—and one property—CourseName (line 11–21). Recall from Chapter 2 that properties are used to manipulate an object’s attributes. For example, in that chapter, we used a Label’s Text property to specify the text to display on the Label. In this example, we use a property in code rather than in the Properties window of the IDE. To do this, we first declare a property as a member of the GradeBook class. As you’ll soon see, the GradeBook’s CourseName property can be used to store a course name in a GradeBook (in instance variable courseName) or retrieve the GradeBook’s course name (from instance variable courseName). Method DisplayMessage—which now specifies no parameters—still displays a welcome message that includes the course name. However, the method now uses the CourseName property to obtain the course name from instance variable courseName.
Example 4.7. GradeBook class that contains a private instance variable, courseName, and a public property to get and set its value.
 1   // Fig. 4.7: GradeBook.cs
 2   // GradeBook class that contains a private instance variable, courseName,
 3   // and a public property to get and set its value.
 4   using System;
 5
 6   public class GradeBook
 7   {
 8      private string courseName; // course name for this GradeBook
 9
10      // property to get and set the course name
11      public string CourseName
12      {
13         get
14         {
15            return courseName;
16         } // end get
17         set
18         {
19            courseName = value;
20         } // end set
21      } // end property CourseName
22
23      // display a welcome message to the GradeBook user
24      public void DisplayMessage()
25      {
26         // use property CourseName to get the
27         // name of the course that this GradeBook represents
28         Console.WriteLine( "Welcome to the grade book for
{0}!",
29            CourseName ); // display property CourseName
30      } // end method DisplayMessage
31   } // end class GradeBook
Example 4.8. Create and manipulate a GradeBook object.
 1   // Fig. 4.8: GradeBookTest.cs
 2   // Create and manipulate a GradeBook object.
 3   using System;
 4
 5   public class GradeBookTest
 6   {
 7      // Main method begins program execution
 8      public static void Main( string[] args )
 9      {
10         // create a GradeBook object and assign it to myGradeBook
11         GradeBook myGradeBook = new GradeBook();
12
13         // display initial value of CourseName
14         Console.WriteLine( "Initial course name is: '{0}'
",
15            myGradeBook.CourseName );
16
17         // prompt for and read course name
18         Console.WriteLine( "Please enter the course name:" );
19         myGradeBook.CourseName = Console.ReadLine(); // set CourseName
20         Console.WriteLine(); // output a blank line
21
22         // display welcome message after specifying course name
23         myGradeBook.DisplayMessage();
24      } // end Main
25   } // end class GradeBookTest
A typical instructor teaches more than one course, each with its own course name. Line 8 declares courseName as a variable of type string. Line 8 is a declaration for an instance variable, because the variable is declared in the class’s body (lines 7–31) but outside the bodies of the class’s method (lines 24–30) and property (lines 11–21). Every instance (i.e., object) of class GradeBook contains one copy of each instance variable. For example, if there are two GradeBook objects, each object has its own copy of courseName. All the methods and properties of class GradeBook can directly manipulate its instance variable courseName, but it’s considered good practice for methods of a class to use that class’s properties to manipulate instance variables (as we do in line 29 of method DisplayMessage). The software engineering reasons for this will soon become clear.
Most instance-variable declarations are preceded with the keyword private (as in line 8). Like public, keyword private is an access modifier. Variables, properties or methods declared with access modifier private are accessible only to properties and methods of the class in which they’re declared. Thus, variable courseName can be used only in property CourseName and method DisplayMessage of class GradeBook.
Software Engineering Observation 4.2
Precede every field and method declaration with an access modifier. Generally, instance variables should be declared private and methods and properties should be declared public. If the access modifier is omitted before a member of a class, the member is implicitly declared private. We’ll see that it’s appropriate to declare certain methods private, if they will be accessed only by other methods of the class.
Software Engineering Observation 4.3
Declaring the instance variables of a class as private and the methods of the class as public facilitates debugging, because problems with data manipulations are localized to the class’s methods and properties, since the private instance variables are accessible only to these methods and properties.
Declaring instance variables with access modifier private is known as information hiding. When an application creates (instantiates) an object of class GradeBook, variable courseName is encapsulated (hidden) in the object and can be accessed only by methods and properties of the object’s class.
How can we allow a program to manipulate a class’s private instance variables but ensure that they remain in a valid state? We need to provide controlled ways for programmers to “get” (i.e., retrieve) the value in an instance variable and “set” (i.e., modify) the value in an instance variable. Although you can define methods like GetCourseName and SetCourseName, C# properties provide a more elegant solution. Next, we show how to declare and use properties.
The GradeBook class’s CourseName property declaration is located in lines 11–21 of Fig. 4.7. The property begins in line 11 with an access modifier (in this case, public), followed by the type that the property represents (string) and the property’s name (CourseName). Properties use the same naming conventions as methods and classes.
Properties contain accessors that handle the details of returning and modifying data. A property declaration can contain a get accessor, a set accessor or both. The get accessor (lines 13–16) enables a client to read the value of private instance variable courseName; the set accessor (lines 17–20) enables a client to modify courseName.
After defining a property, you can use it like a variable in your code. For example, you can assign a value to a property using the = (assignment) operator. This executes the code in the property’s set accessor to set the value of the corresponding instance variable. Similarly, referencing the property to use its value (for example, to display it on the screen) executes the code in the property’s get accessor to obtain the corresponding instance variable’s value. We show how to use properties shortly. By convention, we name each property with the capitalized name of the instance variable that it manipulates (e.g., CourseName is the property that represents instance variable courseName)—C# is case sensitive, so these are distinct identifiers.
Let us look more closely at property CourseName’s get and set accessors (Fig. 4.7). The get accessor (lines 13–16) begins with the identifier get and its body is delimited by braces. The accessor’s body contains a return statement, which consists of the keyword return followed by an expression. The expression’s value is returned to the client code that uses the property. In this example, the value of courseName is returned when the property CourseName is referenced. For example, in the following statement
string theCourseName = gradeBook.CourseName; |
the expression gradeBook.CourseName (where gradeBook is an object of class GradeBook) executes property CourseName’s get accessor, which returns the value of instance variable courseName. That value is then stored in variable theCourseName. Property CourseName can be used as simply as if it were an instance variable. The property notation allows the client to think of the property as the underlying data. Again, the client cannot directly manipulate instance variable courseName because it’s private.
The set accessor (lines 17–20) begins with the identifier set and its body is delimited by braces. When the property CourseName appears in an assignment statement, as in
gradeBook.CourseName = "CS100 Introduction to Computers"; |
the text "CS100 Introduction to Computers" is assigned to the set accessor’s contextual keyword named value and the set accessor executes. Note that value is implicitly declared and initialized in the set accessor—it’s a compilation error to declare a local variable value in this body. Line 19 stores the contents of value in instance variable courseName. A set accessor does not return any data when it completes its task.
The statements inside the property in lines 15 and 19 (Fig. 4.7) each access courseName even though it was declared outside the property. We can use instance variable courseName in the methods and properties of class GradeBook, because courseName is an instance variable of the class.
Method DisplayMessage (lines 24–30 of Fig. 4.7) does not receive any parameters. Lines 28–29 output a welcome message that includes the value of instance variable courseName. We do not reference courseName directly. Instead, we access property CourseName (line 29), which executes the property’s get accessor, returning the value of courseName.
Class GradeBookTest (Fig. 4.8) creates a GradeBook object and demonstrates property CourseName. Line 11 creates a GradeBook object and assigns it to local variable myGradeBook. Lines 14–15 display the initial course name using the object’s CourseName property—this executes the property’s get accessor, which returns the value of courseName.
The first line of the output shows an empty name (marked by single quotes, ''). Unlike local variables, which are not automatically initialized, every field has a default initial value—a value provided by C# when you do not specify the initial value. Thus, fields are not required to be explicitly initialized before they’re used in an application—unless they must be initialized to values other than their default values. The default value for an instance variable of type string (like courseName) is null. When you display a string variable that contains the value null, no text is displayed on the screen.
Line 18 prompts the user to enter a course name. Line 19 assigns the course name entered by the user to object myGradeBook’s CourseName property. When a value is assigned to CourseName, the value specified (which is returned by ReadLine in this case) is assigned to implicit parameter value of CourseName’s set accessor (lines 17–20, Fig. 4.7). Then parameter value is assigned by the set accessor to instance variable courseName (line 19 of Fig. 4.7). Line 20 (Fig. 4.8) displays a blank line, then line 23 calls myGradeBook’s DisplayMessage method to display the welcome message containing the course name.
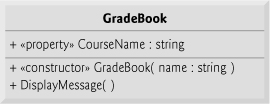
Figure 4.9 contains an updated UML class diagram for the version of class GradeBook in Fig. 4.7. We model properties in the UML as attributes—the property (in this case, CourseName) is listed as a public attribute—as indicated by the plus (+) sign—preceded by the word “property” in guillemets (« and »). Using descriptive words in guillemets (called stereotypes in the UML) helps distinguish properties from other attributes and operations. The UML indicates the type of the property by placing a colon and a type after the property name. The get and set accessors of the property are implied, so they’re not listed in the UML diagram. Class GradeBook also contains one public method DisplayMessage, so the class diagram lists this operation in the third compartment. Recall that the plus (+) sign is the public visibility symbol.

A class diagram helps you design a class, so it’s not required to show every implementation detail of the class. Since an instance variable that’s manipulated by a property is really an implementation detail of that property, our class diagram does not show the courseName instance variable. A programmer implementing the GradeBook class based on this class diagram would create the instance variable courseName as part of the implementation process (as we did in Fig. 4.7).
In some cases, you may find it necessary to model the private instance variables of a class. Like properties, instance variables are attributes of a class and are modeled in the middle compartment of a class diagram. The UML represents instance variables as attributes by listing the attribute name, followed by a colon and the attribute type. To indicate that an attribute is private, a class diagram would list the private visibility symbol—a minus sign (–)—before the attribute’s name. For example, the instance variable courseName in Fig. 4.7 would be modeled as “- courseName : string” to indicate that it’s a private attribute of type string.
Using properties as described earlier in this chapter would seem to violate the notion of private data. Although providing a property with get and set accessors may appear to be the same as making its corresponding instance variable public, this is not the case. A public instance variable can be read or written by any property or method in the program. If an instance variable is private, the client code can access the instance variable only indirectly through the class’s non-private properties or methods. This allows the class to control the manner in which the data is set or returned. For example, get and set accessors can translate between the format of the data stored in the private instance variable and the format of the data preferred by the client.
Consider a Clock class that represents the time of day as a private int instance variable time, containing the number of seconds since midnight. Suppose the class provides a Time property of type string to manipulate this instance variable. Although get accessors typically return data exactly as it’s stored in an object, they need not expose the data in this “raw” format. When a client refers to a Clock object’s Time property, the property’s get accessor could use instance variable time to determine the number of hours, minutes and seconds since midnight, then return the time as a string of the form "HH:MM:SS". Similarly, suppose a Clock object’s Time property is assigned a string of the form "HH:MM:SS". Using the string capabilities presented in Chapter 16, and the method Convert.ToInt32 presented in Section 3.6, the Time property’s set accessor can convert this string to an int number of seconds since midnight and store the result in the Clock object’s private instance variable time. The Time property’s set accessor can also provide data-validation capabilities that scrutinize attempts to modify the instance variable’s value to ensure that the value it receives represents a valid time (e.g., "12:30:45" is valid but "42:85:70" is not). We demonstrate data validation in Section 4.11. So, although a property’s accessors enable clients to manipulate private data, they carefully control those manipulations, and the object’s private data remains safely encapsulated (i.e., hidden) in the object. This is not possible with public instance variables, which can easily be set by clients to invalid values.
Properties of a class should also be used by the class’s own methods to manipulate the class’s private instance variables, even though the methods can directly access the private instance variables. Accessing an instance variable via a property’s accessors—as in the body of method DisplayMessage (Fig. 4.7, lines 28–29)—creates a more robust class that’s easier to maintain and less likely to malfunction. If we decide to change the representation of instance variable courseName in some way, the declaration of method DisplayMessage does not require modification—only the bodies of property CourseName’s get and set accessors that directly manipulate the instance variable will need to change. For example, suppose we want to represent the course name as two separate instance variables—courseNumber (e.g., "CS101") and courseTitle (e.g., "Introduction to C# Programming"). The DisplayMessage method can still use property CourseName’s get accessor to obtain the full course name to display as part of the welcome message. In this case, the get accessor would need to build and return a string containing the courseNumber, followed by the courseTitle. Method DisplayMessage would continue to display the complete course title “CS101 Introduction to C# Programming,” because it’s unaffected by the change to the class’s instance variables.
In Fig. 4.7, we created a GradeBook class with a private courseName instance variable and a public property CourseName to enable client code to access the courseName. When you look at the CourseName property’s definition (Fig. 4.7, lines 11–21), notice that the get accessor simply returns private instance variable courseName’s value and the set accessor simply assigns a value to the instance variable—no other logic appears in the accessors. For such cases, C# provides automatically implemented properties (also known as auto-implemented properties). With an auto-implemented property, the C# compiler creates a private instance variable, and the get and set accessors for returning and modifying the private instance variable. Unlike a user-defined property, an auto-implemented property, must have both a get and a set accessor. This enables you to implement the property trivially, which is handy when you’re first designing a class. If you later decide to include other logic in the get or set accessors, you can simply modify the property’s implementation. To use an auto-implemented property in the GradeBook class of Fig. 4.7, you can replace the private instance variable at line 8 and the property at lines 11–21 with the following code:
public string CourseName { get; set; } |
The IDE has a feature called code snippets that allows you to insert predefined code templates into your source code. One such snippet enables you to insert a public auto-implemented property by typing the word “prop” in the code window and pressing the Tab key twice. Certain pieces of the inserted code are highlighted for you to easily change the property’s type and name. You can press the Tab key to move from one highlighted piece of text to the next in the inserted code. By default, the new property’s type is int and its name is MyProperty. To get a list of all available code snippets, type Ctrl + k, Ctrl + x. This displays the Insert Snippet window in the code editor. You can navigate through the Visual C# snippet folders with the mouse to see the snippets. This feature can also be accessed by right clicking in the source code editor and selecting the Insert Snippet... menu item.
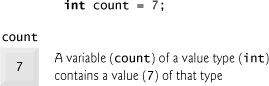
Types in C# are divided into two categories—value types and reference types. C#’s simple types (like int and double) are all value types. A variable of a value type simply contains a value of that type. For example, Fig. 4.10 shows an int variable named count that contains the value 7. Values types are implemented as structs, which are similar to classes and are discussed in more detail in Chapter 16.
By contrast, a variable of a reference type (sometimes called a reference) contains the address of a location in memory where the data referred to by that variable is stored. Such a variable is said to refer to an object in the program. Line 11 of Fig. 4.8 creates a GradeBook object, places it in memory and stores the object’s reference in variable myGradeBook of type GradeBook as shown in Fig. 4.11. The GradeBook object is shown with its courseName instance variable.
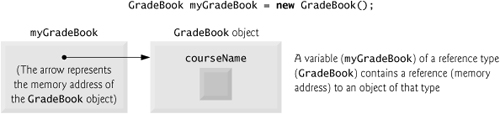
Reference-type instance variables (such as myGradeBook in Fig. 4.11) are initialized by default to the value null. string is a reference type. For this reason, string variable courseName is shown in Fig. 4.11 with an empty box representing the null-valued variable. A string variable with the value null is not an empty string, which is represented by "" or string.Empty. The value null represents a reference that does not refer to an object. The empty string is a string object with no characters in it.
A client of an object must use a variable that refers to the object to invoke (i.e., call) the object’s methods and access the object’s properties. In Fig. 4.8, the statements in Main use variable myGradeBook, which contains the GradeBook object’s reference, to send messages to the GradeBook object. These messages are calls to methods (like DisplayMessage) or references to properties (like CourseName) that enable the program to interact with GradeBook objects. For example, the statement (in line 19 of Fig. 4.8)
myGradeBook.CourseName = Console.ReadLine(); // set CourseName |
uses the reference myGradeBook to set the course name by assigning a value to property CourseName. This sends a message to the GradeBook object to invoke the CourseName property’s set accessor. The message includes as an argument the value read from the user’s input (in this case, "CS101 Introduction to C# Programming") that CourseName’s set accessor requires to perform its task. The set accessor uses this information to set the courseName instance variable. In Section 7.16, we discuss value types and reference types in detail.
Software Engineering Observation 4.4
A variable’s declared type (e.g., int, double or GradeBook) indicates whether the variable is of a value or a reference type. If a variable’s type is not one of the simple types (Appendix B), or an enum or a struct type (which we discuss in Section 7.10 and Chapter 16, respectively), then it’s a reference type. For example, Account account1 indicates that account1 is a variable that can refer to an Account object.
As mentioned in Section 4.5, when a GradeBook (Fig. 4.7) object is created, its instance variable courseName is initialized to null by default. This is also true of the private instance variable that the compiler creates for the auto-implemented CourseName property discussed in Section 4.8. What if you want to provide a course name when you create a GradeBook object? Each class can provide a constructor that can be used to initialize an object of a class when the object is created. In fact, C# requires a constructor call for every object that’s created. The new operator calls the class’s constructor to perform the initialization. The constructor call is indicated by the class name, followed by parentheses. For example, line 11 of Fig. 4.8 first uses new to create a GradeBook object. The empty parentheses after “new GradeBook()" indicate a call without arguments to the class’s constructor. The compiler provides a public default constructor with no parameters in any class that does not explicitly define a constructor, so every class has a constructor. The default constructor does not modify the default values of the instance variables.
When you declare a class, you can provide your own constructor (or several constructors, as you’ll learn in Chapter 10) to specify custom initialization for objects of your class. For example, you might want to specify a course name for a GradeBook object when the object is created, as in
GradeBook myGradeBook = new GradeBook( "CS101 Introduction to C# Programming" ); |
In this case, the argument "CS101 Introduction to C# Programming" is passed to the GradeBook object’s constructor and used to initialize the CourseName. Each time you create a new GradeBook object, you can provide a different course name. The preceding statement requires that the class provide a constructor with a string parameter. Figure 4.12 contains a modified GradeBook class with such a constructor.
Example 4.12. GradeBook class with a constructor to initialize the course name.
 1   // Fig. 4.12: GradeBook.cs
 2   // GradeBook class with a constructor to initialize the course name.
 3   using System;
 4
 5   public class GradeBook
 6   {
 7      // auto-implemented property CourseName implicitly created an
 8      // instance variable for this GradeBook's course name
 9      public string CourseName { get; set; }
10
11      // constructor initializes auto-implemented property
12      // CourseName with string supplied as argument
13      public GradeBook( string name )
14      {
15         CourseName = name; // set CourseName to name
16      } // end constructor
17
18      // display a welcome message to the GradeBook user
19      public void DisplayMessage()
20      {
21         // use auto-implemented property CourseName to get the
22         // name of the course that this GradeBook represents
23         Console.WriteLine( "Welcome to the grade book for
{0}!",
24            CourseName );
25      } // end method DisplayMessage
26   } // end class GradeBook
Lines 13–16 declare the constructor for class GradeBook. A constructor must have the same name as its class. Like a method, a constructor specifies in its parameter list the data it requires to perform its task. When you use new to create an object, you place this data in the parentheses that follow the class name. Unlike a method, a constructor doesn’t specify a return type (not even void). Line 13 indicates that class GradeBook’s constructor has a parameter called name of type string. In line 15, the name passed to the constructor is used to initialize auto-implemented property CourseName via its set accessor.
Figure 4.13 demonstrates initializing GradeBook objects using this constructor. Lines 12–13 create and initialize a GradeBook object. The constructor of class GradeBook is called with the argument "CS101 Introduction to C# Programming" to initialize the course name. The object-creation expression to the right of = in lines 12–13 returns a reference to the new object, which is assigned to variable gradeBook1. Lines 14–15 repeat this process for another GradeBook object, this time passing the argument "CS102 Data Structures in C#" to initialize the course name for gradeBook2. Lines 18–21 use each object’s CourseName property to obtain the course names and show that they were indeed initialized when the objects were created. In Section 4.5, you learned that each instance (i.e., object) of a class contains its own copy of the class’s instance variables. The output confirms that each GradeBook maintains its own course name.
Example 4.13. GradeBook constructor used to specify the course name at the time each GradeBook object is created.
 1   // Fig. 4.13: GradeBookTest.cs
 2   // GradeBook constructor used to specify the course name at the
 3   // time each GradeBook object is created.
 4   using System;
 5
 6   public class GradeBookTest
 7   {
 8      // Main method begins program execution
 9      public static void Main( string[] args )
10      {
11         // create GradeBook object
12         GradeBook gradeBook1 = new GradeBook( // invokes constructor
13            "CS101 Introduction to C# Programming" );
14         GradeBook gradeBook2 = new GradeBook( // invokes constructor
15            "CS102 Data Structures in C#" );
16
17         // display initial value of courseName for each GradeBook
18         Console.WriteLine( "gradeBook1 course name is: {0}",
19            gradeBook1.CourseName );
20         Console.WriteLine( "gradeBook2 course name is: {0}",
21            gradeBook2.CourseName );
22      } // end Main
23   } // end class GradeBookTest
gradeBook1 course name is: CS101 Introduction to C# Programming gradeBook2 course name is: CS102 Data Structures in C# |
Normally, constructors are declared public. If a class does not explicitly define a constructor, the class’s instance variables are initialized to their default values—0 for numeric types, false for type bool and null for reference types. If you declare any constructors for a class, C# will not create a default constructor for that class.
Error-Prevention Tip 4.1

Unless default initialization of your class’s instance variables is acceptable, provide a constructor to ensure that your class’s instance variables are initialized with meaningful values when each new object of your class is created.
The UML class diagram of Fig. 4.14 models class GradeBook of Fig. 4.12, which has a constructor that has a name parameter of type string. Like operations, the UML models constructors in the third compartment of a class in a class diagram. To distinguish a constructor from a class’s operations, the UML places the word “constructor” between guillemets (« and ») before the constructor’s name. It’s customary to list constructors before other operations in the third compartment.
In our next application, we depart temporarily from our GradeBook case study to declare a class called Account that maintains a bank account’s balance. Most account balances are not whole numbers (such as 0, −22 and 1024). For this reason, class Account represents the account balance as a real number (i.e., a number with a decimal point, such as 7.33, 0.0975 or 1000.12345). C# provides three simple types for storing real numbers—float, double, and decimal. Types float and double are called floating-point types. The primary difference between them and decimal is that decimal variables store a limited range of real numbers precisely, whereas floating-point variables store only approximations of real numbers, but across a much greater range of values. Also, double variables can store numbers with larger magnitude and finer detail (i.e., more digits to the right of the decimal point—also known as the number’s precision) than float variables. A key application of type decimal is representing monetary amounts.
Variables of type float represent single-precision floating-point numbers and have seven significant digits. Variables of type double represent double-precision floating-point numbers. These require twice as much storage as float variables and provide 15–16 significant digits—approximately double the precision of float variables. Furthermore, variables of type decimal require twice as much storage as double variables and provide 28–29 significant digits. In some applications, even variables of type double and decimal will be inadequate—such applications are beyond the scope of this book.
Most programmers represent floating-point numbers with type double. In fact, C# treats all real numbers you type in an application’s source code (such as 7.33 and 0.0975) as double values by default. Such values in the source code are known as floating-point literals. To type a decimal literal, you must type the letter “M” or “m” (which stands for “money”) at the end of a real number (for example, 7.33M is a decimal literal rather than a double). Integer literals are implicitly converted into type float, double or decimal when they’re assigned to a variable of one of these types. See Appendix B for the ranges of values for floats, doubles, decimals and all the other simple types.
Although floating-point numbers are not always 100% precise, they have numerous applications. For example, when we speak of a “normal” body temperature of 98.6, we do not need to be precise to a large number of digits. When we read the temperature on a thermometer as 98.6, it may actually be 98.5999473210643. Calling this number simply 98.6 is fine for most applications involving body temperatures. Due to the imprecise nature of floating-point numbers, type decimal is preferred over the floating-point types whenever the calculations need to be exact, as with monetary calculations. In cases where approximation is enough, double is preferred over type float because double variables can represent floating-point numbers more accurately. For this reason, we use type decimal throughout the book for monetary amounts and type double for other real numbers.
Real numbers also arise as a result of division. In conventional arithmetic, for example, when we divide 10 by 3, the result is 3.3333333..., with the sequence of 3s repeating infinitely. The computer allocates only a fixed amount of space to hold such a value, so clearly the stored floating-point value can be only an approximation.
Our next application (Figs. 4.15–4.16) contains a simple class named Account (Fig. 4.15) that maintains the balance of a bank account. A typical bank services many accounts, each with its own balance, so line 7 declares an instance variable named balance of type decimal. Variable balance is an instance variable because it’s declared in the body of the class (lines 6–36) but outside the class’s method and property declarations (lines 10–13, 16–19 and 22–35). Every instance (i.e., object) of class Account contains its own copy of balance.
Example 4.15. Account class with a constructor to initialize instance variable balance.
 1   // Fig. 4.15: Account.cs
 2   // Account class with a constructor to
 3   // initialize instance variable balance.
 4
 5   public class Account
 6   {
 7      private decimal balance; // instance variable that stores the balance
 8
 9      // constructor
10      public Account( decimal initialBalance )
11      {
12         Balance = initialBalance; // set balance using property
13      } // end Account constructor
14
15      // credit (add) an amount to the account
16      public void Credit( decimal amount )
17      {
18         Balance = Balance + amount; // add amount to balance
19      } // end method Credit
20
21      // a property to get and set the account balance
22      public decimal Balance
23      {
24         get
25         {
26            return balance;
27         } // end get
28         set
29         {
30            // validate that value is greater than or equal to 0;
31            // if it is not, balance is left unchanged
32            if ( value >= 0 )
33               balance = value;
34         } // end set
35      } // end property Balance
36   } // end class Account
Example 4.16. Create and manipulate an Account object.
 1   // Fig. 4.16: AccountTest.cs
 2   // Create and manipulate Account objects.
 3   using System;
 4
 5   public class AccountTest
 6   {
 7      // Main method begins execution of C# application
 8      public static void Main( string[] args )
 9      {
10         Account account1 = new Account( 50.00M ); // create Account object
11         Account account2 = new Account( -7.53M ); // create Account object
12
13         // display initial balance of each object using a property
14         Console.WriteLine( "account1 balance: {0:C}",
15            account1.Balance ); // display Balance property
16         Console.WriteLine( "account2 balance: {0:C}
",
17            account2.Balance ); // display Balance property
18
19         decimal depositAmount; // deposit amount read from user
20
21         // prompt and obtain user input
22         Console.Write( "Enter deposit amount for account1: " );
23         depositAmount = Convert.ToDecimal( Console.ReadLine() );
24         Console.WriteLine( "adding {0:C} to account1 balance
",
25            depositAmount );
26         account1.Credit( depositAmount ); // add to account1 balance
27
28         // display balances
29         Console.WriteLine( "account1 balance: {0:C}",
30            account1.Balance );
31         Console.WriteLine( "account2 balance: {0:C}
",
32            account2.Balance );
33
34         // prompt and obtain user input
35         Console.Write( "Enter deposit amount for account2: " );
36         depositAmount = Convert.ToDecimal( Console.ReadLine() );
37         Console.WriteLine( "adding {0:C} to account2 balance
",
38            depositAmount );
39         account2.Credit( depositAmount ); // add to account2 balance
40
41         // display balances
42         Console.WriteLine( "account1 balance: {0:C}", account1.Balance );
43         Console.WriteLine( "account2 balance: {0:C}", account2.Balance );
44      } // end Main
45   } // end class AccountTest
account1 balance: $50.00 account2 balance: $0.00 Enter deposit amount for account1: 49.99 adding $49.99 to account1 balance account1 balance: $99.99 account2 balance: $0.00 Enter deposit amount for account2: 123.21 adding $123.21 to account2 balance account1 balance: $99.99 account2 balance: $123.21 |
Class Account contains a constructor, a method, and a property. Since it’s common for someone opening an account to place money in the account immediately, the constructor (lines 10–13) receives a parameter initialBalance of type decimal that represents the account’s starting balance. Line 12 assigns initialBalance to the property Balance, invoking Balance’s set accessor to initialize the instance variable balance.
Method Credit (lines 16–19) doesn’t return data when it completes its task, so its return type is void. The method receives one parameter named amount—a decimal value that’s added to the property Balance. Line 18 uses both the get and set accessors of Balance. The expression Balance + amount invokes property Balance’s get accessor to obtain the current value of instance variable balance, then adds amount to it. We then assign the result to instance variable balance by invoking the Balance property’s set accessor (thus replacing the prior balance value).
Property Balance (lines 22–35) provides a get accessor, which allows clients of the class (i.e., other classes that use this class) to obtain the value of a particular Account object’s balance. The property has type decimal (line 22). Balance also provides an enhanced set accessor.
In Section 4.5, we introduced properties whose set accessors allow clients of a class to modify the value of a private instance variable. In Fig. 4.7, class GradeBook defines property CourseName’s set accessor to assign the value received in its parameter value to instance variable courseName (line 19). This CourseName property does not ensure that courseName contains only valid data.
The application of Figs. 4.15–4.16 enhances the set accessor of class Account’s property Balance to perform this validation (also known as validity checking). Line 32 (Fig. 4.15) ensures that value is nonnegative. If the value is greater than or equal to 0, the amount stored in value is assigned to instance variable balance in line 33. Otherwise, balance is left unchanged.
Class AccountTest (Fig. 4.16) creates two Account objects (lines 10–11) and initializes them respectively with 50.00M and -7.53M (the decimal literals representing the real numbers 50.00 and -7.53). The Account constructor (lines 10–13 of Fig. 4.15) references property Balance to initialize balance. In previous examples, the benefit of referencing the property in the constructor was not evident. Now, however, the constructor takes advantage of the validation provided by the set accessor of the Balance property. The constructor simply assigns a value to Balance rather than duplicating the set accessor’s validation code. When line 11 of Fig. 4.16 passes an initial balance of -7.53 to the Account constructor, the constructor passes this value to the set accessor of property Balance, where the actual initialization occurs. This value is less than 0, so the set accessor does not modify balance, leaving this instance variable with its default value of 0.
Lines 14–17 in Fig. 4.16 output the balance in each Account by using the Account’s Balance property. When Balance is used for account1 (line 15), the value of account1’s balance is returned by the get accessor in line 26 of Fig. 4.15 and displayed by the Console.WriteLine statement (Fig. 4.16, lines 14–15). Similarly, when property Balance is called for account2 from line 17, the value of the account2’s balance is returned from line 26 of Fig. 4.15 and displayed by the Console.WriteLine statement (Fig. 4.16, lines 16–17). The balance of account2 is 0 because the constructor ensured that the account could not begin with a negative balance. The value is output by WriteLine with the format item {0:C}, which formats the account balance as a monetary amount. The : after the 0 indicates that the next character represents a format specifier, and the C format specifier after the : specifies a monetary amount (C is for currency). The cultural settings on the user’s machine determine the format for displaying monetary amounts. For example, in the United States, 50 displays as $50.00. In Germany, 50 displays as 50,00 €. Figure 4.17 lists a few other format specifiers in addition to C.
Table 4.17. string format specifiers.
Format specifier | Description |
|---|---|
| Formats the string as currency. Displays an appropriate currency symbol ( |
| Formats the string as a whole number. Displays number as an integer. |
| Formats the string with a thousands separator and a default of two decimal places. |
| Formats the number using scientific notation with a default of six decimal places. |
| Formats the string with a fixed number of decimal places (two by default). |
| Formats the number normally with decimal places or using scientific notation, depending on context. If a format item does not contain a format specifier, format |
| Formats the string as hexadecimal. |
Line 19 declares local variable depositAmount to store each deposit amount entered by the user. Unlike the instance variable balance in class Account, the local variable depositAmount in Main is not initialized to 0 by default. Also, a local variable can be used only in the method in which it’s declared. However, this variable does not need to be initialized here because its value will be determined by the user’s input. The compiler does not allow a local variable’s value to be read until it’s initialized.
Line 22 prompts the user to enter a deposit amount for account1. Line 23 obtains the input from the user by calling the Console class’s ReadLine method, then passing the string entered by the user to the Convert class’s ToDecimal method, which returns the decimal value in this string. Lines 24–25 display the deposit amount. Line 26 calls object account1’s Credit method and supplies depositAmount as the method’s argument. When the method is called, the argument’s value is assigned to parameter amount of method Credit (lines 16–19 of Fig. 4.15), then method Credit adds that value to the balance (line 18 of Fig. 4.15). Lines 29–32 (Fig. 4.16) output the balances of both Accounts again to show that only account1’s balance changed.
Line 35 prompts the user to enter a deposit amount for account2. Line 36 obtains the input from the user by calling method Console.ReadLine, and passing the return value to the Convert class’s ToDecimal method. Lines 37–38 display the deposit amount. Line 39 calls object account2’s Credit method and supplies depositAmount as the method’s argument, then method Credit adds that value to the balance. Finally, lines 42–43 output the balances of both Accounts again to show that only account2’s balance changed.
By default, the get and set accessors of a property have the same access as the property—for example, for a public property, the accessors are public. It’s possible to declare the get and set accessors with different access modifiers. In this case, one of the accessors must implicitly have the same access as the property and the other must be declared with a more restrictive access modifier than the property. For example, in a public property, the get accessor might be public and the set accessor might be private. We demonstrate this feature in Section 10.5.
Error-Prevention Tip 4.2
The benefits of data integrity are not automatic simply because instance variables are made private—you must provide appropriate validity checking and report the errors.
Error-Prevention Tip 4.3
set accessors that set the values of private data should verify that the intended new values are proper; if they’re not, the set accessors should leave the instance variables unchanged and indicate an error. We demonstrate how to indicate errors in Chapter 10.
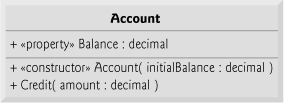
The UML class diagram in Fig. 4.18 models class Account of Fig. 4.15. The diagram models the Balance property as a UML attribute of type decimal (because the corresponding C# property had type decimal). The diagram models class Account’s constructor with a parameter initialBalance of type decimal in the third compartment of the class. The diagram models operation Credit in the third compartment with an amount parameter of type decimal (because the corresponding method has an amount parameter of C# type decimal).
In this chapter, you learned the basic object-oriented concepts of classes, objects, methods, instance variables and properties—these will be used in most substantial C# applications you create. You learned how to declare instance variables of a class to maintain data for each object of the class, how to declare methods that operate on that data, and how to declare properties to obtain and set that data. We demonstrated how to call a method to tell it to perform its task and how to pass information to methods as arguments. We discussed the difference between a local variable of a method and an instance variable of a class and that only instance variables are initialized automatically. We discussed the difference between a value type and a reference type. You learned how to create auto-implemented properties. You also learned how to use a class’s constructor to specify the initial values for an object’s instance variables. We discussed some of the differences between value types and reference types. You learned about the value types float, double and decimal for storing real numbers.
We showed how the UML can be used to create class diagrams that model the constructors, methods, properties and attributes of classes. You learned the value of declaring instance variables private and using public properties to manipulate them. For example, we demonstrated how set accessors in properties can be used to validate an object’s data and ensure that the object is maintained in a consistent state. In the next chapter we begin our introduction to control statements, which specify the order in which an application’s actions are performed. You’ll use these in your methods to specify how they should perform their tasks.
Methods perform tasks. Each method describes the mechanisms that actually perform its tasks. The method hides from its user the complex tasks that it performs.
The application unit that houses a method is called a class. A class may contain one or more methods that are designed to perform the class’s tasks.
A method can perform a task and may return a result.
Each message sent to an object is a method call and tells that method to perform its task.
Each method can specify parameters that represent additional information the method requires to perform its task correctly. A method call supplies arguments for the method’s parameters.
An object has attributes that are carried with the object as it’s used in an application. These attributes are specified as part of the object’s class. Attributes are specified in classes by fields.
An object has properties for accessing attributes. Properties contain
getaccessors for reading attributes andsetaccessors for storing into them.
Keyword
publicis an access modifier.Every class declaration contains keyword
classfollowed immediately by the class’s name.A method declaration that begins with keyword
publicindicates that the method is “available to the public”—that is, it can be called by other classes declared outside the class declaration.Keyword
voidindicates that a method will not return any information when it completes its task.By convention, method names begin with an uppercase first letter, and all subsequent words in the name begin with an uppercase first letter. This is called Pascal case.
Empty parentheses following a method name indicate that the method does not require any parameters to perform its task.
Every method’s body is delimited by left and right braces (
{and}).The body of a method contains statements that perform the method’s task. After the statements execute, the method has completed its task.
When you attempt to execute an application, C# looks for a
Mainmethod to begin execution.Typically, you create an object of a class to call the class’s methods.
Object creation expressions begin with the
newoperator and create new objects.To call a method of an object, follow the variable name with a member access operator (
.), the method name and a set of parentheses containing the method’s arguments.In the UML, each class is modeled in a class diagram as a rectangle with three compartments. The top compartment contains the name of the class, centered horizontally in boldface. The middle compartment contains the class’s attributes, which correspond to fields in C#. The bottom compartment contains the class’s operations, which correspond to methods and constructors in C#.
The UML models operations by listing the operation name, followed by a set of parentheses. A plus sign (
+) in front of the operation name indicates that the operation is a public operation in the UML (i.e., apublicmethod in C#). The plus sign is called the public visibility symbol.
Methods often require additional information to perform their tasks. Such additional information is provided to methods via arguments in method calls.
ConsolemethodReadLinereads characters until a newline character is encountered, then returns the characters as astring.A method that requires data to perform its task must specify this in its declaration by placing additional information in the method’s parameter list.
Each parameter must specify both a type and an identifier.
At the time a method is called, its arguments are assigned to its parameters. Then the method body uses the parameter variables to access the argument values.
A method can specify multiple parameters in a comma-separated parameter list.
The number of arguments in the method call must match the number of required parameters in the method declaration’s parameter list. Also, the argument types in the method call must be consistent with the types of the corresponding parameters in the method’s declaration.
The UML models a parameter of an operation by listing the parameter name, followed by a colon and the parameter type between the parentheses following the operation name.
The UML does not provide types that correspond to every C# type. For this reason, and to avoid confusion between UML types and C# types, we use only C# types in our UML diagrams.
There’s a special relationship between classes that are compiled in the same project. By default, such classes are considered to be in the same namespace. A
usingdirective is not required when one class in a namespace uses another in the same namespace.A
usingdirective is not required if you always refer to a class with its fully qualified class name.
Local variables can be used only in the method in which they’re declared.
A class normally contains methods that manipulate the attributes that belong to a particular object of the class. Attributes are represented as instance variables in a class declaration. Such variables are declared inside a class declaration but outside its method’s bodies.
Each object (instance) of a class has a separate copy of each instance variable.
Most instance-variable declarations are preceded with the
privateaccess modifier. Variables, properties or methods declared with access modifierprivateare accessible only to methods (and properties) of the class in which they’re declared.Declaring instance variables with access modifier
privateis known as information hiding.Properties contain accessors that handle the details of modifying and returning data.
Properties provide a controlled way for programmers to “get” (i.e., retrieve) the value in an instance variable and “set” (i.e., modify) the value in an instance variable.
A property declaration can contain a
getaccessor, asetaccessor or both. Thegetaccessor typically enables a client to read the value of aprivateinstance variable. Thesetaccessor typically enables a client to modify that instance variable’s value.After defining a property, you can use it the same way as you use a variable.
The default value for a field of type
stringisnull.
We model properties in the UML as attributes, preceded by the word “property” in guillemets (« and »). Using descriptive words in guillemets (called stereotypes in the UML) helps distinguish properties from other attributes.
A class diagram helps you design a class, so it’s not required to show every implementation detail of the class. Since an instance variable that’s manipulated by a property is really an implementation detail of that property, our class diagrams do not show instance variables.
privateclass members are preceded by the private visibility symbol (-) in the UML.The UML represents instance variables and properties as attributes by listing the attribute name, followed by a colon and the attribute type.
Properties can scrutinize attempts to modify an instance variable’s value (known as data validation), thus ensuring that the new value for that instance variable is valid.
Using properties would seem to violate the notion of
privatedata. However, asetaccessor can provide data-validation capabilities to ensure that the value is set properly;getandsetaccessors can translate between the format of the data used by the client and the format used in theprivateinstance variable.A benefit of fields over local variables is that all of a class’s methods and properties can use the fields. Another distinction is that a field has a default initial value provided by C# when you do not specify the field’s initial value, but a local variable does not.
With an auto-implemented property, the C# compiler automatically creates a
privateinstance variable, and thegetandsetaccessors for returning and modifying theprivateinstance variable.Visual C# 2010 Express and Visual Studio 2010 have a feature called code snippets that allows you to insert predefined code templates into your source code. One such snippet enables you to insert a
publicauto-implemented property by typing the word “prop” in the code window and pressing the Tab key twice.Pieces of the inserted code are highlighted for you to easily change the property’s type and name. Press the Tab key to move from one highlighted piece of text to the next in the inserted code.
To get a list of all available code snippets, type Ctrl + k, Ctrl + x. This displays the Insert Snippet window in the code editor. This feature can also be accessed by right clicking in the source code editor and selecting the Insert Snippet... menu item.
Types are divided into two categories—value types and reference types.
A variable of a value type contains data of that type.
A variable of a reference type (sometimes called a reference) contains the address of a location in memory where an object is stored.
Reference-type instance variables are initialized by default to the value
null.
A constructor can be used to initialize an object of a class when the object is created.
If no constructor is provided for a class, the compiler provides a
publicdefault constructor with no parameters that does not modify the instance variables’ default values.Like operations, the UML models constructors in the third compartment of a class diagram. To distinguish a constructor from a class’s operations, the UML places the word “constructor” between guillemets (« and ») before the constructor’s name.
Constructors can specify parameters but cannot specify return types.
A real number is a number with a decimal point, such as 7.33, 0.0975 or 1000.12345. C# provides three simple types for storing real numbers—
float,double, anddecimal.Types
floatanddoubleare called floating-point types. The primary difference between them and thedecimaltype is thatdecimalvariables store a limited range of real numbers precisely, but floating-point variables store approximations of real numbers across a much greater range.Variables of type
floatrepresent single-precision floating-point numbers and have seven significant digits. Variables of typedoublerepresent double-precision floating-point numbers. These require twice as much storage asfloatvariables and provide 15–16 significant digits—approximately double the precision offloatvariables. Furthermore, variables of typedecimalrequire twice as much storage asdoublevariables and provide 28–29 significant digits.Real number values that appear in source code are of type
doubleby default.ConvertmethodToDecimalextracts adecimalvalue from astring.The
:in a format item indicates that the next character represents a format specifier.The
Cformat specifier specifies a monetary amount (Cis for currency).It’s possible to declare the
getandsetaccessors of a property with different access modifiers. One accessor must implicitly have the same access as the property and the other must be declared with a more restrictive access modifier than the property;privateis more restrictive thanpublic.
client of an object or a class
compartment in a class diagram (UML)
instantiate (or create) an object
precision of a formatted floating-point number
“prop” code snippet
4.1 | Fill in the blanks in each of the following:
|
4.1 |
|
4.2 | State whether each of the following is true or false. If false, explain why.
|
4.2 |
|
4.3 | What is the difference between a local variable and an instance variable? |
4.3 | A local variable is declared in the body of a method and can be used only in the method in which it’s declared. An instance variable is declared in a class, but not in the body of any of the class’s methods. Every object (instance) of a class has a separate copy of the class’s instance variables. Also, instance variables are accessible to all methods of the class. (We’ll see an exception to this in Chapter 10, Classes and Objects: A Deeper Look.) |
4.4 | Explain the purpose of a method parameter. What is the difference between a parameter and an argument? |
4.4 | A parameter represents additional information that a method requires to perform its task. Each parameter required by a method is specified in the method’s declaration. An argument is the actual value that’s passed to a method parameter when a method is called. |
4.5 | What is the purpose of operator |
4.6 | What is a default constructor? How are an object’s instance variables initialized if a class has only a default constructor? |
4.7 | Explain the purpose of an instance variable. |
4.8 | Explain how an application could use class |
4.9 | Explain why a class might provide a property for an instance variable. |
4.10 | (
Use your modified class in a test application that demonstrates the class’s new capabilities. |
4.11 | ( |
4.12 | ( |
4.13 | ( |
4.14 | ( |
4.15 | (Target-Heart-Rate Calculator) While exercising, you can use a heart-rate monitor to see that your heart rate stays within a safe range suggested by your trainers and doctors. According to the American Heart Association (AHA) (www.americanheart.org/presenter.jhtml?identifier=4736), the formula for calculating your maximum heart rate in beats per minute is 220 minus your age in years. Your target heart rate is a range that is 50–85% of your maximum heart rate. [Note: These formulas are estimates provided by the AHA. Maximum and target heart rates may vary based on the health, fitness and gender of the individual. Always consult a physician or qualified health care professional before beginning or modifying an exercise program.] Create a class called |
4.16 | (Computerization of Health Records) A health care issue that has been in the news lately is the computerization of health records. This possibility is being approached cautiously because of sensitive privacy and security concerns, among others. [We address such concerns in later exercises.] Computerizing health records could make it easier for patients to share their health profiles and histories among their various health care professionals. This could improve the quality of health care, help avoid drug conflicts and erroneous drug prescriptions, reduce costs and, in emergencies, could save lives. In this exercise, you’ll design a “starter” |