Chapter 3
Installing and Configuring vCenter Server
IN THIS CHAPTER, YOU WILL LEARN TO:
- PREPARE FOR INSTALLATION
- Identify Hardware Requirements
- Identify Operating System Requirements for vCenter Server and vSphere Client
- Identify Database Requirements
- Identify Networking Requirements
- Identify Authentication Requirements
- INSTALL A DATABASE
- Create a vCenter Database in Microsoft SQL Server 2008 R2
- Create a vCenter Database in Oracle
- PREPARE AND INSTALL VCENTER SERVER
- Prepare for Installation
- Install vCenter Server
- Deploy a vCenter Server Appliance
- Configure a vCenter Server Appliance
- Install Additional Components
- INSTALL VSPHERE CLIENT
- CONFIGURE VCENTER SERVER
- Connect to vCenter Server
- Install Plug-Ins in vSphere Client
- Configure Advanced vCenter Server Settings
- Create a Datacenter
- Add a Cluster
- Add a Host
VMware vCenter Server is the central management component in a vSphere environment. Without vCenter Server, ESXi hosts are simply hypervisors with the ability to run virtual machines, commonly referred to as guests. When coupled with appropriate host licensing, vCenter Server can significantly extend the capabilities of the hosts it manages. Some of the extended capabilities that vCenter Server includes are vMotion, Storage vMotion, High Availability (HA), Distributed Resource Scheduling (DRS), as well as Storage DRS (SDRS).
Keep in mind that vCenter Server does not independently contain these features. Rather, it leverages these capabilities when hosts are managed by vCenter Server and assigned licenses that include these features.
You should become familiar with vCenter Server’s requirements as well as the proper installation method. A well-configured vCenter Server installation provides a solid administrative platform to manage vSphere to its fullest potential.
One of most important components of the vSphere environment is vCenter Server. vCenter Server acts as a central management point for managing ESXi hosts, additional components (including but not limited to vCenter Update Manager, federated storage and network management, licensing, Host Auto Deployment, authentication, roles, and permissions), and web services and API exposure for partner integration.
Installing vCenter Server can be broken into three steps:
1. Ensure that your system is capable of running vCenter Server.
2. Install vCenter Server and additional components.
3. Perform basic configuration of vCenter Server and additional components as necessary.
As of this writing, vCenter Server is available only for Microsoft Windows systems. This has been a sore subject for administrators in IT shops that primarily run operating systems other than Windows. For these administrators, VMware has released a vSphere Web Client and vCenter Server Appliance, which is Linux-based. We will cover both of these in “Configure a vCenter Server Appliance,” later in this chapter.
With vSphere 4.1, vCenter Server must be installed on a 64-bit Microsoft Windows platform.
To ensure that vCenter Server can accommodate the scalable performance necessary to efficiently manage ESXi hosts, VMware has provided some general requirements for the hardware, operating system, and database required to support vCenter Server.
Identify Hardware Requirements
VMware vCenter Server can be installed on a physical or virtual machine that meets the requirements listed in Table 3.1.
Table 3.1: Physical or Virtual Hardware Requirements for VMWare vCenter Server
| Component | Requirement |
| Processor | Two 64-bit or a single dual-core 64-bit Intel or AMD x86–based processor with a speed of 2.0 GHz or greater. The Itanium processor is not supported. It is a best practice to use a faster processor if the vCenter Database runs on the same server. |
| Memory | 4 GB of RAM minimum. It is a best practice to use more RAM if the database is running on the same server. The VMware vCenter Management Web services require from 512 MB to 4.4 GB of additional memory. The memory is allocated at system startup. |
| Database | A minimum of 2 GB of additional storage is required in addition to the storage required for the operating system installation. If the VMware vCenter Update Manager service is installed on the same system, an additional 22 GB of space is required to accommodate storage of patches. If Microsoft SQL Server 2008 R2 Express is installed as the database, 2 GB of disk space is required during the installation, with 1.5 GB reclaimed after the installation is complete. |
| Networking | A 100 MB network connection can be used, but a 1 GB network connection is recommended. |
Meeting these requirements will ensure proper operation of vCenter Server and any additional components. When designing the environment, give additional thought to future growth or scalability of vCenter Server.
Identify Operating System Requirements for vCenter Server and vSphere Client
Because vCenter Server was developed to operate on a Windows platform, VMware supports this product on only a limited number of operating system configurations. Table 3.2 lists the operating systems for which VMware vCenter Server is supported.
Table 3.2: Operating System Requirements for vCenter Server
| Operating System |
| Windows Server 2003 Standard, Enterprise, Datacenter, 64-bit SP2 |
| Windows Server 2003 R2 Standard, Enterprise, Datacenter, 64-bit SP1 |
| Windows Server 2008, Standard, Enterprise, Datacenter, 64-bit SP2 |
| Windows Server 2008 R2, Standard, Enterprise, Datacenter, 64-bit |
To manage VMware vCenter Server, you use vSphere Client to configure, manage, and monitor the environment. vSphere Client was developed using Microsoft .NET technologies and is also limited to Microsoft operating systems. Table 3.3 lists the operating systems on which vSphere Client may be installed to manage a vCenter Server.
Table 3.3: vSphere Client System Requirements
| Operating System |
| Windows XP Pro (SP3 or greater) |
| Windows XP Pro (SP2 or greater, 64-bit) |
| Windows Server 2003 Standard, Enterprise, and Datacenter (SP2 or greater) 32-bit or 64-bit |
| Windows Server 2003 R2 Standard, Enterprise, and Datacenter (SP2 or greater) 32-bit or 64-bit |
| Windows Vista Business and Enterprise, 32-bit and 64-bit with SP2 |
| Windows 7 Professional and Enterprise, 32-bit and 64-bit SP1 |
| Windows Server 2008 Standard, Enterprise, and Datacenter, 32-bit and 64-bit SP2 |
| Windows Server 2008 Standard, Enterprise, and Datacenter, 64-bit R2 SP1 |
There are also some best practices with regard to the domain membership of a server running vCenter Server. Following these guidelines will ensure that installation and operation run more smoothly:
- Microsoft strongly recommends that vCenter Server be joined to a Microsoft Windows domain. This will provide better security and domain capabilities to services that require it.
- If you are using Linked Mode vCenter Servers, the individual vCenter Servers may be in different domains, provided there is a two-way trust between the two domains.
In addition to vSphere Client, vSphere Web Access may be used to manage the vCenter Server installation, and it has some minimum requirements as well. The following browsers have been tested by VMware to verify proper operation of vSphere Web Access:
- Microsoft Windows Internet Explorer 7
- Microsoft Windows Internet Explorer 8
- Mozilla 1.x for Windows/Linux
- Mozilla Firefox 3.5
- Mozilla Firefox 3.6
Ensuring that the hardware and software requirements are met will ensure that the configuration used for vCenter Server, vSphere Client, and vSphere Web Access will provide a trouble-free installation and management platform for the vSphere environment.
Identify Database Requirements
At the heart of VMware vCenter Server and its ancillary components lie a number of databases.
Separate databases are recommended for vCenter Server and ancillary components, such as vCenter Update Manager, although it is not required for each additional component to be installed using a separate database. Installing different components on different databases can help identify problems with particular components and can result in better performance levels.
These databases do not have to be on the same machine as vCenter Server, nor do they have to reside on the same remote server. It is possible to have a vCenter instance installed on one server, with its SQL database residing on another server, and the vCenter Update Manager database on a third server. The choices are wide and depend on your operational needs. The default installation will load vCenter and required databases on the same system. The vCenter Server installation routine includes Microsoft SQL Server 2008 R2 Express Edition.
If you accept the defaults, the instance of Microsoft SQL Server 2008 R2 Express that is bundled with vCenter Server is used, and user authentication defaults to the rights of the user account performing the installation. If another supported database is used, administrative credentials are required.
NOTE If you are using any edition of Microsoft SQL Server, it is a best practice to ensure that the database service on either the local or the remote machine is also running as a domain account to aid in authentication.
The following databases are supported for vCenter Server:
- IBM DB2 9.5 Fix Pack 5 or greater and 9.7 Fix Pack 2 or greater
- Microsoft SQL Server 2008 R2 Express
- Microsoft SQL Server 2005, 32-bit and 64-bit SP3 or higher
- Microsoft SQL Server 2008, 32-bit and 64-bit SP1 or higher
- Microsoft SQL Server 2008 R2
- Oracle 10g R2
- Oracle 11g R1 11.1.0.7
- Oracle 11g R2 11.2.0.1 with patch 5
NOTE If you are planning to use Update Manager, then you will need to use either MS SQL Server or Oracle. Update Manager does not support DB2 databases. You could use DB2 for vCenter Server and MS SQL or Oracle for the VSphere Update Manager at the same time.
Identify Networking Requirements
Because vCenter is not a single standalone server, application, or isolated computing system, the pieces of the puzzle will require some form of communication between them. There are many possible configuration scenarios depending on the environment in which vCenter is being deployed.
A vCenter Server must be able to communicate with each host and each vSphere client. Furthermore, if a remote database server is utilized rather than a local instance of the database, the required TCP/IP ports for that database installation are also needed.
If an instance of vCenter Server is installed on Windows Server 2008, the installer opens the ports in the Windows Firewall during the installation. If you have any custom firewall software installed, you will need to manually make an exception to allow communication among all of the required pieces of the environment.
vCenter Server requires several ports to be open when you select a default installation. Each of these ports will be used for a different portion of the overall communications path. To enable proper communication among the components, consult a network engineer to ensure the appropriate ports are open for communication.
Table 3.4 lists ports that are required to be open.
Table 3.4: Ports required by vCenter Server
| Port no. | Use |
| 80 | Redirects nonsecure requests to vCenter Server on a secure port. |
| 389 | LDAP services, Directory Services component of vCenter Server. It must be available even if vCenter Server is not part of a Linked Mode group. |
| 443 | Default port for vSphere Client communication. You can change this port, but vSphere Client and any SDK applications must use the vCenter Server name, followed by the nondefault port number. |
| 636 | vCenter Server in Linked Mode. This is the Secure Sockets Layer (SSL) port of the local vCenter Server ADAM Instance. 636 is the preferred port number, but it can be changed. |
| 902 | Multiple uses: manages and sends data to hosts, receives a heartbeat from hosts, and provides remote console access to virtual machines. |
| 903 | Remote console access from virtual machines to vSphere Client. |
| 8080 | VMware VirtualCenter Management Web Services HTTP. |
| 8443 | VMware VirtualCenter Management Web Services HTTPS for vCenter’s Inventory Service. |
| 60099 | Web Service change notification. |
| 10443 | HTTPS port for the vCenter Inventory Service. |
| 10109 | Service Management port for vCenter’s Inventory Service. |
| 10111 | Linked Mode Communication port for vCenter’s Inventory Service. |
WARNING If the default install of SQL Server was used during the install, SQL Reporting Services will be using port 80. You will have to either shut down or remove SQL Reporting Services or use a custom port for vCenter Server.
Identify Authentication Requirements
Initial authentication in vCenter Server is handled through local user accounts on the system upon which vCenter Server is installed. Authentication to manage ESXi servers is handled through vCenter Server as hosts are added to the vSphere configuration. Additionally, local accounts on each host may be created. Accounts local to ESXi hosts do not have permissions in the vCenter Server interface, even though they may have elevated privileges at the host level.
As previously mentioned, VMware utilizes industry-standard databases for vCenter Server. Administrators cannot easily use or access the raw data contained in the vCenter Server database. Instead, they must use vSphere Client. Components like the datacenters, clusters, resource pools, hosts, and virtual machines, along with their associated configuration and performance data, are stored in the backend database that vCenter Server is connected to. As mentioned, the default installation includes Microsoft SQL Server 2008 R2 Express Edition. The vCenter Server installer automatically creates a data source name (DSN), the database, and the database schema when using the default database software. We will examine a few alternate database installations—Microsoft SQL Server 2008 R2 (other than Express Edition) or Oracle 10g or 11g—in the following sections.
Create a vCenter Database in Microsoft SQL Server 2008 R2
The default Microsoft SQL Server 2008 R2 Express Edition installation with vCenter Server supports up to 5 hosts and 50 virtual machines. It is not considered as robust as its cousins, Microsoft SQL Server 2008 Standard and Enterprise editions, which also have enhanced feature sets.
Tables listing the differences among the various editions of Microsoft SQL Server 2008 can be found on Microsoft’s website:
http://www.microsoft.com/sqlserver/2008/en/us/editions.aspx
If you have chosen to use Standard or Enterprise edition, Microsoft recommends certain configuration settings when you’re creating the vCenter Server database. The database can reside on the local system or can be accessed remotely. To configure the vCenter Server database using SQL Server 2008 Standard or Enterprise edition, follow these steps:
1. If vCenter Server is part of a Windows domain, create a domain account that will be used to access the SQL Server instance.
NOTE It is a best practice to create a dedicated domain user account, but you can also use a domain admin account.
Make sure this user has db_datawriter and db_datareader permissions on the SQL instance. Also, during initial installation and upgrades of vCenter Server, the vpxuser account must have db_owner rights on the MSDB database. This access can be revoked after an installation or upgrade.
2. Log in to the Microsoft SQL Server Management Studio with sysadmin (SA) or with a user that has sysadmin privileges, and run the following script. This script is located in the vCenter Server installation package at /vCenter-Server/dbschema/DB_and schema_creation_scripts_MSSWL.txt.
use [master] go CREATE DATABASE [VCDB] ON PRIMARY (NAME = N'vcdb', FILENAME = N'C:VCDB.mdf' ,SIZE = 2000KB , FILEGROWTH = 10% ) LOG ON (NAME = N'vcdb_log', FILENAME = N'C:VCDB.ldf' ,
Remember that you can change the database user, location, and database name within this script. Keep in mind that these values will need to match the DSN created to access the database.
3. Confirm that the SQL Server Agent is running.
4. To set up job scheduling and similar tasks, run the following scripts using the Microsoft SQL Server Management Studio. Run the scripts in the order listed.
job_schedule1_mssql.sql
job_schedule2_mssql.sql
job_schedule3_mssql.sql
job_cleanup_events_mssql
5. The database has now been created and is ready for a DSN to connect to the VCDB instance.
6. On the vCenter Server system, open the Windows ODBC Data Source Administrator by choosing Settings ⇒ All Programs ⇒ Administrative Tools ⇒ Data Sources (ODBC).
7. Select the System DSN tab.
8. Click Add, select SQL Native Client, and click Finish.
9. Type an ODBC DSN name in the Name field, something like vCenter Server.
10. Select the server name from the Server drop-down menu and click Next. This can be the local system or a remote system.
NOTE With a default installation of SQL Server, only a single instance or installation of SQL is present. If multiple SQL Server installations are present on a server, each additional installation is referred to as a named instance. The primary instance does not have a specific name, other than the server name, while named instances are typically signified as SERVERNAMEInstanceName.
11. Select Windows Authentication.
12. Select the database created for the vCenter Server system from the Change The Default Database To menu and click Next.
13. Click Finish.
14. A DSN that is compatible with vCenter Server is now available. When the vCenter Server installer prompts for the DSN of the database, select vCenter Server, or whatever value you entered in step 9.
Create a vCenter Database in Oracle
Not every environment uses Microsoft SQL Server. For various reasons, administrators might need to choose databases already being used in their environment. Oracle is a popular database choice, especially in environments that have a limited Microsoft footprint: It is available for many other platforms, including Linux, Solaris, and HP-UX. VMware supports several versions of Oracle, including 10g and 11g.
NOTE You don’t have to have Oracle installed locally on the vCenter Server. When you’re using Oracle, certain configurations are considered best practices when creating the database.
Perform these steps to create and configure the database:
1. Log on to a SQL*Plus session with the system account.
2. Run the following commands, or script, to create the database. For datafile_path, enter a valid path on your Oracle system:
CREATE SMALLFILE TABLESPACE "VPX" DATAFILE
'datafile_path'
SIZE 1G AUTOEXTEND ON NEXT 10M MAXSIZE
UNLIMITED LOGGING EXTENT MANAGEMENT
LOCAL SEGMENT SPACE MANAGEMENT AUTO;
3. Open a SQL*Plus window with a user that has schema owner rights on the vCenter Server database to create the database schema.
4. Locate the dbschema scripts in the vCenter Server installation package bin/dbschema directory.
5. In SQL*Plus, run the scripts in sequence on the database as shown in the following example. path is the directory path to the bin/dbschema folder.
@path/VCDB_oracle.SQL
@path/purge_stat1_proc_oracle.sql
@path/purge_stat2_proc_oracle.sql
@path/purge_stat3_proc_oracle.sql
@path/purge_usage_stats_proc_oracle.sql
@path/stats_rollup1_proc_oracle.sql
@path/stats_rollup2_proc_oracle.sql
@path/stats_rollup3_proc_oracle.sql
@path/cleanup_events_oracle.sql
@path/delete_stats_proc_oracle.sql
6. Run the following scripts to set up scheduled jobs on the database. The path variable is the same as in step 5:
@path/job_schedule1_oracle.sql
@path/job_schedule2_oracle.sql
@path/job_schedule3_oracle.sql
@path/job_cleanup_events_oracle.sql
7. Oracle can use a local or remote Oracle instance. From the same SQL*Plus window, run the following script (where VPXADMIN is the user):
CREATE USER "VPXADMIN" PROFILE "DEFAULT"
IDENTIFIED BY "oracle" DEFAULT TABLESPACE
"VPX" ACCOUNT UNLOCK;
grant connect to VPXADMIN;
grant resource to VPXADMIN;
grant create view to VPXADMIN;
grant create sequence to VPXADMIN;
grant create table to VPXADMIN;
grant execute on dbms_lock to VPXADMIN;
grant execute on dbms_job to VPXADMIN;
grant unlimited tablespace to VPXADMIN;
8. If the Oracle database is not installed on the same system as vCenter Server, download and install the Oracle client.
9. On the vCenter Server system, open the Windows ODBC Data Source Administrator by choosing Settings ⇒ Control Panel ⇒ Administrative Tools ⇒ Data Sources (ODBC).
NOTE If you are using a 64-bit operating system, run the 32-bit ODBC Administrator application, which is located at C:WindowsSysWOW64odbcad32.exe.
10. Select the System DSN tab and click Add.
11. Select the appropriate Oracle driver for your installation and click Finish.
12. Enter the name of the DSN, such as vCenter Server.
13. Ensure that appropriate values appear in the TNS Names field referencing the local or remote Oracle instances. Select the appropriate TNS Service name.
14. Enter the username created in the Create User section.
15. Click OK. An Oracle database is now available for the vCenter Server installer.
Prepare and Install vCenter Server
Now that you have configured a database, you can begin installing vCenter Server.
TIP Remember that vCenter Server includes an installation of Microsoft SQL Server 2008 R2 Express Edition, and if a database has not previously been installed, the vCenter installation will provide the ability to set up an initial database.
Installing vCenter Server consists of these steps:
1. Prepare for installation.
2. Install vCenter Server.
3. Install additional components.
4. Install vSphere Client.
5. Configure vCenter.
The steps have been segmented in this way to provide a more logical flow of how the process works. Each step is dependent on the previous task, and all the steps are detailed in the following sections.
Prepare for Installation
Before attempting to install the vCenter Server, make sure that your server meets the following criteria:
- The server meets the hardware requirements (see Table 3.1).
- The server is configured with a static IP address.
- The computer name consists of fewer than 15 characters. To conform to best practices, ensure that the computer name matches the hostname in the fully qualified domain name of the system.
- The system is joined to a domain, and not a workgroup. vCenter will be installed in a workgroup, but not all functionality is available. For example, when in a workgroup, vCenter Server will not be able to discover all domains and systems available on the network.
- A supported database is already created, unless you’re using the bundled SQL Server 2008 R2 Express Edition.
- A valid DSN exists to allow vCenter Server to connect to the created database.
- The vCenter Server is able to directly access the hosts it will manage without any type of network address translation between the server and the hosts.
- The vCenter Server’s fully qualified domain name is resolvable.
- The server you are installing on is not an Active Directory Domain Controller.
- The domain user account you will be installing with has the following settings on the server:
- Is a member of the Administrators group
- Has permission to act as part of the operating system
- Can log on as a service
User Account for vCenter Server
During the install, the built-in system account is used by default. However, this account has more permissions and rights than vCenter Server needs. VMware recommends setting up a normal domain user, without domain administrator rights, and adding this user to the local administrator group. Once this has been set up, you can then enable Windows authentication for SQL Server for even more security. Keep in mind that for the SQL Server DSNs configured with Windows authentication, you need to use the same account as the VMware vCenter Management Webservices service and the DSN user.
Install vCenter Server
To start leveraging the capabilities and enterprise-class features of vSphere, you must obtain a copy of vCenter Server and go through the install of vCenter Server.
Obtain a Copy of vCenter Server
Because VMware does not typically ship software to its customers, to get started, you must download the vCenter Server installation media from the VMware site. The download area is located at: http://downloads.vmware.com/
NOTE To download the software, you must set up an account at the VMware store, which you typically do upon purchase of VMware products.
vCenter Server is available in two formats:
- ISO format (DVD-ROM image file)
- ZIP format (compressed file)
Either format will install all of the components necessary, but there are differences. The ISO file may need to be burned to a DVD-ROM for the purpose of installing the software, while the ZIP file must be extracted to a location large enough to accommodate the decompressed files.
vCenter Server can be installed from a DVD-ROM, local path, mapped drive, or network share, but the software can only be installed to the local machine on a local drive.
Install vCenter Server
Once you have the installation media, follow these steps to install vCenter Server:
1. Select autorun.exe.
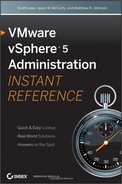
2. On the splash screen shown in Figure 3.1, highlight vCenter Server and then click Install to begin.
Figure 3.1: vCenter Server installer splash screen
3. On the next screen, select the appropriate language for your installation and click OK.
4. The Welcome to the Installation Wizard screen appears. Click Next.
5. Click Next on the End-User Patent Agreement screen.
6. Accept the license agreement by choosing “I agree to the terms of the license agreement,” and then click Next.
7. On the Customer Information screen, enter your name and organization. Below that, you have the option to enter the vCenter Server license key. If you do not enter it at this point, vCenter Server will be installed in evaluation mode, which is fully functional for 60 days. Click Next.
8. On the Database Options screen shown in Figure 3.2, select one of the following, depending on what kind of database you are using:
Figure 3.2: Database Options screen

- Install A Microsoft SQL Server 2008 Express Instance
- Use An Existing Supported Database
If you choose Use An Existing Supported Database, select the database from the Data Source Name list.
9. On the next screen, if you are using SQL Server, click Next since the DSN is using Windows authentication. Otherwise, you may need to enter the database username and password.
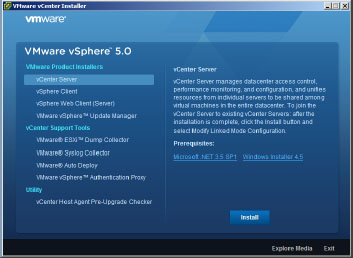
10. Select which account will run the vCenter Server Service (see Figure 3.3). You can use the SYSTEM account or a Windows domain account. If you want to use a Windows domain account, you must be logged in to the server with this account. Fill in the password and FQDN and click Next.
Figure 3.3: vCenter Server Service screen
TIP It is considered a best practice to use a Windows domain account, especially if the database is utilizing SQL Server, as you can then use Windows authentication when connecting to the database.
11. On the next screen, accept the recommended installation path or modify it, and then click Next.
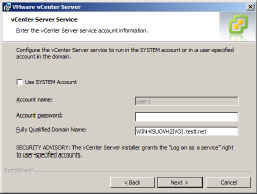
12. On the vCenter Server Linked Mode Options screen (Figure 3.4), choose to link this install to another vCenter Server or to create a standalone VMware vCenter Server instance. During an initial installation, you must create a standalone instance. Click Next.
Figure 3.4: vCenter Linked Mode Options screen
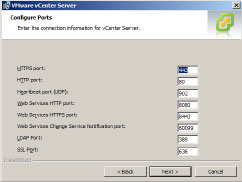
13. On the Configure Ports screen, as shown in Figure 3.5, review the default ports for vCenter Server and, if necessary, modify these ports to fit your environment. Click Next.
Figure 3.5: Configure Ports screen
14. Review the ports used for the Inventory Service and modify these if needed. Click Next.
15. The vCenter Server JVM Memory screen (Figure 3.6) is next. Select the option that best describes your environment. Click Next.
Figure 3.6: vCenter Server JVM Memory screen
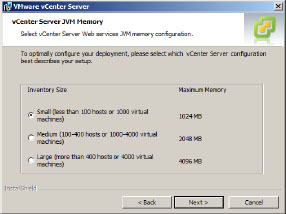
TIP JVM memory can be tuned later if needed.
16. The last screen has a check box that you can select which will bump up the number of the ephemeral ports that vCenter Server will use if you expect to need to power on 2,000 or more virtual machines simultaneously. Click Next to kick off the installation.
Deploy a vCenter Server Appliance
The quickest way to get vCenter Server up and running is to use the new vCenter Server Appliance. The appliance is based on a SLES 11 Linux install and is only supported on ESX/ESXi 4.0, 4.1, and ESXi 5.0. It can be downloaded from VMware and imported into an ESXi host.
NOTE vCenter Server Appliance has most of the capabilities of vCenter Server but is not quite at feature parity. For example, Link Mode is not supported with vCenter Server Appliance at this time.
To deploy a vCenter Server Appliance, follow these steps:
1. Download the vCenter Server Appliance from the VMware website. You will need the .OVF and two .VMDK files. Make sure you place all three files in the same folder on the computer on which you are running the vSphere Client.
2. From the vSphere client, go to File ⇒ Deploy OVF Template.
3. The Deploy OVF Template wizard will open (see Figure 3.7). Click the Browse button and navigate to the folder where the .OVF and .VMDK files are stored. Select the .OVF file and click Open. Now click Next.
Figure 3.7: Deploy OVF Template wizard

4. On the OVF Detail page, review the information and then click Next. Notice that if you wish to provision the full amount of disk space, the server will need 75 GB.
5. On the Name And Location screen, give the server a meaningful name and place it in the appropriate inventory folder. Figure 3.8 shows the server being placed in the Discovered virtual machine folder).
Figure 3.8: Placing the server in an inventory folder

6. Next, select a host or cluster for the server. Click Next.
7. On the Disk Format screen (see Figure 3.9), choose your disk type.
Figure 3.9: Disk Format screen
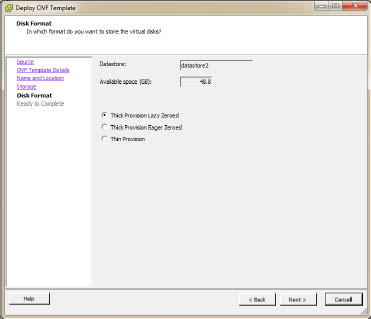
Your choices are:
- Thick Provision Lazy Zeroed: Space is allocated during the creation of the disk. Data on the physical device is not erased during creation. Data is zeroed out on first write from the virtual machine.
- Thick Provision Eager Zeroed: Space is allocated during creation. Data on the physical device is zeroed during creation. Supports clustering features such as Fault Tolerance.
- Thin Provision: The disk appears to the operating system to have the total amount of disk space but only the amount of space actually containing data is consumed on the physical disk.
8. On the Ready to Complete screen, review the summary of your selections and use the check box to specify whether you want to power the virtual machine on automatically once deployed. Click Finish.
Configure a vCenter Server Appliance
Once your vCenter Server Appliance is deployed and powered on, there are two phases of setup that have to happen: steps from the console and steps from the web browser.
Configure vCenter Server Appliance: Console Steps
There are three tasks that need to be completed from the console:
- Change the root password.
- Configure the network.
- Set the time zone.
Start by changing the root password. Follow these steps:
1. From within the vSphere Client, select your vCenter Server Appliance, right-click, and then select Open Console.
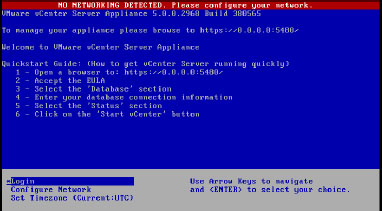
2. When you see the console (Figure 3.10), highlight Login. Hit Enter.
Figure 3.10: vCenter Server Appliance Console screen
3. Enter the default login ID (root) and password (vmware).
4. You should now have a prompt ending in #. This indicates you are logged in as the root user. Enter the command passwd and hit Enter.
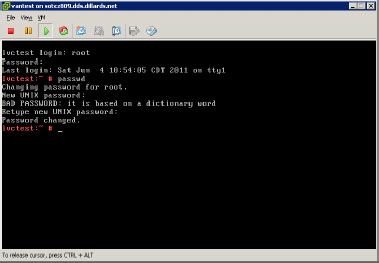
5. Enter a new password and hit Enter. Type it in one more time to verify it and hit Enter. Depending on the password you have chosen to use, you may receive an error about the password being based on a dictionary word as seen in Figure 3.11. The password will still be changed.
Figure 3.11: Changing the root password
6. Type exit to log out.
Now it is time to specify the network settings needed to be able to access the vCenter Server from over the network.
1. From within the vSphere Client, select the vCenter Server Appliance, right-click, and select Open Console.
2. Click inside the console and highlight Network. Hit Enter.
3. On the Change Network Configuration screen, specify whether you want the server to receive an IPv6 SLAAC address.
4. Specify whether you want the server to use DHCP instead of a static address.
5. If you specified No in step 4, enter the following information as prompted: IP address, netmask, gateway, DNS servers, hostname, and proxy if needed.
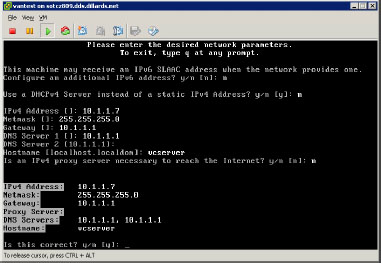
6. Review the summary of the network settings and press Y for yes if they are correct (see Figure 3.12).
Figure 3.12: Entering and confirming network parameters
7. The main console screen (see Figure 3.10) should reappear. Test the connection by pinging the vCenter Server Appliance from a remote client.
Finally, set the time zone the server is in.
1. From within the vSphere Client, select the vCenter Server Appliance, right-click, and select Open Console.
2. Highlight Set Timezone. Hit Enter.
3. Enter numbers for the continent, country, and time zone as prompted.
4. Review the summary of your choices and enter 1 for yes if the information is correct.
Configure a vCenter Server Appliance: Browser Steps
On the main console screen of the vCenter Server Appliance, you will see the URL to enter into a client browser to access vCenter Server Web Console. From here, you will need to perform additional steps in order to get the server ready to manage your environment.
1. In your browser, enter the URL found on the vCenter Server Appliance console screen.
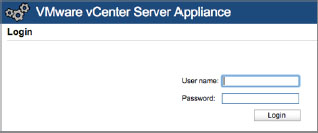
2. The VMware vCenter Server Appliance login screen should load (see Figure 3.13). Enter root as the user name and the password you entered for root when you changed it in the “Configure vCenter Server Appliance: Console Steps” section.
Figure 3.13: VMware vCenter Server Appliance Login screen
3. On the VMware vCenter Server End User License screen, click Accept EULA in the Actions section on the right hand side of the window.
4. To configure the database you wish to use, select the vCenter Server tab from along the top of the screen, and select Database.
5. In the Database Settings page, select the database type you will be using from the drop-down list (see Figure 3.14).
Figure 3.14: Database Settings screen
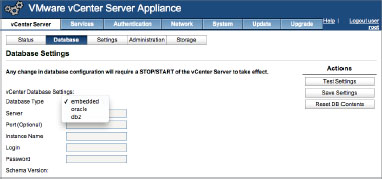
NOTE At the time of writing, Oracle is the only non-embedded databases supported for vCenter Server Appliance.
6. If you are not using the embedded database, enter the server and port information, instance name, login, and password for the database you will be using.
7. Test the connection by clicking Test Settings on the top-right side of the screen.
8. Once it has successfully connected, click Save Settings.
The next procedure is to set the inventory size for the vCenter Server Appliance. You need to do this in two places. Follow these steps:
1. Power off the vCenter Server Appliance.
2. Once the server is off, in the vSphere Client, right-click and select settings.
3. Under the Hardware tab, select Memory. Set the memory size based on your environment:
- 8 GB or higher for fewer than 100 hosts and 1,000 virtual machines within the vCenter Server Appliances’ inventory.
- 12 GB or higher for between 100 and 400 hosts or between 1,000 and 4,000 virtual machines within the vCenter Server Appliances’ inventory.
- 16 GB or higher for over 400 hosts or 4,000 virtual machines within the vCenter Server Appliances’ inventory.
4. Click OK to apply your memory selection.
5. Now power the vCenter Server Appliance back on and log in to the vCenter Server Web Console.
6. Click the vCenter Server tab and select Settings.
7. Select the inventory size from the drop-down list:
- Small corresponds to the 8 GB memory settings from step 3 above.
- Medium corresponds to the 13 GB settings from step 3 above.
- Large corresponds to the 17 GB settings from step 3 above.
8. Click Save Settings.
Now, vCenter Server can be started.
1. Click the status button under the vCenter Server tab.
2. Under actions, click Start vCenter.
Once the vCenter Server Appliance has started, you can now connect using the vSphere Client just as you would connect to any other vCenter Server.
vCenter Server is now ready for you to configure. To perform these tasks, you must install vSphere Client. Additional components can be installed before or after the installation of vSphere Client. To make the process flow more evenly, let’s start by installing the additional components first.
Install Additional Components
To extend the functionality of vCenter Server, additional components are included. These add-ons give vCenter Server greater functionality in the area of ESXi patching, as well as the ability to monitor and report on storage, display hardware status of ESXi hosts that are being managed by vCenter Server, and display health status of vCenter Server services.
Install vSphere Update Manager
As the vSphere environment grows, additional ESXi servers may be added. As the numbers of hosts grow, maintenance, and specifically patching, can become a burden. In the days of ESX 2.x, patches had to be copied to hosts, hosts had to be rebooted into a Linux single-user mode, and then patches were installed. Usually, it was easier to simply rebuild hosts using some type of automated scripting.
VMware released VMware Update Manager with the launch of Virtual Infrastructure 3 with the purpose of making the patching process significantly easier. In vSphere 5, this product has been rebranded as vSphere Update Manager.
NOTE With this release of vSphere Update Manager, VMware now requires 64-bit Windows; however, the database requires a 32-bit system DSN. A 32-bit system DSN for SQL Server can be created using the odbcad32.exe utility, which is installed in the SysWOW64 directory of Windows.
To take advantage of the abilities of vSphere Update Manager, follow these steps to install it:
1. Start the VMware vCenter Installer, and select vSphere Update Manager from the splash screen (shown in Figure 3.1, earlier in this chapter).
2. On the next screen, select the appropriate language setting and click OK.
3. Click Next at the Welcome Screen and Next again on the End-User Patent Agreement screen.
4. On the next screen, click “I agree to the terms of the license agreement” and click Next.
5. On the Support Information screen (see Figure 3.15), review the information about changes to vSphere Update Manager. Also, you can choose whether you want Update Manager to automatically download patches once installed. Click Next.
Figure 3.15: Support Information screen
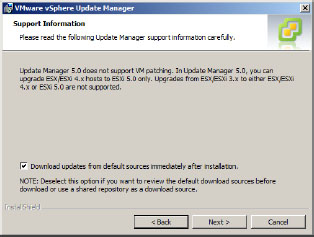
NOTE Take note of the information stated in Figure 3.15. In previous releases of vSphere Update Manager, the ability to patch guest operating systems existed. With this release, that functionality has been removed. Also note that vSphere Update Manager supports updating an ESX/ESXi 4.x host to ESXi 5.0. Version 3.x hosts will need to be updated to 4.x host first before upgrading to 5.0, making it much more appealing to do a new install on these hosts.
6. On the vCenter Server Information screen, shown in Figure 3.16, enter the IP address or FQDN and port of the vCenter Server installation, followed by a username and password so that vSphere Update Manager can properly communicate with vCenter Server. Click Next.
Figure 3.16: Entering vCenter Server information

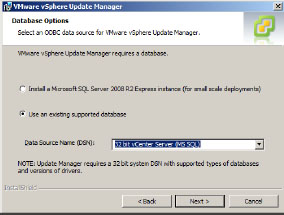
7. On the Database Options screen, select the database to be used for the vSphere Update Manager. If the default SQL Server 2008 R2 Express database was installed during the vCenter Server installation, select Install A Microsoft SQL Server 2008 R2 Instance; otherwise, select Use An Existing Supported Database and select the preconfigured DSN from the Data Source Name (DSN) drop-down menu (see Figure 3.17).
Figure 3.17: Selecting an existing database
8. vSphere Update Manager requires authentication. If the DSN created uses NT Authentication, then a username and password are not required. If the database uses database authentication, then enter a username and password and then click Next.
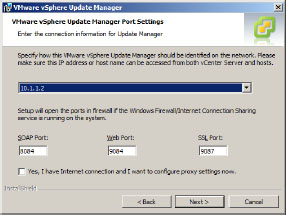
9. On the Port Settings screen (see Figure 3.18), enter the required connection information, which tells vCenter Server, ESX, and ESXi hosts how to talk to vSphere Update Manager. Then click Next.
Figure 3.18: Entering connection information
10. On the Destination Folder screen, accept the defaults or change to the directory where you want to install vSphere Update Manager and the directory to store the downloaded patches. Click Next.
11. On the Ready to Install the Program screen, click Install.
Install vSphere Web Client
The vSphere Web Client allows users to connect to a vCenter Server system to manage ESXi hosts through a web browser. This gives administrators running operating systems other than Microsoft Windows additional options to access vSphere Server. vSphere Web Client requires a 64-bit Windows operating system. The following operating systems are supported:
- Microsoft Windows Server 2003 Standard, Enterprise, and Datacenter, 64-bit SP2
- Microsoft Windows Server 2003 R2 Standard, Enterprise, and Datacenter, 64-bit SP2
- Microsoft Windows Server 2008 Standard, Enterprise, and Datacenter, 64-bit SP2
- Microsoft Windows Server 2008 R2 Standard, Enterprise, and Datacenter, 64-bit SP1
The following browsers are supported:
- Microsoft Internet Explorer 7 and 8
- Mozilla Firefox 3.5 and 3.6
Adobe Flash is required on the client computer to which you are connecting.
To install vSphere Web Client, follow these steps:
1. Start the VMware vCenter Installer, and select vSphere Web Client (Server) from the splash screen (see Figure 3.1, earlier in this chapter). Click Install.
2. On the next screen, select the appropriate language setting and click OK.
3. Click Next at the Welcome screen and Next again on the End-User Patent Agreement screen.
4. On the next screen, click “I agree to the terms of the license agreement” and click Next.
5. On the Customer Information screen, enter your name and organization. Click Next.
6. On the VMware vSphere Web Client Port Settings screen (Figure 3.19), change port settings if you need to, then click Next.
Figure 3.19: VMware vSphere Web Client Port Settings screen

7. Accept or change the installation folder location, then click Next.
8. Click Install to start the installation.
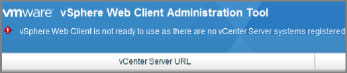
After installation, the browser will open to the VMware vSphere Web Client Administration Tool (see Figure 3.20). At the top of the browser window, notice the red exclamation point. This message is to get you to register a vCenter Server.
Figure 3.20: Exclamation Point on vSphere Web Client
1. In the upper-right corner of the browser window, click Register vCenter Server (Figure 3.21).
Figure 3.21: Click the Register vCenter Server link.
2. The Register vCenter Server screen will open (see Figure 3.22). Fill in the FQDN of the vCenter Server in the vCenter Server URL field, enter the user name that you will use to connect to the vCenter Server system, and enter the user’s password in the Password field.
Figure 3.22: Register vCenter Server screen
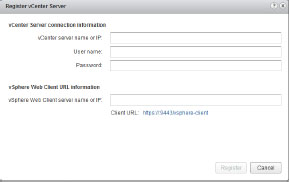
3. In the vSphere Web Client server name or IP field, enter the full qualified domain name for the vSphere Web Client.
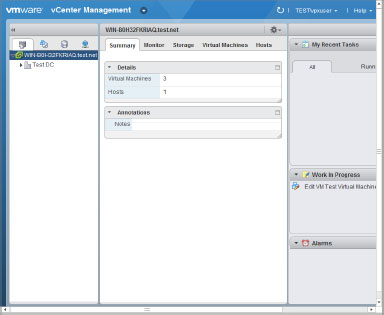
Once the vCenter Server has been registered, you can log in from a browser using the URL below, replacing “myserver.com” with the name of the server you installed vCenter Server on. If you are familiar with vCenter Server, you should not have any problem getting around in the web client (see Figure 3.23).
https://myserver.com:9443/vsphere-client
Figure 3.23: vSphere Web Client
vSphere Client is a full feature application that you install on a Windows operating system which allows the administration of a group of ESXi hosts. Follow these steps to install the vCenter Server client software:
1. Start the VMware vCenter Installer, and select vSphere Client from the splash screen shown in Figure 3.1, earlier in this chapter.
2. Select the appropriate language setting and click OK.
3. Click Next on the Welcome screen and Next again on the End-User Patent Agreement screen.
4. On the next screen, click “I agree to the terms of the license agreement” and click Next.
5. Enter the appropriate customer information on the next screen and click Next.
6. On the next screen, accept the default installation path or modify it, and click Next.
7. Click Install to start the installation.
8. On the final screen, click Finish to complete the installation.
vSphere Client is installed. Plug-ins for additional components that were installed will have to be added upon connecting to vCenter Server.
Now that vSphere Client is installed, the initial setup of the vSphere environment can begin.
Configuring vCenter Server includes these steps:
- Connecting to vCenter Server
- Installing plug-ins in vSphere Client
- Configuring Advanced Settings
- Creating a datacenter
- Creating clusters
- Adding hosts
Each of these steps must be accomplished to leverage the complete feature set of vSphere. For example, enterprise features such as VMware High Availability and Distributed Resource Scheduling cannot be used unless you’ve configured a cluster.
Connect to vCenter Server
vCenter Server operates as a Windows service on the vCenter Server system. There is no native interface in Windows to access the vCenter Server installation. This function is achieved via vSphere Client or web client.
To connect to vCenter Server:
1. Launch the VMware vSphere Client by choosing Start ⇒ Programs ⇒ VMware ⇒ VMware vSphere Client, or by double-clicking the VMware vSphere Client on the Desktop.
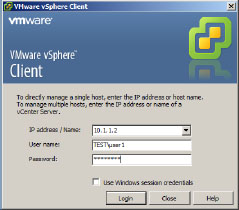
2. When vSphere Client login dialog box (see Figure 3.24) opens, enter the IP address or hostname of the vCenter Server, along with a valid username and password. Alternatively, select the Use Windows Session Credentials check box to use the context of the current user account logged in to the system.
Figure 3.24: vSphere Client login dialog box
3. A Security Warning dialog box appears. This message simply states that you have not chosen to trust the certificate that the vCenter Server is configured to use. Select the option Install This Certificate And Do Not Display Any Security Warnings for “IP/hostname.” Then click Ignore to continue.
4. When vSphere Client loads, if you have not configured licensing for your environment, you will be presented with an Evaluation Notice, warning you about the evaluation period, and what will occur if you do not install your licenses. Click OK.
Once you’re connected to vCenter Server, configuration can begin.
Install Plug-Ins in vSphere Client
Plug-ins extend the abilities of vSphere Client. VMware-provided plug-ins are installed through the Plug-ins drop-down menu in the vSphere Client interface.
The vSphere Update Manager component has a plug-in associated with it. Here’s how to install it:
1. In vSphere Client, select Plug-ins ⇒ Plug-in Management, as shown in Figure 3.25.
Figure 3.25: Select Manage Plug-ins from the Plug-ins menu.

The Plug-in Manager shown in Figure 3.26 appears. The installed plug-ins are listed, and vCenter Update Manager is listed as not installed.
Figure 3.26: Plug-in Manager
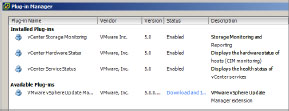
2. Click Download And Install next to vCenter Update Manager in the Status column. You’ll see the progress of the download, as shown in Figure 3.27.
Figure 3.27: Installing the vCenter Update Manager plug-in
3. Choose the appropriate language and click OK. Then click Next.
4. Select I Accept The Terms In The License Agreement, and click Next.
5. On the next screen, click Install.
6. Click Finish to complete the plug-in installation.
7. When you see the security dialog box, click Ignore.
8. Click Close to close the Plug-in Manager.
Configure Advanced vCenter Server Settings
Once the basic installation of vCenter Server is complete, you can configure some additional settings to add to the overall usefulness of the installation.
These advanced settings affect the way vCenter Server behaves under normal operation. Some of these settings are configured only once, and others may need to be modified depending on how the environment is managed.
To configure vCenter Server settings, first select Administration ⇒ vCenter Server Settings. The settings include the following:
License Settings These settings are used to manage licenses for vCenter Server and ESXi hosts, as well as legacy ESX and ESXi hosts. This topic will be discussed in more detail in Chapter 4.
Statistics These settings are used to modify the view or the statistics parameters for data collection, and provide database sizing estimations.
Runtime Settings The Runtime settings—Unique ID, Managed IP, Name Used—distinguish this vCenter Server installation from other installations when you’re using vCenter Server in Linked Mode.
Active Directory These settings are used to set up AD timeout, query limit, validation, and validation timeout. The settings are especially important when vCenter Server is part of a large Active Directory domain environment.
Mail These settings are used to configure a Simple Mail Transfer Protocol (SMTP) server for the purpose of sending out email alerts when alarms are triggered by issues occurring in clusters, hosts, guests, and the like.
SNMP Use these settings to configure Simple Network Management Protocol (SNMP) to send data to external monitoring services, or to allow for the querying of information from vCenter Server by external monitoring services.
Ports Use these settings to configure the web service ports for vCenter Server. The defaults are 80 and 443, and you should change them only if there are conflicts with other services operating on the same ports on vCenter Server.
Timeout Settings These settings are used to manage the amount of time vSphere clients should wait for a response for long and short operations. The settings can be used to tweak the timeouts when you’re using vSphere Client over low-bandwidth networks.
Logging Options These settings are used to modify the logging level for vCenter Server log files. You can change the level of logging to enhance troubleshooting when there are issues in the vSphere environment.
Database The total number of connections to the database is configured here. This setting can be changed to increase or decrease the number of connections, which can increase or decrease the performance of vCenter Server.
Database Retention Policy As events occur in the vSphere environment, they are logged in the vCenter Server database. Collection of these events over time can increase the size of the database. The retention policy will allow you to purge events and tasks that are older than the number of days you configure here.
SSL Settings These settings are used to view and require SSL certificate checking between ESXi hosts when you’re adding them to vCenter Server, as well as when you’re using vSphere Client to connect to the console of guests.
Advanced Settings The advanced settings section allows you to change the value of a variety of settings such as the port used for the SMTP server, log file sizes, and the time to wait for a users and group query to return from Active Directory. In general, you should not change these settings unless you have a specific need to.
Create a Datacenter
To begin configuring the virtual environment, you need a datacenter. A datacenter is the logical container of clusters, ESX and ESXi hosts, resource pools, and virtual machines. Multiple datacenters are typically created when a vCenter Server instance is managing hosts and guests in multiple locations, but this is not a required configuration.
Create a datacenter using one of the following methods:
- Select File ⇒ New ⇒ Datacenter
- Press Ctrl+D
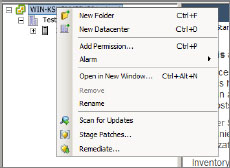
- Right-click on the vCenter Server name in the left panel and choose New Datacenter from the initial logon screen, as shown in Figure 3.28.
Figure 3.28: Creating a new datacenter
- Click Create A Datacenter on the Getting Started tab in the right panel.
The datacenter will be named New Datacenter, and the name will be highlighted, allowing you to rename the datacenter as appropriate for your environment or to coordinate with your environment’s naming standards.
To change the datacenter name, simply type the new name while it is highlighted, and then press Enter.
Add a Cluster
Clusters are not a requirement in the vSphere environment, but they do provide for additional capabilities in vCenter. Clusters enable you to use features such as High Availability (HA) and Dynamic Resource Scheduling (DRS) across ESX and ESXi hosts.
To leverage these features, let’s configure a datacenter:
1. Select a datacenter object, then add a cluster by using one of the following methods:
- Select File ⇒ New ⇒ Add Cluster.
- Press Ctrl+L.
- Right-click on the datacenter and select New Cluster.
2. When the New Cluster Wizard opens, as shown in Figure 3.29, enter a name for the cluster in the Name text box.
Figure 3.29: Entering a name in the New Cluster Wizard
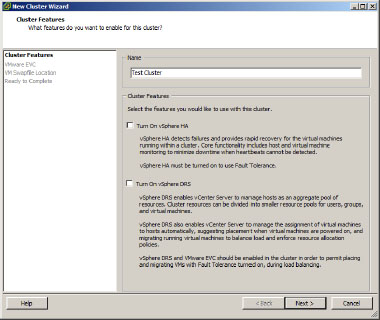
3. As cluster features are selected, the list of steps in the left panel will include additional components for configuration.
4. To enable vSphere High Availability features, select the Turn On vSphere HA check box.
5. To enable vSphere Distributed Resource Scheduling, select the Turn On vSphere DRS check box.
6. Click Next to continue.
We’ll continue these steps in the next section.
Configure vSphere DRS
If you selected Turn On vSphere DRS in step 5 in the previous section, you’ll see vSphere DRS options in the New Cluster Wizard, as shown in Figure 3.30. Follow these steps to configure vSphere DRS:
Figure 3.30: vSphere DRS options in the New Cluster Wizard
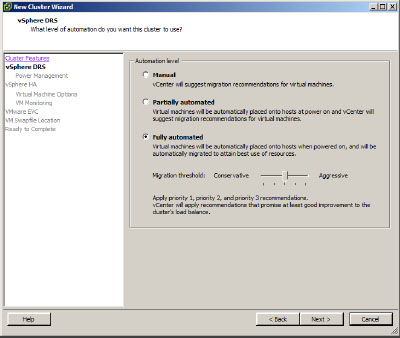
1. On the “What Level Of Automation Do You Want This Cluster To Use?” screen, the DRS feature allows vCenter to load-balance guests across hosts to make sure that there is an even load across all hosts. Select one of the radio buttons on this screen:
Manual Choose this option to have vCenter suggest when guests need to be migrated between hosts.
Partially automated Choose this option to have vCenter suggest when guests need to be migrated between hosts as well as automatically placing guests on hosts when they are powered on.
Fully automated Choose this option to have vCenter automatically place guests on hosts when they are powered on and automatically migrate guests to make the best use of available resources.
2. Move the Migration Threshold slider to determine whether vCenter should use aggressive or conservative decisioning for the movement of guests between hosts in the cluster.
3. Click Next after you make your choices.
4. The Power Management screen (Figure 3.31) allows vCenter to power hosts on or off as required for a cluster’s workload.
Figure 3.31: Power Management options in the New Cluster Wizard

Select one of the following:
Off Choose this option to disable Power Management.
Manual Choose this option to have vCenter recommend evacuating guests from one or more hosts, and power the host off when the workload does not require the hosts. This will also automatically power hosts on when the workload requires additional host resources.
Automatic vCenter will automatically execute power recommendations. Move the DPM Threshold slider to determine whether vCenter should use aggressive or conservative decisioning for the powering on or off of hosts, depending on workload.
5. Click Next to continue.
Configure vSphere HA
If you selected Turn On vSphere HA in step 4 at the beginning of the “Add a Cluster” section, you’ll see vSphere HA options in the New Cluster Wizard, as shown in Figure 3.32.
Figure 3.32: vSphere HA options in the New Cluster Wizard

The High Availability feature lets ESX and ESXi hosts restart virtual machines when an ESX or ESXi host fails. The guests will be restarted on other hosts in the cluster.
Follow these steps to configure vSphere HA:
1. Select the Enable Host Monitoring check box to have vCenter monitor hosts through heartbeats. This option can be deselected during maintenance schedules to prevent host isolation issues, resulting in unnecessary HA failovers.
2. Select an Admission Control option. The Disable button allows guests to be powered on even if doing so would violate the available resource policy. If you click the Disable button, guests will not be powered on if they require more resources than are available.
3. Specify the type of Admission Control Policy. Select one of the available radio buttons to choose a policy based on the number of allowed host failures or the percentage of cluster resources to be reserved for HA, or to specify a specific host to fail over to. Click Next to continue.
4. Next, you’ll see the Virtual Machine Options screen (Figure 3.33). Specify a VM Restart Priority for this cluster. Higher-priority guests are started first.
Figure 3.33: Virtual Machine Options in the New Cluster Wizard
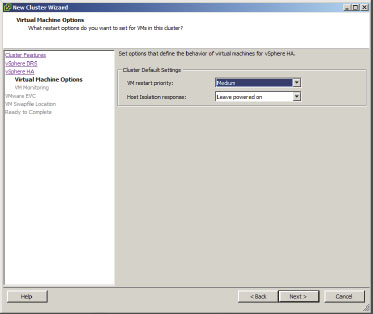
5. Select a Host Isolation Response. This option determines what a host should do with guests if it loses connectivity with vCenter and/or the default gateway. The default is Leave Powered On. The other options are Power Off and Shut Down.
Selecting Leave Powered On ensures that VMs remaining running in a HA isolation condition. This is especially important when using iSCSI or NFS-based shared storage.
NOTE The lock/split brain issue when using IP-based storage has been resolved since VSphere 4.0 Update 2. We no longer need to immediately power off hosts in an isolation condition as long as there is still IP-based storage connectivity.
Click Next to continue.
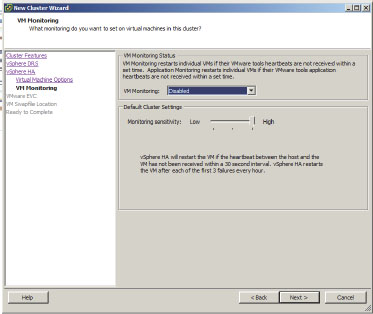
6. The VM Monitoring options (Figure 3.34) appear next. In the VM Monitoring menu, select Enabled if you want to restart guests when VMware tools heartbeats are not received in a given amount of time. Move the Monitoring Sensitivity slider to change the time threshold for monitoring the VMware tools in each guest. Click Next to continue.
Figure 3.34: VM Monitoring options in the New Cluster Wizard
7. The VMWare EVC screen (Figure 3.35) asks if you want to enable Enhanced vMotion Compatibility (EVC) for this cluster. This feature allows you to maximize vMotion compatibility and ensures that only hosts that are compatible with those in your cluster can be added to the cluster. EVC will only present the CPU instruction set of the least capable processors to each guest. Select the appropriate radio button, then click Next to continue.
Figure 3.35: VMware EVC options in the New Cluster Wizard

NOTE When you select either of the Enable options, a drop-down box is provided so you can select the type of hosts being used. Your selection will determine which processor instruction sets are required for a host to become part of the cluster.
8. The Swapfile Policy for Virtual Machines screen is next (Figure 3.36). Specify whether a guest’s swap file is stored with the guest on shared storage, or on a dedicated datastore. Choose the desired option and click Next.
Figure 3.36: Virtual Machine Swapfile Location options in the New Cluster Wizard

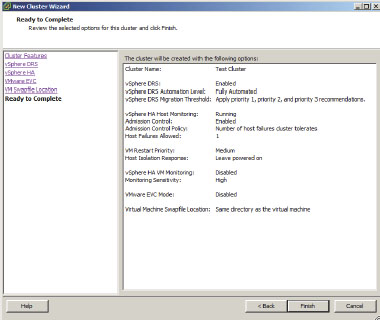
9. When you see the Ready To Complete screen (Figure 3.37), make sure the configuration settings are correct and click Finish.
Figure 3.37: Ready To Complete screen in the New Cluster Wizard
Add a Host
If vCenter Server is the central management point of vSphere, ESX and ESXi hosts are the workers of the environment. To use hosts in a managed vSphere environment, you must add them to the vCenter Server.
To add and configure a host, follow these steps:
1. Add a host using one of the following methods:
- Select File ⇒ New ⇒ Add Host.
- Press Ctrl+H.
- Right-click on the datacenter you created, and select Add Host.
- Click Add A Host on the Getting Started tab in the right panel when a given datacenter is selected.
Once you complete one of these steps, the Add Host Wizard opens.
2. On the Specify Connection Settings screen, enter either the IP address or the FQDN of the ESX or ESXi host you want to add.
3. Enter root as the username and enter the appropriate password for the root user on the host you want to add. Then click Next.
4. Click Yes when presented with a security alert. This alert is shown because a self-generated, self-signed certificate (provided by VMware), which has not been trusted by the Windows system yet, has been installed on the host installation.
5. The Add Host Wizard will show a summary of the ESX or ESXi host you are adding and any virtual machines that may already reside on it. Click Next.
6. You will now be prompted to add a license key. If you have not installed your licenses, you can choose Evaluation Mode, as shown in Figure 3.38. Click Next when finished.
Figure 3.38: Assign License screen

7. The Lockdown Mode screen is next. Enable this if you want only the vpxuser to have authentication permissions and to be able to perform operations against the host directly. All operations initiated by other users have to happen in vCenter Server.
8. On the Virtual Machine Location screen (shown in Figure 3.39), specify a location for the host’s VMs.
Figure 3.39: Specifying a location for the host’s VMs

9. On the Ready To Complete screen, click Finish to add the host to the datacenter, and if you specify one, the selected cluster.
10. Now that you’ve added a host to the cluster, your work is not done. Clusters are only useful when the cluster contains more than one host. Add one or more additional hosts to the cluster using the same steps.