Section 4. Store and Share Information Using Office Live Shared Sites
Sharing and storing information, such as Word documents, Excel spreadsheets, and similar files, on your Office Live site is one of the most compelling reasons to sign up for Office Live Essentials. Office Live gives you access to the Shared Site tool so that users can have the benefit of Microsoft SharePoint technologies without the company having the expense of creating, administering, and maintaining its own SharePoint sites. SharePoint sites enable companies to share information, collaborate with employees and customers, and store documents in a centralized storage area.
Administering Your Shared Site
The Shared Sites link on the navigation bar provides links for you to administer your Office Live Shared Sites. Some of these links, such as Users & Accounts, are also available under the Business Applications navigation bar. You can read more about users and accounts in previous sections of this Short Cut.
The Shared Sites page displays bar graphs indicating the amount of storage consumed and the number of users you have set up for the site. These are handy when you are not sure how many open user accounts you have or the amount of storage space you can use. The following sections describe the Shared Sites administration features you can use for your Office Live site.
Using the Site Directory
The Site Directory displays the list of Shared Sites that you have permission to administer (see Figure 16).
Figure 16. View the Site Directory.

By default, the sites include the following:
On the Site Directory page, you also can see the date the site was last modified. To access a site, click its link in the Site Directory to visit to that site's home page.
Using the Site Manager
To view and perform more tasks for your Shared Sites, use the Site Manager link. You're shown the Private Site Manager page. Here, you can do the following:
- Click the New button to set up a new site. The Choose Site Template window appears, from which you can choose one of your site templates, a team site, blank site, document workspace, or basic meeting workspace. Work through the wizard to set up your new Shared Site. At the end of the wizard, the new site is created with a new URL for it.
- Click the Import button to upload template files for your Shared Site.
- Click the Delete button to remove a Shared Site from your site.
- Click a Shared Site link to open that site's home page.
- Click Add User for a site (under Options on the right side of the page) to display the User Permissions page. You can add users to this site from there.
- Click Site Settings to display the Site Administration tab, as discussed in the preceding section.
The Site Manager page also displays bar graphs indicating the amount of storage consumed and the number of users you have set up for the site.
Using Administration to Restore Your Site
The Administration link on the Shared Sites page enables you to set the time zone for your site and to restore your site to a previously backed-up version (see Figure 17). Office Live automatically performs daily backups of your site, providing you with assurance that your site can be restored in case of corruption or accidental deletion of files. Of course, if you delete files that have not been backed up yet—for example, files that have been uploaded to a document library in the past two hours—those files will not be restored because they are not part of any backup set.
Figure 17. Restore a Shared Site from backup.

Your website and application data has one backup maintained, so you can restore to that copy. The advantage of this is that the last backup is saved. The disadvantage is that you cannot jump over a backup period, such as yesterday, and go to a previous backup, such as last week.
To revert to a backup of your Shared Sites, use the following steps:
- Click Administration on the Shared Sites page. The Site Administration page appears.
- Make sure that the Shared Sites tab is displaying. If not, click it.
- Click the Restore Now button. A message appears warning you that any changes made since the last backup (the backup time and date are in the message) will be lost.
- Click OK if you are sure that you want to restore your site to a backup.
Note
Although the backup feature of Office Live is painless and automatic, you might want to make backups of key documents and other files yourself. Do this by downloading documents to your local drive or network and saving them during your routine network and system backups. This way you have copies of them locally if the Office Live backup does not contain these documents during a restore.
Collaborating with Others Using Office Live
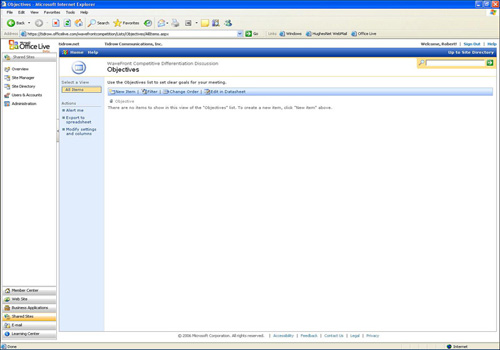
You can create a meeting workspace Shared Site that enables users to submit comments, agendas, upload documents, respond to comments posted by others, and establish objectives for an online meeting (see Figure 18).
Figure 18. Set up a meeting workspace.
To set up a meeting workspace, do the following:
- Click Site Manager under the Shared Sites navigation bar.
- Click the New button on the Private Site Manager page. The Choose Site Template appears.
- Click Basic Meeting Workspace.
- Click Next. The Enter Site Description appears.
- Type a site name for your online meeting.
- Delete the default address in the Site Address box and enter your own address here. Make it short and something you can remember.
- Enter a description of the meeting workspace in the Description box.
- Click Next. The new site is created. When finished, the Confirmation window appears with a link to the new site.
- Click the link to try your new site.
- Press Alt+Tab to Choose Site Template and click Finish when you finish viewing your new site.
After you set up the new collaboration workspace, you need to use the collaboration tools to get the workspace set up for the meeting.
Using Collaboration Tools
When you set up a meeting workspace Shared Site, the following tools are available:
- Objectives—Click the Objectives link to display the Objectives page. Click the New Item to set up new goals for your meeting. Enter an objective in the Objective box. If the objective is part of a file, you can attach a file by clicking the Attach File button. Click Save and then click Close when your objective is ready. Click the Home link at the top of the Objectives page. You return to the meeting workspace.
- Attendees—Click Manage Attendees under the Attendees tool to specify those who are to attend the online meeting. On the Attendees page, click Add Attendee and type the email address of the person you want to attend the meeting. You also can click the Address Book button to select attendees from your Outlook Contacts list. Click the Home link at the top of the Attendees page. You return to the meeting workspace.
- Agenda—Click Add a New Item under the Agenda tool to create a meeting agenda. Enter a subject, owner, time, and notes for the new agenda item. If you want, you can modify the Notes section with different fonts, bullet lists, colored text, and other formatting to call attention to important points you want to address. Click Save and Close. You return to the meeting workspace.
- Document Library—Click Add New Document under Document Library to upload a document to the document library. If you want the document to overwrite a file with the same name that is already in the document library, keep the Overwrite Existing File(s) option selected. Use Browse to locate the document to upload. Click Save and then click Close to return to the meeting workspace.
When you finish building the meeting workspace, you can announce its website address to the attendees. The attendees can log in to the website and begin commenting on the agenda items, reviewing the documents in the document library, and providing feedback on the objectives.