
The network service most commonly used on a Lion Server is VPN. This can be seen by the fact that the VPN service can be managed through the Server application. Setting up the VPN service can be done in about two or three minutes, and as mentioned previously, if you have an Apple AirPort acting as the gateway for the environment, the VPN service automatically opens ports into the server.
VPN is short for Virtual Private Network. A VPN is a tunnel that allows interconnecting two insecure networks by establishing a discreet channel between them. There are site-to-site VPNs that connect two entire networks, but this is the type of feature typically best left for VPN appliances, such as those by Cisco or SonicWALL. For the VPN services in Lion Server, we will only be looking at L2TP, or the Layer 2 Tunneling Protocol.
The L2TP server is simple to configure. Simply open the Server application and then click on the VPN service in the SERVICES section of the Server sidebar. Here, you will see three fields, as seen in Figure 9-1. The Shared Secret is a second password used for client systems. You will also have two fields for “Assign addresses between,” which act as the first and last IP address dynamically handed out to clients who connect to the VPN. The Shared Secret will need to be provided to all VPN users and acts as a second factor in authenticating users (if the client doesn’t have the correct Shared Secret then the username and password will not be submitted to the server). The IP addresses that are provided to clients should not conflict with any other DHCP scopes in use in the network (more on DHCP in the next section).

Once you have provided the Shared Secret and the IP addresses to be used by clients, use the ON and OFF switch to enable the L2TP service and the service will start, showing a green light (or jelly in Apple’s terminology) beside the service once started.
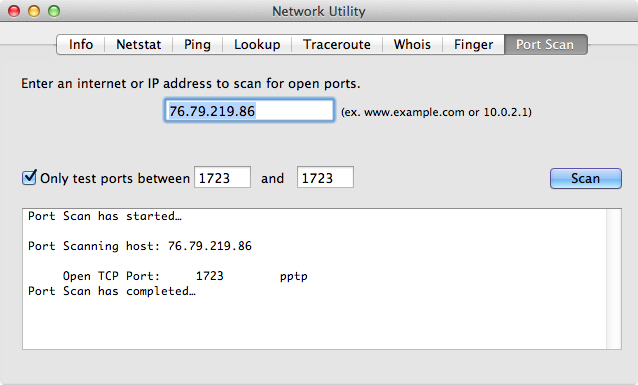
Once enabled, you will need to open a few ports on your firewall. These include 500 (UDP), 1701 (UDP), 4500 (UDP), and 1723 (TCP). These should all be directed from the firewall, or gateway, to the IP address of the server. Once configured, you can use a port scanner, such as that available within Mac OS X’s Network Utility to test the availability of ports. In Figure 9-2 we look at testing port 1723 for the IP address of a server from a remote location.
Many client systems will also use DNS to connect to the VPN server. If this is the case, then the public DNS will need to direct VPN clients to the public address of the gateway. For example, if you have a firewall configured on a public IP address, then the DNS name will need to point to the IP address of the firewall, which then routes incoming connections for the forwarded ports to the server. You can have multiple names for each IP address, and so to help future-proof your environment, it is often a good idea to configure a record for let’s say vpn.krypted.com as well as another for calendar.krypted.com. This helps keep internal traffic routing to multiple servers even if they appear as one server from outside of your local network.
Finally, you will need to make sure that each user who you want to have VPN access has permissions to access the VPN. To do so, open the Server application and click on any user. Then click on the cogwheel icon toward the bottom of the screen and select Edit Access to Services… from the options shown. At the Service Access screen, check the box for VPN if it has not already been selected for the user account and click on the OK button to save your changes to the user’s account.
You can select multiple accounts at the same time by holding down the Command key while clicking on user accounts and add access to the VPN service for all of them concurrently.
Once incoming connections are able to reach the server, it is time to configure clients. In this section, we will look at configuring an iPad and a Mac OS X client to connect to the VPN service. The iPad will have fewer options (e.g., cannot have a static IP address, subnet mask, or gateway setting) and so relies more heavily on the VPN service to be configured properly.
To configure the L2TP client on an iPad (or any other iOS-based device), open the Settings application on the device and then tap on General in the Settings sidebar. Next, tape on Network and then tap on VPN. Tap Add VPN Configuration… to create a new VPN connection.

At the Add Configuration screen (Figure 9-3), provide the following settings:
- Description
A description so users know what connection they are using (e.g., work or home VPN)
- Server
The IP address or DNS name of the server
- Account
The username used on the server
- RSA SecurID
Only use this option if you have a VPN that leverages an RSA SecurID token
- Password
The user’s password
- Secret
The Shared Secret provided when the VPN service was enabled
- Send All Traffic
Routes all traffic going out of the iPad through the VPN tunnel, including traffic destined for the Internet that doesn’t necessarily need to route through the VPN; for most environments, it is fine to disable this option to keep the amount of traffic coming into the network at a minimum
- Proxy
Use the proxy settings to provide a proxy server (e.g., a Squid server) if you are using one; otherwise leave the Proxy set to Off
Tap Save when you have configured the L2TP options and you will then see the new VPN connection in the Choose a Configuration… list. If the Configuration is checked, then use the ON and OFF switch in the VPN screen to enable or disable the VPN connection.
Provided that the VPN connection is established properly, the Status button will show that it has been connected and display how long the connection has been established for. Tapping on the connection then shows the public IP address of the VPN service in the Server field, the time connected in the Connect Time field, the LAN IP address of the VPN server in the Connected to field, and the IP address that is given to the client in the IP Address field of the Status screen.
Practically any computer can connect to the L2TP service in Lion Server, including Mac OS X-based computers. While configuring iOS clients has little in the way of advanced features, Mac OS X VPN clients have a number of advanced features, including the ability to statically assign IP addresses and DNS servers.
To connect a Mac OS X computer to the VPN service, open the System Preferences (available under the Apple menu from any screen in Lion). Click on Network to bring up the Network System Preference pane.
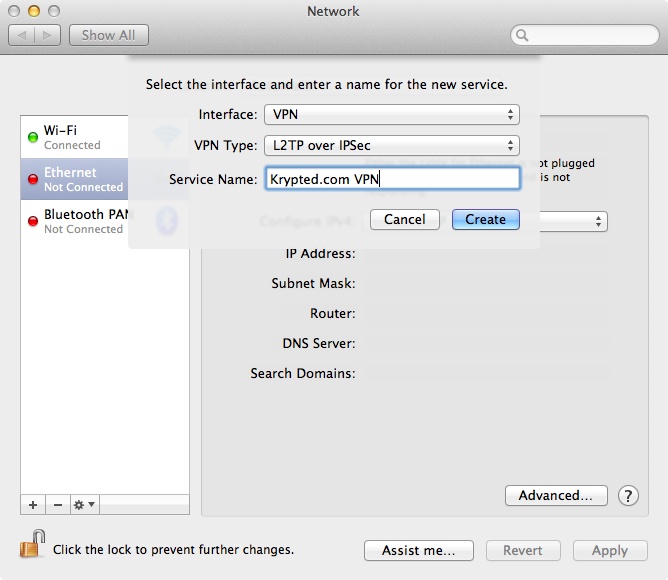
At the resultant pop-up menu, select VPN in the Interface field and then L2TP over IPSec in the VPN Type field. Provide a name that makes it easier for whomever will use the interface to connect to the system (such as Krypted.com VPN in Figure 9-4). Click on the Create button to go to the new L2TP interface.
From the newly created entry (Krypted.com VPN in Figure 9-5), provide the public IP address or DNS name of the Lion Server in the Server Address field and the username that was created in the Server application in the Account Name field.

Then click on the Authentication Settings… button to bring up the Authentication screen (Figure 9-6). Here, provide the user’s password in the Password field and the Shared Secret from the Server application in the Shared Secret field, clicking on the OK button when you are finished.
Note
There are a number of other options in the Authentication screen that allow you to configure Kerberos, certificates, and various two factor authentication options. These are not by default configured with Lion Server as a VPN Server option; however, in order for connections to be established on demand, one of these options may be required. In the event that a non-Lion Server based VPN is being used and one of these options is required, see your network administrator for tips on configuring these options.

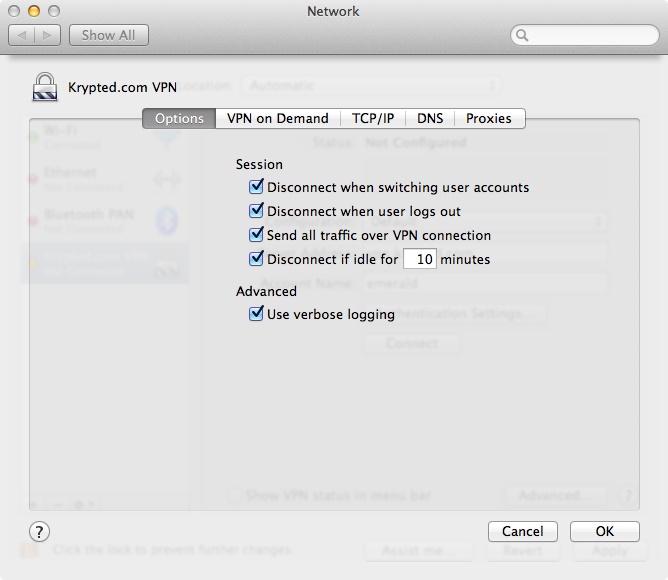
At the main screen for configuring the VPN connection (Figure 9-6), click on Advanced to bring up a number of options, which are as follows (Figure 9-7):
- Options
Configure disconnect times, whether all traffic runs over the VPN and logging options
- VPN on Demand
Enables the VPN attempting to access a network resource accessed through the VPN tunnel
- TCP/IP
Configure static IP addresses, gateways and subnet masks
- DNS
The VPN client should automatically obtain a DNS server when connecting to the Lion Server’s VPN service; however, you can also manually configure the DNS server or Search Domains (which are not provided by the VPN service automatically) using this screen
- Proxies
Allows administrators to configure proxy settings for clients. We don’t cover proxies in this book, but many larger environments use them to secure various types of traffic and reduce network overhead of their connection to the Internet; if your environment requires a proxy to be configured request the appropriate settings to use here from your network administrators
The final option to cover is one of the most useful. At the main configuration screen for the VPN connection, there is an option to Show VPN status in menu bar. Using this option, users can click on a VPN icon in the upper-right corner of the screen and automatically establish a connection to the VPN. This makes the VPN far more usable, as users don’t have to use the System Preferences to access the connection. Additionally, configuring the VPN on Demand options to automatically establish connections to resources over the VPN can help to make it where users don’t even know they’re accessing a VPN other than the slight latency encountered when opening the initial VPN-based resource. This helps to further the security and usability of the VPN, making it a truly useful and secure service.