
Chapter 5. X11
The X Window System (X11) is the basis of Ubuntu’s user interface. X11 is responsible for managing your keyboard, mouse, or touchpad, and also takes care of the hardware acceleration features required by 3-D applications such as games. It’s where you spend most of your time, so it’s important to get it configured just right.
This chapter will help you customize X11 to work exactly the way you want it to. Although nearly every mouse, keyboard, or touchpad will work right out of the box with Ubuntu, you can use the X11 configuration file and some related utilities to get a lot more out of them. If you want to tune X11 to take advantage of all the acceleration features offered by your graphics adapter, spread your desktop across multiple screens, or get your fonts looking just right, the hacks in this chapter will help you out.
Configure Multibutton Mice
Seven buttons, a tilt/scroll wheel, and who knows what else? Find out how to put all those bells and whistles to good use.
Gamers love mice with more buttons than the Space Shuttle because the extra buttons can be mapped to provide quick access to common functions, but getting them working under Linux can be a bit tricky.
Open the Xorg configuration file at /etc/X11/xorg.conf in a text editor (for
example, using the command sudo
vi /etc/X11/xorg.conf) and look for a stanza
labelled InputDevice. If your computer is a laptop with a
touchpad, it may have several InputDevice entries, so make sure you find the
one that refers to your mouse. If it was configured automatically by
Xorg, it will probably look something like this:
Section "InputDevice"
    Identifier   "Configured Mouse"
    Driver        "mouse"
    Option        "CorePointer"
    Option        "Device" "/dev/input/mice"
    Option        "Protocol" "ImPS/2"
    Option        "ZAxisMapping" "4 5"
    Option        "Emulate3Buttons" "true"
EndSection
Start by changing the Protocol
value. The ExplorerPS/2 driver supports more
devices than the older ImPS/2 driver, so substitute
this line:
Option "Protocol" "ExplorerPS/2"
Since your multibutton mouse almost certainly has a middle button,
you don’t need the Emulate3Buttons
option anymore, so delete it.
Unfortunately, there is no way for your computer to automatically determine the number of buttons available on a mouse, so you need to add an option that explicitly tells Xorg how many it has. It’s obvious that you need to count all the actual physical buttons on the mouse, but remember that you usually need to add three more: one for clicking the scroll wheel, one for scroll-up, and one for scroll-down. A typical scroll mouse with two main buttons on the top, two on the side, and a scroll wheel actually has seven buttons as far as the driver is concerned, so add a line like this:
Option "Buttons" "7"
Next, map the action of the scroll wheel to virtual buttons using
the ZAxisMapping option. In the case
of a simple scroll wheel that moves only up or down, you can assign two
values, which are associated with negative (down) and positive (up)
motion, respectively:
Option "ZAxisMapping" "4 5"
Some mice have a scroll wheel that also rocks from side to side, and some even have two scroll wheels, in which case you can add mappings for negative and positive motion in the second axis:
Option "ZAxisMapping" "4 5 6 7"
Unfortunately, you may find the second scroll direction isn’t recognized by Xorg at all because there is currently no standard for defining how mice should encode horizontal scroll data when it’s transmitted to the driver. Even if it is recognized, you may find the rocker or second scroll wheel moves in the opposite direction to what you expect, so you may need to reverse the third and fourth values.
Some browsers such as Firefox are hardcoded to use buttons 4 and 5 as shortcuts for “back” and “forward,” but because some wheel mice report wheel-up and wheel-down as the fourth and fifth button events, respectively, you may need to do some extra work to use the side buttons as back and forward. You can remap the reported button events by calling xmodmap:
xmodmap -e "pointer = 1 2 3 6 7 4 5"
The xmodmap command will need to be run each time
you log in to GNOME, so go to System→Preferences→Sessions→Startup
Programs and put in the whole line; then compensate for the offset
button values by using a modified ZAxisMapping line in /etc/X11/xorg.conf:
Option "ZAxisMapping" "6 7"
One final option you can configure is mouse resolution. Many
multibutton gaming mice run at very high resolutions to enable accurate
targeting, but you may find that it throws off Xorg’s response curve. In
that case, it may help to add a Resolution option in dpi (dots per
inch):
Option "Resolution" "2400"
Once you have made all of these changes, your mouse configuration will look something like this:
Section "InputDevice"
    Identifier   "Configured Mouse"
    Driver       "mouse"
    Option       "CorePointer"
    Option       "Device" "/dev/input/mice"
    Option       "Protocol" "ExplorerPS/2"
    Option       "Buttons" "7"
    Option       "ZAxisMapping" "4 5"
EndSection
To apply changes, you need to restart Xorg. The easiest way to do
so is to log out of your current session and then press
Ctrl-Alt-Backspace, which will kill Xorg and force GDM to restart it (if
GDM doesn’t restart it, log in at the console and run the command
sudo /etc/init.d/gdm restart).
Log back in and launch xev, the
X EVent reporter, and click each button and scroll the scroll wheel in
both directions. Each event will cause a button number to be reported in
the terminal. If everything went as planned, each button will report a
different button number.
Enable Your Multimedia Keyboard
Make the most of the additional keys on your multimedia keyboard.
When you press a key on your keyboard, it detects the key press and sends a corresponding "keycode,” which is then matched using a lookup table that converts the keycode to a character. However, many modern keyboards have a variety of additional keys that typically return keycodes that aren’t included in the standard lookup table, so Linux doesn’t know what to do with them.
In Ubuntu, you can use these extra keys as shortcuts for such tasks as opening email, launching a browser, or changing audio volume. With the help of GNOME Preferences, you can configure some special actions, but for maximum flexibility, Hotkeys lets you completely customize shortcut-key behavior.
Assign GNOME Keyboard Shortcuts
If you want to create shortcuts only for basic tasks, start by opening System→Preferences→Keyboard Shortcuts to see a list of predefined actions, as shown in Figure 5-1.
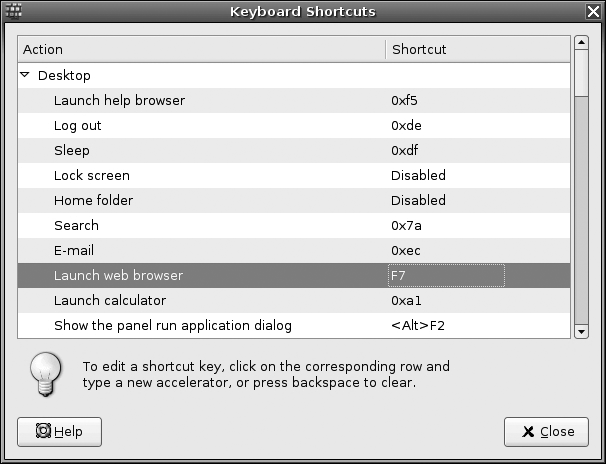
Click on the shortcut entry for an action and then press the key combination you want to associate with it. For example, if you want F7 to launch your web browser, click the shortcut entry next to “Launch web browser” and then press F7. Changes are applied immediately, so there is no need to save the new settings.
The built-in GNOME keyboard-shortcut settings include only predefined actions, so if you want to launch a custom script or an arbitrary program, you’ll need something more flexible, such as Hotkeys.
Hotkeys
Hotkeys is a program that intercepts keycodes from multimedia keys and maps them to specific events. The events are totally user-definable, so you can configure keys to run programs or even custom scripts. For example, in addition to basic actions such as controlling volume, opening email, or launching a browser, you can set keys to do things such as initiate an SSH connection to a remote machine, change your desktop background, launch OpenOffice.org, start a backup, or pretty much anything else you can think of.
Hotkeys is in the universe group of extra software that’s not officially supported by Ubuntu, so if your computer is not set to use software from universe, you may need to “Modify the List of Package Repositories” [Hack #60] before you can install it:
$ sudo apt-get install hotkeysUnderstand Hotkeys configuration parsing
Because Hotkeys uses a two-stage configuration system, it may not be immediately obvious what you need to change to customize commands, and sometimes the changes you make don’t seem to be applied. However, it all makes perfect sense once you understand how Hotkeys parses its configuration files.
The first stage is the keyboard definition file, which does two kinds of mapping: indirect conversion of keycodes to predefined events, and direct conversion of keycodes to user-defined commands. The second stage is the Hotkeys configuration file, which does a second mapping for predefined events, associating them with explicit commands.
This approach allows Hotkeys to map the keycode generated by
the Favorites button on your keyboard with a predefined Favorites
event using the keyboard definition, and then map the Favorites
event to a specific command such as gnome-moz-remote --remote=openBookmarks in the Hotkeys
configuration. That way, the majority of standard actions can be
defined in the Hotkeys configuration, and making them work with a
different keyboard is just a matter of switching the keyboard
definition file.
However, you can also define custom events right in the keyboard definition. This approach maps a keycode straight to a command directly without referring to the Hotkeys configuration file at all. This is how you will probably define more unusual actions, such as launching a terminal and automatically opening an SSH session to a predefined host.
Set keyboard type
The first step to configuring Hotkeys is to define your keyboard type so the correct keycodes can be recognized. Hotkeys comes with sample configurations for a variety of standard keyboard types, so if you’re lucky, you may be able to just select your keyboard from the samples and everything will just work. To see a list of supported keyboard types, run:
$ hotkeys -lThen you can specify one of those keyboard types when you
launch Hotkeys using the -t
flag.
But what if your keyboard isn’t in the list of supported models?
No problem. You can define a custom keyboard type by copying the /usr/share/doc/hotkeys/sample.xml sample file into a .hotkeys directory inside your home directory, and you can then customize the entries in it to match the keycodes returned by your keyboard:
$mkdir ~/.hotkeys$cp /usr/share/doc/hotkeys/sample.xml ~/.hotkeys/mykeyboard.def
Warning
Be sure to check over the XML in this file. At the time of
this writing, the <description> tag at the end of
the file was improperly closed (it should be </description>).
If you then run hotkeys
-l again, you’ll see there is now
a keyboard type of mykeyboard at the top of the
list in addition to all the default keyboards. You can later refer
to your custom keyboard layout by name when launching
Hotkeys.
The sample file is commented, but it may make more sense if you have a look at one of the keyboard definition files provided in /usr/share/hotkeys/ to see how they are structured. You may even prefer to start by copying one of the supplied definitions instead if you find one that is close to what you want.
To set up the file, you will need to know the exact keycodes for the various multimedia keys you wish to use. You can detect keycodes using a utility called xev (“X events”), which does nothing but watch input devices including the mouse and keyboard and display the codes of any events sent to X. By running xev and then pressing each of your multimedia keys in turn, you can see exactly what is being returned and then add those codes to your .hotkeys/mykeyboard.def file. First, install xev:
$ sudo apt-get install xevThen launch xev from a terminal to open a
small test window. Set the mouse’s focus on the test window and then
press one of the multimedia keys. In the terminal that you used to
launch xev, you will see several lines of event
information reported for each key press. What you need to look for
is an entry that says keycode
with a number after it. That number is the keycode that is
associated with that particular key by X. Write down a list of the
multimedia keys and their matching keycodes.
Once you have finished with xev, you can close it using Ctrl-C in the original terminal or by clicking the close box in the window manager.
Next, you need to open your .hotkeys/mykeyboard.def config file in a
text editor and match events to keycodes according to the list you
just made. For example, to match keycode 178 to the Favorites event, you would make an entry
like:
<Favorites keycode="178"/>
The sample file contains a number of predefined events that you can uncomment and configure to suit your keycodes.
Customize predefined actions
Now that Hotkeys has a mapping between keycodes and predefined actions, you can customize the command associated with each action. The global config file is located in /etc/hotkeys.conf, but if you want to customize the action list, you can make a local copy that will automatically override the global config:
$ cp /etc/hotkeys.conf ~/.hotkeys/hotkeys.confFollowing the example above, you could tell Hotkeys to open your Favorites list in Mozilla with an entry like:
Favorites=gnome-moz-remote --remote=openBookmarks
Create custom actions
The previous step allows you to customize the predefined actions, but that’s not much use if you want an action like “Launch xterm with reversed video and open an SSH session to www.example.com“! No problem: you can use the keyboard definition file to associate keycodes with any arbitrary command you like. For example, if you wanted to use the F2 key for a purpose such as opening an SSH session to a remote machine, you could use xev to find the keycode for F2 and edit ~/.hotkeys/mykeyboard.def and put in:
<userdef keycode="68" command="xterm -fg black -bg white -e ssh www.example.com">SSH www.example.com</userdef>
In this case, 68 is the
keycode for F2, and SSH www.example.com is the event label that
will be displayed onscreen by Hotkeys when it executes the
command.
Test Hotkeys
Nearly there! By now, you have a keyboard definition file that maps keycodes to actions, plus a Hotkeys configuration file that maps actions to commands. Now it’s time to launch Hotkeys and try it out.
Specify the keyboard type and launch hotkeys itself:
$ hotkeys -t mykeyboard -bThe -b flag tells Hotkeys
not to launch itself into the background; that makes it easier to
make quick changes if things don’t go quite as planned, because you
can just Ctrl-C to kill the program and launch it again. Later, when
you’re happy with the configuration, you can leave off the -b, and Hotkeys will automatically
background itself on startup.
Alternatively, if Hotkeys is backgrounded and you want to make changes, you can simply use:
$ killall hotkeysand then launch it again.
As soon as you launch it, Hotkeys will start watching for key-press events, so try pressing one of the keys you mapped and see what happens.
To save yourself the hassle of passing the keyboard-type argument to Hotkeys every time, you can put an entry in .hotkeys/hotkeys.conf like this:
Kbd=mykeyboard
which will then be applied automatically.
Onscreen display settings
Hotkeys displays each action onscreen while it’s executing it to give you feedback that something is happening. By default, the OSD is large, bright green, and hangs around on your display for a couple of seconds, so you may want to change the settings to make it less obtrusive.
Look at the bottom of your hotkeys.conf file for settings starting
with osd_. The sample
configuration is well commented, so make changes as you see fit, and
then kill and relaunch Hotkeys for your changes to take
effect.
Start Hotkeys Automatically
Because Hotkeys needs to be running to do its job, you will need to launch it every time you log in to X. That can be a pain, so to have it start automatically, just add it to the Startup Programs in System→Preferences→Sessions. Click Add and type in the command you used to launch Hotkeys from the command line, then save it (see Figure 5-2).

The next time you log in to GNOME, Hotkeys will be started for you automatically and your multimedia keys will be functional right away.
Configure a Touchpad
Configure the special functions of your laptop touchpad and start tapping like crazy.
Most laptops today include a touchpad as a method of controlling the mouse pointer. These touchpads have various configuration options that most people aren’t even aware of. Here’s how to get all these advanced features working under Linux.
Ubuntu includes the synaptics mouse driver by default, and if your laptop’s touchpad is detected during installation, it will be automatically installed and configured. The stock touchpad configuration will include some advanced features like double-finger tap support for middle-clicks and using the right side of the touchpad to do vertical scrolling. To really tweak your touchpad configuration, though, you must make a small edit to your X11 configuration, restart the GUI, and install a configuration program.
Preparing Your X11 Configuration
In order to use the configuration program for your touchpad, first you must edit the X11 configuration to add a directive to enable shared memory in the Xserver. If you’re fairly new to Linux, we suggest you use the nano editor; otherwise, use the editor of your choice.
Tip
The permissions on the X11 configuration are restricted, so you need to make this change using sudo.
Back up the configuration file first:
bill@lexington:~$ sudo cp /etc/X11/xorg.conf /etc/X11/xorg.conf.oldThen edit the file:
bill@lexington:~$ sudo nano /etc/X11/xorg.confOnce you get the file open, you should see a section pertaining to the touchpad. It may look like this:
Section "InputDevice"
   Identifier      "Synaptics Touchpad"
   Driver          "synaptics"
   Option          "SendCoreEvents"      "true"
   Option          "Device"              "/dev/psaux"
   Option          "Protocol"            "auto-dev"
   Option          "HorizScrollDelta"    "0"
EndSection
You’ll need to add a line in that section of the file (before
the EndSection line) with the
SHMConfig option set to on (this will allow you to use the GUI
client to make changes without restarting the Xorg server). Here is a
sample snippet after editing:
Section "InputDevice"
   Identifier      "Synaptics Touchpad"
   Driver          "synaptics"
   Option          "SendCoreEvents"      "true"
   Option          "Device"              "/dev/psaux"
   Option          "Protocol"            "auto-dev"
   Option          "HorizScrollDelta"    "0"
   Option          "SHMConfig"           "on"
EndSection
At this point, save the file and reboot your system (or log out,
switch to a console with Ctrl-Alt-F1, log in, and run the command
sudo /etc/init.d/gdm restart) to load the new X11
configuration. The GUI should come up as usual. If there was a
problem, to get your GUI back, simply log in at the command prompt and
run the following command:
bill@lexington:~$ sudo cp /etc/X11/xorg.conf.old /etc/X11/xorg.confAssuming that your configuration works, you should now install the configuration program for the touchpad: qsynaptics.
Installing qsynaptics
Much like any other software installation, qsynaptics can be installed by using apt-get or aptitude from a terminal:
bill@lexington:~$ sudo aptitude install qsynapticsConfiguring the Touchpad with QSynaptics
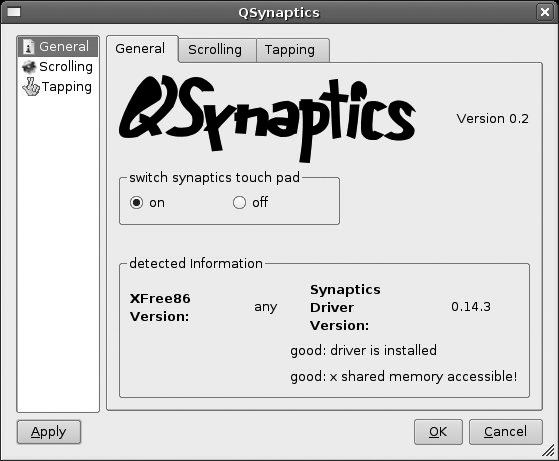
QSynaptics is a graphical program, so it can be run from within
the GNOME desktop. To start it, launch a terminal and run qsynaptics. The QSynaptics dialog will
appear (see Figure 5-3). The
General tab lets you enable or disable the extended features of the
Synaptics touchpad driver.
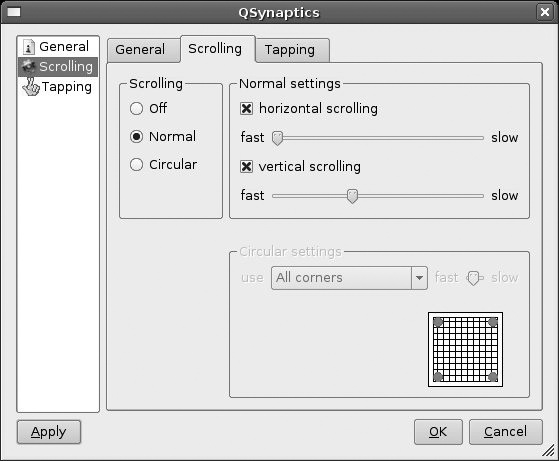
The Scrolling tab (see Figure 5-4) lets you adjust the scrolling behavior. You can adjust the sensitivity of the scroll area, enable horizontal scrolling, and even change the scrolling motion from an up-and-down swipe to a circular gesture on the touchpad.
Tapping gestures are configured on the Tapping tab, shown in Figure 5-5. You can disable tapping altogether, insert a tap-disabling delay after any keyboard press, and create tap gestures for one-, two-, or three-finger taps.

Once you spend some time adjusting your trackpad for your particular needs, you’ll wonder how you lived without this flexibility. It’s great to be able to turn on new features or disable features you may find annoying.
Connect Multiple Displays
You plug an external monitor into your laptop or a second monitor into your desktop computer. At best, nothing happens. At worst, something horrible happens. Find out how to get it right, whether you want to clone your display or spread it across multiple monitors.
Laptops give us the ability to go mobile but usually with a number of compromises compared to a more full-featured desktop machine. The most obvious compromise is screen size. The typical laptop screen is tiny compared to what you probably have sitting on your desk, but setting up your laptop to use an external monitor can give you the best of both worlds.
But multiple screens aren’t limited to laptops. If you spend hours in front of a desktop computer every day, a second or even third monitor can help you work more efficiently.
All it takes to add a second monitor is an extra video card, or a video card with multiple outputs and a bit of configuration of Xorg.
First, you need to determine your video chipset, which in turn will determine which drivers
you can use. If you don’t know the chipset, you can open
System→Administration→Device Manager, and then scroll down the devices
on the left until you find a device labeled “AGP” or “video.”
Alternatively, you can open a terminal and type lspci to see a list of all PCI devices in your
system: look for a line that says “VGA compatible controller” or
something similar. If your laptop has an nVidia or Radeon (ATI) video
chipset, you have the option of using proprietary binary drivers made
available by the manufacturer. These proprietary drivers offer more
features and generally better performance than the currently available
open source drivers, but many people specifically avoid them on
idealistic grounds. Hopefully, we’ll eventually see these proprietary
drivers released under an open source licence, but in the meantime they
do still offer some advantages if you don’t mind using proprietary
software.
Grok the Xorg Conf File
No matter which technique you use to configure your displays, you will need to make changes to the Xorg configuration file located at /etc/X11/xorg.conf, so it helps to be familiar with the way it’s structured and the terms that are used.
xorg.conf contains a series of stanzas, each of which defines a specific part of the X configuration. Various elements such as video cards, screens, and input devices are defined separately and then progressively bound together toward the end of the file. There are a multitude of additional stanzas in the Xorg configuration file, but the following ones are the important sections when running multiple displays (or heads).
Section “Device”
A device is a video card or video adaptor, so
you will need one Device section
for each card in your system. A video card with multiple outputs is
considered a single device, but requires two Device sections to distinguish the
outputs. Each Device section
includes, at a minimum, entries for Identifier and Driver, but if you have more than one
video card installed, you will also need to enter a BusID value so Xorg knows which section is
associated with each card; if you have a card with multiple outputs,
enter a Screen value so Xorg
knows which section is associated with which output. Use lspci -X to determine the BusID for each card in
a format suitable for entry into xorg.conf:
Section "Device"
  Identifier "NVIDIA Corporation NV34M [GeForce FX Go5200]"
  Driver     "nvidia"
  BusID      "PCI:1:0:0"
EndSection
If you have a single device with multiple outputs, just number
the Screen entries starting from 0. You should also give each
Identifier a unique name (in this
example, we’ve simply appended 0 or 1 to the end):
Section "Device"
        Identifier      "NVIDIA Corporation NV40 [GeForce 6800] 0"
        Driver          "nvidia"
        BusID           "PCI:3:0:0"
        Option          "RenderAccel"           "true"
        Option          "AllowGLXWithComposite" "true"
        Screen          0
EndSection

Section "Device"
        Identifier      "NVIDIA Corporation NV40 [GeForce 6800] 1"
        Driver          "nvidia"
        BusID           "PCI:3:0:0"
        Option          "RenderAccel"           "true"
        Option          "AllowGLXWithComposite" "true"
        Screen          1
EndSection
Section “Monitor”
You need one Monitor
section per monitor you have attached to your computer. Give each
one a sensible and unique Identifier value:
Section "Monitor"
        Identifier      "Main Monitor"
        Option          "DPMS"
        HorizSync       28-80
        VertRefresh     43-60
EndSection

Section "Monitor"
        Identifier      "Second Monitor"
        Option          "DPMS"
        HorizSync       28-80
        VertRefresh     43-60
EndSection
Section “Screen”
In X terminology, a screen is a
combination of a device and a monitor. Screen sections have Device and Monitor values that refer to the
appropriate sections by name:
Section "Screen"
        Identifier      "Main Screen"
        Device          "NVIDIA Corporation NV40 [GeForce 6800] 0"
        Monitor         "Main Monitor"
        DefaultDepth    24

        # Subsections for other display depths not shown...
        SubSection "Display"
                Depth           24
                Modes           "1600x1200"
        EndSubSection
EndSection

Section "Screen"
        Identifier      "Second Screen"
        Device          "NVIDIA Corporation NV40 [GeForce 6800] 1"
        Monitor         "Second Monitor"
        DefaultDepth    24
        SubSection "Display"
                Depth           24
                Modes           "1280x1024"
        EndSubSection
EndSection
Section “ServerLayout”
The ServerLayout section is
in turn a combination of one or more Screen sections, along with InputDevice sections that define
keyboards, mice, and trackpads. You’ll see some examples of a
ServerLayout section
shortly.
Tracking Down X Errors
Once you start modifying the Xorg configuration file, there is a very high likelihood that you will end up with your computer in a state where X can’t start at all. The first place to go looking for debugging information is the Xorg logfile, which is regenerated each time X starts and is stored in /var/log/Xorg.<0>.log or similar. The <0> is the identifier that Xorg uses to identify the X session; if you run multiple X sessions, you may also have an Xorg.1.log.
The Xorg log prepends a severity key to the start of each line,
making it very easy to see exactly what caused the problem. (II) lines are informational only, (WW) lines are nonfatal warnings, and
(EE) lines are fatal errors.
Problems often cascade down through the logfile as one failure causes
another, such as a failure to initialize a video card leading to a
failure to initialize a screen.
Configure Xinerama
X can natively support multiple heads, but by default, each one is considered to be totally independent of the others. With independent heads, it’s not possible to have windows span multiple screens, drag windows between screens, or move the mouse cursor from one to the other by dragging it off the edge of one screen and onto the other. Each head is effectively a totally separate environment.
Xinerama is a feature of X that overcomes this limitation by allowing multiple screens to be associated with each other and bound together into a single, unified “virtual screen.” You can define the relationship of the screens to each other so your computer knows where each screen is physically located relative to the others, allowing you to drag windows around and have them overlap the screens in a way that makes sense given the position of your monitors on your desk.
First, make sure Xorg has Xinerama support activated by adding
an appropriate ServerFlags section
if one doesn’t exist already:
Section "ServerFlags"
   Option "Xinerama" "true"
EndSection
Then add sections for your second device, monitor, and screen,
as described earlier, giving them descriptive names. Finally, add your
second screen into the ServerLayout
stanza, describing its relationship to the primary screen. Here’s an
example with two screens:
Section "ServerLayout"
        Identifier      "Twin Head"
        Screen          "Main Screen"
        Screen          "Second Screen" RightOf "Main Screen"
        InputDevice     "Generic Keyboard"
        InputDevice     "Configured Mouse"
EndSection
Exit GNOME, press Ctrl-Alt-Backspace to kill off Xorg and force it to respawn, and watch as both monitors flash to life.
Configure TwinView on nVidia
nVidia cards with multiple outputs support a special video mode called TwinView using the proprietary (binary) drivers. TwinView is a bit like Xinerama because it binds multiple displays together into a single virtual display, but the difference is that it’s done at a very low level within the video driver and the hardware itself. Both heads share a single framebuffer, which basically tricks Xorg into thinking you only have a single monitor, giving it much better performance than Xinerama, as well as allowing OpenGL to operate across both heads at full speed. As far as Xorg is concerned, it’s only driving one screen: it just happens to be a screen with very odd dimensions.
By default, Ubuntu installs the open source nv driver, but to use TwinView, you will need to install the proprietary nvidia driver instead. The nvidia driver is part of the linux-restricted-modules-[arch] package, which comes in several different versions depending on what kernel you are running. Full instructions for installing this binary driver are in “Enable 3-D Video Acceleration” [Hack #52].
Once you have Xorg working successfully with a single monitor
and the binary drivers, run the command sudo nvidia-xconfig -twinview to modify your xorg.conf to support TwinView. If you want
to tweak anything (or see what was done), open /etc/X11/xorg.conf and go to the Device
section for your nVidia card. Rather than defining the second monitor
separately, the nVidia driver accepts a number of additional options
to enable TwinView mode and configure the monitor directly:
Section "Device"
    Identifier     "NVIDIA Corporation NV40 [GeForce 6800]"
    Driver         "nvidia"
EndSection

Section "Screen"
    Identifier     "Default Screen"
    Device         "NVIDIA Corporation NV40 [GeForce 6800]"
    Monitor        "Generic Monitor"
    DefaultDepth    24
    Option         "RenderAccel" "true"
    Option         "AllowGLXWithComposite" "true"
    Option         "TwinView" "True"
    Option         "TwinViewOrientation" "RightOf"
    Option         "UseEdidFreqs" "True"
    Option         "MetaModes" "1280x1024,1280x1024; 1024x768,1024x768"

    # Subsections for other display depths not shown...
   SubSection     "Display"
        Depth     24
        Modes     "1600x1200"
    EndSubSection
EndSection
The MetaModes option tells
the driver what resolutions to use for the two monitors, with the
resolution reported back to Xorg being the sum of the dimensions.
Multiple resolution pairs can be specified; in this case, the monitor
orientation is side-by-side (RightOf), so the effective resolution is
either 2560x1024 or 2048x768.
You can also explicitly set offsets to accurately control the logical position of the screens:
Option "MetaModes" "1600x1200 +0+0, 1024x768 +1600+0;"
Other possible values for TwinViewOrientation are LeftOf, Above, Below, and Clone. Clone is a special mode that displays the
same image on both monitors, ideal for running presentations on a
laptop connected to an external projector.
Configuring MergedFB on ATI/Radeon
Recent ATI video cards support an Xorg mode called MergedFB, which is quite similar to nVidia’s
TwinView in that it manages connections to the second monitor directly
within the driver and pretends to be a single large virtual
monitor:
Section "Device"
   Identifier "Radeon7000"
   Driver     "radeon"
   BusID      "PCI:0:9:0"
   Option     "MergedFB" "true"
   Option     "MonitorLayout" "AUTO, AUTO"
   Option     "CRT2Hsync" "30-65"
   Option     "CRT2VRefresh" "50-75"
   Option     "CRT2Position" "LeftOf"
   Option     "MetaModes" "1280x1024-1280x1024"
EndSection
Like TwinView, there are options to configure the frequency, position, and resolution of the second monitor.
Combining Methods
Sometimes even two monitors aren’t enough, but unfortunately video cards with more than two outputs are quite rare, so you may need to combine techniques if you want to run three or more heads. For example, you may have a twin-head nVidia card running two heads using TwinView, plus a third head connected to an older PCI video card. Because TwinView presents itself to X as being a single virtual screen, you can then combine it with the third head using Xinerama to achieve a triple-head system with relatively little effort.
With a bit of creativity, it’s even possible to combine TwinView, MergedFB, and Xinerama all on the same machine (see Figure 5-6).

Change the Ubuntu Splash Screen
Want to change what you see while Ubuntu boots up? Learn how to put your own image on that splash screen.
When Ubuntu starts up, it displays a progress bar, the Ubuntu logo, and scrolling messages showing what service is being started. Usplash, the userspace bootsplash system, allows you to customize the background, text, and progress bar of the splash screen.
To customize your splash screen, install GCC and the BOGL framebuffer library development package:
$ sudo apt-get install gcc libbogl-devThen create a PNG file to use as the splash-screen background. This is trickier than it sounds because there are some very severe restrictions on the format of the image: it must be 640x480 pixels in size and only 16 colors, so forget about using a nice photograph! Some of the colors are used for special purposes, such as to draw the text messages that appear onscreen as services are started, so the usable palette is even more restricted.
The special palette entries are shown in Table 5-1.
| Index | Use |
| 0 | Main and text backgrounds |
| 1 | Progress bar color |
| 2 | “OK” text color |
| 4 | Progress bar background color |
| 8 | Description text color |
| 13 | “Failed” text color |
Make a directory to work in, copy your PNG in, and rename it to something like usplash-mine.png:
$mkdir usplash$cp myimage.png usplash/usplash-mine.png
Enter the working directory and convert the PNG to a hexadecimal source file, then “compile” it into a shared object file:
$pngtobogl usplash-mine.png > usplash-mine.c$gcc -Os -g -I/usr/include/bogl -fPIC -c usplash-mine.c -o usplash-mine.o$gcc -shared -Wl,-soname,usplash-mine.so usplash-mine.o -o usplash-mine.so
In this case, the resulting object file is called usplash-mine.so, but you can give it a different name, as long as you don’t call it usplash-artwork.so. That name is used by the system to find the current bootsplash artwork, so the safest thing to do is give all the object files unique names and reference the current file with a symlink:
$sudo cp usplash-mine.so /usr/lib/usplash/usplash-mine.so$sudo ln -sf /usr/lib/usplash/usplash-mine.so \/usr/lib/usplash/usplash-artwork.so
To give the kernel access to the splash image early in the boot process, it needs to be stored in the initramfs (initial RAM filesystem). The initramfs is built when the kernel package is installed, so force the currently installed kernel package to be reconfigured:
$ sudo dpkg-reconfigure linux-image-Quname -rQOnce they have been created and installed in /usr/lib/usplash, you can switch between various splash screens, including the original Ubuntu splash, simply by updating the symlink and regenerating the initramfs. For example, to return to the original splash screen:
$sudo ln -sf /usr/lib/usplash/usplash-default.so \/usr/lib/usplash/usplash-artwork.so$sudo dpkg-reconfigure linux-image-Quname -rQ
Enable 3-D Video Acceleration
After a fresh install, X11 is probably not configured to take full advantage of your graphics card. Learn how to take advantage of proprietary drivers to configure your video card for top speed.
Modern graphics cards are actually quite powerful little computers in their own right. Squeezing maximum performance out of them requires them to be set up the right way.
Measure Performance
To see how well your system is currently performing and
give yourself a baseline to compare against after making changes, you
can use a game such as Unreal Tournament 2004 or Quake III to measure
graphic-card performance, both of which have “timedemo” modes that run
through a defined sequence of events as fast as possible and report
the average framerate achieved. An alternative is to use the glxgears utility (run glxgears -printfps), which is included with the
mesa-utils package, but it’s such a simple
application that it really doesn’t stress any decent 3-D hardware, so
the framerate figures it generates aren’t much use as a benchmark. If
you get anything less than about 2,000 fps in glxgears, your video card could probably do
with a tune-up—or replacement!
Identify Your Video Card
To get your video card running at maximum speed, you need to know what brand and model it is so you can select the best drivers. Video cards are generally installed as PCI, PCI-X, or AGP cards, or are provided directly on the motherboard. In reality, all of these card types are just variations on the basic PCI technology, and even onboard video cards are essentially just PCI devices that happen to be permanently installed on the motherboard. This makes it very easy to identify your card by scanning the PCI bus using lspci:
$ lspci -XThe -X flag tells
lspci to report device identifiers in the format
used by the X Windows configuration files rather than in native
format.
You can also tell lspci to report in “verbose” mode:
$ lspci -vVerbose mode provides you a bit more information about each
device. Unfortunately, the -X and
-v flags can’t be combined, so you
have to run them separately.
Look in the reported device list for an entry that says “VGA compatible controller.” The device string will include the manufacturer and model. The most common brands of high-performance 3-D card are nVidia, ATI, and Matrox, although some embedded video cards use chipsets from Intel or other manufacturers.
Drivers
Drivers for video cards have been something of a sore point for open source developers over the last couple of years. Modern video cards are essentially very small, very high-performance computers with their own CPUs and memory, and the drivers are an essential part of what makes them work. The manufacturers tend to guard their driver technology greedily and release only precompiled drivers in binary format that may be used but not modified or reverse-engineered. This runs counter to the ideals of many open source developers who insist that all software, including drivers, should be available in source code format. Thus, many high-performance video cards have at least two sets of drivers available: binary drivers provided by the manufacturer and open source drivers developed by third parties who examine the cards and try to write drivers that will work with them.
Binary drivers have the advantage that they generally offer higher performance and make use of all the features of the card, but they cannot be modified or examined by other developers and can’t be compiled to run on different hardware architectures not supported by the manufacturer.
Open source drivers have the advantage of running on more types of hardware because developers can modify them to suit their own requirements, but the disadvantage is that the developers don’t have access to internal information about the video-card hardware and may not be able to achieve high performance or make use of all features of the card.
The Ubuntu commitment to ship only free software means binary drivers aren’t available in the base distribution, but if you want maximum performance from your 3-D card, you will need to install the binary drivers from the universe and multiverse repositories, or directly from the card manufacturer’s web site. To enable universe and multiverse, you may need to “Modify the List of Package Repositories” [Hack #60].
nVidia
The open source driver for nVidia cards is called nv and comes as part of the basic Xorg installation in Dapper, but for maximum performance, install the binary nvidia driver, which is part of the linux-restricted-modules package. The linux-restricted-modules package comes in several different versions to suit the different kernels, so check which kernel version you are running:
$ uname -r
2.6.15-17-686
Then install the matching linux-restricted-modules package:
$ sudo apt-get install linux-restricted-modules-2.6.15-17-686You will also need either the nvidia-glx or the nvidia-glx-legacy package, depending on the specific card model. If your card is an older model—such as the TNT, TNT2, TNT Ultra, GeForce, or GeForce2—install the nvidia-glx-legacy package. If it’s a newer model—such as a 4-series, 6-series, nForce, Quadro, or FX-series—install nvidia-glx:
$ sudo apt-get install nvidia-glxEdit /etc/X11/xorg.conf and look for a line that says something like:
Driver "nv"
Edit it to specify the nvidia driver:
Driver "nvidia"
Exit from your GNOME session. Then, when you are back at the login prompt, press Ctrl-Alt-Backspace to kill off the X server and force it to restart. As X restarts, you will probably see a big nVidia logo flash on the screen, showing that it has loaded the binary nvidia driver rather than the default nv driver. Log back in to GNOME, start up glxgears, and see if your framerate has improved.
ATI
If you have an ATI card that was auto-configured by Ubuntu, it’s probably running either the ati or radeon driver. For maximum performance with cards in the “Radeon” series, 9-series, X-series, or TV-Out-capable ATI cards, you can install the fglrx driver, and if your card is an 8500 or better, you can also install ATI’s proprietary driver.
Installing the fglrx driver is very easy:
$ sudo apt-get install xorg-driver-fglrxThen edit /etc/X11/xorg.conf, look for a line that lists either the ati or radeon driver:
Driver "ati"
and replace it with the fglrx driver:
Driver "fglrx"
Installing ATI’s proprietary driver requires a few more steps but may produce better performance on the latest cards. Start by going to http://support.ati.com and navigating to the Linux drivers. Download the ATI Driver Installer, not the specific Xorg driver—because that’s packaged as an RPM, and you need to build a .deb instead. Once the (very large!) driver file has downloaded, install some supporting packages and configure the driver. It helps keep things neat if you do this in a subdirectory:
$sudo apt-get install fakeroot gcc-3.4 module-assistant \build-essential debhelper$mkdir ATI$mv ati-driver-installer-8.22.5-i386.run ATI/; cd ATI$chmod +x ati-driver-installer-8.22.5-i386.run$fakeroot ./ati-driver-installer-8.22.5-i386.run
The installer will ask you a couple of questions: answer “Generate distribution specific packages,” then “Ubuntu,” and then “Dapper.” Once the installer finishes, it will have created a nice little Debian package that you can install:
$sudo dpkg -i *.deb$sudo module-assistant build,install fglrx-kernel
Edit /etc/X11/xorg.conf to use the fglrx driver, as described earlier, reboot, and you’re done.
Matrox
Matrox also makes available a proprietary driver that you can build as a Linux kernel module. First, install the kernel headers to use when building the new module:
$ sudo apt-get install linux header Quname -rQ Then download the latest driver installer from Matrox at http://www.matrox.com/mga/support/drivers/latest/.
Building the driver must be done with GCC 3.4, so install it, set an environment variable that specifies that it should be used in preference to other installed versions, and run the installer:
$sudo apt-get install gcc-3.4 gcc-3.4-base$export CC=gcc-3.4$sudo sh mtxdriver-x86_32-1.4.3.3.run
Back up your existing libGL installation, since it won’t work with the mtx driver:
$sudo mkdir /usr/lib/libGL.back$sudo mv /usr/lib/libGL.so* /usr/lib/libGL.back/
Then edit /etc/X11/xorg.conf, find the Device section for your video card, and
alter the Driver line to use the
mtx driver:
Driver "mtx"
Finally, reboot your computer so the kernel can load the new module.
Make Your Fonts Pretty
Ubuntu configures GNOME and KDE to use some very pretty fonts, but there are some tweaks you can use to make them even nicer.
Most computer users don’t even think about fonts. They just expect them to work and assume that text will look the same whether it’s viewed onscreen, printed, or sent to another user in a document. However, font management is actually a surprisingly complex task due to the many subtle variations in the ways fonts can be created and used.
Fonts Are Not Created Equal
Fonts can be defined in a number of different ways and have a variety of file formats. Each operating system has its own method of managing and displaying them. Some fonts are designed as bitmaps to be displayed onscreen, while others are in vector format so they can scale up or down and be printed at high resolution. Some come as bundles that include both bitmap and vector formats in the same package, with one used for onscreen display and the other used in printing or to generate files in output formats such as PDF. And some come as families, with several variations such as bold and italic bundled together with the base font, providing much better results than working from a single base font and then applying such variations algorithmically.
Font Management with Defoma
Ubuntu uses Defoma, the " Debian Font Manager,” to centralize and simplify font management across all applications. Applications can vary dramatically in how they manage fonts, so when a new font is installed on your computer, it’s not always obvious how to tell each application that the font exists and where to find it.
Defoma gets around this problem by allowing applications to register themselves by providing a Defoma configuration script. Then, when a new font is installed, Defoma works through all the configuration scripts and performs whatever action is necessary to enable the font for each application.
The first thing you should do then is make sure that your system is configured to use Defoma to manage fonts. Run:
$ sudo dpkg-reconfigure defomaIf Defoma is not currently set to manage fonts, you will be asked if you want to use it; answer Yes.
If your system has ended up in an unclean state with some manually installed fonts or applications that can’t see some fonts, you can force Defoma to totally rebuild its configuration. This process rescans all your installed fonts and makes sure all registered applications have been updated to use them:
$ sudo defoma-reconfigureOnscreen Font-Rendering Preferences
Various displays have different characteristics, and what looks good on a CRT doesn’t necessarily look good on an LCD. Ubuntu provides a number of font options through System→Preferences→Font (see Figure 5-7).

You can change the default system fonts to suit your preferences, but if you have an LCD, the item to pay attention to is the subpixel smoothing option under Font Rendering. Each pixel in an LCD consists of three subpixels, one each for red, green, and blue. Subpixel smoothing takes the physical layout of the subpixels into account to display fonts as smoothly as possible.
Advanced options (shown in Figure 5-8) are accessible through the Details button near the bottom right.

From here, you can specify screen resolution, smoothing, hinting, and subpixel order.
Screen resolution
When the font renderer displays text onscreen, it needs to convert between various units to determine how large the text needs to be. Often font sizes are specified as points, which are units of measure that have been used (rather inconsistently!) for hundreds of years by printers. Nowadays, most people agree on one point being equal to 1/72nd of an inch, but if you tell your computer to display, for example, 18-point text, it needs to know the resolution of your display so it can figure out how many pixels are equivalent to 18/72nds (i.e., 1/4) of an inch on your particular screen.
Screen resolution is usually expressed as dpi, or dots per inch. To figure out the horizontal and vertical resolution of your screen, measure its width and height and then divide those values into the pixel dimensions set in System→Preferences→Screen Resolution. For example, a typical so-called 17-inch LCD will have physical dimensions of about 13.3 inches by 10.75 inches and run at a native resolution of 1280x1024 pixels. That gives a horizontal resolution of 1280 ÷ 13.3 = 96.2 dpi, and a vertical resolution of 1024 ÷ 10.75 = 95.3 dpi. Close enough to call it 96 dpi for both.
By determining the actual physical resolution of your display and setting the correct Resolution value in the Font preferences, you can ensure that when your computer displays a font onscreen at a specific size, it will be scaled to appear at that actual size.
Smoothing
The Smoothing setting actually controls the level of antialiasing to apply when fonts are rendered. Antialiasing can have a dramatic impact on the clarity of fonts, particularly when displayed on an LCD. It smooths out jaggy corners and edges on fine lines by visually filling in gaps using surrounding pixels set to intermediate shades of grey. If you have an LCD, for the best-looking fonts, you should definitely select Subpixel as the Smoothing setting.
Hinting
Because computer screens operate at a much lower resolution than what we are used to seeing with printed material, fonts that are scaled down to a small size can sometimes suffer from effects whereby the shape and position of individual letters don’t interact well with the pixel structure of the display itself, producing visible artifacts. For example, two letters next to each other that both have thin vertical lines may happen to fall slightly differently onto the pixel grid of the display, with the result that one line appears fatter than the other. A similar effect can occur with rounded letters, where fine curves may disappear or be inconsistent. Often the relative placement of letters will alter the visual effect of other letters around them. Hinting is the process of making tiny adjustments in the outline-filling process while rendering fonts to compensate for effects that might cause individual characters to appear differently from the way they were designed.
Doing accurate hinting requires more processor power whenever your computer needs to render large quantities of text, but the end result is text that appears smoother, more consistent and easier to read. You can choose from four hinting levels in Font Rendering Details: None, Slight, Medium, and Full. The difference might seem subtle if you’re not used to closely examining text and you don’t know what to look for, but if you have a relatively modern machine, it’s worth turning on hinting. LCDs in particular can benefit greatly from it, giving you much more readable text and less eyestrain.
Subpixel order
In the main Font Preferences dialog, there was an option to turn on subpixel smoothing, but for it to be really effective, you also need to make sure your computer knows the physical structure of the individual subpixels. In reality, subpixels are not dots: they’re typically very short lines placed side by side.
The vast majority of LCDs use an RGB order, but some reverse that and place the subpixels in BGR order. Then there are variations on those two options, with some manufacturers stacking subpixels vertically instead of placing them side by side. Selecting the option that matches your particular monitor structure will let your computer do the best job possible of smoothing fonts onscreen.
Install Microsoft Core Fonts
Microsoft Windows comes bundled with a number of core TrueType fonts. Because Windows is so widely used, many documents and web sites are designed around the core Microsoft fonts, and if you don’t have them installed, your computer may not be able to display some documents as the author intended. Licence restrictions prevent the Microsoft fonts from being distributed directly as part of Ubuntu, but Microsoft does make them available for free download directly from its web site, and there is even an Ubuntu package that takes care of downloading and installing them for you:
$ sudo apt-get install msttcorefontsThe msttcorefonts package is part of the multiverse repository, so it’s not available on a standard Ubuntu installation and you may need to “Modify the List of Package Repositories” [Hack #60] before you can install it.
The package doesn’t include the fonts themselves but instead connects to the Microsoft web site and downloads and installs them in the correct location on your computer. The fonts will then be available to applications the next time they start up.
Install Macintosh and Windows TrueType Fonts
Installing TrueType fonts is very easy on Ubuntu. On
your desktop or in a file-browser window, just type Ctrl-L to access
the Open Location window; then type fonts:/// and click Open. You will then see
a list of all the fonts you currently have access to on your system.
Drag your new TrueType font from your desktop or file manager into the
font-list window, and it will be automatically installed and made
available to applications through Defoma the next time they start
up.
It’s actually not quite that simple if the fonts come from a Macintosh system, because Mac OS embeds extra font information using a special format that Linux can’t read directly. Before you drag Mac OS fonts into your fonts:/// folder, you need to convert them with a utility called fondu, which you can install with the following command:
$ sudo apt-get install fonduThen copy your Mac OS font directory to your Linux machine and run:
$ fondu *inside it to generate converted TTF files.
Tip
The fonts:/// location isn’t a real location in the filesystem. It’s a virtual view that lets you manage the fonts that have been installed without having to worry about where they are actually located on disk. The fonts shown by default are the system-wide fonts that have been installed on your machine for all users to access, but when you drag a new font into the window, it actually stores it inside a hidden folder called .fonts inside your home directory.