
5 Encoding and decoding
It’s easy to confuse the topic of encoding and decoding with encryption. These are similar procedures, but the purpose of encryption is to conceal and safeguard information. Encoding is done for transportation of information that may be too complex for the medium or to translate between different systems or for other innocuous purposes. Regardless, the process of encoding and decoding has the potential to be action packed and full of intrigue.
Still, back in the early days of computer telecommunications, encoding and decoding were regular occurrences. I remember transferring my first program over a modem: 16 kilobytes that took 16 minutes to transfer. That program consisted of binary data, but it was transported as plain text. It required encoding on the sending end and decoding on the receiving end. Such magic happens today as well, though probably much faster.
To explore the concept of encoding and decoding, regardless of the thrills and dangers, you must:
None of these items is dreary, not like that book on 100 fun and legal home projects you can do with an ironing board. But if you want to know more about encryption, refer to chapter 4.
5.1 The concept of plain text
The computer doesn’t know text. The char data type is merely a tiny integer, ranging in value from 0 through 255 (unsigned) or -128 to 127 (signed). It’s only the presentation of the char data type that makes it look like a character.
In C, the putchar() function outputs a value as a character. The function’s man page declares the function’s argument as an integer, though it appears on the standard output device as a character.
The printf() function is a bit more understanding of characters. It outputs a char data type as a character but only when the %c placeholder is used in the format string. If you substitute %d, the decimal integer output placeholder, the data is output as a number.
But what thing is output? How does the computer know to match a specific value with a given character? The answer comes in the form of the venerable digital acronym, ASCII.
5.1.1 Understanding ASCII
It’s important to note that ASCII is pronounced “ass-key.” That’s right: ass and key. Titter all you like, but if you say, “ask two,” everyone will know you’re a dork.
It’s unimportant to note that ASCII stands for the American Standard Code for Information Interchange. Yes, it’s a standard devised by people who sit around all day having fun creating standards. And though the standard was developed in the early 1960s, it wasn’t until the mid-1980s that pretty much every computer on the planet began using ASCII codes consistently.
By adopting the ASCII standard for assigning codes to characters, computers can exchange basic information without requiring any translation. Before it was widely adopted in the late 1970s, computers had to run translation programs to get even a text file to read properly from one system to the next. But today, a text file on your overpriced Macintosh is easily readable on my cheap-o Linux box that my friend Don built in the back of his shop for $499.
The way ASCII works is to assign codes, integer values, to common characters and symbols. This translation originated from the telegraph era, where the codes had to be consistent for a message to be translated—encoded and decoded—lest the Hole-in-the-Wall Gang rob the 12:10 yet again because old Hamer McCleary was taking a nap at the Belle Fourche station.
ASCII codes are devised in a clever pattern, which is amazing for any group of humans to produce. The pattern allows for all sorts of fun and creative things to happen, as covered in section 5.1.4. Figure 5.1 lists the ASCII code table in its common, four “stick” presentation. See whether you can spy any of the patterns.

Figure 5.1 The ASCII table showing decimal, octal, hexadecimal, and character values
From figure 5.1, you see that ASCII codes range from 0 through 127. These are binary values 000-0000 through 111-1111. For the C language char data type, these values are all positive whether the variable is signed or unsigned.
Each of the four columns, or “sticks,” in the ASCII table (refer to figure 5.1) represents a different category of character types. Again, the codes are organized, probably due to some education from earlier abominable computer character codes that have since been taken out, placed in a dumpster, and set on fire with a jet engine.
The first stick consists of nonprinting control codes, which is why its output looks so dull in figure 5.1. Read more about the control codes in section 5.1.2.
Characters in the second stick in the ASCII table were selected for sorting purposes. The first few characters echo those on a teletype machine, the shifted number keys. These still hold true today for the most part: Shift+1 is the ! (exclamation point), Shift+3 is the # (hash), and so on.
The third stick contains uppercase letters, plus a few symbols.
The fourth stick contains lowercase letters, plus the rest of the symbols.
Miracles and magic surrounding the ASCII table and these codes are covered in the next few sections.
Having an ASCII table handy is vital to any programmer. Rather than sell you my handsome ASCII wall chart on Etsy, I decided that you must code your own ASCII table. Make the output appear exactly as shown in figure 5.1—which happens to be the output from my own ASCII program and looks like the wall chart. I often run my ASCII program as a reference because such information is useful and a program is a quick way to keep it handy, though I’m not making any money on Etsy.
The source code for my solution to this exercise is found in this book’s online repository as asciitable01.c. But please try creating your own before you just ape everything that I did.
5.1.2 Exploring the control codes
I find the first stick of ASCII codes to be the most interesting, from both a historical and hilarious perspective. The control code names are adorable! “End of Text”? Try using that one in a meeting sometime, but just say “Control C” instead. Some people might get it.
“End of Text” is the official name of the Ctrl+C control code, ASCII code 3. Table 5.1 lists the details. Some of the codes or their keyboard equivalents might be familiar to you.
Table 5.1 lists decimal, octal (base 8), and hexadecimal values for each ASCII code. The Name column shows the ancient teletype name, the code’s original and forgotten purpose. Still, some of these control codes are used today: the computer’s beep remains control code 7, the “bell,” keyboard equivalent Ctrl+G and escape sequence a (for alert or alarm).
The Ctrl column shows the control key combinations used in the terminal window. Modern descriptions use the word Ctrl for control, though the grizzled, sandal-wearing Unix coders of yore prefer the caret character, ^. This expression explains why pressing Ctrl+D as the Linux EOF character outputs ^D in a terminal window. And this character’s original name is “End of Transmission,” which makes sense. (Don’t press Ctrl+D just to see the ^D character appear; doing so closes the terminal window.)
Some of the control key shortcuts map directly to other keys on the keyboard, primarily for use in a terminal window. For example, Ctrl+M is the Enter/Return key: pressing Ctrl+M is the same as pressing the Enter key. Other control keys mapped include:
These shortcuts may not work in all circumstances, but table 5.1 shows how they’re mapped.
The Esc column in table 5.1 lists the C escape character equivalent for some of the common control codes. Remember, any code can be specified as an escape character sequence in C if you use the format xnn where nn is the character’s ASCII code in hexadecimal.
Many of the control keys have lost their purpose in a modern computer. Back in the teletype days—from which the current terminal window in Linux has its roots—they were significant. In fact, the Ctrl+S/Ctrl+Q (XON, XOFF) keys still work to pause and resume a scrolling display of text. It’s just that modern terminals display text so rapidly that using these keys today is pointless.
Be careful when outputting a control character in your code. Some of them have predictable functions, specifically those in the Esc column in table 5.1. These escape sequences are useful in C. But sending a weirdo control code to standard output can potentially mess up the display. For example, on some terminals, outputting ^L (code 12, Form Feed) clears the display. When sent to a printer—even a modern printer—^L ejects a sheet of paper.
As a tip—because I know someday you’re going to try outputting a control code on purpose or perhaps accidentally—if a control code whacks out the terminal display, issue the reset command. Type reset and press Enter, and the terminal attempts to recover itself from however you messed it up.
The final control code doesn’t appear in the last stick of the ASCII table (refer to table 5.1). This is character code 127, often called Del (Delete) or Rub Out. Like codes 0 through 31, it’s nonprintable, but its output doesn’t mess up the display. This character is a holdover from the teletype era, where it was used as a backup-and-erase character; the Backspace code (8 or ^H) merely moves the cursor and is a nondestructive backup.
5.1.3 Generating noncharacter output
When output as a character, char variables appear as a character. And thank goodness: the days of computers showing raw data are over—except for the movies, where computers still feature blinking lights and displays that output row upon row of numbers. Then again, monitors in movies make noise when displaying text and “hackers” type endlessly at a computer where they should be using a mouse. Silly Hollywood.
Using conversion characters other than %c, you can write code that outputs char data as decimal or hexadecimal values—even using the same variable:
printf("%c = %d = %x
",ch,ch,ch);
In this statement, variable ch is output thrice: once as its character value, once as a decimal integer, and again as a hexadecimal integer. If you’re into octal, you can use %o to output the value in base 8 as well. In fact, if you wrote code for exercise 5.1, you probably used a printf() statement along these lines.
The standard C library lacks a binary output function. Therefore, it’s your job to write one. Or you can just rely upon what I use, my binString() function.
Listing 5.1 shows the 8-bit version of my binString() function, concocted to output values stored in the char data type. The function uses the bitwise & operator to determine whether the far left bit in the character byte is on (1). If so, the character '1' is placed into the b[] buffer; otherwise, '0' is set. The value in variable a is then shifted one bit position to the left, and the operation repeats. As the bits are checked, string b[] is filled with ones and zeros. This string is declared static, so its value can be returned and the binary string used by whatever statement calls the binString() function.
Listing 5.1 The 8-bit binString() function
char *binString(char a)
{
static char b[9]; ❶
int i;
i = 0; ❷
while( i<8 ) ❸
{
b[i] = a&0x80 ? '1' : '0'; ❹
a <<= 1; ❺
i++;
}
b[i] = '�'; ❻
return(b);
}❶ The string is static so that its value is retained; nine characters allow for an 8-bit byte, plus another element for the terminating null character.
❷ Initializes the index variable
❸ Loops for each bit in the 8-bit byte
❹ The ternary operator sets a 1 or 0 into the string, depending on the value of the far left bit in variable a.
❺ Variable a’s value is shifted one bit position to the left.
❻ At this point, i is equal to 8, so the string is capped.
The 8-bit binString() function can be woven into code to output values in the ASCII table in binary, which is yet another way to generate noncharacter output—more interesting than dull decimal, sexy hex, or outdated octal.
To see binString() function in action, refer to the source code file binascii01.c included in this book’s online repository. Its program outputs an ASCII table with binary data.
As a nerd, I enjoy the patterns created by binary values and how they relate to hexadecimal. In fact, I find it easy to convert between hex and binary, often doing so in my head. This relationship is illustrated in table 5.2, which makes it easy to understand some common ASCII conversion tricks revealed in the next section.
Table 5.2 Binary to hexadecimal conversions
Figure 5.2 illustrates binary bit positions, which help continue my nerd-gushing adoration of the binary-hexadecimal affair. For example, note that even numbers have zero set as the first binary digit. (Like decimal, binary digits are ordered from right to left, lowest to highest.) Odd values have the 1 digit in the first position.

Figure 5.2 Bit positions in a byte and how they factor out into a value
Other things I find cool: binary 1010 is hex A, which is 10 decimal. The double “10” digits is a nice clue. Binary 1011 is hex B, or 11 decimal. Other patterns are obvious if you examine table 5.2 and figure 5.2—but be wary of becoming a nerd, too, if you overly enjoy such things.
5.1.4 Playing with ASCII conversion tricks
The folks who laid out the ASCII table, assigning codes to characters, were clever—for humans. Either they were towering geniuses who appreciated knowledge as they coordinated values and characters, or they just hit the luck jackpot. I don’t care either way. But I will take advantage of the serendipity.
Oh, and I loathe the word serendipity.
One of the tricks I take advantage of is the way digits 0 through 9 are mapped to hex values 0x30 through 0x39. This arrangement makes it easy to perform simple math on the character values to translate them into numeric values. For example:
printf("%d
",'9' - '0');
This printf() statement subtracts '0' from '9', which look like character values but are seen by the compiler as 0x39 - 0x30. The result is output as decimal value nine, which is what '9' represents.
If char variable a contains a digit character, you can extract its integer value with:
b = a - '0';
You can pull a similar trick with letters of the alphabet to get them in the range of 0 though 25, though the hexadecimal value of A or a isn’t as sexy. For example, assume an uppercase letter is in char variable ch:
offset = ch - 'A';
Here, the value of offset is equal to the number of the uppercase letter in ch, zero through 25 for A through Z. An example of this operation at work appears in chapter 3, where the nato[] array is referenced by using a letter of the alphabet. See nato01.c and nato02.c in this book’s online repository for chapter 3.
ASCII table sticks one and three (refer to table 5.1) show the same characters for a different run of numbers. The control codes in the first stick use characters ^@ through ^_ (underscore) and the third stick uses character @ through _ (underscore). So, one way to express a control code is to add hex value 0x40 to the character’s value for output. In the following printf() statement, char variable cc holds a control code value (0x00 through 0x1F), which is output as ^@ through ^_:
printf("Control code: ^%c
",cc+0x40);
The following statement reflects another way to express the statement with the same output:
printf("Control code: ^%c
",cc+'@');
If you compare the ASCII table’s third and fourth sticks (again in figure 5.1), you see that the upper- and lowercase characters differ by exactly 32 or 0x20. This arrangement allows for some interesting character manipulations to switch between upper- and lowercase letters:
-
To convert an uppercase letter to lowercase, you reset the sixth bit in the byte.
-
To convert a lowercase letter to uppercase, you set the sixth bit in the byte.
Figure 5.3 illustrates the bit setting and resetting process with the letters A and a. The same relationship holds for all letters of the Latin alphabet: setting or resetting the sixth bit changes a character between upper- and lowercase.

Figure 5.3 How the sixth bit in a byte affects letter case
To magically manipulate the sixth bit in a byte, you use a bitwise logical operator, & (AND) or | (OR). You most likely skipped over these operators when you first learned C. For shame.
To convert uppercase to lowercase, you must set the sixth bit. This operation is handled by the | (OR) operator on the byte’s sixth bit. The expression is:
c = c | 0x20;
Above, the uppercase letter in char variable c is converted to its lowercase equivalent. The code can also be abbreviated as:
c |= 0x20;
To convert a lowercase letter to uppercase, you must reset (change to zero) the sixth bit in the byte. To handle this operation, use the & bitwise operator, which masks out bits:
c = c & 0xdf;
c &= 0xdf;
The binary representation of 0x20 is 01000000. The binary representation of 0xdf is 10111111.
The source code shown in listing 5.2 demonstrates these techniques. The sample string in sentence[] is processed twice. The first time, a while loop plucks uppercase characters from the string, converting them to lowercase by the bitwise | 0x20 operation. The second while loop targets lowercase letters, converting them to uppercase with the & 0xdf operation. Pointer s is used to work through the sentence[] array one character at a time.
Listing 5.2 Source code for casetricks01.c
#include <stdio.h>

int main()
{
    char sentence[] = "ASCII makes my heart beat faster
";
    char *s;

    s = sentence;
    while(*s)
    {
        if( *s>='A' && *s<='Z' )      ❶
            putchar( *s | 0x20 );     ❷
        else
            putchar(*s);
        s++;
    }

    s = sentence;
    while(*s)
    {
        if( *s>='a' && *s<='z' )      ❸
            putchar( *s & 0xdf );     ❹
        else
            putchar(*s);
        s++;
    }

    return(0);
}❷ Outputs the lowercase character
❹ Outputs the uppercase character
ascii makes my heart beat faster
ASCII MAKES MY HEART BEAT FASTER
In my code, I often revert to using the ctype functions tolower() or toupper() to make the conversion. But these bitwise operations perform the trick just as well, with the bonus that they make your code look super cryptic.
5.2 The hex encoder/decoder
My first telecommunications file transfer took 16 minutes. It was between a friend’s TRS-80 computer and mine, using an analog modem over standard phone lines. The transfer speed was 300 BPS, if you want to feign an appalled expression.
The data transferred was plain text. It could have been binary because, quite honestly, the phone line doesn’t care which bits in a byte represent characters. Still, I sat for 15 minutes watching jibber jabber flow down my screen and magically transform into a program: the original binary was encoded as two-digit hexadecimal values, transmitted, and then another program on my computer digested the hex bytes, converting them back into binary data.
Another example of this hexadecimal encoding was found in the computer magazines of the era. Articles showcased amazing programs that you could type in; the hex bytes were listed on the pages. Hobbyists eagerly typed byte after byte into their keyboards, a hex decoder program gobbling up all the digits and creating a binary program that—fingers crossed—ran the first time and performed some wondrous task. Those were the days.
By the way, hex encoding isn’t encryption nor is it compression. It’s merely a way to express binary data in a printable manner.
5.2.1 Writing a simple hex encoder/decoder
The most important part about converting ASCII—and binary—to hex is doing so in a format that’s reliably converted back. After all, some type of verification is required to ensure that the data was successfully backed out of the encoding garage.
One way to translate any information into hex is to write a filter, such as the one shown in the next listing. (Refer to chapter 4 if you need brushing up on filters.) The filter processes each byte (int ch) input. The printf() statement’s conversion character %02X outputs the byte as a 2-digit hex value with a leading zero, if necessary. The code outputs a newline only after all input is processed, which means the translation is one long string of hex bytes.
Listing 5.3 Source code for hexenfilter01.c
#include <stdio.h>

int main()
{
    int ch;

    while( (ch=getchar()) != EOF )
    {
        printf("%02X",ch);
    }
    putchar('
');

    return(0);
}
Here’s a sample run at the command prompt, using standard input (the keyboard), assuming that the program name is hexe and it exists in the current directory:
$ ./hexe
Hello there, hex!
48656C6C6F2074686572652C20686578210A
Figure 5.4 illustrates what’s going on with the output, how each character of input is translated into the hex bytes.
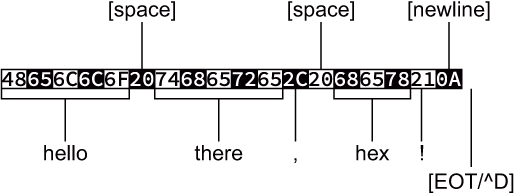
Figure 5.4 What’s going on with the output of a simple hex encoder
This filter can process more than plain text. You can redirect input from any file type, including a binary executable:
$ ./hexe < hexe
The problem with this serial hex digit approach is that the output is useful only to the decoder program. I wouldn’t expect a user to type in a long string of hex digits. Such a chore would be a nightmare.
To decode the long-string-of-text hex filter, you must write a program that properly translates 2-digit hex values into their byte-value equivalent. The assumption made in such a program is that it’s receiving the exact type of information that the encoder generates—which is a huge assumption, and one I’d never make in any program I planned on releasing as a practical utility.
A big part of the translation is identifying and converting hexadecimal digits into their integer values. To accomplish this task, I present the tohex() function, shown in the following listing. It hunts down ASCII characters 0 through 9 and A through F, translating them into their integer equivalents. Anything out of range generates a return value of -1. (The function doesn’t convert lowercase hex digits, which isn’t necessary for decoding in this example.)
Listing 5.4 The tohex() function.
int tohex(c)
{
    if( c>='0' && c<='9' )    ❶
        return(c-'0');        ❷
    if( c>='A' && c<='F' )    ❸
        return(c-'A'+0xA);    ❹
    return(-1);               ❺
}
❶ Eliminates the digits 0 through 9
❷ Returns the digit’s integer value
❸ Eliminates the letters A through F
❹ Returns the character’s hex value: ‘A’==0x0A
❺ All other characters return -1.
The tohex() function fights only part of the battle. The rest of the job is to read standard input, assembling every two hex digits into a byte. To accomplish this task, I wrote an endless while loop, shown next. It fetches the two characters, sticks them together, and then outputs the resulting value, which can be binary or plain text.
Listing 5.5 Decoding the endless line of a hex filter
while(1)                     ❶
{
    ch = getchar();          ❷
    if( ch==EOF ) break;     ❸
    a = tohex(ch);           ❹
    if( a<0 ) break;         ❺
    a<<=4;                   ❻
    ch = getchar();          ❼
    if( ch==EOF ) break;
    b = tohex(ch);
    if( b<0) break;
    putchar(a+b);            ❽
}
❶ The endless loop relies upon the presence of an EOF to terminate.
❷ Reads a character and immediately . . .
❸ . . . checks for the EOF and breaks the loop if found
❹ Converts the character to a hex value
❺ Exits if the character isn’t hex
❻ Shifts value a four bits to represent the upper half of the byte in value
❼ Repeats the process for the next character, but without the shift
The entire batch of code is available in this book’s online repository as hexdefilter01.c. It can be run straight-up, assuming you know a smattering of hex values to type in:
$ ./hexd
48656C6C6F2C20776F726C64210A
Hello, world!
The program stops when it encounters a nonhex digit or when the EOF is encountered, which helps match it up perfectly with the output from the hexenfilter01.c program. In fact—the true test of encoding and decoding—you can pump output through both filters and end up with the original data:
$ echo "This proves whether it works!" | ./hexe | ./hexd
This proves whether it works!
Text is echoed to standard input but first piped through the hexe (hexenfilter01.c) program, assumed to be in the current directory. This encoded output is then piped through the hexd (hexdefilter01.c) program. The output is the original text.
These simple filters process information, whipping it into one long string of hexadecimal characters. This type of hex encoding may work for transferring a silly game on a 300 BPS modem in the last century, but good luck getting a user to type in all those bytes without crossing their eyes. No, additional formatting is necessary for a better hex encoder/decoder.
5.2.2 Coding a better hex encoder/decoder
I prefer a hex encoding method that shows its details in a neat, orderly manner. Especially back in the old days, if you were typing in row upon row of hex bytes published in a computer magazine to input a program, you didn’t need to see the Great Wall of Hex.
A good approach to hex-encoding data, especially if the information is to be presented both for a human and a decoding program, is to format the output in neat rows and columns. For example:
HEX ENCODE v1.0                                           ❶
 54 68 69 73 20 69 73 20 61 6E 20 65 78 61 6D 70 6C 65    ❷
 20 6F 66 20 68 65 78 20 65 6E 63 6F 64 69 6E 67 20 69    ❷
 6E 20 61 20 66 6F 72 6D 61 74 74 65 64 20 6D 61 6E 6E    ❷
 65 72 2E 20 49 20 61 70 70 6C 61 75 64 20 79 6F 75 20    ❷
 66 6F 72 20 62 65 69 6E 67 20 61 20 6E 65 72 64 20 61    ❷
 6E 64 20 64 65 63 6F 64 69 6E 67 20 74 68 69 73 20 65    ❷
 78 61 6D 70 6C 65 2E 0A
HEX ENCODE END                                            ❸
❶ Title text with version number
❷ Neatly and consistently outputs rows of hex values
This output is from a filter, though it’s formatted to be more presentable and predictable. It still has its flaws, which I’ll get into eventually, but it’s a better encoder despite the data output being a series of hexadecimal digits, just like that of the filter presented in the preceding section.
Listing 5.6 shows the source code for the Hex Encode 1.0 program. It’s based on a typical I/O filter, though it formats output based on a certain number of hex digits per line, shown in the code as defined constant BYTES_PER_LINE. Variable bytes tracks the digits output, ensuring that the hex digit pairs stay consistent line by line. This value is reset when the number of digits output equals the defined constant BYTES_PER_LINE, and a new line of hex digits is output. The final line output marks the end of encoding.
Listing 5.6 Source code for hexencode01.c
#include <stdio.h>

#define BYTES_PER_LINE 18                 ❶

int main()
{
    int ch,bytes;

    bytes = 0;                            ❷
    printf("HEX ENCODE v1.0
");          ❸
    while( (ch=getchar()) != EOF )
    {
        printf(" %02X",ch);
        bytes++;
        if( bytes == BYTES_PER_LINE)      ❹
        {
            putchar('
');                ❺
            bytes = 0;                    ❻
        }
    }
    printf("
HEX ENCODE END
");         ❼

    return(0);
}
❶ Set this value as a defined constant so that it can be updated easily.
❷ Initializes the byte counter
❸ Outputs the header line before processing standard input
❹ Checks for the end of the line
❺ If so, outputs a newline . . .
❻ . . . and resets the byte counter
❼ After processing standard input (including the EOF), outputs the tail line
The hex-encoding code works like any filter, waiting for the EOF or, when using standard input, a press of the Ctrl+D key to terminate. Here is sample output:
$ echo "Hello, World!" | ./hexencode
HEX ENCODE v1.0
 48 65 6C 6C 6F 2C 20 57 6F 72 6C 64 21 0A
HEX ENCODE END
Writing the encoding program is the easy part. More difficult is decoding, where you must properly interpret the format to convert the hex digits back into bytes. As with any complex coding contraption, I accomplish such a task one step at a time.
The first step to writing the hex decoder is to write a filter that processes a line of input at a time. This proto-program is shown in the next listing. It’s incomplete as far as decoding is concerned. It extracts a line of text from standard input and stores it in the line[] buffer. The buffer is output once it’s filled, which is dull. Still, future versions of the program will use the line[] buffer to process the encoded values.
Listing 5.7 Source code for hexdecode01.c
#include <stdio.h> #define BYTES_PER_LINE 18 #define LENGTH (BYTES_PER_LINE*3+1) ❶ int main() { char line[LENGTH]; int x,ch; x = 0; while( (ch=getchar()) != EOF ) { line[x] = ch; ❷ x++; ❸ if( ch==' ' || x==LENGTH) ❹ { if( line[x-1]==' ') ❺ line[x-1] = '�'; else line[x] = '�'; printf("%s ",line); ❻ x = 0; } } return(0); }
❶ Calculates the buffer size for the number of bytes times the number of spaces used, plus one for the null character
❷ Stores incoming characters in the buffer
❹ Checks for newline (as the decoded file is formatted) or a full buffer
❺ Replaces the newline with a null character; otherwise, caps the string
❻ Outputs the line, unmodified
As written, the source code for hexdecode01.c processes any input line by line. The lines are truncated at LENGTH number of characters, which is calculated as the exact length of lines output by the hexencode program shown earlier. No other processing is done on the incoming data, so the program’s output looks exactly like whatever is input. Here, you see the file sample.txt, created by the hexencode program, which is output as is by the hexdecode program:
$ ./hexdecode < sample.txt
HEX ENCODE v1.0
 54 68 69 73 20 69 73 20 61 6E 20 65 78 61 6D 70 6C 65
 20 6F 66 20 68 65 78 20 65 6E 63 6F 64 69 6E 67 20 69
 6E 20 61 20 66 6F 72 6D 61 74 74 65 64 20 6D 61 6E 6E
 65 72 2E 20 49 20 61 70 70 6C 61 75 64 20 79 6F 75 20
 66 6F 72 20 62 65 69 6E 67 20 61 20 6E 65 72 64 20 61
 6E 64 20 64 65 63 6F 64 69 6E 67 20 74 68 69 73 20 65
 78 61 6D 70 6C 65 2E 0A
HEX ENCODE END
The program works, so the code accomplished the first step in the process. To improve the code, the next change confirms that the input data is formatted properly. After all, this is a decoding program for a specific encoded data format. This improvement takes advantage of the hexencode program’s first and last lines of output (shown in the sample output): the initial line HEX ENCODE 1.0 must be detected or else the file is improperly formatted and no further processing is necessary. Also, the final line, HEX ENCODE END, is tested to determine when line processing is over.
Several small chunks of code must be added to hexdecode01.c to make these improvements. First, the new code uses the exit() and strncmp() functions, which require the inclusion of two header files:
#include <stdlib.h>
#include <string.h>
A new variable declaration is required, pointer r. This pointer holds the return value from the fgets() function, which is used to determine whether input is valid:
char *r
The variable declarations are followed by a chunk of code designed to read the initial line of text. The fgets() function reads the line from standard input (stdin), which is then tested with an if statement. If the return value from fgets() is NULL or the string doesn’t compare with the required hex-encoding header, an error message is output and the program terminates:
r = fgets(line,LENGTH,stdin);                        ❶
if( r==NULL || strncmp(line,"HEX ENCODE",10)!=0 )    ❷
{
    f>printf(stderr,"Invalid HEX ENCODE data
");     ❸
    exit(1);
}
❶ The first line of input is gobbled up.
❷ fgets() returns NULL on invalid input; otherwise, the strncmp() function performs an exact comparison on the first line of text versus the required text.
❸ An error message is sent to the standard error device to avoid output confusion.
I omitted version testing on the first line of text, which I’m saving for a later improvement to the code, covered in the next section.
The final chunk of text is added in the while loop, just before the printf() statement that outputs the value of line[]. The statements test for the terminating line in the formatted hex encoding. If found, the loop is broken without outputting the final line:
if( strncmp(line,"HEX ENCODE END",13)==0 )
    break;
All these modifications are included in the source code file hexdecode02.c, available in this book’s online repository.
When compiled and run, the output is similar to the earlier program, but an improperly formatted hex encode file is identified right away. So, if you run the program on its own source code file, you see this output:
$ ./hexdecode < hexdecode02.c
Invalid HEX ENCODE data
Otherwise, the output looks the same as the first version. The hex byte lines are read and output with no further processing:
$ ./hexdecode < sample.txt
 54 68 69 73 20 69 73 20 61 6E 20 65 78 61 6D 70 6C 65
 20 6F 66 20 68 65 78 20 65 6E 63 6F 64 69 6E 67 20 69
 6E 20 61 20 66 6F 72 6D 61 74 74 65 64 20 6D 61 6E 6E
 65 72 2E 20 49 20 61 70 70 6C 61 75 64 20 79 6F 75 20
 66 6F 72 20 62 65 69 6E 67 20 61 20 6E 65 72 64 20 61
 6E 64 20 64 65 63 6F 64 69 6E 67 20 74 68 69 73 20 65
 78 61 6D 70 6C 65 2E 0A
The final improvement is to process the hex digits, translating them into values. This change requires only one new variable and one additional chunk of statements. The new variable is integer hex, which can be added to the existing int variable declarations:
int x,ch,hex;
To translate the hexadecimal character pairs into bytes, the while loop’s printf() statement is replaced with a nested while loop. This inner loop processes the line[] buffer, parsing out the hex digit pairs. I use the strtok() function to handle the parsing or “tokenizing,” if that’s what the tok stands for. Using this function saves a lot of overhead, reducing the code by several statements.
Within the nested while loop, a sscanf() function translates the parsed hex digits, which are now considered a 2-character string, into an integer value. The value generated is sent to standard output. The process repeats until the entire line is processed, which is the beauty of the strtok() function:
r = strtok(line," ");           ❶
while(r)                        ❷
{
    sscanf(r,"%02X",&hex);      ❸
    printf("%c",hex);           ❹
    r = strtok(NULL," ");       ❺
}
❶ Parses the string (input line of text), separating its content by spaces
❷ As long as the strtok() function returns a non-NULL value, loops
❸ Translates the 2-character hex string into an integer value
❹ Outputs the integer value (which can be non-ASCII)
❺ Keeps scanning the same string
This final modification to the code is available in the repository as hexdecode03.c. It completes the project. The resulting program, which I’ve named hexdecode, can properly decode the data encoded by the hexencode program.
To put the program to the test, I encoded and then decoded the program file itself. The first step is to encode the program file, saving the output for use later:
$ ./hexencode < hexdecode > hexdecode.hex
This command processes the binary data in the hexdecode program file. The output is redirected to a new file named hexdecode.hex. This file is plain text but formatted as shown throughout this section: with a header, rows of hex digits, and a tail.
To decode the file and translate it back into binary data, use this command:
cat hexdecode.hex | ./hexdecode > hexdecode.bin
The cat command outputs the encoded file, hexdecode.hex, created earlier. This output (which is plain text) is piped through the hexdecode program. The result—now binary data, so standard output looks ugly—is redirected into a new file, hexdecode.bin.
To ensure that both the original hexdecode program file and the encoded/decoded data file hexdecode.bin are identical, I use the diff command:
diff hexdecode hexdecode.bin
Because the diff program generates no output, it’s confirmed that the original binary file was encoded into a text file of hexadecimal character pairs and successfully decoded back into its original binary format. The hexencode/hexdecode filters work. Then again, I wouldn’t have written all this stuff if they didn’t. No spoilers.
5.2.3 Adding a wee bit of error-checking
I was delighted with my original efforts for the hexencode/hexdecode series of filters. That’s until I started looking at the encoded information and trying to figure out how it could be messed up. After all, upon successful creation of any program, you as a C coder must immediately figure out how to break it.
Consider that you’re a teen with a computer (and no social life, natch), and you’re eager to type in the new Laser Blaster game fresh from the pages of Compute! magazine. You type line after line, hex digit after digit. Did you screw up? If so, at what point did the mistake happen?
To help track entry errors, early hex dumps in magazines offered a checksum digit at the end of each row. This checksum is merely the total of all the byte values in the row, sometimes modulo 0x100 to make it look like another two digit hex value. When the user typed in the code, they could run the checksum (or their hex decoder program would) to determine whether a mistake was made and which line had to be reread and whether the entire operation had to start all over again. Yes, this is one reason Jolt Cola came in 12-packs.
The source code for checksum01.c is shown in the next listing. It demonstrates how to perform a simple type of checksum. Each successive value from array hexbytes[] is accumulated in int variable checksum. This result is output modulo 0x100, which keeps it byte-size for consistency.
Listing 5.8 Source code for checksum01.c
#include <stdio.h>

int main()
{
    int hexbytes[] = {
        0x41, 0x42, 0x43, 0x44, 0x45,              ❶
        0x46, 0x47, 0x48, 0x49, 0x4A               ❶
    };
    int x,checksum;

    checksum = 0;                                  ❷
    for( x=0; x<10; x++ )
    {
        checksum += hexbytes[x];                   ❸
        printf(" %02X",hexbytes[x]);
    }
    printf("
Checksum = %02X
",checksum%0x100);  ❹

    return(0);
}
❶ Just a random assortment of hex values; 10 total
❷ Initializes the checksum variable here
❹ Outputs the checksum, but limited to a char-size value
Writing a program like checksum01.c is an approach I often take to solving a larger programming project. Whenever I add a new feature to any program, I want to ensure that it works. If instead I add the feature to existing code, the process may introduce other problems that complicate bug hunting.
Here’s sample output from the checksum01.c program:
41 42 43 44 45 46 47 48 49 4A
Checksum = B7
More complex methods exist to calculate a checksum, including some clever variations that can even tell you which specific value is incorrect. But never mind!
Adding a checksum to the hexencode/hexdecode programs requires that both source code files are modified. Yes, it’s version 2.0, now featuring (modest) error checking. So, not only must both programs calculate and output a checksum byte, but the version number must also be updated and verified. If you want to go further, you can have the hexdecode program still decode version 1.0 files without applying the checksum. More work to do!
Update the source code to hexencode01.c to add a checksum hex value to be output at the end of each row. Don’t forget the final row’s checksum (hint, hint). Oh, and update the version number to 2.0. My solution is found in this book’s online repository as hexencode02.c.
The code for your solution to exercise 5.2 may not look exactly as mine does, but the output should resemble something like this:
HEX ENCODE v2.0
 54 68 69 73 20 69 73 20 61 6E 20 65 78 61 6D 70 6C 65 8F
 20 6F 66 20 68 65 78 20 65 6E 63 6F 64 69 6E 67 20 69 4A
 6E 20 61 20 66 6F 72 6D 61 74 74 65 64 20 6D 61 6E 6E 9F
 65 72 2E 20 49 20 61 70 70 6C 61 75 64 20 79 6F 75 20 12
 66 6F 72 20 62 65 69 6E 67 20 61 20 6E 65 72 64 20 61 37
 6E 64 20 64 65 63 6F 64 69 6E 67 20 74 68 69 73 20 65 8C
 78 61 6D 70 6C 65 2E 0A BF
HEX ENCODE END
This output is like the program’s first (1.0) version’s output, but an extra hex value appears at the end of each row. This value is the checksum.
Decoding this data, turning it back into binary, requires an update to the hexdecode program, obviously: first, it must check the version number. If the encoded data shows “v2.0,” the decoder must examine the byte value and confirm that the line was properly decoded. If not, decoding stops and the information is flagged as invalid. And, yes, I’m making you perform this change on your own as the next exercise.
Convert the source code for hexdecode03.c to handle the extra checksum byte set there by the program created from hexencode01.c (exercise 5.2). You must properly account for and use the checksum byte to ensure that each line of the encoded text file is read properly. My solution is named hexdecode04.c, which is available in the online repository. Please attempt this exercise on your own before you cheat and see how I did it. Comments in my code explain what’s going on—and a particularly lucky turn of events that surprised even me.
Alas, my solution isn’t perfect, as you can read in my code comments. Further modification may help send the code in the right direction. This is a topic I may explore on my blog in the future, especially after I’ve eaten lots of cake.
5.3 URL encoding
Another type of text encoding, one that you’ve probably seen before and become frightened over, is URL encoding. Also known as percent encoding, this encoding format preserves web page address and online form content by using printable characters and a smattering of percent signs. This encoding avoids some characters appearing in a URL that may offend our internet overlords.
Specifically, for a web page address, URL encoding is used when referencing something that may otherwise be misinterpreted by the web server, such as a binary value, embedded web page, spaces, or other sneaky data. URL encoding allows this information to be sent as plain text and properly decoded later.
As with any other encoding, you can write a URL-encoding translation program in C. All you need to know are all the URL encoding rules.
5.3.1 Knowing all the URL encoding rules
To help you make the connection between what you may have seen and how URL encoding looks, here’s an example:
https%3A%2F%2Fc-for-dummies.com%2Fblog%2F
All the encoding is plain text; URL-encoded is human-readable. Although every character could be encoded, only special characters are presented as a 2-digit hex value prefixed with a percent sign—for example, %24 for the dollar sign character, ASCII code 0x24.
Though various rules exist regarding this encoding method, the HTML 5 standard defines it as follows:
-
Alphanumeric characters are not translated (0 to 9, A to Z, upper- and lowercase).
-
The characters - (dash), . (period), _ (underscore), and * (asterisk) are retained.
-
Spaces are converted into the + (plus) character, though the %20 code is also used.
-
All other characters are represented as their hexadecimal ASCII value, prefixed with a percent sign.
-
If the data to encode is wider than a byte, such as a Unicode character, it’s divided into byte-size values, each a 2-digit hex number prefixed with a percent sign. This final point may not be consistent for all wide-character values.
Subtle variations on these rules exist, but you get the gist of it. This information is adequate for you to experience the joy of writing your own URL encoding and decoding programs.
5.3.2 Writing a URL encoder
The key to success with writing a URL-encoding program, a filter in this incarnation, is to catch the exceptions first. Output whatever characters need no translation just as they are. Once these items are eliminated, all other characters the program outputs must obey the percent-hexadecimal encoding method.
The source code for urlencoder01.c appears in the following listing. It’s a standard filter that processes input one character at a time. The four URL encoding exceptions are handled first (- . _ *) followed by the space. The isalnum() function weeds out all alphanumeric characters. Anything remaining is output using the %-hexadecimal format, as shown in the code’s printf() statement.
Listing 5.9 Source code for urlencoder01.c
#include <stdio.h>
#include <ctype.h>

int main()
{
    int ch;

    while( (ch=getchar()) != EOF )
    {
        if( ch=='-' || ch=='.' || ch=='_' || ch=='*' )   ❶
            putchar(ch);
        else if( ch==' ')                                ❷
            putchar('+');
        else if( isalnum(ch) )                           ❸
            putchar(ch);
        else
            printf("%%%02X",ch);                         ❹
    }

    return(0);
}
❶ These characters are okay; output as-is.
❷ The space is output as a + character.
❸ Alphanumeric characters are output as-is.
❹ The %% is required to output a percent sign, followed by a 2-digit hexadecimal value, prefixed by a leading zero if necessary.
Here is a sample run of the program, which I’ve named urlencoder:
$ ./urlencoder
https:/ /c-for-dummies.com/blog/
https%3A%2F%2Fc-for-dummies.com%2Fblog%2F%0A^D$
Here, the filter is run at the prompt, so all keyboard input appears in the output. This approach explains why you see the %0A character for the newline at the end of the final line, followed by the Ctrl+D key (^D) to terminate input. The command prompt, $, appears immediately after.
If you’re used to seeing URL encoding, and understand the basic parts of a URL, you may recognize a few common codes:
Of course, beyond being a nerd, you need not memorize these common URL encodings. Instead, you can write your own URL decoder, which is also a sign of being a nerd but with a potential to garner an income.
5.3.3 Creating a URL decoder
I hope you won’t find creating a URL decoder too difficult. Unlike the encoder, the only incoming character the filter should care about is the percent sign. Oh, sure, you could test for “illegal” characters such as those out of range; I’ll leave the extra coding up to you.
The key to weeding out the hex digits is to scan for the % character. Once it’s encountered, you can use a function like tohex(), covered way back in section 5.2.1, to translate the next two incoming hex digits. Again, more testing can be done to determine whether the characters were legitimate hexadecimal digits—but you get the idea.
Presented in the next listing is my quick-and-dirty solution to the URL decoder. It uses a modified version of the tohex() function shown earlier; this one also checks for lowercase hexadecimal digits. Otherwise, the only “bad” incoming character this code scans for is the EOF.
Listing 5.10 Source code for urldecoder01.c
#include <stdio.h>

int tohex(int c)
{
    if( c>='0' && c<='9' )
        return(c-'0');
    if( c>='A' && c<='F' )
        return(c-'A'+0xA);
    if( c>='a' && c<='f' )            ❶
        return(c-'a'+0xA);
    return(-1);
}

int main()
{
    int ch,a,b;

    while( (ch=getchar()) != EOF )
    {
        if( ch=='%' )                 ❷
        {
            ch = getchar();
            if( ch==EOF ) break;      ❸
            a = tohex(ch);            ❹
            ch = getchar();           ❺
            if( ch==EOF ) break;
            b = tohex(ch);
            putchar( (a<<4)+b );      ❻
        }
        else
            putchar(ch);
    }

    return(0);
}❷ Checks for the % sign and grabs the next two characters
❹ Converts the hex digit to an integer
❻ Outputs the proper character value
The program created from the url_decoder01.c source code translates URL encoding, dealing with the % values as they’re encountered. Its major problem, however, is that it doesn’t know how to deal with improperly formed URL-encoded text. Some error checking is in order . . . but I’ve reached my assigned page count for this chapter—plus, it’s almost midnight and I’m out of Ritalin.
Your task is to improve the URL decoder shown in listing 5.10. To do so, ensure that an unwanted character doesn’t filter in. When such an offense occurs, exit the program with an appropriate error message. Further, check the return value from the tohex() function to ensure that it properly reads hexadecimal values.
You can find my solution in this book’s online source code repository. The file is named urldecoder02.c. Please try this exercise on your own. Don’t cheat. You know the drill.