
Closing
![]() Action Tool: Close Out Project Activities
Action Tool: Close Out Project Activities
|
|
|
Assignment
Decide whether you have enough information to prove to the sponsor that the project is needed and feasible.
Desired Outputs
![]() A document confirming that there is a needed for the project deliverables; this would describe the following items in broad terms:
A document confirming that there is a needed for the project deliverables; this would describe the following items in broad terms:
The project goal and/or underlying concepts
The deliverables
By what means the deliverables might be created
The costs of creating and implementing the deliverables
The benefits to be obtained by implementing the deliverables
Who are the sponsor(s) and stakeholders
In what ways the sponsor(s) and stakeholders are prepared to support the project
Worksheet: Demonstrating Project Need and Feasibility
Instructions: This worksheet is designed to help you decide whether you’ve “done your homework” and obtained enough information to prove to your sponsor* that the project you propose is needed and feasible.
Evaluate your project documentation to date by asking yourself each of these questions. (Alter-nately, you might have a colleague or project supporter review the document with the sponsor’s point of view in mind.) Check Yes for those you have answered adequately. If you check No, review the follow-up suggestion and figure out what to do next.
| YES | NO | QUESTIONS |
| Have I defined the project goal clearly, in terms the sponsor* can understand? If no, redefine the goal statement and have it checked by someone who “thinks like the sponsor.” | ||
| Is the sponsor financially and organizationally able to provide all needed support? If no, who is the real sponsor and how can we get the real sponsor involved? | ||
| Have I expressed the core project concept clearly and succinctly? If no, redefine the core project description and have it checked by someone who “thinks like the sponsor.” | ||
| Does a market analysis or needs analysis show a bona fide need for the product (deliverables) of the project? If no, consider abandoning the project or conducting an appropriate analysis that “proves” project need. | ||
| Have we clearly expressed the costs and benefits of the project? If no, restate the description of costs and benefits and have it checked by someone who ‘thinks like the sponsor.” | ||
| Have I consulted all project stakeholders to obtain their opinions about the need and feasibility? If no, identify missing stakeholders and review the need/feasibility with them, asking for feedback. | ||
| Have we defined a project strategy in enough detail to enable the sponsors to really understand “what they’re getting into?” If no, restate the project strategy and have it checked by someone who “thinks like the sponsor.” | ||
| Have I assembled the results of my research into a well-written document and/or presentation? If no, create your document or presentation and have it checked by someone who “thinks like the sponsor.” | ||
| Have I determined an appropriate audience and scheduled a time, place, and date for presenting my project proposal? If no, discuss these items with your supervisor (or a more experienced project manager) and figure out what to do next. | ||
| Have I rehearsed the presentation, including my answers to potentially controversial questions? If no, plan and conduct such a rehearsal. |
* Sponsor is the customer, client, final owner, or entity providing funding. The sponsor has the power to provide funds, approve the use of resources, and/or stop the project.
|
|
|
Assignment
Obtain suitable authorization from the sponsor to begin the project.
Desired Outputs
![]() A “go/no go” decision is made by the sponsor.
A “go/no go” decision is made by the sponsor.
If “no go,” all planning typically stops.
If “go,” the next items apply.
![]() A project manager is identified and assigned.
A project manager is identified and assigned.
![]() A “project charter” is created that:
A “project charter” is created that:
Formally recognizes the existence of the project
Is supported by a manager external to the project and at a high enough organizational level so that he or she can support project needs
Authorizes the project manager to apply organizational resources (people, equipment, materials) to project activities
Worksheet: Is This Project Authorized?
Instructions: This worksheet will help you figure out whether you have been fully authorized to continue with the project you proposed. Assuming that you have been given some form of approval to begin the project, evaluate that approval to determine if it provides you with the authority you need in order to do the job. (If you are working with a formal or informal advisory group, you might ask its members to complete this worksheet for you.)
| YES | NO | QUESTIONS |
| Has the project been formally recognized as a project by one or more sponsors? If no, find out why not and discuss with your supervisor or the potential sponsor what to do next. | ||
| Has news of the project been widely circulated in written form? If no, find out why not and figure out what to do next. | ||
| Has project authorization been issued by a manager external to the project and at a high enough organizational level to help meet project needs? If no, identify an appropriate sponsoring manager and figure out how you can get his or her authorization. | ||
| Has the project manager been clearly identified? If no, find out who should identify the project manager and what steps are needed to get the project manager officially identified. | ||
| Is the project manager authorized to apply organizational resources (people, equipment, materials) to project activities? If the project manager has not been formally authorized, then ask the sponsor by whose authority project resources will be applied. | ||
| Has the project manager been given the “green light” to move on to the next project phase? If no, decide what conditions need to be met to get authorization, and begin to meet them. | ||
| Has a project charter been created and approved by appropriate decisionmakers? If no, create one and get it approved. (See Worksheet: The Project Charter) |
Remember: If the project isn’t authorized, you probably should not be expending resources (including your own time) working on it.
Worksheet: The Project Charter
Project Name:
Project Manager:
| Project Tracking Number: |
Date: |
Project Justification (Problem or Opportunity Addressed):
Overview of Deliverables (high-level, broad-brush only—provide details, if any, in appendices*):
Specific Project Objectives & Success Criteria
(schedule, cost, quality):
Primary Stakeholders & Roles (including broad statement of roles and responsibilities of all customers, sponsors, contributors, reviewers, managers, sign-off authorities, project manager, etc.):
Key Assumptions:
Signatures—The following people agree that the above information is accurate:
• Project team members:
• Project sponsor and/or authorizing manager(s):
|
|
|
Note: Whether you will need authorization to begin each phase will depend on the type of project and the organizations involved. Initial approval of the entire project may be enough to initiate authorization of each project phase automatically. However, see Pitfalls and Cautions below.
Assignment
Obtain suitable authorization from the sponsor to begin a particular project phase.
Desired Outputs
![]() A “ go/no go” decision is made by the sponsor concerning whether the project manager will be authorized to apply organizational resources (people, equipment, materials) to the activities of a particular phase (as opposed to the entire project).
A “ go/no go” decision is made by the sponsor concerning whether the project manager will be authorized to apply organizational resources (people, equipment, materials) to the activities of a particular phase (as opposed to the entire project).
If “no go,” all work typically stops.
If “go,” continue with the next items.
![]() The phase is given written approval that:
The phase is given written approval that:
Formally recognizes the existence of the phase
Is supported by a manager external to the project and at a high enough organizational level so that he or she can support the needs of the phase
Authorizes the project manager to apply organizational resources (people, equipment, materials) to activities of the phase
Worksheet: Is This Phase Really Authorized?
Instructions: This worksheet will help you figure out whether you have been fully authorized to begin a project phase. Assuming that you have been given some form of approval to begin the phase, evaluate that approval to determine if it provides you with the authority you need to do the job. (If you are working with a formal or informal advisory group, you might ask its members to complete this worksheet with you.)
| YES | NO | QUESTIONS |
| Is the phase we are about to begin part of a project that has been formally recognized as a project? If no, return to Action Item: Obtain Project Authorization. | ||
| Have all appropriate stakeholders approved the results of the preceding phase? If no, consider how and why the results of the preceding phase were not approved. Ask yourself: “Should we really continue to the next phase without reworking the deliverables, changing the formal project specifications, or otherwise changing our project plans?” | ||
| Have the authorization for this phase has been issued by a manager external to the project and at a high enough organizational level to help meet project needs? If no, identify an appropriate sponsoring manager and figure out how you can get his or her authorization. | ||
| Is it clear who the project manager is for this phase? If no, find out who should identify the project manager and what steps are needed to get the manager officially identified. | ||
| Is the project manager authorized to apply organizational resources (people, equipment, materials) to the phase? If the project manager has not been formally authorized, then ask the sponsor by whose authority project resources will be applied. | ||
| Has the project manager been given the “green light” to continue with this project phase? If no, decide what conditions need to be met to get authorization and begin to meet them. |
Remember: If the phase isn’t authorized, you probably should not be expanding resources (including your own time) working on it!
|
|
|
Assignment
Create an adequate description of project scope.
Desired Outputs
![]() Statement of project scope, to include:
Statement of project scope, to include:
Project justification
List of major project deliverables
List of project objectives (quantifiable criteria that must be met for success—at minimum: cost, schedule, and quality measures)
![]() Scope management plan, to include:
Scope management plan, to include:
How scope will be managed (i.e., how scope changes will be identified and integrated into the project)
Expected stability of the project
![]() Work breakdown structure—a “family tree” that organizes and defines the total scope of the project.
Work breakdown structure—a “family tree” that organizes and defines the total scope of the project.
Checklist: Evaluating Project Scope
Instructions: This checklist is designed to help you evaluate your description of project scope; then, using the list below, check off the items that you have completed. (If you are working with a formal or informal advisory group, you might ask all of its members to work through this checklist with you.)
![]() There is a clear project justification (i.e., a clear explanation of why the project has been undertaken).
There is a clear project justification (i.e., a clear explanation of why the project has been undertaken).
![]() There is a list of all major project deliverables.
There is a list of all major project deliverables.
![]() There is a list of project objectives.
There is a list of project objectives.
![]() The project objective list includes quantifiable criteria for success, including:
The project objective list includes quantifiable criteria for success, including:
• Cost criteria (i.e., What cost limits will be met in order for the project to be judged a success?)
• Schedule criteria (i.e., What calendar dates will be met in order for the project to be judged a success?)
• Quality measures (i.e., By what measures will we know that the project has produced quality deliverables or achieved quality results?)
![]() Project objectives do not take the form of fuzzy descriptions such as “to provide maximum customer satisfaction” or “to create state-of-the-art deliverables.”
Project objectives do not take the form of fuzzy descriptions such as “to provide maximum customer satisfaction” or “to create state-of-the-art deliverables.”
![]() There is a description of what constitutes an “out-of-bound” condition that could lead to a change in project scope (e.g., excess costs, schedule extensions, reduction in quality, increase in deliverables).
There is a description of what constitutes an “out-of-bound” condition that could lead to a change in project scope (e.g., excess costs, schedule extensions, reduction in quality, increase in deliverables).
![]() There is a description of what to do when project scope changes are identified (e.g., notify sponsor, execute a contract change order, stop project work).
There is a description of what to do when project scope changes are identified (e.g., notify sponsor, execute a contract change order, stop project work).
![]() There is a description of the expected stability of the project (e.g., “We have anticipated and spelled out potential unstable factors”).
There is a description of the expected stability of the project (e.g., “We have anticipated and spelled out potential unstable factors”).
![]() There is a work breakdown structure (WBS) or a “family tree” chart that organizes and defines the total scope of the project.
There is a work breakdown structure (WBS) or a “family tree” chart that organizes and defines the total scope of the project.
![]() All the items above have been organized into a single, comprehensive document (see Worksheet: Project Scope Statement.)
All the items above have been organized into a single, comprehensive document (see Worksheet: Project Scope Statement.)
Worksheet: Project Scope Statement
Project Name:
Project Manager:
| Project Tracking Number: |
Date: |
Project Justification (Problem or Opportunity Addressed):
Overview of Deliverables (… broad brush only—Place detailed WBS in appendices”):
Specific Project Objectives & Success Criteria (schedule, cost, quality):
Scope Management Issues (including ways scope changes will be handled, contract change orders will be processed, etc.):
Primary Stakeholders & Roles (including broad statement of roles and responsibilities of all customers, sponsors, contributors, reviewers, managers, sign-off authorities, project manager, etc.):
Key Assumptions:
Signatures—The following people agree that the above information is accurate:
• Project team members:
• Project sponsor and/or authorizing manager(s):
*Appendices (Needs Analysis/Feasibility Study Notes, Detailed Work Breakdown Structure, Preliminary Schedule, Preliminary Cost Estimate, Sample Deliverables, Background Memos/Reports, Organization Chart of Project Team, others as needed).
Example: Work Breakdown Structure
(WBS)
A work breakdown structure describes the components and subcomponents of the project’s various work products as a “family tree.” Consider this example. A couple has decided that they would like to change their lifestyle by moving to their own custom-made log cabin in the wilderness. Below is a work breakdown structure for this project.
Note that the client shows all the various outputs that must be created, not just the most obvious. We can see, for example, that getting the financing arranged and the services installed will be important project outcomes, so the couple must account for these in their plans. Had they focused only on the most obvious (the cabin’s construction), they may have overlooked these outcomes.
FIGURE 4. Work Breakdown
Structure Chart
As this example shows, a main benefit of starting a project with a work breakdown structure is that it keeps the project manager focused on uncovering all the “hidden” deliverables. Only after all these specific outputs are examined in detail can the project manager build an accurate list of activities (i.e., the project work tasks) necessary to create these deliverables.
|
|
|
Assignment
Define and sequence all the activities necessary to complete the project.
Desired Outputs
![]() An activity list (list of all activities that will be performed on the project)
An activity list (list of all activities that will be performed on the project)
![]() Updates of the work breakdown structure (WBS) (For details, see Action Tool: Describe Project Scope.)
Updates of the work breakdown structure (WBS) (For details, see Action Tool: Describe Project Scope.)
![]() A project network diagram showing the relationships among project activities
A project network diagram showing the relationships among project activities
Guidelines for Defining and Sequencing Project Activities
Instructions: Follow these steps to define and sequence your project activities. You may use the check boxes to mark the items as completed. (If you are working with a formal or informal advisory group, you might ask its members to work through these guidelines with you.)
STEP 1: Assemble the following:
![]() Description of project scope
Description of project scope
![]() Historical data an activities that were required for similar projects (i.e., What activities are usually completed for similar types of projects?)
Historical data an activities that were required for similar projects (i.e., What activities are usually completed for similar types of projects?)
![]() One or more experts who have defined and sequenced activities for similar projects
One or more experts who have defined and sequenced activities for similar projects
STEP 2: Create detailed activities lists.
![]() Examine the WBS, and for each product (deliverable) to be created, make a list of specific activities.
Examine the WBS, and for each product (deliverable) to be created, make a list of specific activities.
![]() Group these activities into clusters or groups of related activities. Keep in mind the typical project phases required by your industry’s best practices.
Group these activities into clusters or groups of related activities. Keep in mind the typical project phases required by your industry’s best practices.
![]() Separate some of the clustered activities into activities that may “stand alone.”
Separate some of the clustered activities into activities that may “stand alone.”
![]() Identify review, revision, and sign-off points, if appropriate.
Identify review, revision, and sign-off points, if appropriate.
![]() Identify closure points for completing deliverables.
Identify closure points for completing deliverables.
STEP 3: Create the project network diagram.
![]() Draw a diagram showing the relationships among activities (which must come first, which must come next, which ones may proceed at the same time, etc.).
Draw a diagram showing the relationships among activities (which must come first, which must come next, which ones may proceed at the same time, etc.).
STEP 4: Evaluate the detailed list of activities and the network diagram, and revise/adjust.
![]() Revisit your network diagram and list of activities, and decide if they can be refined in any way.
Revisit your network diagram and list of activities, and decide if they can be refined in any way.
![]() Ask an outside advisor (an expert in the project activities) to evaluate your network diagram and supporting activity list.
Ask an outside advisor (an expert in the project activities) to evaluate your network diagram and supporting activity list.
![]() Consider expanding or adding a level of detail to all activities whose measures of quality, cost, or schedule are unclear.
Consider expanding or adding a level of detail to all activities whose measures of quality, cost, or schedule are unclear.
Example: Project Network Diagram
When you have listed all your project tasks and have figured out all of the task relationships, you are ready to organize them into a network diagram. Such a diagram can highlight important relationships among project activities, allowing project planners to analyze these relationships and, if necessary, change them. Figure 5 shows two different types of network diagrams. Both of the diagrams below illustrate a do-it-yourself kitchen remodeling project. The kitchen owner has decided to repaint the walls, regrout the tile on the countertop, and install some new appliances. Note how the progress from one project activity to another can easily be seen in the diagrams.
FIGURE 5. Network Diagrams for Kitchen Remodeling Project
|
|
|
|
Action Tool: Estimate Durations for Activities and Resources Required |
|
Assignment
Estimate duration for activities and resources required to complete those activities.
Desired Outputs
![]() Estimate of duration (time required) for each activity, and assumptions related to each estimate.
Estimate of duration (time required) for each activity, and assumptions related to each estimate.
![]() Statement of resource requirements (What people, equipment, and materials will be needed for each activity?)
Statement of resource requirements (What people, equipment, and materials will be needed for each activity?)
![]() Updates of activity list (How will the activities list need to be modified now that we have looked at durations and resources in greater detail?)
Updates of activity list (How will the activities list need to be modified now that we have looked at durations and resources in greater detail?)
Guidelines for Estimating Duration of Activities and Resources Required
Instructions: Follow these steps to estimate the duration for project activities and the resources required. You may use the check boxes to mark items as completed. (If you are working with a formal or informal advisory group, you might ask its members to work through this worksheet with you.)
STEP 1: Assemble the following:
![]() Scope statement
Scope statement
![]() Activity list and network diagram
Activity list and network diagram
![]() Description of the resource pool, including resources available and their capabilities
Description of the resource pool, including resources available and their capabilities
![]() Historical data on similar activities from project files, commercial databases, or project team knowledge
Historical data on similar activities from project files, commercial databases, or project team knowledge
![]() Organizational policy regarding staffing, rental/purchase of equipment and supplies, and so forth
Organizational policy regarding staffing, rental/purchase of equipment and supplies, and so forth
![]() One or more experts who have estimated duration and resources required for similar projects
One or more experts who have estimated duration and resources required for similar projects
STEP 2: Examine each activity, then estimate its duration and probable resources required (see Worksheet: Estimating Duration of Activities and Resources Required).
![]() Estimate of duration for each activity
Estimate of duration for each activity
![]() Estimate of resources required for each activity
Estimate of resources required for each activity
![]() Assumptions about the resources to be assigned (for example, employees will need to work 10-hour days or the machine will need to process 75 units per hour)
Assumptions about the resources to be assigned (for example, employees will need to work 10-hour days or the machine will need to process 75 units per hour)
Note: Some organizations can supply you with data on what can reasonably be expected from a particular resource in order to achieve a quality work product. For example, a reasonable expectation for a veteran bricklayer might be to lay X number of bricks per day. If the project manager is forced, due to budget cuts, to hire fewer bricklayers or inexperienced bricklayers, then you may not be able to maintain your project schedule. Your assumptions should clearly state any “reasonable expectancies” such as these so that they may be captured in your project plan.
![]() Maximum time some staff members may devote to a particular activity.
Maximum time some staff members may devote to a particular activity.
STEP 3: Re-evaluate the activity relationships, given your duration and resource assumptions.
![]() Examine clusters or groups of related activities.
Examine clusters or groups of related activities.
![]() Examine “stand alone” activities.
Examine “stand alone” activities.
STEP 4: Adjust the project network diagram as needed.
![]() Network diagram adjusted.
Network diagram adjusted.
STEP 5: Informally present your estimates of duration and resources required to an expert colleague to “reality check” it; adjust as needed.
![]() Expert review, adjustment
Expert review, adjustment
Worksheet: Estimating Durations of Activities and Resources Required
Instructions: In the Activity column, list the phases and activities that must be completed. In the Duration column, list the amount of time required to complete each activity. In the Resources column, enter the names of all resources which are required to complete each activity. Resources should include all people (including contractors), equipment, facilities, or materials. In addition, your assumptions about experience level, brand names of equipment, facility or equipment specifications, number of resources, and so on should be clearly spelled out, since failure to acquire resources with the assumed characteristics will likely impact the time required to complete the activity.
| Phase and Activity | Duration (hours or days) | Resources Required with Assumptions |
| Total Time Required: |
| Phase and Activity | Duration (hours or days) | Resources Required with Assumptions |
| Total Time Required: |
|
|
|
Assignment
Develop a project schedule.
Desired Outputs
![]() Project schedule (planned start-and-finish dates for each activity) in the form of Gantt charts, network diagrams, milestone charts, or text tables.
Project schedule (planned start-and-finish dates for each activity) in the form of Gantt charts, network diagrams, milestone charts, or text tables.
![]() Supporting details, as required, to show resource usage over time, cash flow projections over time, order/delivery schedules, or other schedule-related details.
Supporting details, as required, to show resource usage over time, cash flow projections over time, order/delivery schedules, or other schedule-related details.
![]() Schedule management plan describing how schedule changes will be handled.
Schedule management plan describing how schedule changes will be handled.
Guidelines for Developing the Project Schedule
Instructions: Follow these steps to develop a project schedule. You may use the check boxes to mark items as completed. (If you are working with a formal or informal advisory group, you might ask its members to work through these guidelines with you.)
STEP 1: Assemble the following:
![]() Your estimates of duration and resources required
Your estimates of duration and resources required
![]() Information about availability of resources—how many will be available and when
Information about availability of resources—how many will be available and when
![]() Organization calendars—these identify when work is allowed (when resources will be available, which days are holidays, which days are vacation days, and so on)
Organization calendars—these identify when work is allowed (when resources will be available, which days are holidays, which days are vacation days, and so on)
![]() Project constraints, including:
Project constraints, including:
![]() Imposed dates based on stakeholder requirements, seasonal weather, etc.
Imposed dates based on stakeholder requirements, seasonal weather, etc.
![]() Key events or major milestone completion dates
Key events or major milestone completion dates
![]() Unusual assumptions about resources or duration
Unusual assumptions about resources or duration
![]() A blank calendar or other blank form on which to record the schedule
A blank calendar or other blank form on which to record the schedule
STEP 2: On the blank calendar, label any holidays or other dates when resources won’t be available
![]() Identify holidays, vacations, and the like.
Identify holidays, vacations, and the like.
STEP 3: Examine each activity and its duration, and plot the activity on the calendar. On a separate page labeled “assumptions,” capture any assumptions about the activity, including assumptions about the resources to be assigned
![]() Plot activities, duration.
Plot activities, duration.
![]() List assumptions about resources.
List assumptions about resources.
STEP 4: After the days are plotted on a standard calendar, create other types of schedule displays that will be useful (e.g., Gantt charts, network diagrams, milestone charts, text tables).
![]() Create specialized project-wide charts, schedules.
Create specialized project-wide charts, schedules.
STEP 5: If your project’s network diagram or Gantt chart shows many different activities happening at the same time, consider finding the critical path and attempting to shorten it in order to reduce the project’s overall duration. (The critical path is that sequence of activities which take the most time to complete.)
Here are some ways you can shorten the critical path:
![]() Reduce the duration of some of the activities. (Simply allow less time for them.)
Reduce the duration of some of the activities. (Simply allow less time for them.)
![]() Add more resources to some of the activities. (If you assign more people or equipment, you can often reduce the time required. Be careful, however, since this can increase the coordination time required.)
Add more resources to some of the activities. (If you assign more people or equipment, you can often reduce the time required. Be careful, however, since this can increase the coordination time required.)
![]() Allow more hours in the workday. (allow for overtime or add another shift.)
Allow more hours in the workday. (allow for overtime or add another shift.)
![]() Allow more workdays in the schedule. (allow for weekend or holiday work.)
Allow more workdays in the schedule. (allow for weekend or holiday work.)
![]() Change the relationships of activities: (Instead of performing some tasks sequentially, one at a time, perform them at the same time, in parallel fashion.)
Change the relationships of activities: (Instead of performing some tasks sequentially, one at a time, perform them at the same time, in parallel fashion.)
![]() Use slack time more effectively. (Find slack between activities or “downtime” for some resources, and “move up” or plan to complete pending activities during this time.)
Use slack time more effectively. (Find slack between activities or “downtime” for some resources, and “move up” or plan to complete pending activities during this time.)
![]() Redefine one or more project phases. (Check to see if some activities contained within a phase are causing the phase to be delayed needlessly; then consider moving these activities to the next phase.)
Redefine one or more project phases. (Check to see if some activities contained within a phase are causing the phase to be delayed needlessly; then consider moving these activities to the next phase.)
![]() Redefine “done.” (Consider whether some deliverables, particularly interim deliverables such as blueprints, prototypes or drafts, might be defined as “finished” in a less complete form.)
Redefine “done.” (Consider whether some deliverables, particularly interim deliverables such as blueprints, prototypes or drafts, might be defined as “finished” in a less complete form.)
![]() Reduce the amount of deliverables that a particular activity produces. (It takes less time to do less work!)
Reduce the amount of deliverables that a particular activity produces. (It takes less time to do less work!)
![]() Reduce the overall project scope. (Eliminate some work products, processes, or deliverables.)
Reduce the overall project scope. (Eliminate some work products, processes, or deliverables.)
Caution: After you have determined which of the methods you would like to use to shorten the critical path, you should discuss them with your sponsors or stakeholders. Since many of these methods result in fundamental changes in project structure, you should discuss the positive and negative effects they might have on the project, and obtain sponsor/stakeholder approval.
STEP 6: Consider making customized activity schedules. They could be tailored for executive overview, for individual categories of resources (e.g., electricians, carpenters, landscapers), or for special project teams (workers in Argentina, England, France).
![]() Consider creating/create customized schedules.
Consider creating/create customized schedules.
STEP 7: Informally present your preliminary schedules to an expert colleague to “reality-check” it; adjust as needed.
![]() Reality-check with peer or expert.
Reality-check with peer or expert.
A Gantt chart is a graphic display of schedule-related information. In the typical Gantt chart, activities are listed down the left side of the chart, dates are shown across the top or bottom, and planned activity duration are shown as horizontal bars, placed according to the dates. A Gantt chart is sometimes called a “bar chart.” Because the Gantt bars are proportionally longer for project activities that take longer to complete, Gantt charts can effectively display relative differences in duration of activities.
Choose a Gantt chart when you want to show which activities will take longer than others. Note that project management software packages create high-quality Gantt charts quickly and easily. A sample of a Gantt chart is shown below.
FIGURE 6. Sample of Gantt Chart
A network diagram, as discussed in Action Item: Define and Sequence Project Activities, shows which project activities depend on which other activities in order to be completed. Choose a network diagram when you want to clearly show the relationships among activities. Network diagrams may be presented with schedule data included on each activity description, as shown below.
FIGURE 7. Network Diagram With
Schedule Data
In addition, network diagrams may be time-scaled to show the relative amount of time passing between activities. In the example below, we not only see the relative length of time to be spent on each activity, we have identified a delay or period of “downtime” between regrouting the tile and installing the appliances.
FIGURE 8. Network Diagram With
Time Scale
Milestone charts show only the most significant project events. Choose a milestone chart when you want to provide broad overviews of the project’s main events for executive audiences or others who want to see only the “big picture.” Below is an example of a milestone chart.
FIGURE 9. Sample of a
Milestone Chart
Finally, project events and dates may be presented as text tables, as shown in Figure 10.
FIGURE 10. Sample of a
Text Table
You should select your schedule format carefully, keeping the needs of the audience in mind. Ask yourself:
• Who are the readers of this schedule?
• How much information do they need? (“Big picture” or details?)
• What form of schedule does this reader like (or expect) to see?
• Should I create customized versions of the schedule for certain audiences, certain activities or phases, or certain display purposes?
Finally, since everyone is familiar with its format, an ordinary calendar can be a powerful way to communicate the project schedule. As the example below illustrates, a calendar can show relative duration and concurrence of activities, as well as days of the week and month, including weekends.
|
|
|
Assignment
Estimate the costs of completing all project activities.
Desired Outputs
![]() Cost estimates for completion of each activity.
Cost estimates for completion of each activity.
![]() Supporting detail, including assumptions and constraints related to costs.
Supporting detail, including assumptions and constraints related to costs.
![]() Cost management plan describing how cost variances will be handled.
Cost management plan describing how cost variances will be handled.
![]() Revisions to the project activity list or network diagrams in response to the need for more detail about costs.
Revisions to the project activity list or network diagrams in response to the need for more detail about costs.
Example; A “Bottom Up” Cost Estimate
There are three popular methods of cost estimating:
![]() Bottom up estimating—estimating the cost of individual activities and summarizing or “rolling up” these costs to determine project costs. (This method is preferred, since it is typically most accurate given unique project requirements.)
Bottom up estimating—estimating the cost of individual activities and summarizing or “rolling up” these costs to determine project costs. (This method is preferred, since it is typically most accurate given unique project requirements.)
![]() Analogous estimating—sometimes called “top down” estimating, this involves using the actual cost of a previous, similar project to make an estimate of costs for a planned project.
Analogous estimating—sometimes called “top down” estimating, this involves using the actual cost of a previous, similar project to make an estimate of costs for a planned project.
Caution: Project managers should be sure to challenge the assumption that the previous analogous project was actually similar to the project they are planning. It must be truly similar in order for the cost estimates to be accurate.
![]() Fixed budget estimating—taking the total amount of money you have available for the project and dividing it across the various project components to see what you can and can’t afford.
Fixed budget estimating—taking the total amount of money you have available for the project and dividing it across the various project components to see what you can and can’t afford.
Figure 11, on the following page, is an example of a “bottom up” cost estimate. In this sample, we have estimated the cost of removing brush from a vacant lot. This one-day project will involve one laborer, one truck driver/laborer, and one supervisor/laborer. In addition, we have assumed that we will need to rent a truck to carry the brush away and pay a fee at the landfill to dispose of the brush.
Note that the worksheet lists all activities, the amount of time each activity will take, and the resources to be applied to complete each activity. Note also that some resources (the workers) will incur costs based on the number of hours they take to perform the task. These are typically referred to as variable cost resources, since the cost varies according to the effort expended.
Other resources (like the truck and landfill dumping fee) are typically referred to as fixed cost resources, since they involve a one-time cost, no matter how much effort is expended. Finally, note that the worksheet is designed to provide total costs for each resource, for each activity, and for the entire project.
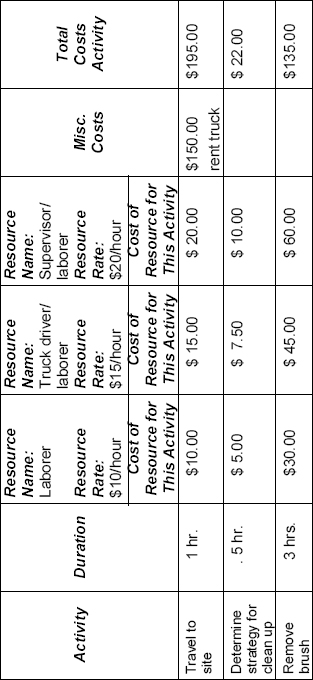
FIGURE 11. Sample Cost-Estimation Worksheet—Brush Removal Project
This example is overly simplified in order to illustrate the relationship among cost elements. However, when you plan your projects, you will likely need to add many more columns for resources and break down “Misc. Costs” into subcategories based on the deliverables you are creating. In addition, you should consider adding blanks for contingency fees, administrative costs, profit, and other items related to your particular organization’s needs.
Guidelines for Making a “Bottom Up” Cost Estimate
Instructions: Follow these steps to develop a project cost estimate using the “bottom up” estimating technique. You may use the check boxes to mark items as completed. (If you are working with a formal or informal advisory group, you might ask some of its members to work through these guidelines with you.)
STEP 1: Assemble the following:
![]() Descriptions of all project activities.
Descriptions of all project activities.
![]() Description of resource requirements.
Description of resource requirements.
![]() Description of resource rates (e.g., how much resources will cost per hour or per day)
Description of resource rates (e.g., how much resources will cost per hour or per day)
![]() Duration estimates for each activity.
Duration estimates for each activity.
![]() Historical data regarding costs of activities, resources, and projects.
Historical data regarding costs of activities, resources, and projects.
STEP 2: Set up a worksheet similar to the same worksheet shown earlier.
![]() Set up worksheet.
Set up worksheet.
![]() Consider making a new electronic spreadsheet, using a template electronic spreadsheet file from a similar project, or using project management software to estimate the costs.
Consider making a new electronic spreadsheet, using a template electronic spreadsheet file from a similar project, or using project management software to estimate the costs.
STEP 3: Evaluate your worksheet according to these checkpoints:
![]() All project activities are listed.
All project activities are listed.
![]() All project resources are assigned to the appropriate activities, including variable resources (paid by the hour or day) and fixed resources (paid a one-time fee).
All project resources are assigned to the appropriate activities, including variable resources (paid by the hour or day) and fixed resources (paid a one-time fee).
![]() Costs are summarized by activity.
Costs are summarized by activity.
![]() Costs are summarized by resource.
Costs are summarized by resource.
![]() Miscellaneous fees, such as profit, standard contingencies, administrative costs, shipping, communications (fax, phone, e-mail), and other costs are considered.
Miscellaneous fees, such as profit, standard contingencies, administrative costs, shipping, communications (fax, phone, e-mail), and other costs are considered.
![]() Detailed cost estimates for similar projects were consulted when building this worksheet.
Detailed cost estimates for similar projects were consulted when building this worksheet.
STEP 4: Use the worksheet to complete the cost estimate, filling in all the blanks as required.
![]() Complete the cost estimate.
Complete the cost estimate.
STEP 5: Informally present your preliminary cost estimate to an expert colleague to ‘reality-check” it; adjust as needed.
![]() Reality-check.
Reality-check.
STEP 6: Create summaries of costs and/or graphical displays of costs for presentation to stakeholders.
![]() Create cost summaries and graphics.
Create cost summaries and graphics.
|
|
|
Assignment
Build a project budget and spending plan.
Desired Outputs
![]() A cost baseline or time-phased budget that will be used to measure and monitor project costs.
A cost baseline or time-phased budget that will be used to measure and monitor project costs.
![]() A spending plan, telling how much will be spent on what resources at what time.
A spending plan, telling how much will be spent on what resources at what time.
![]() A set of procedures by which project team members will monitor costs and update the budget.
A set of procedures by which project team members will monitor costs and update the budget.
Guidelines for Building a Budget and Spending Plan
Instructions: Follow these steps to build a budget and spending plan. You may use the check boxes to mark items as completed. (If you are working with a formal or informal advisory group, you might ask some of its members to work through these guidelines with you.)
STEP 1: ASSEMBLE THE FOLLOWING:
![]() Project cost estimates
Project cost estimates
![]() Work breakdown structure (WBS)
Work breakdown structure (WBS)
![]() Project schedule
Project schedule
![]() Budget forms or sample budget/spending plans approved by your organization
Budget forms or sample budget/spending plans approved by your organization
STEP 2: MAKE A WORKSHEET WITH HEADINGS SIMILAR TO THESE:
| Activity | Account Code | Budgeted, January | Budgeted, February | Budgeted, March | Budgeted, April (etc.) |
|
|
|
|
|
|
|
Note: If you want to monitor your spending on a quarterly or weekly basis, then label the column headings accordingly.
![]() Worksheet is completed.
Worksheet is completed.
STEP 3: List all project activities in the left column of the worksheet.
![]() Project activities are listed.
Project activities are listed.
STEP 4: For each activity, examine the project schedule and cost estimate to determine how much will be spent the first month, how much the second month, and so on. Then list the appropriate dollar amounts in the columns beside each activity.
![]() Dollar amounts are listed by time.
Dollar amounts are listed by time.
Note:You might want to create a more detailed spending plan by breaking out specific resource costs under each activity. Consider the example provided on the following page.
STEP 5: Informally present your preliminary budget and spending plan to an expert colleague to “reality-check” it; adjust as needed based on his or her feedback.
![]() Budget spending plan is “reality-checked” and revised.
Budget spending plan is “reality-checked” and revised.
STEP 6: Present your budget and spending plan to your supervisor and (if appropriate) to the sponsor; adjust as needed and obtain approval.
![]() Budget spending plan is approved.
Budget spending plan is approved.
|
|
|
|
|
|
Assignment
Create a quality plan.
Desired Outputs
![]() Quality management plan, including operational definitions
Quality management plan, including operational definitions
![]() Quality verification checklists
Quality verification checklists
![]() Amendments to the project activity list, budget, and schedule to allow implementation of the quality plan
Amendments to the project activity list, budget, and schedule to allow implementation of the quality plan
Guidelines for Creating a Formal Quality Plan
Instructions: Follow these steps to build a formal quality plan. You may use the check boxes to mark items as completed. (If you are working with a formal or informal advisory group, you might ask some of its members to work through these guidelines with you.)
STEP 1: Assemble the following documents:
![]() Your organization’s quality policy
Your organization’s quality policy
![]() Project scope statement
Project scope statement
![]() Project product description (preliminary deliverables specifications)
Project product description (preliminary deliverables specifications)
![]() Standards and regulations
Standards and regulations
![]() Descriptions of process outputs in particular project team disciplines
Descriptions of process outputs in particular project team disciplines
STEP 2: Analyze each of the items assembled in Step 1, and distill from each item, a list of operational definitions of quality.
![]() For each item, complete this statement: “According to this item, quality means…”
For each item, complete this statement: “According to this item, quality means…”
![]() Compile the items in a list and sort them into related groups.
Compile the items in a list and sort them into related groups.
STEP 3: Based on the list created in Step 2, make checklists that the various project team members can use to inspect for quality. (Checklists should be expressed as “Do this…” or “Have you done this…?”)
![]() Checklists are created.
Checklists are created.
STEP 4: Develop a statement describing how quality management will be implemented on the project. It should describe specific methods of:
• Quality control—examining specific project results to see if they comply with quality standards, and identifying ways to eliminate causes of unsatisfactory performance.42
• Quality assurance—evaluating overall project performance on a regular basis to provide confidence that the project will satisfy the relevant project quality standards.43
![]() Statement of quality control and quality assurance is developed.
Statement of quality control and quality assurance is developed.
|
| |
|
Optional Action Item: Create a Formal Project Communications Plan |
|
Assignment
Develop a project communications plan.
Desired Output
A communications management plan, including:
![]() Collection structure
Collection structure
![]() Distribution structure
Distribution structure
![]() Description of information to be disseminated
Description of information to be disseminated
![]() Schedules listing when information will be produced
Schedules listing when information will be produced
![]() A method for updating the communications plan
A method for updating the communications plan
Guidelines for Developing the Project Communications Plan
Instructions: Follow these steps to build your project communications plan. You may use the check boxes to mark items as completed. Refer to the Worksheet: Project Communications Planner, as needed. (If you are working with a formal or informal advisory group, you might ask some of its members to work through these guidelines with you.)
STEP 1: Assemble the following:
![]() List of project stakeholders and their roles, responsibilities, and physical locations
List of project stakeholders and their roles, responsibilities, and physical locations
![]() Any descriptions of communication requirements or related assumptions among stakeholders
Any descriptions of communication requirements or related assumptions among stakeholders
![]() Information about external reporting requirements (What do the public, the press, the government, and other outsiders need to know about the project? How will they find out?)
Information about external reporting requirements (What do the public, the press, the government, and other outsiders need to know about the project? How will they find out?)
![]() Information about technology available to support communication on the project (e.g., fax, e-mail, voice mail, messenger, postal service, radio)
Information about technology available to support communication on the project (e.g., fax, e-mail, voice mail, messenger, postal service, radio)
![]() Information about typical project communications methods for the industry or in your organization.
Information about typical project communications methods for the industry or in your organization.
STEP 2: Answer this question: “What kind of information does each stakeholder need?”
![]() List of information needed by each stakeholder.
List of information needed by each stakeholder.
![]() Typical information needed by stakeholders on similar projects.
Typical information needed by stakeholders on similar projects.
STEP 3: Analyze all stakeholder information needs and answer this question: “What methods/technologies will provide all information needed by stakeholders without wasting resources on providing unneeded information or using inappropriate technology?”
![]() List of appropriate communications methods and technologies
List of appropriate communications methods and technologies
STEP 4: Create a project communications plan that includes information about:
![]() Collection structure—How and by whom will project information be gathered, what information will be gathered, and from whom?
Collection structure—How and by whom will project information be gathered, what information will be gathered, and from whom?
![]() Distribution structure—To whom will information flow, and by what methods?
Distribution structure—To whom will information flow, and by what methods?
![]() Description of each type of information to be disseminated—What format, content, level of detail, conventions/ definitions will be used?
Description of each type of information to be disseminated—What format, content, level of detail, conventions/ definitions will be used?
![]() Schedules listing when each type of information will be produced
Schedules listing when each type of information will be produced
![]() A method for updating the communications plan as the project progresses
A method for updating the communications plan as the project progresses
Worksheet: Project Communications Planner
Instructions: Look at the chart on the following page. In the Who column, list all the different project stakeholders who will be needing information as the project unfolds. (You may want to list some stakeholders as a group, such as “Engineering” or “Marketing.” However, be careful that you have a clear idea about the specific people within the group to whom communications should be going.)
In the What Information column, list the type of information this person or group will need.
In the When column, list how often or at what points in the project this person or group will need the information. (For example, you might say “weekly” or “monthly” here, or “at sign-off of Phase II.”)
In the How (Form/Medium) column, list the appropriate medium of communication. (For example, you might say “e-mail status report,” “team meeting,” “broadcast voice mail,” or “update to project web page.”)
| Who | What Information | When | How (Form/Medium |
|
|
|
|
|
|
| |
Caution: This Action Item describes comprehensive organizational planning and staffing approaches, which might be “overkill” for a smaller project. Use your judgment to determine how many of the elements listed here make sense for your project.
Assignment
Develop an organizational plan and a strategy for acquiring staff.
Desired Outputs
Desired outputs include:39
![]() Role and responsibility assignments
Role and responsibility assignments
![]() Staffing plan
Staffing plan
![]() Organizational chart
Organizational chart
![]() Organization detail as appropriate
Organization detail as appropriate
![]() Project staff
Project staff
![]() Project team directory
Project team directory
Guidelines for Developing the Organizational Plan and Strategy for Acquiring Staff
Instructions: Follow these steps to develop the organizational plan and strategy for acquiring staff. You may use the check boxes to mark items as completed. (If you are working with a formal or informal advisory group, you might ask some of its members to work through these guidelines with you.)
STEP 1: Given your description of project activities in earlier statements of scope, and so forth, list the job titles (roles) of people who will be needed to complete each activity.
![]() Job titles or roles are listed
Job titles or roles are listed
STEP 2: For each job title, list the responsibilities (tasks) to be performed. Consult these sources as needed:
• Project templates—role and responsibility definitions from similar projects.
• Organization-specific human resource practices—policies, guidelines, and procedures that dictate how people are deployed (e.g., Will managers serve as “coaches?” If so, then what exactly is the role of “coach?”)
![]() Job responsibilities are listed.
Job responsibilities are listed.
STEP 3: Create a Responsibility/Accountability Matrix; refer to the example below.40
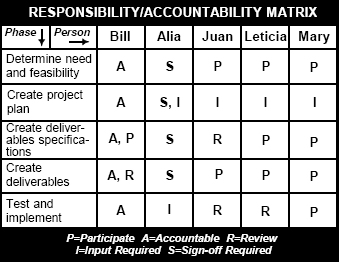
![]() Responsibility/Accountability Matrix is created
Responsibility/Accountability Matrix is created
STEP 4: Create a staffing plan that answers these questions:41
• When and how will people be added?
• Will the project use both internal and external resources? (Refer to Action item: Plan For and Acquire Outside Resources)
• When will people be “let go” from the project team?
• How long should people be held when there is “downtime” (absence of work on their assigned activity)?
![]() Staffing plan is created
Staffing plan is created
STEP 5: Create an organization chart that graphically displays project reporting relationships.42 The chart should take into account reporting relationships among:
• Different organizational units (subcontractors, departments, etc.
• Different technical disciplines (engineers, builders, etc.)
• Different individuals
![]() Organization chart is created.
Organization chart is created.
STEP 6: Flesh out the organizational plan with these details as needed:
• Warnings describing what you will not be able to do if you cannot staff the project as recommended. (Describe what project deliverables cannot be created, how the schedule will be delayed, how safety may be jeopardized, and so on.)
• Specific job descriptions or position descriptions, including job title, skills, responsibilities, knowledge, authority, expected physical work environment, and so on.
• Training needs, if the staff to be acquired may not have all the skills required.
![]() Warnings related to essential staffing are stated
Warnings related to essential staffing are stated
![]() Job descriptions and training needs are detailed
Job descriptions and training needs are detailed
STEP 7: Use appropriate procurement practices to identify and recruit resources. Take into account the staffing plan from Step 4, as well as standard recruiting practices dictated by your organization’s policies (also see “Optional Action Item: Plan to Acquire Outside Resources.)
![]() Identify resources
Identify resources
![]() Recruit resources
Recruit resources
![]() Confirm resources as part of project team
Confirm resources as part of project team
STEP 8: When all (or most) staff positions have been filled, create a project team directory consisting of:
• Names of team members and stakeholders
• How to reach each person listed (fax, phone, e-mail, postal service address, and so on)
• Other information such as direct reports, responsibilities, administrative support people, and so on as needed
![]() Project team directory is created
Project team directory is created
Note: Will you be working with experts whose area of expertise is unknown to you? If so, review the Guidelines: Tips for Working with Experts Outside Your Area of Expertise.
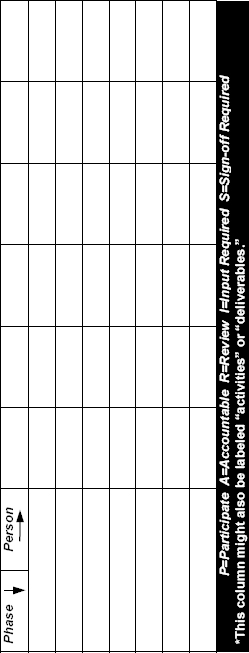
Worksheet: Project Responsibility/ Accountability Matrix
Instructions: Using the matrix on the next two pages, list the project phases, activities, or deliverables in the first column. Label each of the remaining columns with the name of a project team member. Fill in the blanks underneath each team member’s name with the appropriate initial to indicate his or her role related to this phase, activity, or deliverable. (Example: “I” for input, “S” for sign-off, etc.) Try to avoid using more than one initial per cell on the grid. Note: For best results, consider making this a team effort and complete the worksheet early in the project.
Guidelines: Tips for Working With Experts Outside Your Area of Expertise
Try some of these techniques for working with experts outside your area of expertise.
![]() Get them involved early on in the project, and ask them to help you plan, in detail, all the activities associated with their part of the project.
Get them involved early on in the project, and ask them to help you plan, in detail, all the activities associated with their part of the project.
![]() Openly express your respect for their professional judgment, and frequently seek their opinions.
Openly express your respect for their professional judgment, and frequently seek their opinions.
![]() Let them know you aren’t pretending to know their profession.
Let them know you aren’t pretending to know their profession.
![]() Don’t try to micromanage their specific actions. Instead, focus on their results by repeatedly referring to the deliverables specifications and formal statement of project scope.
Don’t try to micromanage their specific actions. Instead, focus on their results by repeatedly referring to the deliverables specifications and formal statement of project scope.
![]() Ask them to provide you with overview information relating to their field. (These might take the form of handbooks, primers, slide presentations, promotional videos, and so on.)
Ask them to provide you with overview information relating to their field. (These might take the form of handbooks, primers, slide presentations, promotional videos, and so on.)
![]() Ask them to describe for you the essential characteristics of finished products and work processes in their field. In other words, find out where their professional values lie and in what situations you can expect them to fight for these values.
Ask them to describe for you the essential characteristics of finished products and work processes in their field. In other words, find out where their professional values lie and in what situations you can expect them to fight for these values.
![]() Single out a “friendly” expert and ask him or her to help you learn the jargon, acronyms, and underlying values of the profession. Ask this person to coach you or help you prepare for difficult meetings with his or her colleagues.
Single out a “friendly” expert and ask him or her to help you learn the jargon, acronyms, and underlying values of the profession. Ask this person to coach you or help you prepare for difficult meetings with his or her colleagues.
![]() Try to establish some basis of commonality. Go to lunch and get acquainted. Do you both enjoy hiking? The opera? Your children? Remember, when you regard each other as people and not merely as robots performing job roles, you are both more likely to spend the energy necessary to achieve understanding.
Try to establish some basis of commonality. Go to lunch and get acquainted. Do you both enjoy hiking? The opera? Your children? Remember, when you regard each other as people and not merely as robots performing job roles, you are both more likely to spend the energy necessary to achieve understanding.
|
|
|
Assignment
Given a potential project, identify risks and plan to respond to them.
Desired Output
A document that describes the following:43
![]() Sources of risk
Sources of risk
![]() Potential risk events
Potential risk events
![]() Risk symptoms
Risk symptoms
![]() Ways to improve other processes or activities
Ways to improve other processes or activities
![]() Opportunities to pursue or threats to which to respond
Opportunities to pursue or threats to which to respond
![]() Opportunities or threats to ignore
Opportunities or threats to ignore
![]() Risk management plan
Risk management plan
![]() Contingency plans
Contingency plans
![]() Descriptions of desired reserves
Descriptions of desired reserves
![]() Contractual agreements to mitigate risks
Contractual agreements to mitigate risks
Guidelines for Identifying Risks and Planning to Respond
Instructions: Follow these steps to identify project risks and to plan responses to them. You may use the check boxes to mark items as completed. (If you are working with a formal or informal advisory group, you might ask its members to work through these guidelines with you.)
STEP 1: Determine what sources of risk and which risk events may reasonably be expected to affect the project.4
![]() Examine the product (deliverables) description. Which require creation by using unproven technology? Or which deliverables are themselves made up of unproven technology?
Examine the product (deliverables) description. Which require creation by using unproven technology? Or which deliverables are themselves made up of unproven technology?
![]() Examine the scope statement. Are the project costs or objectives overly aggressive?
Examine the scope statement. Are the project costs or objectives overly aggressive?
![]() Examine the work breakdown structure. Are there hidden dependencies that should be explored? Could the work breakdown structure be broken into greater detail in some areas to “shine a light” on risks or opportunities? If so, then create this detail.
Examine the work breakdown structure. Are there hidden dependencies that should be explored? Could the work breakdown structure be broken into greater detail in some areas to “shine a light” on risks or opportunities? If so, then create this detail.
![]() Examine the staffing plan. Are there “irreplaceable” team members who might be made unavailable somehow?
Examine the staffing plan. Are there “irreplaceable” team members who might be made unavailable somehow?
![]() Examine the resource requirements (people, equipment, and materials). Could market conditions make it difficult to obtain some resources (a risk) or easier to obtain some resources (an opportunity)?
Examine the resource requirements (people, equipment, and materials). Could market conditions make it difficult to obtain some resources (a risk) or easier to obtain some resources (an opportunity)?
![]() Examine the history of similar projects. What potential opportunities or threats might we identify based on previous experience?
Examine the history of similar projects. What potential opportunities or threats might we identify based on previous experience?
![]() Use established checklists from your project’s discipline to evaluate risk and opportunities.
Use established checklists from your project’s discipline to evaluate risk and opportunities.
![]() Interview various stakeholders to uncover opportunities or risks.
Interview various stakeholders to uncover opportunities or risks.
STEP 2: Quantify the risks identified in Step 1 to determine which risk events warrant response. Consider:
• Expected monetary value or impact of the risk
• Expected impact on project quality
• Expected impact on project schedule.
![]() Risks are quantified.
Risks are quantified.
STEP 3: Decide which risks or opportunities to focus on and document them by making a list of “risks to pursue.”
![]() “Risks to Pursue” list is created.
“Risks to Pursue” list is created.
STEP 4: For each risk warranting response, choose one of these risks responses:45
Avoid it—by eliminating the cause. This might involve using different approaches to the work process, different staffing, redefined deliverables, revised (lower-risk) schedules, or modified stakeholder expectations.
• Mitigate it—by reducing the expected monetary value. For example, you could:
![]() Contract out high-risk activities to specialists who have more experience.
Contract out high-risk activities to specialists who have more experience.
![]() Obtain insurance policies to deal with some types of risk.
Obtain insurance policies to deal with some types of risk.
![]() Develop contingency plans that identify specific actions that will be taken if an identified risk should occur.
Develop contingency plans that identify specific actions that will be taken if an identified risk should occur.
![]() Set aside a “desired reserve” of cash or other resources to use if the risk occurs.
Set aside a “desired reserve” of cash or other resources to use if the risk occurs.
• Accept it—and take the consequences.
(Note: See the Risk Assessment and Response Analyzer.)
![]() Each risk is examined and a decision to avoid, mitigate, or accept it is made.
Each risk is examined and a decision to avoid, mitigate, or accept it is made.
STEP 5: Create a risk management plan that contains these sections:
• List of potential risk events
• Description of risk symptoms
• Ways to improve processes or activities to reduce risks
• Opportunities to pursue or threats to which to respond
• Opportunities or threats that have been identified and consciously ignored
• Description of contingency plans and steps to take to mitigate risks
• Recommended contractual agreements to mitigate risks
![]() Risk management plan is created.
Risk management plan is created.
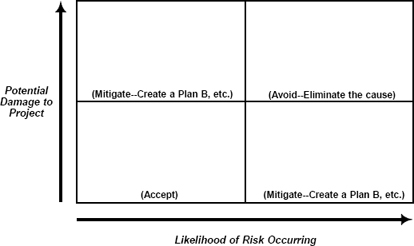
Worksheet: Risk Assessment and Response Analyzer
Instructions: Make a list of risks to your project. Using the grid on the following page, examine each risk separately and try to place it in the appropriate grid cell. Using the hints provided in each cell, determine an appropriate response to the risk.
For example, let’s say that we are managing a technical project that faces the risk of losing the only scientist who understands the science behind the project. This would be enormously damaging to the project. At the same time, we know that she is being aggressively pursued by other companies and is unhappy with her current salary. This means it is highly likely that she will leave before the project is completed. Given these circumstances, this risk fits into the upper right grid square (high potential damage, high likelihood). So our overall approach should be to avoid this risk—eliminate its cause. We may do this by obtaining a higher salary for her, by hiring someone else with equivalent expertise as a back-up, or by insisting that the thoroughly train others so they develop her level of epxertise.
|
| |
|
Optional Action Tool: Plan for and Acquire Outside Resources |
|
Assignment
Describe your strategy for procuring outside goods or services, soliciting bids, and selecting the best contractor for the job.
Desired Output
A procurement management plan indicating the following:46
![]() Types of contracts to be used among contractors or vendors
Types of contracts to be used among contractors or vendors
![]() How estimates from vendors will be obtained
How estimates from vendors will be obtained
![]() Responsibilities of the project management team versus people in any “procurement” department
Responsibilities of the project management team versus people in any “procurement” department
![]() How to use any standardized procurement documents
How to use any standardized procurement documents
![]() Statement of work (SOW) or statement of requirements (SOR) describing the item (product or service) to be procured. The statement should provide prospective contractors with enough detail that they can evaluate their ability to provide the item
Statement of work (SOW) or statement of requirements (SOR) describing the item (product or service) to be procured. The statement should provide prospective contractors with enough detail that they can evaluate their ability to provide the item
![]() Bid documents, such as RFP (request for proposal), IFB (invitation for bid), invitation for quotation, and other similar documents
Bid documents, such as RFP (request for proposal), IFB (invitation for bid), invitation for quotation, and other similar documents
![]() Contract with one or more suppliers of goods or services
Contract with one or more suppliers of goods or services
Guidelines for Planning to Procure Outside Goods or Services
Instructions: Follow these steps to plan to procure (acquire) the help of outside contractors to provide certain goods or services for your project. You may use the check boxes to mark items as completed. (If you are working with a formal or informal advisory group, you might ask some of its members to work through these guidelines with you.)
STEP 1: Assemble the following:
![]() Scope statement
Scope statement
![]() Detailed product description (details of all deliverables to be created)
Detailed product description (details of all deliverables to be created)
![]() Description of resources that support procurement (procurement department, internal project experts who can help find contractors, professional directories, and so on)
Description of resources that support procurement (procurement department, internal project experts who can help find contractors, professional directories, and so on)
![]() Information on market conditions for the particular type of contractor you are trying to procure
Information on market conditions for the particular type of contractor you are trying to procure
![]() Any relevant planning inputs, such as cost estimates and quality management plans
Any relevant planning inputs, such as cost estimates and quality management plans
![]() Constraints and assumptions that will likely limit options (such as funds or schedule)
Constraints and assumptions that will likely limit options (such as funds or schedule)
STEP 2: Decide to “make or buy” the goods or services
![]() Examine the costs and benefits of creating the goods or services yourself. Consider:
Examine the costs and benefits of creating the goods or services yourself. Consider:
![]() Workload of existing resources
Workload of existing resources
![]() The time required to locate and acquire additional resources (such as new staff or new equipment)
The time required to locate and acquire additional resources (such as new staff or new equipment)
![]() Your expertise in managing these resources
Your expertise in managing these resources
![]() Whether you want to have this resource available on an ongoing basis, as part of your organization
Whether you want to have this resource available on an ongoing basis, as part of your organization
![]() Examine the costs and benefits of procuring the goods or services from an outside contractor. Consider:
Examine the costs and benefits of procuring the goods or services from an outside contractor. Consider:
![]() The actual cost of purchase compared to the cost of using internal resources
The actual cost of purchase compared to the cost of using internal resources
![]() The cost (including “headaches” and time spent) in soliciting bids and selecting vendors
The cost (including “headaches” and time spent) in soliciting bids and selecting vendors
![]() What external contractors can provide that your organization cannot or should not be able to provide on an ongoing basis
What external contractors can provide that your organization cannot or should not be able to provide on an ongoing basis
![]() Involve subject-matter experts from the project team, industry groups, consultant organizations, or even prospective contractors in these preliminary discussions
Involve subject-matter experts from the project team, industry groups, consultant organizations, or even prospective contractors in these preliminary discussions
![]() Decide to buy goods or services from an outside resource
Decide to buy goods or services from an outside resource
Note:If you decide to make the goods or perform the services internally, stop here.
STEP 3: Create a procurement management plan indicating the following:47
![]() Types of contracts to be used among contractors or vendors
Types of contracts to be used among contractors or vendors
![]() How estimates from vendors will be obtained
How estimates from vendors will be obtained
![]() Responsibilities of the project management team versus responsibilities of people in any “procurement” department
Responsibilities of the project management team versus responsibilities of people in any “procurement” department
![]() How to use any standardized procurement documents
How to use any standardized procurement documents
![]() Procurement management plan is created
Procurement management plan is created
STEP 4: Create a statement of work (SOW) or statement of requirements (SOR) describing the item (product, deliverables or service) to be procured. The statement should provide prospective contractors with enough detail that they can evaluate their ability to provide the item.48
![]() Statement of Work or Requirements is created
Statement of Work or Requirements is created
STEP 5: Create bid documents, such as RFP (request for proposal), IFB (invitation for bid), invitation for quotation, and similar documents.49
![]() Refer to any standard forms required by your organization
Refer to any standard forms required by your organization
![]() Refer to past versions of these documents for similar projects, and use “boilerplate” text if appropriate
Refer to past versions of these documents for similar projects, and use “boilerplate” text if appropriate
![]() Discuss your draft bid documents with someone who has solicited bids similar to yours
Discuss your draft bid documents with someone who has solicited bids similar to yours
![]() Finalize your RFP, IFP, or similar document
Finalize your RFP, IFP, or similar document
STEP 6: Create bid/proposal evaluation criteria (means of scoring contractors’ proposals). Consider these typical criteria and possibly weight some of them to count higher than others:
![]() Cost
Cost
![]() Quality
Quality
![]() Vendor team members
Vendor team members
![]() Track record
Track record
![]() Facilities and equipment
Facilities and equipment
![]() Creativity of proposal
Creativity of proposal
![]() Referrals from former customers
Referrals from former customers
![]() Ability to meet the schedule
Ability to meet the schedule
![]() Bid/proposal evaluation criteria are established
Bid/proposal evaluation criteria are established