

How many times have you been speaking in front of a group and been unsure about what's about to come out of your mouth?
But, it's not only your mind that can go. There are so many things to focus on. Your body language, your content, what the slides should look like. What to wear, what to do with your hands, how to phrase your key points. What to do with your voice, how to present with charisma, how to create an aura as you speak. How to get buy-in from your audience, how to engage them, handling your nerves, the best way to practise. The list goes on and on ...
In my job, I coach people how to do all these things. But for the purpose of this book, I'm going to focus on just one aspect: reducing your jelly. In other words, getting your content exactly right, so that you:
engage your audience; and
have the best chance of achieving your desired results from your presentation.
These aren't easy skills to master. But learn and apply the content of this chapter, and you will be streets ahead of 99% of the presenters out there.
Hard to believe? Well, how many times have you sat through a presentation and been bored, or found the content irrelevant, or thought the presenter was waffling? How many times have you been reading the slides instead of listening to the presenter? How many times have you realized the slides were really prompts for the presenter, rather than being designed to make your audience experience better? How many times have you not even understood what the presenter was talking about?
And the biggest presenter crime of all ... how many times have you sat through a presentation and not known what you are supposed to do at the end, after hearing it?
You see, presentations are often full of irrelevant jelly.
They are not audience-focussed.
To be blunt, they can be utterly boring.
In this section, you will discover how to prepare jelly-free, engaging presentations that get great results. I'll cover the three critical elements to making presentations successful–the before, during and after. Or, to give them proper titles:
Before: how to prepare content that gets results (RAP Method™);
During: delivery skills to impress your audiences; and
After: how to follow up your presentations, to ensure they work.
In my experience, people find it easiest to learn what I'm about to share with you through a mixture of:
hearing the rules; and
seeing them applied to a worked example.
So, this chapter follows a different format from the rest of the book. Here, you will read the rules of successful presenting, with each rule being followed by a worked example that develops through the chapter.
How do you prepare for presentations?
In an absolute blind panic ... you've not left enough time to prepare properly–again.
Use last time's presentation, with the minimum possible changes (preparing this way is often accompanied by this conversation with a colleague: 'But last time's didn't work' ... 'I know, but this time it just might').
Start by writing your PowerPoint slides, and then – once they're finished – thinking, 'Now, what do I want to say?'
Recognise any/all of these? Unfortunately, none is efficient or logical.
When you think about it, the key to getting positive results from a presentation is to first know what results you want to achieve. So, you need to start your preparation by thinking of this first.
But you won't achieve these results unless your audience does what you want after hearing you. So, you need to consider them next.
And only after you've thought through both these areas – your results and the audience – can you start preparing your presentation.
So, the process for preparing successful presentations – and I strongly advise you to use this every single time – is a three-step process I've developed: my RAP Method™:
Results – what do you want to achieve?
Audience – what are they like?
Preparation – only do this once you've addressed the first two areas.
Results: What do you want to achieve?
There are seven steps to establishing your results:
A | What objective do you want to achieve afterwards (draft one)? |
B | Expand on step As objective, using 'question words'. |
C | What objective do you want to achieve afterwards (final ver-wsion)? |
D | List all the points that could help you achieve step C's objective. |
E | Prepare your '15 seconds'. |
F | Transition zone. |
G | Prepare your RAP Reminder Card™. |
If you take only one thing from this section, let it be this:
Note
For you to achieve a great result from your presentation, the first thing you must know is the result you want to achieve.
To find this, ask yourself: 'What do I want my audience to do after hearing me speak? How will I judge if this presentation has been a success?'
The next step makes sure that step As objective is right, and that you haven't missed anything out.
The best way to do this is to ask yourself questions about the objective you wrote in step A, by using all of the questioning words – why, when, who, where, how, etc. – to draw more points out.
Step C – What objective do you want to achieve afterwards? (final version)
You can now create the official version of your objective by enhancing your draft one objective (step A) with the answers to step B's questions. This will lead to a long sentence, covering everything you want to achieve.
This step is something presenters rarely do at this stage, if at all. And that is to find all the points that give you the greatest chance of achieving your objective.
Traditionally, you see, people start preparing presentations by thinking, 'What should I say on slide 1, then slide 2 ...?'
However, that leads to too much jelly, because people often start presentations the same way they started their last one ... often, with their date of incorporation!
So, rather than thinking how the presentation should start, you should first identify all the points that give you the best chance of success.
Imagine you have a presentation to do. It's to an important audience. You want to do a great job. They have graciously given you 30 minutes and you have prepared a truly fantastic presentation. You know it will knock their socks off. Then, just as you open your mouth to speak, you hear the dreaded news ...
'I'm sorry, we haven't much time to see you today. You've just got 15 seconds. What did you want to tell us?'
Okay, this isn't very likely to happen. But you must always know your answer to this question, or you won't have the clarity you need on what your key points are.
You'll have listed 10 – 15 points in step D, but which are the main 3 or 4 you simply must get across if you are to achieve your objective? These points will be your 15 seconds.
Remember, you're thinking from your audience's point of view here, not yours. So you're looking for the points they'll find most compelling.
The best – and easiest – way to establish your 15 seconds is to play Winner Stays On with your list in step D. Compare the top two points. Ask yourself which of these points is the most likely to help you achieve step C's objective.
This is the winner. It stays on. Then, work your way down the list. So, if point 1 is better than point 2, cross point 2 out. Then, compare points 1 and 3. If point 1 is still the winner, cross point 3 out, and compare points 1 and 4.
As you do this, you will find there are three or four points that are so fundamentally critical that they simply cannot be crossed out ... and it is these that form your 15 seconds.
You need your audience to buy into what you're saying; so you must phrase things from their point of view, not yours, by:
writing down your presenter-focussed phrases;
thinking what the business AFTERs are for these phrases;
thinking what the emotional AFTERs are;
improving all these AFTERs using the phrase 'Well that's a good thing for you because', to make sure the benefits to the audience are spelt out;
circling the most convincing new phrases;
creating your audience-focussed phrases from these circled words; and
preparing the title for your presentation, using the most persuasive two or three phrases from the above six stages.
At first glance, these seven stages seem extremely confusing. The example beginning opposite will make it much clearer. Read it in conjunction with the seven stages above. (You'll see that the left hand column relates to stage 1, the second column to stage 2 and so on. Stage 7 is on page 195...)

Steps A to F have provided a robust, audience-focussed skeleton around which to build your presentation.
Once you are used to doing this, you'll find it doesn't take very long at all: 10 – 15 minutes at most. But this time is critical if your presentation is to work.
The only remaining danger is that – as you get into the detailed preparation – you might go off at a tangent, forgetting all the excellent work you've done.
Avoid this by creating a RAP Reminder Card™(Table 7.1).
Table 7.1. Example of a RAP Reminder Card™
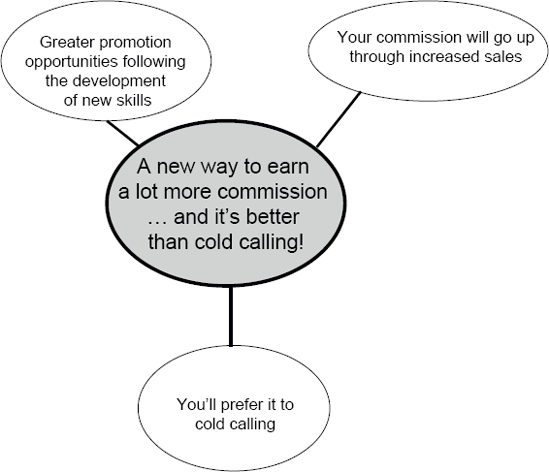
'I want to increase our department's sales, by getting all my customer-facing staff to want to go Networking at Chamber of Commerce, BNI and the Institute of Directors, from now onwards.' | 'A new way to earn a lot more commission ... and it's better than cold calling!'
|
Get a long piece of card.
Fold it lengthways.
Lay it on its side (so it's wide but not high).
On the left hand side, write the final version of your objective (step C).
On the right hand side, put the title of your talk at the top, and your 15 seconds underneath (all from step F).
Then, put this card on your desk, next to where you are working. Keep referring to it throughout your preparation. It will keep you focussed on what you are trying to achieve, and what the main points are.
Audiences – what are they like?
Let's face it, your audience isn't 100% focussed on you. They have thousands of things going on inside their heads, like their business, their children, the holiday they have to book, what they're having for tea ...
But you need your audience to be glad they heard your presentation so that they are likely to do what you want them to.
Which leads to the golden rule of audiences:
Note
After hearing your presentation, you want your audience to think, 'I'm really glad I heard that'.
Unfortunately, traditional presentations are miles away from achieving this. Standard presentation jelly – like the presenter's year of incorporation, number of offices, etc. – will never have the audience thinking, 'I'm really glad I heard that'.
So, how do you ensure your audiences are always thinking, 'I'm really glad I heard that'? It's all to do with one simple seven letter word ...
Empathy is defined as 'the ability to identify with and understand another person's feelings or difficulties'.
More simply, it is putting yourself in the audience's shoes, seeing things from their point of view. And the better you do this, the better your chances of saying things they want to act on.
But empathizing is hard to do. It's subjective. If I were to say to you, 'Think of your audience at your next presentation ... and empathize with them,' it's not exactly easy to do, is it?
A way I developed to empathize with audiences is to JOLT them:
Judged-by
Objectives
Like doing
Time
Judged-by asks, the question, 'How are the audience judged? How do their superiors judge if they have done a good job or not?' Generally, in business, people default to seeking to do well in the areas where they are judged. So, since sales people are judged on their sales, most of what they do is geared to increasing their sales figures.
Objectives simply means their business and personal goals. What are they looking to achieve?
Like doing covers what they do in their spare time.
Time focuses on how much/little time they have. The reason this is so important is that if your audience is short of time (and, let's face it, everybody seems to be these days), time is often their overriding priority when deciding how to act.
So, to empathize with your next audience, JOLT them. Think how they're judged, what objectives they are looking to achieve, what they like doing, and what their time constraints are. Doing this helps you speak on their level much more.
As to the question of how much JOLTing you should do ... if you're doing a key presentation to a smallish group, JOLT everyone individually; if it is for any other presentation, simply JOLT them as a group, which I've done for our worked example overleaf:
Where are we up to?
The work you have done so far has led to the creation of two documents:
a RAP Reminder Card™ (Table 7.2), and
a JOLT analysis.
Table 7.2. The RAP Reminder Card™ example from earlier
'I want to increase our department's sales, by getting all my customer-facing staff to want to go Networking at Chamber of Commerce, BNI and the Institute of Directors, from now onwards.' | 'A new way to earn a lot more commission ... and it's better than cold calling!'
|
And, now that you have crystal clear clarity as to:
what you are trying to achieve, and
who your audience are,
you can now write your presentation.
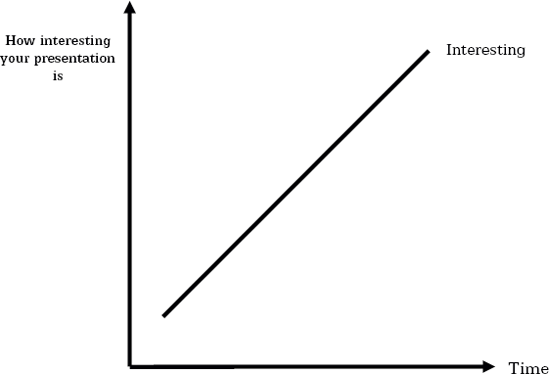
The traditional way to prepare a presentation – slide 1, then slide 2, etc. – is totally ineffective. The reason is that, although you are developing arguments in a logical way (a good thing), the presentation gets more interesting as it goes on (Fig. 7.1):
But, as you know, an audience's concentration reduces during a presentation, like in Figure 7.2:

Taking these two graphs together (Figure 7.3) shows:

In other words, you are getting more interesting (Fig. 7.1) as the audience's brain is switching off (Fig. 7.2). So, at point X you're reaching your key points just as they've stopped listening.
So, the best way to prepare your presentation is to get your RAP Reminder Card™ and JOLT analysis, and then do the following:
1 Build a skeleton around your 15 seconds
Since your 15 seconds are your most powerful messages, you must base your entire presentation around them.
So createyourskeleton by writing your title in a circle in the middle of a page, and drawing a separate branch for each of the points in your 15 seconds (simply copy the wording from your RAP Reminder Card™), like in Figure 7.4:
2 Flesh out the skeleton with common sense
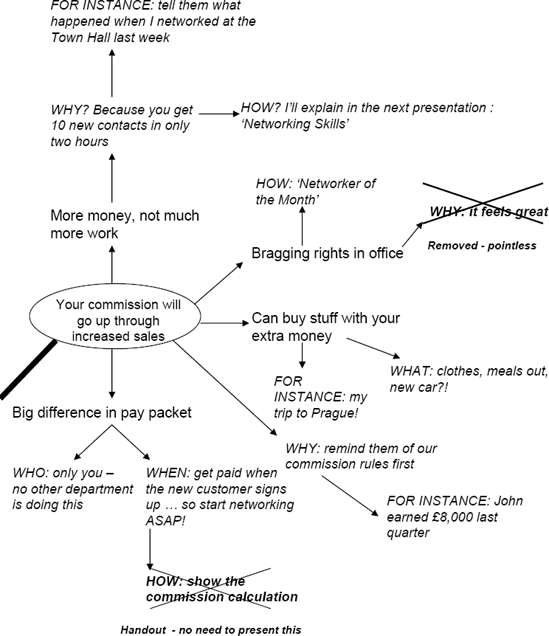
Now, on each branch, add all the relevant points you can think of to make that branch a compelling argument for your audience.
Write everything you can think of here. Don't pre-judge if it'll end up in the presentation or not ... you'll edit it down later anyway (Fig. 7.5).
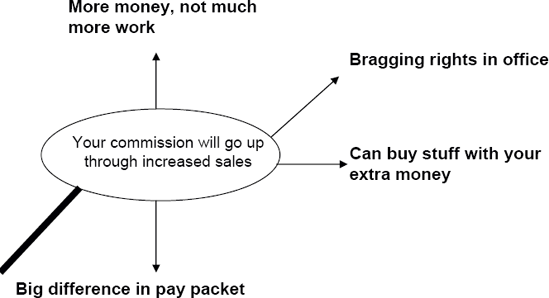
For clarity, I am going to show you how this would work with just one of the three branches. Obviously, you would do it with all the branches when preparing your presentation.
3. Flesh out with 'question words'
You've seen earlier how useful questioning words – who, why, what, etc. – are for developing points. You can use them again here to:
develop the points you've already got; and
come up with some new ones (Fig. 7.6).

4 Flesh out with 'for instance'
A great tip for presentations: Facts tell; stories sell.
Personal stories get buy-in from an audience, are memorable and are extremely useful tools for aiding explanations. This being the case, your presentations need stories.
The type, style and duration of your stories will depend on the results and audience of RAP, i.e. the results you want, and what your audience will buy into. But, presentations will always be better if they include stories.
The most memorable stories are either personal or humorous. You already know this to be true. If I were to ask you to recall something you heard recently that moved you, or made you laugh, you'd no doubt be able to do it easily.
But, if you can't find a suitable personal/humorous story, at the very least find an interesting one. If you're making a sales pitch and want to tell the story of how you helped Mr Grey, a Widget Maker, save money on his operational costs, it's going to need a more interesting angle. This could be Mr Grey's hobby, how the two of you first met, a funny thing you once did together ... anything. Don't exclude Mr Grey's weekend obsession with naked paragliding because you don't think it's relevant to the presentation. If it makes your content more interesting and memorable for the audience, include it.
The easiest way to weave stories into a presentation is:
state a fact;
'for instance ...' (Fig. 7.7); then
your interesting story.

So, you might say: (1) 'We know we can reduce your operating costs because we're experts at it. (2) For instance, (3) one of our clients is a gentleman called Mr Grey, who has a very interesting weekend hobby...'
Believe it or not, your presentation is nearly done. So far, you have:
identified your objective;
found your 15 seconds;
JOLTed your audience;
created your skeleton (with a separate branch for each of the key points in your 15 seconds); and
fleshed out the skeleton with:
common sense;
questioning words; and
'For instance'/stories.
There are six final steps to completing your presentation. And the first of these is simple, quick and can even be good fun. It's:
You now have a very solid skeleton, with lots of flesh on it. But, almost definitely, you'll have too much information. You need to un-clutter your presentation by going through every point and asking:
Note
'Does this point make me more likely to achieve my objective?'
Your answer will be one of three:
'Yes, I must say it'; or
'No, I don't need to'; or
'I don't need to say it, but I should give this info to the audience in a handout.' (Fig. 7.8.)
6 'If I were you ...'
Your penultimate task in assembling content centres around the fact your audiences will often have their own information, thoughts and preconceptions about your topic, some of which won't be favourable. This could be, in a sales pitch, the potential customer knowing about your competitors' strengths. Or, when you want your colleagues to buy into something, but they see that as extra work for them and don't want to know.
So, how to handle their preconceptions? If you don't address their concerns during your presentation, one of two things will happen:
the audience could voice these issues in a rabble-rousing way; which quickly gets out of hand; or
even more worryingly, they don't raise them, so they are never addressed.
Both are disasters. The first is not pleasant and is hard to rectify. The second is an absolute catastrophe, because their negative preconceptions have never been addressed so are still there.
A third option is for you to proactively mention their concerns during your presentation, and address them there and then.
The phrase to introduce these concerns is 'If I were you', followed by the concern(s) using words they might have said themselves. This shows total empathy, and that you see it from their point of view.
Youthen address their concern(s) using pre-prepared lines that maximise your chance of eliminating them.
A word of warning here: note the term pre-prepared. It is critical you prepare this in advance, or you run the risk of jellying, and throwing everything you can think of to address the point. And, of course, the more meandering your explanation, the more your audience, think 'I don't buy this'.
So, address audience concerns in your presentation. Be totally prepared. Totally focussed. Totally succinct. So that you address them quickly, efficiently and then can move on to the rest of your presentation.
7 Call to action
The final piece of the jigsaw is one that very few presenters include, yet it's crucial. Without it, chances of success are slim.
It goes at the end of your presentation. It's your call to action: in other words, crystal clear directions to your audience as to what you want them to do next.
You'll have been to many presentations where, at the end, you've thought, 'Okay, that makes perfect sense. But what am I supposed to do now?'
You don't want your audience thinking this, so you must be very precise as to what you want them to do.
To create your call to action, it's always worth going back to your RAP Reminder Card™ (page 193) to remind yourself what your objective is, then base your call to action on that.
As a final point, notice how the example below starts off with some simple thoughts that the audience can't help but nod in agreement with. Once you start audiences nodding, it's easier to keep them doing so!
8 The layout that puts your key points in the audience's long term memory
It's nearly time to turn your workings into your presentation. The only remaining question is: what order should you say your content in?
Well, you want your content to be in the order that gives you the best chance of the audience being convinced by – and remembering – it.
To show you how an audience's memory works, try this exercise, which I first saw in Tony Buzan's book Brilliant Memory: Unlock the power of your mind (2006, Pearson Education Ltd).
Look down this list of words, and remember as many as you can. Only read the list once. Spend no more than twenty seconds doing so ...
Hen |
Bus |
Brown |
Hit |
Potato |
Seven |
Then |
Why |
Fortune |
Then |
Toe |
Hat |
Field |
Then |
Swim |
The Grand Old Duke of York |
Never |
Then |
By |
Ever |
Blunt |
Then |
Flute |
High |
Tar |
Horse |
Tailor |
Now, without looking back, answer the following:
What were the first five words?
What were the last five words?
Which word was repeated?
What was the long phrase in the middle of the list?
Look back at the list of words and see how you did. To put your results in context, (and don't worry how you compare with what follows – it tests memory, not intelligence, after all!), I have performed a version of this exercise on stage to tens of thousands of people in the last couple of years. Three recurring themes for any audience of any size in any country are:
people tend to do much better on question 1 than question 2;
most people seem to answer question 3 correctly; and
practically everybody remembers question 4.
The four ways memories work are shown in Figure 7.9:

Figure 7.9. The four ways memories work. See Table 7.2 on the next page for an explanation of each reference point.
Table 7.3. Explanation of each reference point in Figure 7.9
Graph reference | Memory Bias | Meaning you remember things ... |
|---|---|---|
1 | Early Bias | ... at the start |
2 | Recency Bias | ... at the end |
3 | Repetitive Bias | ... that are repeated |
4 | Outstanding Bias | ... that stand out in some way |
The level to which each individual's memory works varies, but the fact is that everybody remembers things in a combination of these four ways.
And now comes a very important point. Look at these two facts you now know:
your 15 seconds are the points most likely to help you achieve your objective; and
each audience member's memory works in some/all of these four ways – first, last, repeated or outstanding.
These two facts lead us to this conclusion:
Note
To give yourself the best chance of achieving your presentation's objective, you must say each of your key points (your 15 seconds) in each of the four memory ways.
So, the ideal layout is the one shown in Figure 7.10.

Notice how each of your 15 seconds hits the four long term memory hotspots. They appear at the start, at the end, are repeated and will include an outstanding element (because your content for each point will include something that stands out to the audience. Figure 7.11 shows how this would look for this section's example.

9 Transferring your workings into the above layout You have three working papers:
your big skeleton (part 5);
'If I were you' (part 6); and
your call to action (part 7).
To slot them into the layout you've just read, you have to work out the order you want to say everything.
So it's simply a case of going through your workings, and thinking, 'Which of these points should I say first, second?' and so on.
My technique is to number each main point on each branch in the order I want to discuss them (using 1, 2, 3), and then order each sub-point using the references 1A, 1B, 1C (Fig. 7.12).

Figure 7.12. 'My technique is to number each main point on each branch in the order I want to discuss them (using 1, 2, 3), and then order each sub-point using the references 1A, 1B, 1C.'
I find it then helps me to transfer the ordered workings into a more traditional linear style. At this stage, I also think how I am going to link the points together.
10 An important point about linking:
Notice the smoothness of the transitions in the above script? You want this with your presentation, so you need good links between points.
The best mechanism for this is what I call Bye Hi: say Bye to the previous points and Hi to the new one.
For example see how the asterisked sentence works in this format 'So, it's great for increasing your money ['Bye' to the previous point (money)], but, even better ['Hi' to the next point]'.
11 Building slides (if you're using them) using the 'Two Ronnies' approach
Have you heard of the phrase 'death by PowerPoint'?
Have you ever been on the receiving end of a presentation that this phrase could have been invented for?!
I have. So many times, it's frightening. One that has stayed with me for years was by someone who'll remain nameless. The 'highlights' were:
Every slide was crammed with words.
Every slide looked the same: yellow writing on a blue background.
The words were so small you couldn't read them.
There were 136 slides.
The presentation was one hour long.
She read every single slide out word for word, adding nothing.
The worst bit: she'd given us copies of the slides in advance, so we could read ahead.
It was dire. As I write this, I remember the utter helplessness that I felt after two minutes, knowing exactly what the next 58 minutes had in store for me... and that there was nothing I could do about it.
To make sure your slides don't have this effect, think of you and them as a double act.
You will notice the title to this section makes reference to the 'Two Ronnies', who were a famous British comedy act – Ronnie Barker and Ronnie Corbett. Their shows were the usual mix of jokes, sketches and the like.
One format for their jokes was a mock news show, where they would introduce jokes by saying, And in the news today...', and follow it with a funny story.
When they were reading out the news, they always spoke alternately. One Ronnie would tell a joke; then the other would tell the next joke. You never saw both Ronnies saying the same joke at the same time. If they had done this, you would have shouted at the television: 'Will one of you two Ronnies SHUT UP! I can't understand a word, when you're both saying the same thing at the same time.'
It's the same with your slides. When you're presenting, you're Ronnie One; your slides, Ronnie Two.
And you don't want your audience shouting, 'Will one of you two Ronnies SHUT UP! I can't understand a word, when you're both saying the same thing at the same time.'
You see, you (Ronnie One) are really good at certain things. You can engage people. Discuss topics in full sentences. Speak with passion on your subject. Interact with the audience, engage with them. Inject personality.
But the slideshow (Ronnie Two) is brilliant at other things. He is very good at showing images, graphics, diagrams, charts, graphs, etc.
It wouldn't make sense for you (Ronnie One) to verbally describe a six-segment pie chart, when Ronnie Two could simply hold it up on a slide. Similarly it doesn't make sense for Ronnie Two to say full sentences, because slides aren't very good at injecting passion into lots of words. That's your job.
If you like, think of yourself as the Passion Ronnie, and the slides as the Picture Ronnie. You have to present so that both of you are maximising your relative strengths. Lots of words on slides is not playing to his strength. And it is this which is so prevalent in the business world today, and has led to the phrase 'death by PowerPoint'.
Following the logic here, if the two Ronnies aren't both speaking at the same time, that suggests neither are saying the full message. And that's right. A presentation needs both of you. So, your slides must not make sense on their own. If they do, Ronnie Two is saying the whole message. There is no need for Ronnie One. In fact, if your slides are that verbose, I wouldn't bother presenting them. I'd simply email them to the audience, and ask them to call if they have any questions.
As well as reducing words and increasing visuals on the slides, there are two final points to remember with slides:
If you put all the information on a slide so it appears all at once, the audience will read ahead. You know this to be case. Think of the last presentation you saw when five pullet points came up at once. The presenter waxed lyrically about point 1, whilst you read points 2 – 5 and then wanted him to click to the next slide. So, always build the slides up as you go through them.
The most important function of PowerPoint is the letter B. Press B on the keyboard and it blanks the PowerPoint screen. This means that you can shut Ronnie Two up while you're talking, so the audience isn't looking at him, but focusing their sole attention on you.
Your presentation is now complete. But it's 100% definitely not going to work if you don't deliver it well.
So you need to practise. And the more you practise, the more you know the material, and the better you get.
The traditional approach to practising is shown in Figure 7.13 (assume the ten boxes represent slides, and that the grey shading shows where people traditionally focus their attention when practising – the darker the grey, the more intense the practice):
Do you recognise this? This method of practising is often closely followed by the presenter running out of time, so he or she has to 'wing it' anyway.
Although there is a lot of logic in starting at the beginning when practising, there are some serious problems, including:
the ending – which, as you know, is critical – is often too weak because it's not been practised;
the links are not seamless, so the presentation is disjointed;
you are focusing your practice on the wrong part. You know your topic fairly well anyway, so why spend so much time practising the slides' content? Spend more time on the Bye Hi links.
Instead, a much better way to practise a presentation is that shown in Figure 7.14:
Figure 7.14. 'Practise the start, end and links until they all become second nature; then, do one or two full run-throughs, spending extra time on tricky bits.'
So, practise the start, end and links until they all become second nature; then, do one or two full run-throughs, spending extra time on tricky bits, like the If I were you section, page 206.
This approach is much better. Your presentation will have more cohesion. You get to the end more quickly. And you are practising the areas where you are most likely to become unstuck – the start, the end and the linking of topics.
A further word of warning here when practising: however long the presentation takes when practising in your bedroom, it will take at least 25% longer on the day. You will probably ad lib more, there will be questions, etc. ... So, if you've been given 25 minutes to present, make sure it only takes 20 minutes when practising ...
Presentation delivery skills are a subject in their own right. You could write a whole book on it. In fact, countless thousands of authors have done.
Because this book is all about reducing your jelly, the thrust of this chapter is about producing audience-friendly, jelly-free content that gives you the maximum chance of achieving your objective.
However, I think it would be inappropriate of me to exclude delivery skills entirely from a section on presentations. After all, if I were you, I would want some simple hints I could apply straight away to improve my delivery.
Figures 7.15 and 7.16 give another excerpt from my sales programme Win That Pitch: A Step by Step Guide to Winning More Business (www.andybounds.com/winthatpitch). It contains some really simple tips on body language that will make a big difference to your effectiveness on the day ...


Everything has gone brilliantly so far. You prepared your presentation in the right way. You delivered it like a pro. At the end of the presentation, the audience said 'yes'. Everything has gone as planned.
Unfortunately, there is still an area where many presentations are won and lost. And that's in the follow-up.
Even if you get a 'yes' from the audience on the day, it's still your responsibility to ensure that this 'yes' translates to actual achievement of your objective.
For instance, if you are making a sales pitch, it's not enough for the prospective customer to say, 'Yes, we'll buy from you'. You need them to actually sign the order form.
So, it is important to follow up. I am sure there's been many a time when you felt your audience said 'yes', but then nothing happened. And it is so frustrating.
To follow up, it's a question of getting agreement:
agreement from them on your call to action; and
agreement on who will do what and when.
Note
'Great stuff. So we're all agreed then. To take this forward, I'll send you an email detailing when the networking skills course will take place. You'll get this by the end of today. I'll need you to confirm attendance, book it in your diary and then we can get things moving. Is that OK?'
Follow the advice in this section, and you will create a jelly-free presentation that works. It will contain only the information you need to say. And that information will be phrased such that audiences will buy into it.
However, the next time you have a presentation to do, you don't want to be wading through this entire section from beginning to end again. To use this chapter as a guideline for future presentations:
read the worked example only;
prepare your presentation in the same style; and
only go back to the rest of the chapter if you need more detail.
This style of presentation is very powerful. I have used it time and time again, for companies in all types of industries, all over the world. And it works.
Do you remember my question earlier in this section: how do you prepare – in a blind panic, by making minor tweaks to an existing presentation, or a bit of both? Well, once you have prepared a presentation using the techniques in this section, you'll never do either of these ever again!