
Chapter 10. Making Up for a Reduced Component Set
In spite of the component improvements discussed in Chapter 9, the overall number of
components in the Flash authoring tool has been reduced for ActionScript 3.0 FLA files. The data
components, in particular, have been removed completely and now belong to
the Flex framework. A handful of user interface (UI) components, such as
Accordion, Tree, and Window, are also absent.
These components are still available for ActionScript 2.0 documents, but the Components panel adjusts its contents based on a FLA file’s publish settings (File→Publish Settings→Flash→Script). Even if you start in an ActionScript 2.0 document, and then add components to the Library panel and change your publish settings, you will only see error messages when you compile. Components designed for different versions of ActionScript can’t be mixed in the same FLA file. This chapter discusses a number of ways to work around (or work without) Flash components no longer supported in ActionScript 3.0.
Working Without Data Components in ActionScript 3.0
The data components in ActionScript 2.0 offered a panel-based interface for configuring sophisticated data interactions among UI components and even external data sources, such as XML documents and databases. In a sense, they provided a more complex, but similar apparatus to the Script Assist feature of the Actions panel, best suited to older ActionScript. Developers who routinely work with complex data binding are generally going to find a more comfortable workflow in Flex Builder 3, which is specifically geared toward Rich Internet Application (RIA) development. You may, however, encounter the occasional need for some of these features in the Flash authoring tool. The following sections discuss the implementation of a pair of popular data components in ActionScript 2.0, and then recommend a replacement workflow for ActionScript 3.0 documents.
Creating an XMLConnector Scenario in ActionScript 2.0
In ActionScript 2.0, one of the XMLConnector component’s uses was to load,
parse, and use XML data to populate UI components. During this process,
a copy of the DataBindingClasses
component (Window→Common Libraries→Classes) was automatically added to
the library, which facilitated nearly codeless data
binding among components; that is, components could be
configured to influence the data content and visual display of other
components automatically. You could do this with barely any use of
ActionScript, but the process was fairly involved and required a well
organized bit of fiddling among tabs of the Component Inspector panel,
as demonstrated in the following example. Although the XMLConnector component was potentially helpful
to designers, you can reproduce the functionality illustrated here with
relatively little effort in ActionScript 3.0. One approach is discussed
immediately after the ActionScript 2.0 version.
Create a new ActionScript 2.0 FLA file, and then save it as XMLConnector.fla. In the Timeline, rename the default layer to
scripts, and then add a new layer namedcomponents.Open the Components panel. With the
componentslayer selected, drag a copy of theXMLConnectorcomponent to the stage. It doesn’t matter where you position this component, because, like all data components, it becomes invisible at runtime. Select theXMLConnectorcomponent, and then use the Property inspector to give it the instance namexmlConn.Drag a copy of the
ComboBoxandTextInputcomponents to the stage. Give theComboBoxcomponent the instance namemyComboBox, and theTextInputcomponent the instance namemyTextInput.Create a new XML document in the same folder as XMLConnector.fla, and then save the new document as cds.xml (this is the same file used in Chapter 1, so you may copy that one, if you like). The contents of this XML file should read as follows:
<?xml version="1.0" encoding="iso-8859-1"?>
<library>
    <artist name="The Beatles">
        <album name="Abbey Road">
            <track title="Come Together" />
            <track title="Something" />
            <track title="Maxwell's Silver Hammer" />
            <track title="Oh! Darling" />
            <track title="Octopus's Garden" />
            <track title="I Want You (She's So Heavy)" />
            <track title="Here Comes the Sun" />
            <track title="Because" />
            <track title="You Never Give Me Your Money" />
            <track title="Sun King" />
            <track title="Mean Mr. Mustard" />
            <track title="Polythene Pam" />
            <track title="She Came in Through the Bathroom Window" />
            <track title="Golden Slumbers" />
            <track title="Carry That Weight" />
            <track title="The End" />
            <track title="Her Majesty" />
        </album>
    </artist>
</library>
Select
xmlConn, and then open the Component Inspector panel (Window→Component Inspector). Select the Parameters tab, and then entercds.xmlas the value of theURLparameter. Set thedirectionparameter toreceive, as shown in Figure 10-1. This associates theXMLConnectorcomponent with the cds.xml document.Select the Component Inspector panel’s Schema tab. Select the existing
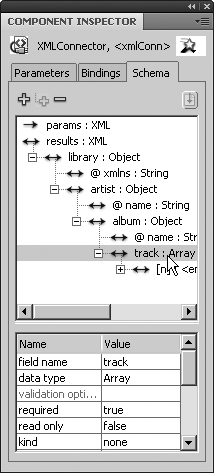
resultsschema, and then click the far right arrow button to browse for the cds.xml document (Figure 10-2).
When the XML document is displayed in the Schema tab, notice the
results→library→artist→album→tracknode, as shown in Figure 10-3. This node represents the numerous<track>elements of the XML document, which are going to be displayed by theComboBoxcomponent.Select the
myComboBoxinstance. In the Component Inspector panel, select the Bindings tab, and then click the button to add a binding. This opens the Add Binding dialog box.
Select
button to add a binding. This opens the Add Binding dialog box.
Select dataProvider, and then click OK to close the dialog box. In the Bindings tab, double-click thebound toparameter to open the Bound To dialog box.In the Bound To dialog box, as shown in Figure 10-4, select
XMLConnector,<xmlConn>on the left (this is thexmlConninstance) and the deeply nestedtracknode on the right, as noted in Step 7. Click OK to close the dialog box. This action automatically adds theDataBindingClassescomponent to the library.At this point, the
myComboBoxinstance is associated with the<track>elements of the XML document, thanks to theXMLConnectorcomponent. Now you just need a trigger. Select frame 1 of thescriptslayer, and then open the Actions panel. Type the following ActionScript:xmlConn.trigger();
Select Control→Test Movie to confirm that the
ComboBoxcomponent displays the names of the tracks from The Beatles’ Abbey Road album (Figure 10-5).


To demonstrate data binding between the
ComboBoxandTextInputcomponents, close the SWF file, and then continue with a few additional steps. Select themyTextInputinstance, and then return to the Component Inspector panel’s Bindings tab. Click the
button to open the Add Binding dialog box. You see one choice for
text, which refers to the TextInput.textproperty of the component (the text it displays). Select thetextbinding, then click OK to close the dialog box.In the Bindings tab, double-click the
bound toparameter to open the Bound To dialog box. As shown in Figure 10-6, selectComboBox,<myComboBox>on the left, andselectedItemon the right, which refers to theComboBox.selectedItemproperty of themyComboBoxinstance.


Turn on the “Use path expression” checkbox, and then enter the expression
title, as shown in Figure 10-6. This associates thetitleproperty of the currently selected item in theComboBox—namely, a<track>element’stitleattribute—with theTextInput.textproperty of themyTextInputinstance. Click OK to close the dialog box.Select Control→Test Movie to confirm that the
TextInputcomponent updates automatically to display the current value of theComboBoxcomponent.

Recreating an XMLConnector Scenario in ActionScript 3.0
ActionScript 3.0 has no data components to recreate the XMLConnector, but you can reproduce the features just described in ActionScript 3.0 with surprisingly little code. It’s a matter of loading the XML document and responding to a couple pertinent events.
Create a new ActionScript 3.0 FLA file, and then name it XMLConnectorMimic.fla. Rename the default layer in the Timeline to
scripts, and then add a new layer namedcomponents.With the
componentslayer selected, open the Components panel, and then drag a copy of theComboBoxandTextInputcomponents to the stage. Give theComboBoxcomponent the instance namemyComboBox, and theTextInputcomponent the instance namemyTextInput.Select frame 1 of the
scriptslayer, and then open the Actions panel. Enter the following code:var myXML:XML = new XML(); var xmlLoader:URLLoader = new URLLoader(); xmlLoader.load(new URLRequest("cds.xml")); xmlLoader.addEventListener(Event.COMPLETE, completeHandler); function completeHandler(evt:Event):void { myXML = XML(evt.target.data); var len:int = myXML..track.length(); for (var i:int = 0; i < len; i++) { myComboBox.addItem({label:myXML..track[i].@title}); } myComboBox.addEventListener(Event.CHANGE, changeHandler); } function changeHandler(evt:Event):void { myTextInput.text = myComboBox.selectedLabel; }In the first four lines, the variable
myXMLis declared and set to an instance of theXMLclass. Another variable,xmlLoader, is set to aURLLoaderinstance and used to request the cds.xml document. Finally, theEvent.COMPLETEevent, which indicates that the XML document has loaded, is associated with a customcompleteHandler()function.The
completeHandler()function parses the XML document, and routes its contents to themyXMLinstance. Using ECMAScript for XML (E4X) syntax, the remainder of this function uses aforloop to repeatedly invokeComboBox.addItem()on themyComboBoxinstance in order to supply it with labels. Finally, theEvent.CHANGEevent constant is associated with a customchangeHandler()function, which updates theTextInput.textproperty of themyTextInputinstance.Note
See the section Namespaces in Chapter 3, for more detailed information on E4X and the navigation of XML documents.
Select Control→Test Movie to confirm that the
ComboBoxcomponent correctly displays track information that theTextInputcomponent updates automatically to display the current value of theComboBoxcomponent. Compare the ActionScript 2.0 and 3.0 SWF files for this exercise, and you’ll see that the ActionScript 3.0 SWF file weighs less than half of its companion’s file size.
Creating a WebServiceConnector Scenario in ActionScript 2.0
Web services provide an XML-based mechanism for data exchange by
way of a protocol called Simple Object Access Protocol (SOAP), (http://www.w3.org/TR/soap12-part0/), whose specification
is maintained by the World Wide Web Consortium (W3C), the same body
responsible for the HTML specification. SOAP messages can be consumed
with the ActionScript 2.0 WebServiceConnector data component.
Create a new ActionScript 2.0 FLA file, and then name it WebServiceComponent.fla. In the Timeline, rename the default layer to
scripts, and create a new layer namedcomponent.With the
componentlayer selected, open the Components panel, and then drag a copy of theWebServiceConnectorcomponent to the stage. Use the Property inspector to give the component the instance namewsConn.Open the Web Services panel (Window→Other Panels→Web Services). Unfortunately, this panel is active only in ActionScript 2.0 documents, but it provides a handy way to check what methods are available from any number of Web services, in addition to what parameters those methods expect. Click the Define Web services button (a blue globe) to open the Define Web Services dialog box. In this dialog box, click the
button to
add a new Web service URL. Enter http://www.w3schools.com/webservices/tempconvert.asmx?WSDL,
and then click the OK button to close the dialog box. This action
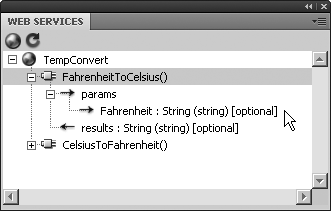
updates the Web Services panel (Figure 10-7) to show the
name of a particular Web service provided by http://w3schools.com, TempConvert, which features two methods. Open theparamsnode beneathFahrenheitToCelsius()to see that a single string parameter is expected: a value in Fahrenheit, to be converted to Celsius.With the
WebServiceConnectorcomponent selected, open the Component Inspector panel, and then set theWSDLURLparameter to http://www.w3schools.com/webservices/tempconvert.asmx?WSDL, theoperationparameter toFahrenheitToCelsius, and the other two parameters totrue(Figure 10-8). This action prepares thewsConninstance to use theFahrenheitToCelsius()method of theTempConvertWeb service.Select frame 1 of the
scriptslayer, and then open the Actions panel. Type the following ActionScript:wsConn.addEventListener("result", resultHandler); wsConn.params = ["451"]; wsConn.trigger(); function resultHandler(evt:Object):Void { trace(evt.target.results); };This associates the
WebServiceConnector.resultevent with a customresultHandler()function that traces the value returned by the Web service. TheWebServiceConnector.paramsproperty of thewsConninstance is set to anArrayinstance (the square brackets,[], are a shorthand for the expressionnew Array()). In honor of Ray Bradbury’s novel Fahrenheit 451, the string"451"is provided as the sole value of theparamsarray. Some methods receive numerous parameters, would be added in a comma-delimited list. Finally, theWebServiceConnector.trigger()method nudges thewsConninstance into action.Select Control→Test Movie to confirm that the value 232.777777777778 (the Celsius value for 451 degrees Fahrenheit) appears in the Output panel. In the menu bar of the SWF file, select View→Bandwidth Profiler to see that the file weighs 40KB.

Recreating a WebServiceConnector Scenario in ActionScript 3.0
No ActionScript 3.0 equivalent to WebServiceConnector ships with
the authoring tool, but a free third-party extension, written by Pieter
Michels (http://www.wellconsidered.be/), neatly fits the bill.
Pieter kindly granted permission for the use of his extension in
conjunction with this book. His WebService component extension, available at
http://www.wellconsidered.be/blog/as3-webservice-component/,
provides three Web service–related classes, demonstrated in this
exercise.
To reproduce the WebService
connector feature in ActionScript 3.0, you need to download Pieter
Michels’ WebService Component extension from http://www.wellconsidered.be/blog/as3-webservice-component/.
When the download is complete, unpack the ZIP archive, and then
double-click the wellconsidered_ws.mxp file to open
it in the Adobe Extension Manager (Figure 10-9). Click the Accept button, and then click the OK button to
see the extension included among your list of extensions, which will
vary from the one depicted.

Make sure the new extension is turned on by ensuring the checkbox in the Enabled column is selected in the On/Off column (Figure 10-10).
Shut down the Flash authoring tool, and then launch it again so that the extension is activated at startup.

Create a new ActionScript 3.0 FLA file, and then name it WebServiceExtension.fla. Rename the default layer in the Timeline to
scripts.Open the Components panel and note that a new folder, named wellconsidered, is now available. Open this new folder, and then drag a copy of the
Operation,OperationEvent, andWebServicecomponents to the library. These provide a virtualbe.wellconsidered.servicespackage for three classes corresponding to the three components in the library. These classes will be referenced in the ActionScript in Step 3.Select frame 1 of the
scriptslayer, and then open the Actions panel. Type the following code:import be.wellconsidered.services.WebService; import be.wellconsidered.services.Operation; import be.wellconsidered.services.events.OperationEvent; var ws:WebService = new WebService("http://www.w3schools.com/¬ webservices/tempconvert.asmx?WSDL"); var op:Operation = new Operation(ws); op.FahrenheitToCelsius("451"); op.addEventListener(OperationEvent.COMPLETE, completeHandler); function completeHandler(evt:OperationEvent):void { trace(evt.data); } op.addEventListener(OperationEvent.FAILED, failedHandler); function failedHandler(evt:OperationEvent):void { trace(evt.data); }After the required classes are imported, a
wsvariable is declared and set to an instance of the customWebServiceclass, which is fed the URL of theTempConvertWeb service as a parameter. Anopvariable is set to an instance of the customOperationclass, which is associated with thewsinstance. The remoteFahrenheitToCelsius()method is invoked on theopinstance, and passed in the string"451"parameter.Finally, two events are associated with respective custom functions: the
OperationEvent.COMPLETEevent is triggered when theOperationinstance receives data from the Web service, in which case the value 232.777777777778 is sent to the Output panel; if the Web service is unavailable, or some other error occurs, then theOperationEvent.FAILEDevent may be handled to gracefully deal with the situation.Select Control→Text Movie to verify that the Web service communication succeeds. In the file menu of the SWF file, select View→Bandwidth Profiler to see that the file weighs a mere 6KB.
ActionScript 2.0 Components in ActionScript 3.0 SWF Files
Even though you can’t include ActionScript 2.0 components in
ActionScript 3.0 FLA files (and vice versa), an interesting detour lets
you load ActionScript 2.0 SWF files at runtime by ActionScript 3.0 SWF
files. Intercommunication between such SWF files is possible by way of the
native LocalConnection and ExternalInterface classes. Renowned Flash guru
Grant Skinner (http://gskinner.com/) offers a set of free classes named
SWFBridge, written in ActionScript 2.0
and 3.0, to facilitate this communication. In this way, ActionScript 2.0
components, such as Accordion and
DateField, can be incorporated into an
ActionScript 3.0 workflow.
Download Grant’s classes from http://www.gskinner.com/blog/archives/2007/07/swfbridge_easie.html.
When the download is complete, unpack the ZIP archive, and then decide on a folder in
which to store the files used for the following exercise. The SWFBridge classes are organized into a com.gskinner.utils package, so make
sure to create corresponding com/gskinner/utils subfolders inside
your chosen exercise folder. Place the SWFBridgeAS2.as and SWFBridgeAS3.as files into the utils subfolder before continuing.
Note
You can also store these classes in separate folders, such as a repository of routinely accessed ActionScript 2.0 and 3.0 classes, as long as you configure your global classpath settings to be aware of those locations. See Chapter 5 for more details.
Create a new ActionScript 2.0 FLA file and name it ContentAS2.fla. Rename the default layer in the Timeline to
scripts, and then create a new layer namedcomponents.With the
componentslayer selected, open the Components panel, and then drag a copy of theAccordionandDateFieldcomponents to the left side of the stage. Use the Property inspector to give theAccordioncomponent the instance namemyAccordion, and theDateFieldcomponent the instance namemyDateField.To provide some content for the
myAccordioninstance, use the Create New Symbol dialog box (Insert→New Symbol) a few times to create two or three movie clip symbols. In turn, double-click each symbol in the library to enter its timeline. Use the drawing tools to draw a few shapes to distinguish each symbol, or import a unique graphic file into each symbol. When finished, right-click (Ctrl-click) each symbol in the library, and then select Properties. Select the Export for ActionScript checkbox to provide a unique linkage identifier for every symbol.Select the
myAccordioninstance. In the Component Inspector panel, double-click to configure thechildLabels,childNames, andchildSymbolsparameters to correspond to movie clip symbols created in Step 3. For example, if you have three movie clips that contain photos of a child building snowmen in the sand, showing off her braids, and jumping, you might configure thechildLabelsparameter with descriptive labels likeSandmen,Braids, andJumping, as seen in Figure 10-11. ThechildNamesparameter refers to yet-to-be-created instance names for these symbols, so you might use mcSandmen, mcBraids, and mcJumping. Finally,childSymbolsrefers to the symbols’ linkage identifiers, so you might usesandmen,braids, andjumping.Select Control→Test Movie to verify that the
Accordioncomponent displays your content, as seen in Figure 10-12. Click from pane to pane to switch from one movie clip to the next.


Close the SWF file. Select frame 1 of the
scriptslayer, and then open the Actions panel. Enter the following ActionScript:import com.gskinner.utils.SWFBridgeAS2; var myBridge:SWFBridgeAS2 = new SWFBridgeAS2("connectionID", this);The
SWFBridgeAS2class is imported, and amyBridgevariable is declared, and set to a instance of theSWFBridgeAS2class. This variable will manage the bridge of communication between this SWF file and the host ActionScript 3.0 SWF file that’ll eventually load it. Two parameters are provided to themyBridgeinstance: an arbitrarily named connection identifier ("connectionID"), and a reference to the current SWF file (this).Continue entering the following code:
function selectSegment(segment:Number):Void {
    myAccordion.selectedIndex = segment;
}
Here, a custom
selectSegment()function selects which pane of theAccordioncomponent to display, by setting theAccordion.selectedIndexproperty of themyAccordioninstance to an incoming parameter,segment. The ActionScript 3.0 SWF file that loads this file at runtime will trigger this function.Enter the remainder of the ActionScript 2.0 code:
var accListener:Object = new Object();
accListener.change = accChangeHandler;
myAccordion.addEventListener("change", accListener);
function accChangeHandler(evt:Object):Void {
    myBridge.send("notifyComboBox", evt.target.selectedIndex);
}

var dfListener:Object =  new Object();
dfListener.change = dfChangeHandler;
myDateField.addEventListener("change", dfListener);
function dfChangeHandler(evt:Object):Void {
    myBridge.send("notifyTextInput", evt.target.selectedDate);
}
These two blocks of code do practically the same thing. In each case, a listener variable is declared, and set to an instance of the
Objectclass. These listener objects act as event handling stand-ins on behalf of themyAccordionandmyDateFieldinstances. Each listener is associated with thechangeevent of its corresponding component, set to trigger a companion function that sends a message to the forthcoming ActionScript 3.0 SWF file by way of themyBridgeinstance.Each event handler invokes the
SWFBridgeAS2.send()method on themyBridgeinstance, and tells the ActionScript 3.0 SWF file what to do. For example, when the user changes themyAccordioninstance, it uses themyBridgeinstance to trigger a function in the ActionScript 3.0 SWF file by way of the string reference"notifyComboBox", passing a parameter whose value is the number of its own index.Select Control→Test Movie again to update the ActionScript 2.0 SWF file.
Create a new ActionScript 3.0 FLA file, and then name it ContentAS3.fla. Rename the default layer in the Timeline to
scripts, and create a new layer namedcomponents.With the
componentslayer selected, open the Components panel, and then drag a copy of theComboBoxandTextInputcomponents to the stage. Use the Property inspector to give theComboBoxcomponent the instance namemyComboBox, and theTextInputcomponent the instance namemyTextInput. Arrange these components on the right side of the stage, in order to make room for the ActionScript 2.0 SWF file.Select the
myComboBoxinstance. In the Component Inspector panel, double-click to configure thedataProviderparameter to correspond to the movie clip symbols displayed by theAccordioninstance in the ActionScript 2.0 SWF file. For example, click the
button to add a new entry. In the new entry, change the labelfield toSandmen, and thedatafield to0. Add a second new entry. In the second new entry, change thelabelfield toBraidsand thedatafield to1. Create a third new entry. In the third new entry, change thelabelfield toJumping, and thedatafield to2.Select frame 1 of the
scriptslayer, and then open the Actions panel. Type the following ActionScript 3.0:import com.gskinner.utils.SWFBridgeAS3; var myBridge:SWFBridgeAS3 = new SWFBridgeAS3("connectionID", this);So far, the code’s nearly identical. The ActionScript 3.0 version instantiates its own
myBridgevariable, only this time the variable’s set to an instance of theSWFBridgeAS3class. The"connectionID"parameter here matches the one specified in the ActionScript 2.0 file, which opens a single channel of communication between the two SWF files.Continue entering the following code:
var myLoader = new Loader()
myLoader.load(new URLRequest("contentAS2.swf"));
addChild(myLoader);
Here, a
Loaderinstance loads the ActionScript 2.0 SWF file and adds it to the display list.Continue with the following code:
function notifyComboBox(num:int):void {
    myComboBox.selectedIndex = num;
}

function notifyTextInput(str:String):void {
    myTextInput.text = str;
}
These functions define the behavior of the notifications sent by the ActionScript 2.0 SWF file, whose event handlers trigger
notifyComboBox()andnotifyTextInput()by way of the string references"notifyComboBox"and"notifyTextInput"(see Step 6).Continue entering the remaining code, which sends a message to the ActionScript 2.0 SWF file, using the by-now familiar
SWFBridge.send()method:myComboBox.addEventListener(Event.CHANGE, changeHandler); function changeHandler(evt:Event):void { myBridge.send("selectSegment", evt.target.selectedIndex); }Select Control→Test Movie to experience the collaboration between ActionScript 2.0 and 3.0 SWF files. Note that selecting various panes in the
Accordioncomponent updates theComboBoxcomponent in the host SWF file, and vice versa. Note also that various selections of theDateFieldcomponent update theTextInputcomponent in the host SWF file (Figure 10-13).

For alternatives to SWFBridge,
experiment with the free ActionScript Bridge component by Jumpeye,
available at http://www.JumpeyeComponents.com/Flash-Components/Various/ActionScript-Bridge-91/,
and FlashInterface, by Robert
Taylor, available at http://www.flashextensions.com/products/flashinterface.php.
Exploring Third-Party UI Components
Numerous third-party companies have developed components for Flash, some of which require licensing fees and some of which are free. A Google search on “ActionScript 3.0 Flash components” will lead you to a number of component repositories, as well as tutorials to help you create your own. Here is an example of two ready-made component providers.
Yahoo! ASTRA Components
The Yahoo! Developer Network (http://developer.yahoo.com/) offers a number of ActionScript 3.0 UI components under the BSD free software license, as part of a Flash component set (http://developer.yahoo.com/flash/astra-flash/) called ASTRA. Components are installed with the Adobe Extension Manager and closely match the API, syntax, and library folder structure of the built-in ActionScript 3.0 component set. ASTRA components include:
AutoComplete: provides a list of suggestions from a supplied dataset based on the characters entered by the userAlertManager: manages the queuing of alert windowsAudioPlayback: conceptually similar toFLVPlayback, but for audio filesBarChart,ColumnChart,LineChart, andPieChart: display tabular data in various graphical representationsMenuandMenuBar: ActionScript 3.0 versions of the native ActionScript 2.0 equivalentsTabBar: facilitates switching among various application statesTree: an ActionScript 3.0 version of the native ActionScript 2.0 equivalent
Here’s a quick demonstration of the Yahoo! ASTRA TabBar component.
Download the ASTRA component set from http://developer.yahoo.com/flash/astra-flash/. When the download completes, unpack the ZIP archive, and then double-click the Astra.mxp file to open it in the Adobe Extension Manager. Follow the steps described for installing Pieter Michels’ WebService component extension earlier in this chapter (see the Recreating a WebServiceConnector Scenario in ActionScript 3.0). Shut down the Flash authoring tool, and then launch it again so that the extension is activated at startup.
Create a new ActionScript 3.0 FLA file, and then open the Components panel. Drag a copy of the
TabBarcomponent from the Yahoo! folder to the stage. Use the Property inspector to give this component the instance namemyTabBar.Select the
myTabBarinstance. In the Component Inspector panel, double-click to configure thedataProviderparameter. In the Values dialog box that opens, click the button to
add a new entry. In the new entry, change the labelfield toHome, and thedatafield tohome. Add a second new entry. In the second new entry, change thelabelfield toAbout Us, and thedatafield toabout us. Create a third new entry. In the third new entry, change thelabelfield toContact Us, and thedatafield tocontact us. Set theautoSizeTabsToTextWidthparameter totrueto ensure that the labels expand to fit their content.In the Timeline, select frame 1, and then open the Actions panel. Enter the following code:
import com.yahoo.astra.fl.events.TabBarEvent;

myTabBar.addEventListener(TabBarEvent.ITEM_CLICK, clickHandler);

function clickHandler(evt:TabBarEvent):void {
    trace(evt.item.data);
}
Here, an
importdirective makes theTabBarEventclass available to this frame script. ThemyTabBarcomponent instance is referenced by instance name and associated with a customclickHandler()function to handle theTabBarEvent.ITEM_CLICKevent. Inside theclickHandler()function, atrace()function references thedataproperty of the currently selected tab, and sends its value to the Output panel. In actual practice, you might use the expressionevt.item.datainside a call togotoAndPlay(), to send the timeline to a frame label associated with the selected tab.Select Control→Test Movie to verify that tab selection sends corresponding values to the Output panel.
Note
This syntax is from the Astra Library Documentation (http://developer.yahoo.com/flash/astra-flash/classreference/), which thoroughly covers the full ASTRA API.
Jumpeye Components
Jumpeye offers a wide variety of attractive ActionScript 3.0 UI components for sale on its website: http://www.JumpeyeComponents.com/Flash-Components/. Components include:
Accordion Panel V3: provides horizontal and vertical multipane selection, like the native ActionScript 2.0 Accordion component, but much more powerful and configurable
Loader Pro: loads images or animations, both from the library or external files, with visual transitions
Color Picker Pro: provides robust color picking capability with a variety of user interfaces
Thumbnail Slider: loads images and displays them as a scrollable thumbnail carousel
ToolTip 2007 Pro: provides highly configurable tool tips when the user hovers over designated areas
Numerous additional audio/video, menu, and transition effects components
As a gift to readers of this book, Jumpeye has offered a special coupon code that lets you download its Accordion Panel V3 component free of charge. Read on to see how to cash in, and check out the quick demonstration.
Create a user account on the Jumpeye Components website. Navigate to the Accordion Panel V3 webpage (http://www.JumpeyeComponents.com/Flash-Components/User-Interface/Accordion-Panel-V3-40/). Click the Add to Shopping Cart button.
On the Shopping Cart page, enter this coupon code into the field titled “Enter your discount coupon number here”:
e0a5a7f2573beb2171da4b38f1j13058Click the Check button. This action refreshes the web page to indicate a full discount. Click the Check Out button. Verify your customer information, and then click the Post Your Order button. When the web page refreshes, click the hyperlink that says, “Go to download page.” Download the component.
When the download is complete, unpack the ZIP archive, and then double-click the AccordionPanelV3AS3.mxp file to open it in the Adobe Extension Manager. Follow the steps described for installing Pieter Michels’ WebService component extension earlier in this chapter (see the Recreating a WebServiceConnector Scenario in ActionScript 3.0). Shut down the Flash authoring tool, and then launch it again so that the extension is activated at startup.
Open the accordion_panel.fla file included with the download. Note that a copy of the component already exists on the stage, and has the instance name
accordionPanel.In the Parameters panel, note that the
xmlPathparameter already shows the valueacc_panel.xml. This parameter points to an XML document included with the other sample files from the ZIP archive. Open the XML document to see its contents:<?xml version="1.0" encoding="UTF-8"?> <component name="Accordion Panel v3"> <data childStyle="style1"> <item title="Jumpeye" contentPath="images/img1.jpg"/> <item title="Working" contentPath="images/img2.jpg"/> <item title="Drawing" contentPath="images/img3.jpg"/> <item title="On meeting" contentPath="images/img4.jpg"/> <item title="Having fun" contentPath="images/img5.jpg"/> </data> </component>
These XML nodes give you a straightforward way to let the component know what content to display.
Select Control→Test Movie to verify that clicking on headings displays the corresponding pane.
Delete one of the
<item>nodes in the XML document, and then save the file. In the Flash authoring tool, select Control→Test Movie again to verify that the corresponding pane is no longer present.Note
The full Jumpeye Accordion Panel V3 API is available in the AccordionPanelV3.pdf file included with the ZIP archive.