Chapter 7. Working with Library and Linkage Changes
Like its forerunner, ActionScript 3.0 supports the attachment of
library assets at runtime, but the mechanics have changed. The only class
methods that now contain the word “attach” relate to connecting the SWF file
to an external device, such as NetStream.attachCamera(), which lets the user
transmit webcam input. You don’t find familiar methods like MovieClip.attachMovie() and Sound.attachSound() anywhere, so how can you
access the library now at runtime? The answer’s gratifyingly elegant, and
even in its simple approach, ActionScript 3.0 gives you more elaborate
options than before.
Linkages Now Reference Classes
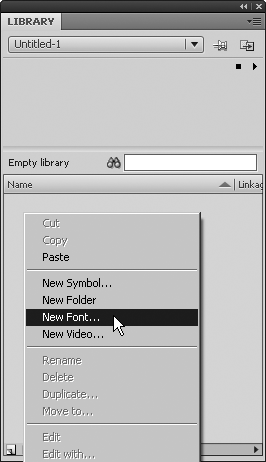
Prior to ActionScript 3.0, you could optionally assign library assets a linkage identifier in the Library panel. This procedure provided a unique label for the chosen asset, so that you could single it out at runtime when needed, and pull it to the stage. Linkage identifiers are still possible in Flash CS4 Professional when a FLA file is configured for an older version of ActionScript. To access an asset’s linkage properties, right-click (Ctrl-click) the asset as shown in Figure 7-1, and then select Properties.
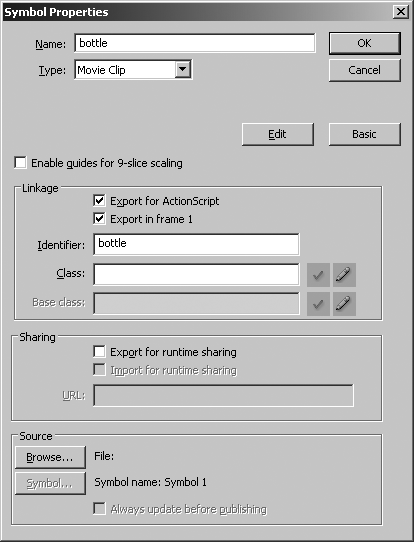
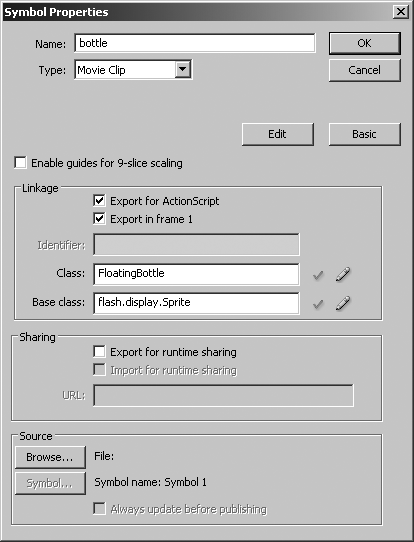
Selecting Properties opens the Symbol Properties dialog box, whose Linkage area is initially the same for documents configured for any version of ActionScript. The Export for ActionScript checkbox is enabled, but nothing else in that area is enabled (Figure 7-2).

The difference arrives when you select that Export for ActionScript checkbox. In ActionScript 2.0 documents, the Identifier field is enabled and automatically populated with the selected asset’s library name (Figure 7-3). The Class field is enabled for optional association with a custom class file—you don’t need this for garden variety attaching—and the Base class field is disabled, because it applies only to ActionScript 3.0. Finally, the Export in first frame checkbox is enabled and automatically selected.
Note
The identifier name is technically unrelated to the asset’s library name, and you can change it to another name, if desired.
ActionScript 2.0 presents numerous ways to attach assets at runtime,
but the variety isn’t always a blessing. Too many choices can make the
syntax hard to remember. The MovieClip
and Sound classes, for example, support
attachMovie() and attachSound() methods, respectively, to attach
movie clips and audio files from the library. Image files, such as JPEGs,
GIFs, and PNGs, require the BitmapData.loadBitmap() method. Fonts are
referenced by linkage identifier in instances of TextFormat or StyleSheet. Oddly, button symbols can’t be
attached unless converted to movie clips.
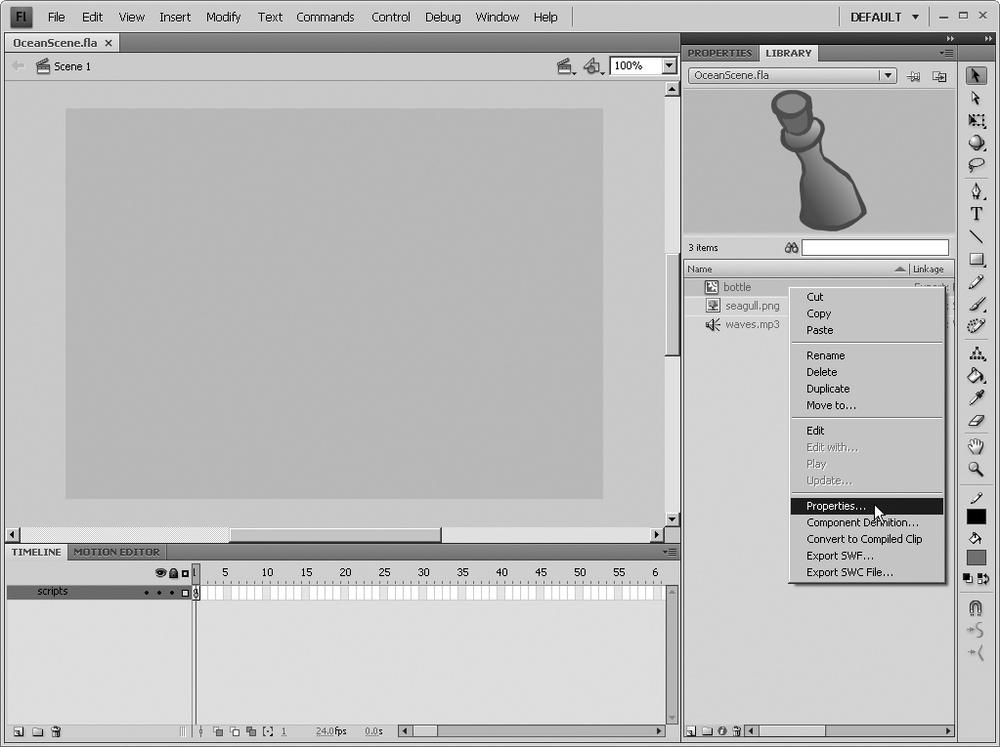
In contrast, ActionScript 3.0 unifies these mechanisms into a single approach, and supports every sort of asset a library can hold, other than graphic symbols. In an ActionScript 3.0 FLA file, checking Export for ActionScript enables a different set of input fields in the Symbol Properties dialog box, as shown in Figure 7-4.
This time, the linkage Identifier field is disabled and the asset’s
name has automatically been supplied for the Class field instead. The Base
class field is enabled and automatically populated with an appropriate
related class (this bottle asset
happens to be a movie clip symbol, and the base class is set to the fully
qualified package flash.display.MovieClip).
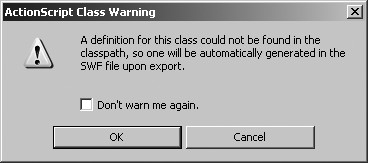
This configuration seems to indicate that ActionScript 3.0 linkage requires a custom class. In truth, it does; but the authoring tool lends a hand by writing this class for you. If you click OK at this point, then you see an alert that tells you as much (Figure 7-5). Select the “Don’t warn me again” checkbox if you prefer not to see this warning every time you supply linkage properties to a library asset. Click OK to acknowledge the alert.
In the FLA file illustrated, the asset in question is a drawing of a
half-submerged bottle, which has been converted to a movie clip symbol.
The library name of this asset is “bottle,” which provides the default
class name. When the SWF file is compiled, a custom bottle class is written on your behalf that
extends MovieClip, which means you can
“attach” the bottle asset by instantiating it and adding it to the display
list. For example, you could declare a variable named asset, strongly type it as bottle, and set it to a new instance of the
bottle class like this:
var asset:bottle = new bottle();
Because the bottle class extends
MovieClip, it supports all the features
defined by that class, including x,
y, width, and height properties. To center this asset, you
could use the following two new lines:
var asset:bottle = new bottle();
asset.x = (stage.stageWidth / 2) − (asset.width / 2);
asset.y = (stage.stageHeight / 2) − (asset.height / 2);

Keep in mind that, like any visual object in ActionScript 3.0, the bottle instance must be added to the display list in order to be seen (shown in bold):
var asset:bottle = new bottle();
asset.x = (stage.stageWidth / 2) − (asset.width / 2);
asset.y = (stage.stageHeight / 2) − (asset.height / 2);
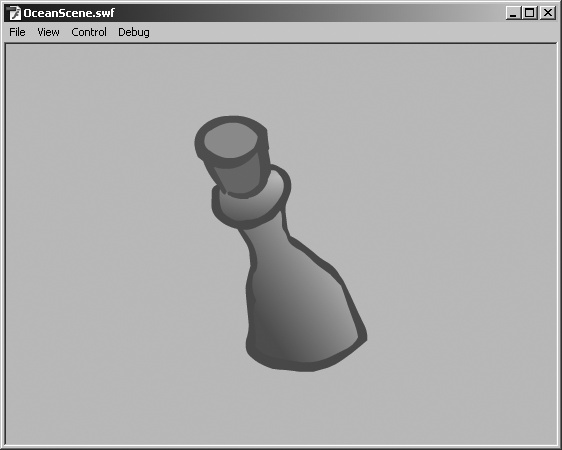
addChild(asset);Now, the SWF file shows the attached movie clip symbol (Figure 7-6).
Naming Classes
By longstanding convention, class names begin with a capital
letter. If the class name is composed of more than one word, this
convention is applied to each word and spaces are removed, which is why,
for example, “movie clip” becomes MovieClip. Though perfectly acceptable from a
technical standpoint, advanced programmers may cringe at a class named
bottle, so to stay consistent with
recommended best practices, you may want to rename your linkage classes
accordingly. In this case, the change would be Bottle, and the instantiation would changes as
follows:
var asset:Bottle = new Bottle();
If your asset’s library name happens to contain spaces—for
example, “floating bottle”—the authoring tool removes those spaces for
you, suggesting floatingbottle as your class name, in
which case the manual change to FloatingBottle not only defers to
convention but also makes the class name easier to read.
In addition to spaces, many other characters are not allowed in
class names. Like variables, class names can’t begin with a number or
any punctuation other than an underscore (_) or dollar sign ($). If your library asset happens to include
invalid characters, you see the warning shown in Figure 7-7 when you click OK in
the Symbol Properties dialog box.

Specifying a Base Class
In most cases, you can stick with the base class supplied automatically for you in the Base class field of the Symbol Properties dialog box. The authoring tool is smart enough to recognize the file format of the associated asset and, for example, suggests the following base classes for various types of assets:
flash.display.MovieClip: movie clip symbolflash.display.SimpleButton: button symbolflash.display.BitmapData: image files (JPEG, GIF, PNG, BMP, TIFF, and so on)flash.media.Sound: audio files (MP3, WAV, AIFF, and so on)flash.text.Font: font filesNote
In the case of images and audio, Flash supports more file formats for importing than it does for the loading of external files.
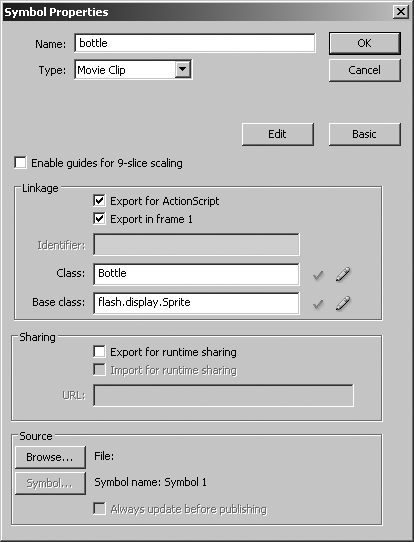
If a movie clip symbol contains only one frame and no nested
multiframe assets, then it effectively meets the criteria of a sprite,
and you may change its base class accordingly (Figure 7-8). By extending the
Sprite class, your asset avoids the
slight memory overhead of the MovieClip class.
Writing a Custom Class
If you like, you can write your own class to provide additional functionality for an attached asset. Custom classes must extend the same base class displayed in the Symbol Properties dialog box.
To make the submerged bottle drift back and forth, for example,
you could write something like the custom FloatingBottle class that follows, which
extends Sprite:
package {
import flash.display.Sprite;
import flash.events.Event;
public class FloatingBottle extends Sprite {
private var _driftCounter:Number;
// constructor
public function FloatingBottle() {
_driftCounter = 0;
addEventListener(Event.ENTER_FRAME, drift);
}
private function drift(evt:Event):void {
_driftCounter += 0.12;
this.x += Math.cos(_driftCounter) * 2;
}
}
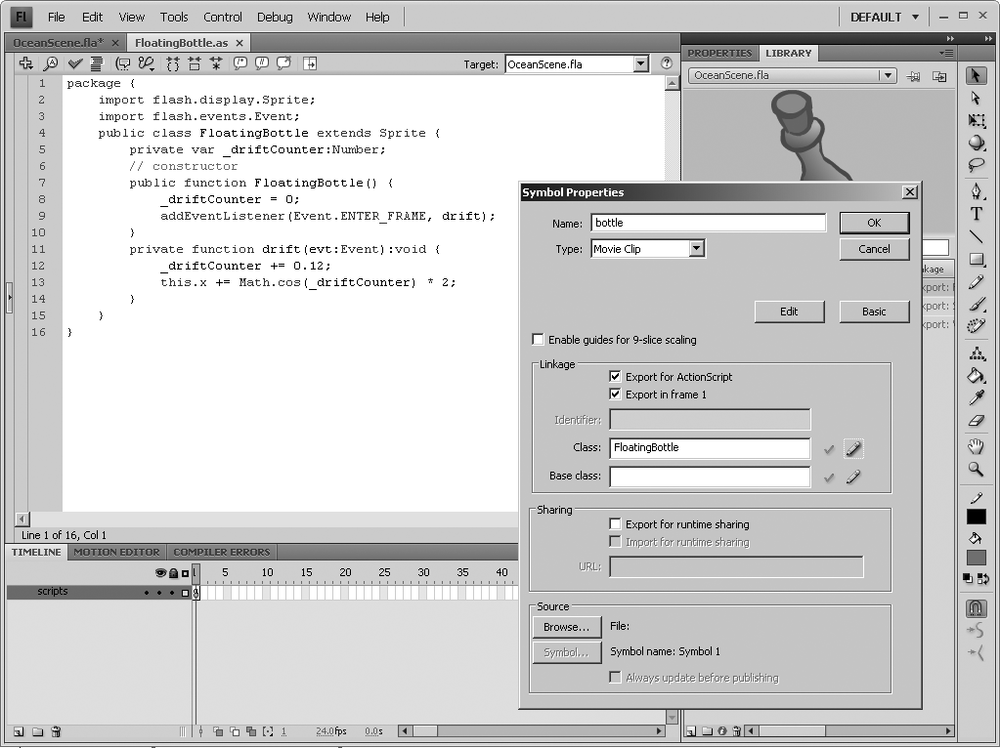
}In this case, the Class field in the Symbol Properties dialog box
must be set to FloatingBottle and the
Base class must be set to flash.display.Sprite, as shown in Figure 7-9.
The actual class file, FloatingBottle.as, must appear in same folder as the FLA file if no package is provided in the Class field. If your class file exists elsewhere, be sure to include its package information in the Symbol Properties dialog box.
Note
For more information on packages, see the section Importing and Packages in Chapter 3 and Figure 5-12 in Chapter 5.
To verify that the custom class is available, in the Symbol Properties dialog box, click the green checkmark button next to the Class field. Doing so gives you a message that tells where the class was found or that one will be automatically generated upon export. The pencil button opens the associated class file in a Script window of the authoring tool (Figure 7-10). No warning is given for custom classes when you click the OK button, because the authoring tool doesn’t have to write a class for you.
The instantiation of assets based on custom classes is no
different from those with automatically generated classes. The following lines attach the same bottle library asset,
positioning it slightly lower than the center of the stage. This time,
the bottle drifts back and forth because a frame loop repeatedly
executes the drift() method of the
FloatingBottle class.
var fb:FloatingBottle = new FloatingBottle();
fb.x = (stage.stageWidth / 2) – (fb.width / 2);
fb.y = ((stage.stageHeight / 2) – (fb.height / 2)) + 50;
addChild(fb);
Recognizing the Associated Class
Because each type of asset represents its own class, instantiation
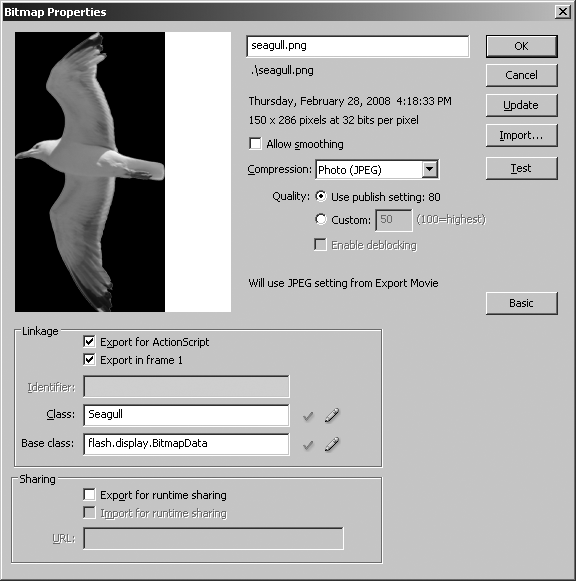
must follow the rules that normally pertain to that class. A seagull photo imported into the library as seagull.png represents the BitmapData class. Assuming a default (automatically written) class is set as
Seagull in the Symbol Properties
dialog box, the asset can be added to the stage in conjunction with the
Bitmap class, as is true of any
BitmapData instance:
var sg:Seagull = new Seagull(150, 286);
var bmp:Bitmap = new Bitmap(sg);
addChild(bmp);
The BitmapData constructor
function requires a width and height, here obtained from the Bitmap
Properties dialog box for this asset. Right-click (Ctrl-click) an asset in the library, and
then select Properties to open this dialog box. Notice, in Figure 7-11, that linkage
properties are also available from this dialog box.
In this case, the bmp variable
points to an instance of the Bitmap
class, which features x and width properties, just like movie clips. To
position the image before adding it to the display list, simply
configure the desired properties (new code in bold).
var sg:Seagull = new Seagull(150, 286);
var bmp:Bitmap = new Bitmap(sg);
bmp.x = stage.stageWidth - bmp.width;
addChild(bmp);
An audio file imported into the library as waves.mp3 represents the Sound class. Assuming a default (automatically written) class is set as
Waves in the Symbol Properties dialog
box, the asset can be instantiated the same as any Sound instance:
var wv:Waves = new Waves();
wv.play();
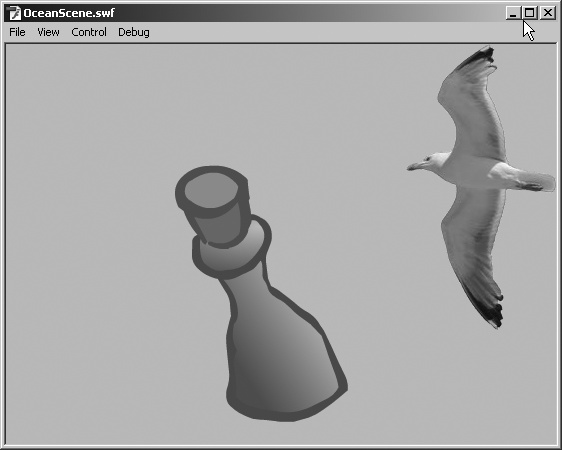
With FloatingBottle, Seagull, and Waves attached to the SWF file at runtime, the
SWF looks like Figure 7-12. (You’ll just have
to trust that the bottle’s drifting, and roaring ocean waves are
audible.)
Attaching Fonts
One of the benefits of designing in Flash, as opposed to
traditional HTML, is that SWF files can embed fonts. While you don’t
need ActionScript to use embedded fonts, you can certainly instantiate
text fields dynamically and format them with instances of the TextFormat or StyleSheet classes, which, in turn, can
reference fonts stored in the library.
To embed a font and make it available to ActionScript 3.0, use the following steps:
Create a new FLA file, and, inside the Library panel, right-click (Ctrl-click), and then select New Font, as shown in Figure 7-13. You can also make this selection from the panel menu in the upper right (just below the
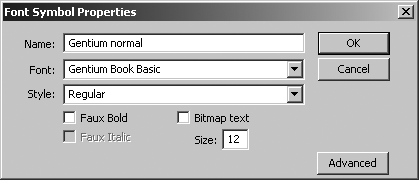
Xthat closes the panel).This opens a Font Symbol Properties dialog box (Figure 7-14) that lets you select an installed font and give it a name. The name you give can differ from the font’s actual name; in fact, because different versions of the font (bold, italic, and so on) must be included as separate assets, you may find it useful to provide a name that indicates the style used. The content of the Name field becomes the asset’s library name. If you click the Advanced button, you can already assign linkage information in this step; otherwise, proceed to Step 2.
Note
When including font variants, make sure to select the desired variant in the Style drop-down. Faux variants are often available—such as Faux Bold, shown—when the actual variant is not installed on the computer that publishes the SWF file. Bitmap text refers to bitmapped fonts, which are not composed of vector shapes. Most fonts are vector-based, and as such scale cleanly. By choosing Bitmap text, you rasterize vector font outlines, which means they do not scale cleanly. The Size field pertains only to bitmapped fonts, so it makes no difference what value it reads for vector fonts.
Once imported, the font appears in the library with a representative “A” icon. Right-click (Ctrl-click) the asset, and then choose Properties, just as when assigning linkage to any other asset. In the Font Symbol Properties dialog box, click the Advanced button if necessary. Select Export for ActionScript, and then provide a meaningful class name, such as
GentiumNormal, as shown in Figure 7-15. Verify that the base class isflash.text.Font. Click OK to exit the dialog box. Embedding is complete!Select frame 1 in the main timeline, and then type the following ActionScript into the Actions panel:
var gentium:GentiumNormal = new GentiumNormal();

var fmt:TextFormat = new TextFormat();
fmt.font = gentium.fontName;
fmt.size = 32;
An arbitrarily named variable,
gentium, is declared and set to an instance of theGentiumNormalclass defined in the Font Symbol Properties dialog box in Step 2. Remember, this linkage class extendsFont, so thegentiumobject supports all the functionality defined by theFontclass. Next, another variable,fmt, is set to an instance of theTextFormatclass. The operative line is where thefontproperty of theTextFormatinstance (fmt) is set to thefontNameproperty of thegentiuminstance.To use this formatting object with text field, add the following code after the existing ActionScript:
var myTextField:TextField =  new TextField();
myTextField.autoSize = "left";
myTextField.embedFonts = true;
myTextField.defaultTextFormat = fmt;
myTextField.text = "Lorem ipsum dolor sit amet."
addChild(myTextField);
A third variable,
myTextField, is declared and set to an instance of theTextFieldclass. The operative lines show theembedFontsproperty set totrueand thedefaultTextFormatproperty set to theTextFormatinstance (fmt) created in Step 3. TheTextFieldclass also supports asetTextFormat()method to format text already displayed in a text field, but thedefaultTextFormatproperty sets the default formatting. ThesetTextFormat()method works like this:regularText.text = "Lorem ipsum dolor sit amet." regularText.setTextFormat(fmt);
and can be constrained to individual characters with additional parameters.
Note
Gentium is an elegant, effectively open source typeface designed by Victor Gaultney and freely released under the SIL Open Font License (http://scripts.sil.org/OFL). Files for Windows, Mac, and Linux are available for download at http://scripts.sil.org/Gentium_download and http://scripts.sil.org/Gentium_basic.
Alternatively, you can format text using Cascading Style Sheets (CSS) markup, either stored in an external CSS file or defined directly in ActionScript. Add the following new lines after the existing code:
var css:StyleSheet = new StyleSheet();
css.setStyle("p", {fontFamily:gentium.fontName, fontSize:32});
css.setStyle("a", {textDecoration:"underline"});
Here, an arbitrarily named variable,
css, is declared and set to an instance of theStyleSheetclass. In the next two lines, theStyleSheet.setStyle()method is invoked oncssto declare two new styles: apelement selector, which affects all<p>HTML elements, and anaelement selector, which affects all<a>HTML elements. (The HTML in this example refers to a text field, rather than the HTML document that would theoretically embed this SWF file.)The
setStyle()method accepts two parameters: a string representing the element to stylize, and an object to define the style’s properties. In this case, the object is declared with curly braces ({}) as a shortcut to bypass the expressionnew Object(). ThefontFamilyproperty is set togentium.fontName, just as theTextFormat.fontproperty was set in Step 3.Note
The
StyleSheetclass is especially useful for formatting hyperlinks, but it supports only a small subset of the actual CSS specification, just as Flash text fields support only a small subset of the HTML specification. See theStyleSheetclass entry in the ActionScript 3.0 Language and Components Reference for full details.Here’s a second text field to illustrate use of the
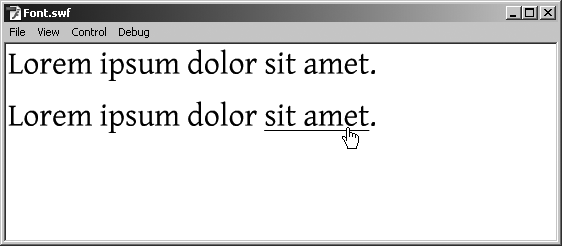
StyleSheetinstance. Add the following code after the existing ActionScript:var webText:TextField = new TextField(); webText.autoSize = "left"; webText.embedFonts = true; webText.styleSheet = css; webText.htmlText = "<p>Lorem ipsum dolor ¬ <a href='http://www.oreilly.com/'>sit amet</a>.</p>"; webText.y = 52; addChild(webText);This time, the text field’s
styleSheetproperty is set to thecssinstance created in Step 5, and itshtmlTextproperty is set to an HTML-formatted string, including<p>and<a>elements.Select Control→Test Movie to see both text fields display a message with the embedded Gentium font (Figure 7-16).