
Chapter 5
Networking and Communicating
Your iPad connects to the Internet through wireless networks and Wi-Fi hotspots; if it has cellular capability, it can connect through the cellular network as well. The iPad also has Bluetooth connectivity for connecting headsets and other devices. Once connected to the Internet, you can send instant messages, share your news on Twitter, post updates to Facebook, and make video calls with FaceTime.
Control Wi-Fi, Bluetooth, and Cellular Access
Connect Bluetooth Devices to Your iPad
Control Cellular Data and Background Refresh
Connect Your iPad to a Different Carrier
Connect Your iPad to a Different Access Point
Share Your iPad’s Internet Access
Mute a Conversation or Share Your Location
Share Your Updates Using Twitter
Chat Face-to-Face Using FaceTime
Control Wi-Fi, Bluetooth, and Cellular Access
Normally, you will want to keep your iPad connected to the Internet so that you can send and receive messages and browse the web. But when you do not need or may not use the cellular network or Wi-Fi, you can turn on the Airplane Mode feature to cut off all connections.
Turning on Airplane Mode turns off Wi-Fi and Bluetooth connections as well. But you can also turn Wi-Fi and Bluetooth on and off separately when you need to.
Control Wi-Fi, Bluetooth, and Cellular Access
![]() Press the Home button.
Press the Home button.
The Home screen appears.
![]() Tap Settings.
Tap Settings.
The Settings screen appears.

![]() To turn Airplane Mode on, set the Airplane Mode switch to On (
To turn Airplane Mode on, set the Airplane Mode switch to On (![]() ).
).
Note: When your iPad has a wireless network connection, it uses that connection instead of the cellular connection. This helps keep down your cellular network usage and often provides a faster connection.
A The iPad turns off all cellular, Wi-Fi, and Bluetooth connections. An airplane icon (![]() ) appears in the status bar.
) appears in the status bar.
![]() To turn on Wi-Fi, tap Wi-Fi.
To turn on Wi-Fi, tap Wi-Fi.
The Wi-Fi screen appears.
![]() Set the Wi-Fi switch to On (
Set the Wi-Fi switch to On (![]() ).
).

B The list of available networks appears in the Choose a Network section.
C If your iPad detects a known network, it connects automatically, and the network moves out of the Choose a Network list up to below the Wi-Fi switch. If not, you can connect to a network manually as described in the section “Connect to Wi-Fi Networks,” later in this chapter.
![]() Tap Bluetooth.
Tap Bluetooth.
The Bluetooth screen appears.

![]() Set the Bluetooth switch to On (
Set the Bluetooth switch to On (![]() ) if you need to use Bluetooth devices while Airplane Mode is on.
) if you need to use Bluetooth devices while Airplane Mode is on.
Connect Bluetooth Devices to Your iPad
To extend the functionality of your iPad, you can connect devices to it that communicate using the wireless Bluetooth technology.
For example, you can connect a Bluetooth keyboard so that you can quickly type e-mail messages, notes, or documents. Or you can connect a Bluetooth headset so that you can listen to music and make and take FaceTime calls. If you connect a Bluetooth headset or headphones, you need to tell the iPad which audio device to use.
Connect Bluetooth Devices to Your iPad
Set Up a Bluetooth Device
![]() Press the Home button.
Press the Home button.
![]() Tap Settings.
Tap Settings.

![]() Tap Bluetooth.
Tap Bluetooth.
The Bluetooth screen appears.
![]() Set the Bluetooth switch to On (
Set the Bluetooth switch to On (![]() ).
).
![]() Turn on the Bluetooth device and make it discoverable.
Turn on the Bluetooth device and make it discoverable.
Note: Read the Bluetooth device’s instructions to find out how to make the device discoverable via Bluetooth.
A The My Devices list shows devices you have already paired with your iPad.
B The Other Devices list shows unpaired devices.
![]() Tap the device’s button.
Tap the device’s button.
Your iPad attempts to pair with the device.

![]() If the Bluetooth Pairing Request dialog opens, type the code to confirm the pairing request.
If the Bluetooth Pairing Request dialog opens, type the code to confirm the pairing request.
The iPad pairs with the device and then connects to it.

C The device appears in the My Devices list.
D The Connected readout indicates that the device is connected.
Choose the Device for Playing Audio
![]() Tap and swipe up from the bottom of the screen.
Tap and swipe up from the bottom of the screen.
Control Center opens.
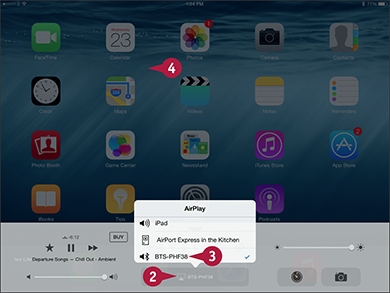
![]() Tap AirPlay (
Tap AirPlay (![]() ).
).
The AirPlay dialog appears.
![]() Tap the AirPlay device you want to use.
Tap the AirPlay device you want to use.
![]() Tap the screen above Control Center.
Tap the screen above Control Center.
Control Center closes.
TIP
How do I stop using a Bluetooth device?
When you no longer need to use a particular Bluetooth device, tell your iPad to forget it. Press the Home button, tap Settings, and then tap Bluetooth. On the Bluetooth screen, tap the device’s info button (![]() ). On the device’s screen, tap Forget this Device, and then tap Forget Device in the confirmation dialog.
). On the device’s screen, tap Forget this Device, and then tap Forget Device in the confirmation dialog.
Control Cellular Data and Background Refresh
If you have a cellular iPad, you can monitor and control its use of cellular data using the Cellular screen in the Settings app. You can also turn on and off the Data Roaming feature, which enables you to access the Internet using other carriers’ networks, usually at extra cost.
You can also use the Background App Refresh feature to control which apps refresh their content via Wi-Fi or cellular connections when running in the background rather than as the foreground app.
Control Cellular Data and Background Refresh
![]() Press the Home button.
Press the Home button.
The Home screen appears.
![]() Tap Settings.
Tap Settings.
The Settings screen appears.
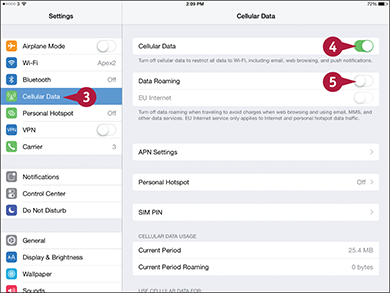
![]() Tap Cellular Data.
Tap Cellular Data.
The Cellular Data screen appears.
![]() If you need to turn cellular data off altogether, set the Cellular Data switch to Off (
If you need to turn cellular data off altogether, set the Cellular Data switch to Off (![]() ). Normally, you will want to leave this switch set to On (
). Normally, you will want to leave this switch set to On (![]() ).
).
![]() Set the Data Roaming switch to On (
Set the Data Roaming switch to On (![]() ) if you need to use data roaming.
) if you need to use data roaming.
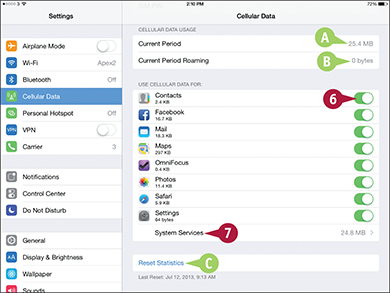
A The Current Period readout shows how much cellular data your iPad has used on your regular carrier.
B The Current Period Roaming readout shows data roaming usage.
C You can tap Reset Statistics to reset your usage statistics.
![]() In the Use Cellular Data For area of the Cellular screen, set each app’s switch to On (
In the Use Cellular Data For area of the Cellular screen, set each app’s switch to On (![]() ) or Off (
) or Off (![]() ), as needed.
), as needed.
![]() Tap System Services.
Tap System Services.
The System Services Screen appears.
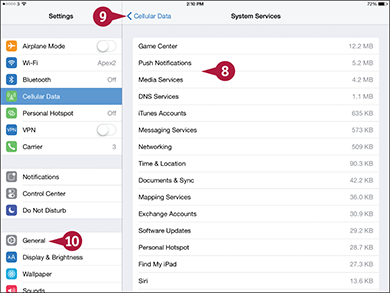
![]() Browse the list to identify any services that use cellular data heavily.
Browse the list to identify any services that use cellular data heavily.
![]() Tap Cellular Data.
Tap Cellular Data.
The Cellular Data screen appears.
![]() Tap General.
Tap General.
The General screen appears.
![]() Tap Background App Refresh.
Tap Background App Refresh.
The Background App Refresh screen appears.

![]() Set the Background App Refresh switch to On (
Set the Background App Refresh switch to On (![]() ) or Off (
) or Off (![]() ), as needed.
), as needed.
![]() Set each individual app switch to On (
Set each individual app switch to On (![]() ) or Off (
) or Off (![]() ), as needed.
), as needed.
![]() Tap General.
Tap General.
The General screen appears.
Connect Your iPad to a Different Carrier
The SIM card in your cellular iPad makes it connect automatically to a particular carrier’s network, such as the AT&T network. When you go outside your carrier’s network, you can connect manually to a different carrier’s network by using the Carrier screen in the Settings app. For example, if you travel to the UK, you can connect to carriers such as O2, Vodafone, EE, or 3.
To connect to a different carrier’s network, you may need to set up an account with that carrier or pay extra charges to your standard carrier.
Connect Your iPad to a Different Carrier
The Home screen appears.
![]() Tap Settings.
Tap Settings.
The Settings screen appears.

![]() Tap Carrier.
Tap Carrier.
The Network Selection screen appears.
![]() Set the Automatic switch to Off (
Set the Automatic switch to Off (![]() ).
).
The list of available carriers appears.

![]() Tap the carrier you want to use.
Tap the carrier you want to use.
A A check mark appears next to the carrier.
Note: When you want to switch back to your regular carrier, set the Automatic switch on the Network Selection screen to On (![]() ).
).
Connect Your iPad to a Different Access Point
Normally, your cellular iPad connects automatically to a suitable access point for its network carrier. But under some circumstances you may need to specify which access point to use. This is a specialized and relatively unusual move you perform from the APN Settings screen in the Settings app. APN, short for Access Point Name, is the name of a particular gateway between a cellular network and the Internet.
Connect Your iPad to a Different Access Point
![]() Press the Home button.
Press the Home button.
The Home screen appears.
![]() Tap Settings.
Tap Settings.
The Settings screen appears.

![]() Tap Cellular Data.
Tap Cellular Data.
The Cellular Data screen appears.
![]() Tap APN Settings.
Tap APN Settings.
The APN Settings screen appears.

![]() Type the name of the APN.
Type the name of the APN.
![]() Type the username if you need to provide one.
Type the username if you need to provide one.
![]() Type the password if applicable.
Type the password if applicable.
A You can tap Reset Settings to reset the cellular settings on your iPad to their defaults.
![]() Tap Cellular Data.
Tap Cellular Data.
The Cellular Data screen appears.
Share Items via AirDrop
AirDrop is a technology for sharing files swiftly and easily with iOS devices and Macs near your iPad. AirDrop uses Wi-Fi or Bluetooth to transfer files wirelessly without the iOS devices having to be on the same wireless network. For example, you can use AirDrop to share a photo, a contact record, or an item from Passbook. You can use AirDrop in any app that displays a Share button (![]() ).
).
You can turn AirDrop on when you need it and off when you do not. When AirDrop is on, you can choose between accepting items only from your contacts or from everyone.
Share Items via AirDrop
Turn AirDrop On or Off
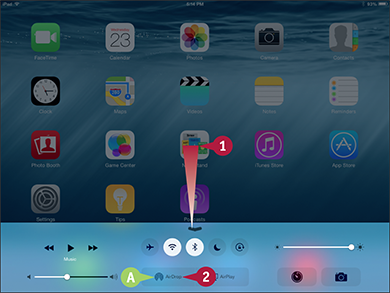
![]() Swipe up from the bottom of the screen.
Swipe up from the bottom of the screen.
Control Center opens.
A The readout shows the AirDrop status: AirDrop, indicating the feature is off; AirDrop: Contacts Only; or AirDrop, Everyone.
![]() Tap AirDrop.
Tap AirDrop.

![]() Tap Off, Contacts Only, or Everyone, as needed.
Tap Off, Contacts Only, or Everyone, as needed.
The AirDrop dialog closes.
The AirDrop readout shows the AirDrop setting you chose.
![]() Tap the screen above Control Center.
Tap the screen above Control Center.
Control Center closes.
Share an Item via AirDrop
![]() Open the app that contains the item. For example, tap Photos on the Home screen.
Open the app that contains the item. For example, tap Photos on the Home screen.
![]() Navigate to the item you want to share. For example, tap a photo to open it.
Navigate to the item you want to share. For example, tap a photo to open it.

![]() Tap Share (
Tap Share (![]() ).
).
The Share sheet appears.

B In some apps, you can select other items to share at the same time. For example, in Photos, you can select other photos.
![]() In the AirDrop area, tap the device to which you want to send the item.
In the AirDrop area, tap the device to which you want to send the item.
Note: AirDrop works on Macs running OS X version 10.10, which is called Yosemite; and the iPad mini, the fourth-generation iPad, the iPhone 5, and the fifth-generation iPod touch and later versions. Earlier iOS devices do not have the wireless hardware needed for AirDrop.
Share Your iPad’s Internet Access
Your cellular iPad can not only access the Internet from anywhere it has a suitable connection to the cell network, but it can also share that Internet access with your computer or other devices. This feature is called Personal Hotspot. For you to use Personal Hotspot, your iPad’s carrier must permit you to use it. Some carriers simply charge the Personal Hotspot data as part of the iPad allowance, but others charge an extra fee per month for using the feature.
Share Your iPad’s Internet Access
Set Up Personal Hotspot
![]() Press the Home button.
Press the Home button.
The Home screen appears.
![]() Tap Settings.
Tap Settings.
The Settings screen appears.

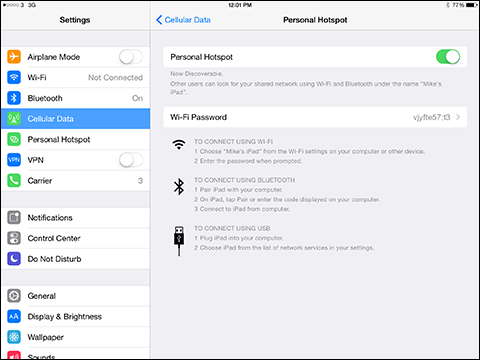
![]() Tap Personal Hotspot.
Tap Personal Hotspot.
The Personal Hotspot screen appears.
![]() Tap Wi-Fi Password.
Tap Wi-Fi Password.
The Wi-Fi Password screen appears.

![]() Tap
Tap ![]() to clear the default password.
to clear the default password.
![]() Type the password you want to use.
Type the password you want to use.
Note: You can connect up to five computers or other devices, such as an iPod touch, to the Internet by using Personal Hotspot on your iPad. Because the devices share the connection, the more devices transferring data, the slower each device’s data rate will be.
The Personal Hotspot screen appears again.
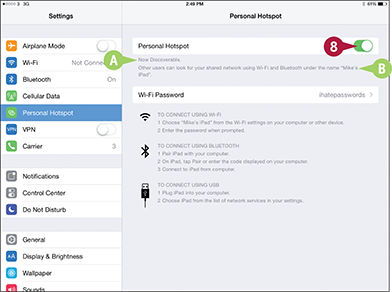
![]() Set the Personal Hotspot switch to On (
Set the Personal Hotspot switch to On (![]() ).
).
A The Now Discoverable readout appears.
B The wireless network’s name appears for reference.
![]() Connect your computer or device to Personal Hotspot. See the tip for details.
Connect your computer or device to Personal Hotspot. See the tip for details.
Stop Using Personal Hotspot

C When Personal Hotspot is active, the Personal Hotspot blue bar appears across the top of the screen, showing the number of connections.
![]() Press the Home button.
Press the Home button.
The Home screen appears.
The Settings screen appears.
![]() Tap Personal Hotspot.
Tap Personal Hotspot.
The Personal Hotspot screen appears.
![]() Set the Personal Hotspot switch to Off (
Set the Personal Hotspot switch to Off (![]() ).
).
TIP
How do I connect my Mac or PC to Personal Hotspot?
The simplest way is to join the Personal Hotspot Wi-Fi network as you would any other wireless network. Alternatively, connect your Mac or PC to your iPad via the USB cable. On a Mac, ![]() +click System Preferences in the Dock and click Network. In the Network Preferences pane, click iPad USB and then click Apply. In Windows, if the Set Network Location dialog opens, click Home Network and then click Close.
+click System Preferences in the Dock and click Network. In the Network Preferences pane, click iPad USB and then click Apply. In Windows, if the Set Network Location dialog opens, click Home Network and then click Close.
Connect to Wi-Fi Networks
A cellular iPad can connect to the Internet either via the cell phone network or via a Wi-Fi network. To conserve your data allowance, use a Wi-Fi network instead of the cell phone network whenever you can. A Wi-Fi–only iPad always uses Wi-Fi for connecting to the Internet.
The first time you connect to a Wi-Fi network, you must provide the network’s password. After that, the iPad stores the password, so you can connect to the network without typing the password again.
Connect to Wi-Fi Networks
Connect to a Network Listed on the Wi-Fi Screen
![]() Press the Home button.
Press the Home button.
![]() Tap Settings.
Tap Settings.

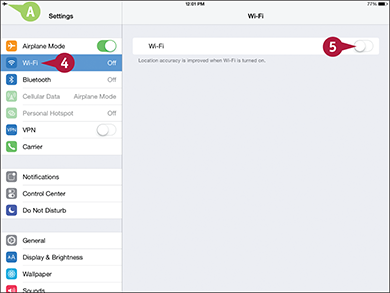
![]() Tap Wi-Fi.
Tap Wi-Fi.
The Wi-Fi screen appears.
![]() Set the Wi-Fi switch to On (
Set the Wi-Fi switch to On (![]() ).
).
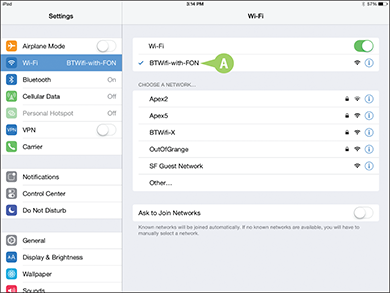
The Choose a Network list appears.
A A lock icon (![]() ) indicates the network uses security, such as a password.
) indicates the network uses security, such as a password.
![]() Tap the network you want to connect to.
Tap the network you want to connect to.
Note: If the network does not have a password, your iPad connects to it without prompting you for a password.
The Enter Password dialog appears.
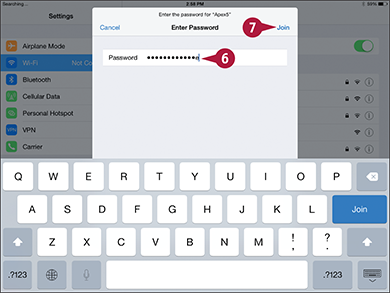
![]() Type the password.
Type the password.
Note: The Join button turns blue when you have entered enough characters for a Wi-Fi password. Until then, the Join button is unavailable.
![]() Tap Join, and your iPad connects to the wireless network.
Tap Join, and your iPad connects to the wireless network.

B The Wi-Fi network your iPad has connected to appears at the top of the screen with a check mark to its left.
C The Wi-Fi signal icon (![]() ) in the status bar and on the Wi-Fi screen shows the strength of the Wi-Fi signal. The more bars that appear, the stronger the signal is.
) in the status bar and on the Wi-Fi screen shows the strength of the Wi-Fi signal. The more bars that appear, the stronger the signal is.
Connect to a Network Not Listed on the Wi-Fi Screen
Note: A wireless network configured not to broadcast its network name does not appear on the Wi-Fi screen.
![]() Press the Home button.
Press the Home button.
![]() Tap Settings.
Tap Settings.
![]() Tap Wi-Fi.
Tap Wi-Fi.
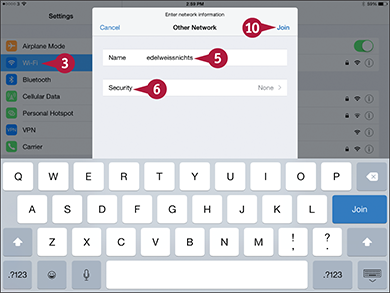
![]() Tap Other.
Tap Other.
![]() In the Other Network dialog, type the network name.
In the Other Network dialog, type the network name.
![]() Tap Security.
Tap Security.
![]() Tap the security type — for example, WPA2.
Tap the security type — for example, WPA2.
![]() Tap Other Network.
Tap Other Network.
![]() Type the password in the Password field.
Type the password in the Password field.
TIPS
What does the Ask to Join Networks switch control?
Your iPad automatically connects to networks it has connected to before. Set the Ask to Join Networks switch to On (![]() ) if you want your iPad to prompt you when wireless networks are available that your iPad has never used.
) if you want your iPad to prompt you when wireless networks are available that your iPad has never used.
How do I stop using a particular wireless network?
Tap ![]() to the right of the network’s name on the Wi-Fi screen. On the network’s screen, tap Forget this Network. In the dialog that opens, tap Forget.
to the right of the network’s name on the Wi-Fi screen. On the network’s screen, tap Forget this Network. In the dialog that opens, tap Forget.
Log In to Wi-Fi Hotspots
When you are in town or on the road, you can log in to Wi-Fi hotspots to enjoy fast Internet access.
You can find Wi-Fi hotspots at many locations, including coffee shops and restaurants, hotels, and airports. Some municipal areas, and even some parks and highway rest stops, also provide public Wi-Fi. Some Wi-Fi hotspots charge for access, whereas others are free to use.
Log In to Wi-Fi Hotspots
The Home screen appears.
![]() Tap Settings.
Tap Settings.
The Settings screen appears.

![]() Tap Wi-Fi.
Tap Wi-Fi.
The Wi-Fi screen appears.
![]() If Wi-Fi is off, set the Wi-Fi switch to On (
If Wi-Fi is off, set the Wi-Fi switch to On (![]() ).
).
The list of wireless networks appears.
![]() Tap the Wi-Fi hotspot you want to join.
Tap the Wi-Fi hotspot you want to join.
The iPad joins the hotspot.
A The Wi-Fi network your iPad has connected to appears at the top of the screen with a check mark to its left.
![]() Press the Home button.
Press the Home button.
The Home screen appears.

![]() Tap Safari.
Tap Safari.
Safari opens.
The login screen for the Wi-Fi hotspot appears.

![]() Type your login details.
Type your login details.
After connecting to the hotspot, you can use the Internet. For example, you can browse the web using Safari or send and receive e-mail using the Mail app.
Connect to a Network via VPN
If you use your iPad for work, you may need to connect it to your work network. By using the settings, username, and password that the network’s administrator provides, you can connect via virtual private networking, or VPN, across the Internet. You can also use VPN to connect to your home network if you set up a VPN server on it.
VPN uses encryption to create a secure connection across the Internet. By using VPN, you can connect securely from anywhere you have an Internet connection.
Connect to a Network via VPN
Set Up the VPN Connection on the iPad
![]() Press the Home button.
Press the Home button.
The Home screen appears.
![]() Tap Settings.
Tap Settings.
The Settings screen appears.

![]() Tap General.
Tap General.
The General screen appears.
![]() Tap VPN.
Tap VPN.
The VPN screen appears.

Note: If your iPad already has a VPN you want to use, tap it, and then go to Step 1 of the next set of steps, “Connect to the VPN.”

![]() On the Add Configuration screen, tap the tab for the VPN type: L2TP, PPTP, or IPSec.
On the Add Configuration screen, tap the tab for the VPN type: L2TP, PPTP, or IPSec.
![]() Fill in the details of the VPN.
Fill in the details of the VPN.
![]() Set the Send All Traffic switch to On (
Set the Send All Traffic switch to On (![]() ) if you want all your Internet traffic to go via the VPN.
) if you want all your Internet traffic to go via the VPN.
![]() Tap Save.
Tap Save.
Connect to the VPN

![]() On the VPN screen, set the VPN switch to On (
On the VPN screen, set the VPN switch to On (![]() ).
).
The iPad connects to the VPN.
A The Status readout shows Connected. You can tap ![]() to display the VPN’s screen, which contains more details.
to display the VPN’s screen, which contains more details.
B The VPN indicator appears in the status bar.
![]() Work across the network connection as if you were connected directly to the network.
Work across the network connection as if you were connected directly to the network.
![]() When you are ready to disconnect from the VPN, set the VPN switch on the VPN screen to Off (
When you are ready to disconnect from the VPN, set the VPN switch on the VPN screen to Off (![]() ).
).
C You can turn the VPN on and off by using the VPN switch in the left column.
Send Instant Messages
When you need to communicate quickly with another person, but do not need to speak to him, you can send an instant message using the Messages app.
The Messages app runs on the iPad, the iPhone, and the iPod touch; and on the Mac running OS X version 10.10, called Yosemite; OS X version 10.9, called Mavericks; or version 10.8, called Mountain Lion. You can use Messages to send instant messages to other users of Messages on these devices. You can send either straightforward text messages or messages that include photos or videos.
Send Instant Messages
![]() Press the Home button.
Press the Home button.
![]() Tap Messages.
Tap Messages.
The Messages screen appears.

![]() Tap New Message (
Tap New Message (![]() ).
).
The New Message screen appears.
![]() Tap
Tap ![]() .
.
The Contacts dialog opens.
![]() Tap the appropriate contact.
Tap the appropriate contact.
Note: If the contact’s record contains multiple phone numbers or addresses, Messages displays the Info pane. Tap the number or address you want to use.
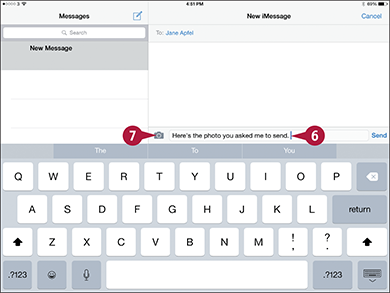
![]() Tap in the text field, and then type your message.
Tap in the text field, and then type your message.
![]() To add a photo, tap
To add a photo, tap ![]() .
.
![]() In the dialog that opens, tap Photo Library. In this dialog, you can tap Take Photo or Video to take a photo or video with the camera (see Chapter 11), and then send it with the message.
In the dialog that opens, tap Photo Library. In this dialog, you can tap Take Photo or Video to take a photo or video with the camera (see Chapter 11), and then send it with the message.
The Photos dialog opens.
![]() Tap the album that contains the photo.
Tap the album that contains the photo.
The album opens.
![]() Tap the photo.
Tap the photo.
The photo opens in the Choose Photo dialog.

![]() Tap Use.
Tap Use.
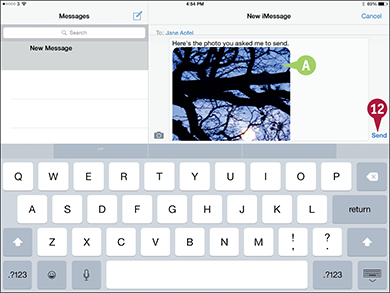
A The photo appears in the message.
Note: You can attach another photo or video by repeating Steps 7 to 11.
![]() Tap Send.
Tap Send.
TIP
Is there another way to send a photo or video?
Yes. You can start from the Camera app or the Photos app. This way of sending a photo or video is handy when you are taking photos or videos or when you are browsing your photos or videos. Tap the photo or video you want to share, and then tap Share (![]() ). On the Share sheet, tap Message. Your iPad starts a message containing the photo or video in Messages. You can then address and send the message.
). On the Share sheet, tap Message. Your iPad starts a message containing the photo or video in Messages. You can then address and send the message.
Mute a Conversation or Share Your Location
When using Messages, you may need to mute a conversation temporarily so that it does not interrupt you while you do other things. You can do this by displaying the Details screen for the conversation and setting the Do Not Disturb switch to On.
From the Details screen for a conversation, you can also share your current location by sending an embedded link for the Maps app, enabling the recipient to see exactly where you are. You can also share your location for a specific length of time with all your contacts.
Mute a Conversation or Share Your Location
Open Messages and Display the Details Screen for the Conversation
![]() Press the Home button.
Press the Home button.
![]() Tap Messages.
Tap Messages.
The Messages screen appears.

![]() Tap the conversation you want to view.
Tap the conversation you want to view.
The conversation appears.
![]() Tap Details.
Tap Details.
Turn On Do Not Disturb for the Conversation
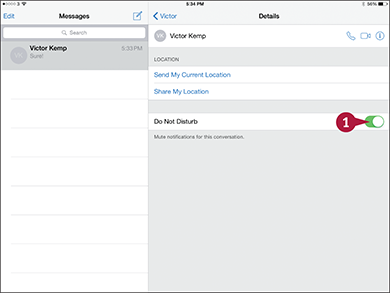
![]() On the Details screen, set the Do Not Disturb switch to On (
On the Details screen, set the Do Not Disturb switch to On (![]() ).
).
Note: After you turn on Do Not Disturb for a conversation, your iPad does not display notifications for this conversation.
Share Your Location
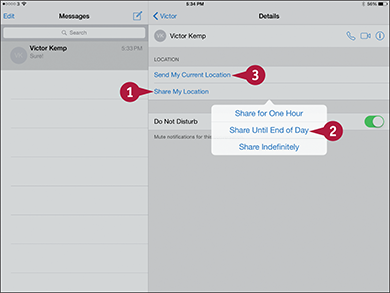
![]() On the Details screen, tap Share My Location.
On the Details screen, tap Share My Location.
A dialog opens.
![]() Tap Share for One Hour, Share Until End of Day, or Share Indefinitely, as needed.
Tap Share for One Hour, Share Until End of Day, or Share Indefinitely, as needed.
Your friends can now track your location through Messages for the period of time you chose.
![]() Tap Send My Current Location.
Tap Send My Current Location.
Message displays a preview of a map showing your current location.
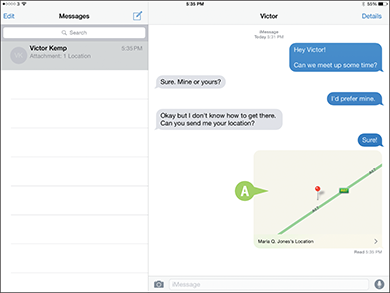
A You can tap the preview to view it full screen.
Messages sends the location to your contact.
Manage Your Instant Messages
Messages is great for communicating quickly and frequently with your nearest and dearest, as well as your colleagues — so it may not take long before the interface is so full of messages that it becomes hard to navigate.
To keep your messages under control, you can forward messages to others and delete messages you do not need to keep. You can either delete messages from a conversation, leaving the conversation’s other messages, or delete the entire conversation.
Manage Your Instant Messages
Forward or Delete One or More Messages from a Conversation
![]() Press the Home button.
Press the Home button.
![]() Tap Messages.
Tap Messages.

![]() In the Messages column of the Messages screen, tap the appropriate conversation.
In the Messages column of the Messages screen, tap the appropriate conversation.
![]() Tap and hold the first of the messages you want to forward or delete.
Tap and hold the first of the messages you want to forward or delete.
![]() Tap More.
Tap More.
A column of selection buttons (![]() ) appears to the left of each message.
) appears to the left of each message.

![]() Tap (
Tap (![]() changes to
changes to ![]() ) for each message you want to affect.
) for each message you want to affect.
![]() Tap Forward (
Tap Forward (![]() ).
).
Messages starts a new message containing the forwarded messages.
A Instead of forwarding the messages, you can tap Delete (![]() ) to delete them from the conversation.
) to delete them from the conversation.
B You can tap Delete All to delete all the messages.
![]() Address the message and tap Send to send it.
Address the message and tap Send to send it.
Delete a Conversation
![]() Press the Home button.
Press the Home button.
The Home screen appears.
![]() Tap Messages.
Tap Messages.
The Messages screen appears.
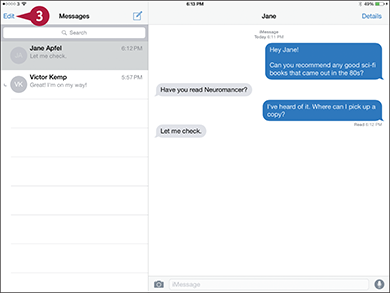
![]() Tap Edit.
Tap Edit.
The Messages column switches to Edit mode.

![]() Tap
Tap ![]() for the conversation you want to delete (
for the conversation you want to delete (![]() changes to
changes to ![]() ).
).
The Delete button appears.
![]() Tap Delete.
Tap Delete.
Messages deletes the conversation and turns off Edit mode.
Note: You can also delete a conversation by tapping it in the conversation list, swiping to the left, and then tapping Delete.
Share Your Updates Using Twitter
The apps on your iPad are fully integrated with Twitter, the online microblogging service. If you need to send a short textual tweet, you can use the Twitter app. If you need to send a photo, you can start from the Photos app and create a tweet in moments.
When tweeting, you can choose to add your location to the tweet. Adding the location can help your followers understand and appreciate your posts, but it also raises privacy concerns — for example, concerns about stalking.
Share Your Updates Using Twitter
Send a Text Tweet
![]() Press the Home button.
Press the Home button.
The Home screen appears.
Note: If Twitter does not appear, tap Settings, tap Twitter, and then tap Install.
The Twitter app opens.

![]() Tap
Tap ![]() .
.
The New Tweet screen appears.

![]() Type the text of the tweet.
Type the text of the tweet.
Note: You can also tap the microphone icon (![]() ) to activate Siri, and then dictate the text of the tweet.
) to activate Siri, and then dictate the text of the tweet.
![]() Tap Location (
Tap Location (![]() ) if you want to add your location to the tweet.
) if you want to add your location to the tweet.
![]() Tap Tweet.
Tap Tweet.
Twitter posts the tweet to your Twitter account.
Send a Photo Tweet
![]() From the Home screen, tap Photos.
From the Home screen, tap Photos.
The Photos app opens.
![]() Navigate to the photo you want to tweet. For example, tap Albums and then tap the album that contains the photo.
Navigate to the photo you want to tweet. For example, tap Albums and then tap the album that contains the photo.
![]() Tap the photo to display it.
Tap the photo to display it.
![]() Tap Share (
Tap Share (![]() ).
).
The Share sheet appears.

![]() Tap Twitter.
Tap Twitter.

A The Twitter dialog opens, showing the tweet with the photo attached.
![]() Type the tweet.
Type the tweet.
![]() If you want to add the location to the tweet, tap Location. In the Location dialog, tap the location, and then tap Twitter to return to the Twitter dialog.
If you want to add the location to the tweet, tap Location. In the Location dialog, tap the location, and then tap Twitter to return to the Twitter dialog.
![]() Tap Post.
Tap Post.
Post Updates on Facebook
If you have an account on Facebook, the world’s biggest social network, you can post updates directly from your iPad with a minimum of fuss.
When you are using the Facebook app, you can easily start a post from within it by tapping the Status button. But you can also start from apps that contain content suitable for Facebook posts. For example, you can post a photo from the Photos app to Facebook.
Post Updates on Facebook
Post an Update from the Facebook App
![]() Press the Home button.
Press the Home button.
![]() Tap Facebook.
Tap Facebook.
Note: If Facebook does not appear, tap Settings, tap Facebook, and then tap Install.

![]() On your Facebook app home page, tap Write Post.
On your Facebook app home page, tap Write Post.
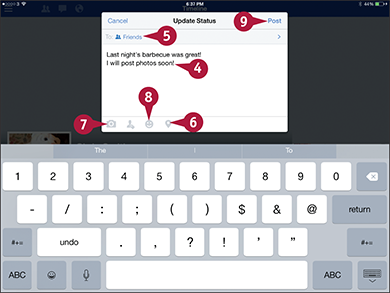
![]() In the Update Status dialog, type the update.
In the Update Status dialog, type the update.
![]() To choose whom to share the update with, tap To, tap the appropriate people or groups in the Share With dialog, and then tap Done.
To choose whom to share the update with, tap To, tap the appropriate people or groups in the Share With dialog, and then tap Done.
![]() To add the location to the update, tap Location (
To add the location to the update, tap Location (![]() ).
).
![]() To add a photo or video, tap
To add a photo or video, tap ![]() . You can then take a new photo or video or select an existing one.
. You can then take a new photo or video or select an existing one.
![]() To add your current activity, tap
To add your current activity, tap ![]() and tap the appropriate activity.
and tap the appropriate activity.
![]() Tap Post.
Tap Post.
Post a Photo Update
![]() Press the Home button.
Press the Home button.
The Home screen appears.
![]() Tap Photos.
Tap Photos.
The Photos app opens.
![]() Navigate to the photo you want to post. For example, tap Albums and then tap the album that contains the photo.
Navigate to the photo you want to post. For example, tap Albums and then tap the album that contains the photo.
![]() Tap the photo to display it.
Tap the photo to display it.
![]() Tap Share (
Tap Share (![]() ).
).
The Share sheet appears.

![]() Tap Facebook.
Tap Facebook.

A The Facebook dialog appears, with the photo ready for posting.
![]() Type the text for the update.
Type the text for the update.
![]() To choose the album, tap Album, and then tap the album in the Choose Album dialog.
To choose the album, tap Album, and then tap the album in the Choose Album dialog.
![]() Tap Location, tap the location in the Location dialog, and then tap Facebook to return to the Facebook dialog.
Tap Location, tap the location in the Location dialog, and then tap Facebook to return to the Facebook dialog.
![]() To specify the audience, tap Audience, and then tap the appropriate group in the Audience dialog.
To specify the audience, tap Audience, and then tap the appropriate group in the Audience dialog.
![]() Tap Post.
Tap Post.
TIP
From what other apps can I post updates to Facebook?
You can post updates to Facebook from any app to which the developer has added Facebook integration. For example, you can post a location from the Maps app or a lecture from iTunes U to Facebook.
To see whether you can post updates to Facebook from an app, tap Share (![]() ) from the app. If Facebook appears on the Share sheet, you can post an update to Facebook.
) from the app. If Facebook appears on the Share sheet, you can post an update to Facebook.
Chat Face-to-Face Using FaceTime
By using the FaceTime feature on your iPad, you can enjoy video chats with any of your contacts who have an iPhone 4 or later, an iPad 2 or later, an iPad mini, a fourth-generation or later iPod touch, or the FaceTime for Mac application.
To make a FaceTime call, you and your contact must both have Apple IDs or iPhones. Your iPad must also be connected to either a wireless network or the cellular network. Using a wireless network is preferable because you typically get better performance and do not use up your cellular data allowance.
Chat Face-to-Face Using FaceTime
The Home screen appears.

![]() Tap FaceTime.
Tap FaceTime.
The FaceTime app opens, showing the Contacts list.
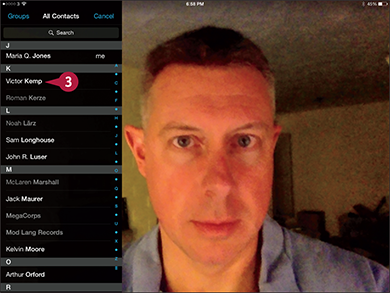
![]() Tap the contact you want to call with FaceTime.
Tap the contact you want to call with FaceTime.
The contact’s record opens.
![]() Tap FaceTime (
Tap FaceTime (![]() ).
).
The iPad starts a FaceTime call, showing your video preview.
When your contact answers, smile and speak.
When the connection is established, your iPad displays the caller full screen, with your video inset.

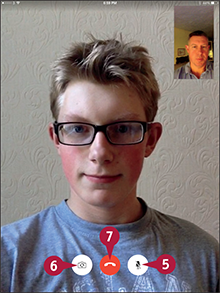
![]() If you need to mute your microphone, tap Mute (
If you need to mute your microphone, tap Mute (![]() ). Tap Mute (
). Tap Mute (![]() ) when you want to turn muting off again.
) when you want to turn muting off again.
![]() If you need to show your contact something using the rear-facing camera, tap Switch Cameras (
If you need to show your contact something using the rear-facing camera, tap Switch Cameras (![]() ). Your inset video then shows the picture that is being sent to your contact. Tap Switch Cameras (
). Your inset video then shows the picture that is being sent to your contact. Tap Switch Cameras (![]() ) when you are ready to switch back.
) when you are ready to switch back.
![]() When you are ready to end the call, tap End (
When you are ready to end the call, tap End (![]() ).
).
Note: When your iPad receives a FaceTime request, and the screen shows who is calling, aim the camera at your face, and then tap Answer to answer.
TIP
Are there other ways of starting a FaceTime call?
Yes. Here are three other ways of starting a FaceTime call:
• In the Contacts app, tap the contact to display the contact record, and then tap FaceTime (![]() ).
).
• In a Messages conversation, tap Contact, and then tap FaceTime (![]() ).
).
• Ask Siri to call a contact via FaceTime. For example, press and hold the Home button to summon Siri, and then say “FaceTime John Smith.”