
Chapter 10
Working with Photos and Books

In this chapter, you learn to use the Photos app to view and share photos. You also learn to use the iBooks app to read e-books and PDF files.
Browse Photos Using Years, Collections, and Moments
Share Photos Using My Photo Stream
Share Photo Albums with Other People
Share Photos via E-Mail and Messaging
Read Digital Books with iBooks
Add PDF Files to iBooks and Read Them
Browse Photos Using Years, Collections, and Moments
You can use the Photos app to browse the photos you have taken with the camera in your iPad, photos you have synced using iTunes or via the iCloud Shared Streams feature, and photos you saved from instant messages, e-mail, web pages, and social media.
You can browse your photos by date and locations using the smart groupings that Photos creates. Each Year grouping contains Collections; and the Collections grouping contains Moments, which contain your photos. Alternatively, you can browse by albums, as explained in the next section, “Browse Photos Using Streams.”
Browse Photos Using Years, Collections, and Moments
![]() Press the Home button.
Press the Home button.
The Home screen appears.
![]() Tap Photos.
Tap Photos.
The Photos app opens.

![]() Tap Photos.
Tap Photos.
The Photos screen appears, showing the Years list.
![]() Tap the year you want to open.
Tap the year you want to open.
The Collections screen for the year appears.
Note: Scroll up or down as needed to see other collections. You can scroll from one year to another.
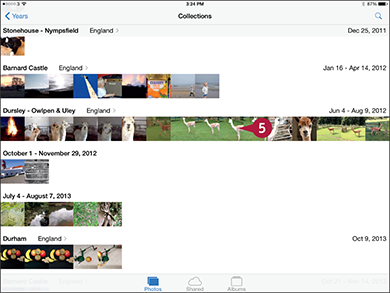
![]() Tap the collection you want to open.
Tap the collection you want to open.
The Moments screen for the collection appears.
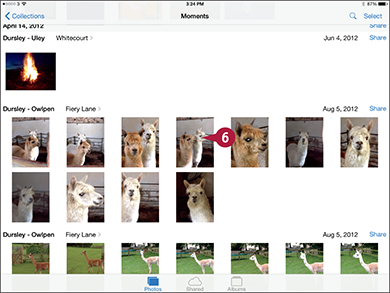
![]() Tap the photo you want to view.
Tap the photo you want to view.
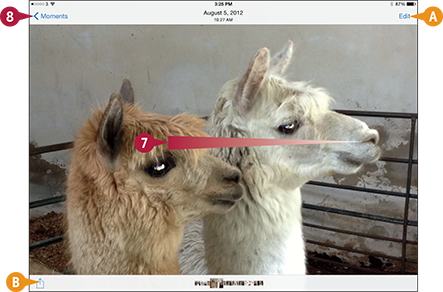
A You can tap Edit to edit the photo, as explained in Chapter 11.
B You can tap Share (![]() ) to share the photo, as explained later in this chapter.
) to share the photo, as explained later in this chapter.
![]() Tap and swipe left or right to display other photos in the moment.
Tap and swipe left or right to display other photos in the moment.
Another photo appears.
![]() Tap Moments.
Tap Moments.
The Moments screen appears.
![]() Tap Collections.
Tap Collections.
The Collections screen appears.
![]() Tap Years.
Tap Years.
The Years screen appears, and you can navigate to another year.
Browse Photos Using Streams
The Photos app on your iPad includes support for an iCloud feature called shared streams that enables you to share photos easily with others and enjoy the photos they are sharing. In this section, you learn how to add other people’s shared streams to the Photos app on your iPad by accepting invitations. You also learn how to browse through the photos they are sharing.
Later in this chapter, you learn to share your own photos via shared streams.
Browse Photos Using Streams
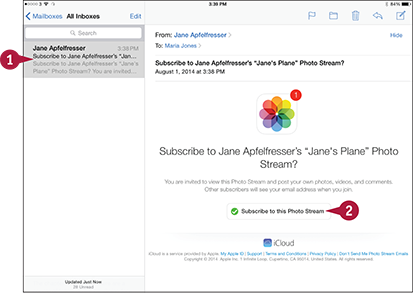
![]() When you receive an invitation to a photo stream, open the e-mail message in Mail.
When you receive an invitation to a photo stream, open the e-mail message in Mail.
![]() Tap Subscribe to this Photo Stream.
Tap Subscribe to this Photo Stream.
The Photos app becomes active, and the Shared Streams screen appears.
The new stream appears on the Shared Streams screen.
Note: The Activity item in the upper-left corner of the Shared Streams screen shows new activity on your shared streams. Tap Activity to see the latest photos posted on all your shared streams.
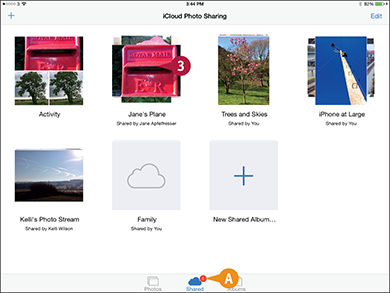
A The badge indicates there are new items for you.
![]() Tap the new stream.
Tap the new stream.
The new stream’s screen appears.
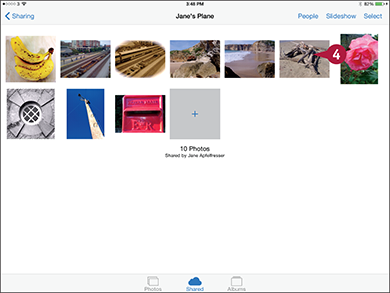
![]() Tap a photo.
Tap a photo.

B You can tap Add a comment to add a comment on the photo.
C You can tap Share (![]() ) to share the photo with others.
) to share the photo with others.
D You can tap a thumbnail to display other photos.
Note: You can also swipe left or right to display other photos.
![]() Tap the stream’s name.
Tap the stream’s name.
The stream’s screen appears.
![]() Tap Streams.
Tap Streams.
The Shared Streams screen appears, and you can navigate to another stream.
TIP
How do I remove a shared stream?
In the Photos app, tap Shared to display the Shared Streams screen. Tap Edit to turn on Editing mode, and then tap ![]() at the upper-left corner of the stream you want to remove. Tap the Unsubscribe button in the Unsubscribe dialog that opens.
at the upper-left corner of the stream you want to remove. Tap the Unsubscribe button in the Unsubscribe dialog that opens.
Browse Photos Using Albums
Along with browsing by collections and browsing shared photo streams, you can browse your photos by albums. The Camera app on your iPad automatically maintains several albums, storing each photo you take in the Recently Added album and each video in an album called Videos. You can also create other albums manually from your photos or sync existing albums from your computer.
If you sync your iPad with iPhoto on the Mac, you can sync an album called Faces that contains known faces that iPhoto has recognized in your photos.
Browse Photos Using Albums
The Home screen appears.
![]() Tap Photos.
Tap Photos.
The Photos app opens.

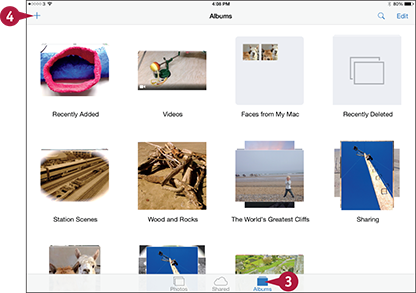
![]() Tap Albums.
Tap Albums.
The Albums screen appears.
Note: Recently Added is the album in which iOS places the photos you take; photos you save from web pages, e-mail messages, instant messages, and social media; and photos you save after opening them from other people’s streams and editing them.
![]() Tap the album you want to open. This example uses an album called Sharing.
Tap the album you want to open. This example uses an album called Sharing.
The album’s screen appears, showing a thumbnail of each photo.

![]() Tap the photo you want to view.
Tap the photo you want to view.
The photo opens.

![]() Tap a photo on the Thumbnails bar.
Tap a photo on the Thumbnails bar.
Note: You can also swipe left to display the next photo or right to display the previous photo.
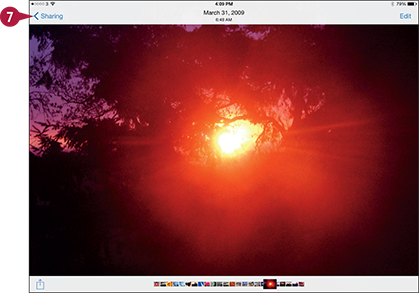
![]() Tap the album’s name in the upper-left corner of the screen.
Tap the album’s name in the upper-left corner of the screen.
The album appears.
![]() Tap Albums.
Tap Albums.
The Albums screen appears, and you can tap another album to display it.
Create Albums
Not only can you sync photo albums you have created on your computer to your iPad, but you can also create albums directly on your iPad. The process is similar to creating a playlist within the Music app in that you start a new album, name it, and then select the photos you want to include in it. You can create albums to store a collection of photos with a similar theme and include only the photos that you want to view.
Create Albums
![]() Press the Home button.
Press the Home button.
The Home screen appears.
![]() Tap Photos.
Tap Photos.
The Photos app opens.
![]() Tap Albums.
Tap Albums.
The Albums screen appears.
![]() Tap
Tap ![]() .
.

![]() Type the name for the new album.
Type the name for the new album.
![]() Tap Save.
Tap Save.
The Photos category automatically opens.
![]() Tap each photo that you want to add to the album.
Tap each photo that you want to add to the album.
A check mark appears in the bottom-right corner of each photo that you pick.
Note: Tap Select All to add all photos to the album. This may not be a sensible choice if you have many photos in your library.
![]() Tap Done.
Tap Done.
Photos adds the selected photos to the album.
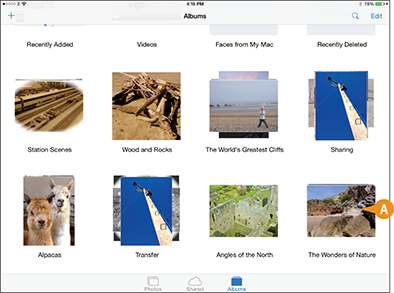
A The album appears on the Albums screen. You can tap the album if you want to open it and view its contents.
TIP
How do I delete albums from my iPad?
Tap the Albums category on the main Photos screen, and then tap Edit. A ![]() appears in the upper-left corner of the albums you created on your iPad; tap this icon to delete the album. You cannot delete albums that you have synced from your computer in this manner. To remove those albums, choose not to sync those albums to your iPad and then run another sync.
appears in the upper-left corner of the albums you created on your iPad; tap this icon to delete the album. You cannot delete albums that you have synced from your computer in this manner. To remove those albums, choose not to sync those albums to your iPad and then run another sync.
Share Photos Using My Photo Stream
If you have an iCloud account, you can use the My Photo Stream feature to share your photos among your iOS devices and your computer.
After you turn on My Photo Stream on your iPad, other iOS devices, and your Macs, Photo Stream automatically syncs your 1,000 most recent photos among the devices and your computers.
Share Photos Using My Photo Stream
Turn On My Photo Stream on Your iPad
![]() Press the Home button.
Press the Home button.
The Home screen appears.
![]() Tap Settings.
Tap Settings.
The Settings screen appears.

![]() Tap iCloud.
Tap iCloud.
The iCloud screen appears.
![]() Tap Photos.
Tap Photos.
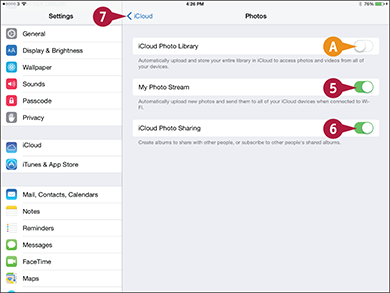
A You can set the iCloud Photo Library switch to On (![]() ) to store all your library in iCloud.
) to store all your library in iCloud.
![]() Set the My Photo Stream switch to On (
Set the My Photo Stream switch to On (![]() ).
).
![]() If you want to share photo streams with others, set the iCloud Photo Sharing switch to On (
If you want to share photo streams with others, set the iCloud Photo Sharing switch to On (![]() ). See the next section, “Share Photo Albums with Other People,” for more.
). See the next section, “Share Photo Albums with Other People,” for more.
![]() Tap iCloud.
Tap iCloud.
The iCloud screen appears again.
Use Photo Stream on Your Mac
![]() Click
Click ![]() , and then click System Preferences.
, and then click System Preferences.
The System Preferences window opens.
![]() Click iCloud.
Click iCloud.
The iCloud pane appears.

![]() Click Photos (
Click Photos (![]() changes to
changes to ![]() ).
).
![]() Click Options.
Click Options.
The iCloud Photos dialog opens.

![]() Click My Photo Stream (
Click My Photo Stream (![]() changes to
changes to ![]() ).
).
![]() If you want to share photo streams with others, click Photo Sharing (
If you want to share photo streams with others, click Photo Sharing (![]() changes to
changes to ![]() ).
).
![]() Click Done.
Click Done.
![]() Click System Preferences, and then click Quit System Preferences.
Click System Preferences, and then click Quit System Preferences.
![]() Click iPhoto (
Click iPhoto (![]() ) on the Dock.
) on the Dock.
![]() In iPhoto, click Photo Stream.
In iPhoto, click Photo Stream.
The Photo Stream screen appears.
TIP
How do I use Photo Stream in Windows?
In Windows 8, display the Start screen and click iCloud Photos in the Apps section of the Apps list. In earlier versions of Windows, click Start to open the Start menu, and then locate and click the iCloud Photos item on it.
In the iCloud Photos window, click Open iCloud Control Panel. Click Photos (![]() changes to
changes to ![]() ). Click Options to display the Photos Options dialog box. Click My Photo Stream (
). Click Options to display the Photos Options dialog box. Click My Photo Stream (![]() changes to
changes to ![]() ) and Photo Sharing (
) and Photo Sharing (![]() changes to
changes to ![]() ). Click Change and select the folder. Click OK, and then click Apply.
). Click Change and select the folder. Click OK, and then click Apply.
Share Photo Albums with Other People
After turning on the Photo Sharing feature in the Settings app, you can create shared photo albums, invite people to subscribe to them, and add photos as needed. See the previous section, “Share Photos Using My Photo Stream,” to turn on the Photo Sharing feature.
You can also control whether subscribers can post photos and videos to your shared photo album, decide whether to make the album publicly available on the iCloud.com website, and choose whether to receive notifications when subscribers comment on your photos or post their own.
Share Photo Albums with Other People
![]() Press the Home button.
Press the Home button.
![]() Tap Photos.
Tap Photos.
![]() Tap Shared.
Tap Shared.

![]() Tap
Tap ![]() .
.
The iCloud dialog opens.
![]() Type the name for the album.
Type the name for the album.
![]() Tap Next.
Tap Next.

![]() Tap
Tap ![]() to display the Contacts screen, and then tap the contact to add.
to display the Contacts screen, and then tap the contact to add.
![]() Repeat Step 7 to add other contacts as needed. You can also type contact names.
Repeat Step 7 to add other contacts as needed. You can also type contact names.
![]() Tap Create.
Tap Create.
The iCloud Photo Sharing screen appears.
![]() Tap the new stream.
Tap the new stream.
The stream’s screen appears.
![]() Tap
Tap ![]() .
.
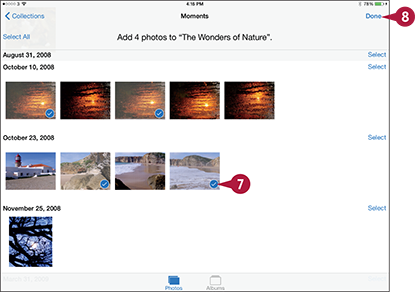
The Moments screen appears, with the selection controls displayed.
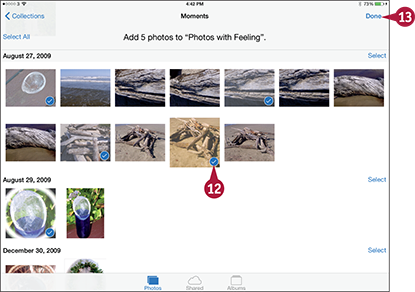
![]() Tap each photo you want to add.
Tap each photo you want to add.
![]() Tap Done.
Tap Done.
![]() In the iCloud dialog that appears, type any text you want to post with the photos.
In the iCloud dialog that appears, type any text you want to post with the photos.
![]() Tap Post.
Tap Post.

![]() On the album's screen, tap People.
On the album's screen, tap People.
The People dialog appears.
A To invite others to the stream, tap Invite People.
![]() Set the Subscribers Can Post switch to On (
Set the Subscribers Can Post switch to On (![]() ) or Off (
) or Off (![]() ), as needed.
), as needed.
![]() Set the Public Website switch to On (
Set the Public Website switch to On (![]() ) or Off (
) or Off (![]() ) to control whether to make the stream publicly accessible on the iCloud.com website.
) to control whether to make the stream publicly accessible on the iCloud.com website.
![]() Set the Notifications switch to On (
Set the Notifications switch to On (![]() ) or Off (
) or Off (![]() ), as needed.
), as needed.
![]() Tap outside the People dialog to close it.
Tap outside the People dialog to close it.
TIP
If I make a photo stream public, how do people find the website?
In the People dialog, when you set the Public Website switch for a photo stream to On (![]() ), a Share Link button appears. Tap Share Link to display the Share dialog, and then tap the means of sharing you want to use — for example, Message, Mail, Twitter, or Facebook.
), a Share Link button appears. Tap Share Link to display the Share dialog, and then tap the means of sharing you want to use — for example, Message, Mail, Twitter, or Facebook.
Share Photos via E-Mail and Messaging
From the Photos app on your iPad, you can quickly share photos via e-mail or instant messaging. Often sharing only a single photo at a time is best because it keeps down the message size and can help avoid cellular charges. But if you want, you can include multiple photos in the same message. You can include multiple photos either by using the Share sheet to add other photos to the one you have already selected or by selecting multiple photos before displaying the Share sheet.
Share Photos via E-Mail and Messaging
Select the Photo and Display the Share Sheet
![]() Browse to the photo you want to share. Use the techniques explained in the three previous sections.
Browse to the photo you want to share. Use the techniques explained in the three previous sections.
![]() Tap Share (
Tap Share (![]() ).
).
The Share sheet appears.

![]() To include another photo from the same source, tap the photo’s selection button (
To include another photo from the same source, tap the photo’s selection button (![]() changes to
changes to ![]() ). Scroll left or right as needed to find the photos you want.
). Scroll left or right as needed to find the photos you want.
![]() In the Photos app, display the collection of photos. For example, tap a year, tap a collection, and then tap a moment to display the photos in the moment.
In the Photos app, display the collection of photos. For example, tap a year, tap a collection, and then tap a moment to display the photos in the moment.
![]() Tap Select in the upper-right corner of the screen.
Tap Select in the upper-right corner of the screen.
The Photos app switches to Selection mode.
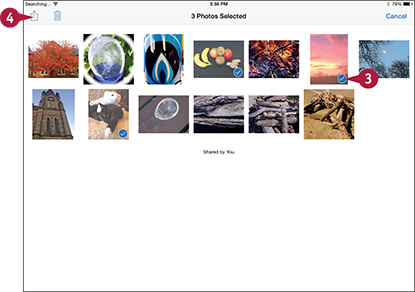
![]() Tap each photo to include (
Tap each photo to include (![]() appears on each photo).
appears on each photo).
![]() Tap Share (
Tap Share (![]() ).
).
The Share sheet appears.
Share the Photo via Messaging
![]() In the Share sheet, tap Message.
In the Share sheet, tap Message.
Your iPad creates a new message in the Messages app with the photo attached to the message.
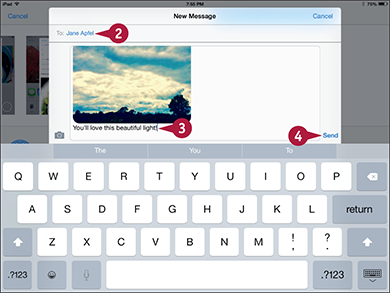
![]() Tap To and address the message.
Tap To and address the message.
![]() Tap in the body area, and then type any text needed.
Tap in the body area, and then type any text needed.
![]() Tap Send.
Tap Send.
The Messages app sends the message.
![]() On the Share sheet, tap Mail.
On the Share sheet, tap Mail.

![]() Tap To and address the e-mail message.
Tap To and address the e-mail message.
![]() Tap Subject and type the subject for the e-mail message.
Tap Subject and type the subject for the e-mail message.
![]() Tap in the body area, and then type any text needed.
Tap in the body area, and then type any text needed.
![]() Tap Cc/Bcc, From.
Tap Cc/Bcc, From.
The CC area, Bcc area, From area, and Image Size options appear.
![]() Tap Small, Medium, Large, or Actual Size, as needed.
Tap Small, Medium, Large, or Actual Size, as needed.
![]() Tap Send.
Tap Send.
Play Slide Shows of Photos
Your iPad can not only display your photos but also play them as a slide show. You can select an existing group of photos, such as an album, or make a custom selection from moments. You can also choose to repeat the slide show or run the photos in random order. Then, when you start the slide show, you can choose which transition to use and add music. To make the most of your slide shows, you can choose the slide timing in the Photos screen in Settings.
Play Slide Shows of Photos
The Home screen appears.
![]() Tap Photos.
Tap Photos.
The Photos screen appears.
![]() Navigate to the photo with which you want to start the slide show. For example, tap Photos, tap the appropriate year, tap the appropriate collection, and then tap the moment that contains the photo.
Navigate to the photo with which you want to start the slide show. For example, tap Photos, tap the appropriate year, tap the appropriate collection, and then tap the moment that contains the photo.
The moment or other photo collection opens.
![]() Tap the photo you want to use at the beginning of the slide show.
Tap the photo you want to use at the beginning of the slide show.
The photo opens.
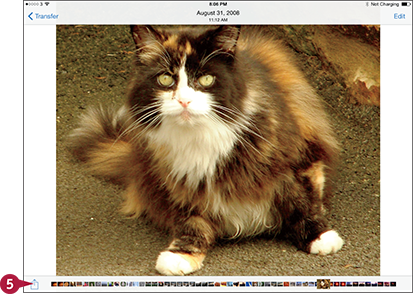
![]() Tap Share (
Tap Share (![]() ).
).
The Share sheet appears.

![]() Tap each photo you want to include in the slide show (
Tap each photo you want to include in the slide show (![]() changes to
changes to ![]() ).
).
![]() Tap Slideshow.
Tap Slideshow.
The Slideshow Options screen appears.
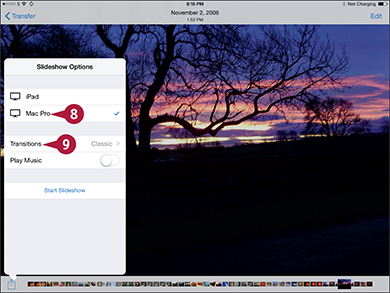
![]() If you have a choice of output devices, such as an Apple TV instead of your iPad, tap the one you want to use.
If you have a choice of output devices, such as an Apple TV instead of your iPad, tap the one you want to use.
![]() Tap Transitions.
Tap Transitions.
The Transitions dialog opens.
![]() Tap the transition you want to use.
Tap the transition you want to use.
The Slideshow Options dialog appears.

![]() If you want to play music during the slide show, set the Play Music switch to On (
If you want to play music during the slide show, set the Play Music switch to On (![]() ).
).
The Music button appears.
![]() Tap Music.
Tap Music.
The Music dialog appears.
![]() Tap the song, album, or playlist you want to play.
Tap the song, album, or playlist you want to play.
The Slideshow Options screen appears.
![]() Tap Start Slideshow.
Tap Start Slideshow.
The slide show starts.
Read Digital Books with iBooks
Using the iBooks app, you can read e-books that you load on the iPad from your computer, read e-books that you download for free or purchase from online stores, or read PDF files you transfer from your computer.
If you have already loaded some e-books, you can read them as described in this section. If iBooks contains no books, either press the Store button to visit the iBooks Store or see the next section, “Add PDF Files to iBooks and Read Them,” for instructions on adding PDF files to iBooks.
Read Digital Books with iBooks

The Home screen appears.
![]() Navigate to the Home screen that contains the iBooks icon. For example, tap and drag left to scroll to the right one or more times.
Navigate to the Home screen that contains the iBooks icon. For example, tap and drag left to scroll to the right one or more times.
![]() Tap iBooks.
Tap iBooks.
The Books screen appears.
A If Books does not appear in the upper-middle area of the iBooks screen, tap ![]() . In the Collections dialog that appears, tap Books to display the list of books.
. In the Collections dialog that appears, tap Books to display the list of books.
![]() Tap the book you want to open.
Tap the book you want to open.
The book opens.
Note: When you open a book, iBooks displays your current page. When you open a book for the first time, iBooks displays the book’s cover, first page, or default page.

![]() Tap anywhere on the screen to hide the reading controls. Tap again to display them once more.
Tap anywhere on the screen to hide the reading controls. Tap again to display them once more.
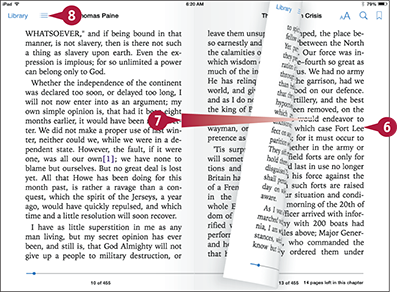
![]() Tap the right side of the page to display the next page.
Tap the right side of the page to display the next page.
Note: To display the previous page, tap the left side of the page. Alternatively, tap the left side of the page and drag to the right.
![]() To look at the next page without fully revealing it, tap the right side and drag to the left. You can then either drag further to turn the page or release the page and let it fall closed.
To look at the next page without fully revealing it, tap the right side and drag to the left. You can then either drag further to turn the page or release the page and let it fall closed.
![]() To jump to another part of the book, tap Table of Contents (
To jump to another part of the book, tap Table of Contents (![]() ).
).
Note: Alternatively, you can drag the indicator at the bottom of the screen to move quickly through the book.
The table of contents appears.

![]() Tap the part of the book you want to display.
Tap the part of the book you want to display.
Note: To search in the book, tap Search (![]() ). On the Search screen, type the search term, and then tap the match you want to display.
). On the Search screen, type the search term, and then tap the match you want to display.
TIP
How do I change the font iBooks uses?
Tap the screen to display the controls, and then tap Font Settings (![]() ). In the Font Settings dialog, tap Smaller or Larger to change the font size. Tap Fonts to display the font list, and then tap the font you want to use. Finally, tap outside the Font Settings dialog to close it.
). In the Font Settings dialog, tap Smaller or Larger to change the font size. Tap Fonts to display the font list, and then tap the font you want to use. Finally, tap outside the Font Settings dialog to close it.
Add PDF Files to iBooks and Read Them
These days, many books, reports, and other documents are available as Portable Document Format, or PDF, files. You can add your PDF files to iBooks on the Mac or load PDF files on your iPad and read them using iBooks. This is a great way to take your required reading with you so that you can catch up on it anywhere.
Add PDF Files to iBooks and Read Them
Add PDFs to iBooks on Your Mac

![]() On your Mac, click iBooks (
On your Mac, click iBooks (![]() ) on the Dock.
) on the Dock.
Note: If iBooks (![]() ) does not appear on the Dock, click Launchpad (
) does not appear on the Dock, click Launchpad (![]() ) on the Dock, and then click iBooks (
) on the Dock, and then click iBooks (![]() ) on the Launchpad screen.
) on the Launchpad screen.
The iBooks window opens.
![]() Click File.
Click File.
The File menu opens.
![]() Click Add to Library.
Click Add to Library.
The Add To Library dialog opens.

![]() Click the PDF file or select the PDF files you want to add.
Click the PDF file or select the PDF files you want to add.
![]() Click Add.
Click Add.
iBooks adds the PDF file or files to your PDFs collection.
iBooks syncs the PDF files to your collection in iCloud.
Now, provided you have set the Sync Collections switch to On (![]() ) on the iBooks screen in the Settings app, iBooks on your iPad syncs the PDFs from iCloud.
) on the iBooks screen in the Settings app, iBooks on your iPad syncs the PDFs from iCloud.
Read a PDF File Using iBooks
![]() Press the Home button.
Press the Home button.
The Home screen appears.
![]() Navigate to the Home screen that contains the iBooks icon. For example, tap and drag left to scroll to the right one or more times.
Navigate to the Home screen that contains the iBooks icon. For example, tap and drag left to scroll to the right one or more times.
![]() Tap iBooks.
Tap iBooks.
The Books screen appears.

![]() Tap
Tap ![]() .
.
The Collections dialog appears.
![]() Tap PDFs.
Tap PDFs.
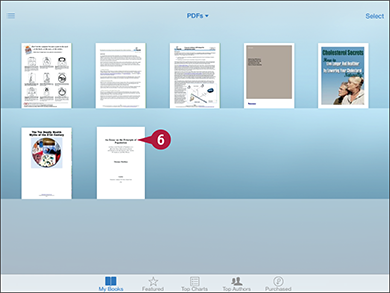
![]() Tap the PDF file you want to open.
Tap the PDF file you want to open.
The PDF file appears. You can then read the PDF file by scrolling up and down and zooming in and out as needed.
Note: If you open a PDF file while browsing the web in Safari, you can open the file in iBooks. To do so, tap the screen, and then tap Open in iBooks on the command bar that pops up.