Chapter 4
Sending and Receiving Email
You can use the Mail app to work with your email account. You can use Mail to send email messages and file attachments. You can also use Mail to receive and read incoming messages.
Receive and Read Email Messages
Configure an Email Account
Before you can send an email message, you must add your email account to the Mail application. This also enables you to use Mail to retrieve the messages that others have sent to your account.
You use Mail to set up web-based email accounts with services such as Gmail. Note, however, that if you are already signing in to Windows using a Microsoft account, then Windows automatically adds that account to the Mail app — so you need to follow the steps in this section only if you want to add another account to Mail.
Configure an Email Account
![]() On the taskbar, click Mail (
On the taskbar, click Mail (![]() ).
).
Mail opens.
Note: If you are starting Mail for the first time and the app prompts you to add an account, skip to step 4.
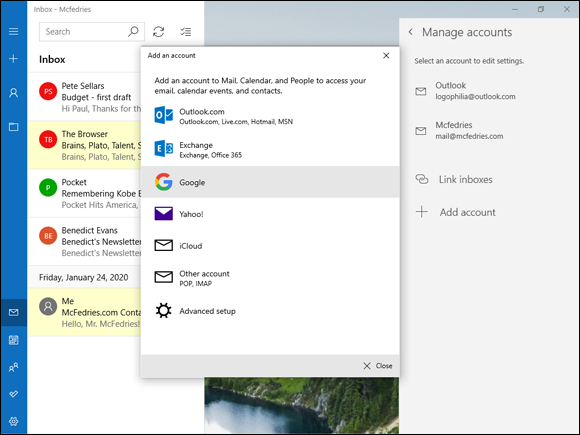
![]() Click Settings (
Click Settings (![]() ).
).
The Settings pane appears.
![]() Click Manage Accounts.
Click Manage Accounts.
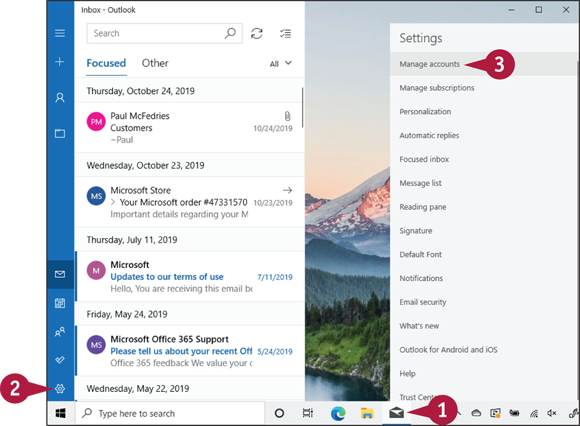
The Manage Accounts pane appears.
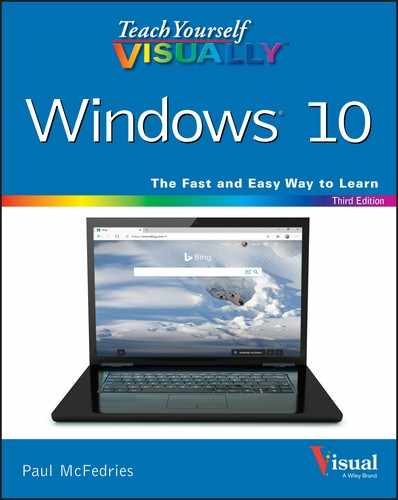
![]() Click Add account.
Click Add account.
The Add an Account menu appears.
![]() Click the type of account that you want to add.
Click the type of account that you want to add.
Note: How you proceed from here depends on the type of account you selected in step 5. The steps that follow apply to most account types.
Mail asks for your account email address.
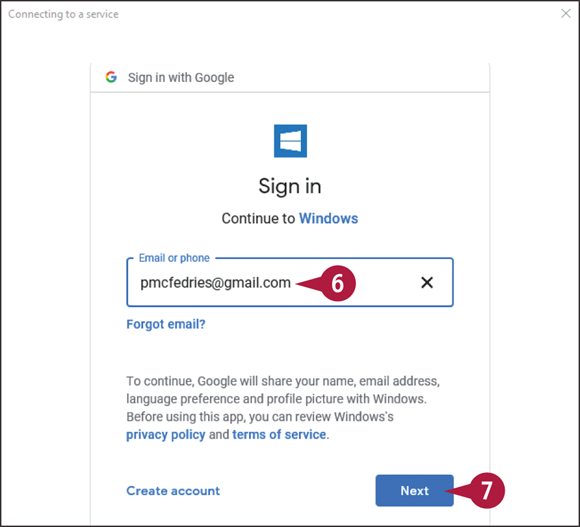
![]() Type your email address.
Type your email address.
![]() Click Next.
Click Next.
Mail asks for your account password.
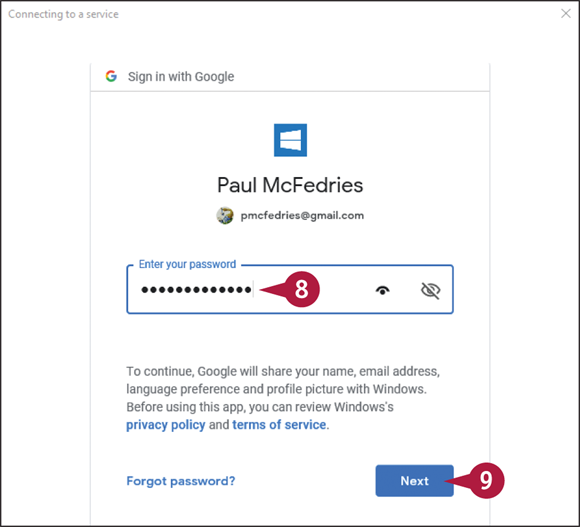
![]() Type your email password.
Type your email password.
![]() Click Next.
Click Next.
Mail asks for permission to access your account.
![]() Click Allow (not shown).
Click Allow (not shown).
![]() Click Done (not shown).
Click Done (not shown).
Mail adds your email account to the Accounts pane.
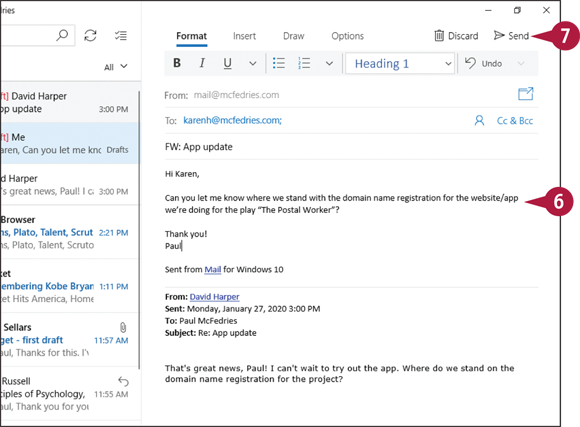
Send an Email Message
If you know the email address of a person or organization, you can send an email message to that address. Each address uniquely identifies the location of an Internet mailbox. An address takes the form username@domain, where username is the name of the person’s account, and domain is the Internet name of the company that provides the person’s email account.
When you send an email message, it travels through your email provider’s outgoing mail server. This server routes the message to the recipient’s incoming mail server, which then stores the message in the recipient’s mailbox.
Send an Email Message

![]() In Mail, click New mail (
In Mail, click New mail (![]() ).
).

A message window appears.
![]() Type the email address of the recipient.
Type the email address of the recipient.
![]() To send a copy of the message to another person, you can click Cc & Bcc, and then type that person’s email address in the Cc field.
To send a copy of the message to another person, you can click Cc & Bcc, and then type that person’s email address in the Cc field.
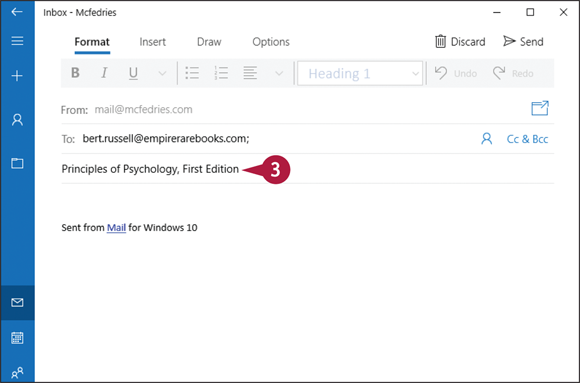
![]() Type a subject for the message.
Type a subject for the message.

![]() Type the message.
Type the message.
Note: See the next section, “Format the Message Text,” to learn how to apply formatting to your message.
![]() Click Send.
Click Send.
Mail sends your message.
Format the Message Text
You can add visual interest and make your message easier to read by formatting your message text. A plain email message is quick to compose, but it is often worth the extra time to add formatting to your text. For example, you can add bold or italic formatting to highlight a word or phrase. Mail supports a wide range of formatting options, including font colors, highlights, emoticons, bulleted lists, and numbered lists. All these formatting options have their place, but be careful not to overdo it, or you may make your message harder to read.
Format the Message Text
Format the Message Font
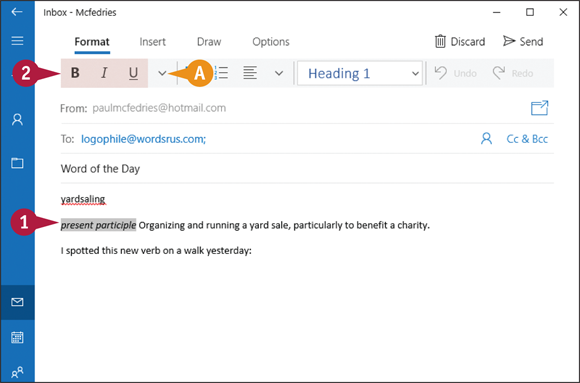
![]() Select the text that you want to format.
Select the text that you want to format.
![]() Click the font formatting that you want to apply, such as Bold (
Click the font formatting that you want to apply, such as Bold (![]() ), Italic (
), Italic (![]() ), or Underline (
), or Underline (![]() ).
).
![]() For more font options, you can click
For more font options, you can click ![]() .
.
Mail applies the font formatting to the text.
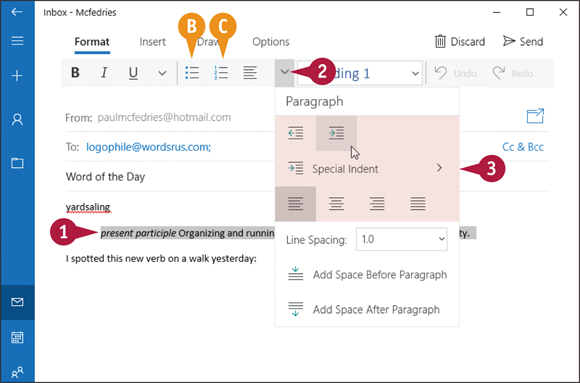
Format a Message Paragraph
![]() Select the paragraph that you want to format.
Select the paragraph that you want to format.
![]() Click the Paragraph Formatting
Click the Paragraph Formatting ![]() .
.
![]() Click the paragraph formatting that you want to apply, such as indents or alignment.
Click the paragraph formatting that you want to apply, such as indents or alignment.
![]() You can click Bullets (
You can click Bullets (![]() ) to convert the paragraphs to bullet points.
) to convert the paragraphs to bullet points.
![]() You can click Numbering (
You can click Numbering (![]() ) to convert the paragraphs to a numbered list.
) to convert the paragraphs to a numbered list.
Mail applies the paragraph formatting to the text.
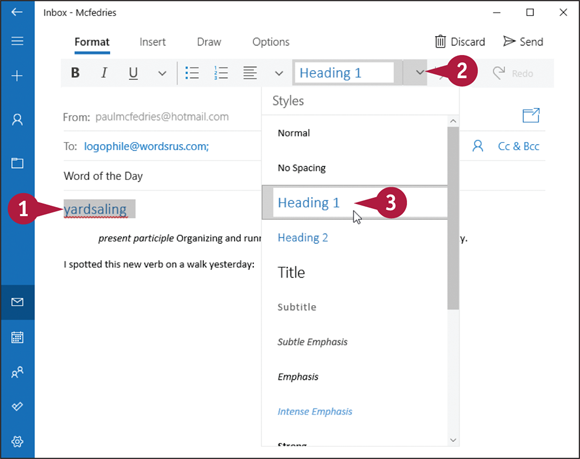
Apply a Style
![]() Select the text that you want to format.
Select the text that you want to format.
![]() Click the Styles
Click the Styles ![]() .
.
![]() Click a style.
Click a style.
Mail applies the style to the text.
Insert a Picture

![]() Position the cursor where you want the picture to appear.
Position the cursor where you want the picture to appear.
![]() Click the Insert tab.
Click the Insert tab.
![]() Click Pictures.
Click Pictures.
The Open dialog box appears.
![]() Select the location of the picture.
Select the location of the picture.
![]() Click the picture.
Click the picture.
![]() Click Insert.
Click Insert.
Mail adds the picture to the email message.
Add a File Attachment
If you have a document that you want to send to another person, you can attach the document to an email message. A typical email message is fine for short notes, but you may have something more complex to communicate, such as budget numbers or a slide show, or some form of media that you want to share, such as an image or a song. Because these more complex types of data usually come in a separate file — such as a spreadsheet, presentation file, or video file — it makes sense to send that file to your recipient as an attachment.
Add a File Attachment
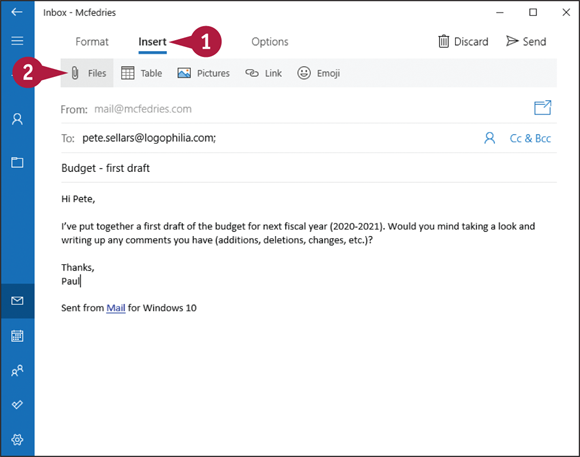
![]() Click the Insert tab.
Click the Insert tab.
![]() Click Files.
Click Files.
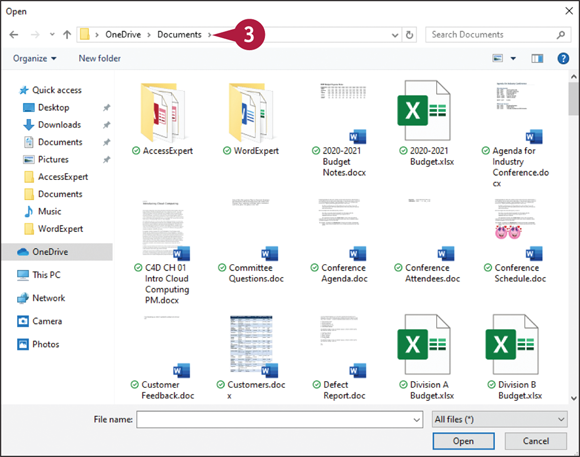
The Open dialog box appears.
![]() Select the folder that contains the file you want to attach.
Select the folder that contains the file you want to attach.
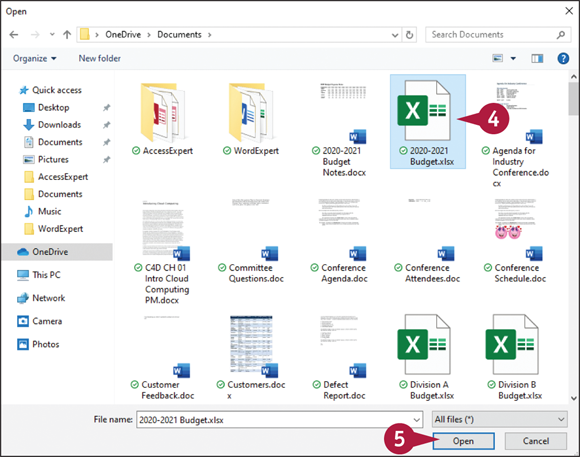
![]() Click the file that you want to attach.
Click the file that you want to attach.
![]() Click Open.
Click Open.
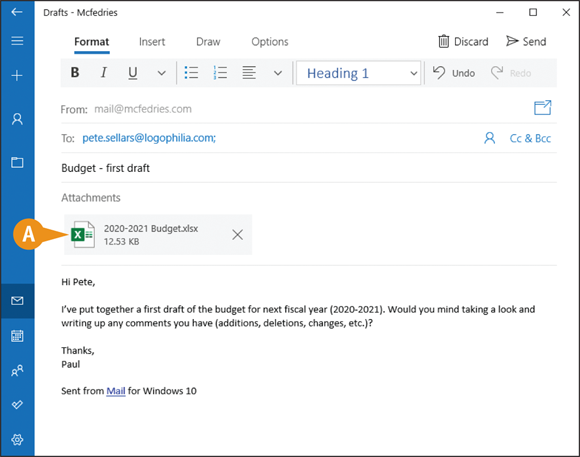
![]() Mail attaches the file to the message.
Mail attaches the file to the message.
Save a Draft of a Message
If you cannot complete or send your message right away, you can save it as a draft and open it again later. As you work on an email message, you might find that you need to give it more thought or that you have to do more research. Rather than discard your work, you can close the message and Mail will save it for you automatically. Mail stores the saved message in your account’s Drafts folder. When you are ready to resume editing the message, you can open it from the Drafts folder.
Save a Draft of a Message
Save the Draft
![]() Compose the message up to the point where you want Mail to save it.
Compose the message up to the point where you want Mail to save it.
![]() Click Back (
Click Back (![]() ).
).
Mail closes the message and saves the message to your Drafts folder.
Open the Draft
![]() Click All Folders (
Click All Folders (![]() ).
).
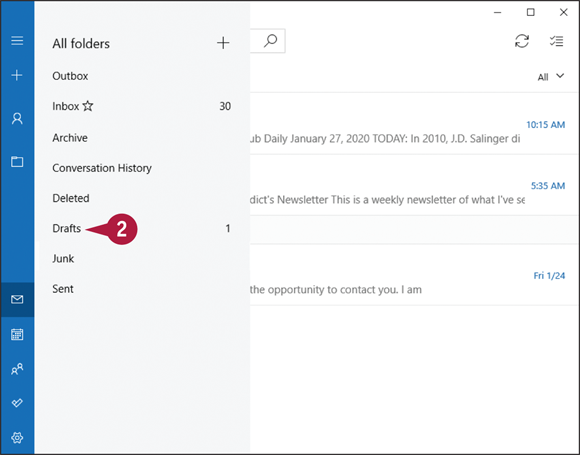
Mail displays your account folders.
Note: The folders you see — as well as the names of the folders — vary depending on the type of email account you are using.
![]() Click Drafts.
Click Drafts.
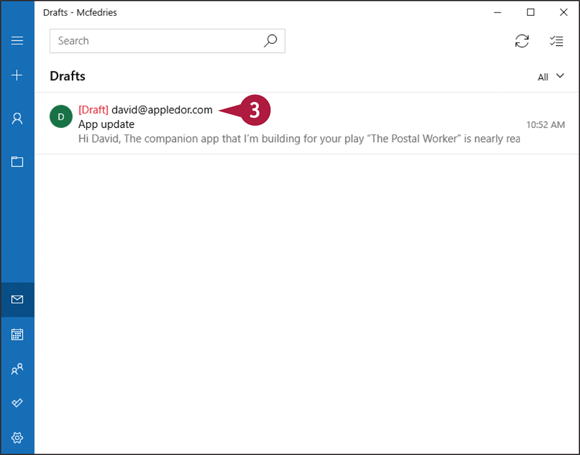
![]() Click the draft that you want to open.
Click the draft that you want to open.
Mail opens the message for editing.
Receive and Read Email Messages
When another person sends you an email message, that message ends up in your email account’s mailbox on the incoming mail server maintained by your ISP or email provider. However, that company does not automatically pass along that message to you. Instead, you must use Mail to connect to your mailbox on the incoming mail server and then retrieve any messages waiting for you. By default, Mail automatically retrieves new messages as they arrive, but you can also check for new messages at any time.
Receive and Read Email Messages
Receive Email Messages
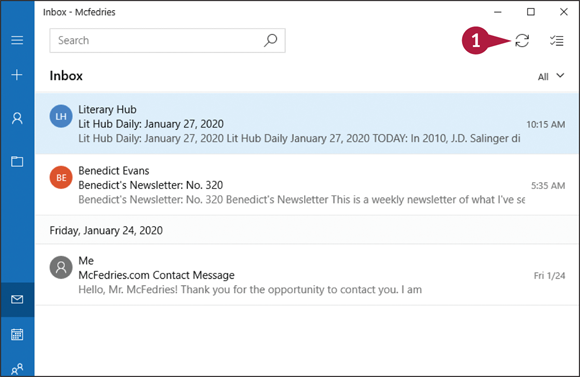
![]() Click Refresh (
Click Refresh (![]() ).
).
Mail checks for new messages.
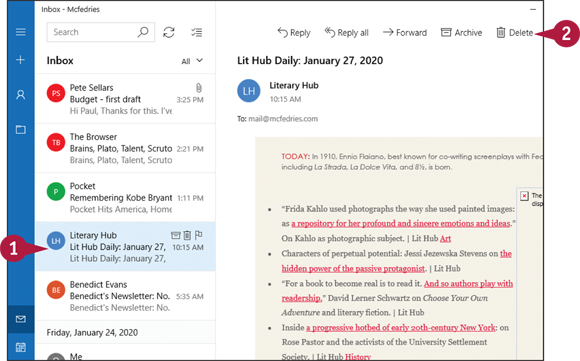
![]() If you have new messages, they appear in your Inbox folder.
If you have new messages, they appear in your Inbox folder.
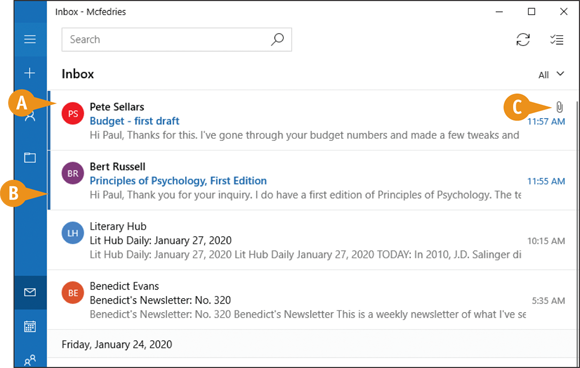
![]() This bar appears beside messages that you have not yet read.
This bar appears beside messages that you have not yet read.
![]() The
The ![]() symbol means that the message has an attachment.
symbol means that the message has an attachment.
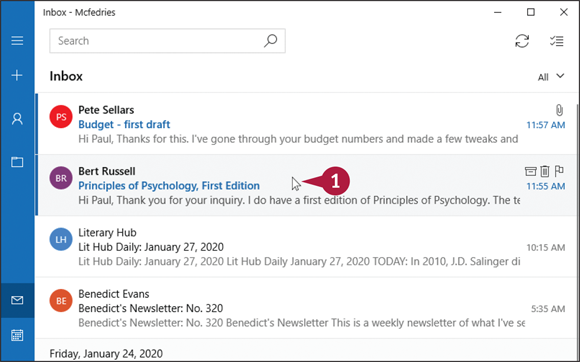
Read a Message
![]() Click the message.
Click the message.
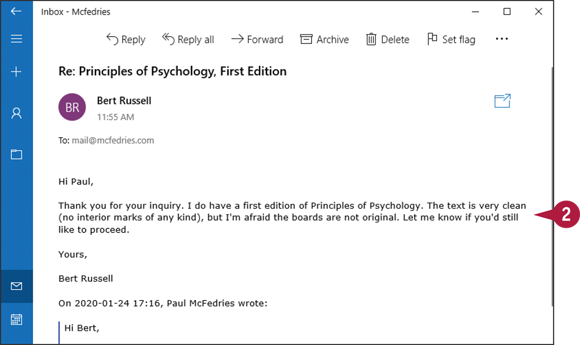
Mail opens the message.
![]() Read the message text.
Read the message text.
Reply to a Message
When a message you receive requires some kind of response — whether it is answering a question, supplying information, or providing comments — you can reply to that message. Most replies go only to the person who sent the original message. However, you can also send the reply to all the people who were included in the original message’s To and Cc lines. Mail includes the text of the original message in the reply, but you might want to edit the original message text to include only enough of the original message to put your reply into context.
Reply to a Message
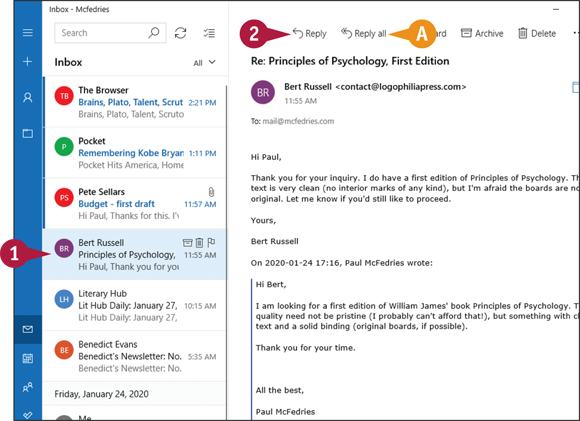
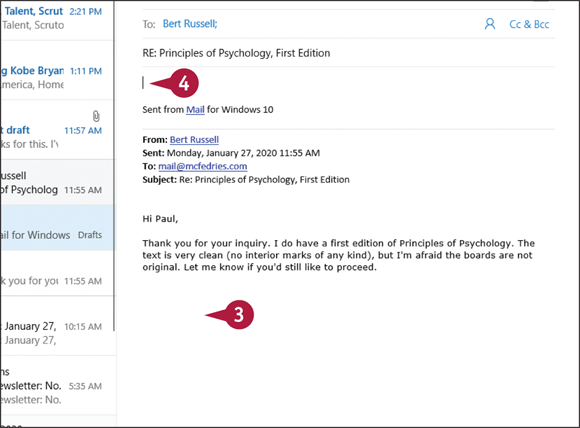
![]() Click the message to which you want to reply.
Click the message to which you want to reply.
![]() Click Reply.
Click Reply.
![]() If you prefer to respond to all the message recipients, you can click Reply all instead.
If you prefer to respond to all the message recipients, you can click Reply all instead.
Note: See the first tip for more information.
A message window appears.
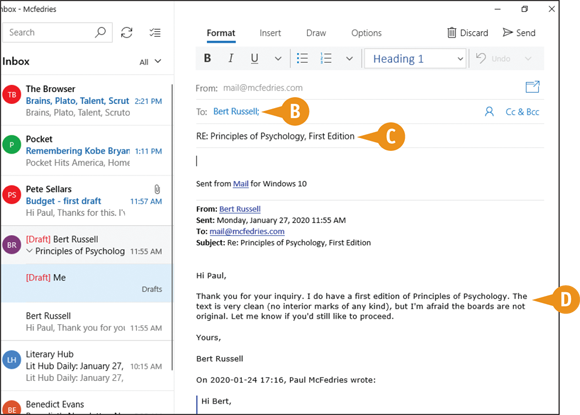
![]() Mail automatically inserts the sender of the original message as the recipient.
Mail automatically inserts the sender of the original message as the recipient.
![]() Mail also inserts the subject line, preceded by “RE:”.
Mail also inserts the subject line, preceded by “RE:”.
![]() Mail includes the original message’s addresses (To and From), date, subject, and text at the bottom of the reply.
Mail includes the original message’s addresses (To and From), date, subject, and text at the bottom of the reply.
![]() Edit the original message to include only the text relevant to your reply.
Edit the original message to include only the text relevant to your reply.
![]() Click the area above the original message text.
Click the area above the original message text.
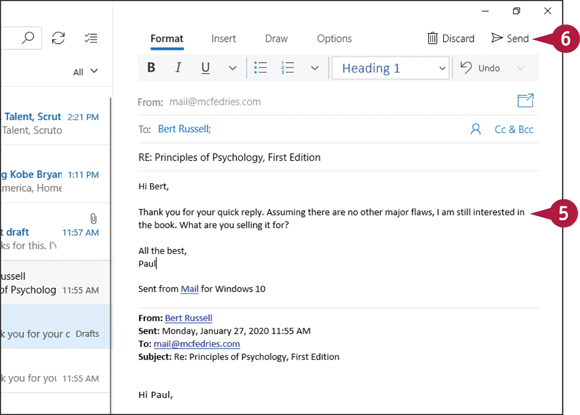
![]() Type your reply.
Type your reply.
![]() Click Send.
Click Send.
Mail sends your reply.
Note: Mail stores a copy of your reply in the Sent folder.
Forward a Message
If a message has information that is relevant to or concerns another person, you can forward a copy of the message to that person. You can also include your own comments in the forward.
In the body of the forward, Mail includes the original message’s addresses, date, and subject line. Below this information, Mail also includes the text of the original message. In most cases, you will leave the entire message intact so that your recipient can see it. However, if only part of the message is relevant to the recipient, you should edit the original message accordingly.
Forward a Message
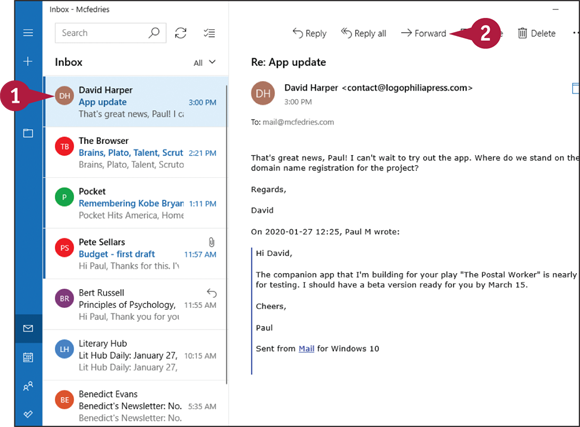
![]() Click the message that you want to forward.
Click the message that you want to forward.
![]() Click Forward.
Click Forward.

A message window appears.
![]() Mail inserts the subject line, preceded by “FW:”.
Mail inserts the subject line, preceded by “FW:”.
![]() The original message’s addresses (To and From), date, subject, attachments, and text are included.
The original message’s addresses (To and From), date, subject, attachments, and text are included.
![]() Select or type the email address of the person to whom you are forwarding the message.
Select or type the email address of the person to whom you are forwarding the message.
![]() To send a copy of the message to another person, you can click Cc & Bcc, and then enter that person’s email address in the Cc field.
To send a copy of the message to another person, you can click Cc & Bcc, and then enter that person’s email address in the Cc field.
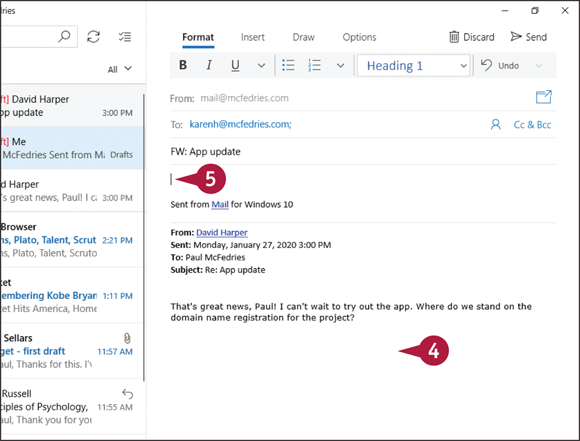
![]() If necessary, edit the original message to include only the text relevant to your forward.
If necessary, edit the original message to include only the text relevant to your forward.
![]() Click the area above the original message text.
Click the area above the original message text.
![]() Type your comments.
Type your comments.
![]() Click Send.
Click Send.
Mail sends your forward.
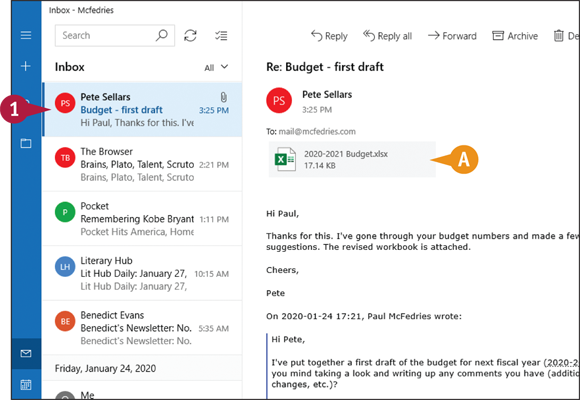
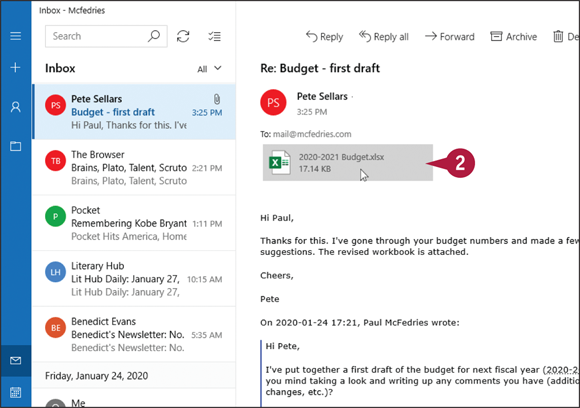
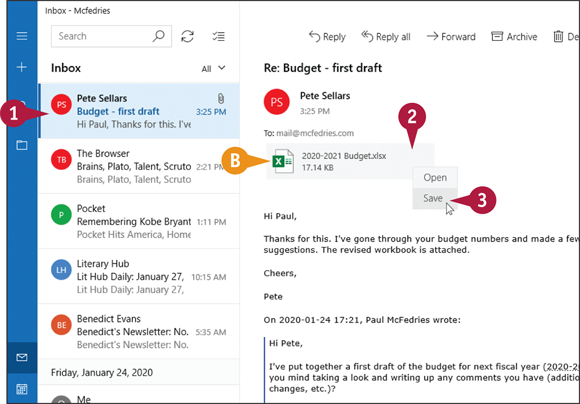
Open and Save an Attachment
When a message comes in and displays the attachment symbol (a paper clip), it means that the sender has included a file as an attachment to the message. If you just want to take a quick look at the file, you can open the attachment directly from Mail. Alternatively, if you want to keep a copy of the file on your computer, you can save the attachment to your hard drive.
Be careful when dealing with attached files. Computer viruses are often transmitted by email attachments.
Open and Save an Attachment
Open an Attachment
![]() Click the message that has the attachment, as indicated by a paper clip (
Click the message that has the attachment, as indicated by a paper clip (![]() ).
).
![]() The message attachment appears.
The message attachment appears.
![]() Click the attachment that you want to open.
Click the attachment that you want to open.
The file opens in the appropriate program.
Note: Instead of opening the file, you may see a message that says, “Windows can’t open this type of file.” This means that you need to install the appropriate program for the type of file. If you are not sure, ask the person who sent you the file what program you need.
Save an Attachment
![]() Click the message that has the attachment, as indicated by a paper clip (
Click the message that has the attachment, as indicated by a paper clip (![]() ).
).
![]() A list of the message attachments appears.
A list of the message attachments appears.
![]() Right-click the attachment that you want to save.
Right-click the attachment that you want to save.
![]() Click Save.
Click Save.
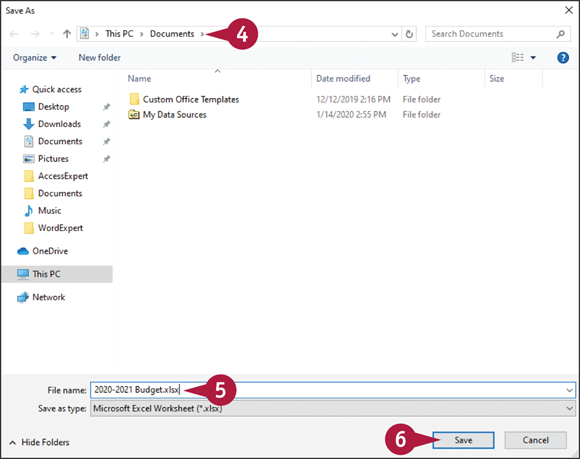
The Save As dialog box appears.
![]() Click the folder where you want to store the file.
Click the folder where you want to store the file.
![]() Edit the filename, if needed.
Edit the filename, if needed.
![]() Click Save.
Click Save.
Mail saves the attachment to your PC’s hard drive.
Delete a Message
After you have used Mail for a while, you may find that you have a lot of messages in your Inbox folder. The more messages you have, the harder it becomes to find a message that you want and the more time-consuming it gets to navigate the messages. To keep the Inbox uncluttered and easier to navigate, you should delete any messages that you have already read and do not need to keep.
Note that when you delete a message, Mail actually sends it to the Trash folder. If you delete a message accidentally, you can retrieve it from the Trash folder.
Delete a Message
Delete a Message from the Inbox
![]() Click the message that you want to delete.
Click the message that you want to delete.
![]() Click Delete.
Click Delete.
Note: If you have a tablet PC, you can also delete a message by swiping to the left across the message.
Mail removes the message from the Inbox and moves it to the Trash folder.
Restore a Deleted Message
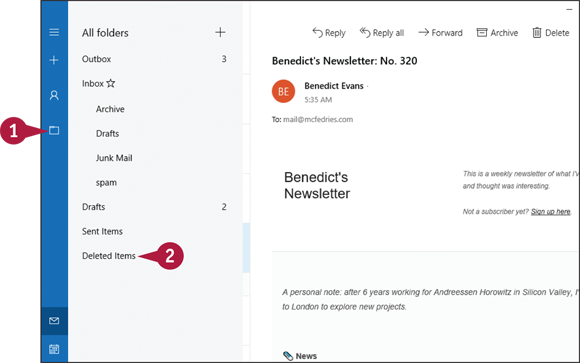
![]() Click All Folders (
Click All Folders (![]() ).
).
Mail displays the folders list.
![]() Click Deleted Items.
Click Deleted Items.
Note: Depending on your email account, this folder might be named Deleted, instead.

Mail opens the Deleted Items (or Deleted) folder.
![]() Right-click the message that you want to restore.
Right-click the message that you want to restore.
![]() Click Move.
Click Move.
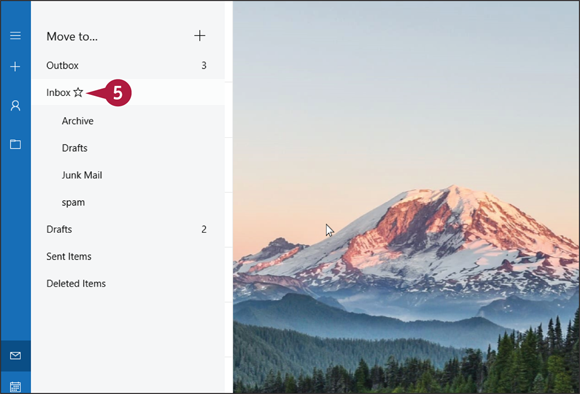
Mail displays a list of folders.
![]() Click Inbox.
Click Inbox.
Mail restores the message to the Inbox folder.
Create a Folder for Saving Messages
After you have used Mail for a while, you may find that you have a lot of messages in your Inbox folder. To keep the Inbox uncluttered, you can create new folders and then move messages from the Inbox to the new folders.
To help keep your messages organized, you should use each folder you create to save related messages. For example, you could create separate folders for people you correspond with regularly, projects you are working on, different work departments, and so on. By saving each message to the appropriate folder, you make it easier to find your messages in the future.
Create a Folder for Saving Messages
Create a Folder
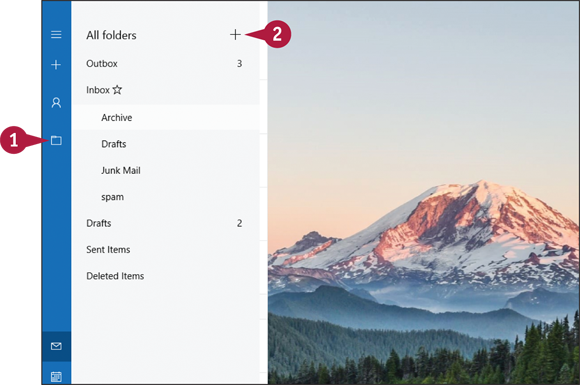
![]() Click All Folders (
Click All Folders (![]() ).
).
Mail displays the folders list.
![]() Click Create new folder (
Click Create new folder (![]() ).
).

You are prompted to enter the folder name.
![]() Type the name of the new folder.
Type the name of the new folder.
![]() Press
Press ![]() .
.
The new folder is created.
Note: If you see a message telling you the folder could not be created, it means your email account does not support folder creation via the Mail app.
Move a Message to Another Folder
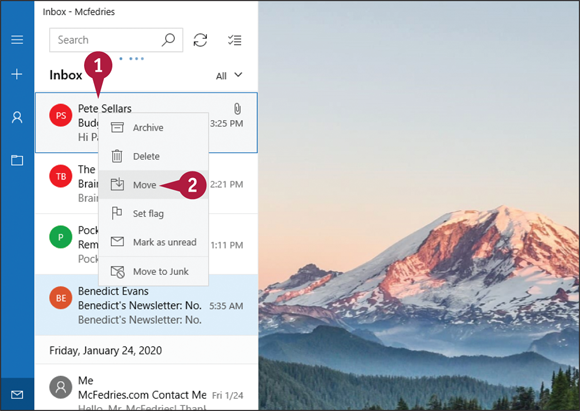
![]() In Mail, right-click the message you want to move.
In Mail, right-click the message you want to move.
![]() Click Move.
Click Move.
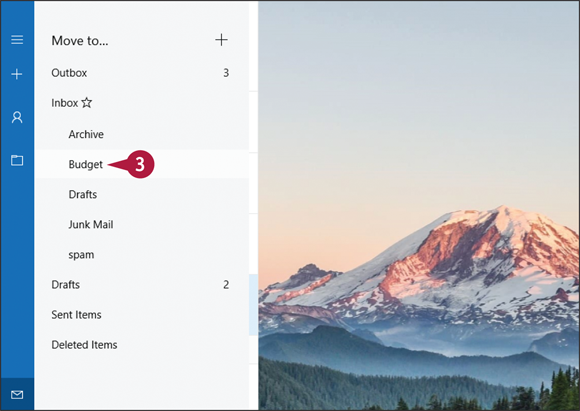
Mail displays the list of folders.
![]() Click the folder you want to use as the destination.
Click the folder you want to use as the destination.
Mail moves the message.
Configure Mail Options
The Mail app comes with a few options that you can configure to make the program suit the way you prefer to work. Several of these options are related to how you use swipe gestures in the Mail app, if you are running Windows on a Touch PC or tablet. You can also configure the Mail app background image and whether the app displays notifications. Finally, you can also customize the signature text that appears in the body of the messages you create as well as in the replies and forwards you send.
Configure Mail Options
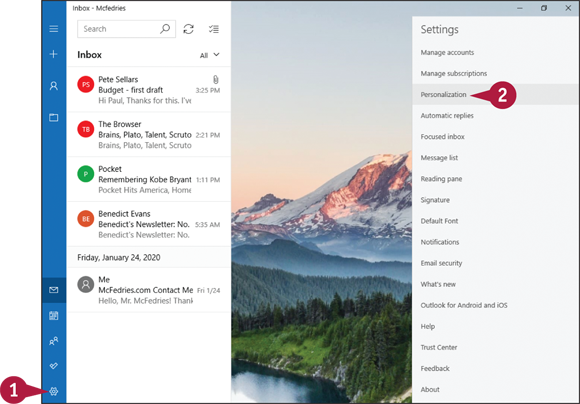
![]() Click Settings (
Click Settings (![]() ).
).
The Settings pane appears.
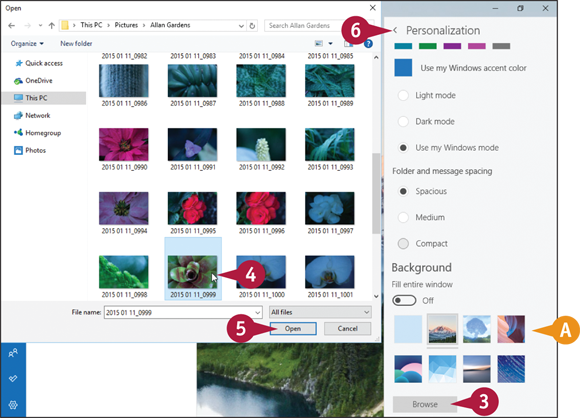
![]() To change the Mail app background image, click Personalization.
To change the Mail app background image, click Personalization.
Mail displays the Personalization pane.
![]() Click Browse.
Click Browse.
The Open dialog box appears.
![]() Click the image.
Click the image.
![]() Click Open.
Click Open.
![]() Alternatively, you can click one of the predefined images.
Alternatively, you can click one of the predefined images.
![]() Click Back (
Click Back (![]() ) to return to the Settings pane.
) to return to the Settings pane.
![]() Click Reading pane (not shown).
Click Reading pane (not shown).
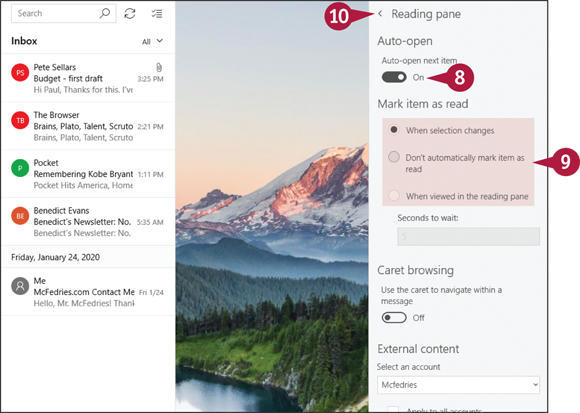
The Reading Pane settings appear.
![]() If you click the Auto-open next item switch to On, Mail automatically opens the next message after you use a swipe gesture to delete a message.
If you click the Auto-open next item switch to On, Mail automatically opens the next message after you use a swipe gesture to delete a message.
![]() In the Mark Item as Read section, click an option to specify when Mail marks a message as having been read (
In the Mark Item as Read section, click an option to specify when Mail marks a message as having been read (![]() changes to
changes to ![]() ).
).
![]() Click Back (
Click Back (![]() ) to return to the Settings pane.
) to return to the Settings pane.
![]() Click Message List (not shown).
Click Message List (not shown).

The Message List pane appears.
![]() If you do not want to use gestures on a tablet, click the Enable swipe actions switch to Off.
If you do not want to use gestures on a tablet, click the Enable swipe actions switch to Off.
![]() Click the Swipe right / hover
Click the Swipe right / hover ![]() and click the action that Mail performs when you swipe right on a message.
and click the action that Mail performs when you swipe right on a message.
![]() Click the Swipe left / hover
Click the Swipe left / hover ![]() and click the action that Mail performs when you swipe left on a message.
and click the action that Mail performs when you swipe left on a message.
Mail saves the mail options.