Chapter 11
Sharing Your Computer
If you share your computer with other people, you can create separate user accounts so that each person works only with his own documents, programs, and Windows settings. This chapter shows you how to create and change user accounts, how to log on and off different accounts, how to share documents between accounts, and how to create and restrict a child’s account.
Change Your User Account Picture
Display User Accounts
To work with user accounts, you need to display the Windows Accounts settings. A user account is a collection of Windows folders and settings associated with one person. In this chapter, you learn how to create new user accounts, change a user account’s picture, change a user account’s password, and delete a user account. To perform any of these tasks, you must first display the Accounts screen of the Settings app.
Display User Accounts
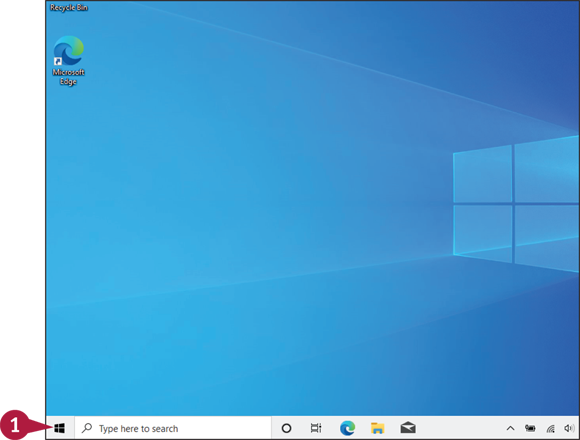
![]() Click Start (
Click Start (![]() ).
).

The Start menu appears.
![]() Click your user account.
Click your user account.

![]() Click Change account settings.
Click Change account settings.
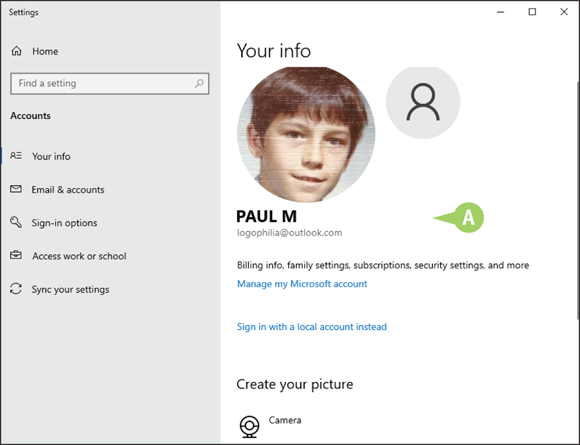
The Accounts screen appears.
![]() Information about your account appears here. Later, after you have switched to another account, information for the current account appears in this spot.
Information about your account appears here. Later, after you have switched to another account, information for the current account appears in this spot.
Create a User Account
If you want to share your computer with another person, you need to create a user account for that individual. This enables the person to log on to Windows and use the system. The new user account is completely separate from your own account. This means that the other person can change settings, create documents, and perform other Windows tasks without interfering with your settings or data.
You can create a local user account or a Microsoft account. For maximum privacy, you should safeguard each account with a password.
Create a User Account
![]() Display the Accounts screen of the Settings app.
Display the Accounts screen of the Settings app.
Note: See the previous section, “Display User Accounts,” to learn how to display the Accounts screen.
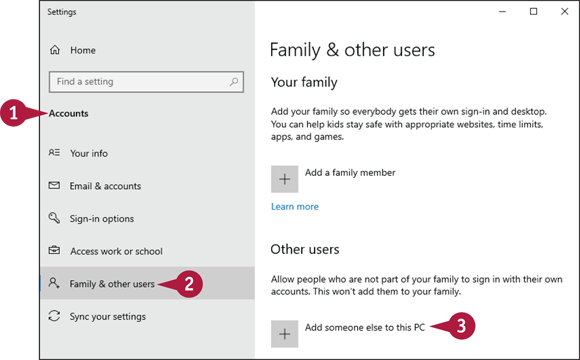
![]() Click Family & other users.
Click Family & other users.
![]() Click Add someone else to this PC.
Click Add someone else to this PC.
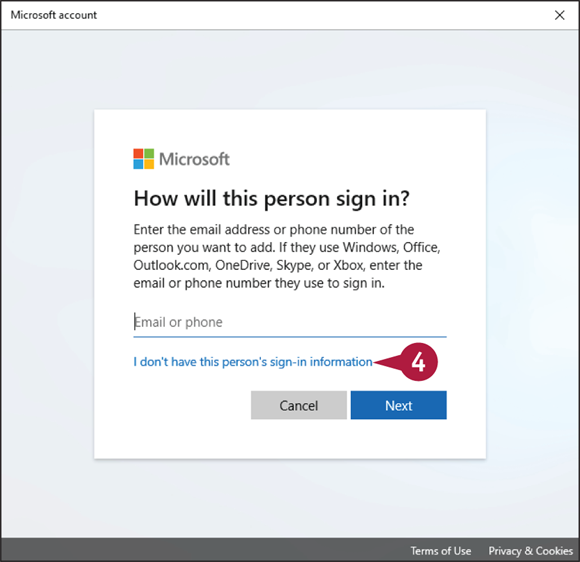
The How Will This Person Sign In screen appears.
![]() For a local account, click I don’t have this person’s sign-in information.
For a local account, click I don’t have this person’s sign-in information.
Note: If you want to create a Microsoft account instead, see Chapter 1 for more information.
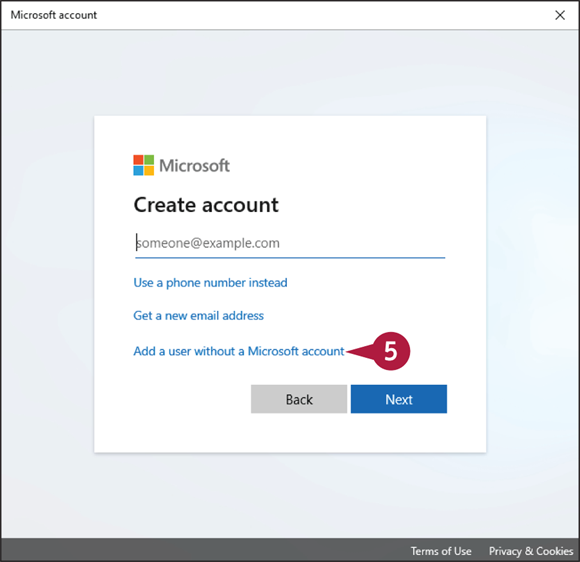
The Create Account screen appears.
![]() Click Add a user without a Microsoft account.
Click Add a user without a Microsoft account.
The Create an Account for this PC screen appears.
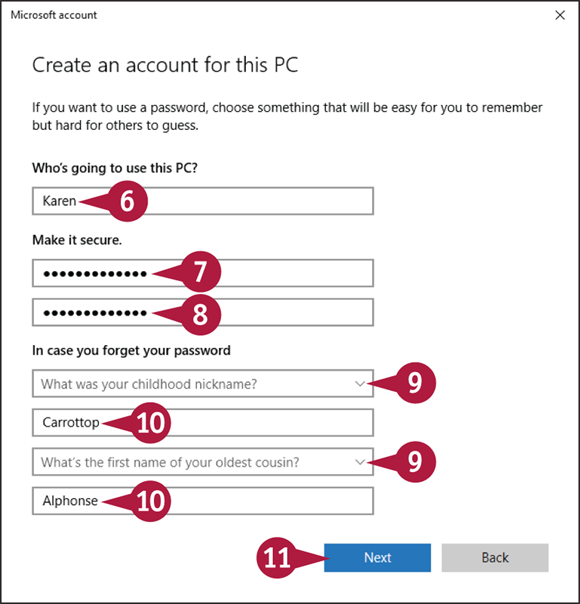
![]() Type the name you want to use for the new account.
Type the name you want to use for the new account.
![]() Type the password.
Type the password.
Note: The password appears as dots for security reasons.
![]() Retype the password.
Retype the password.
![]() For each security question, click
For each security question, click ![]() and then click the question you want to use.
and then click the question you want to use.
![]() Type an answer for each question.
Type an answer for each question.
![]() Click Next.
Click Next.
Windows creates the account and adds it to the Other Users section of the Family & Other Users screen.
Switch Between Accounts
After you have created more than one account on your computer, you can switch between accounts. This is useful when one person is already working in Windows and another person needs to use the computer.
When you switch to a second account, Windows leaves the original user’s programs and windows running. This means that after the second person is finished, the original user can sign on again and continue working as before.
Switch Between Accounts
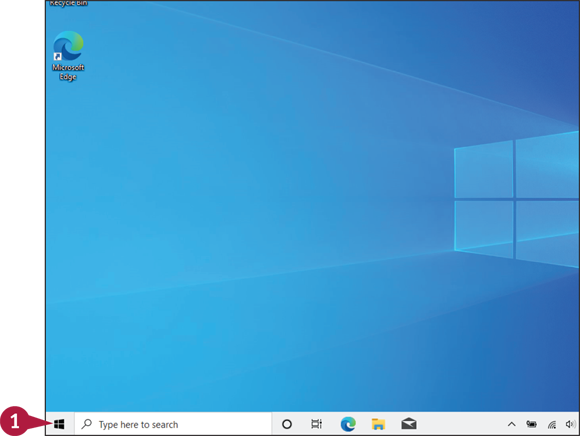
![]() Click Start (
Click Start (![]() ).
).
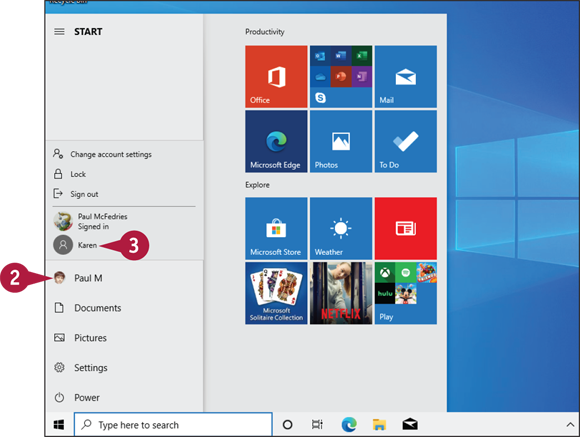
The Start menu appears.
![]() Click your user account.
Click your user account.
![]() Click the user account you want to switch to.
Click the user account you want to switch to.
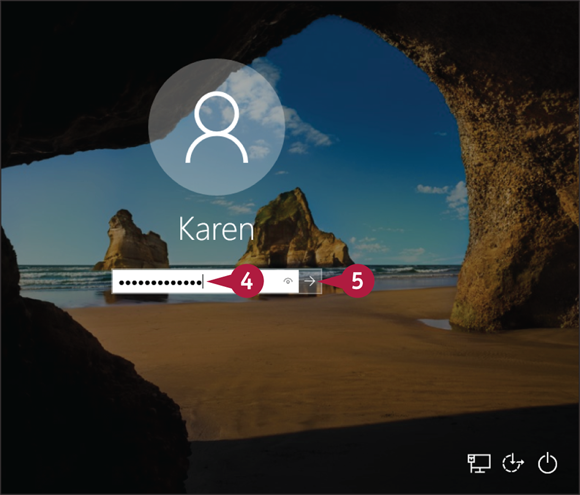
Windows prompts you for the user account password.
![]() Type the password.
Type the password.
![]() Click Submit (
Click Submit (![]() ).
).
Note: The first time you switch to a new account, Windows takes a few moments to configure the account.
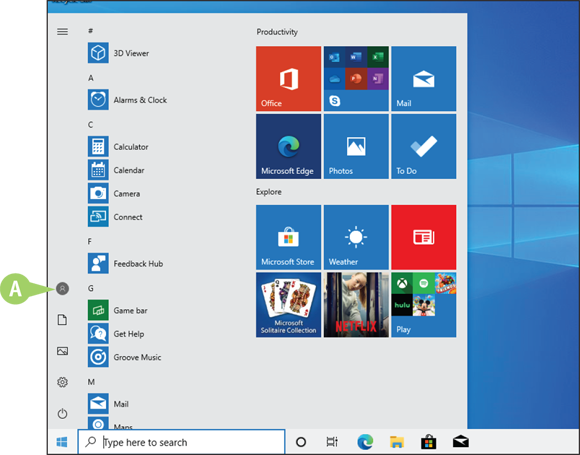
![]() The user’s default picture now appears in the Start menu, and the user’s name appears when you hover the mouse pointer (
The user’s default picture now appears in the Start menu, and the user’s name appears when you hover the mouse pointer (![]() ) over the account picture. To learn how to change the default picture, see the next section, “Change Your User Account Picture.”
) over the account picture. To learn how to change the default picture, see the next section, “Change Your User Account Picture.”
Change Your User Account Picture
You can add visual interest to your user account as well as make it easier to tell one user account from another by adding a picture to the account. When you create a user account, Windows assigns it a default picture, which appears in the user’s Start screen tile, the Accounts screen of the Settings app, and the sign-on screen. Unfortunately, this default picture is a generic silhouette of a person’s head and upper torso, so it is not very interesting or useful. If you have a more suitable picture that you would prefer to use, you can change your picture.
Change Your User Account Picture
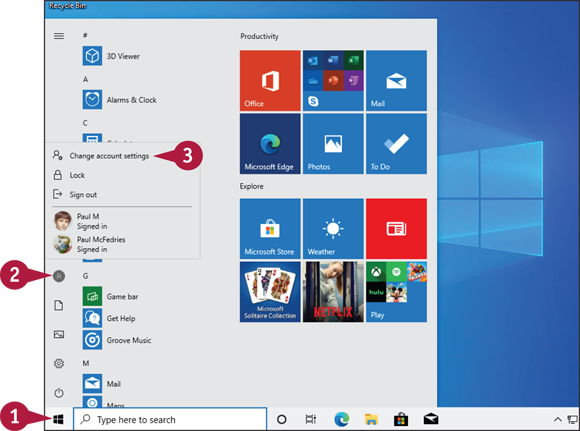
![]() Click Start (
Click Start (![]() ).
).
The Start menu appears.
![]() Click the user account.
Click the user account.
![]() Click Change account settings.
Click Change account settings.
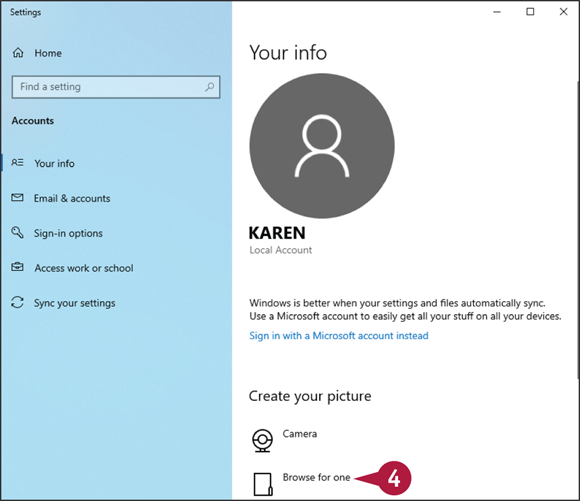
The Settings app appears with the Your Info tab displayed.
![]() Click Browse for one.
Click Browse for one.
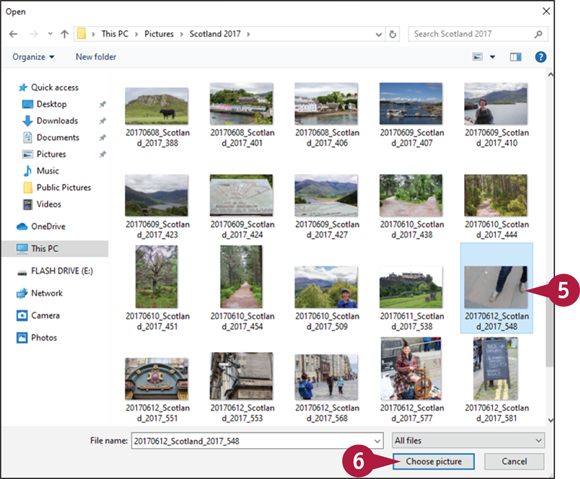
The Open dialog box appears.
![]() Click the picture you want to use.
Click the picture you want to use.
![]() Click Choose picture.
Click Choose picture.

![]() The Your Info tab appears and displays the new picture.
The Your Info tab appears and displays the new picture.
Change a User’s Password
If you set up a user account with no password, or if you find it difficult to remember your password, you can change the password. Assigning a password to each user account is good practice because otherwise someone who sits down at the PC can sign in using an unprotected account.
It is also good practice to assign a strong password to each account, so that a malicious user cannot guess the password and gain access to the system. Whether you want to assign a password or create a password that is stronger or easier to remember, you can use Windows to change an existing password.
Change a User’s Password
![]() If you want to change another user’s password, sign in as that user.
If you want to change another user’s password, sign in as that user.
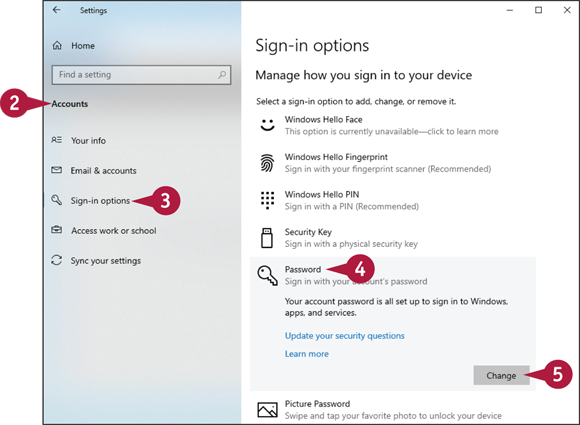
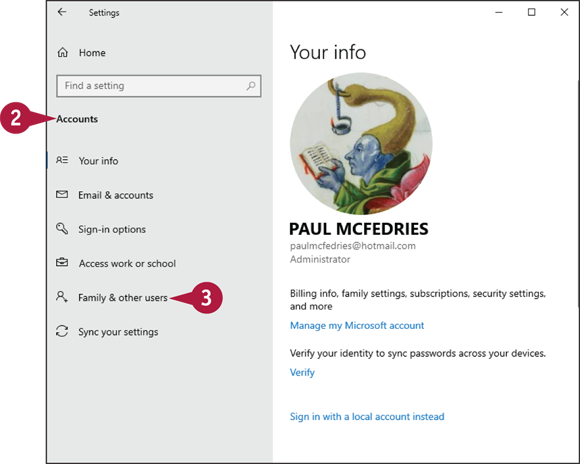
![]() Display the Accounts screen of the Settings app.
Display the Accounts screen of the Settings app.
Note: See the section “Display User Accounts,” earlier in this chapter, to learn how to display the Accounts screen.
![]() Click Sign-in options.
Click Sign-in options.
![]() Click Password.
Click Password.
![]() Click Change.
Click Change.
Note: If the account has no password, click Add in the Password section.
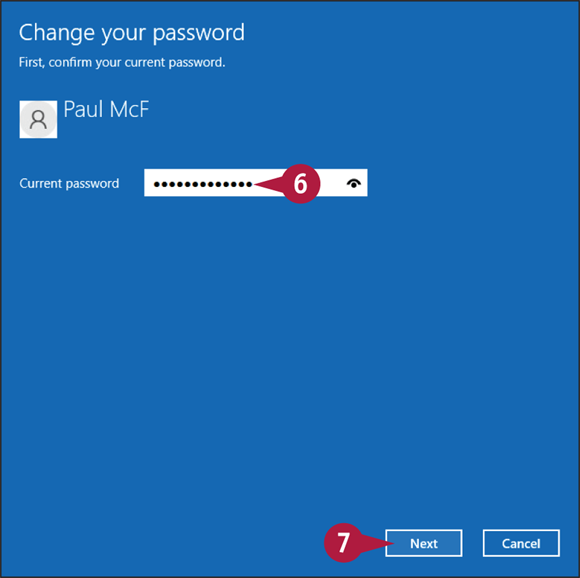
Windows prompts you to verify your current password.
Note: If the account has no current password, skip to step 8.
![]() Type your current account password.
Type your current account password.
![]() Click Next.
Click Next.
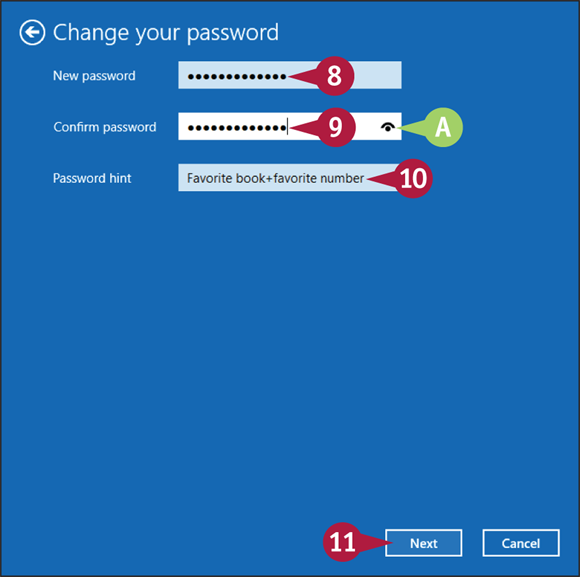
Windows prompts you for the new password.
![]() Type the new password.
Type the new password.
![]() Type the new password again.
Type the new password again.
![]() If you are not sure whether you typed a password correctly, you can click and hold Display Password Characters (
If you are not sure whether you typed a password correctly, you can click and hold Display Password Characters (![]() ) to temporarily display the password.
) to temporarily display the password.
![]() Type a hint.
Type a hint.
![]() Click Next.
Click Next.
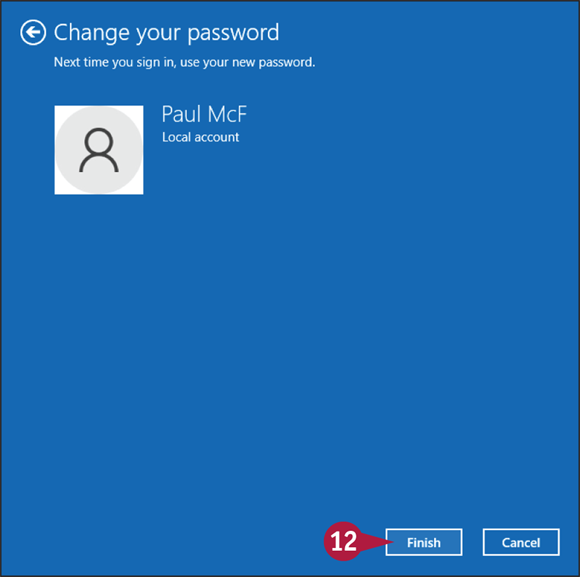
![]() Click Finish.
Click Finish.
Windows updates the user account password.
Delete an Account
If you create a user account temporarily, or if you have a user account that is no longer needed or no longer used, you can delete that account. This reduces the number of users that appear in the Users tab of the Settings app, as well as the Windows sign-on screen, which can make these screens a bit easier to navigate. Deleting a user account also means that Windows reclaims the hard drive space that the account uses, which gives you more room to store files in your other accounts.
Delete an Account
![]() Sign out of the user account you want to delete.
Sign out of the user account you want to delete.
Note: To sign out of an account, click Start (![]() ), click the user account on the Start menu, and then click Sign out.
), click the user account on the Start menu, and then click Sign out.
![]() Display the Accounts screen of the Settings app.
Display the Accounts screen of the Settings app.
Note: See the section “Display User Accounts,” earlier in this chapter, to learn how to display the Accounts screen.
![]() Click Family & other users.
Click Family & other users.
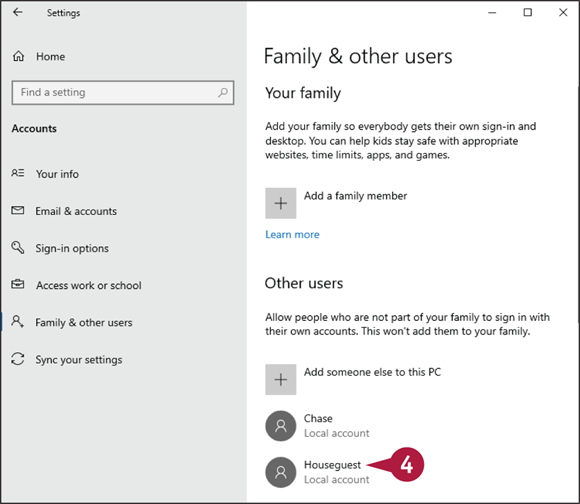
The Family & Other Users screen appears.
![]() Click the user account you want to delete.
Click the user account you want to delete.
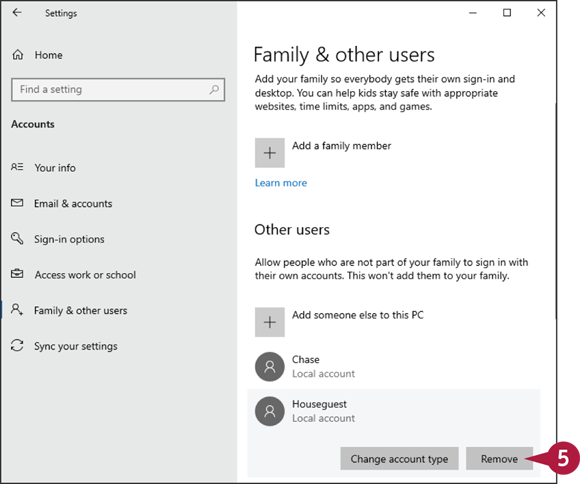
![]() Click Remove.
Click Remove.
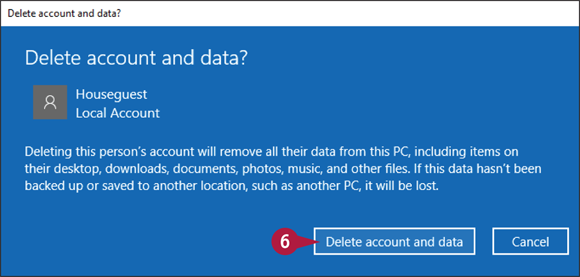
The Delete Account and Data dialog box appears.
![]() Click Delete account and data.
Click Delete account and data.
Windows deletes the account.
Add a Child to Your PC
If you have a child whom you want to give access to your PC, you can add that child as a family member rather than as a regular user account. The advantage is that you gain access to an extensive array of settings that enable you to restrict the child’s activities, content, and screen time. This section shows you how to add a child as a family member. The next section, “Set Restrictions on a Child Account,” takes you through the types of restrictions you can apply. Note that your child must have an email account to be added as a family member.
Add a Child to Your PC

![]() Display the Accounts screen of the Settings app.
Display the Accounts screen of the Settings app.
Note: See the section “Display User Accounts,” earlier in this chapter, to learn how to display the Accounts screen.
![]() Click Family & other users.
Click Family & other users.
![]() Click Add a family member.
Click Add a family member.
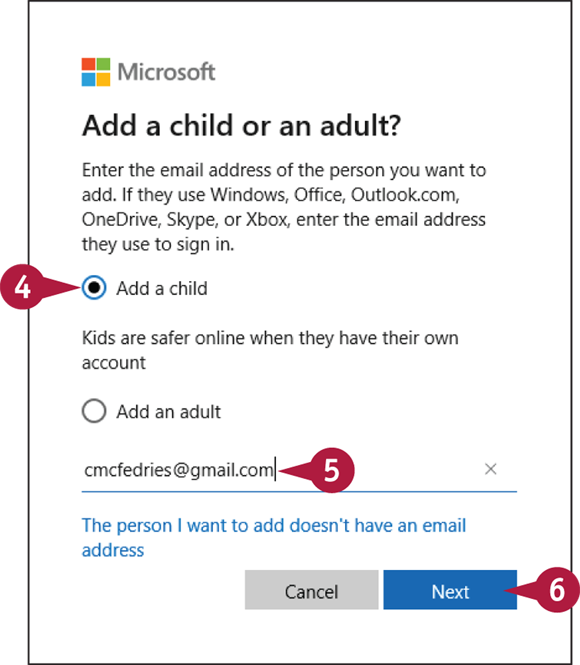
The Add a Child or an Adult window appears.
![]() Click Add a child (
Click Add a child (![]() changes to
changes to ![]() ).
).
![]() Type the child’s email address.
Type the child’s email address.
![]() Click Next.
Click Next.
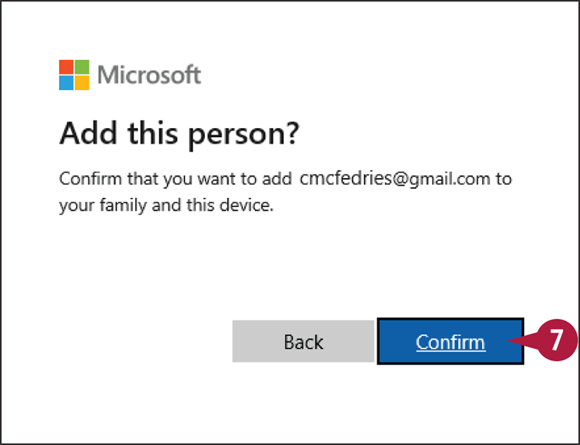
Windows asks you to confirm that you want to add the child to your PC.
![]() Click Confirm.
Click Confirm.
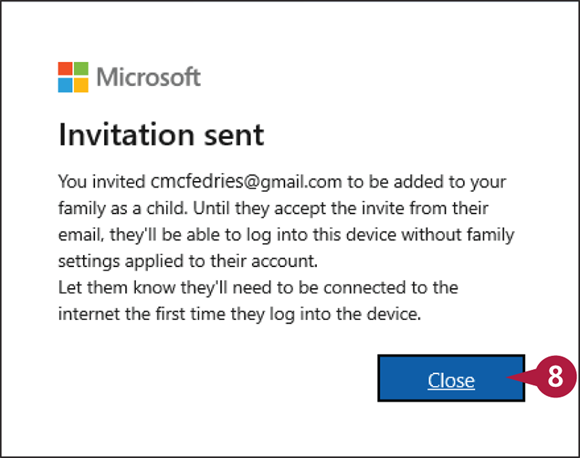
Windows lets you know that an invitation was sent to the person.
![]() Click Close.
Click Close.
![]() Access your child’s email account, open the email from Microsoft Family, click the Accept Invitation button, and then click Join the family (not shown).
Access your child’s email account, open the email from Microsoft Family, click the Accept Invitation button, and then click Join the family (not shown).
Windows adds the child to the Your Family section of the Family & Other Users tab in the Settings app.
Set Restrictions on a Child Account
You can set restrictions on an account that you have set up for a child. When you add a child as a family member on your PC, as described in the previous section, you can use Microsoft’s online family settings to enable various monitoring and restriction features. For example, you can receive weekly email reports of your child’s web browsing activity, restrict the hours each day that your child is able to use the PC, and block games, apps, media, and websites that are inappropriate for a child.
Set Restrictions on a Child Account
Display Family Settings
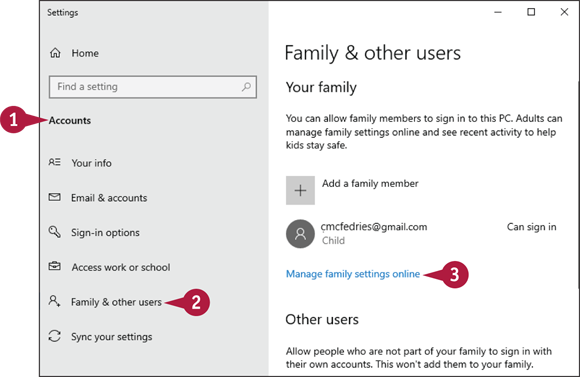
![]() Display the Accounts screen of the Settings app.
Display the Accounts screen of the Settings app.
Note: See the section “Display User Accounts,” earlier in this chapter, to learn how to display the Accounts screen.
![]() Click Family & other users.
Click Family & other users.
![]() Click Manage family settings online.
Click Manage family settings online.
Enable Activity Reporting
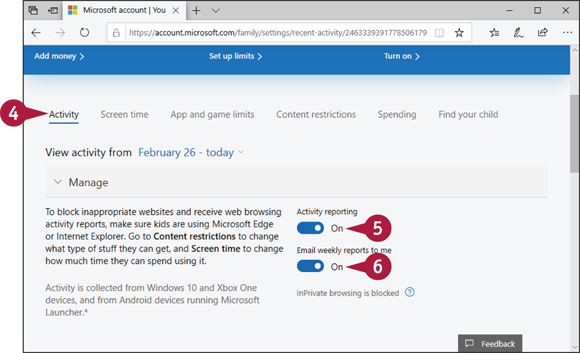
The Edge browser appears and opens the Family tab of your Microsoft account.
![]() Click Activity.
Click Activity.
![]() Click the Activity reporting switch to On.
Click the Activity reporting switch to On.
![]() Click the Email weekly reports to me switch to On.
Click the Email weekly reports to me switch to On.
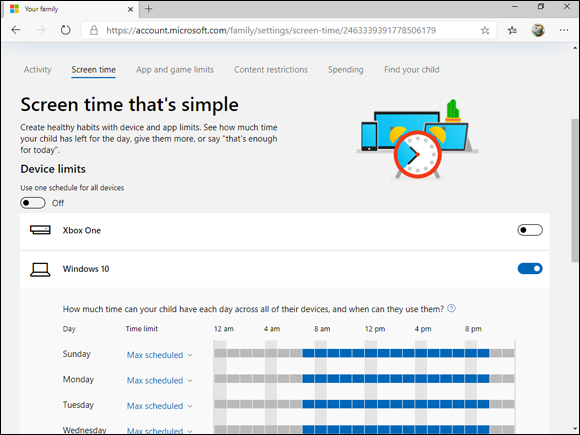
Set Screen Time Limits
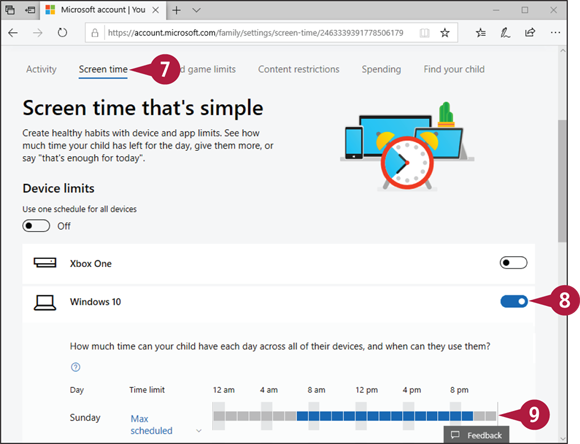
![]() Click Screen time.
Click Screen time.
![]() Click the Windows 10 switch to On.
Click the Windows 10 switch to On.
![]() For a particular day, click the time you want to work with.
For a particular day, click the time you want to work with.
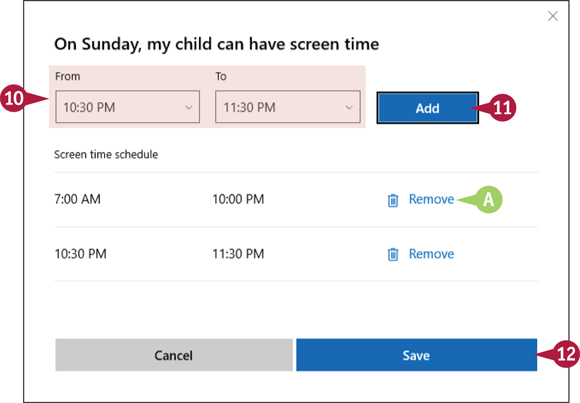
A window opens in which you can specify a time range that your child can use the PC.
![]() Click the From and To times to set the time in 30-minute increments.
Click the From and To times to set the time in 30-minute increments.
![]() Click Add.
Click Add.
![]() To delete a previously added schedule, you can click Remove beside the schedule.
To delete a previously added schedule, you can click Remove beside the schedule.
![]() Click Save.
Click Save.
Windows saves the screen time limit you chose.
![]() Repeat steps 9 to 12 to set more screen time limits as needed.
Repeat steps 9 to 12 to set more screen time limits as needed.
Share a Document or Folder
You can share documents and folders of your choice with other users set up on your computer.
Sharing a document or folder enables you to work on a file with other people without having to send them a copy of the file. You can set up each document or folder with Read or Read/Write permissions. Read permission means that users cannot make changes to the document or folder; Read/Write permission means that users can view and make changes to the document or folder.
Share a Document or Folder
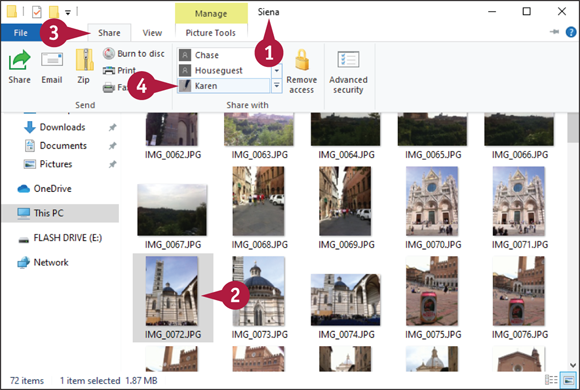
Set Read Permission for One User
![]() Open the folder containing the item you want to share.
Open the folder containing the item you want to share.
![]() Click the document or folder you want to share.
Click the document or folder you want to share.
![]() Click the Share tab.
Click the Share tab.
![]() Click the user you want to have Read permission on the file.
Click the user you want to have Read permission on the file.
Windows shares the file with the user.
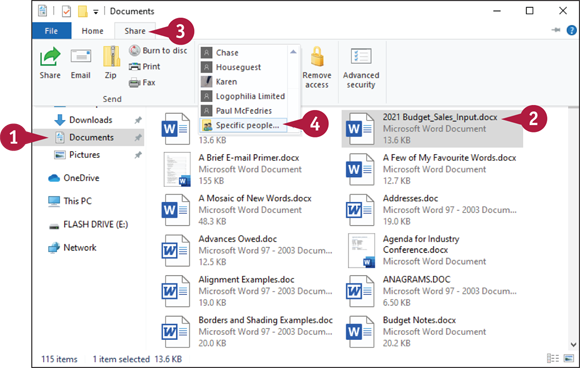
Set Custom Permissions
![]() Open the folder containing the item you want to share.
Open the folder containing the item you want to share.
![]() Click the document or folder you want to share.
Click the document or folder you want to share.
![]() Click the Share tab.
Click the Share tab.
![]() Click the Share with
Click the Share with ![]() and then click Specific people.
and then click Specific people.
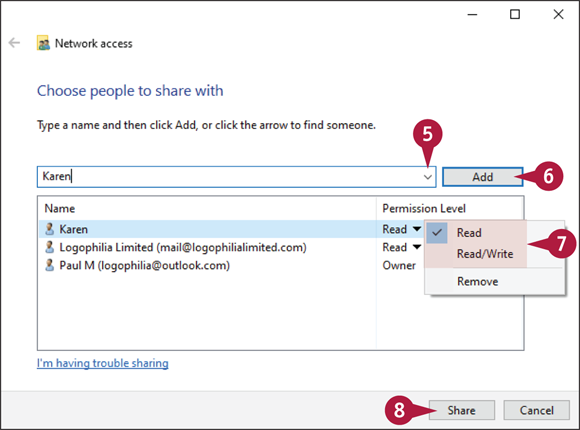
The Network Access dialog box appears.
![]() Click
Click ![]() and then click the name of the user.
and then click the name of the user.
![]() Click Add.
Click Add.
![]() Click
Click ![]() and then click the permission level.
and then click the permission level.
![]() Click Share.
Click Share.
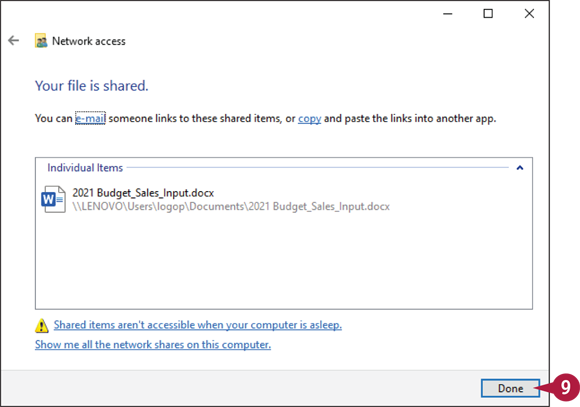
Windows shares the document or folder.
![]() Click Done.
Click Done.
View Network Resources
To see what other network users have shared on your network, you can use the Network folder. A network resource can be a folder, hard drive, disc drive, flash drive, printer, scanner, or other shared device. You might have to enter a password to access a network resource.
By default, Windows turns off its network discovery service, which enables you to see the network’s shared resources. Before you can view or access a shared resource, you must activate network discovery.
View Network Resources
Activate Network Discovery
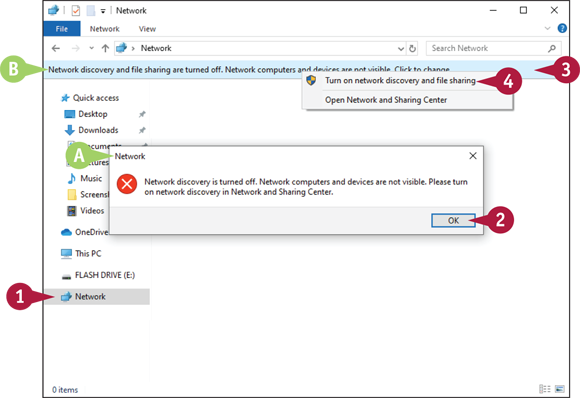
![]() In File Explorer, click the Network folder.
In File Explorer, click the Network folder.
![]() Windows displays a message telling you that network discovery is turned off.
Windows displays a message telling you that network discovery is turned off.
Note: If you do not see this message, skip the rest of the steps in this subsection.
![]() Click OK.
Click OK.
![]() Windows displays an information bar.
Windows displays an information bar.
![]() Click the information bar.
Click the information bar.
![]() Click Turn on network discovery and file sharing.
Click Turn on network discovery and file sharing.
Note: If Windows asks for administrative credentials, enter the password for your main Windows account.
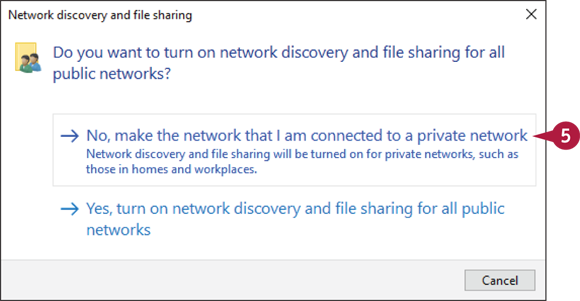
Windows displays the Network Discovery and File Sharing dialog box.
![]() Click No, make the network that I am connected to a private network.
Click No, make the network that I am connected to a private network.
View Network Resources
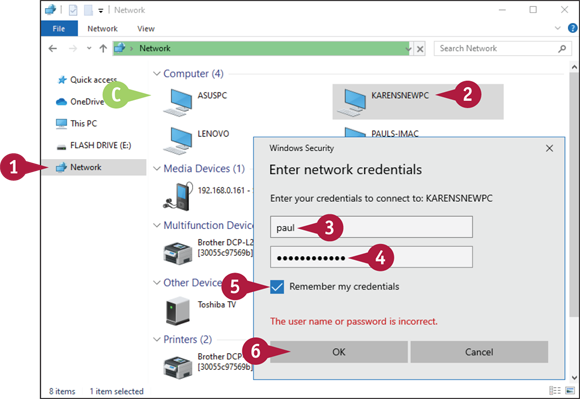
![]() In File Explorer, click the Network folder.
In File Explorer, click the Network folder.
![]() Windows displays icons for each computer that is sharing resources.
Windows displays icons for each computer that is sharing resources.
![]() Double-click the computer that is sharing the resource you want to access.
Double-click the computer that is sharing the resource you want to access.
![]() Type the username of an account that is allowed to access the computer.
Type the username of an account that is allowed to access the computer.
Note: If you already have an identical account on the network computer, you will be signed in automatically, in which case you can skip to step 7.
![]() Type the account password.
Type the account password.
![]() Click Remember my credentials (
Click Remember my credentials (![]() changes to
changes to ![]() ).
).
![]() Click OK.
Click OK.
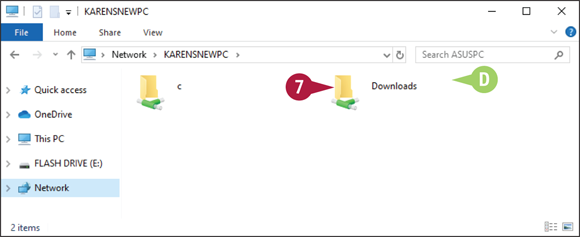
![]() The resources the computer is sharing appear here.
The resources the computer is sharing appear here.
![]() Double-click an icon to access the resource.
Double-click an icon to access the resource.