
Participate in a Meeting
Everything in the book until now has been preamble! We are finally at the main event: being part of a meeting.
Zoom meetings may have all participants joining via just video, just audio, or some combination of the two. Some people in a session may be using a dial-up line as audio-only members.
Meetings might have a single person streaming their video on camera, like a lecturer, fitness instructor, or manager, and everyone else locked out from showing theirs. Or a screen might show every participant!
A host might mute everyone and ask that only text messaging be used as a backchannel, or might call on individuals and hand a sort of virtual mic to them, highlighting them as they ask a question or take a turn in a presentation or course.
Let’s dig into how we find a meeting and join it, and then how to work within a video session.
What Makes a Meeting
A Zoom meeting is a sort of virtual room to which you’re invited. Every meeting has a unique meeting ID (a 9 to 11 digit number), and nearly all have a passcode. You may be sent an invitation that contains the meeting ID, the passcode, and a URL that will redirect (with permission) through Zoom’s website to connect you to the meeting.
The host may have opted to include the passcode in the URL; if so, it appears as &pwd= followed by letters and numbers. This adds risk with publicly announced or posted meetings, as an unwanted party can use the URL to join. Other hosts may share just the portion of the URL that contains the meeting ID (with the passcode provided through other means), and you will then be prompted to enter the passcode to join the meeting.
Each meeting is set up with particular parameters, some of which can be modified during the session. Here’s a list of what you may be able to do in a meeting, keeping in mind some hosts may disable certain options or they may not be available at the host’s service tier or without the host’s permission:
Share a video stream from your camera.
Share audio from a mic you select.
Share your screen.
Annotate a host or participant’s shared screen using drawing tools or adding text.
Record a session’s audio and video.
Chat via text in a public channel with all participants, privately with the host, or privately with one or more other participants.
Join the Meeting
When it’s showtime, you join the meeting and can start watching or actively participating. You can join a meeting in several ways:
Click or tap a plain meeting URL.
Click or tap a meeting URL with the passcode embedded.
Visit the Join a Meeting webpage, enter the meeting ID, and click Join.
Launch the app in any operating system, and tap or click Join—this doesn’t actually join you to the meeting, but takes you to the next step. Enter the meeting ID and (if available) the name under which you want to appear when you join (Figure 15). Tap or click Join.

In the first three methods, you should find yourself at a webpage that prompts you to open the Zoom app. Approve that action—the button and text varies by browser and platform—and the Zoom app launches if you have it installed. Otherwise, you can follow prompts to download the app and then return to the page.
Most Zoom meetings have a passcode set. If you didn’t click or tap a URL with the passcode embedded or if you started to join the meeting by entering the meeting ID, you will be asked for the passcode—but only at the time at which the meeting’s Waiting Room opens before the meeting or the meeting starts. Enter the passcode when prompted.
When you join a meeting, you may pass through as many as four stages:
Waiting for the host: Before a host has started the meeting or joined a session, a message appears: “Waiting for the host to start this meeting.”
Hanging out in the Waiting Room: When the host set the meeting so they have to start it, or if you join after they have already started it, you are likely to be placed into the Waiting Room. You see a message that reads, “Please wait, the meeting host will let you in soon.” You can test audio in the desktop app while you wait.
Prompted about audio or video: Depending on your app settings, you may see a preview of your video and be asked if you want to join with video on. You can choose to start or not start video and proceed to the actual meeting. You may also be prompted to enable device-based audio (Call Over Internet or Computer Audio), to dial in, or—with certain paid accounts with an extra feature enabled—to have Zoom call your phone number for phone-based audio. For dialing in, see the sidebar just below.
Joined to the meeting: You’re allowed in and meeting controls appear in the app. This can happen immediately if the host lets people join before they arrive, after they start the meeting, or after they let you in from the Waiting Room.
The meeting now starts and you see the main Zoom interface and controls (Figure 16). What you see varies by default choices; whether you’re using a mobile, desktop, or web app; the size or type of your mobile device; and the processing power on a desktop computer.

Adjust the View
Zoom’s apps have a number of ways to view people in a meeting, plus variants that depend on whether you’re in a full-screen mode on the desktop and whether someone is sharing their screen in the session.
In desktop and web apps, switch between the two main view types (described next) in the upper-right corner of the screen. Click the Speaker View ![]() icon when in Gallery View, and the Gallery View
icon when in Gallery View, and the Gallery View ![]() icon when in Speaker View. The full-screen
icon when in Speaker View. The full-screen ![]() icon is found in the same corner.
icon is found in the same corner.
Active Speaker
Active Speaker view, the default option when a meeting starts, places the video stream or screen of the person actively sending audio in a large portion of the view (Figure 18).

In desktop and web apps with a regular window, members appear as thumbnail-sized streaming videos in a row above the speaker, organized by the most recent speakers; the number varies by window size. You can page through sets of member videos with the forward and back arrow. If you’re displaying a view of your video, you always appear farthest left.
In mobile versions, you see just a live view of yourself.
This view lets you override the software picking the active speaker by using the “pin” feature. In a desktop or web app, hover over the video of the person you want, click the More  icon, and choose Pin Video. Hover over their video and click Switch to Active Speaker to cancel out. In a mobile app, double-tap the speaker to pin them. Double tap again to remove the pin.
Desktop apps set to full-screen mode change up how other participants’ video streams are shown. The active speaker appears as the main full-screen window, while a separate floating window can be moved around and dragged larger or shrunk to a wee rectangle (Figure 19).

The floating windows can be set to one of up to four states (depending on the number of recent speakers and total participants in the meeting), accessible by clicking icons in its upper-left corner:
Talking: Clicking the single horizontal line
 icon hides the thumbnail video and shows only the current speaker’s Zoom name.
Active Speaker: Click the squat rectangle
 icon to see just your own thumbnail video.
Multiple speakers: Click the two stacked rectangle
 icon to see recent active speakers if the session involves three or more people. (This icon doesn’t appear with a one-on-one session.)
Gallery View: If one or more people is sharing their screen for a presentation or other purpose, you can click a grid
 icon and see a gallery of people, the number of which depends on how wide and deep you shape the window.
Gallery View
You see equally sized streaming view of each participant. For meetings with more than a certain number of people, the gallery is divided into pages you can click or swipe through. In desktop apps, click the forward and backward buttons at the middle-left and middle-right of the screens. On a mobile device, swipe left from the Active Speaker view to move to Gallery View, then swipe left and right to page through.
The number of participants each page can hold varies by device, app, and processing power:
Smartphones: Up to four per page.
iPad: Up to nine per page.
Web apps: No option to use Gallery View.
Desktop apps: As many as 49 per page with an Intel i7 processor or better. For less-powerful processors, the number is smaller (Figure 20).

Even though this view might show dozens of people at once, the Zoom apps seem to handle streaming with aplomb. I can see up to 25 participants per screen on my 2017 iMac with an i5 processor, and in testing, the video is shockingly crisp and fluid.
In full-screen mode in desktop apps, Gallery View works just as it does in a regular window.
Hide Non-Video Participants
Audio-only meeting members appear as a black video rectangle with their name (computer audio and video plus dial-in) or Caller ID (dial-in audio only). That can be very handy to identify who is speaking, for a host to mute or unmute you, and for other reasons.
However, if you find it distracting, you can opt to hide people who aren’t streaming video. You can set it as a desktop app preference in Settings > Video (“Hide non-video participants”) or within a session, click an audio-only person’s box or click the More icon in the upper-right corner of their window (Figure 21).

Then you can choose Hide Non-Video Participants, and it will free up some screen territory. This is especially useful in large meetings.
Minimize for a Floating View
There’s yet another view: the Mini Window. In desktop apps, you can click the minimize button in the Zoom window, and the display switches to a tiny floating window of just the active speaker (Figure 22).

Click the downward pointing arrow  to switch between the Talking and Active Speaker modes as described above for the Active Speaker view. You can mute audio and video by clicking those icons. To return to the regular Zoom view, tap the expand
  icon.
icon.
In mobile apps, you can tap the More icon and choose Minimize Meetings. The active speaker shrinks to a thumbnail in the upper-right corner. You can drag the thumbnail to any point along any side of your screen. Tap the thumbnail to re-enter the meeting.
Pop Out a Window in Desktop Apps
The Participants list and chat are normally connected to the desktop app’s righthand side as a slide-out pane with participants on top.
However, you can click the downward-pointing arrow to the left of either the Participants or Chat pane’s name and select Pop Out to have either or both become freestanding windows. To reverse this, click the More icon and choose Merge to Meeting Window.
View a Shared Screen
Zoom is often used to share someone’s screen for a presentation or demonstration in a browser or app. Zoom’s view options change in desktop apps when screen sharing is involved.
If someone’s sharing their screen, it fills the main portion of the view. The top shows a video thumbnail or thumbnails in either Active Speaker or Gallery view. The normal view icon in the upper-right corner of the window changes to a screen-sharing swap ![]() icon. Click it to swap between the selected view and the shared screen.
icon. Click it to swap between the selected view and the shared screen.
Let’s look first at how to manage screen sharing in Zoom apps and then what actions you can take relative to the shared view.
View in a Desktop App
Zoom has a small handful of screen-sharing options for viewers in their desktop apps in Settings; several options can also be engaged in an active meeting:
Fill your screen: You can opt to enter full-screen mode or maximize the window’s zoom with separate checkboxes. You can also toggle full-screen mode in an active meeting by clicking Enter Full Screen button in the upper-right corner. Click a meeting window’s normal maximize button to zoom it to its largest available non-full-screen size or to restore it to previously scaled dimensions.
Don’t fill your screen: Pick “Scale to fit shared content to Zoom window” to retain a window’s proportions.
Side by side: In the previous three modes for window management in the two bullet points above—full-screen, maximized window, and scale to fit—you can also enable Side-by-side Mode as a setting, or click View Options during an active meeting when someone is sharing. the shared screen appears at left and the active speaker or a grid of participants at right. A dividing line between the two parts can be dragged left or right to resize that partition.
The shared screen displays the message “You are viewing person name’s screen” in a green bar at the top of the Zoom view or second window.
You can resize the window if it’s not in full-screen mode, or click View Options to choose an enlargement or reduction size.
View in a Mobile App
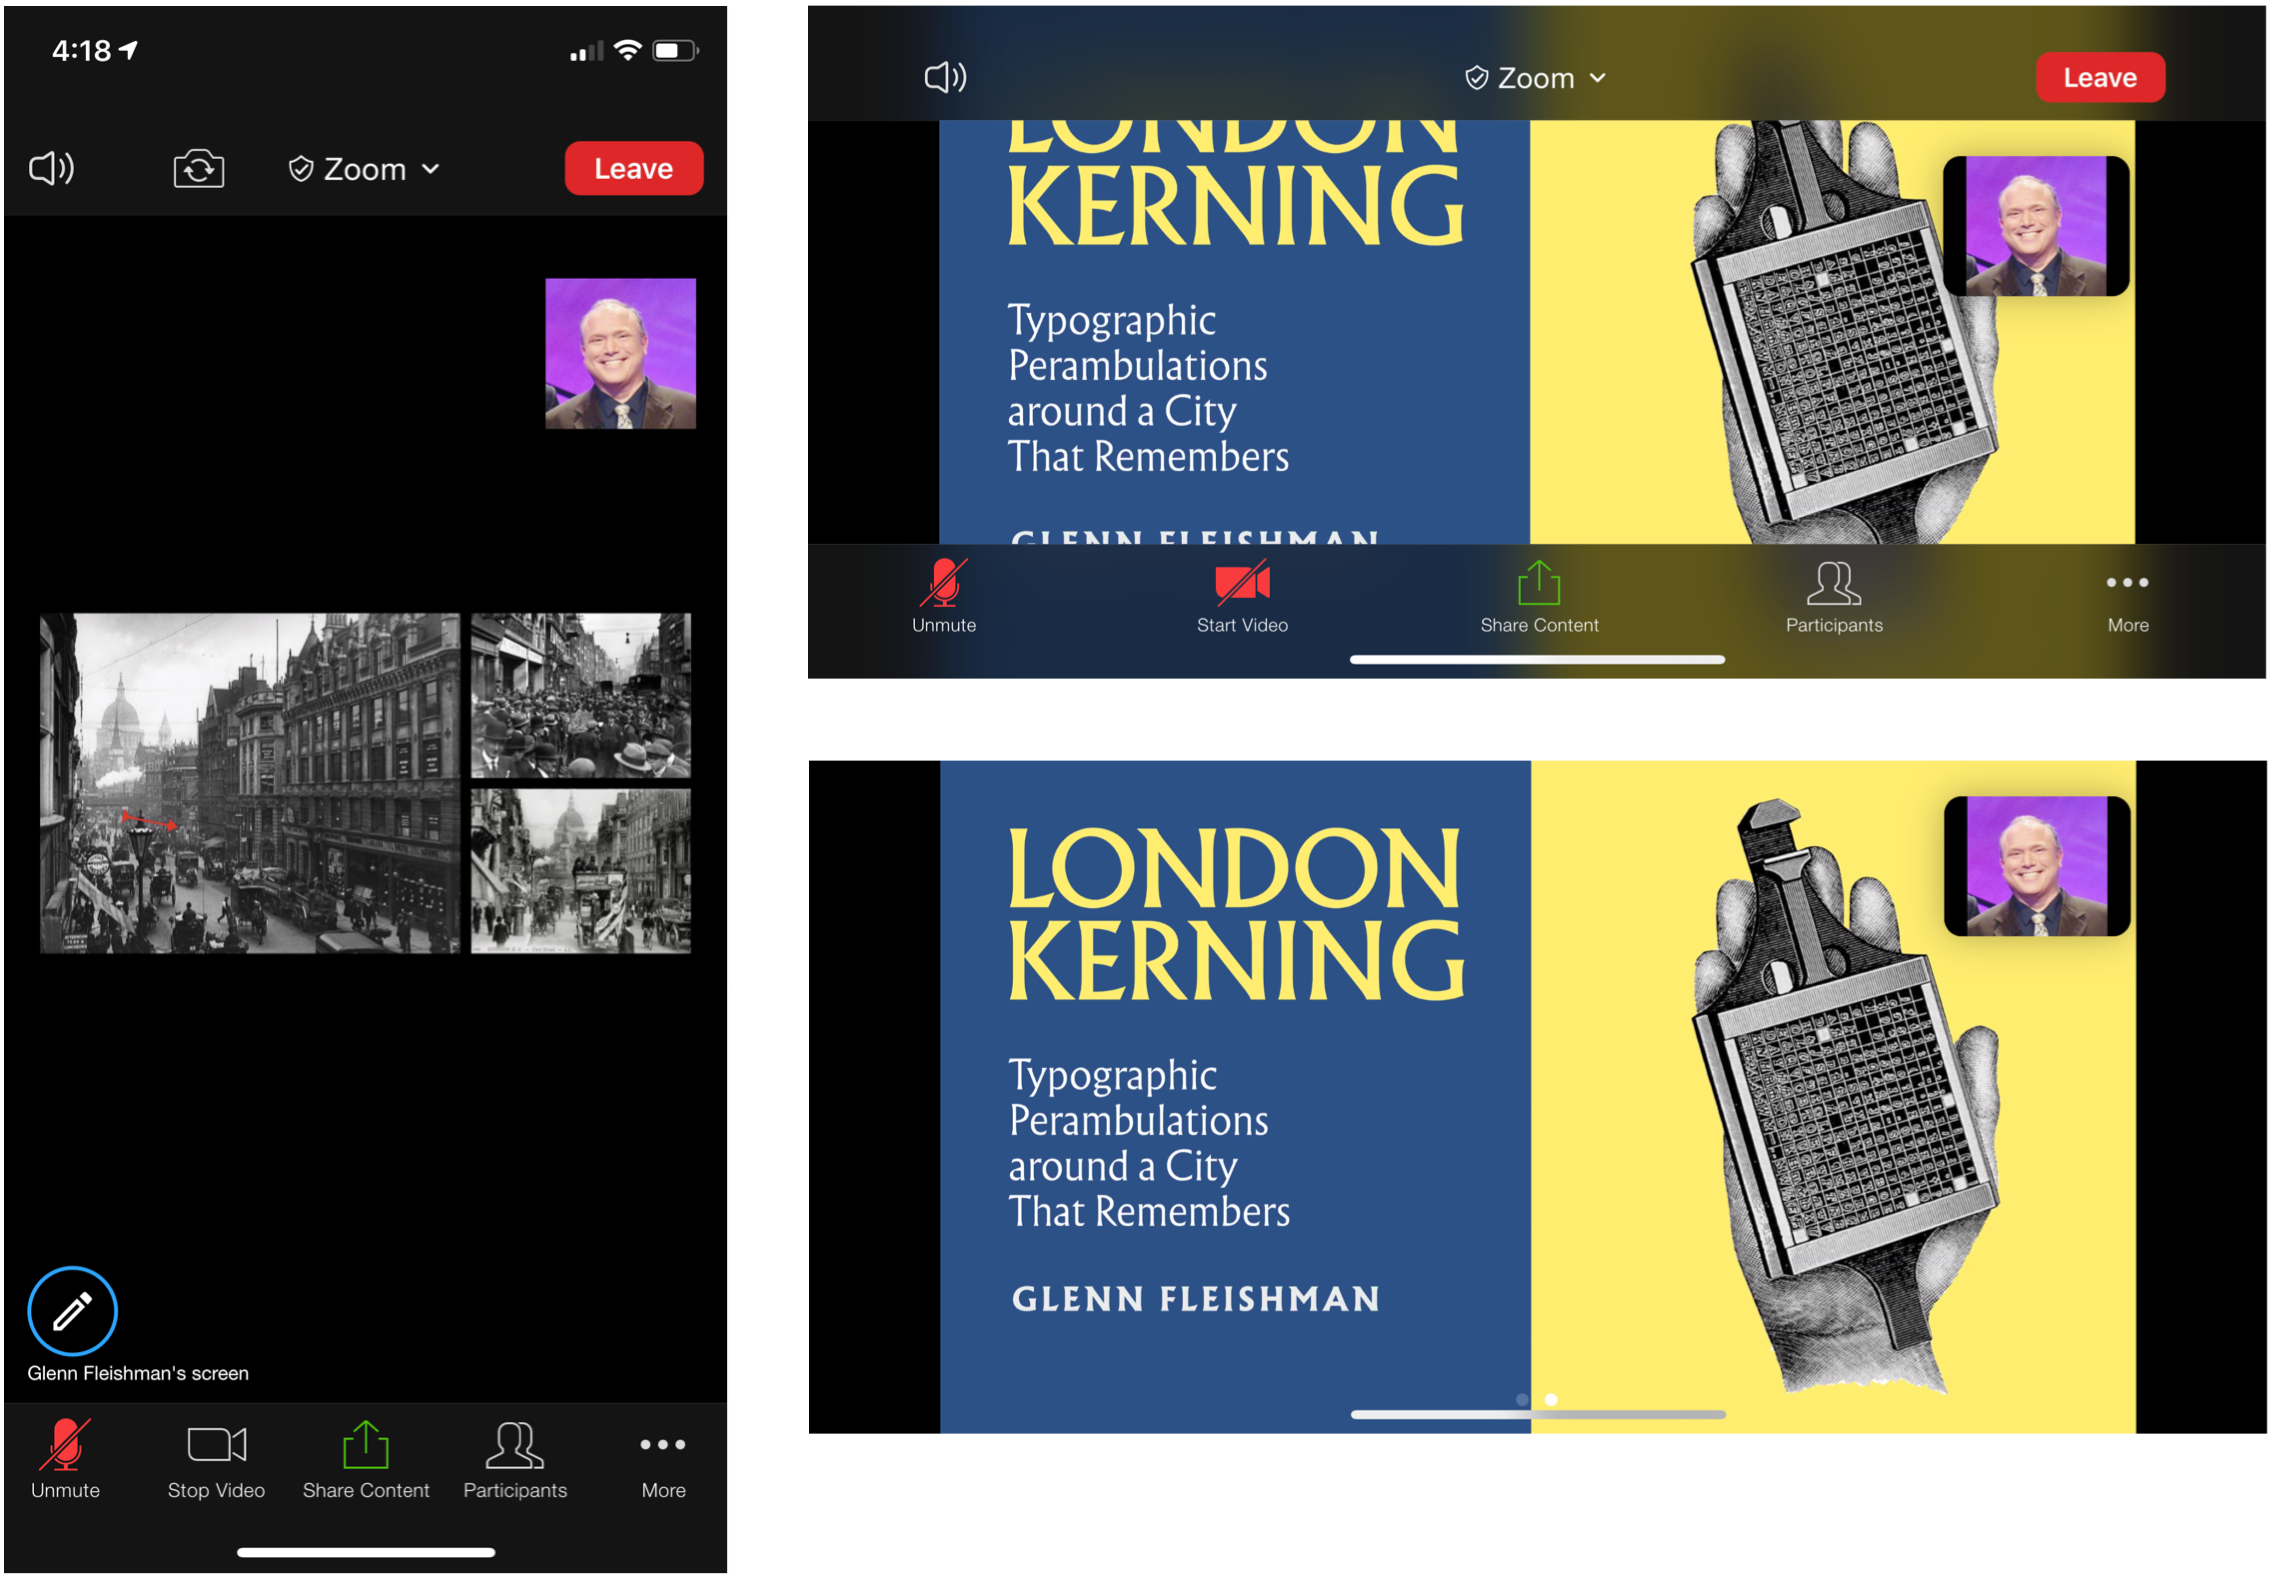
Mobile apps have no settings you can change for screen sharing. However, you can pinch or spread your fingers to zoom out or in, and hold to pan, on any touchscreen mobile device to see more, less, or a different aspect of the shared screen.
You can also give yourself more territory, particularly when you use a landscape view on your mobile device to view the shared screen—almost always desirable as most shared items will be wider than tall.
Tap More , then Meeting Settings, and disable Always Show Meeting Controls. Tap Done. Now the controls will disappear after a few seconds (Figure 23). You can tap the screen or move the image to have them re-appear.
Mark Up a Screen
If a meeting host allows it, the presenter and other participants can use annotation. (For more on host controls, see Manage Screen Sharing.)
This works with any kind of shared item, which includes the whiteboard, effectively a blank screen that is solely used for annotation.
In a desktop app, click the Display Options menu and choose Annotate; in a mobile app, tap the pencil in a circle in the lower-left corner of the screen. Both the desktop and mobile annotation bars can be repositioned around the screen by dragging.
Annotation relies on simple drawing and graphics tools. On the desktop, you can add text, draw freehand, add shapes (like circles and arrows), use tiny stamps, and highlight elements (Figure 24).

Format allows a choice of color and line width, along with limited text choices for the Text tool.
Each annotation is a separate item that can be deleted when clicked with the Eraser selected. You can also move through undo/redo or clear your annotations, as well as save the annotation layer.
Your name appears on other people’s screens as you annotate unless that feature is disabled. Lots of people can disable names appearing: each participant (for their own screen as they watch annotation occur), a host (for a meeting), or an administrator (for host accounts).
The presenter additionally has a Select button to move items around, and can erase their own and everyone else’s annotation elements. A Spotlight tool lets you drag a laser-pointer-like orange dot around the screen. It’s so tiny, though, that it’s hardly worthwhile.
Mobile users have fewer options. When marking up a screen, you can draw with a pen, mark up with a highlighter, add a line with an arrow at one end, and change the color and line width. The mobile tools are more limited, as befits a smaller touch-based environment.
While sharing your screen, the highlighter is replaced with Spotlight, which works as semi-pointlessly as it does on the desktop.
Interact in a Meeting
Meetings occur for a lot of different reasons, and for those that require or expect your participation, you have many ways to manage your interactions within the session. This is, of course, true of both social and professional meetings.
Take a Role in a Meeting
There’s no set way for people to participate in a Zoom meeting and there are lots of positions in which you may find yourself:
Passive listener/watcher: For some sessions, you may simply be watching someone speak, like an instructor in a class or a public lecture, and not share (or be allowed to share) your audio or video. You might use chat to ask questions or talk with other participants, or an organizer might have you use an entirely different system or website for that.
Active participant: Your video is streaming all the time, and you engage in active conversation with a main speaker or among all participants. Social and school class sessions are the most common form, along with less-structured company and organization meetings for brainstorming. Note particularly Mute Audio and Manage Video, below, on muting your audio when not actively speaking.
Part of a roster of presenters: In many kinds of meetings, there’s either an agenda with selected people presenting or speaking, or the organizer or group has selected people ahead of time. This could be a business meeting, a government committee meeting, or a class session.
Public meeting with permission to briefly participate: Because many kinds of in-person group meetings have gone virtual, it’s likely you may be part of a support group, public-policy meeting, organization or corporate board session, or other circumstances in which you will be spotlighted on request to ask a question or present a public statement. Your video may be stopped and audio muted except for those periods in which you’re called upon.
Take Actions
Zoom offers a lot of options for taking an active role in a meeting. Your choices are always limited by powers granted by the host to participants or to you as an individual. But they can include:
Speak up over audio.
Share a file, screen, presentation, or app from your computer or mobile device. See Share Your Screen.
Mark up a shared screen. See Mark Up a Screen, above.
Click or tap buttons to indicate responses, described fully in Interact in a Meeting.
Type in a chat sessions to the host, the entire set of participants, or specific other members. See Chat in Zoom.
Record a session or part of it. See Record a Meeting.
Mute Audio and Manage Video
Generally, the mute button is your friend. For most sessions, mute yourself. Zoom provides a visual cue by showing the mic in red with a line through it in all their apps.
When you need to speak:
Use the Space bar: In desktop apps, leave audio muted and rely on the spacebar. Whenever you press and hold the Space bar, Zoom unmutes your audio and shows a visual indicator. Release it, and you’re back to being muted.
Click the mic icon: In any Zoom app, you can click or tap the mic icon to toggle mute. You can click Unmute in the Participants sidebar in a desktop app. Remember to mute yourself again when you’re not speaking.
A host may have both muted everyone in a meeting and disabled their ability to unmute themselves. In that case, the only way to unmute is to request that the host unmute you. Conversely, if you’re muted, a host may request that you unmute yourself—you receive an alert in Zoom, and can choose to enable audio or not.
You can also start and stop video. A host may ask people to not stream video when they’re not speaking or at all. But you might also not want to be on camera all the time. It also reduces your upstream bandwidth and the bandwidth consumed by other participants. Depending on who organized the meeting and under what expectations it takes place, you can click or tap the Stop Video button whenever you like.
Get Attention
In interactive meetings, if everyone talks whenever they like, things can get out of control. It can mean the loudest or most determined talker-overs dominate discussions—whether it’s a business meeting that would normally happen in a conference room or a family get-together to talk about what people have been up to.
A meeting host may implement technical controls or set and enforce terms. (I offer suggestions to hosts in Manage Participants.) However, you can be part of setting a social or business culture in the absence of anyone else.
Here are a few methods to try:
Your physical hand: Raise your actual hand or wave or make physical movement.
Your virtual hand: Raise your virtual hand: click a button at the bottom of the Participants list in desktop apps or tap Raise Hand on the More
menu in mobile apps. The host is alerted. You can also lower your hand after raising it. (Call-in audio participants can press *9 to raise their hand.)Nonverbal feedback: A host unlocks a set of options by enabling nonverbal feedback in their meeting settings. Icons appear at the bottom of the Participants list (desktop) or on the More
menu (mobile), and also appear next to your name. Options include Raise/Lower hand, as well as “yes,” “no,” “go slower,” “clap,” “need a break,” and so on. A full list is available on a Zoom help page.Use a physical sign: Make small signs that say “yes,” “no,” “maybe,” and “applause” or other messages (Figure 25). Print these out on stiff paper and cut them out. Distribute PDFs of them to other regular participants for extra points.

Figure 25: A sign can help convey a response in a Zoom session. Use Reactions: Click Reactions in a desktop app or tap the More
icon in mobile apps, and you can select either the applause or thumbs up emoji. These appear briefly overlaid on your screen on everyone else’s meeting.Send a message to the host: If chat is enabled, you can tell the host you have a question, concern, or comment—but only if they have said up front that they welcome those messages, or if you know the host and don’t feel that it’s a problem to message them.
Send Files and Chat: While in a meeting, you can also send files and chat with other people. See Chat in Zoom.
Stay Safe in a Meeting
Participants in Zoom meetings largely rely on the host taking action. A meeting’s host can report a user to Zoom within an active meeting using a feature added in April 2020; see Protect a Zoom Meeting. Participants can also report abusive with a bit more effort via email; read Zoom’s up-to-date reporting instructions to proceed.
As a participant, you can also take manual steps before a session and also act within a session if you see behavior that violates the rules of a meeting, societal norms, or laws. You can also protect yourself with some guidelines. Here are my suggestions:
Don’t share invitations for public meetings with anyone you don’t know, unless you’ve been asked to be the organizer.
Decline to accept meeting invitations that appear without knowing why you’re receiving them.
In a public meeting, don’t accept or interact privately with strangers via a Zoom chat session.
Backchannel to the host via chat as soon as someone starts to engage in problematic or abusive behavior. Describe briefly and specifically what you’re seeing. Ask them not to identify you as the source to avoid retribution.