
Get Started with Automator
Automator is an easy-to-use technology, included as part of macOS, for bundling actions into sequences known as workflows. If programming gives you the willies, Automator is nothing to fear. You don’t have to learn a new language or write in code—just drag things into a list, fill in some blanks, and check some boxes.
For example, a workflow can:
- Convert text files and graphics into an ebook in EPUB format
- Create a graphic from a word or phrase
- Import all the images from a Web page into Photos
- Create and mount a new disk image
- Convert a movie file to a size and format suitable for your iPhone or iPad
- Create an audio file with a synthesized voice reading the contents of a text file
- Add a 1-pixel gray border around any graphic (that’s how we put the borders on most of the graphics in Take Control books!)
- Upload a file to each of several server destinations—with a different, pattern-based name in each place (that’s how we upload Take Control books to the various places they need to go when they’re ready for sale!)
Workflows are made from building blocks called actions. Automator includes many actions, as do a number of the applications bundled with macOS (such as Calendar, Contacts, Mail, iTunes, and Preview). Just as a third-party app may or may not include AppleScript support, some apps come with their own Automator actions and some don’t. A few third-party apps with good Automator support are BBEdit, DEVONagent Pro, DEVONthink Pro Office, LaunchBar, Microsoft Office 2016, Pixelmator, and Transmit. (In some cases, notably BBEdit, Automator support for an app requires a separate download and installation.) In addition, actions can optionally contain instructions written in numerous programming and scripting languages, including AppleScript, JavaScript, Perl, Python, and Ruby, and shell scripts.
I’ll show you how to make a few simple Automator workflows. Then I’ll tell you about some of your other options, where to find existing workflows that you can use as is or modify to meet your needs, and how to learn more about Automator.
Create a Simple Automator Workflow
For an easy (yet somewhat fancy) introduction, we’ll create a workflow that asks you to type some text, and then speaks it back to you:
- Open Automator (in
/Applications). - Click New Document.
- In the dialog that appears, select Workflow (the default) as the document type and click Choose. Your window should now look something like Figure 29.

Figure 29: An empty Automator workflow window. - If you don’t see a Library list in a sidebar on the left, click Show Library on the toolbar.
The Library is the list of available actions. You can click a category or app name to see its available actions, or type a search term into the Search field to find matching actions.
- Type
textinto the Search field to show only text-related actions in the second column. - Locate the Ask for Text action in the second column, and drag it into the workflow area on the right (Figure 30).
As the name suggests, this action displays a dialog that asks you to enter text.

Figure 30: The Ask for Text action, ready to be filled in. - Fill in the question you want the dialog to ask, such as
What would you like me to say?and, if you like, fill in a default answer, such asBeep. Select the Require an Answer checkbox to ensure that some text must be entered (so that the workflow always does something). - Return to the second column, find the Speak Text action, and drag it below the Ask for Text action (Figure 31).
You’ll notice that the two actions join together to show that the output of the first one (whatever you type into the dialog) is fed as input into the second one.
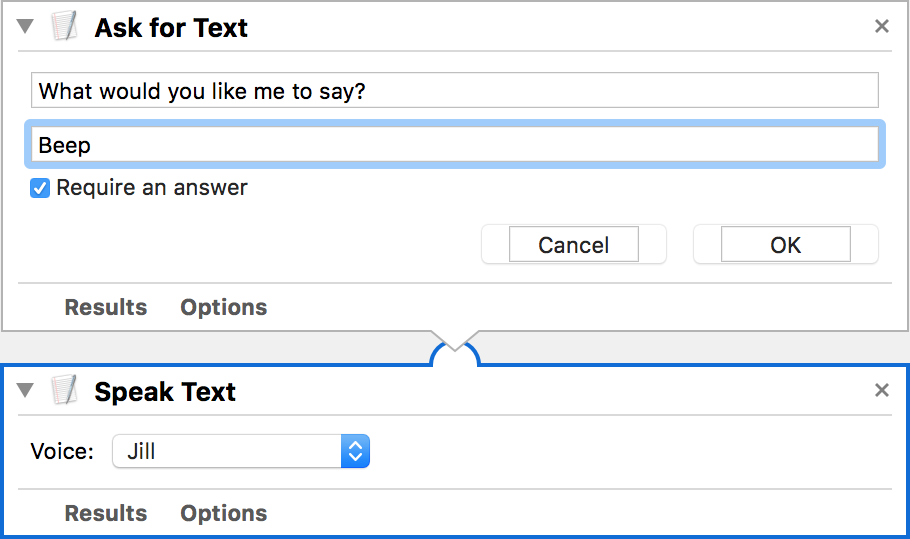
Figure 31: Two actions joined into a workflow. - If you like, choose a different voice from the Voice pop-up menu.
Your workflow is now ready. To run it, click the Run ![]() button on the toolbar. You should see a dialog asking you what you want it to say. Accept the default answer or supply a new one, click OK, and your Mac will speak that text.
button on the toolbar. You should see a dialog asking you what you want it to say. Accept the default answer or supply a new one, click OK, and your Mac will speak that text.
That’s the general idea of workflows. Usually, one action produces some sort of output (a file, a URL, text, or whatever) and feeds that to the next action, which does something with it and passes it along to another action—and so on. The final action provides the result in the form you’re looking for (a modified file, information in a dialog, an open Web page, or what-have-you).
To reuse a workflow, save it (choose File > Save, choose a name and location, and click Save); you can then double-click it to reopen it in Automator. Or you can save it as an app (same procedure, but choose Application from the File Format menu in the Save dialog), and you get a stand-alone, double-clickable Automator app. (For other ways to package a workflow, see the sidebar Automator Workflow Types.)
Create an Automator Droplet
I mentioned a moment ago that you can save an Automator action as a double-clickable app. Automator apps can also function as droplets—that is, they’ll perform the actions you specify on any files or folders you drag and drop onto the app icon. I’d like to show you a quick example, and in the process point out a few other interesting things about Automator. For this example, we’ll create a droplet that scales images to 50 percent of their original size, saves them as JPEGs (regardless of their original format), and renames them, changing the case to Title Case and adding the word “Scaled” to the filename.
Follow these steps:
- Open Automator. If the new document window doesn’t appear automatically, choose File > New.
- Click Application, followed by Choose.
- From the Photos category, drag the Scale Images action to your workflow.
An alert appears, telling you that the action you just added with change files passed into it. If you wanted Automator to add a step here so that it works on a copy of the file instead, you could click Add. But for the purpose of this example, we don’t—we’re going to go ahead and change the original—so click Don’t Add. (You’ll see this alert a few more times before we’re done with this workflow!)
- In the Scale Images action, choose By Percentage from the pop-up menu and fill in 50 in the field that follows.
- From the Photos category, drag the Change Type of Images action to your workflow. Once again, click Don’t Add in the alert that appears. Choose JPEG from the To Type pop-up menu.
- From the Files & Folders category, drag the Rename Finder Items action to your workflow. Click Don’t Add, as usual. From the first pop-up menu, choose Change Case. Leave the second set to “Basename only,” and choose Title Case from the third.
- From the Files & Folders category, drag another instance of Rename Finder Items to your workflow, and yet again, click Don’t Add. This time, choose Add Text from the first pop-up menu. Then fill in “ Scaled” (that is, a space followed by the word Scaled) in the text field, and leave the other pop-up menu set to “after name.”
- Choose File > Save, enter a name (such as Scale & Rename), and save the app. The final version should look something like Figure 32.

To run the app, first make a copy of a graphic that you don’t mind altering, or take a quick screenshot just so you have a disposable graphic file to work with. Drag that graphic onto the app you saved in Step 8. You should see the title change (for example, “my graphic.png” would become “My Graphic Scaled.jpg”) and if you open the graphic in Preview, you’ll see that it’s in JPEG format and at 50 percent of its original size. (Needless to say, you can adjust the size, format, and naming to something that would be more useful to you.)
I want to point out a few things about this workflow:
- You can reorder the steps any which way. In some cases, order is significant (you need to make one change before making another one that depends on it), but in this case, it doesn’t matter. You could, for example, drag the two renaming steps above the two image steps and get exactly the same result.
- Although I asked you to opt out of the steps that make copies of the file (just to keep the example short and sweet), you should pay attention to that option in real life—especially when a file format changes or unrecoverable data might be lost.
- Sometimes you need multiple instances of the same action (as with “Rename Finder Items” here) to get the desired end result.
Create Your Own Service
Services (refer back to Use Services for System-wide Shortcuts) help you automate common tasks, but what about uncommon tasks—things you’d like a service to do, but for which you can’t find a prebuilt solution? Even if you’re not a programmer, you can create your own service with Automator!
To create a service, open Automator and create a new workflow (see Create a Simple Automator Workflow), but instead of selecting Workflow as the document type, select Service. When you do so, a few new options appear at the top of your workflow; fill them in to specify how and where your service will work:
- Service Receives Selected: From this pop-up menu, choose the type of data that must be selected for the service to appear; the service then receives the selected data as input. For example, choose Text, Dates, Files or Folders, Image Files, or Web Content. (To create a service that requires no input at all, choose No Input.)
- In: Use this pop-up menu to choose whether your service should be available in Any Application, or only in a specific application. (Choose Other and navigate to the app if it doesn’t appear in the menu.)
- Input Is: For certain data types only, you can use this pop-up menu to determine whether the service acts on the Entire Selection or only the relevant portion of it—for example, Only Addresses, Only URLs, or Only Dates.
- Output Replaces Selected Text: For Text and Rich Text selections only, check this box if you want the service to replace whatever’s selected after the service runs. For example, if you select a word and run a service that translates it into another language, you may want the translated word to replace the original.
Then build your workflow as usual, save it, and give it a name. Automator automatically stores it in ~/Library/Services.
Here’s a simple yet useful example from the Automator portion of the Mac OS X Automation site: a service that takes text you’ve selected in any app and turns it into a static image with a user-specified font, size, style, and color. (You might use such an image on a Web site, in an email newsletter, or in a Keynote presentation, for example.)
To create this service:
- Open Automator. If the new document window doesn’t appear automatically, choose File > New.
- Click Service, followed by Choose. Leave the settings in the top portion of the window set at their defaults.
- From the Photos category, drag the action Create Banner Image from Text to the workflow. Select the “Replace existing file” checkbox, and choose your desired location, typeface, color, and size (or leave it set to the defaults—Desktop folder, Helvetica, black, and 64 points, respectively).
- From the Photos category, drag the Open Images in Preview action to the workflow.
Your workflow should now look something like Figure 33.

Figure 33: This service workflow converts selected text to an image. - Now choose File > Save and give your workflow a name (such as Text to Image).
To use the workflow, open any app that lets you select text. Select a few words and then choose Application Name > Services > Service Name, where “Application Name” is the name of the app you’re using and “Service Name” is the name you chose in Step 5. Automator creates the image, saves it on your desktop, and opens it in Preview.
Find and Run Sample Workflows
Automator workflows you find online usually work unmodified on your Mac—you double-click them and, depending on how they were saved, you either run them in Automator or they run as apps. (If you want to edit an Automator app, drop it onto the Automator icon.)
Try some of the sample workflows (most of which should still work fine, even if they’re a bit old) at these sites:
- 15 Automator and AppleScripts You Can’t Live Without at TechRadar
- 10 Awesome Uses for Automator Explained at Tuts+
You may find workflows that almost do what you want them to do. Feel free to experiment by changing options within actions, or swapping out one action for another. Unlike AppleScript, Automator makes it simple to tinker without worrying that you’ll make a syntax error or have no idea what command to use—your only building blocks are the actions you see in the list.
Learn More about Automator
If you want to learn much more about working with Automator:
- For a quick and interesting tutorial, start with Apple’s (somewhat outdated) Mac Basics: Automator page.
- See the Automator portion of the Mac OS X Automation site.
- Read Neil North’s Automator for Mac OS X: Tutorial and Examples.