Customize Mail
Mail isn’t the fanciest or most powerful email client for the Mac, and many people have dismissed it as being too unsophisticated for email power users. I agree with that sentiment to a point—in its default configuration, Mail isn’t a fantastic email program. However, you can customize Mail in many ways, including by adding plugins that both dramatically increase its capabilities and modify standard behaviors to become much more useful. The result is that with a bit of effort, you can turn a so-so email client into a deluxe and highly optimized tool.
In this chapter, I acquaint you with some of the most important ways to customize Mail that don’t require any additional software. I don’t list every single option, nor do I go into tremendous detail, but I want to make sure you’re aware of what so many Mail users aren’t—you don’t have to live with the stock version of Mail, and you can improve your enjoyment of the app a great deal with a bit of grooming.
Sidebar
The sidebar is the area on the left of Mail’s main window that contains all your mailboxes. Don’t see it? Choose View > Show Mailbox List. Prefer to keep it hidden? Choose View > Hide Mailbox List. (Apple seems to think Mail is easier to use when the sidebar is hidden, but for most people with multiple accounts or more than a few mailboxes, the sidebar is indispensable.)
You can also rearrange items in the sidebar by dragging them to new locations, with certain limitations:
Top-level categories with titles in bold (such as Mailboxes, which contains your Special Mailboxes; Smart Mailboxes; and individual accounts) can be reordered—for example, you might want to show your smart mailboxes at the top of the list and your special mailboxes at the bottom.
Within the Mailboxes category, the order of (unified) special mailboxes is fixed; for example, Drafts always appears above Sent. However, you can reorder accounts within a unified special mailbox. For example, if your Gmail account is listed before iCloud under Sent, you can drag iCloud above Gmail—and that modified order will be reflected under all your unified special mailboxes.
You can reorder the mailboxes within any given account.
You can click Show or Hide next to a sidebar category to expand or collapse its contents (see Hidden Interface Elements), but you can’t manually hide the categories themselves. On the other hand, Mail automatically hides the names of accounts that have no sub-mailboxes beneath them.
Mail used to have a Mail Activity pane at the bottom of the sidebar. It’s gone now, but an abbreviated version (Figure 10) appears briefly in the same location when Mail is performing a background task that takes more than a moment.

Toolbars
The toolbar is the area at the top of a window (just below the window’s title, if it has one), that contains a series of buttons and other controls. Mail has three different toolbars, one for each type of window:
Viewer window: Mail’s main window, which Apple calls the Viewer window, lists your messages and shows their contents. It has a toolbar that includes buttons such as Get Mail
 and New Message
  , which apply across accounts, as well as things like Delete
  and Reply
  , which apply to the currently selected message(s).
Incoming message window: If you double-click a message in the Viewer window, that message opens in its own message window. The message window’s toolbar contains some of the same buttons as the Viewer window (such as Delete
and Reply ) but also a Print  button.
Compose new message window: When you’re writing a new message (including replying and forwarding), the window’s toolbar contains only relevant buttons, such as Send
 and Attachments
  .
.
You can customize each of these toolbars individually. Open a window of the appropriate sort, choose View > Customize Toolbar, and drag buttons on or off the toolbar, or to new locations, to suit your needs. By doing so, you can add frequently used controls (such as Archive, for the Viewer window and incoming message window) and remove any controls you seldom use.
Message Header
The term “message header” is a bit ambiguous in Mail, because what it normally means in the context of email is the information at the top of a message that includes sender, recipient, subject, date sent, and lots of other (normally hidden) data such as the addresses of the mail servers the message passed through to get from the sender to you, and the name of the app used to send it. But Mail also uses “message header” to refer to the top portion of the new message window, which contains the address fields and a row of controls underneath it (Figure 11). That’s what we’re concerned with here.

You can change a few things about this portion of the window to suit your needs. To do so, click the unlabeled Header Fields ![]() pop-up menu in the toolbar and choose any of the following to turn them on or off:
pop-up menu in the toolbar and choose any of the following to turn them on or off:
CC, Bcc, and Reply-To address Fields: Enabling these here has the same effect as choosing the corresponding commands from the View menu.
Priority Field: Displays a pop-up menu from which you can choose !! (high priority), ! (normal priority), or – (low priority) for outgoing messages; these flags normally show up in the recipient’s client to indicate how important you, the sender, think the message is.
Views
By default, Mail’s main Viewer window displays an optional sidebar, a vertical list of messages including brief excerpts, and a preview pane on the right showing the contents of the selected message.
If you prefer, you can switch to what Mail calls the “classic” layout (Figure 12), which puts the preview pane at the bottom instead of on the right, and presents the message list as a sortable table, but without excerpts. To use the classic layout, go to Mail > Preferences > Viewing and select Use Classic Layout.

The layout of the Viewing pane in Mail preferences may suggest otherwise, but the three options directly beneath the Classic Layout checkbox apply only when you are not using the classic layout:
Show To/Cc label in the message list: With this option enabled, a label indicates whether you were a To/Cc addressee, as opposed to a Bcc or mailing list addressee
Show contact photos in the message list: Pulls the senders’ photos, if any, from the Contacts app and displays them alongside the message excerpts; if no photo is available for a sender, displays a circle with the sender’s initials
List Preview: How many lines of text (if any) to show as an excerpt in the main message list
In addition to the overall window layout, you can also enable or disable Organize by Conversation (choose View > Organize by Conversation), which applies only to the currently selected mailbox and groups together all the sent and received messages in a given thread, even if only one of them actually resides in the current mailbox. (Usually, but not always, Mail is smart enough to group messages into a conversation even if someone changes the subject line along the way.) Thanks to this feature, there’s no need to move sent and received messages to the same mailbox in order to view them as a thread.
Tabbed Windows
Like most apps in Sierra or later, Mail can use tabs to show multiple views within the same window frame. Normally, this capability applies only to the Viewer window, but different rules apply in Full-Screen Mode. This means you can have multiple Viewer windows, each with its own layout, sort order, settings, and so on, and switch among them with a click.
To use tabbed windows in Mail, first make sure you have at least two Viewer windows (as a reminder, choose File > New Viewer Window to create a new one). Then choose Window > Merge All Windows to combine the viewer windows into a single window with tabs, and click a tab to switch to that viewer. To close a tab, choose File > Close Window, press ⌘-W, or click the x ![]() icon that appears when you hover over the tab.
icon that appears when you hover over the tab.
Favorites Bar
A thin strip below the toolbar in the Viewer window (Figure 13) shows your Favorite mailboxes—those to which you’d like one-click access, even if the sidebar is hidden. If you drag a special mailbox (or any mailbox with sub-mailboxes) to this bar, you see a tiny arrow to the right of the mailbox name; click and hold on the arrow to view a pop-up menu of the individual accounts or sub-mailboxes. A number in parentheses indicates the number of unread messages in that mailbox.

To add a mailbox to the Favorites bar, drag it from Mail’s sidebar. To remove a mailbox, drag it off the bar. You can also drag mailboxes left or right in the bar to reorder them.
Each of the first 10 favorites, starting from the left, gets an automatic keyboard shortcut with a corresponding number—⌘-1 for the first, ⌘-2 for the second, and so on up to ⌘-0. So in the figure above, Junk, which is the sixth favorite from the left, would be ⌘-6. Pressing a shortcut displays the contents of the corresponding mailbox in the Viewer window.
Message Filters
Mail in Sierra added a feature that allows you to filter your currently selected mailbox to display only those messages that match certain criteria you specify, much like a similar feature in iOS (see Filter Your Inbox). For example, if you have lots of messages in your Inbox, you may want to temporarily show only those that are unread, or come from VIPs, or have attachments.
To filter your messages, click the tiny filter ![]() icon above the message list. By default, Mail then displays only those messages in the currently selected mailbox that are unread:
icon above the message list. By default, Mail then displays only those messages in the currently selected mailbox that are unread: ![]() . To change which messages appear when the filter is on, click the blue text (in this case, “Unread”) to display a pop-up menu (Figure 14).
. To change which messages appear when the filter is on, click the blue text (in this case, “Unread”) to display a pop-up menu (Figure 14).

In this menu, click one or more items to check or uncheck them; Mail displays only messages matching the checked items.
To stop filtering your messages, click the dark-gray filter ![]() icon.
icon.
VIPs
In Mail, a VIP is any sender you designate as being especially important. Mail can use your list of VIPs in a variety of ways to call special attention to messages from those people. VIPs you set up in the macOS version of Mail sync to the iOS version and vice versa, as long as both devices are configured to use the same iCloud account (with Mail enabled in System Preferences > iCloud).
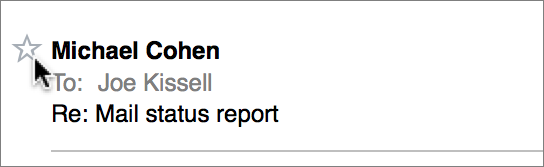
To put someone on your VIP list, open any message from that person. Move your pointer to the area just to the left of the sender’s name in the header of the message (Figure 15) and click the star ☆ icon that appears there. Repeat as often as you like for other senders; or, to remove someone from the VIP list, click that person’s star ☆ again.
Once you have at least one VIP, Mail creates a new VIPs entry in your mailbox list along with the other Special Mailboxes. You can select that mailbox to see messages from all your VIPs, or expand the list and select any particular VIP’s name to see messages from just that person.
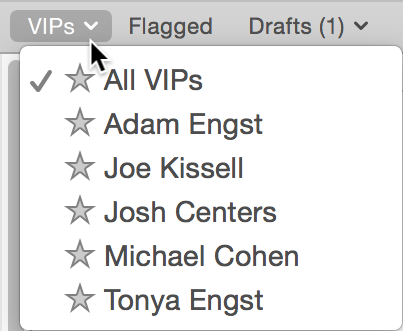
Similarly, a VIPs category appears in your Favorites bar (Figure 16). Click that favorite to show mail from all VIPs, or choose a person from the pop-up menu that appears when you click the arrow beside the favorite.
Besides being able to jump right to messages from any or all of your VIPs, you can do the following using the VIPs feature:
Use VIPs in notifications: Set Mail’s Notifications preferences to notify you only when email arrives from VIPs. See Notifications for more information.
Use VIPs in rules: Perform any sort of automated action (play a sound, run an AppleScript, send a special reply, etc.) when a message from a VIP arrives. See the sidebar VIPs and Notifications in Rules, later in this book.
Signatures
A signature is boilerplate content that is appended to the end of your email messages, typically containing your contact information or perhaps a pithy quote.
You can define as many signatures as you need, mix and match them with accounts as you deem appropriate, set which signature (if any) each account uses by default, and even rotate or randomize signatures within an account.
I’m astonished that after all these years, Mail still has such an odd and user-unfriendly way to configure signatures, but once you get the hang of it, it’s not too bad.
To set up signatures, go to Mail > Preferences > Signatures. The left column lists your email accounts, the center column lists your signatures, and the right column displays the contents of each signature (Figure 17).

First follow these steps to create your signatures:
In the left column, select All Signatures if it isn’t already selected.
Click the plus
 button to create a new signature, and give it a name that will help you distinguish it from other signatures.
In the right-hand column, add your signature. Here are some tips:
To make your signature use the default font you set for outgoing messages, select Always Match My Default Message Font. (This setting uses the font selected in the Fonts & Colors preference pane, along with the default message format—plain text or rich text—set in the Composing pane.)
You are not restricted to plain text—you can apply fonts, sizes, colors, and styles using commands on the Format menu—but I advise sticking with plain text to avoid forcing the entire outgoing message to be rich text. (For more on this, see Choose Formatting Wisely, later.)
You can drag in (or paste in) a graphic, but I do not recommend it, since it may annoy recipients. (For one thing, an image in a signature counts as an attachment, so every message from you will appear, to the recipient, as a message with an attachment.)
Keep your signature short—two or three lines is plenty. Nobody likes receiving email with signatures that go on and on, or that are longer than the message itself (especially those with line after line of pointless and unenforceable legalese)!
If your signature is too wide for Mail’s preferences window, you can actually—unlike with most Preferences windows—resize the window for a better view.
Repeat the above steps for as many signatures as you want to create.
You now have signatures defined, but before you can use them, you must assign them to particular accounts and configure their behavior:
Assign each new signature to one account, or to multiple accounts. To do so, drag a signature’s name from the middle column onto an account name at the left.
The number under the account name indicates how many signatures are associated with that account. To see just the signatures in one account, select the account name on the left.
Specify how Mail will add signatures to messages sent from each account. Select an account in the left column, and then choose an option from the Choose Signature pop-up menu:
Automatically: Choose a single signature or choose At Random or In Sequential Order.
Manually: Choose None.
Repeat this step for each account listed in the left column.
By default, signatures appear at the bottom of messages, below any quoted text. If you prefer to put your signature above the quoted text, if any, select “Place signature above quoted text.” Note that this setting affects all signatures, in all accounts.
Close the Preferences window.
Your new signatures are now available for use in outgoing messages.
To apply a signature to an outgoing message (or to change the one Mail has applied automatically), choose it from the Signature pop-up menu when composing a message. Unlike some email apps, which append signatures after you click Send, Mail displays the signature as editable text, so that you can change or delete it manually if you like.
Keyboard Shortcuts
You can assign keyboard shortcuts to nearly any command in Mail. To do this, go to System Preferences > Keyboard > Shortcuts > App Shortcuts. Click the plus ![]() button, choose Mail from the Application pop-up menu, type the name of the menu command in the Menu Title field, click in the Keyboard Shortcut field, and press the keystroke combination you want to use. Then click Add.
button, choose Mail from the Application pop-up menu, type the name of the menu command in the Menu Title field, click in the Keyboard Shortcut field, and press the keystroke combination you want to use. Then click Add.
There’s just one problem, which occurs if you try to do this for any mailbox on the Move To or Copy To submenu. Both the Move To and Copy To submenus contain exactly the same commands, and by default, macOS keyboard shortcuts are tied only to the name of the command, not the submenu name. That means you’ll have a hard time predicting whether a given shortcut will copy or move messages (and indeed, the behavior changes, depending on which action—copy or move—you performed most recently). To solve this problem, type the full path of the menu command, with -> to represent a submenu, as in: Message->Move to->Travel (with no space before or after ->).
If you want even more flexibility in assigning keyboard shortcuts, opt for a third-party keyboard shortcut tool such as Keyboard Maestro or Mail Act-On (described later in this book).