Use 1Password on the Go
Most of this book has talked about the desktop versions of 1Password (for macOS and Windows), with occasional references to the mobile versions for iOS/iPadOS and Android. This chapter provides a bit more detail about those two versions, as well as noting the key ways in which they differ from the desktop versions. And, for iPhone users who also have an Apple Watch, this chapter explains how to get a handful of 1Password features on your wrist.
iOS/iPadOS
The iOS/iPadOS version of 1Password runs on the iPhone, iPad, and iPod touch. You can download it for free from the App Store; as noted above, you’ll need to either use a 1Password subscription or sync it with a Mac or PC to unlock all its capabilities. You should also be aware that 1Password for iOS/iPadOS does not currently offer the following features:
Creating new local vaults
Changing the sort order
Performing advanced searches and creating smart folders
Performing a security audit (although individual items in the Compromised Logins category do display a banner to that effect, as long as Watchtower is enabled in Settings
 > Security)
Editing web form details
Adding or modifying icons/thumbnails
In addition, form filling is a bit different—and it offers greater security and flexibility than iCloud Keychain.
Configure 1Password for iOS/iPadOS
If you use a 1Password account (see Learn About 1Password Accounts), follow the prompts to log in when you first run 1Password for iOS/iPadOS. If not, one of the first things you’ll probably want to do is sync the iOS/iPadOS version of 1Password with your Mac or PC; if you’ve already turned on Dropbox or iCloud sync, it’s a matter of a few taps. (I cover all the details—as well as what to do if you prefer to avoid cloud-based sync—in Set Up Syncing.)
You’ll also want to configure certain security settings to make it easier to access your data. One major difference from the desktop versions of 1Password is the option to use Touch ID or Face ID on supported devices, or a PIN code on devices without Touch ID or Face ID. These are convenience features to prevent you from having to enter your master password repeatedly (which, let’s face it, can be a real pain on a tiny iPhone keyboard!).
To set up Touch ID or Face ID:
For a device with a fingerprint sensor, if you haven’t already set up Touch ID for the device itself and enrolled your fingerprints, do so in Settings > Touch ID & Passcode. For a device that supports Face ID, if you haven’t already set it up, do so in Settings > Face ID & Passcode.
In 1Password, tap Settings
> Security.Turn on Touch ID or Face ID.
With Touch ID or Face ID enabled, when you switch away from and back to 1Password (or leave it open but unused for the time specified in the Auto-Lock setting), 1Password prompts you for a fingerprint or face scan, rather than your master password or a PIN code. If you can’t or don’t want to use your fingerprint or scan your face, you can tap Cancel and then type your master password instead. You’ll still need to enter your master password if you restart your iOS/iPadOS device.
To set up a PIN code on devices that support neither Touch ID nor Face ID:
Tap Settings
> Security.Turn on PIN Code, type in a 4-digit code, and repeat to confirm.
Having done this, when you switch away from and back to 1Password (or leave it open but unused for the time specified in the Auto-Lock setting, such as 10 minutes), you can simply tap the PIN code instead of suffering through entering a potentially lengthy passcode. You’ll still need to enter your master password if you restart your iOS/iPadOS device, or if you make a mistake when entering your PIN code. (If you prefer to be prompted more frequently for your master password, go to Settings ![]() >Advanced > Security > Require Master Password and tap the desired frequency.)
>Advanced > Security > Require Master Password and tap the desired frequency.)
Find Your Way Around
The arrangement of icons and lists depends on your device’s screen size and orientation, but you’ll want to acquaint yourself with a few main controls, which should appear either on the left side or the bottom of your screen:
Favorites: Tap the Favorites
 icon to display your favorites, as shown in Figure 40, left.
Categories: Tap the Categories
 icon to display a list of categories including All Items, Logins, Secure Notes, and so on (Figure 40, right); then, tap a category name to list its contents.
Figure 40: 1Password on an iPhone. On the left, Favorites (showing individual items); on the right, the list of categories. The main navigational controls are at the bottom in this view. Tags: Tap the Organize
 icon to display your tags.
Settings: Tap the Settings
icon to adjust your preferences.
Use Safari or Another Browser
While browsing the web in Safari, Chrome, or any of numerous other iOS/iPadOS browsers, you can access your 1Password data.
First, there’s a one-time setup procedure:
In the main iOS/iPadOS Settings app, go to Passwords & Accounts > AutoFill Passwords.
Make sure the AutoFill Passwords switch at the top is turned on.
Tap 1Password to enable it. (You can leave iCloud Keychain enabled it, or tap it to disable it, as you prefer; in my experience, logging in is less confusing when only 1Password is selected.)
Now, whenever you come to a webpage that asks for your login credentials, follow these steps:
Tap in the username or password field.
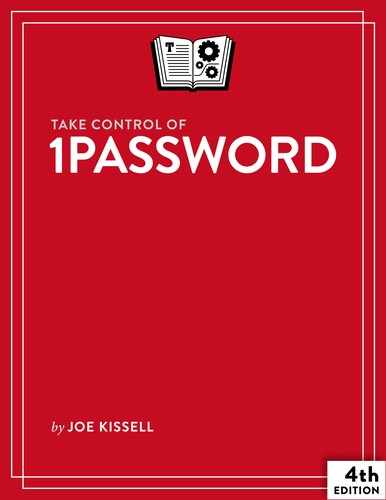
iOS/iPadOS looks for a matching login in 1Password. If it finds one, it displays that login in the middle of the QuickType bar (Figure 41). (If the QuickType bar is hidden, the login appears in a popover at the bottom of the screen.) In certain situations, you may see more than one potential login match.
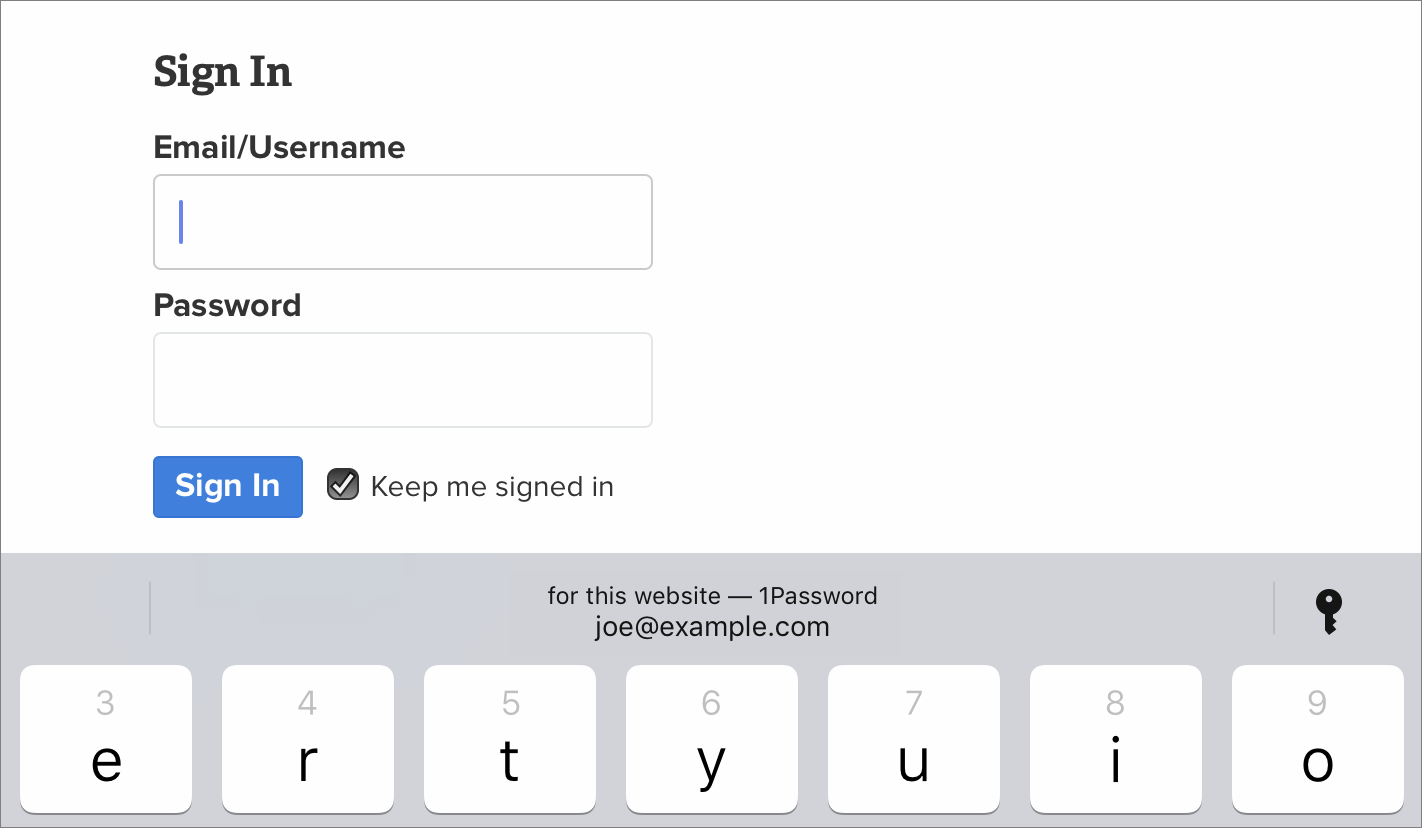
Figure 41: A 1Password login appears on the QuickType bar. If you see the login you want to use, tap it. If not, tap the key
 icon, which may be either on the QuickType bar or at the bottom of the screen. A popover (Figure 42) shows other potential matches; if you see the one you want here, tap it.
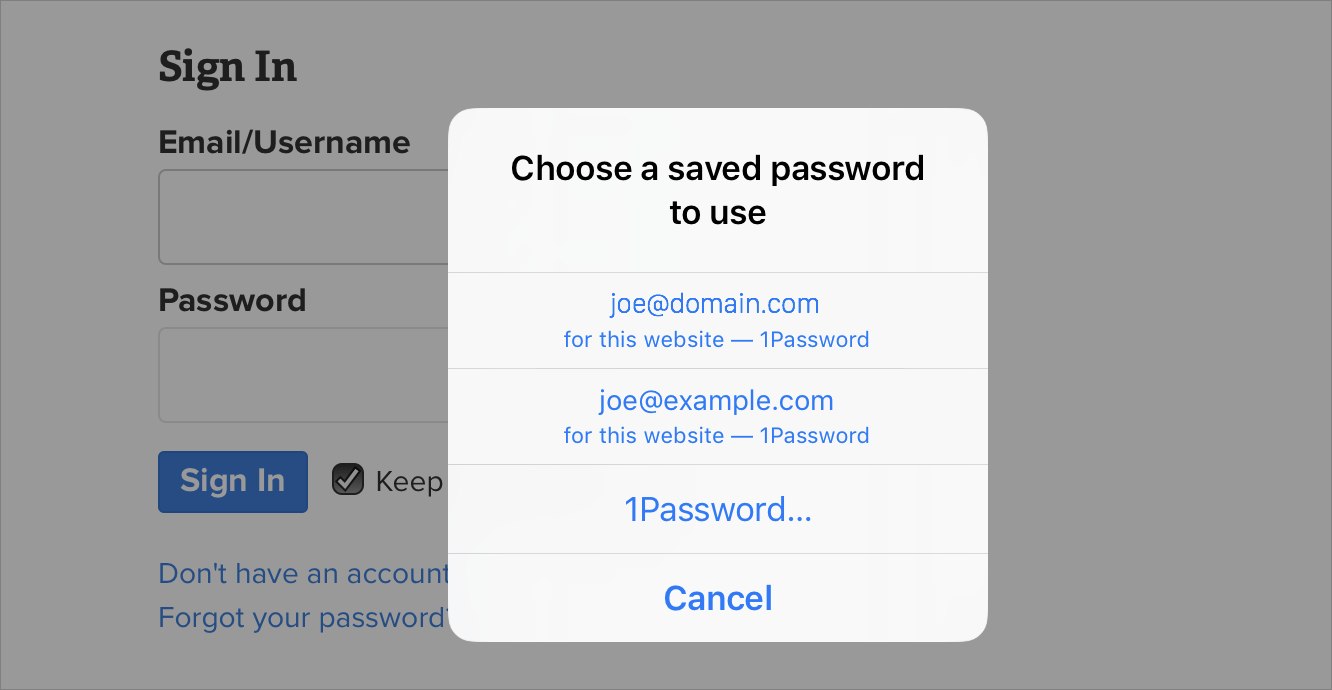
Figure 42: This popover shows other potential matches. If you don’t see the login you want, tap 1Password, unlock it, find the login you want, and tap it.
Unlock 1Password if necessary. iOS/iPadOS fills in your credentials.
Tap the Submit button.
This process is much smoother and less finicky than it once was, but it doesn’t cover every scenario in which you might want to use 1Password. Specifically, this process doesn’t let you use 1Password to generate a new password, store credentials for a new site, or enter other information besides login credentials (like credit card data or your mailing address). You can still do all these things, but you must do them the old-fashioned way—using the 1Password app extension, which appears in Share sheets.
First, set up the 1Password app extension:
Open Safari.
Tap Share
 .
.In the Share sheet that appears, swipe leftward on the bottom row of icons, and then tap More.
Tap the 1Password switch to turn it on. Then touch and hold the grab
 icon on the right and drag 1Password to the top of the Activities list so it appears first (leftmost) when you next open the Share sheet.
Tap Done.
After that initial setup process, you can use 1Password for a variety of activities. Here are a few examples.
Fill in data in a browser:
In your browser, navigate to a login page for which you’ve stored credentials in 1Password.
Tap Share
> 1Password  .
.Unlock 1Password.
Tap the login item, credit card, or identity you want to use.
1Password fills in your information.
Tap the Sign In, Log In, or similar button to submit the form.
Generate a new password and save a login in a browser:
Tap the password field.
Tap the key
icon.Tap 1Password.
Unlock 1Password.
Tap Create Login.
Enter your username.
Tap Generate New Password.
Tap Save & Fill.
Generate a new password in an app:
Open the app and navigate to its login screen.
Tap the Password Manager
 icon, which may have a different appearance depending on the app.
Tap 1Password.
Follow steps 4–8 above, except you’ll tap Save (rather than Save & Fill) in step 8.
Work with 1Password Items
When viewing a list of logins (Figure 43), you can swipe any item toward the right to reveal a Copy Password button; tap this as a shortcut to copy the item’s password. Or, tap the item name to see its main details. Similar to the Mac version, you can tap “Saved form details” to see (but not edit) the individual fields saved for that item. Tap any field to show a Copy button and, for passwords, Reveal and Show in Large Type buttons.
To edit the item, tap Edit in the upper-right corner. (You can also create a new item by tapping the plus ![]() icon and then tapping an item type.) An editing view appears (Figure 44).
icon and then tapping an item type.) An editing view appears (Figure 44).

The controls in the list, item, and edit view should be mostly self-explanatory, and largely familiar if you use 1Password on a Mac. Even so, I want to point out a few details:
Password Generator: If the item includes a password (such as the login item in the figure above), tap Edit to enter edit mode, and then tap Generate New Password to generate a new password; the password generator (Figure 45) appears. The password generator has two modes—Characters (that is, random characters) and Words (that is, Diceware-style passwords); swipe left or right to switch modes.

Figure 45: The password generator in iOS (in its basic mode). Swipe to the right to see Characters mode (left); swipe to the left to see Words mode (right). In Characters mode, you can adjust the Length slider, vary the number of digits and symbols, and toggle the control for Avoid Ambiguity (i.e., omit
1 l I 0 O), which is enabled by default. In Words mode, you can change the number of words and the character used to separate them. Most changes you make appear immediately, but if you switch between Characters and Words mode, tap Regenerate Password to switch the password to the new mode. (When you’re happy with the password, tap Done to save it.)Sharing: Tap Share to display a Share sheet, and then tap a destination to share a URL that encodes the item’s content (see Share an Individual Item for details); or tap an AirDrop recipient to share this item via AirDrop.
Adding documents: In edit view, you can add a document from the camera or the Files app to any item. To do so, tap Add New File (under “Related Items”) and then tap one of the following:
Photo from Camera Roll
Take Photo with Camera
Scan a Document (like taking a photo, but this option also straightens the image and uses OCR to recognize text in it)
Import from Files
Use Multiple Vaults in iOS/iPadOS
1Password for iOS/iPadOS supports multiple vaults, with a 1Password account or an in-app purchase of 1Password Pro. Back in Sync with the Cloud or a Folder, I explained how to sync an existing secondary vault with 1Password for iOS/iPadOS. You can also do the following:
Switch vaults: Tap the Vault
 or All Vaults
  icon at the top of the screen and then tap the name of the vault you want to use. (If All Vaults
  is selected, 1Password shows entries from all your vaults together.)
Change a local vault’s sync settings: Go to Settings
> Vaults, tap a local vault, tap Sync Service, tap the sync method you want to switch to, and follow the prompts.Remove a local vault: Go to Settings
> Vaults, tap a local vault name, and tap Delete Vault. This removes the vault from your device, but not from Dropbox or iCloud. (You can’t remove your primary vault or a vault in a 1Password account.)
Use 1Password on an Apple Watch
If you have an Apple Watch, you can configure 1Password for iOS to display certain manually selected pieces of data—including logins, credit cards, and one-time passwords—on your wrist. (As a reminder, Apple Watch support requires 1Password Pro, available as an in-app purchase.) You won’t get anything like the full capabilities of 1Password on your Apple Watch, but you’ll have easier access to some of your most important secure information.
To set up 1Password for your Apple Watch:
Make sure your iPhone is configured to use a passcode, Touch ID, or Face ID. (You can set this up in Settings > Touch ID & Passcode or Settings > Face ID & Passcode.)
Open the 1Password app.
Tap Settings
> Apple Watch.Turn on Enable Apple Watch.
Manually add the 1Password items you want to be able to view on your wrist:
Open any item in 1Password.
Tap Add to Apple Watch.
Repeat as necessary to add more items.
Having done this one-time setup, to use 1Password on your Apple Watch, press the Digital Crown and tap the 1Password icon to open the app on the watch. Now, scroll to the item you want to view and tap it.
Android
You can download 1Password for Android for free by visiting Google Play on your Android device. (You can also, if you like, purchase a subscription to a 1Password account through Google Play.) Compared to the Mac and Windows versions of 1Password, the current Android version (7.3.4) lacks a few features, but it’s becoming more powerful all the time. It’s now roughly on par with the iOS/iPadOS version—and indeed, it can do a few things the iOS/iPadOS version can’t (for example, the Watchtower feature on Android shows not only Compromised Logins but also Vulnerable Passwords and Inactive 2FA; enable these on 1Password’s Settings ![]() > Watchtower screen).
> Watchtower screen).
1Password for Android can fill your credentials into browser forms and other apps, and it can use 1Password accounts or sync data using Dropbox or directly with your Mac or PC using WLAN or manual folder sync.
The Android version does have some limitations, though:
Your device must be running Android 5 or later. For fingerprint unlock, you’ll need Android 6 or later, and for split-screen mode (which enables you to drag and drop usernames, passwords, and other data from 1Password to another app), you must have Android 7 or later.
1Password for Android supports only a single local vault, in addition to 1Password account vaults. (You can, however, add multiple accounts, each with one or more vaults.)
There’s no easy way to switch syncing methods—for example, from Dropbox syncing to WLAN syncing. To change syncing methods, you must wipe 1Password’s data and start over from scratch by going to the main Settings app and tapping Storage > Other Apps > 1Password > Clear Data, and then tapping OK.
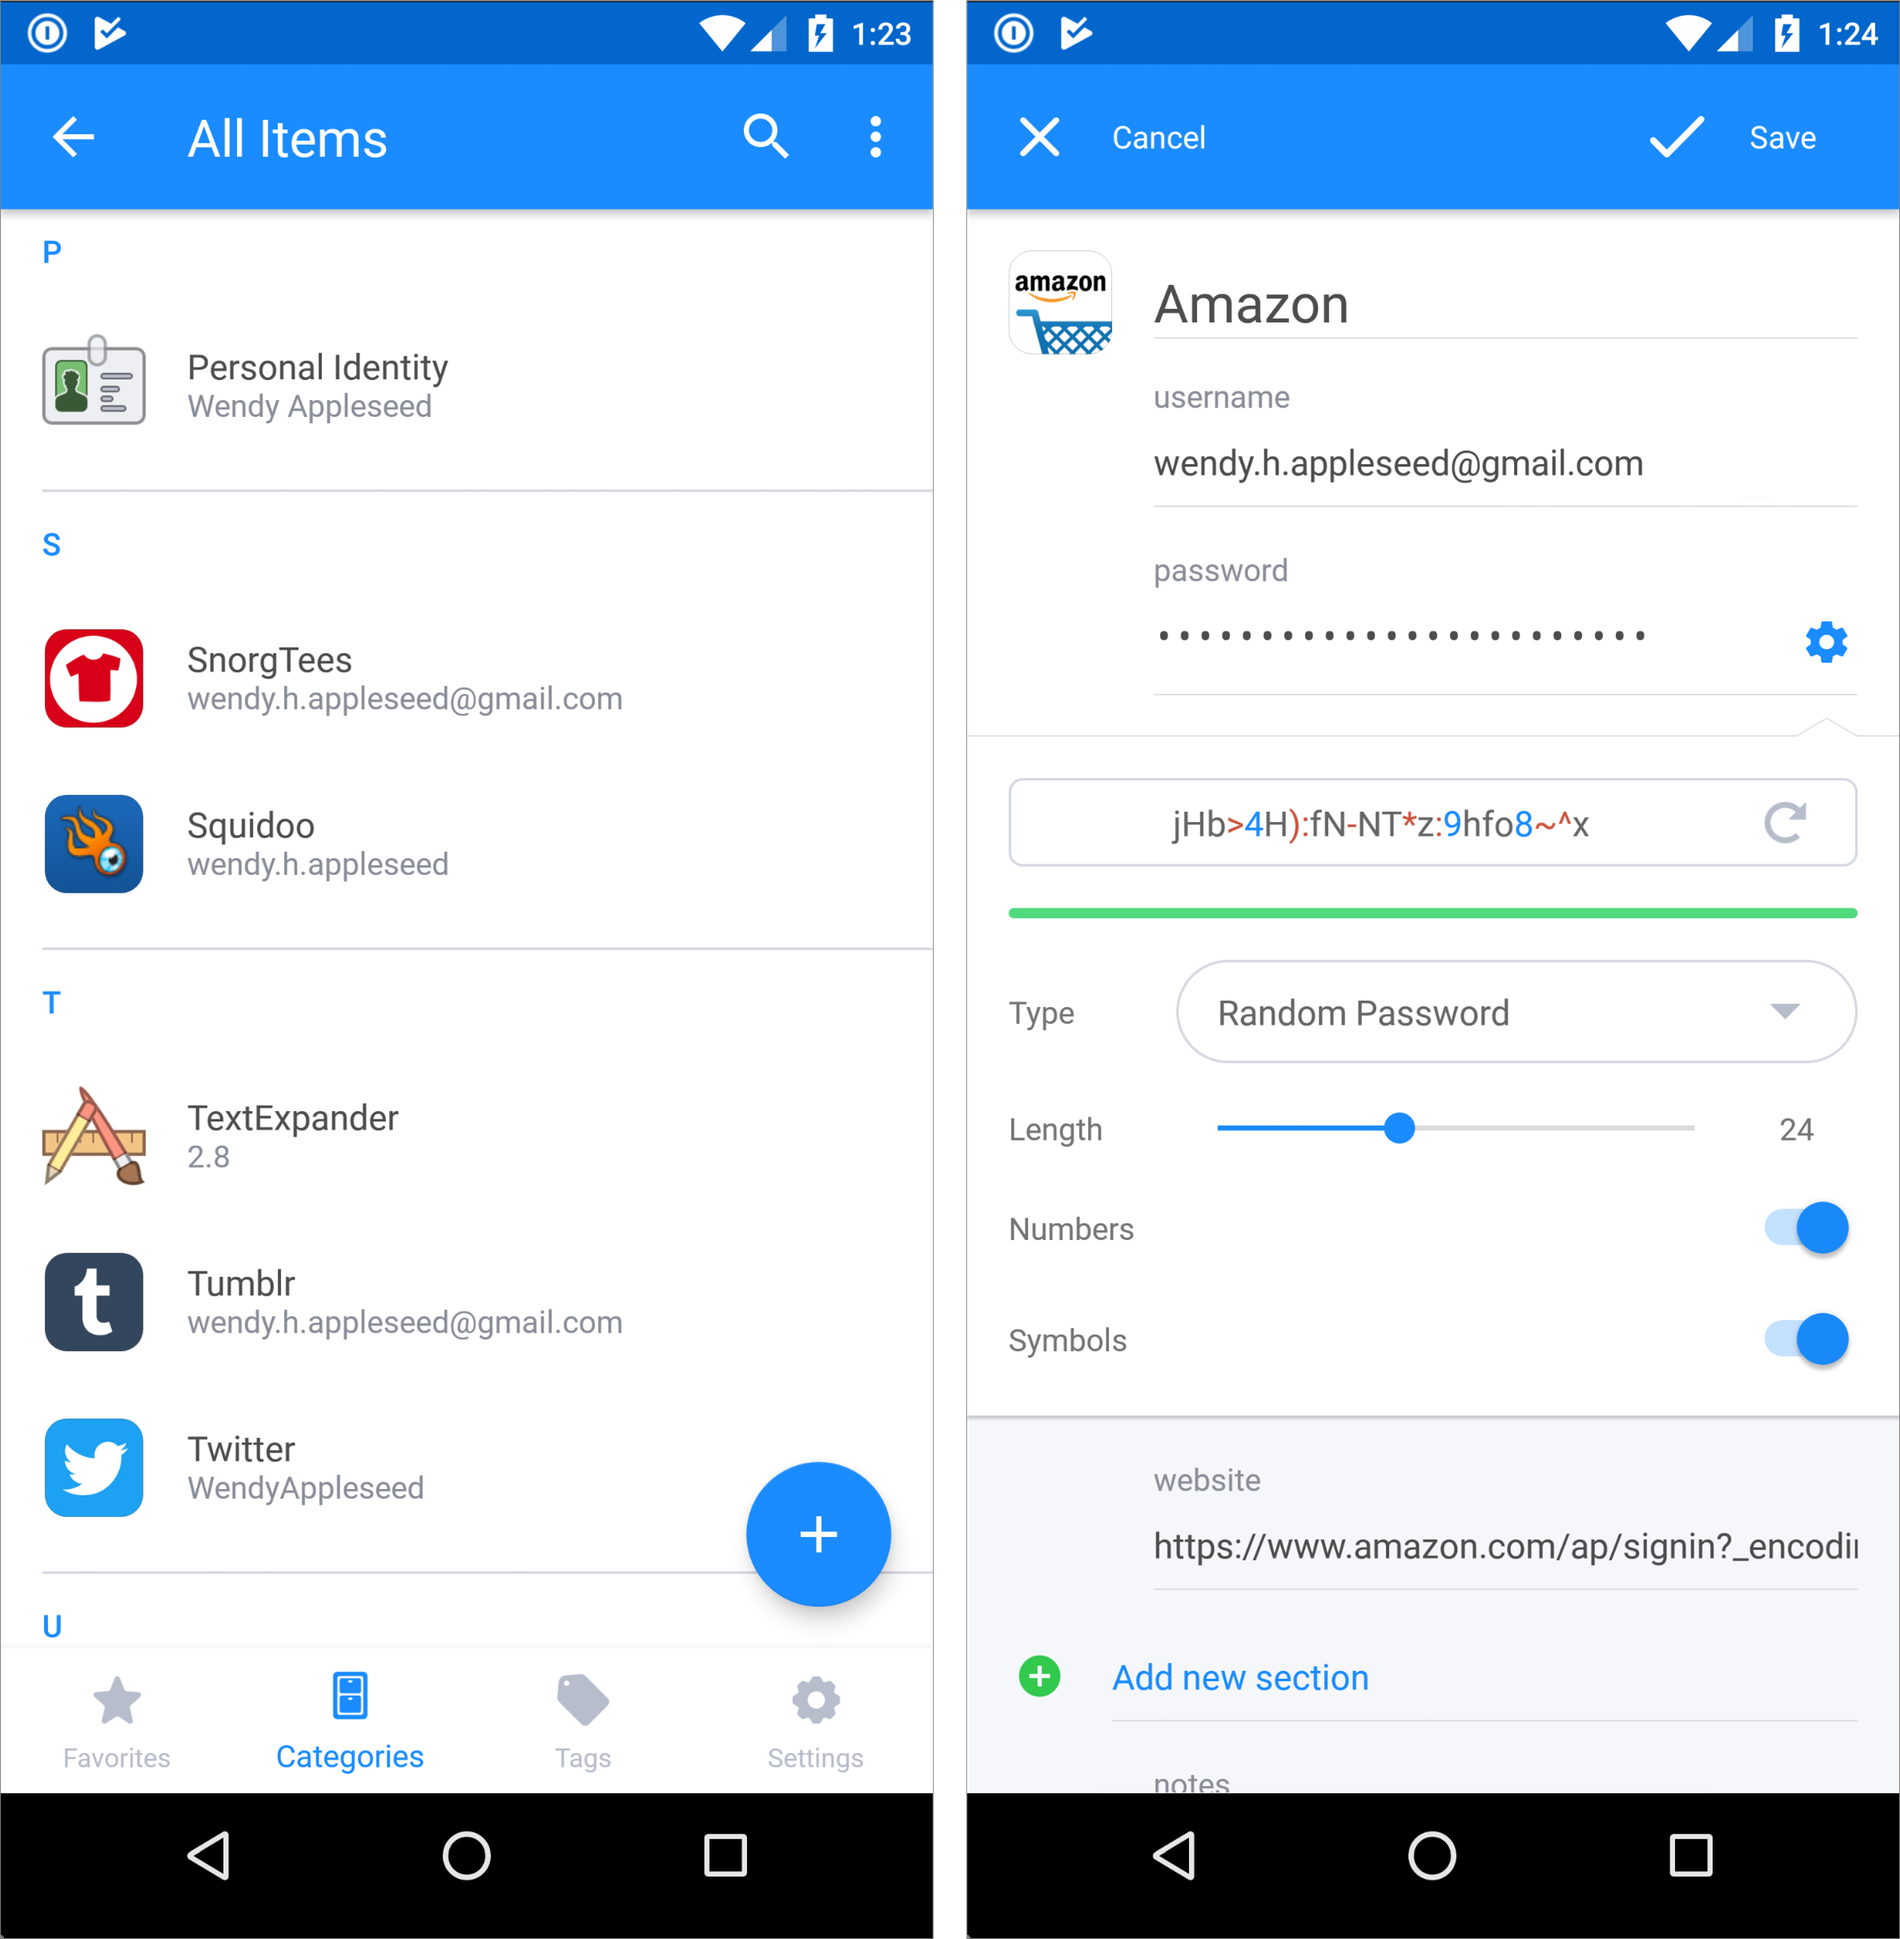
Those qualifications aside, if you’ve used any other version of 1Password, you’ll have no trouble finding your way around 1Password for Android. The navigation is self-explanatory for the most part, and most screens look similar to the iOS/iPadOS version (Figure 46).
For complete instructions on filling forms and saving passwords, read Use 1Password to fill and save in apps and browsers on your Android device. The short version of filling forms is:
First, enable the necessary settings in 1Password:
Go to 1Password Settings
 > Autofill, turn on Autofill, select 1Password, and tap OK.
Return to 1Password Settings
> Autofill (which may require unlocking 1Password again), turn on Accessibility, tap 1Password, turn on Use Service, and tap OK.Optional but recommended: Still in 1Password Settings
> Autofill, turn on “Auto-copy one-time passwords.”
In any web form, tap in a username field on a web form, tap Autofill with 1Password, unlock 1Password, and tap the login item’s name.
To get more help with the Android version of 1Password, read Get to know 1Password for Android or visit the AgileBits Android Forum.