unit
4
weaving + string craft
Weaving involves a lot of words that start with the letter W, including warp and weft. This can be kind of confusing, but by the end of this chapter it will all make sense. Just remember: weaving is the act of taking a fiber and going over and under other fibers. Weaving is done on a loom, and in the following labs, looms take on many different shapes and sizes from a small plate to a collection of drinking straws! Enjoy the process as you see how individual strands of fiber can be magically transformed into three-dimensional structures.

LAB |
woven mat |
Let’s learn the basics of weaving with this simple yarn mat. We will create a loom from simple cardboard. The vertical strings will be our warp and our weaving strings, which are horizontal, will be our weft. Remember, the pattern is always over and under for weaving!

weaving a mat with yarn
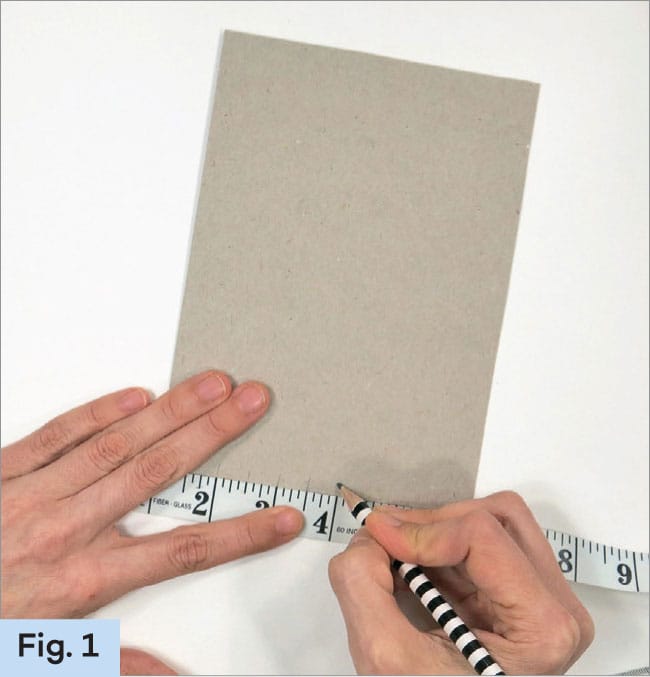
1. Use a ruler or tape measure to make a small tic mark every 1/2" (1.3 cm) inch along both of the shorter edges of the cardboard. There should be 10 lines at the top and 10 at the bottom. Cut those lines about 1/4" (6.4 mm) long to form notches for the yarn. (Fig. 1)
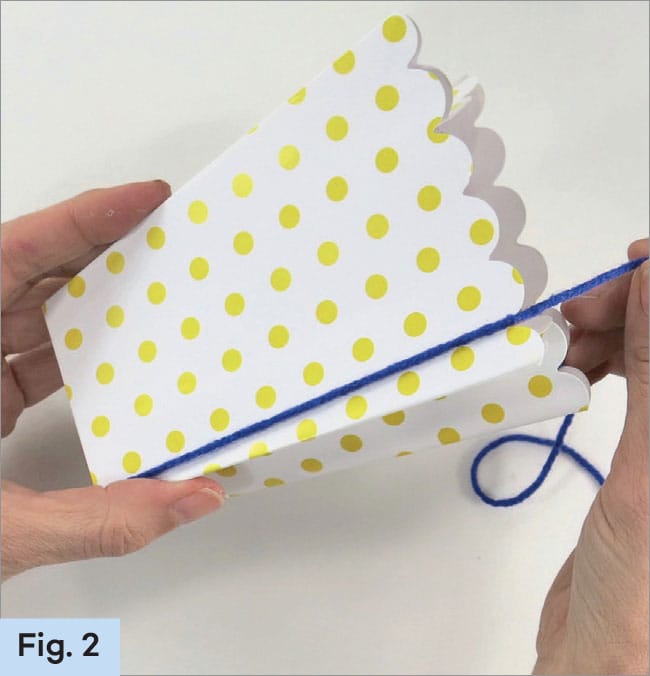
2. Now that the loom is made, it is time to warp the loom. “To warp” means to wrap strings on the loom for weaving. To warp the loom, place the end of an uncut ball (or skein) of yarn into one of the corner notches of the loom. Leave a short tail of yarn in the back; the rest of the yarn will be in the front (Fig. 2). Secure the yarn tail to the back with tape.

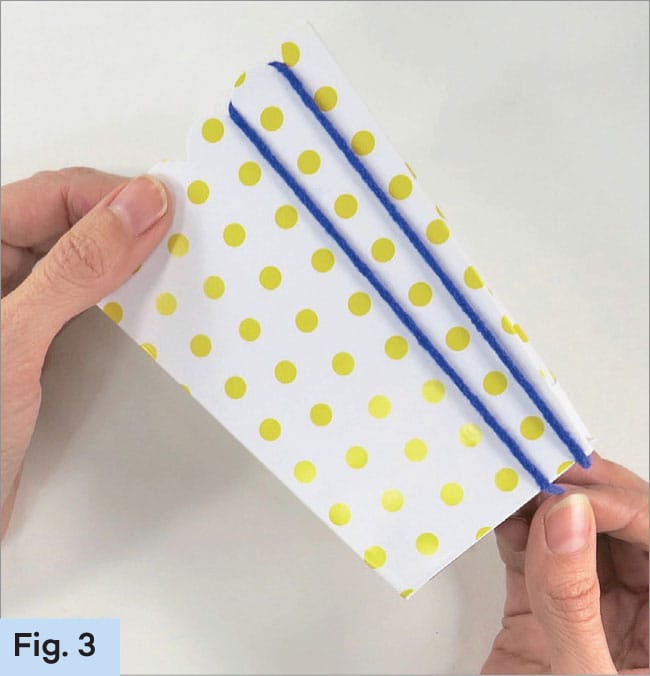
3. Bring the yarn directly down and slide it into the bottom notch. (Fig. 3)

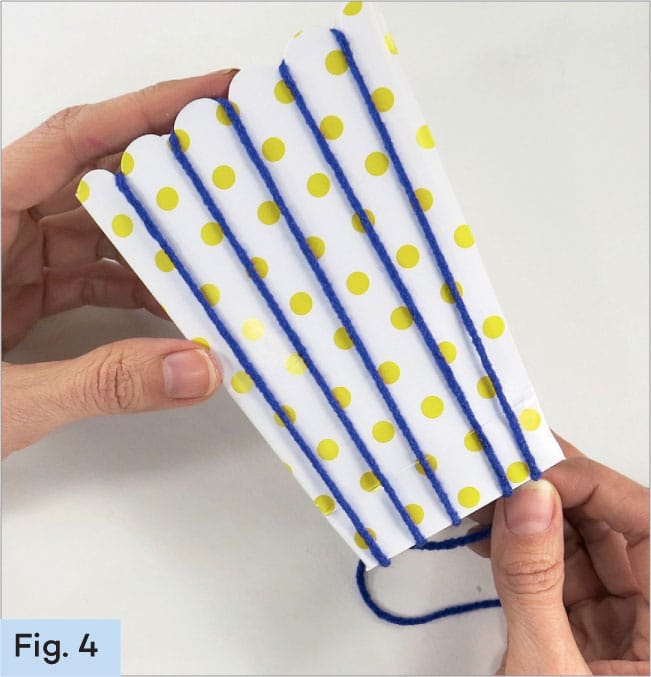
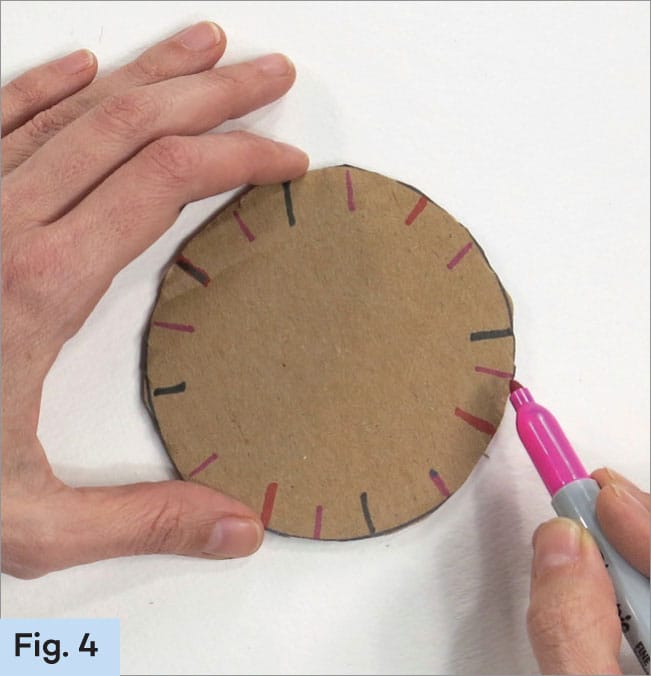
4. Wrap the yarn around the back of the cardboard and into the next notch, so the yarn stays on the front of the cardboard. Bring the yarn directly up to the top, as shown. (Fig. 4)

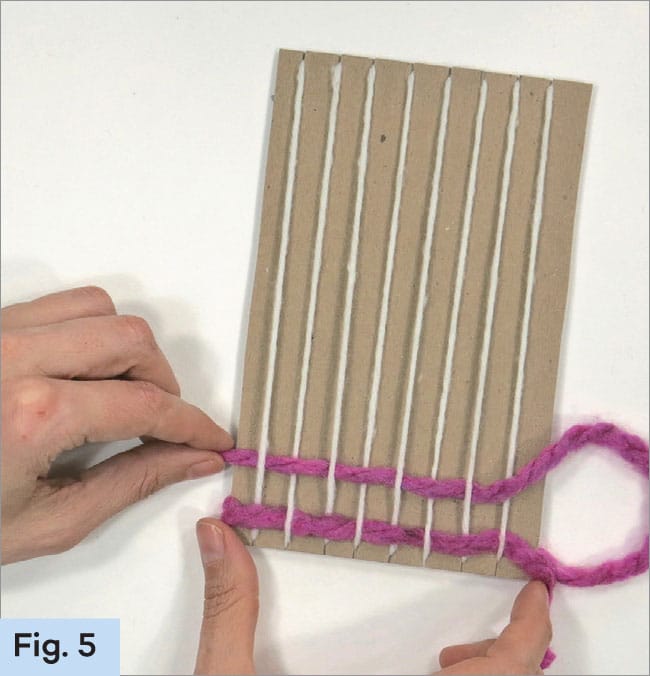
5. Continue warping the loom until all the notches on the front are filled with yarn. It should resemble a harp. Cut the end of the yarn and tape on the back of the cardboard. There should be no harp lines on the back, just the small lines of yarn between the notches. (Fig. 5)

6. Now it is time to weave. Weaving is a pattern of over and under. To practice, take a large craft stick and weave it through the loom, going over one strand of yarn and under the next. Weave the second stick in a pattern that is the opposite of the first. This is how the yarn weaving will look. (Fig. 6)

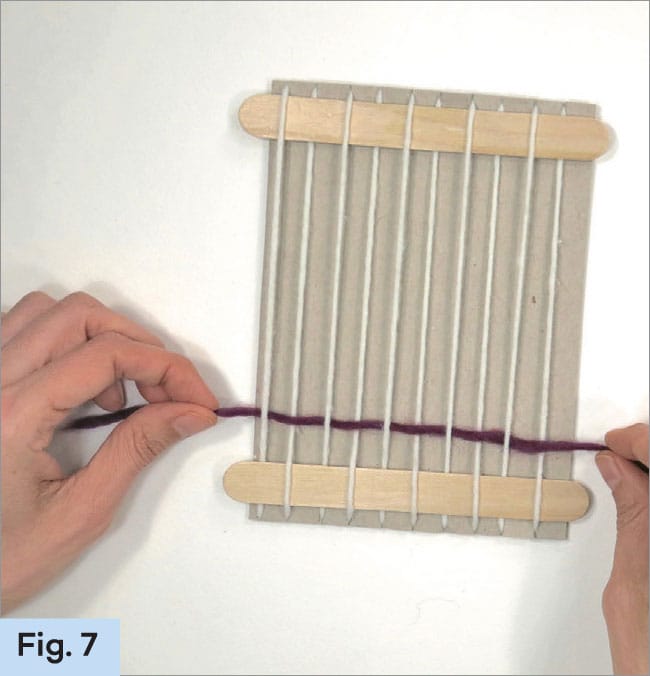
7. Push one stick to the bottom and the other to the top. Pick one strand of yarn and weave the yarn through the loom in a pattern opposite of the stick. (Fig. 7)
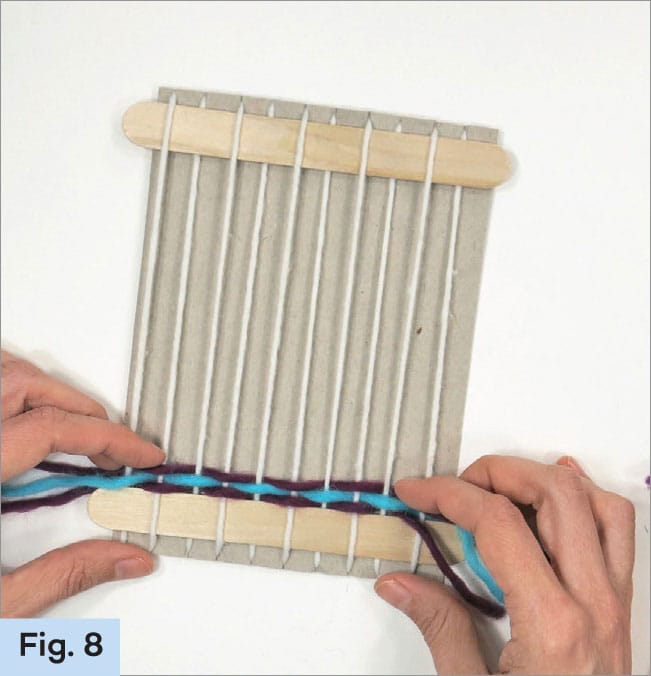
8. Choose the next yarn strand and weave it opposite of the previous strand. Use your fingers to pack the yarn down toward the bottom craft stick. (Fig. 8)
9. When the weaving has reached the top craft stick, it is time to take it off the cardboard loom. Very carefully, slide the bottom craft stick out, two strands of warp yarn at a time. Pluck the warp yarns from the notches at one end of the loom. Cut the warp yarns so you can tie them in double knots all the way across the weaving. (Fig. 9)

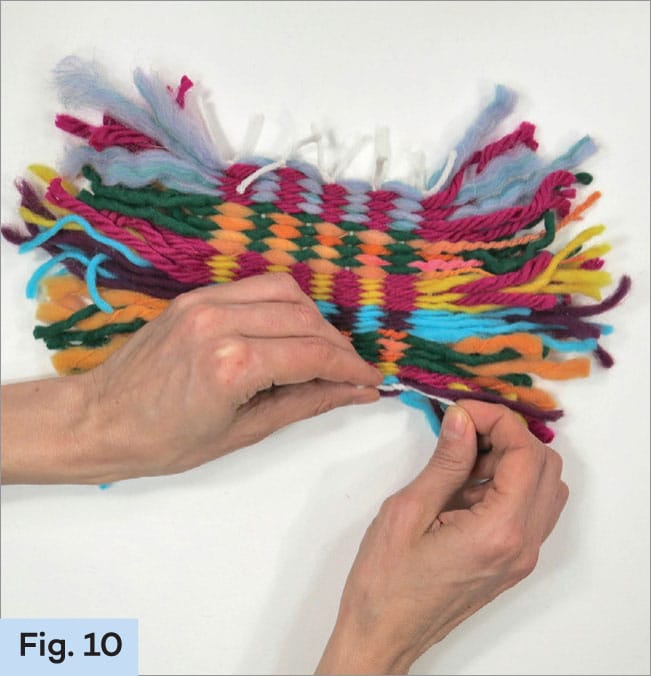
10. Once the warp yarns are cut and knotted on one end of the loom, repeat the same process on the other end. Trim the weaving strands on the sides to even them out. (Fig. 10)
or try this
Instead of weaving with yarn, weave with narrow ribbon, for a totally different look.
LAB |
woven basket |
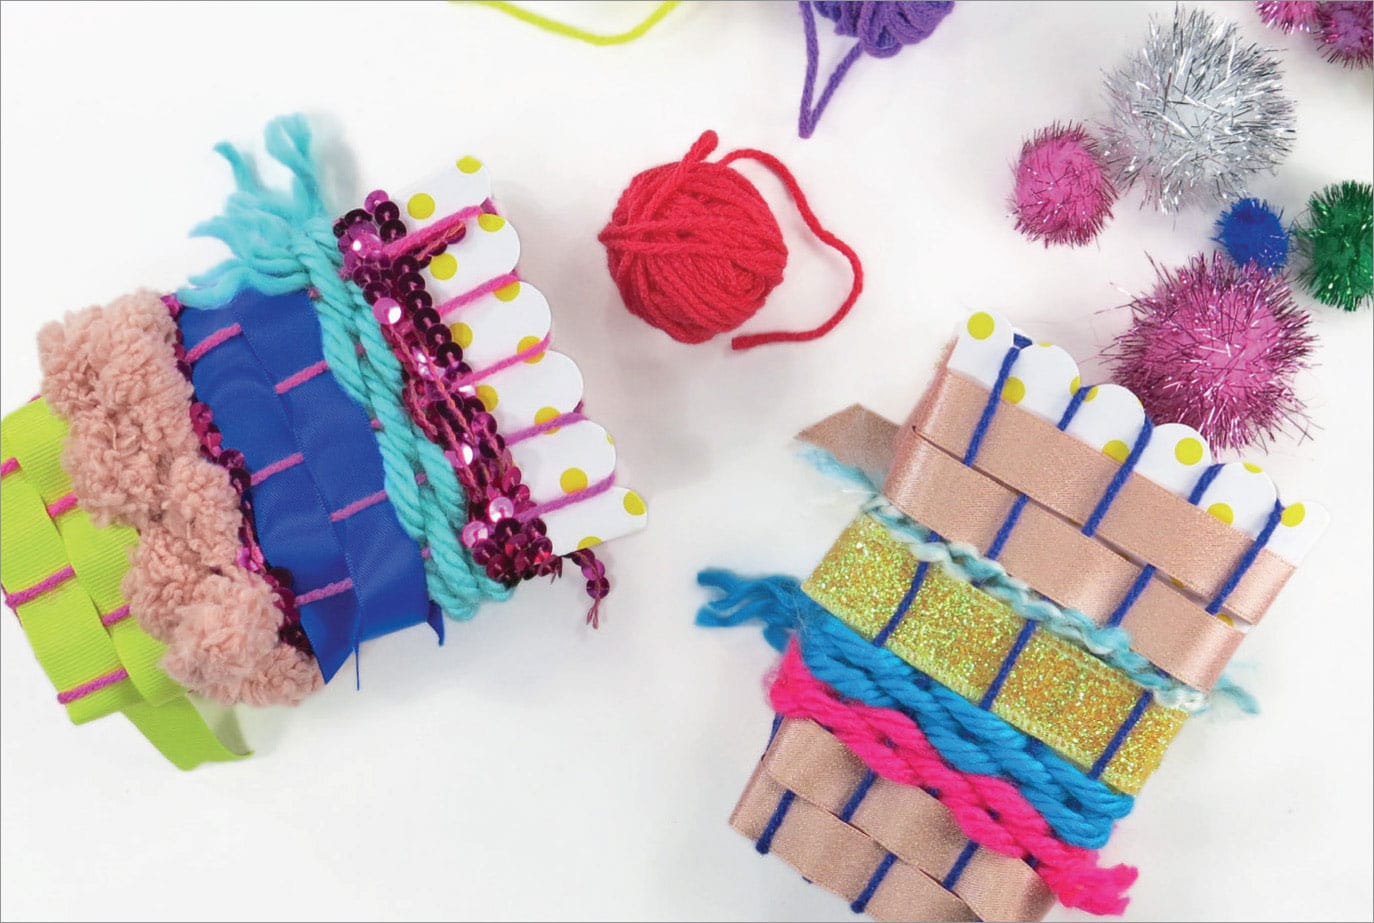
Weavings don’t always involve weaving with yarn on a flat loom. Anything can be turned into a loom if you use your imagination! Let’s try our hand at weaving a basket by using a treat bag or a cup!
making a woven basket
1. Open the cardboard treat bag. Slide the yarn into one of the scalloped notches, near a corner on the front or back, and secure the yarn inside with tape. (Fig. 1)

tip
If the treat bag is not scalloped across the top, you can cut an even number of 1/2" (1.3 cm) notches around the top edge.
2. To warp the treat bag, bring the yarn down the front, across the bottom, and up the other side. Slide the yarn directly into the notch directly opposite the first notch on the other side of the treat bag. (Fig. 2)
3. Slide the yarn into the next notch (on the same side) and bring the yarn to the bottom of the treat bag, across the bottom, and up the other side. (Fig. 3)
4. Continue warping the treat bag in this way until both the front and the back are warped. (Fig. 4)
5. Cut yarn and tape the end inside the treat bag. (Fig. 5)

6. Now it is time to warp the sides. This is done the same way as the front and back. Begin by taping the yarn on the inside of the treat bag.
7. Again, bring the yarn down and across the bottom to the opposite side, go in a notch, go out of the notch, and pull across the bottom. Continue until the sides are warped. Cut and tape the yarn on the inside of the treat bag. (Fig. 6)

8. Now it is time to weave, use ribbon or yarn or alternate different weaving fibers, and go over and under the warp strings. (Fig. 7)

9. Turn the treat bag as you weave. Be sure to always weave in the opposite pattern as the previous weft of yarn or ribbon. (Fig. 8)

10. To add a new weft of yarn or ribbon, just leave a short tail hanging out of the weaving. Have the new weft pick up where the last one left off. (Fig. 9) Weave until you reach the top of the treat bag.

or try this
You can also use a plastic drinking cup as the loom, you just need to cut an even number of 1/2" (1.3 cm) notches around the top edge of the cup. Follow the instructions above, but you can warp the cup with one length of thread all around the cup.
If you use a cup, continue warping the loom until all the notches are filled. Cut and tape the yarn end on the inside of the cup. Then weave the weft yarns or ribbons just like for the treat bag.
LAB |
woven pouch |
Let’s try weaving a pouch! This lab begins like Lab 37, because you make a cardboard loom, only this time you make a pocket of the finished project by weaving all the way around the loom.

making a woven pouch
1. With a ruler or a tape measure, draw small lines at both the top and bottom short edges of the cardboard that are 1/2" (1.3 cm) apart like in Lab 37. There should be 8 lines at the top and the bottom. Cut these notches. (Fig. 1)

2. Now it is time to warp the loom. Unlike in Lab 37, this loom is warped all the way around. To start, place the end of the warping string in one of the cut notches in the top corner and secure the tail with tape. Pull the string down and go into the bottom notch. (Fig. 2)

3. Pull the string around the back of the cardboard, up to the top and into the next notch. Then pull the string down to the bottom and repeat. When finished, the loom looks like a harp on both the front and the back. Cut the string and secure the tail with tape. (Fig. 3)

4. Cut the yarn weft pieces about 12" (30 cm) long. Thread the tapestry needle with the yarn. Begin weaving at one end of the loom, passing the yarn over and under the warp yarn. Pull the yarn until there is about a 2" (5 cm) tail hanging from the end of the loom. This thread tail is secured later. When you reach the end of the row, turn the loom over and continue weaving over and under the “back”. (Fig. 4)

5. Once you have woven the yarn across the “back” side, turn the loom over to the front. As you continue to weave, remember to weave in the opposite pattern as the previous yarn. Over and under the warp yarns, and then under and over the warp yarns. (Fig. 5)
6. Continue weaving until there is no more yarn. Thread the next length of yarn into the tapestry needle and insert the needle four warp strings back, so the yarns overlap. This secures the ends of the yarn strands in the weaving. Follow the same pattern as the last string and continue weaving. (Fig. 6)

7. Continue to weave around the loom, adding more yarn as needed, until the pouch is the desired height. Now it is time to weave the flap. To do this, weave only one side of the loom. Instead of turning the loom over when the yarn reaches the end of the warp strings, have the yarn loop back across the front. (Fig. 7)

tip
You might want to weave the flap in a different color yarn!
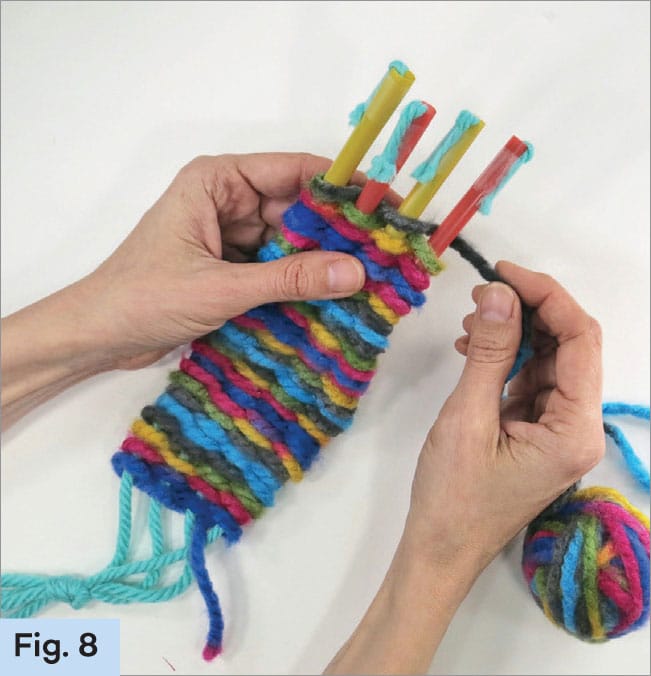
8. Continue weaving back and forth on the front of the loom to create the flap. When the flap has reached 21/2" to 3" (6.4 × 7.6 cm), slide the needle down into the weft strings and slide the yarn off the needle. (Fig. 8)

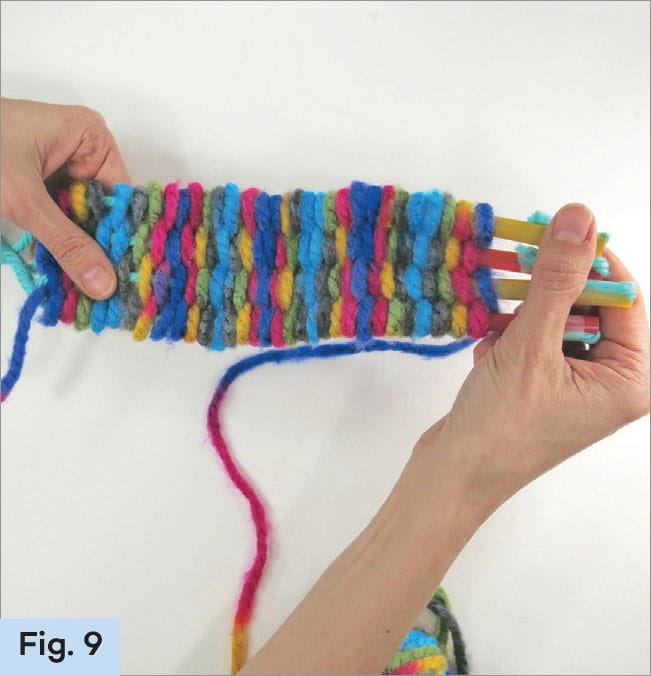
9. Remove the woven pouch from the loom by cutting only two of the warp strings at a time. Begin close to the top of the loom. Double knot the first two strings on both sides of the loom. (Fig. 9)

10. Continue cutting two strings at a time and double knotting them on both sides of the loom. One extra string may be left. Tie it to one of the other double knotted strings. (Fig. 10)

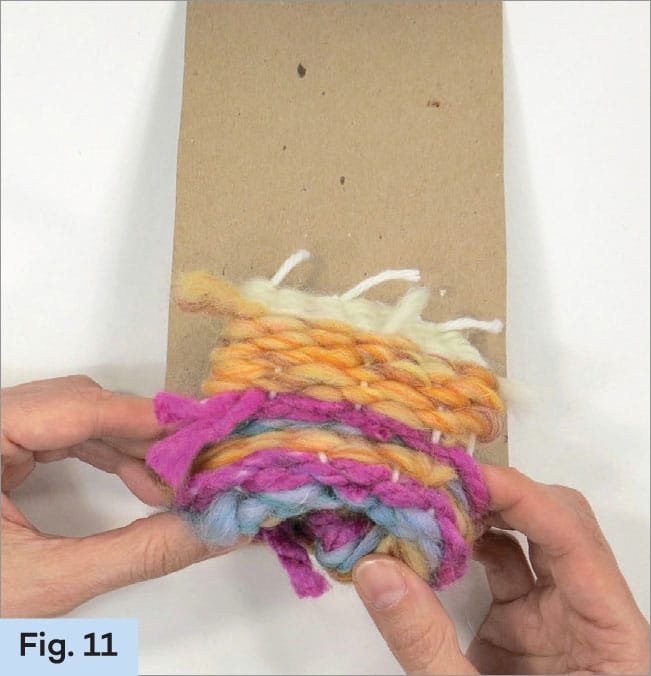
11. Slide the weaving off the loom. As it comes off, it flips inside out. Leave it this way so that all the knots are now on the inside of the weaving and not visible. (Fig. 11)
12. If you want to be able to button the pouch closed, move the flap out of the way and sew a button onto the front of the pouch at the location covered by the flap. Be careful not to sew the button through both the front and back, or you won’t be able to store things in your handwoven pouch. (Fig. 12)

13. Make a buttonhole in the front by separating the weft yarns on the flap and sliding the button though the opening. (Fig. 13)

LAB |
circle loom weaving |
Circle loom weaving is different than the past weaving labs because the loom is round. But, as with all weaving, the pattern is over and under. Keep that in mind and discover just how fun and easy circle loom weaving can be.

making a circle weaving
1. Every weaving is created on a loom. The loom for this weaving is a plate. To decorate the plate, paint the front before turning it into a loom. Let the paint dry. (Fig. 1)

2. On the back of the plate, use a tape measure or ruler to measure and mark lines every 2" (5 cm) around the rim of the plate. There should be 11 lines around the edge of the plate. Cut the lines. (Fig. 2)

tip
I used an 8" (20.3 cm) diameter plate, but any size works as long as you cut 11 notches around the rim or edge of the plate.
3. On the back of the plate, slide the 48" (1.2 m) of yarn into any one of the cut notches. Leave a short tale and tape it in place. On the front of the plate, take the long strand of yarn. Pull it gently down and slide into a notch at the bottom of the plate, opposite the beginning notch. (Fig. 3)

4. Count the empty notches on either side of the plate. Whatever side has more notches, is the one the yarn goes to next. From behind, slide it into the next closest notch and pull the yarn to the front. (Fig 4.)

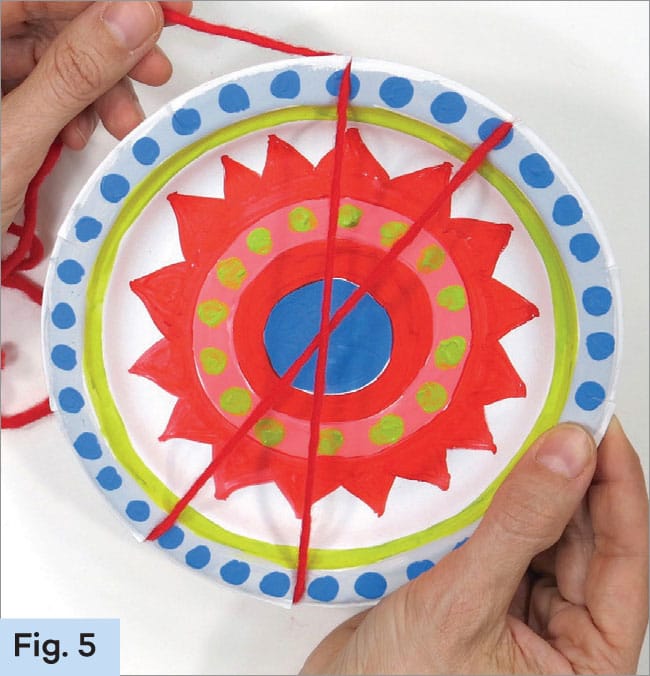
5. Take the string to the top of the loom and slide into the notch beside the top one. This should form a narrow X on the loom. (Fig. 5)
6. Once again, take the string and go from the back to the front of the notch directly beside the last notch. Take the string to the opposite side of the loom. (Fig. 6)

7. Continue this pattern until the yarn looks like the spokes of a bicycle. There should be no empty notches. This yarn is now your loam yarn, or warp. (Fig. 7)

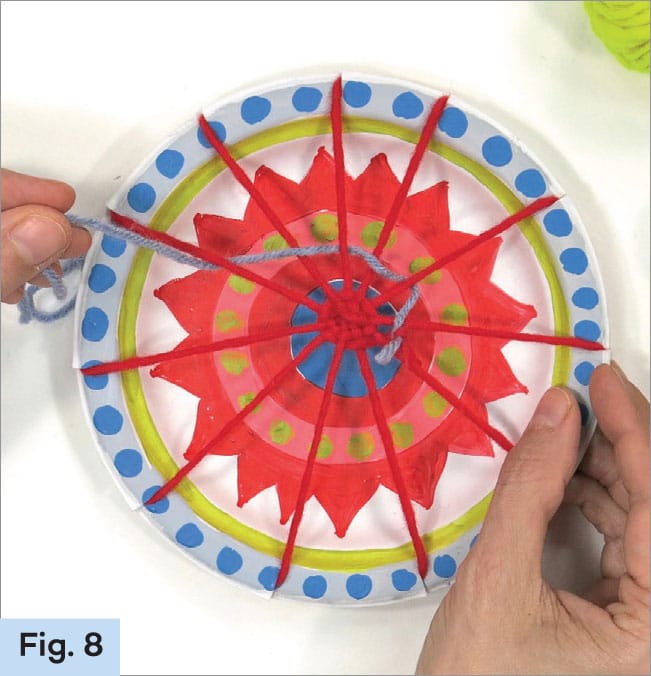
8. Now that the loom is made, weave different color yarns, in a circle, with the same under and over pattern. Begin by placing the weaving yarn under one of the spokes. Then go over the next. Do this pattern of under and over all the way around the plate. Pull the weaving yarns tightly. (Fig. 8)
9. Continue adding more yarn and weaving until your weaving is as wide as desired. Cut the yarn. Tie the end to one of the spokes of the weaving. (Fig. 9)

10. Tape a yarn hanger to the back and add pom poms to the bottom for decoration.
tip
If you want to vary the yarn color of the weft (loom) yarns, simply cut the first yarn and tie a new color yarn to the cut end with an overhand knot.
LAB |
picture frame weaving |
Like the weavings created on the round plate looms, this weaving remains on the picture frame. In this lab, you learn how to add more texture to weavings with the introduction of the rya knot.
weaving a fiber arts picture frame
1. The frame can be oriented vertically or horizontally. At the top of the frame, tie a double knot with a skein of yarn. (Fig. 1)

2. Bring the yarn down to the bottom of the frame. Wrap it around the frame twice, going over the frame, around the frame, and then pull the yarn up towards the top. (Fig. 2)

3. At the top of the frame, wrap the yarn around it twice. This time, instead of going over the frame to start wrapping, begin by going under the frame, around twice, and then pull the yarn toward the bottom. Continue this pattern of wrapping the yarn twice around the frame, both at the top and the bottom. Stop wrapping on the same end of the frame as you started. (Fig. 3)

4. Weave over and under the warp strands with the weft yarn. Use your fingers or thread the yarn through a tapestry needle. (Fig. 4)

5. After weaving one row, have the yarn make a “u-turn” and begin weaving back across. This time, weave the opposite pattern. Meaning, if the last strand was under the warp string, the weft strand will go over. Continue weaving back and forth across the loom in this manner. (Fig. 5)

tip
For a tight weaving, warp the loom with the yarn strands close together. For a loose weaving, space the yarn strands apart. There should be an odd number of yarn strands on the loom.
6. If the yarn strand is getting short or you want to change colors, cut the original yarn, with a short tail, at one side of the weaving. Rethread the needle with a new color and pick up weaving where the last strand of yarn left off. Be certain to do the opposite pattern of weaving. Weave these thread tails back into the project with a tapestry needle once you finish the entire weaving. (Fig. 6)

7. To add rya knots, cut strands of yarn that are about 6" (15.2 cm) long. Hold two strands together, place the middle of the two strands of yarn over two warp strings. Pull the ends of the cut yarn between the middle of the two warp strings. (Fig. 7) Complete a row of rya knots in this way.

8. To complete the weaving, continue adding yarn, feathers, ribbon, or even scraps of paper to the weaving. (Fig. 8)

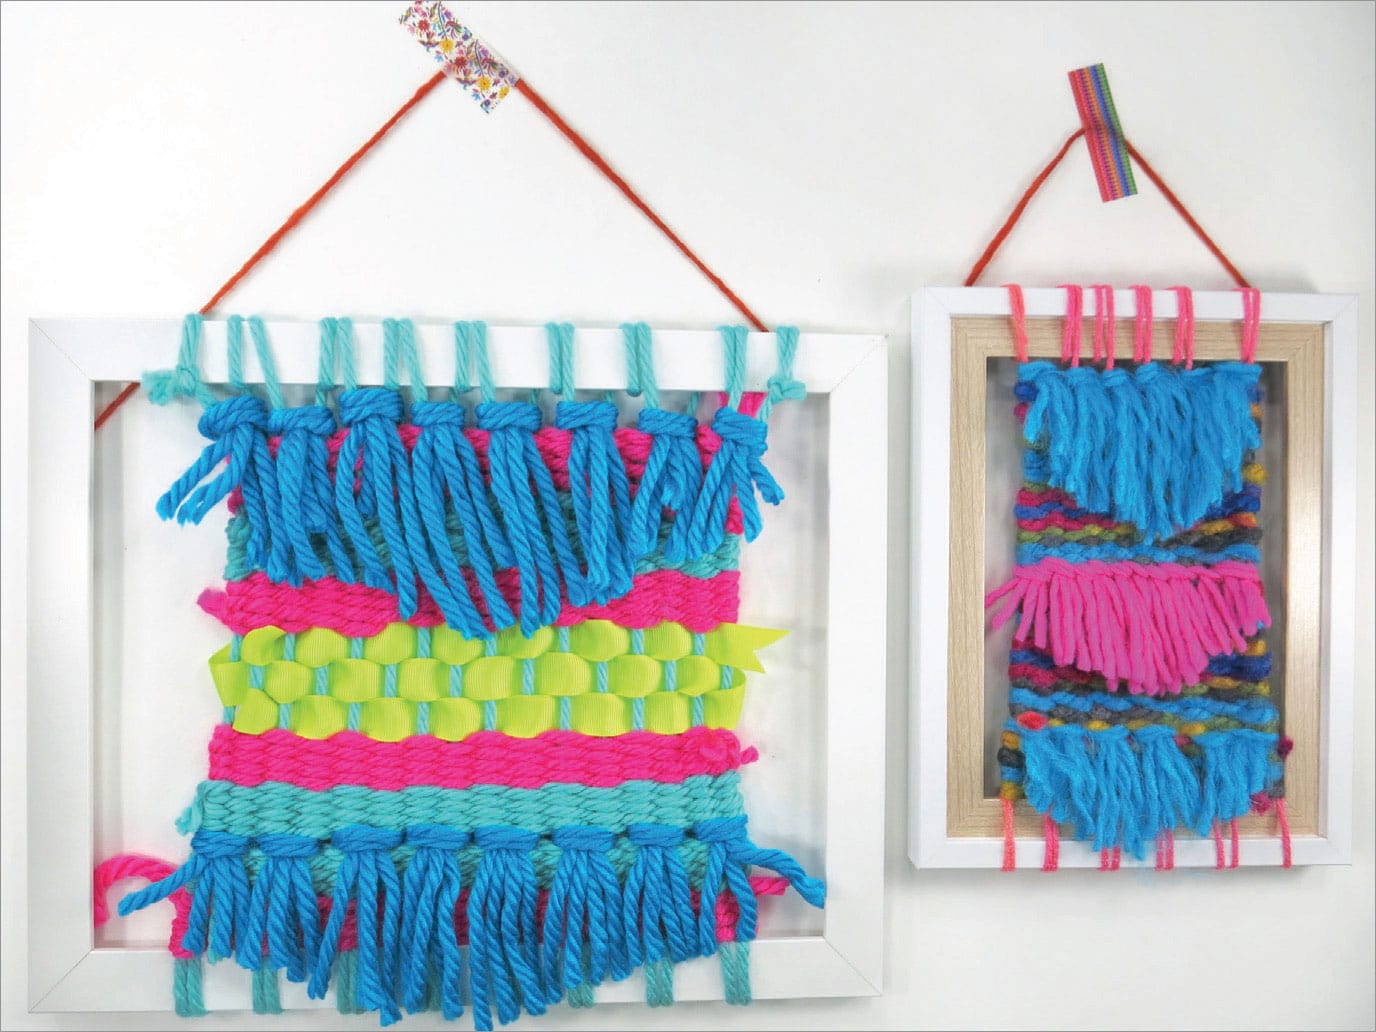
9. Weave until you reach the top of the frame. Weave any thread tails back into the project with the tapestry needle. Leave the weaving on the frame loom and hang!
tip
When weaving back and forth across a loom, pull the weft yarn gently or your weaving will begin to draw in like an hourglass.
LAB |
tree weaving |
This lab uses a round loom just like in Lab 40. This time, the warping is done a bit differently to create a tree weaving! Once completed, think of other things your weaving could be besides a tree—could you invert the weaving to make an evergreen tree? Could you use different colors to weave a turkey or a peacock? So many possibilities!

weaving a tree shape
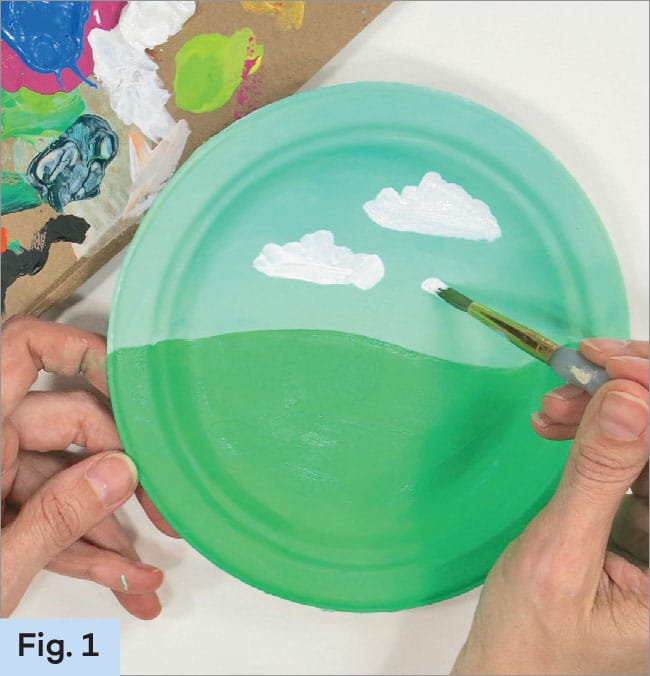
1. Paint a landscape on the right side of the plate. Pick a day or nighttime color for the sky. Paint the ground a different color, perhaps green for grass. Add details like clouds in the sky or flowers on the ground. (Fig. 1)
2. Once the plate is dry, decide where the tree will go. Draw two lines about a 1/2" (1.3 cm) apart at the bottom of the plate to indicate the tree trunk. (Fig. 2)

3. At the top of the plate, draw eight lines, 1" (2.5 cm) apart to indicate the top of the tree. Cut each of the drawn lines from the edge to the rim of the plate. This is your loom. The warp yarns won’t go around the plate, they will go in and out of the notches, so there is minimal yarn on the back of the plate. (Fig. 3)

4. To warp the loom, slide the end of the brown yarn into the bottom left notch. Tape the yarn tail on the back of the plate. Bring the yarn up to the top of the loom and go into the first notch on the left. (Fig. 4)

5. Slide the yarn, from the back to the front, and into the notch beside the one just entered. Bring the yarn to the bottom of the plate and into the notch to the right of the first notch. (Fig. 5)

6. Wrap the yarn around the notch so it comes back out the original and first notch. Bring the yarn up to the top of the plate, third notch from the left and then down to right side notch on the bottom of the plate. (Fig. 6)

7. Continue sliding the yarn from the first notch on the bottom left into all the notches at the top and from all the top notches down to the bottom right side notch, until all the notches at the top are full and the yarn is at the bottom of the plate. (Fig. 7)

8. Cut the end of the yarn, leaving about 12" (30 cm) to create the trunk of the tree. Wrap the 12" (30 cm) tail over all the warp strings and then under all the warp strings. Pull the yarn tightly to bring the strings together to create the trunk. (Fig. 8)

9. When the trunk is the desired height, double knot the end of the yarn to one of the tree “branches.”
10. Time to weave! Begin at the bottom of the tree and weave in an over and under pattern through the tree branches. (Fig. 9)

11. Leave a tail of yarn about 2" (5 cm) long. Start a new strand of yarn, leaving a 2" (5 cm) thread tail and continue weaving, over and under, until you reach the rim of the plate. Once you are finished weaving, use a tapestry needle to weave the thread tails into the project. (Fig. 10)

12. To finish, tie the last yarn to one of the warp tree branches. You can even sew or glue buttons on the tree for flowers or fruit. (Fig. 11)

or try this
Make an evergreen tree, by warping and weaving with two notches at the top and the eight at the bottom. Begin weaving at the top of the tree, adding the wrapped trunk last.
LAB |
straw weaving |
Remember, a loom for weaving can be made from just about anything…including drinking straws! When complete, a straw weaving can use used as a bookmark, a belt, or even a wristband. Just vary the length of the warp string to alter the length of the weaving.

weaving with straws
1. Cut two straws in half. (Fig. 1)

2. Tilt one of the straws down, slide one 12" (30 cm) length of yarn into the straw until just a little of the yarn comes out the end. (Fig. 2)

3. Secure the yarn end with tape. Repeat for the remaining three straws. (Fig. 3)

4. Align all the straws together at the top. Tie the bottom of the yarns together in an overhand knot. (Fig. 4)

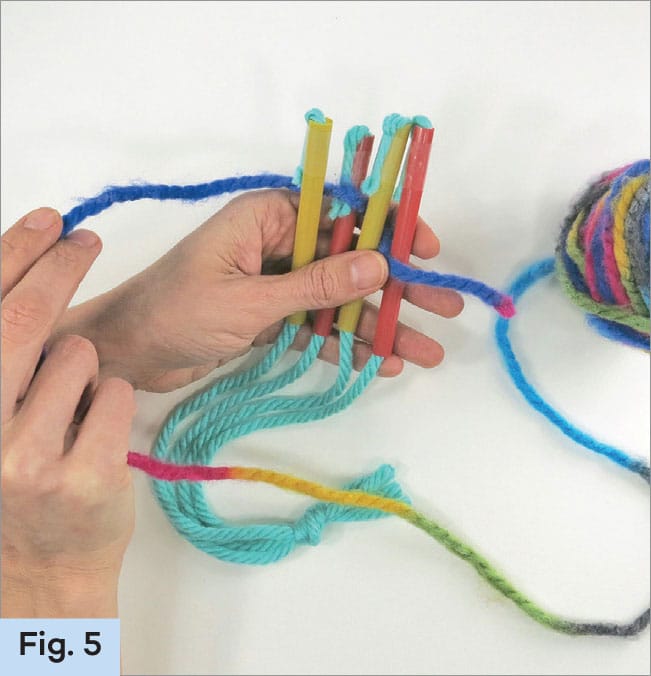
5. Hold the straws together near the top with your thumb in front and fingers in back. Place the end of the weaving yarn under your thumb. Think of the straws as having a number, from left to right: 1, 2, 3, 4. (Fig. 5)
6. Continue to hold the yarn in place with your thumb.
• With your extra hand, wrap the yarn around the back of straw 3. (Fig. 6)

• Then weave the yarn in front of straw 2. (Fig. 7)

• Loop the yarn around straw 1. (Fig. 8)
• Now go behind straw 2 and in front of straw 3, the opposite of the previous pattern. (Fig. 9)
• Loop around straw 4 and behind straw 3. Continue this weaving pattern of over, under, and around. (Fig. 10)

7. Continue weaving. The yarn at the bottom may start to unravel a bit but don’t worry about that. As the weaving grows, slowly and gently scoot it down the straws. Do not push it all the way off the straws. (Fig. 11)

8. When the weaving has moved all the way to the bottom of the knot and 2" (5 cm) from the top of the straws, stop. (Fig. 12)

9. Slide the weaving down the straws. Pinch the straws so that the yarn stays in place. Cut off the top of the straws below the tape. (Fig. 13)

10. Hold onto yarn so that it does not slide down the weaving and cause it to unravel. Remove the straws. (Fig. 14)

11. Cut the weaving (weft) yarn, leaving a 2" (5 cm) tail. Then cut a short piece of the same yarn and use it to secure the top of the weaving with an overhand knot. Use a tapestry needle to bury the beginning and end of the weft yarn thread tails. Trim the warp yarns. (Fig. 15)
LAB |
kumihimo |
Kumihimo is a Japanese form of braided cord making. In Japanese, kumi-himo means “gathered threads.” Historically, these braided cords were used by the samurai to lace their armor. Creating these cords is highly addictive! Use them as bracelets, belts, or bookmarks.

weaving kumihimo
1. To create a loom, trace a round jar or a lid that is no smaller than 6" (15.2 cm) in diameter. Cut out the cardboard along the tracing. (Fig. 1)

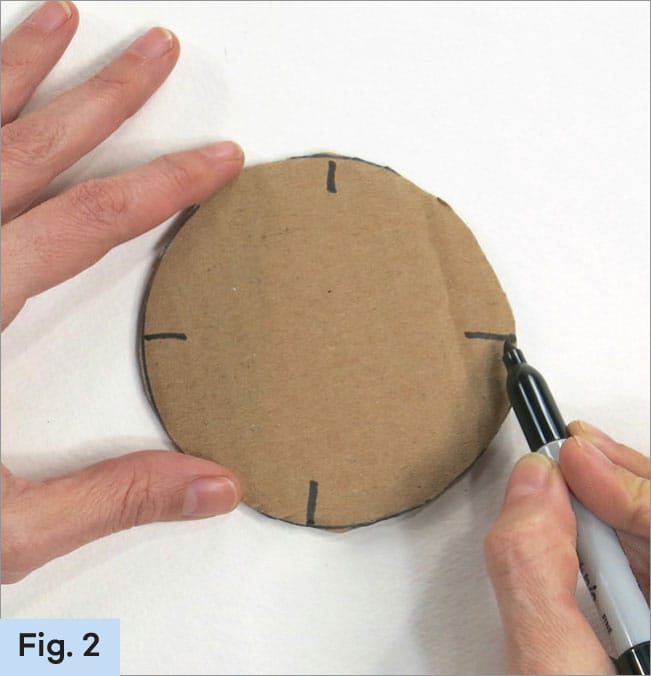
2. Starting at the top of the circle, draw a short line. If this were a compass, this would be north. Draw three more lines for south, east and west. (Fig. 2)
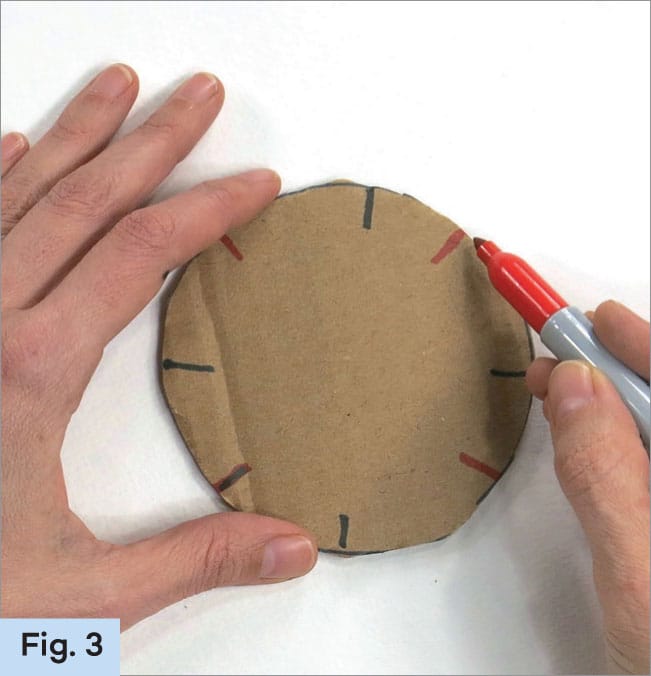
3. Draw four more lines, each in the middle of the first four drawn lines. If this were a compass, these would be north-east, north-west, south-east, south-west. (Fig. 3)
4. Draw a line in the middle of each of the 8 lines already drawn on the circle for a total of 16 lines on the circle. Cut about 1/2" (1.3 cm) into the circle on each of these lines. Use an ink pen to poke a hole into the center of the circle. (Fig. 4)
5. Tie the eight strands of yarn into an overhand knot at one end.
• Begin by bringing all eight strands into the shape of the letter U. (Fig. 5)
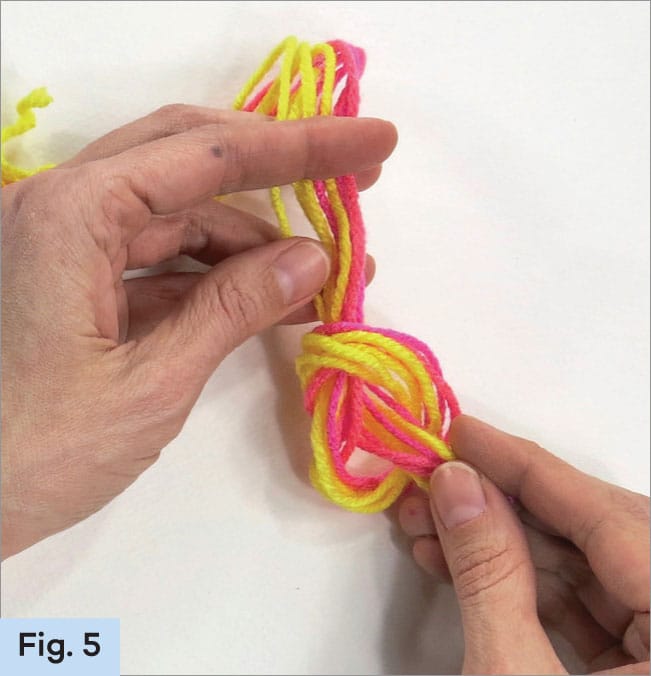
• Bring the short set of strands over the long strands. Place them through the loop of yarn and pull tightly. (Fig. 6)

6. Push the knot through the hole in the middle of the circle. (Fig. 7)

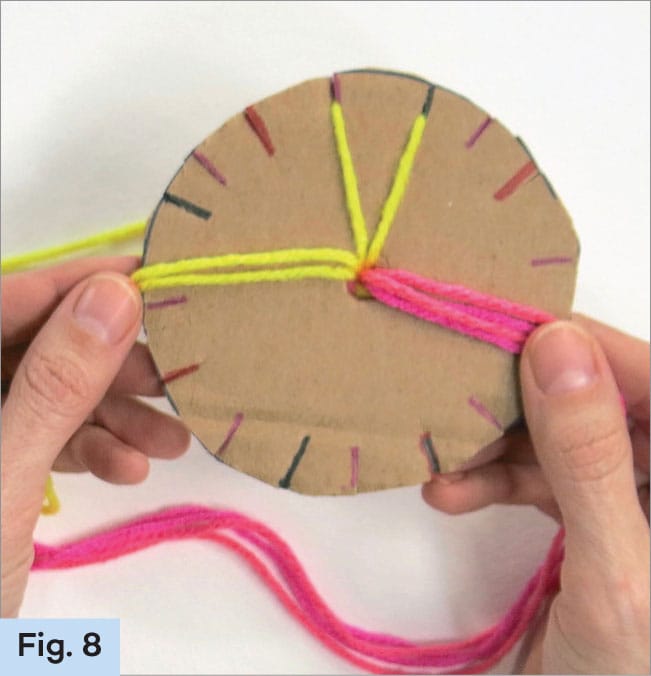
7. Pull the short strands of yarn through one side and leave the long on the other side. The side with the short strands is the back. Turn the loom over to the side with the long strands of yarn. This is the front and where the weaving will be done. (Fig. 8)
8. Separate the long strands by color. Slide one of the four strands of one color into any of the notches on the loom. Place the second strand of the same color right beside the first, creating a V. (Fig. 9)

9. Take the two remaining strands of the first color and slide them into two notches on the opposite end of the loom. The yarn placed in the loom should look like a very narrow X. If this were a compass, the yarn placed in the loom would be north and south. (Fig. 10)

10. With the four strands of yarn of the second color, follow the same steps. These strands will go in the east and west position of the imaginary compass. (Fig. 11)

11. Now for the weaving process. Once the process is learned, it is very easy. Always hold the loom in your right hand. There are two X’s on the loom. One is vertical, the other horizontal. While weaving, only the X that is vertical is used. Always start at the bottom of the X, lifting the left side of the X out of the loom. (Fig. 12)

12. Bring that strand of yarn to the top of the X. Slide it into the loom on the top left side of the X, creating a fork. (Fig. 13)

13. Switch and hold the loom with your left hand, rotating the loom so the other X (the second color) is vertical. Use your right hand to remove the top right strand of the fork. (Fig. 14)

14. Still using your right hand, slide the yarn into the notch on the right side of the bottom, creating an X. (Fig. 15)

15. Turn the entire loom clockwise until the X that was previously horizontal is now vertical. (Fig. 16) This is where steps 10-14 are repeated. To remember the steps, think of this simple poem:
Left strand to the top, right side drops, turn it like the hands of a clock.
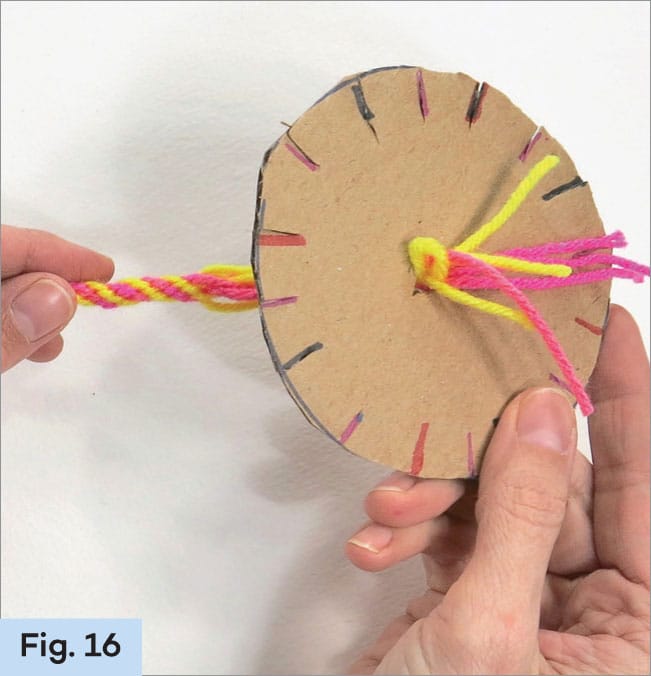
16. While weaving, gently tug on the cord to help pull the weaving out. After about five minutes, a woven cord should be forming through the bottom of the loom (Fig. 17)

17. If you are uncertain which color should be woven next, look closely at the yarn. Whichever color is on top is the one that was just woven. Move on to the next color. (Fig. 18)

tip
It is best to leave the weaving in a fork formation when taking a break. Then it is easy to see where the weaving left off and what color to start back with.
18. If the strands of yarn may start to tangle, untangle them by pulling only one strand of yarn out of the tangle at a time (Fig. 19)

19. Continue weaving until the unwoven strands of yarn are no longer long enough to fit into the notches of the loom. (Fig. 20)

20. Take the unwoven yarn out of the loom and slide it through the hole. (Fig. 21)

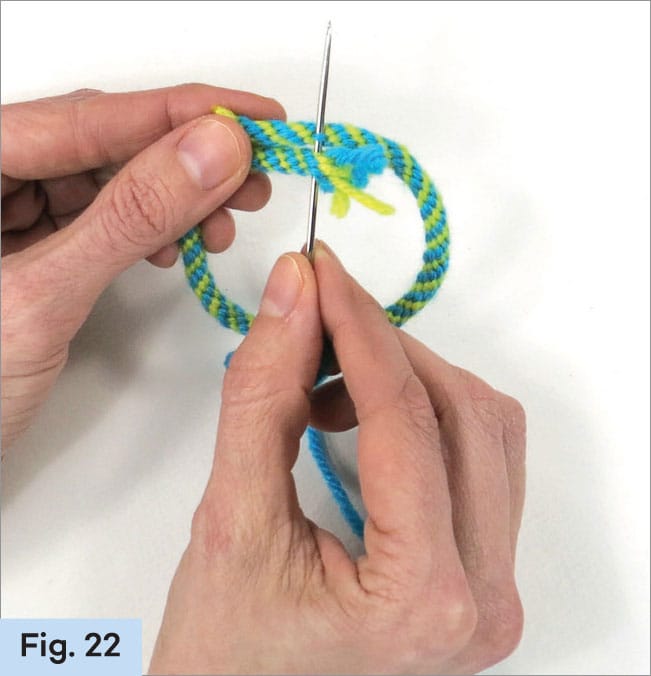
21. At this point, the cord weaving is complete. Cut off the starting knot and the extra stands of yarn on the finished end. Leave the woven cord aa bookmark or a loop for a future weaving project. To create a bracelet, thread a chenille needle and knot one end of the yarn. Overlap the ends of the cord. Pull needle through both the bottom and the top of the cord. (Fig. 22)
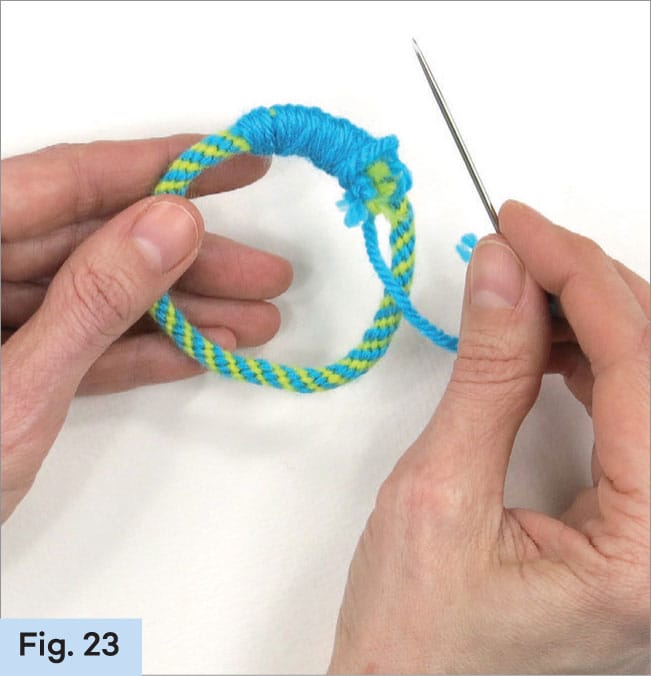
22. Wrap the yarn around and around the two overlapped cords. Finish by stitching a knot at the end. (Fig. 23)
tip
Hold onto the cardboard loom, it can be reused to create more cords unless it is too bent out of shape.