
10 Integrating Spring
- Processing data in real time
- Defining integration flows
- Using Spring Integration’s Java DSL definition
- Integrating with emails, filesystems, and other external systems
One of the most frustrating things I encounter as I travel is being on a long flight and having a poor or nonexistent in-flight internet connection. I like to use my air time to get some work done, including writing many of the pages of this book. If there’s no network connection, I’m at a disadvantage if I need to fetch a library or look up a Javadoc, and I’m not able to get much work done. I’ve learned to pack a book to read for those occasions.
Just as we need to connect to the internet to be productive, many applications must connect to external systems to perform their work. An application may need to read or send emails, interact with an external API, or react to data being written to a database. And, as data is ingested from or written to these external systems, the application may need to process data in some way to translate it to or from the application’s own domain.
In this chapter, you’ll see how to employ common integration patterns with Spring Integration. Spring Integration is a ready-to-use implementation of many of the integration patterns that are catalogued in Enterprise Integration Patterns by Gregor Hohpe and Bobby Woolf (Addison-Wesley, 2003). Each pattern is implemented as a component through which messages ferry data in a pipeline. Using Spring configuration, you can assemble these components into a pipeline through which data flows. Let’s get started by defining a simple integration flow that introduces many of the features and characteristics of working with Spring Integration.
10.1 Declaring a simple integration flow
Generally speaking, Spring Integration enables the creation of integration flows through which an application can receive or send data to some resource external to the application itself. One such resource that an application may integrate with is the filesystem. Therefore, among Spring Integration’s many components are channel adapters for reading and writing files.
To get your feet wet with Spring Integration, you’re going to create an integration flow that writes data to the filesystem. To get started, you need to add Spring Integration to your project build. For Maven, the necessary dependencies follow:
<dependency>
    <groupId>org.springframework.boot</groupId>
    <artifactId>spring-boot-starter-integration</artifactId>
</dependency>
<dependency>
    <groupId>org.springframework.integration</groupId>
    <artifactId>spring-integration-file</artifactId>
</dependency>
The first dependency is the Spring Boot starter for Spring Integration. This dependency is essential to developing a Spring Integration flow, regardless of what the flow may integrate with. Like all Spring Boot starter dependencies, it’s available as a check box in the Initializr1 form.
The second dependency is for Spring Integration’s file endpoint module. This module is one of over two dozen endpoint modules used to integrate with external systems. We’ll talk more about the endpoint modules in section 10.2.9. But, for now, know that the file endpoint module offers the ability to ingest files from the filesystem into an integration flow and/or to write data from a flow to the filesystem.
Next you need to create a way for the application to send data into an integration flow so that it can be written to a file. To do that, you’ll create a gateway interface, such as the one shown next.
Listing 10.1 Message gateway interface to transform method invocations into messages
package sia6;

import org.springframework.integration.annotation.MessagingGateway;
import org.springframework.integration.file.FileHeaders;
import org.springframework.messaging.handler.annotation.Header;

@MessagingGateway(defaultRequestChannel="textInChannel")   ❶
public interface FileWriterGateway {

  void writeToFile(
      @Header(FileHeaders.FILENAME) String filename,       ❷
      String data);

}
Although it’s a simple Java interface, there’s a lot to be said about FileWriterGateway. The first thing you’ll notice is that it’s annotated with @MessagingGateway. This annotation tells Spring Integration to generate an implementation of this interface at run time—similar to how Spring Data automatically generates implementations of repository interfaces. Other parts of the code will use this interface when they need to write a file.
The defaultRequestChannel attribute of @MessagingGateway indicates that any messages resulting from a call to the interface methods should be sent to the given message channel. In this case, you state that any messages that result from a call to writeToFile() should be sent to the channel whose name is textInChannel.
As for the writeToFile() method, it accepts a filename as a String, and another String that will contain the text should be written to a file. What’s notable about this method signature is that the filename parameter is annotated with @Header. In this case, the @Header annotation indicates that the value passed to filename should be placed in a message header (specified as FileHeaders.FILENAME, which is a constant in the FileHeaders class that is equal to the value "file_name") rather than in the message payload. The data parameter value, on the other hand, is carried in the message payload.
Now that you’ve created a message gateway, you need to configure the integration flow. Although the Spring Integration starter dependency that you added to your build enables essential autoconfiguration for Spring Integration, it’s still up to you to write additional configurations to define flows that meet the needs of the application. Three configuration options for declaring integration flows follow:
We’ll take a look at all three of these configuration styles for Spring Integration, starting with the old-timer, XML configuration.
10.1.1 Defining integration flows with XML
Although I’ve avoided using XML configuration in this book, Spring Integration has a long history of integration flows defined in XML. Therefore, I think it’s worthwhile for me to show at least one example of an XML-defined integration flow. The following listing shows how to configure your sample flow in XML.
Listing 10.2 Defining an integration flow with Spring XML configuration
<?xml version="1.0" encoding="UTF-8"?><beans
xmlns="http://www.springframework.org/schema/beans"
  xmlns:xsi="http://www.w3.org/2001/XMLSchema-instance"
  xmlns:int="http://www.springframework.org/schema/integration"
  xmlns:int-file="http://www.springframework.org/schema/integration/file"
  xsi:schemaLocation="http://www.springframework.org/schema/beans
    http://www.springframework.org/schema/beans/spring-beans.xsd
    http://www.springframework.org/schema/integration
    http://www.springframework.org/schema/integration/spring-integration.xsd
    http://www.springframework.org/schema/integration/file
    http://www.springframework.org/schema/integration/file/spring-integration-file.xsd">

    <int:channel id="textInChannel" />           ❶

    <int:transformer id="upperCase"
        input-channel="textInChannel"
        output-channel="fileWriterChannel"
        expression="payload.toUpperCase()" />    ❷

    <int:channel id="fileWriterChannel" />       ❸

    <int-file:outbound-channel-adapter id="writer"
        channel="fileWriterChannel"
        directory="/tmp/sia6/files"
        mode="APPEND"
        append-new-line="true" />                ❹

</beans>
Breaking down the XML in listing 10.2, we get the following:
-
You configured a channel named
textInChannel. You’ll recognize this as the same channel that’s set as the request channel forFileWriterGateway. When thewriteToFile()method is called onFileWriterGateway, the resulting message is published to this channel. -
You configured a transformer that receives messages from
textInChannel. It uses a Spring Expression Language (SpEL) expression to calltoUpperCase()on the message payload. The result of the uppercase operation is then published tofileWriterChannel. -
You configured the channel named
fileWriterChannel. This channel serves as the conduit that connects the transformer with the outbound channel adapter. -
Finally, you configured an outbound channel adapter using the
int-filenamespace. This XML namespace is provided by Spring Integration’s file module to write files. As you configured it, it receives messages fromfileWriterChanneland writes the message payload to a file whose name is specified in the message’s"file_name"header in thedirectoryspecified in the directory attribute. If the file already exists, the file will be appended with a newline rather than be overwritten.
This flow is illustrated in figure 10.1 using graphical elements styled after those in Enterprise Integration Patterns.

The flow comprises five components: a gateway, two channels, a transformer, and a channel adapter. These are just a few of the components that can be assembled into an integration flow. We’ll explore these components and others supported by Spring Integration in section 10.2.
If you want to use XML configuration in a Spring Boot application, you’ll need to import the XML as a resource into the Spring application. The easiest way to do this is to use Spring’s @ImportResource annotation, shown in the next code sample, on one of your application’s Java configuration classes:
@Configuration
@ImportResource("classpath:/filewriter-config.xml")
public class FileWriterIntegrationConfig { ... }
Although XML-based configuration has served Spring Integration well, most developers have grown wary of using XML. (And, as I said, I’m avoiding XML configuration in this book.) Let’s set aside those angle brackets and turn our attention to Spring Integration’s Java configuration style.
10.1.2 Configuring integration flows in Java
Most modern Spring applications have eschewed XML configuration in favor of Java configuration. In fact, in Spring Boot applications, Java configuration is a natural style to complement autoconfiguration. Therefore, if you’re adding an integration flow to a Spring Boot application, it makes perfect sense to define the flow in Java.
As a sample of how to write an integration flow with Java configuration, take a look at the next listing. This shows the same file-writing integration flow as before, but this time it’s written in Java.
Listing 10.3 Using Java configuration to define an integration flow
package sia6;

import java.io.File;
import org.springframework.context.annotation.Bean;
import org.springframework.context.annotation.Configuration;
import org.springframework.integration.annotation.ServiceActivator;
import org.springframework.integration.annotation.Transformer;
import org.springframework.integration.file.FileWritingMessageHandler;
import org.springframework.integration.file.support.FileExistsMode;
import org.springframework.integration.transformer.GenericTransformer;

@Configuration
public class FileWriterIntegrationConfig {

  @Bean
  @Transformer(inputChannel="textInChannel",              ❶
               outputChannel="fileWriterChannel")
  public GenericTransformer<String, String> upperCaseTransformer() {
    return text -> text.toUpperCase();
  }

  @Bean
  @ServiceActivator(inputChannel="fileWriterChannel")
  public FileWritingMessageHandler fileWriter() {         ❷
    FileWritingMessageHandler handler =
        new FileWritingMessageHandler(new File("/tmp/sia6/files"));
    handler.setExpectReply(false);
    handler.setFileExistsMode(FileExistsMode.APPEND);
    handler.setAppendNewLine(true);
    return handler;
  }

}
With Java configuration, you declare two beans: a transformer and a file-writing message handler. The transformer is a GenericTransformer. Because GenericTransformer is a functional interface, you’re able to provide its implementation as a lambda that calls toUpperCase() on the message text. The transformer bean is annotated with @Transformer, designating it as a transformer in the integration flow that receives messages on a channel named textInChannel and writes messages to the channel named fileWriterChannel.
As for the file-writing bean, it’s annotated with @ServiceActivator to indicate that it’ll accept messages from fileWriterChannel and hand those messages over to the service defined by an instance of FileWritingMessageHandler. FileWritingMessageHandler is a message handler that writes a message payload to a file in a specified directory using a filename specified in the message’s “file_name” header. As with the XML example, FileWritingMessageHandler is configured to append to the file with a newline.
One thing unique about the configuration of the FileWritingMessageHandler bean is that there’s a call to setExpectReply(false) to indicate that the service activator shouldn’t expect a reply channel (a channel through which a value may be returned to upstream components in the flow). If you don’t call setExpectReply (false), the file-writing bean defaults to true, and, although the pipeline still functions as expected, you’ll see a few errors logged stating that no reply channel was configured.
You’ll also notice that you didn’t need to explicitly declare the channels. The textInChannel and fileWriterChannel will be created automatically if no beans with those names exist. But if you want more control over how the channels are configured, you can explicitly construct them as beans like this:
@Bean
public MessageChannel textInChannel() {
  return new DirectChannel();
}
...
@Bean
public MessageChannel fileWriterChannel() {
  return new DirectChannel();
}
The Java configuration option is arguably easier to read—and slightly briefer—and is certainly consistent with the Java-only configuration I’m shooting for in this book. But it can be made even more streamlined with Spring Integration’s Java DSL (domain-specific language) configuration style.
10.1.3 Using Spring Integration’s DSL configuration
Let’s take one more stab at defining the file-writing integration flow. This time, you’ll still define it in Java, but you’ll use Spring Integration’s Java DSL. Rather than declare an individual bean for each component in the flow, you’ll declare a single bean that defines the entire flow.
Listing 10.4 Providing a fluent API for designing integration flows
package sia6;

import java.io.File;
import org.springframework.context.annotation.Bean;
import org.springframework.context.annotation.Configuration;
import org.springframework.integration.dsl.IntegrationFlow;
import org.springframework.integration.dsl.IntegrationFlows;
import org.springframework.integration.dsl.MessageChannels;
import org.springframework.integration.file.dsl.Files;
import org.springframework.integration.file.support.FileExistsMode;

@Configuration
public class FileWriterIntegrationConfig {

  @Bean
  public IntegrationFlow fileWriterFlow() {
    return IntegrationFlows
        .from(MessageChannels.direct("textInChannel"))     ❶
        .<String, String>transform(t -> t.toUpperCase())   ❷
        .handle(Files                                      ❸
            .outboundAdapter(new File("/tmp/sia6/files"))
            .fileExistsMode(FileExistsMode.APPEND)
            .appendNewLine(true))
        .get();
  }

}
This new configuration is as terse as it can possibly be, capturing the entire flow in a single bean method. The IntegrationFlows class initiates the builder API, from which you can declare the flow.
In listing 10.4, you start by receiving messages from the channel named textInChannel, which then go to a transformer that uppercases the message payload. After the transformer, messages are handled by an outbound channel adapter created from the Files type provided in Spring Integration’s file module. Finally, a call to get() builds the IntegrationFlow to be returned. In short, this single bean method defines the same integration flow as the XML and Java configuration examples.
You’ll notice that, as with the Java configuration example, you don’t need to explicitly declare channel beans. Although you reference textInChannel, it’s automatically created by Spring Integration because there’s no existing channel bean with that name. But you can explicitly declare the channel bean if you want.
As for the channel that connects the transformer to the outbound channel adapter, you don’t even reference it by name. If there’s a need to explicitly configure the channel, you can reference it by name in the flow definition with a call to channel() as follows:
@Bean
public IntegrationFlow fileWriterFlow() {
  return IntegrationFlows
      .from(MessageChannels.direct("textInChannel"))
      .<String, String>transform(t -> t.toUpperCase())
      .channel(MessageChannels.direct("FileWriterChannel"))
      .handle(Files
          .outboundAdapter(new File("/tmp/sia6/files"))
          .fileExistsMode(FileExistsMode.APPEND)
          .appendNewLine(true))
      .get();
}
One thing to keep in mind when working with Spring Integration’s Java DSL (as with any fluent API) is that you must employ whitespace shrewdly to maintain readability. In the example given here, I’ve been careful to indent lines to indicate blocks of related code. For even longer, more complex flows, you may even consider extracting portions of the flow into separate methods or subflows for better readability.
Now that you’ve seen a simple flow defined using three different configuration styles, let’s step back and take a look at Spring Integration’s big picture.
10.2 Surveying the Spring Integration landscape
Spring Integration covers a lot of ground with a multitude of integration scenarios. Trying to include all of it in a single chapter would be like trying to fit an elephant in an envelope. Instead of a comprehensive treatment of Spring Integration, I’ll present a photograph of the Spring Integration elephant to give you some idea of how it works. Then you’ll create one more integration flow that adds functionality to the Taco Cloud application.
An integration flow is composed of one or more of the following components. Before you write any more code, we’ll take a brief look at the role each of these components plays in an integration flow:
-
Filter—Conditionally allows messages to pass through the flow based on some criteria
-
Transformer—Changes message values and/or converts message payloads from one type to another
-
Router—Directs messages to one of several channels, typically based on message headers
-
Splitter—Splits incoming messages into two or more messages, each sent to different channels
-
Aggregator—The opposite of a splitter; combines multiple messages coming in from separate channels into a single message
-
Service activator—Hands a message off to some Java method for processing, and then publishes the return value on an output channel
-
Channel adapter—Connects a channel to some external system or transport; can either accept input or write to the external system
-
Gateway—Passes data into an integration flow via an interface
You’ve already seen a few of these components in play when you defined the file-writing integration flow. The FileWriterGateway interface was the gateway through which an application submitted text to be written to a file. You also defined a transformer to convert the given text to uppercase; then you declared a service gateway that performed the task of writing the text to a file. And the flow had two channels, textInChannel and fileWriterChannel, that connected the other components with each other. Now, a quick tour of the integration flow components, as promised.
10.2.1 Message channels
Message channels are the means by which messages move through an integration pipeline, as shown in figure 10.2. They’re the pipes that connect all the other parts of Spring Integration plumbing together.

Figure 10.2 Message channels are conduits through which data flows between other components in an integration flow.
Spring Integration provides several channel implementations, including the following:
-
PublishSubscribeChannel—Messages published into aPublishSubscribeChannelare passed on to one or more consumers. If multiple consumers exist, all of them receive the message. -
QueueChannel—Messages published into aQueueChannelare stored in a queue until pulled by a consumer in a first in, first out (FIFO) fashion. If multiple consumers exist, only one of them receives the message. -
PriorityChannel—LikeQueueChannelbut, rather than FIFO behavior, messages are pulled by consumers based on the messagepriorityheader. -
RendezvousChannel—LikeQueueChannelexcept that the sender blocks the channel until a consumer receives the message, effectively synchronizing the sender with the consumer. -
DirectChannel—LikePublishSubscribeChannel, but sends a message to a single consumer by invoking the consumer in the same thread as the sender. This allows for transactions to span across the channel. -
ExecutorChannel—Similar toDirectChannel, but the message dispatch occurs via aTaskExecutor, taking place in a thread separate from the sender. This channel type doesn’t support transactions that span the channel. -
FluxMessageChannel—A Reactive Streams Publisher message channel based on Project Reactor’sFlux. (We’ll talk more about Reactive Streams, Reactor, andFluxin chapter 11.)
In both the Java configuration and Java DSL styles, input channels are automatically created, with DirectChannel as the default. But if you want to use a different channel implementation, you’ll need to explicitly declare the channel as a bean and reference it in the integration flow. For example, to declare a PublishSubscribeChannel, you’d declare the following @Bean method:
Then you’d reference this channel by name in the integration flow definition. For example, if the channel were being consumed by a service activator bean, you’d reference it in the inputChannel attribute of @ServiceActivator like so:
Or, if you’re using the Java DSL configuration style, you’d reference it with a call to channel() as follows:
@Bean
public IntegrationFlow orderFlow() {
  return IntegrationFlows
      ...
      .channel("orderChannel")
      ...
      .get();
}
It’s important to note that if you’re using QueueChannel, the consumers must be configured with a poller. For instance, suppose that you’ve declared a QueueChannel bean like this:
You’d need to make sure that the consumer is configured to poll the channel for messages. In the case of a service activator, the @ServiceActivator annotation might look like this:
In this example, the service activator polls from the channel named orderChannel every 1 second (or 1,000 ms).
10.2.2 Filters
You can place filters in the midst of an integration pipeline to allow or disallow messages from proceeding to the next step in the flow, as shown in figure 10.3.
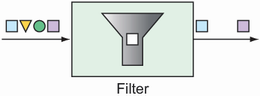
Figure 10.3 Filters based on some criteria allow or disallow messages from proceeding in the pipeline.
For example, suppose that messages containing integer values are published through a channel named numberChannel, but you want only even numbers to pass on to the channel named evenNumberChannel. In that case, you could declare a filter with the @Filter annotation like this:
@Filter(inputChannel="numberChannel",
        outputChannel="evenNumberChannel")
public boolean evenNumberFilter(Integer number) {
  return number % 2 == 0;
}
Alternatively, if you’re using the Java DSL configuration style to define your integration flow, you could make a call to filter() like this:
@Bean
public IntegrationFlow evenNumberFlow(AtomicInteger integerSource) {
  return IntegrationFlows
      ...
      .<Integer>filter((p) -> p % 2 == 0)
      ...
      .get();
}
In this case, you use a lambda to implement the filter. But, in truth, the filter() method accepts a GenericSelector as an argument. This means that you can implement the GenericSelector interface instead, should your filtering needs be too involved for a simple lambda.
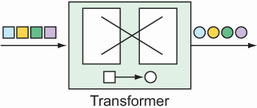
10.2.3 Transformers
Transformers perform some operation on messages, typically resulting in a different message and, possibly, with a different payload type (see figure 10.4). The transformation can be something simple, such as performing mathematic operations on a number or manipulating a String value. Or the transformation can be more complex, such as using a String value representing an ISBN to look up and return details of the corresponding book.
For example, suppose that integer values are being published on a channel named numberChannel, and you want to convert those numbers to a String containing the Roman numeral equivalent. In that case, you can declare a bean of type GenericTransformer and annotate it with @Transformer as follows:
@Bean
@Transformer(inputChannel="numberChannel",
             outputChannel="romanNumberChannel")
public GenericTransformer<Integer, String> romanNumTransformer() {
  return RomanNumbers::toRoman;
}
The @Transformer annotation designates this bean as a transformer bean that receives Integer values from the channel named numberChannel and uses a static method named toRoman() to do the conversion. (The toRoman() method is statically defined in a class named RomanNumbers and referenced here with a method reference.) The result is published to the channel named romanNumberChannel.
In the Java DSL configuration style, it’s even easier with a call to transform(), passing in the method reference to the toRoman() method as follows:
@Bean
public IntegrationFlow transformerFlow() {
  return IntegrationFlows
      ...
      .transform(RomanNumbers::toRoman)
      ...
      .get();
}
Although you’ve used a method reference in both of the transformer code samples, know that the transformer can also be specified as a lambda. Or, if the transformer is complex enough to warrant a separate Java class, you can inject it as a bean into the flow configuration and pass the reference to the transform() method like so:
@Bean
public RomanNumberTransformer romanNumberTransformer() {
  return new RomanNumberTransformer();
}

@Bean
public IntegrationFlow transformerFlow(
                    RomanNumberTransformer romanNumberTransformer) {
  return IntegrationFlows
      ...
      .transform(romanNumberTransformer)
      ...
      .get();
}
Here, you declare a bean of type RomanNumberTransformer, which itself is an implementation of Spring Integration’s Transformer or GenericTransformer interfaces. The bean is injected into the transformerFlow() method and passed to the transform() method when defining the integration flow.
10.2.4 Routers
Routers, based on some routing criteria, allow for branching in an integration flow, directing messages to different channels (see figure 10.5).
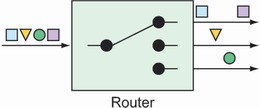
Figure 10.5 Routers direct messages to different channels, based on some criteria applied to the messages.
For example, suppose that you have a channel named numberChannel through which integer values flow. And let’s say that you want to direct all messages with even numbers to a channel named evenChannel, whereas messages with odd numbers are routed to a channel named oddChannel. To create such a routing in your integration flow, you can declare a bean of type AbstractMessageRouter and annotate the bean with @Router, as shown next:
@Bean
@Router(inputChannel="numberChannel")
public AbstractMessageRouter evenOddRouter() {
  return new AbstractMessageRouter() {
    @Override
    protected Collection<MessageChannel>
              determineTargetChannels(Message<?> message) {
      Integer number = (Integer) message.getPayload();
      if (number % 2 == 0) {
        return Collections.singleton(evenChannel());
      }
      return Collections.singleton(oddChannel());
    }
  };
}

@Bean
public MessageChannel evenChannel() {
  return new DirectChannel();
}

@Bean
public MessageChannel oddChannel() {
  return new DirectChannel();
}
The AbstractMessageRouter bean declared here accepts messages from an input channel named numberChannel. The implementation, defined as an anonymous inner class, examines the message payload, and, if it’s an even number, returns the channel named evenChannel (declared as a bean after the router bean). Otherwise, the number in the channel payload must be odd, in which case, the channel named oddChannel is returned (also declared in a bean declaration method).
In Java DSL form, routers are declared by calling route() in the course of a flow definition, as shown here:
@Bean
public IntegrationFlow numberRoutingFlow(AtomicInteger source) {
  return IntegrationFlows
    ...
      .<Integer, String>route(n -> n%2==0 ? "EVEN":"ODD", mapping -> mapping
        .subFlowMapping("EVEN", sf -> sf
            .<Integer, Integer>transform(n -> n * 10)
            .handle((i,h) -> { ... })
            )
        .subFlowMapping("ODD", sf -> sf
            .transform(RomanNumbers::toRoman)
            .handle((i,h) -> { ... })
            )
        )
      .get();
}
Although it’s still possible to declare an AbstractMessageRouter and pass it into route(), this example uses a lambda to determine whether a message payload is odd or even. If it’s even, then a String value of EVEN is returned. If it’s odd, then ODD is returned. These values are then used to determine which submapping will handle the message.
10.2.5 Splitters
At times in an integration flow, it can be useful to split a message into multiple messages to be handled independently. Splitters, as illustrated in figure 10.6, will split and handle those messages for you.
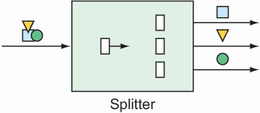
Figure 10.6 Splitters break down messages into two or more separate messages that can be handled by separate subflows.
Splitters are useful in many circumstances, but you might use a splitter for the following two essential use cases:
-
A message payload contains a collection of items of the same type that you’d like to process as individual message payloads. For example, a message carrying a list of products might be split into multiple messages with payloads of one product each.
-
A message payload carries information that, although related, can be split into two or more messages of different types. For example, a purchase order might carry delivery, billing, and line-item information. The delivery details might be processed by one subflow, billing by another, and line items in yet another. In this use case, the splitter is typically followed by a router that routes messages by payload type to ensure that the data is handled by the right subflow.
When splitting a message payload into two or more messages of different types, it’s usually sufficient to define a POJO that extracts the individual pieces of the incoming payload and returns them as elements of a collection.
For example, suppose that you want to split a message carrying a purchase order into two messages: one carrying the billing information and another carrying a list of line items. The following OrderSplitter will do the job:
public class OrderSplitter {
  public Collection<Object> splitOrderIntoParts(PurchaseOrder po) {
    ArrayList<Object> parts = new ArrayList<>();
    parts.add(po.getBillingInfo());
    parts.add(po.getLineItems());
    return parts;
  }
}
You can then declare an OrderSplitter bean as part of the integration flow by annotating it with @Splitter like this:
@Bean
@Splitter(inputChannel="poChannel",
          outputChannel="splitOrderChannel")
public OrderSplitter orderSplitter() {
  return new OrderSplitter();
}
Here, purchase orders arrive on the channel named poChannel and are split by OrderSplitter. Then, each item in the returned collection is published as a separate message in the integration flow to a channel named splitOrderChannel. At this point in the flow, you can declare a PayloadTypeRouter to route the billing information and the line items to their own subflow as follows:
@Bean
@Router(inputChannel="splitOrderChannel")
public MessageRouter splitOrderRouter() {
  PayloadTypeRouter router = new PayloadTypeRouter();
  router.setChannelMapping(
      BillingInfo.class.getName(), "billingInfoChannel");
  router.setChannelMapping(
      List.class.getName(), "lineItemsChannel");
  return router;
}
As its name implies, PayloadTypeRouter routes messages to different channels based on their payload type. As configured here, messages whose payload is of type BillingInfo are routed to a channel named billingInfoChannel for further processing. As for the line items, they’re in a java.util.List collection; therefore, you map payloads of type List to be routed to a channel named lineItemsChannel.
As things stand, the flow splits into two subflows: one through which BillingInfo objects flow and another through which a List<LineItem> flows. But what if you want to break it down further such that instead of dealing with a List of LineItem objects, you process each LineItem separately? All you need to do to split the line-item list into multiple messages, one for each line item, is write a method (not a bean) that’s annotated with @Splitter and returns a collection of LineItem objects, perhaps something like this:
@Splitter(inputChannel="lineItemsChannel", outputChannel="lineItemChannel")
public List<LineItem> lineItemSplitter(List<LineItem> lineItems) {
  return lineItems;
}
When a message carrying a payload of List<LineItem> arrives in the channel named lineItemsChannel, it passes into the lineItemSplitter() method. Per the rules of a splitter, the method must return a collection of the items to be split. In this case, you already have a collection of LineItem objects, so you just return the collection directly. As a result, each LineItem in the collection is published in a message of its own to the channel named lineItemChannel.
If you’d rather use the Java DSL to declare the same splitter/router configuration, you can do so with calls to split() and route() as shown here:
return IntegrationFlows
  ...
    .split(orderSplitter())
    .<Object, String> route(
        p -> {
          if (p.getClass().isAssignableFrom(BillingInfo.class)) {
            return "BILLING_INFO";
          } else {
            return "LINE_ITEMS";
          }
        }, mapping -> mapping
          .subFlowMapping("BILLING_INFO", sf -> sf
              .<BillingInfo> handle((billingInfo, h) -> {
                ...
              }))
          .subFlowMapping("LINE_ITEMS", sf -> sf
              .split()
              .<LineItem> handle((lineItem, h) -> {
                ...
              }))

        )
    .get();
The DSL form of the flow definition is certainly terser, if not arguably a bit more difficult to follow. We could clean this up a bit by extracting the lambdas to methods. For example, we could use the following three methods to replace the lambdas used in the flow definition:
private String route(Object p) {
  return p.getClass().isAssignableFrom(BillingInfo.class)
      ? "BILLING_INFO"
      : "LINE_ITEMS";
}

private BillingInfo handleBillingInfo(
        BillingInfo billingInfo, MessageHeaders h) {
  // ...
}

private LineItem handleLineItems(
        LineItem lineItem, MessageHeaders h) {
  // ...
}
Then, we could rewrite the integration flow with method references like this:
return IntegrationFlows
  ...
    .split()
    .route(
      this::route,
      mapping -> mapping
        .subFlowMapping("BILLING_INFO", sf -> sf
          .<BillingInfo> handle(this::handleBillingInfo))
        .subFlowMapping("LINE_ITEMS", sf -> sf
          .split()
          .<LineItem> handle(this::handleLineItems)));
Either way, this uses the same OrderSplitter to split the order as the Java configuration example. After the order is split, it’s routed by its type to two separate subflows.
10.2.6 Service activators
Service activators receive messages from an input channel and send those messages to an implementation of MessageHandler, as shown in figure 10.7.

Figure 10.7 Service activators invoke some service by way of a MessageHandler on receipt of a message.
Spring Integration offers several MessageHandler implementations out of the box (even PayloadTypeRouter is an implementation of MessageHandler), but you’ll often need to provide some custom implementation to act as a service activator. As an example, the following code shows how to declare a MessageHandler bean, configured to be a service activator:
@Bean
@ServiceActivator(inputChannel="someChannel")
public MessageHandler sysoutHandler() {
  return message -> {
    System.out.println("Message payload:  " + message.getPayload());
  };
}
The bean is annotated with @ServiceActivator to designate it as a service activator that handles messages from the channel named someChannel. As for the MessageHandler itself, it’s implemented via a lambda. Although it’s a simple MessageHandler, when given a Message, it emits its payload to the standard output stream.
Alternatively, you could declare a service activator that processes the data in the incoming message before returning a new payload, as shown in the next code snippet. In that case, the bean should be a GenericHandler rather than a MessageHandler.
@Bean
@ServiceActivator(inputChannel="orderChannel",
                  outputChannel="completeChannel")
public GenericHandler<EmailOrder> orderHandler(
                             OrderRepository orderRepo) {
  return (payload, headers) -> {
    return orderRepo.save(payload);
  };
}
In this case, the service activator is a GenericHandler that expects messages with a payload of type EmailOrder. When the order arrives, it’s saved via a repository; the resulting saved EmailOrder is returned to be sent to the output channel whose name is completeChannel.
You may notice that a GenericHandler is given not only the payload but also the message headers (even if the example doesn’t use those headers in any way). If you prefer, you can also use service activators in the Java DSL configuration style by passing a MessageHandler or GenericHandler to handle() in the flow definition as follows:
public IntegrationFlow someFlow() {
  return IntegrationFlows
    ...
      .handle(msg -> {
        System.out.println("Message payload:  " + msg.getPayload());
       })
      .get();
}
In this case, the MessageHandler is given as a lambda, but you could also provide it as a method reference or even as an instance of a class that implements the MessageHandler interface. If you give it a lambda or method reference, be aware that it accepts a message as a parameter.
Similarly, handle() can be written to accept a GenericHandler if the service activator isn’t intended to be the end of the flow. Applying the order-saving service activator from before, you could configure the flow with the Java DSL like this:
public IntegrationFlow orderFlow(OrderRepository orderRepo) {
  return IntegrationFlows
    ...
      .<EmailOrder>handle((payload, headers) -> {
          return orderRepo.save(payload);
       })
    ...
      .get();
}
When working with a GenericHandler, the lambda or method reference accepts the message payload and headers as parameters. Also, if you choose to use GenericHandler at the end of a flow, you’ll need to return null, or else you’ll get errors indicating that there’s no output channel specified.
10.2.7 Gateways
Gateways are the means by which an application can submit data into an integration flow and, optionally, receive a response that’s the result of the flow. Implemented by Spring Integration, gateways are realized as interfaces that the application can call to send messages to the integration flow (see figure 10.8).

Figure 10.8 Service gateways are interfaces through which an application can submit messages to an integration flow.
You’ve already seen an example of a message gateway with FileWriterGateway. FileWriterGateway was a one-way gateway with a method accepting a String to write to a file, returning void. It’s just about as easy to write a two-way gateway. When writing the gateway interface, be sure that the method returns some value to publish into the integration flow.
As an example, imagine a gateway that fronts a simple integration flow that accepts a String and translates the given String to all uppercase. The gateway interface might look something like this:
package sia6;
import org.springframework.integration.annotation.MessagingGateway;
import org.springframework.stereotype.Component;

@Component
@MessagingGateway(defaultRequestChannel="inChannel",
                  defaultReplyChannel="outChannel")
public interface UpperCaseGateway {
  String uppercase(String in);
}
What’s amazing about this interface is that it’s not necessary to implement it. Spring Integration automatically provides an implementation at run time that sends and receives data through the specified channels.
When uppercase() is called, the given String is published to the integration flow into the channel named inChannel. Regardless of how the flow is defined or what it does, when data arrives in the channel named outChannel, it’s returned from the uppercase() method.
As for the uppercase integration flow, it’s a simplistic integration flow with only a single step to transform the String to uppercase. Here, it’s expressed in the Java DSL configuration:
@Bean
public IntegrationFlow uppercaseFlow() {
  return IntegrationFlows
    .from("inChannel")
    .<String, String> transform(s -> s.toUpperCase())
    .channel("outChannel")
    .get();
}
As defined here, the flow starts with data coming into the channel named inChannel. The message payload is then transformed by the transformer, which is defined here as a lambda expression, to perform an uppercase operation. The resulting message is then published to the channel named outChannel, which is what you’ve declared as the reply channel for the UpperCaseGateway interface.
10.2.8 Channel adapters
Channel adapters represent the entry and exit points of an integration flow. Data enters an integration flow by way of an inbound channel adapter and exits an integration flow by way of an outbound channel adapter. This is illustrated in figure 10.9.

Inbound channel adapters can take many forms, depending on the source of the data they introduce into the flow. For example, you might declare an inbound channel adapter that introduces incrementing numbers from an AtomicInteger2 into the flow. Using Java configuration, it might look like this:
@Bean
@InboundChannelAdapter(
    poller=@Poller(fixedRate="1000"), channel="numberChannel")
public MessageSource<Integer> numberSource(AtomicInteger source) {
  return () -> {
    return new GenericMessage<>(source.getAndIncrement());
  };
}
This @Bean method declares an inbound channel adapter bean which, per the @InboundChannelAdapter annotation, submits a number from the injected AtomicInteger to the channel named numberChannel every 1 second (or 1,000 ms).
Whereas @InboundChannelAdapter indicates an inbound channel adapter when using Java configuration, the from() method is how it’s done when using the Java DSL to define the integration flow. The following snippet of a flow definition shows a similar inbound channel adapter as defined in the Java DSL:
@Bean
public IntegrationFlow someFlow(AtomicInteger integerSource) {
  return IntegrationFlows
      .from(integerSource, "getAndIncrement",
          c -> c.poller(Pollers.fixedRate(1000)))
    ...
      .get();
}
Often, channel adapters are provided by one of Spring Integration’s many endpoint modules. Suppose, for example, that you need an inbound channel adapter that monitors a specified directory and submits any files that are written to that directory as messages to a channel named file-channel. The following Java configuration uses FileReadingMessageSource from Spring Integration’s file endpoint module to achieve that:
@Bean
@InboundChannelAdapter(channel="file-channel",
                                             poller=@Poller(fixedDelay="1000"))
public MessageSource<File> fileReadingMessageSource() {
  FileReadingMessageSource sourceReader = new FileReadingMessageSource();
  sourceReader.setDirectory(new File(INPUT_DIR));
  sourceReader.setFilter(new SimplePatternFileListFilter(FILE_PATTERN));
  return sourceReader;
}
When writing the equivalent file-reading inbound channel adapter in the Java DSL, the inboundAdapter() method from the Files class achieves the same thing. As shown next, an outbound channel adapter is the end of the line for the integration flow, handing off the final message to the application or to some other system:
@Bean
public IntegrationFlow fileReaderFlow() {
  return IntegrationFlows
      .from(Files.inboundAdapter(new File(INPUT_DIR))
          .patternFilter(FILE_PATTERN))
      .get();
}
Service activators, implemented as message handlers, often serve the purpose of an outbound channel adapter, especially when data needs to be handed off to the application itself. We’ve already discussed service activators, so there’s no point in repeating that discussion.
It’s worth noting, however, that Spring Integration endpoint modules provide useful message handlers for several common use cases. You saw an example of such an outbound channel adapter, FileWritingMessageHandler, in listing 10.3. Speaking of Spring Integration endpoint modules, let’s take a quick look at what ready-to-use integration endpoint modules are available.
10.2.9 Endpoint modules
It’s great that Spring Integration lets you create your own channel adapters. But what’s even better is that Spring Integration provides more than two dozen endpoint modules containing channel adapters—both inbound and outbound—for integration with a variety of common external systems, including those listed in table 10.1.
Table 10.1 Spring Integration provides more than two dozen endpoint modules for integration with external systems.
|
Dependency artifact ID (Group ID: | |
|---|---|
One thing that’s clear from looking at table 10.1 is that Spring Integration provides an extensive set of components to meet many integration needs. Most applications will never need even a fraction of what Spring Integration offers. But it’s good to know that Spring Integration has you covered if you need any of these components.
What’s more, it would be impossible to cover all the channel adapters afforded by the modules listed in table 10.1 in the space of this chapter. You’ve already seen examples that use the filesystem module to write to the filesystem. And you’re soon going to use the email module to read emails.
Each of the endpoint modules offers channel adapters that can be either declared as beans when using Java configuration or referenced via static methods when using Java DSL configuration. I encourage you to explore any of the other endpoint modules that interest you most. You’ll find that they’re fairly consistent in how they’re used. But for now, let’s turn our attention to the email endpoint module to see how you might use it in the Taco Cloud application.
10.3 Creating an email integration flow
You’ve decided that Taco Cloud should enable its customers to submit their taco designs and place orders by email. You send out flyers and place takeout ads in newspapers inviting everyone to send in their taco orders by email. It’s a tremendous success! Unfortunately, it’s a bit too successful. There are so many emails coming in that you have to hire temporary help to do nothing more than read all the emails and submit order details into the ordering system.
In this section, you’ll implement an integration flow that polls the Taco Cloud inbox for taco order emails, parses the emails for order details, and submits the orders to Taco Cloud for handling. In short, the integration flow you’re going to need will use an inbound channel adapter from the email endpoint module to ingest emails from the Taco Cloud inbox into the integration flow.
The next step in the integration flow will parse the emails into order objects that are handed off to another handler to submit orders to Taco Cloud’s REST API, where they’ll be processed the same as any order. To start with, let’s define a simple configuration properties class to capture the specifics of how to handle Taco Cloud emails, as shown here:
package tacos.email;

import org.springframework.boot.context.properties.ConfigurationProperties;
import org.springframework.stereotype.Component;
import lombok.Data;

@Data
@ConfigurationProperties(prefix="tacocloud.email")
@Component
public class EmailProperties {

  private String username;
  private String password;
  private String host;
  private String mailbox;
  private long pollRate = 30000;
  public String getImapUrl() {
    return String.format("imaps:/ /%s:%s@%s/%s",
        this.username, this.password, this.host, this.mailbox);
  }

}
As you can see, EmailProperties captures properties that are used to produce an IMAP URL. The flow uses this URL to connect to the Taco Cloud email server and poll for emails. Among the properties captured are the email user’s username and password, as well as the hostname of the IMAP server, the mailbox to poll, and the rate at which the mailbox is polled (which defaults to every 30 seconds).
The EmailProperties class is annotated at the class level with @ConfigurationProperties with a prefix attribute set to tacocloud.email. This means that you can configure the details of consuming an email in the application.yml file like this:
tacocloud:
  email:
    host: imap.tacocloud.com
    mailbox: INBOX
    username: taco-in-flow
    password: 1L0v3T4c0s
    poll-rate: 10000
Of course, the email server configuration shown here is fictional. You’ll need to tweak it to match the email server details that you’ll be using.
Also, you may get an “unknown property” warning in your IDE. That’s because the IDE is looking for metadata it needs to understand what those properties mean. The warnings won’t break the actual code, and you can ignore them if you want. Or you can make them go away by adding the following dependency to your build (also available as a Spring Initializr option called “Spring Configuration Processor”):
<dependency>
  <groupId>org.springframework.boot</groupId>
  <artifactId>spring-boot-configuration-processor</artifactId>
  <optional>true</optional>
</dependency>
This dependency includes support for automatically generating metadata for custom configuration properties such as the ones we’re using to configure the email server details.
Now let’s use EmailProperties to configure the integration flow. The flow you’re aiming to create will look a little like figure 10.10.

You have the following two options when defining this flow:
-
Define it within the Taco Cloud application itself. At the end of the flow, a service activator will call into the repositories you’ve defined to create the taco order.
-
Define it as a separate application. At the end of the flow, a service activator will send a
POSTrequest to the Taco Cloud API to submit the taco order.
Whichever you choose has little bearing on the flow itself, aside from how the service activator is implemented. But because you’re going to need some types that represent tacos, orders, and ingredients, which are subtly different from those you’ve already defined in the main Taco Cloud application, you’ll proceed by defining the integration flow in a separate application to avoid any confusion with the existing domain types.
You also have the choice of defining the flow using either XML configuration, Java configuration, or the Java DSL. I rather like the elegance of the Java DSL, so that’s what you’ll use. Feel free to write the flow using one of the other configuration styles if you’re interested in a little extra challenge. For now, let’s take a look at the Java DSL configuration for the taco order email flow as shown next.
Listing 10.5 Defining an integration flow to accept emails and submit them as orders
package tacos.email;

import org.springframework.context.annotation.Bean;
import org.springframework.context.annotation.Configuration;
import org.springframework.integration.dsl.IntegrationFlow;
import org.springframework.integration.dsl.IntegrationFlows;
import org.springframework.integration.dsl.Pollers;
import org.springframework.integration.mail.dsl.Mail;

@Configuration
public class TacoOrderEmailIntegrationConfig {

  @Bean
  public IntegrationFlow tacoOrderEmailFlow(
      EmailProperties emailProps,
      EmailToOrderTransformer emailToOrderTransformer,
      OrderSubmitMessageHandler orderSubmitHandler) {

    return IntegrationFlows
        .from(Mail.imapInboundAdapter(emailProps.getImapUrl()),
            e -> e.poller(
                Pollers.fixedDelay(emailProps.getPollRate())))
        .transform(emailToOrderTransformer)
        .handle(orderSubmitHandler)
        .get();
  }

}
The taco order email flow, as defined in the tacoOrderEmailFlow() method, is composed of the following three distinct components:
-
An IMAP email inbound channel adapter—This channel adapter is created with the IMAP URL generated from the
getImapUrl()method ofEmailPropertiesand polls on a delay set in thepollRateproperty ofEmailProperties. The emails coming in are handed off to a channel connecting it to the transformer. -
A transformer that transforms an email into an order object—The transformer is implemented in
EmailToOrderTransformer, which is injected into thetacoOrderEmailFlow()method. The orders resulting from the transformation are handed off to the final component through another channel. -
A handler (acting as an outbound channel adapter)—The handler accepts an order object and submits it to Taco Cloud’s REST API.
The call to Mail.imapInboundAdapter() is made possible by including the Email endpoint module as a dependency in your project build. The Maven dependency looks like this:
<dependency>
  <groupId>org.springframework.integration</groupId>
  <artifactId>spring-integration-mail</artifactId>
</dependency>
The EmailToOrderTransformer class is an implementation of Spring Integration’s Transformer interface, by way of extending AbstractMailMessageTransformer (shown in the following listing).
Listing 10.6 Converting incoming emails to taco orders using an integration transformer
package tacos.email;

import java.io.IOException;
import java.util.ArrayList;
import java.util.List;
import javax.mail.Message;
import javax.mail.MessagingException;
import javax.mail.internet.InternetAddress;
import org.apache.commons.text.similarity.LevenshteinDistance;
import org.slf4j.Logger;
import org.slf4j.LoggerFactory;
import org.springframework.integration.mail.transformer
                                            .AbstractMailMessageTransformer;
import org.springframework.integration.support
                                            .AbstractIntegrationMessageBuilder;
import org.springframework.integration.support.MessageBuilder;
import org.springframework.stereotype.Component;

@Component
public class EmailToOrderTransformer
     extends AbstractMailMessageTransformer<EmailOrder> {
  private static Logger log =
          LoggerFactory.getLogger(EmailToOrderTransformer.class);

  private static final String SUBJECT_KEYWORDS = "TACO ORDER";

  @Override
  protected AbstractIntegrationMessageBuilder<EmailOrder>
                doTransform(Message mailMessage) throws Exception {
    EmailOrder tacoOrder = processPayload(mailMessage);
    return MessageBuilder.withPayload(tacoOrder);
  }

  private EmailOrder processPayload(Message mailMessage) {
    try {
      String subject = mailMessage.getSubject();
      if (subject.toUpperCase().contains(SUBJECT_KEYWORDS)) {
        String email =
              ((InternetAddress) mailMessage.getFrom()[0]).getAddress();
        String content = mailMessage.getContent().toString();
        return parseEmailToOrder(email, content);
      }
    } catch (MessagingException e) {
        log.error("MessagingException: {}", e);
    } catch (IOException e) {
        log.error("IOException: {}", e);
    }
    return null;
  }

  private EmailOrder parseEmailToOrder(String email, String content) {
    EmailOrder order = new EmailOrder(email);
    String[] lines = content.split("\r?\n");
    for (String line : lines) {
      if (line.trim().length() > 0 && line.contains(":")) {
        String[] lineSplit = line.split(":");
        String tacoName = lineSplit[0].trim();
        String ingredients = lineSplit[1].trim();
        String[] ingredientsSplit = ingredients.split(",");
        List<String> ingredientCodes = new ArrayList<>();
        for (String ingredientName : ingredientsSplit) {
          String code = lookupIngredientCode(ingredientName.trim());
          if (code != null) {
            ingredientCodes.add(code);
          }
        }

        Taco taco = new Taco(tacoName);
        taco.setIngredients(ingredientCodes);
        order.addTaco(taco);
      }
    }
    return order;
  }

  private String lookupIngredientCode(String ingredientName) {
    for (Ingredient ingredient : ALL_INGREDIENTS) {
      String ucIngredientName = ingredientName.toUpperCase();
      if (LevenshteinDistance.getDefaultInstance()
                  .apply(ucIngredientName, ingredient.getName()) < 3 ||
          ucIngredientName.contains(ingredient.getName()) ||
          ingredient.getName().contains(ucIngredientName)) {
        return ingredient.getCode();
      }
    }
    return null;
  }

  private static Ingredient[] ALL_INGREDIENTS = new Ingredient[] {
      new Ingredient("FLTO", "FLOUR TORTILLA"),
      new Ingredient("COTO", "CORN TORTILLA"),
      new Ingredient("GRBF", "GROUND BEEF"),
      new Ingredient("CARN", "CARNITAS"),
      new Ingredient("TMTO", "TOMATOES"),
      new Ingredient("LETC", "LETTUCE"),
      new Ingredient("CHED", "CHEDDAR"),
      new Ingredient("JACK", "MONTERREY JACK"),
      new Ingredient("SLSA", "SALSA"),
      new Ingredient("SRCR", "SOUR CREAM")
  };
}
AbstractMailMessageTransformer is a convenient base class for handling messages whose payload is an email. It takes care of extracting the email information from the incoming message into a Message object that’s passed into the doTransform() method.
In the doTransform() method, you pass the Message to a private method named processPayload() to parse the email into an EmailOrder object. Although similar, the EmailOrder object in question isn’t the same as the TacoOrder object used in the main Taco Cloud application; it’s slightly simpler, as shown next:
package tacos.email;
import java.util.ArrayList;
import java.util.List;
import lombok.Data;

@Data
public class EmailOrder {

  private final String email;
  private List<Taco> tacos = new ArrayList<>();

  public void addTaco(Taco taco) {
    tacos.add(taco);
  }

}
Rather than carry the customer’s entire delivery and billing information, this EmailOrder class carries only the customer’s email, obtained from the incoming email.
Parsing emails into taco orders is a nontrivial task. In fact, even a naive implementation involves several dozen lines of code. And those several dozen lines of code do nothing to further the discussion of Spring Integration and how to implement a transformer. Therefore, to save space, I’m leaving out the details of the processPayload() method.
The last thing that EmailToOrderTransformer does is return a MessageBuilder with a payload containing the EmailOrder object. The message that’s produced by the MessageBuilder is sent to the final component in the integration flow: a message handler that posts the order to Taco Cloud’s API. The OrderSubmitMessageHandler, as shown in the next listing, implements Spring Integration’s GenericHandler to handle messages with an EmailOrder payload.
Listing 10.7 Posting orders to the Taco Cloud API via a message handler
package tacos.email;

import org.springframework.integration.handler.GenericHandler;
import org.springframework.messaging.MessageHeaders;
import org.springframework.stereotype.Component;
import org.springframework.web.client.RestTemplate;

@Component
public class OrderSubmitMessageHandler
       implements GenericHandler<EmailOrder> {

  private RestTemplate rest;
  private ApiProperties apiProps;

  public OrderSubmitMessageHandler(ApiProperties apiProps, RestTemplate rest) {
    this.apiProps = apiProps;
    this.rest = rest;
  }

  @Override
  public Object handle(EmailOrder order, MessageHeaders headers) {
    rest.postForObject(apiProps.getUrl(), order, String.class);
    return null;
  }
}
To satisfy the requirements of the GenericHandler interface, OrderSubmitMessageHandler overrides the handle() method. This method receives the incoming EmailOrder object and uses an injected RestTemplate to submit the EmailOrder via a POST request to the URL captured in an injected ApiProperties object. Finally, the handle() method returns null to indicate that this handler marks the end of the flow.
ApiProperties is used to avoid hardcoding the URL in the call to postForObject(). It’s a configuration properties file that looks like this:
package tacos.email;

import org.springframework.boot.context.properties.ConfigurationProperties;
import org.springframework.stereotype.Component;
import lombok.Data;

@Data
@ConfigurationProperties(prefix = "tacocloud.api")
@Component
public class ApiProperties {
  private String url;
}
And in application.yml, the URL for the Taco Cloud API might be configured like this:
To make RestTemplate available in the project so that it can be injected into OrderSubmitMessageHandler, you need to add the Spring Boot web starter to the project build like so:
<dependency>
  <groupId>org.springframework.boot</groupId>
  <artifactId>spring-boot-starter-web</artifactId>
</dependency>
Although this makes RestTemplate available in the classpath, it also triggers autoconfiguration for Spring MVC. As a standalone Spring Integration flow, the application doesn’t need Spring MVC or even the embedded Tomcat that autoconfiguration provides. Therefore, you should disable Spring MVC autoconfiguration with the following entry in application.yml:
The spring.main.web-application-type property can be set to either servlet, reactive, or none. When Spring MVC is in the classpath, autoconfiguration sets its value to servlet. But here you override it to none so that Spring MVC and Tomcat won’t be autoconfigured. (We’ll talk more about what it means for an application to be a reactive web application in chapter 12.)
Summary
-
Spring Integration enables the definition of flows through which data can be processed as it enters or leaves an application.
-
Integration flows can be defined in XML, Java, or using a succinct Java DSL configuration style.
-
Message gateways and channel adapters act as entry and exit points of an integration flow.
-
Messages can be transformed, split, aggregated, routed, and processed by service activators in the course of a flow.
-
Message channels connect the components of an integration flow.
1 See https://start.spring.io/.
2 AtomicInteger is useful for incrementing a counter in a multithreaded situation, such as the one here where multiple messages may arrive on the channel simultaneously.