
11 Introducing Reactor
Have you ever held a subscription for a newspaper or a magazine? The internet has certainly taken a bite out of the subscriber base of traditional publications, but there was a time when a newspaper subscription was one of the best ways to keep up with the events of the day. You could count on a fresh delivery of current events every morning, to read during breakfast or on the way to work.
Now suppose that if, after paying for your subscription, several days go by and no papers have been delivered. A few more days go by, and you call the newspaper sales office to ask why you haven’t yet received your daily paper. Imagine your surprise if they explain, “You paid for a full year of newspapers. The year hasn’t completed yet. You’ll certainly receive them all once the full year of newspapers is ready.”
Thankfully, that’s not at all how subscriptions work. Newspapers have a certain timeliness to them. They’re delivered as quickly as possible after publication so that they can be read while their content is still fresh. Moreover, as you’re reading the latest issue, newspaper reporters are writing new stories for future editions, and the presses are fired up producing the next edition—all in parallel.
As we develop application code, we can write two styles of code—imperative and reactive, which are described as follows:
-
Imperative code is a lot like that absurd hypothetical newspaper subscription. It’s a serial set of tasks, each running one at a time, each after the previous task. Data is processed in bulk and can’t be handed over to the next task until the previous task has completed its work on the bulk of data.
-
Reactive code is a lot like a real newspaper subscription. A set of tasks is defined to process data, but those tasks can run in parallel. Each task can process subsets of the data, handing it off to the next task in line while it continues to work on another subset of the data.
In this chapter, we’re going to step away from the Taco Cloud application temporarily to explore Project Reactor (https://projectreactor.io/). Reactor is a library for reactive programming that’s part of the Spring family of projects. And because it serves as the foundation of Spring’s support for reactive programming, it’s important that you understand Reactor before we look at building reactive controllers and repositories with Spring. Before we start working with Reactor, though, let’s quickly examine the essentials of reactive programming.
11.1 Understanding reactive programming
Reactive programming is a paradigm that’s an alternative to imperative programming. This alternative exists because reactive programming addresses a limitation in imperative programming. By understanding these limitations, you can better grasp the benefits of the reactive model.
Note Reactive programming isn’t a silver bullet. In no way should you infer from this chapter or any other discussion of reactive programming that imperative programming is evil and that reactive programming is your savior. Like anything you learn as a developer, reactive programming is a perfect fit in some use cases, and it’s ill-fitted in others. An ounce of pragmatism is advised.
If you’re like me and many developers, you cut your programming teeth with imperative programming. There’s a good chance that most (or all) of the code you write today is still imperative in nature. Imperative programming is intuitive enough that young students are learning it with ease in their school’s STEM programs, and it’s powerful enough that it makes up the bulk of code that drives the largest enterprises.
The idea is simple: you write code as a list of instructions to be followed, one at a time, in the order that they’re encountered. A task is performed and the program waits for it to complete before moving on to the next task. At each step along the way, the data that’s to be processed must be fully available so that it can be processed as a whole.
This is fine . . . until it isn’t. While a task is being performed—and especially if it’s an I/O task, such as writing data to a database or fetching data from a remote server—the thread that invoked that task is blocked, unable to do anything else until the task completes. To put it bluntly, blocked threads are wasteful.
Most programming languages, including Java, support concurrent programming. It’s fairly easy to fire up another thread in Java and send it on its way to perform some work while the invoking thread carries on with something else. But although it’s easy to create threads, those threads are likely to end up blocked themselves. Managing concurrency in multiple threads is challenging. More threads mean more complexity.
In contrast, reactive programming is functional and declarative in nature. Rather than describe a set of steps that are to be performed sequentially, reactive programming involves describing a pipeline or stream through which data flows. Rather than requiring the data to be available and processed as a whole, a reactive stream processes data as it becomes available. In fact, the incoming data may be endless (a constant stream of a location’s real-time temperature data, for instance).
Note If you’re new to functional programming in Java, you may want to have a look at Functional Programming in Java by Pierre-Yves Saumont (Manning, 2017), or Grokking Functional Programming by Michał Płachta (Manning, 2021).
To apply a real-world analogy, consider imperative programming as a water balloon and reactive programming as a garden hose. Both are suitable ways to surprise and soak an unsuspecting friend on a hot summer day. But they differ in their execution style as follows:
-
A water balloon carries its payload all at once, soaking its intended target at the moment of impact. The water balloon has a finite capacity, however, and if you wish to soak more people (or the same person to a greater extent), your only choice is to scale up by increasing the number of water balloons.
-
A garden hose carries its payload as a stream of water that flows from the spigot to the nozzle. The garden hose’s capacity may be finite at any given point in time, but it’s unlimited over the course of a water battle. As long as water is entering the hose from the spigot, it will continue to flow through the hose and spray out of the nozzle. The same garden hose is easily scalable to soak as many friends as you wish.
There’s nothing inherently wrong with water balloons (or imperative programming), but the person holding the garden hose (or applying reactive programming) has an advantage in regard to scalability and performance.
11.1.1 Defining Reactive Streams
Reactive Streams is an initiative started in late 2013 by engineers from Netflix, Lightbend, and Pivotal (the company behind Spring). Reactive Streams aims to provide a standard for asynchronous stream processing with nonblocking backpressure.
We’ve already touched on the asynchronous trait of reactive programming; it’s what enables us to perform tasks in parallel to achieve greater scalability. Backpressure is a means by which consumers of data can avoid being overwhelmed by an overly fast data source, by establishing limits on how much they’re willing to handle.
The Reactive Streams specification can be summed up by four interface definitions: Publisher, Subscriber, Subscription, and Processor. A Publisher produces data that it sends to a Subscriber per a Subscription. The Publisher interface declares a single method, subscribe(), through which a Subscriber can subscribe to the Publisher, as shown here:
Once a Subscriber has subscribed, it can receive events from the Publisher. Those events are sent via methods on the Subscriber interface as follows:
public interface Subscriber<T> {
  void onSubscribe(Subscription sub);
  void onNext(T item);
  void onError(Throwable ex);
  void onComplete();
}
The first event that the Subscriber will receive is through a call to onSubscribe(). When the Publisher calls onSubscribe(), it passes a Subscription object to the Subscriber. It’s through the Subscription that the Subscriber can manage its subscription, as shown next:
The Subscriber can call request() to request that data be sent, or it can call cancel() to indicate that it’s no longer interested in receiving data and is canceling the subscription. When calling request(), the Subscriber passes in a long value to indicate how many data items it’s willing to accept. This is where backpressure comes in, preventing the Publisher from sending more data than the Subscriber is able to handle. After the Publisher has sent as many items as were requested, the Subscriber can call request() again to request more.
Once the Subscriber has requested data, the data starts flowing through the stream. For every item that’s published by the Publisher, the onNext() method will be called to deliver the data to the Subscriber. If there are any errors, onError() is called. If the Publisher has no more data to send and isn’t going to produce any more data, it will call onComplete() to tell the Subscriber that it’s out of business.
As for the Processor interface, it’s a combination of Subscriber and Publisher, as shown here:
As a Subscriber, a Processor will receive data and process it in some way. Then it will switch hats and act as a Publisher to publish the results to its Subscribers.
As you can see, the Reactive Streams specification is rather straightforward. It’s fairly easy to see how you could build up a data processing pipeline that starts with a Publisher, pumps data through zero or more Processors, and then drops the final results off to a Subscriber.
What the Reactive Streams interfaces don’t lend themselves to, however, is composing such a stream in a functional way. Project Reactor is an implementation of the Reactive Streams specification that provides a functional API for composing Reactive Streams. As you’ll see in the following chapters, Reactor is the foundation for Spring’s reactive programming model. In the remainder of this chapter, we’re going to explore (and, dare I say, have a lot of fun with) Project Reactor.
11.2 Getting started with Reactor
Reactive programming requires us to think in a very different way from imperative programming. Rather than describe a set of steps to be taken, reactive programming means building a pipeline through which data will flow. As data passes through the pipeline, it can be altered or used in some way.
For example, suppose you want to take a person’s name, change all of the letters to uppercase, use it to create a greeting message, and then finally print it. In an imperative programming model, the code would look something like this:
String name = "Craig";
String capitalName = name.toUpperCase();
String greeting = "Hello, " + capitalName + "!";
System.out.println(greeting);
In the imperative model, each line of code performs a step, one right after the other, and definitely in the same thread. Each step blocks the executing thread from moving to the next step until complete.
In contrast, functional, reactive code could achieve the same thing like this:
Mono.just("Craig")
    .map(n -> n.toUpperCase())
    .map(cn -> "Hello, " + cn + "!")
    .subscribe(System.out::println);
Don’t worry too much about the details of this example; we’ll talk all about the just(), map(), and subscribe() operations soon enough. For now, it’s important to understand that although the reactive example still seems to follow a step-by-step model, it’s really a pipeline that data flows through. At each phase of the pipeline, the data is tweaked somehow, but no assumption can be made about which thread any of the operations are performed on. They may be the same thread . . . or they may not be.
The Mono in the example is one of Reactor’s two core types. Flux is the other. Both are implementations of Reactive Streams’ Publisher. A Flux represents a pipeline of zero, one, or many (potentially infinite) data items. A Mono is a specialized reactive type that’s optimized for when the dataset is known to have no more than one data item.
The previous example actually contains three Mono objects. The just() operation creates the first one. When the Mono emits a value, that value is given to the map() operation to be capitalized and used to create another Mono. When the second Mono publishes its data, it’s given to the second map() operation to do some String concatenation, the results of which are used to create the third Mono. Finally, the call to subscribe() subscribes to the Mono, receives the data, and prints it.
11.2.1 Diagramming reactive flows
Reactive flows are often illustrated with marble diagrams. Marble diagrams, in their simplest form, depict a timeline of data as it flows through a Flux or Mono at the top, an operation in the middle, and the timeline of the resulting Flux or Mono at the bottom. Figure 11.1 shows a marble diagram template for a Flux. As you can see, as data flows through the original Flux, it’s processed through some operation, resulting in a new Flux through which the processed data flows.

Figure 11.2 shows a similar marble diagram, but for a Mono. As you can see, the key difference is that a Mono will have either zero or one data item, or an error.

In section 11.3, we’ll explore many operations supported by Flux and Mono, and we’ll use marble diagrams to visualize how they work.
11.2.2 Adding Reactor dependencies
To get started with Reactor, add the following dependency to the project build:
<dependency>
  <groupId>io.projectreactor</groupId>
  <artifactId>reactor-core</artifactId>
</dependency>
Reactor also provides some great testing support. You’re going to write a lot of tests around your Reactor code, so you’ll definitely want to add the next dependency to your build:
<dependency>
  <groupId>io.projectreactor</groupId>
  <artifactId>reactor-test</artifactId>
  <scope>test</scope>
</dependency>
I’m assuming that you’re adding these dependencies to a Spring Boot project, which handles dependency management for you, so there’s no need to specify the <version> element for the dependencies. But if you want to use Reactor in a non–Spring Boot project, you’ll need to set up Reactor’s BOM (bill of materials) in the build. The following dependency management entry adds Reactor’s 2020.0.4 release to the build:
<dependencyManagement>
    <dependencies>
        <dependency>
            <groupId>io.projectreactor</groupId>
            <artifactId>reactor-bom</artifactId>
            <version>2020.0.4</version>
            <type>pom</type>
            <scope>import</scope>
        </dependency>
    </dependencies>
</dependencyManagement>
The examples we’ll work with in this chapter are standalone and unrelated to the Taco Cloud projects we’ve been working with. Therefore, it may be best to create a fresh new Spring project with the Reactor dependencies in the build and work from there.
Now that Reactor is in your project build, you can start creating reactive pipelines with Mono and Flux. For the remainder of this chapter, we’ll walk through several operations offered by Mono and Flux.
11.3 Applying common reactive operations
Flux and Mono are the most essential building blocks provided by Reactor, and the operations those two reactive types offer are the mortar that binds them together to create pipelines through which data can flow. Flux and Mono offer more than 500 operations, which can be loosely categorized as follows:
As much fun as it would be to poke at each of the 500 operations to see how they tick, there’s simply not enough room in this chapter. I’ve selected a few of the most useful operations to experiment with in this section. We’ll start with creation operations.
Note Where are the Mono examples? Mono and Flux share many of the same operations, so it’s mostly unnecessary to show the same operation twice, once for Mono and again for Flux. Moreover, although the Mono operations are useful, they’re slightly less interesting to look at than the same operations when given a Flux. Most of the examples we’ll work with will involve Flux. Just know that Mono often has equivalent operations.
11.3.1 Creating reactive types
Often when working with reactive types in Spring, you’ll be given a Flux or a Mono from a repository or a service, so you won’t need to create one yourself. But occasionally you’ll need to create a new reactive publisher.
Reactor provides several operations for creating a Flux or Mono. In this section, we’ll look at a few of the most useful creation operations.
If you have one or more objects from which you’d like to create a Flux or Mono, you can use the static just() method on Flux or Mono to create a reactive type whose data is driven by those objects. For example, the following test method creates a Flux from five String objects:
@Test
public void createAFlux_just() {
  Flux<String> fruitFlux = Flux
      .just("Apple", "Orange", "Grape", "Banana", "Strawberry");
}
At this point, the Flux has been created, but it has no subscribers. Without any subscribers, data won’t flow. Thinking of the garden hose analogy, you’ve attached the garden hose to the spigot, and there’s water from the utility company on the other side—but until you turn on the spigot, water won’t flow. Subscribing to a reactive type is how you turn on the flow of data.
To add a subscriber, you can call the subscribe() method on the Flux as follows:
The lambda given to subscribe() here is actually a java.util.Consumer that’s used to create a Reactive Streams Subscriber. Upon calling subscribe(), the data starts flowing. In this example, there are no intermediate operations, so the data flows directly from the Flux to the Subscriber.
Printing the entries from a Flux or Mono to the console is a good way to see the reactive type in action. But a better way to actually test a Flux or a Mono is to use Reactor’s StepVerifier. Given a Flux or Mono, StepVerifier subscribes to the reactive type and then applies assertions against the data as it flows through the stream, finally verifying that the stream completes as expected.
For example, to verify that the prescribed data flows through the fruitFlux, you can write a test that looks like this:
StepVerifier.create(fruitFlux)
    .expectNext("Apple")
    .expectNext("Orange")
    .expectNext("Grape")
    .expectNext("Banana")
    .expectNext("Strawberry")
    .verifyComplete();
In this case, StepVerifier subscribes to the Flux and then asserts that each item matches the expected fruit name. Finally, it verifies that after Strawberry is produced by the Flux, the Flux is complete.
For the remainder of the examples in this chapter, you’ll use StepVerifier to write learning tests—tests that verify behavior and help you understand how something works—to get to know some of Reactor’s most useful operations.
A Flux can also be created from an array, Iterable, or Java Stream. Figure 11.3 illustrates how this works with a marble diagram.
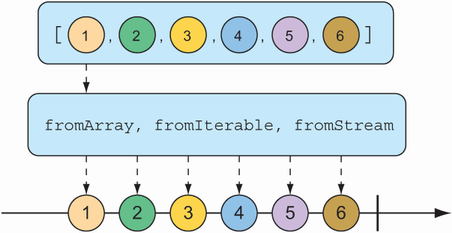
To create a Flux from an array, call the static fromArray() method, passing in the source array like so:
@Test
public void createAFlux_fromArray() {
  String[] fruits = new String[] {
      "Apple", "Orange", "Grape", "Banana", "Strawberry" };

  Flux<String> fruitFlux = Flux.fromArray(fruits);

  StepVerifier.create(fruitFlux)
      .expectNext("Apple")
      .expectNext("Orange")
      .expectNext("Grape")
      .expectNext("Banana")
      .expectNext("Strawberry")
      .verifyComplete();
}
Because the source array contains the same fruit names you used when creating a Flux from a list of objects, the data emitted by the Flux will have the same values. Thus, you can use the same StepVerifier as before to verify this Flux.
If you need to create a Flux from a java.util.List, java.util.Set, or any other implementation of java.lang.Iterable, you can pass it into the static fromIterable() method, as shown here:
@Test
public void createAFlux_fromIterable() {
  List<String> fruitList = new ArrayList<>();
  fruitList.add("Apple");
  fruitList.add("Orange");
  fruitList.add("Grape");
  fruitList.add("Banana");
  fruitList.add("Strawberry");

  Flux<String> fruitFlux = Flux.fromIterable(fruitList);

  StepVerifier.create(fruitFlux)
      .expectNext("Apple")
      .expectNext("Orange")
      .expectNext("Grape")
      .expectNext("Banana")
      .expectNext("Strawberry")
      .verifyComplete();
}
Or, if you happen to have a Java Stream that you’d like to use as the source for a Flux, fromStream() is the method you’ll use, as shown next:
@Test
 public void createAFlux_fromStream() {
   Stream<String> fruitStream =
        Stream.of("Apple", "Orange", "Grape", "Banana", "Strawberry");
   Flux<String> fruitFlux = Flux.fromStream(fruitStream);

   StepVerifier.create(fruitFlux)
       .expectNext("Apple")
       .expectNext("Orange")
       .expectNext("Grape")
       .expectNext("Banana")
       .expectNext("Strawberry")
       .verifyComplete();
 }
Again, you can use the same StepVerifier as before to verify the data published by the Flux.
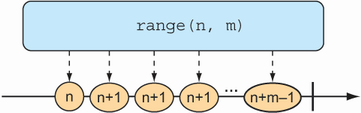
Sometimes you don’t have any data to work with and just need Flux to act as a counter, emitting a number that increments with each new value. To create a counter Flux, you can use the static range() method. The diagram in figure 11.4 illustrates how range() works.
The following test method demonstrates how to create a range Flux:
@Test
public void createAFlux_range() {
  Flux<Integer> intervalFlux =
      Flux.range(1, 5);

  StepVerifier.create(intervalFlux)
      .expectNext(1)
      .expectNext(2)
      .expectNext(3)
      .expectNext(4)
      .expectNext(5)
      .verifyComplete();
}
In this example, the range Flux is created with a starting value of 1 and an ending value of 5. The StepVerifier proves that it will publish five items, which are the integers 1 through 5.
Another Flux-creation method that’s similar to range() is interval(). Like the range() method, interval() creates a Flux that emits an incrementing value. But what makes interval() special is that instead of you giving it a starting and ending value, you specify a duration or how often a value should be emitted. Figure 11.5 shows a marble diagram for the interval() creation method.

For example, to create an interval Flux that emits a value every second, you can use the static interval() method as follows:
@Test
public void createAFlux_interval() {
  Flux<Long> intervalFlux =
      Flux.interval(Duration.ofSeconds(1))
          .take(5);

  StepVerifier.create(intervalFlux)
     .expectNext(0L)
      .expectNext(1L)
      .expectNext(2L)
      .expectNext(3L)
      .expectNext(4L)
      .verifyComplete();
}
Notice that the value emitted by an interval Flux starts with 0 and increments on each successive item. Also, because interval() isn’t given a maximum value, it will potentially run forever. Therefore, you also use the take() operation to limit the results to the first five entries. We’ll talk more about the take() operation in the next section.
11.3.2 Combining reactive types
You may find yourself with two reactive types that you need to somehow merge together. Or, in other cases, you may need to split a Flux into more than one reactive type. In this section, we’ll examine operations that combine and split Reactor’s Flux and Mono.
Suppose you have two Flux streams and need to create a single resulting Flux that will produce data as it becomes available from either of the upstream Flux streams. To merge one Flux with another, you can use the mergeWith() operation, as illustrated with the marble diagram in figure 11.6.

For example, suppose you have a Flux whose values are the names of TV and movie characters, and you have a second Flux whose values are the names of foods that those characters enjoy eating. The following test method shows how you could merge the two Flux objects with the mergeWith() method:
@Test
public void mergeFluxes() {

  Flux<String> characterFlux = Flux
      .just("Garfield", "Kojak", "Barbossa")
      .delayElements(Duration.ofMillis(500));
  Flux<String> foodFlux = Flux
      .just("Lasagna", "Lollipops", "Apples")
      .delaySubscription(Duration.ofMillis(250))
      .delayElements(Duration.ofMillis(500));

  Flux<String> mergedFlux = characterFlux.mergeWith(foodFlux);

  StepVerifier.create(mergedFlux)
      .expectNext("Garfield")
      .expectNext("Lasagna")
      .expectNext("Kojak")
      .expectNext("Lollipops")
      .expectNext("Barbossa")
      .expectNext("Apples")
      .verifyComplete();
}
Normally, a Flux will publish data as quickly as it possibly can. Therefore, you use a delayElements() operation on both of the created Flux streams to slow them down a little—emitting an entry only every 500 ms. Furthermore, so that the food Flux starts streaming after the character Flux, you apply a delaySubscription() operation to the food Flux so that it won’t emit any data until 250 ms have passed following a subscription.
After merging the two Flux objects, a new merged Flux is created. When StepVerifier subscribes to the merged Flux, it will, in turn, subscribe to the two source Flux streams, starting the flow of data.
The order of items emitted from the merged Flux aligns with the timing of how they’re emitted from the sources. Because both Flux objects are set to emit at regular rates, the values will be interleaved through the merged Flux, resulting in a character, followed by a food, followed by a character, and so forth. If the timing of either Flux were to change, it’s possible that you might see two character items or two food items published one after the other.
Because mergeWith() can’t guarantee a perfect back and forth between its sources, you may want to consider the zip() operation instead. When two Flux objects are zipped together, it results in a new Flux that produces a tuple of items, where the tuple contains one item from each source Flux. Figure 11.7 illustrates how two Flux objects can be zipped together.
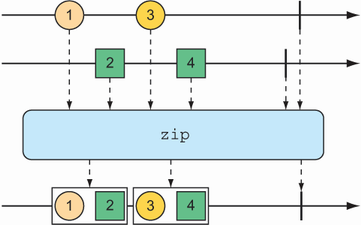
Figure 11.7 Zipping two Flux streams results in a Flux containing tuples of one element from each Flux.
To see the zip() operation in action, consider the following test method, which zips the character Flux and the food Flux together:
@Test
public void zipFluxes() {
  Flux<String> characterFlux = Flux
      .just("Garfield", "Kojak", "Barbossa");
  Flux<String> foodFlux = Flux
      .just("Lasagna", "Lollipops", "Apples");

  Flux<Tuple2<String, String>> zippedFlux =
      Flux.zip(characterFlux, foodFlux);

  StepVerifier.create(zippedFlux)
        .expectNextMatches(p ->
            p.getT1().equals("Garfield") &&
            p.getT2().equals("Lasagna"))
        .expectNextMatches(p ->
            p.getT1().equals("Kojak") &&
            p.getT2().equals("Lollipops"))
        .expectNextMatches(p ->
            p.getT1().equals("Barbossa") &&
            p.getT2().equals("Apples"))
        .verifyComplete();
}
Notice that unlike mergeWith(), the zip() operation is a static creation operation. The created Flux has a perfect alignment between characters and their favorite foods. Each item emitted from the zipped Flux is a Tuple2 (a container object that carries two other objects) containing items from each source Flux, in the order that they’re published.
If you’d rather not work with a Tuple2 and would rather work with some other type, you can provide a Function to zip() that produces any object you’d like, given the two items (as shown in the marble diagram in figure 11.8).
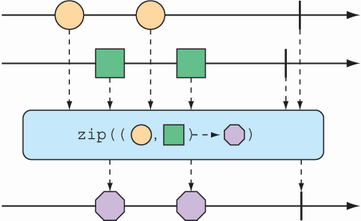
Figure 11.8 An alternative form of the zip() operation results in a Flux of messages created from one element of each incoming Flux.
For example, the following test method shows how to zip the character Flux with the food Flux so that it results in a Flux of String objects:
@Test
public void zipFluxesToObject() {
  Flux<String> characterFlux = Flux
      .just("Garfield", "Kojak", "Barbossa");
  Flux<String> foodFlux = Flux
      .just("Lasagna", "Lollipops", "Apples");

  Flux<String> zippedFlux =
      Flux.zip(characterFlux, foodFlux, (c, f) -> c + " eats " + f);

  StepVerifier.create(zippedFlux)
        .expectNext("Garfield eats Lasagna")
        .expectNext("Kojak eats Lollipops")
        .expectNext("Barbossa eats Apples")
        .verifyComplete();
}
The Function given to zip() (given here as a lambda) simply concatenates the two items into a sentence to be emitted by the zipped Flux.
Selecting the first reactive type to publish
Suppose you have two Flux objects, and rather than merge them together, you merely want to create a new Flux that emits the values from the first Flux that produces a value. As shown in figure 11.9, the firstWithSignal() operation picks the first of two Flux objects and echoes the values it publishes.

Figure 11.9 The first() operation chooses the first Flux to emit a message and thereafter produces messages only from that Flux.
The following test method creates a fast Flux and a slow Flux (where “slow” means that it will not publish an item until 100 ms after subscription). Using firstWithSignal(), it creates a new Flux that will publish values only from the first source Flux to publish a value.
@Test
public void firstWithSignalFlux() {

  Flux<String> slowFlux = Flux.just("tortoise", "snail", "sloth")
        .delaySubscription(Duration.ofMillis(100));
  Flux<String> fastFlux = Flux.just("hare", "cheetah", "squirrel");

  Flux<String> firstFlux = Flux.firstWithSignal(slowFlux, fastFlux);

  StepVerifier.create(firstFlux)
      .expectNext("hare")
      .expectNext("cheetah")
      .expectNext("squirrel")
      .verifyComplete();
}
In this case, because the slow Flux won’t publish any values until 100 ms after the fast Flux has started publishing, the newly created Flux will simply ignore the slow Flux and publish values only from the fast Flux.
11.3.3 Transforming and filtering reactive streams
As data flows through a stream, you’ll likely need to filter out some values and modify other values. In this section, we’ll look at operations that transform and filter the data flowing through a reactive stream.
Filtering data from reactive types
One of the most basic ways of filtering data as it flows from a Flux is to simply disregard the first so many entries. The skip() operation, illustrated in figure 11.10, does exactly that.
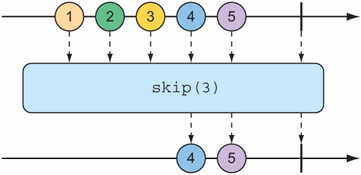
Figure 11.10 The skip() operation skips a specified number of messages before passing the remaining messages on to the resulting Flux.
Given a Flux with several entries, the skip() operation will create a new Flux that skips over a specified number of items before emitting the remaining items from the source Flux. The following test method shows how to use skip():
@Test
public void skipAFew() {
  Flux<String> countFlux = Flux.just(
      "one", "two", "skip a few", "ninety nine", "one hundred")
      .skip(3);

  StepVerifier.create(countFlux)
      .expectNext("ninety nine", "one hundred")
      .verifyComplete();
}
In this case, you have a Flux of five String items. Calling skip(3) on that Flux produces a new Flux that skips over the first three items and publishes only the last two items.
But maybe you don’t want to skip a specific number of items but instead need to skip the first so many items until some duration has passed. An alternate form of the skip() operation, illustrated in figure 11.11, produces a Flux that waits until some specified time has passed before emitting items from the source Flux.

Figure 11.11 An alternative form of the skip() operation waits until some duration has passed before passing messages on to the resulting Flux.
The test method that follows uses skip() to create a Flux that waits 4 seconds before emitting any values. Because that Flux was created from a Flux that has a 1-second delay between items (using delayElements()), only the last two items will be emitted.
@Test
public void skipAFewSeconds() {
  Flux<String> countFlux = Flux.just(
      "one", "two", "skip a few", "ninety nine", "one hundred")
      .delayElements(Duration.ofSeconds(1))
      .skip(Duration.ofSeconds(4));

  StepVerifier.create(countFlux)
      .expectNext("ninety nine", "one hundred")
      .verifyComplete();
}
You’ve already seen an example of the take() operation, but in light of the skip() operation, take() can be thought of as the opposite of skip(). Whereas skip() skips the first few items, take() emits only the first so many items (as illustrated by the marble diagram in figure 11.12):
@Test
public void take() {
  Flux<String> nationalParkFlux = Flux.just(
      "Yellowstone", "Yosemite", "Grand Canyon", "Zion", "Acadia")
      .take(3);

  StepVerifier.create(nationalParkFlux)
      .expectNext("Yellowstone", "Yosemite", "Grand Canyon")
      .verifyComplete();
}
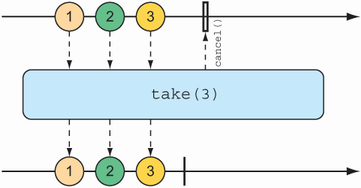
Figure 11.12 The take() operation passes only the first so many messages from the incoming Flux and then cancels the subscription.
Like skip(), take() also has an alternative form that’s based on a duration rather than an item count. It will take and emit as many items as pass through the source Flux until some period of time has passed, after which the Flux completes. This is illustrated in figure 11.13.
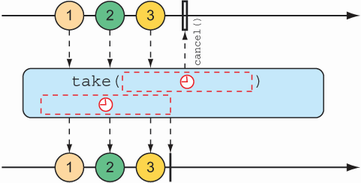
Figure 11.13 An alternative form of the take() operation passes messages on to the resulting Flux until some duration has passed.
The following test method uses the alternative form of take() to emit as many items as it can in the first 3.5 seconds after subscription:
@Test
public void takeForAwhile() {
  Flux<String> nationalParkFlux = Flux.just(
      "Yellowstone", "Yosemite", "Grand Canyon", "Zion", "Grand Teton")
      .delayElements(Duration.ofSeconds(1))
      .take(Duration.ofMillis(3500));

  StepVerifier.create(nationalParkFlux)
      .expectNext("Yellowstone", "Yosemite", "Grand Canyon")
      .verifyComplete();
}
The skip() and take() operations can be thought of as filter operations where the filter criteria are based on a count or a duration. For more general-purpose filtering of Flux values, you’ll find the filter() operation quite useful.
Given a Predicate that decides whether an item will pass through the Flux, the filter() operation lets you selectively publish based on whatever criteria you want. The marble diagram in figure 11.14 shows how filter() works.

Figure 11.14 An incoming Flux can be filtered so that the resulting Flux receives only messages that match a given predicate.
To see filter() in action, consider the following test method:
@Test+
public void filter() {
  Flux<String> nationalParkFlux = Flux.just(
      "Yellowstone", "Yosemite", "Grand Canyon", "Zion", "Grand Teton")
      .filter(np -> !np.contains(" "));

  StepVerifier.create(nationalParkFlux)
      .expectNext("Yellowstone", "Yosemite", "Zion")
      .verifyComplete();
}
Here, filter() is given a Predicate as a lambda that accepts only String values that don’t have any spaces. Consequently, "Grand Canyon" and "Grand Teton" are filtered out of the resulting Flux.
Perhaps the filtering you need is to filter out any items that you’ve already received. The distinct() operation, as illustrated in figure 11.15, results in a Flux that publishes only items from the source Flux that haven’t already been published.
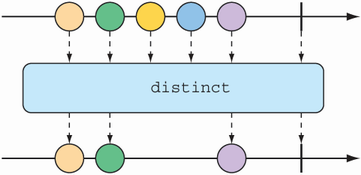
In the following test, only unique String values will be emitted from the distinct Flux:
@Test
public void distinct() {
  Flux<String> animalFlux = Flux.just(
      "dog", "cat", "bird", "dog", "bird", "anteater")
      .distinct();

  StepVerifier.create(animalFlux)
      .expectNext("dog", "cat", "bird", "anteater")
      .verifyComplete();
}
Although "dog" and "bird" are each published twice from the source Flux, the distinct Flux publishes them only once.
One of the most common operations you’ll use on either a Flux or a Mono is to transform published items to some other form or type. Reactor’s types offer map() and flatMap() operations for that purpose.
The map() operation creates a Flux that simply performs a transformation as prescribed by a given Function on each object it receives before republishing it. Figure 11.16 illustrates how the map() operation works.

Figure 11.16 The map() operation performs a transformation of incoming messages into new messages on the resulting stream.
In the following test method, a Flux of String values representing basketball players is mapped to a new Flux of Player objects:
@Test
public void map() {
  Flux<Player> playerFlux = Flux
    .just("Michael Jordan", "Scottie Pippen", "Steve Kerr")
    .map(n -> {
      String[] split = n.split("\s");
      return new Player(split[0], split[1]);
    });

  StepVerifier.create(playerFlux)
      .expectNext(new Player("Michael", "Jordan"))
      .expectNext(new Player("Scottie", "Pippen"))
      .expectNext(new Player("Steve", "Kerr"))
      .verifyComplete();
}

@Data
private static class Player {
  private final String firstName;
  private final String lastName;
}
The Function given to map() (as a lambda) splits the incoming String at a space and uses the resulting String array to create a Player object. Although the Flux created with just() carried String objects, the Flux resulting from map() carries Player objects.
What’s important to understand about map() is that the mapping is performed synchronously, as each item is published by the source Flux. If you want to perform the mapping asynchronously, you should consider the flatMap() operation.
The flatMap() operation requires some thought and practice to acquire full proficiency. As shown in figure 11.17, instead of simply mapping one object to another, as in the case of map(), flatMap() maps each object to a new Mono or Flux. The results of the Mono or Flux are flattened into a new resulting Flux. When used along with subscribeOn(), flatMap() can unleash the asynchronous power of Reactor’s types.

Figure 11.17 The flatMap() operation uses an intermediate Flux to perform a transformation, consequently allowing for asynchronous transformations.
The following test method demonstrates the use of flatMap() and subscribeOn():
@Test
public void flatMap() {
  Flux<Player> playerFlux = Flux
    .just("Michael Jordan", "Scottie Pippen", "Steve Kerr")
    .flatMap(n -> Mono.just(n)
        .map(p -> {
            String[] split = p.split("\s");
            return new Player(split[0], split[1]);
          })
        .subscribeOn(Schedulers.parallel())
      );

  List<Player> playerList = Arrays.asList(
      new Player("Michael", "Jordan"),
      new Player("Scottie", "Pippen"),
      new Player("Steve", "Kerr"));

  StepVerifier.create(playerFlux)
      .expectNextMatches(p -> playerList.contains(p))
      .expectNextMatches(p -> playerList.contains(p))
      .expectNextMatches(p -> playerList.contains(p))
      .verifyComplete();
}
Notice that flatMap() is given a lambda Function that transforms the incoming String into a Mono of type String. A map() operation is then applied to the Mono to transform the String into a Player. After the String is mapped to a Player on each internal Flux, they are published into a single Flux returned by flatMap(), thus completing the flattening of the results.
If you stopped right there, the resulting Flux would carry Player objects, produced synchronously in the same order as with the map() example. But the last thing you do with the Mono is call subscribeOn() to indicate that each subscription should take place in a parallel thread. Consequently, the mapping operations for multiple incoming String objects can be performed asynchronously and in parallel.
Although subscribeOn() is named similarly to subscribe(), they’re quite different. Whereas subscribe() is a verb, subscribing to a reactive flow and effectively kicking it off, subscribeOn() is more descriptive, specifying how a subscription should be handled concurrently. Reactor doesn’t force any particular concurrency model; it’s through subscribeOn() that you can specify the concurrency model, using one of the static methods from Schedulers, that you want to use. In this example, you used parallel(), which uses worker threads from a fixed pool (sized to the number of CPU cores). But Schedulers supports several concurrency models, such as those described in table 11.1.
Table 11.1 Concurrency models for Schedulers
The upside to using flatMap() and subscribeOn() is that you can increase the throughput of the stream by splitting the work across multiple parallel threads. But because the work is being done in parallel, with no guarantees on which will finish first, there’s no way to know the order of items emitted in the resulting Flux. Therefore, StepVerifier is able to verify only that each item emitted exists in the expected list of Player objects and that there will be three such items before the Flux completes.
Buffering data on a reactive stream
In the course of processing the data flowing through a Flux, you might find it helpful to break the stream of data into bite-size chunks. The buffer() operation, shown in figure 11.18, can help with that.

Figure 11.18 The buffer() operation results in a Flux of lists of a given maximum size that are collected from the incoming Flux.
Given a Flux of String values, each containing the name of a fruit, you can create a new Flux of List collections, where each List has no more than a specified number of elements as follows:
@Test
public void buffer() {
  Flux<String> fruitFlux = Flux.just(
      "apple", "orange", "banana", "kiwi", "strawberry");

  Flux<List<String>> bufferedFlux = fruitFlux.buffer(3);

  StepVerifier
      .create(bufferedFlux)
      .expectNext(Arrays.asList("apple", "orange", "banana"))
      .expectNext(Arrays.asList("kiwi", "strawberry"))
      .verifyComplete();
}
In this case, the Flux of String elements is buffered into a new Flux of List collections containing no more than three items each. Consequently, the original Flux that emits five String values will be converted to a Flux that emits two List collections, one containing three fruits and the other with two fruits.
So what? Buffering values from a reactive Flux into nonreactive List collections seems counterproductive. But when you combine buffer() with flatMap(), it enables each of the List collections to be processed in parallel, as shown next:
@Test
public void bufferAndFlatMap() throws Exception {
  Flux.just(
      "apple", "orange", "banana", "kiwi", "strawberry")
      .buffer(3)
      .flatMap(x ->
        Flux.fromIterable(x)
          .map(y -> y.toUpperCase())
          .subscribeOn(Schedulers.parallel())
          .log()
      ).subscribe();
}
In this new example, you still buffer a Flux of five String values into a new Flux of List collections. But then you apply flatMap() to that Flux of List collections. This takes each List buffer and creates a new Flux from its elements, and then applies a map() operation on it. Consequently, each buffered List is further processed in parallel in individual threads.
To prove that it works, I’ve also included a log() operation to be applied to each sub-Flux. The log() operation simply logs all Reactive Streams events, so that you can see what’s really happening. As a result, the following entries are written to the log (with the time component removed for brevity’s sake):
[main] INFO reactor.Flux.SubscribeOn.1 -
                  onSubscribe(FluxSubscribeOn.SubscribeOnSubscriber)
[main] INFO reactor.Flux.SubscribeOn.1 - request(32)
[main] INFO reactor.Flux.SubscribeOn.2 -
                  onSubscribe(FluxSubscribeOn.SubscribeOnSubscriber)
[main] INFO reactor.Flux.SubscribeOn.2 - request(32)
[parallel-1] INFO reactor.Flux.SubscribeOn.1 - onNext(APPLE)
[parallel-2] INFO reactor.Flux.SubscribeOn.2 - onNext(KIWI)
[parallel-1] INFO reactor.Flux.SubscribeOn.1 - onNext(ORANGE)
[parallel-2] INFO reactor.Flux.SubscribeOn.2 - onNext(STRAWBERRY)
[parallel-1] INFO reactor.Flux.SubscribeOn.1 - onNext(BANANA)
[parallel-1] INFO reactor.Flux.SubscribeOn.1 - onComplete()
[parallel-2] INFO reactor.Flux.SubscribeOn.2 - onComplete()
As the log entries clearly show, the fruits in the first buffer (apple, orange, and banana) are handled in the parallel-1 thread. Meanwhile, the fruits in the second buffer (kiwi and strawberry) are processed in the parallel-2 thread. As is apparent by the fact that the log entries from each buffer are woven together, the two buffers are processed in parallel.
If, for some reason, you need to collect everything that a Flux emits into a List, you can call buffer() with no arguments as follows:
This results in a new Flux that emits a List that contains all the items published by the source Flux. You can achieve the same thing with the collectList() operation, illustrated by the marble diagram in figure 11.19.
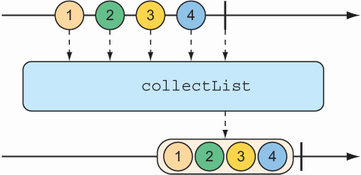
Figure 11.19 The collectList() operation results in a Mono containing a list of all messages emitted by the incoming Flux.
Rather than produce a Flux that publishes a List, collectList() produces a Mono that publishes a List. The following test method shows how it might be used:
@Test
public void collectList() {
  Flux<String> fruitFlux = Flux.just(
      "apple", "orange", "banana", "kiwi", "strawberry");

  Mono<List<String>> fruitListMono = fruitFlux.collectList();

  StepVerifier
      .create(fruitListMono)
      .expectNext(Arrays.asList(
          "apple", "orange", "banana", "kiwi", "strawberry"))
      .verifyComplete();
}
An even more interesting way of collecting items emitted by a Flux is to collect them into a Map. As shown in figure 11.20, the collectMap() operation results in a Mono that publishes a Map that’s populated with entries whose key is calculated by a given Function.
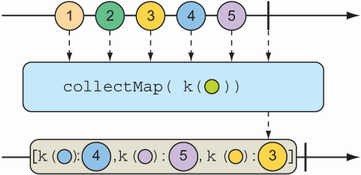
Figure 11.20 The collectMap() operation results in a Mono containing a map of messages emitted by the incoming Flux, where the key is derived from some characteristic of the incoming messages.
To see collectMap() in action, have a look at the following test method:
@Test
public void collectMap() {
  Flux<String> animalFlux = Flux.just(
      "aardvark", "elephant", "koala", "eagle", "kangaroo");

  Mono<Map<Character, String>> animalMapMono =
      animalFlux.collectMap(a -> a.charAt(0));

  StepVerifier
      .create(animalMapMono)
      .expectNextMatches(map -> {
        return
            map.size() == 3 &&
            map.get('a').equals("aardvark") &&
            map.get('e').equals("eagle") &&
            map.get('k').equals("kangaroo");
      })
      .verifyComplete();
}
The source Flux emits the names of a handful of animals. From that Flux, you use collectMap() to create a new Mono that emits a Map, where the key value is determined by the first letter of the animal name and the value is the animal name itself. In the event that two animal names start with the same letter (as with elephant and eagle or koala and kangaroo), the last entry flowing through the stream overrides any earlier entries.
11.3.4 Performing logic operations on reactive types
Sometimes you just need to know if the entries published by a Mono or Flux match some criteria. The all() and any() operations perform such logic. Figures 11.21 and 11.22 illustrate how all() and any() work.

Figure 11.21 A Flux can be tested to ensure that all messages meet some condition with the all() operation.
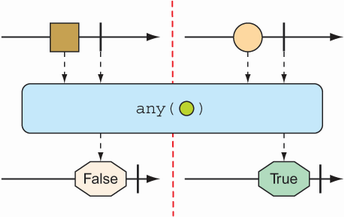
Figure 11.22 A Flux can be tested to ensure that at least one message meets some condition with the any() operation.
Suppose you want to know that every String published by a Flux contains the letter a or the letter k. The following test shows how to use all() to check for that condition:
@Test
public void all() {
  Flux<String> animalFlux = Flux.just(
      "aardvark", "elephant", "koala", "eagle", "kangaroo");

  Mono<Boolean> hasAMono = animalFlux.all(a -> a.contains("a"));
  StepVerifier.create(hasAMono)
    .expectNext(true)
    .verifyComplete();

  Mono<Boolean> hasKMono = animalFlux.all(a -> a.contains("k"));
  StepVerifier.create(hasKMono)
    .expectNext(false)
    .verifyComplete();
}
In the first StepVerifier, you check for the letter a. The all operation is applied to the source Flux, resulting in a Mono of type Boolean. In this case, all of the animal names contain the letter a, so true is emitted from the resulting Mono. But in the second StepVerifier, the resulting Mono will emit false because not all of the animal names contain a k.
Rather than perform an all-or-nothing check, maybe you’re satisfied if at least one entry matches. In that case, the any() operation is what you want. This new test case uses any() to check for the letters t and z:
@Test
public void any() {
  Flux<String> animalFlux = Flux.just(
      "aardvark", "elephant", "koala", "eagle", "kangaroo");

  Mono<Boolean> hasTMono = animalFlux.any(a -> a.contains("t"));

  StepVerifier.create(hasTMono)
    .expectNext(true)
    .verifyComplete();

  Mono<Boolean> hasZMono = animalFlux.any(a -> a.contains("z"));
  StepVerifier.create(hasZMono)
    .expectNext(false)
    .verifyComplete();
}
In the first StepVerifier, you see that the resulting Mono emits true, because at least one animal name has the letter t (specifically, elephant). In the second case, the resulting Mono emits false, because none of the animal names contain z.
Summary
-
Reactive programming involves creating pipelines through which data flows.
-
The Reactive Streams specification defines four types:
Publisher,Subscriber,Subscription, andTransformer(which is a combination ofPublisherandSubscriber). -
Project Reactor implements Reactive Streams and abstracts stream definitions into two primary types,
FluxandMono, each of which offers several hundred operations. -
Spring leverages Reactor to create reactive controllers, repositories, REST clients, and other reactive framework support.