
HTML frames have been around for quite a while. A frames page is a page that is segmented into two or more sections called frames. Each frame contains a separate page and can be configured with scrollbars and a frame border that can be either fixed or resizable.
If you’ve spent any amount of time discussing Web design with other Web designers, you’ve no doubt encountered what I call the “never use it” mentality. Web designers with this mentality maintain a list of Web design techniques they claim should never be used under any circumstance. The use of frames is a technique that appears on many of those lists, but as with any technique, there are effective uses for frames. The trick is in knowing when to use them.
One of the most common uses of frames is in separating navigation elements from other page content, especially when the navigation components require scrolling. The benefit of using frames in such setups is that you can scroll the page containing the navigation elements without scrolling the page containing the main content.
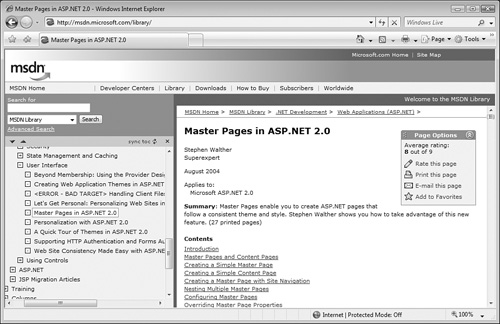
One of the best examples of this type of setup is Microsoft’s MSDN Library Web site (shown in Figure 10.1). The navigation tree in the left frame contains a large number of nodes. In this case, the number of navigation options is so vast that it would create a significant amount of whitespace in the main page on the right if everything was in one frame. Therefore, this is an excellent use of frames for site navigation.
There’s a general rule of thumb that dictates when you should not use frames: Don’t use frames unless your site design warrants using frames. There are several drawbacks to using frames, and using them when they aren’t warranted only invites problems.
Some of the drawbacks of frames are:
Search engines will often index pages that are part of a frameset. When that happens, search results can link to pages that don’t include your navigation or other important page elements.
They may not render the same way on all computers. Frames include window elements such as scrollbars that aren’t always the same size in every browser, thereby causing rendering problems in some cases.
When a frames page links to another frames page, you end up with nested frames. This can be extremely frustrating for users of your Web site.
You must also take into account that the text size in browsers can be (and often is) adjusted by users with low vision and for other reasons. If your frames are designed for text of a certain size and a site visitor alters the text size in the browser, it can modify your Web site’s layout in unpredictable ways.
Tip
There is a movement under way (and there has been for quite some time) to replace frames with CSS. In fact, doing so is quite possible and it works well in modern browsers.
You can read about a method of doing this at www.webreference.com/programming/css_frames/.
Frames pages (as opposed to inline frames, which I’ll discuss later) are actually made up of multiple pages. At the top level is the frameset page. The frameset page doesn’t actually contain any visible content. Instead, it contains HTML code that defines two or more frames and their layout.
Note
It’s technically possible to have a frameset that defines only one frame. However, there’s really no point to this setup.
To create a new frameset in Expression Web:
Select File, New, Page.
Select Frames Pages from the list of page types.
Select the frame layout of your choice from the list in the New dialog, as shown in Figure 10.2. For this example, I chose the Contents layout.

After Expression Web creates the frameset, you’ll have a choice of either creating a new page for each frame or choosing an existing page to appear within the frame. To create a new page, click the New Page button shown in Figure 10.3.
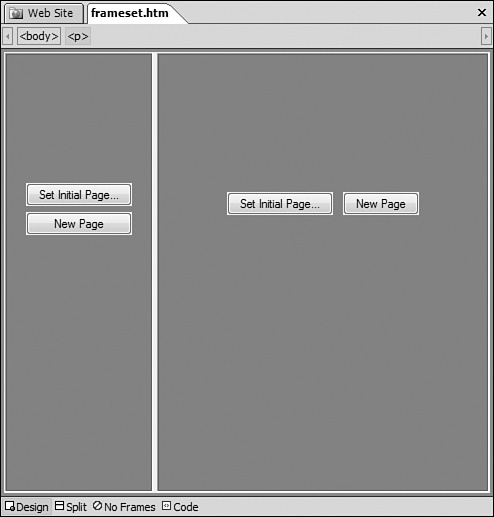
To use an existing page, click the Set Initial Page button to display the Insert Hyperlink dialog, where you can choose a page. You can also enter a URL to a location not in your Web site, as shown in Figure 10.4. After you click OK, the page or URL you specified will be loaded into the frame.

To configure frames in a frameset, right-click the frame and choose Frame Properties from the menu. Alternatively, you can select the frame and select Format, Frames, Frame Properties. Either method will display the Frame Properties dialog shown in Figure 10.5.
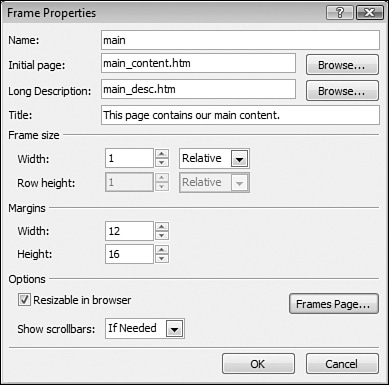
The following properties are configurable in the Frame Properties dialog:
Name—. The name of the frame can be used when you need to direct hyperlinks to open in that frame. Links with a
targetattribute of “main” will open in the frame being configured (refer to the example shown in Figure 10.5).Initial Page—. The initial page is the URL displayed in the frame when it is first loaded.
Long Description—. The long description specifies the URL of a file that contains a long description of what appears in the frame. This is used by screen readers.
Title—. The title is a short description of the frame’s contents. It is also used by screen readers.
Frame Size Width and Row Height—. Specifies the width and height of the frame. This can be relative to other frames in the frameset, a percentage of available window space, or absolute pixel dimensions.
Margin Width and Height—. Specifies the margins for the frame.
Resizable in Browser—. When checked, the frame can be resized by dragging the border in the browser.
Show Scrollbars—. Configures whether or not scrollbars are displayed. Can be set to the following: If Needed, Never, or Always.
Caution
If you set Show Scrollbars to Never and the frame’s content extends beyond the borders of the frame, any content outside the frame will be inaccessible by users of your Web site.
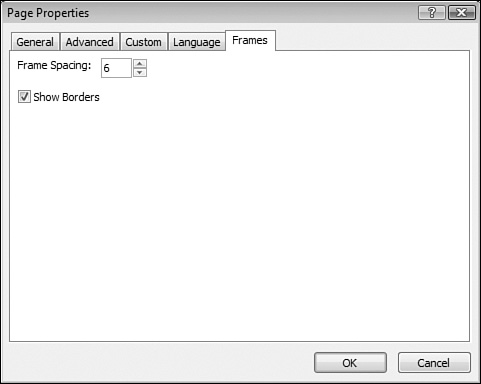
By clicking the Frames Page button shown previously in Figure 10.5, you can access properties for the frameset page, as shown in Figure 10.6. Adjusting the Frame Spacing value changes the width of the border between frames. To remove the border completely, remove the check from the Show Borders checkbox.
Caution
The Frame Spacing setting adds a framespacing attribute to the <frameset> tag in your page. The framespacing attribute is only recognized by Internet Explorer and is a non-standard attribute. It will be ignored by other browsers.
To split a frame into two frames, select the frame and then select Format, Frames, Split Frame. Expression Web will display the Split Frame dialog shown in Figure 10.7, where you can choose to split the frame into columns or rows.
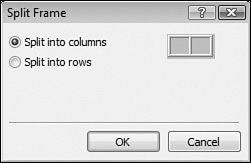
When a frame is split into two frames, each of the two frames will be 50% of the width or height of the original frame.
Note
If you are considering splitting a frame, consider whether it might not be more appropriate to simply add a table to the existing page instead. Splitting frames can create a user interface for your Web site that is awkward to navigate.
→ | For more information on adding tables to a page, see “Tables in Expression Web,” p. 160 (Chapter 9). |
Frames are a fairly old technology (they were introduced in Netscape 2.0) and are supported in all modern browsers. However, frames are one of the few HTML techniques that have no graceful fallback. When browsers encounter a tag they don’t understand, they simply ignore the tag. In most cases, that doesn’t present much of a problem, but in the case of frames, the page containing the frame tags doesn’t contain any content. It only contains tags that define the frames. For that reason, when a browser that doesn’t understand frames loads that page, it simply won’t display anything at all.
Note
Keep in mind that your Web site will rarely (if ever) be visited by someone using a browser that doesn’t support frames.
Fortunately, there is a way to specify alternate content for browsers that don’t understand frames. By using the No Frames view, as shown in Figure 10.8, you can specify content to be displayed for browsers that don’t support frames.
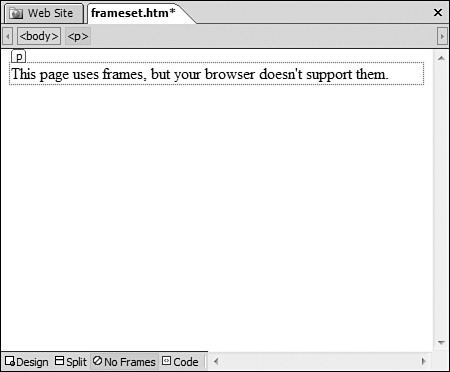
The default message provided by Expression Web (shown in Figure 10.8) isn’t very useful, so you’ll likely want to add your own content. Therein lies one of the problems with frames. If you’re going to create content in the No Frames view that emulates your frames content, you may as well carefully evaluate whether the frameless content is suitable for everyone as a substitute for frames.
Expression Web allows you to easily configure a hyperlink to target a particular frame. To cause a hyperlinked URL to display in a specific frame:
Insert a hyperlink.
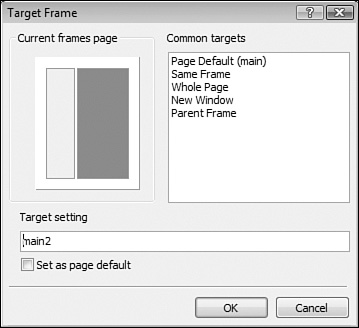
In the Insert Hyperlink dialog, click Target Frame, as shown in Figure 10.9.
In the Target Frame dialog, enter the name of the frame you want to target. You can also simply click on the frame that you want to target in the Current Frames Page representation, as shown in Figure 10.10.
Note

If your hyperlink targets a specific frame but clicking the hyperlink opens a new window instead, see “Targeted Hyperlink Opens New Window” in the “Troubleshooting” section of this chapter.
Click OK to dismiss the Target Frame dialog.
Enter a URL for the hyperlink or select a page from the Insert Hyperlink dialog and click OK to insert the hyperlink.

So far in this chapter we’ve covered using frames inside a frameset page. Using this method, a single page is broken up into multiple frames. Another type of frame available to you in Expression Web is the inline frame. An inline frame is a frame that can be inserted into an existing page and can be any size you wish.
→ | For more information on layers, see “Using Layers,” p. 439 (Chapter 25). |
Figure 10.11 shows an inline frame into which I have loaded the Microsoft Xbox 360 Web site. Notice that there are scrollbars so you can scroll around the entire page displayed by the inline frame.

Note
In most cases, you will want to display your own content inside an inline frame. The inline frame shown in Figure 10.11 displays an external Web site so you can more clearly see exactly what the inline frame does.
To insert an inline frame, place the insertion point where you would like the inline frame and double-click on the Inline Frame control in the Toolbox. When you do, you will be given the option of specifying an initial page or creating a new page for the frame’s content, as shown in Figure 10.12.

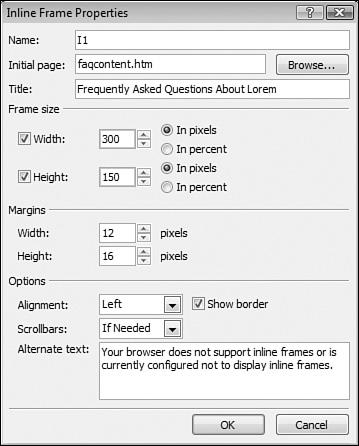
After you’ve added content in an inline frame, you can control that inline frame’s properties by right-clicking on the inline frame and selecting Inline Frame Properties from the menu. Doing so displays the Inline Frame Properties dialog shown in Figure 10.13.
Tip
By inserting an inline frame inside a layer, you can position the inline frame anywhere you’d like on the page by simply dragging the layer.
The options available in the Inline Frame Properties dialog are essentially the same as those available in the Frame Properties dialog previously shown in Figure 10.5. One notable exception is that the Inline Frame Properties dialog provides an Alternate Text textbox for entering content to be displayed for users who cannot see inline frames.
Tip
You can enter HTML code into the Alternate Text textbox in the Inline Frame Properties dialog. By using HTML as alternate text, you can display alternate content that shares a look and feel with the rest of your Web site.
As with frames pages, you can target an inline frame with hyperlinks by specifying the name of the inline frame in the target attribute of the hyperlink. This is a common way of updating a portion of a page when a link is clicked elsewhere on the page.
I’ve created a hyperlink that uses the target attribute to target one of my frames. However, when I click the link, the page opens in a new window instead.
It’s likely that you have inadvertently misspelled the frame name in the target attribute. When an unknown frame name is specified for a target, most browsers will simply open a new window to display the link.
As I mentioned when I opened this chapter, there are plenty of Web designers who will tell you that you should never use frames. I’m not one of them. However, you should carefully consider the possibility of using tables or other design elements such as CSS. If you do decide that frames are the right choice for you, there are some general tips you should follow so that they don’t become a point of frustration for users of your site.
Note
If you’d like some guidelines on when to use frames and when you might want to consider other options, see “Using Frames in Web Sites” earlier in this chapter.
As you’ve seen in this chapter, it’s possible to configure a frames page so there are no borders on the frames. Before you choose to go borderless, you should carefully consider your site’s design. If you have user interface elements such as graphics that distinguish the frame from the rest of your page, removing the borders may be a suitable option.
Examine the page in Figure 10.14. The navigation links at the left side are in one frame and the main content is in another. However, there’s no way to tell that it’s a frames page by looking at it. If I scrolled the content page, the navigation would remain in place. That may be what you want, but it may also be confusing to some users. By placing a border on the frame, it provides a visual indicator that the two parts of the page are separate.

When adding frames for navigation elements, it’s often tempting to configure the frames so they cannot be resized. Depending on the site’s design, that may or may not be a good idea.
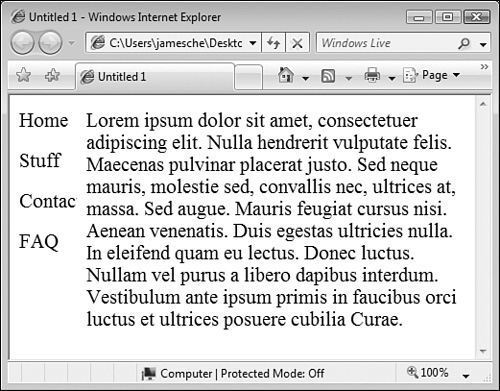
If the content in the frame consists of text, it can often be a bad idea not to allow users to resize the frame. Some users of your Web site may have adjusted the size of the text in their browser. In some cases, this may cause your text to overflow the frame.
The page in Figure 10.15 is an example of bad design with frames. Notice that the Contact link is not fully visible because I have adjusted the text size in my browser.
When using frames in your Web site, make sure that you test carefully. Adjust the size of the text in your browser and test your site again. The goal is to make your site look the way you intend for all site visitors. With careful testing and design, you can easily reach that goal.
If you do use frames in your Web site, you run the risk of your frames page being displayed inside of a nested frameset. Figure 10.16 shows an example of a nested frameset caused by a link inside of a frameset linking to a frames page.

The solution to this problem is to include a JavaScript snippet that will break out of a frameset. Simply include the following snippet inside of your <head> section in the frameset page.
<script language="javascript" type="text/javascript">
if (window != top) top.location.href = location.href;
</script>
This script will force the frameset page to break out of any nested framesets when it is loaded.