
In Chapter 2, we looked into samples demonstrating basic SOA with POX over HTTP and we have also seen an introduction to SOAP. Today SOAP is so indispensible a technology, and standard, as most of the B2B communications across trading partners happen over this. Whether SOAP, as its name implies, is simple or not is still disputed. However, one aspect which everyone agrees with is its open standards-based nature and the industry wide support available in the form of tools and frameworks. Almost all web services stacks adopts SOAP as the de-facto over the wire protocol. This is true with many Java web services framework too. Now, to implement your own web services in Java, or to access a third-party web service from within your Java code, you need to understand the various options existing today so that you can make decisions. This chapter is intended to introduce major web service implementations available in the Java/J2EE world. So, we will cover the following in this chapter:
WS using JAX-WS 2.0
WS using Apache Axis
WS using Spring
WS using XFire
We will have code samples and build files starting from scratch demonstrating how to set up web services and how to access an existing web service using the above web service implementations.
JAX-WS stands for Java API for XML Web Services. The JAX-WS 2.0 specification replaces JAX-RPC 1.0 and is the next generation web services API-based on JSR 224.
The JAX-WS 2.0 project develops and evolves the code base for the reference implementation of the JAX-WS specification and is available in the URL https://jax-ws.dev.java.net/. At present the code base supports JAX-WS 2.0 and JAXWS 2.1.
The following list specifies new features implemented by JAX-WS 2.0:
Direct support for JAXB 2.0-based data binding
Support for the latest W3C and WS-I standards (e.g. SOAP 1.2, WSDL 1.2, and SAAJ 1.3)
Standardized metadata for Java to WSDL (and vice versa) mapping
Ease-of-development features
Support for easier evolution of web services
Improved handler framework
Support for asynchronous RPC and non-HTTP transports
Another exciting feature of JAX-WS 2.0 is the support it has got within Java Platform, Standard Edition 6 (Java SE 6). This means, JAX-WS 2.0-based code and components can be executed from within a fully blown J2EE server infrastructure such as Project GlassFish, or with just Java SE 6. This is indeed a great advantage for Java developers, which has been previously enjoyed only by .NET developers (.NET stack supports web services development in the light-weight manner).
JAX-WS 2.0 provides the following new APIs in the Java SE 6 platform to build web applications and web services:
|
API |
Package |
|---|---|
|
JAX-WS |
javax.xml.ws |
|
SAAJ |
javax.xml.soap |
|
WS Metadata |
javax.jws |
First things first and simple things foremost! In this section, you will not use any application server or any third-party web server, but will use just Java SE 6 and its tools to develop and deploy a simple web service.
As said earlier, we will start with our simple samples first. The code artifacts for our first sample are placed in the folder ch03�1_JaxWSJavaStandAlone.
The server is composed of three Java files kept in folder ch03�1_JaxWSJavaStandAloneServersrc and are explained below:
IHello is a java interface and is shown here:
public interface IHello{
String sayHello (String name);
}
HelloImpl implements the business functionality to be exposed as web service. This class realizes the preceding IHello interface:
import javax.jws.WebService;
import javax.jws.soap.SOAPBinding;
import javax.jws.WebMethod;
@WebService(name="IHello", serviceName="HelloService")
@SOAPBinding(style=SOAPBinding.Style.RPC)
public class HelloImpl implements IHello{
@WebMethod(operationName = "sayHello")
public String sayHello(String name){
System.out.println("HelloImpl.sayHello...");
return "
Hello From Server !! : " + name;
}
}
HelloImpl is annoted with javax.jws.WebService annotation. The @WebService annotation defines the class as a web service endpoint. The javax.jws.soap.SOAPBinding annotation specifies the mapping of the web service onto the SOAP message protocol. HelloImpl declares a single method named sayHello, which is annotated with the @WebMethod annotation. This annotation will expose the annotated method to web service clients. In fact, the IHello interface is not required while building a JAX-WS endpoint, but we have used it here as a good programming practice.
HelloServer is a main class which makes use of javax.xml.ws.Endpoint for publishing the web service:
import javax.xml.ws.Endpoint;
public class HelloServer {
public static void main(String args[]) {
log("HelloServer.main : Creating HelloImpl...");
IHello iHello = new HelloImpl();
try{
// Create and publish the endpoint at the given address
log("HelloServer.main : Publishing HelloImpl...");
Endpoint endpoint1 =
Endpoint.publish("http://localhost:8080/Hello", iHello);
log("HelloServer.main : Published Implementor...");
}
catch (Exception e) {
System.err.println("ERROR: " + e);
e.printStackTrace(System.out);
}
System.out.println("HelloServer Exiting ...");
}
}
The Client is composed of one Java file kept in folder ch03�1_JaxWSJavaStandAloneClientsrc. The HelloClient is dependent on two auto generated classes for example, HelloService and IHello. These classes will be auto generated, when we will build the client later in this exercise. The following code of client is straightforward:
public class HelloClient{
public static void main(String args[]) {
log("HelloClient.main : Creating HelloImpl...");
HelloService helloService = null;
IHello helloImpl = null;
String gotFromServer = null;
try{
log("HelloClient.main : Creating HelloImplService...");
if(args.length != 0){
helloService = new HelloService(new URL(args[0]),
new QName(args[1], args[2]));
}
else{
helloService = new HelloService();
}
log("HelloClient.main : Retreiving HelloImpl...");
helloImpl = helloService.getIHelloPort();
log("HelloClient.main : Invoking
helloImpl.sayHello("Binil")...");
gotFromServer = helloImpl.sayHello("Binil");
log("HelloClient.main : gotFromServer : " + gotFromServer);
}
catch (Exception e) {
System.err.println("ERROR: " + e);
e.printStackTrace(System.out);
}
}
}
You will first have to instantiate the HelloService, which has the required plumping to connect to the web service. Then, you will get a reference to the port using which you can invoke the remote web service.
As a first step and if you haven't done it before, edit examples.PROPERTIES provided along with the code download for this chapter and change the paths there to match your development environment. The code download for this chapter also includes a README.txt file, which gives detailed steps to build and run the samples.
To build the server and bring up the server in a single command, it is easy for you to go to ch03�1_JaxWSJavaStandAlone folder and execute the following command:
cd ch03�1_JaxWSJavaStandAlone ant server

Once the server is up and running, you can execute ant client command in a different prompt.
When we build the client, we also auto generate some client side artifacts out of the deployed web service using the following ant task:
<target name="GenSrc">
<exec executable="${env.JAVA_HOME}/bin/wsimport">
<arg line="-keep
-d build
-p com.binildas.ws.javastandalone.simple
-s ${gensrc} http://localhost:8080/Hello?WSDL"/>
</exec>
</target>
The client code is dependent on these generated files. So, we can now build the client codebase, and then send a web service request to the server. Any response received from the server is printed to the console. The following commands build and run the client in a single go.
cd ch03�1_JaxWSJavaStandAlone ant client

Let us now move on to an Enterprise Server and deploy a similar web service there. For running the samples in this section, we will go with the Java EE 5 SDK Update 4 for Windows (java_ee_sdk-5_04-windows-nojdk.exe), which is available for download at http://java.sun.com/javaee/downloads/index.jsp.
If you already have the latest version of JDK installed in your machine, you may choose to download the 'nojdk' version of the installable, or else you need to download the 'Java EE + JDK' version. Double-click and install the Java EE Server into some location in your hard drive (preferably to a file path with no spaces and fancy characters).
To start the default domain of the Java EE Server, it is easy for you to select the Start Default Server option from the Programs menu:
Start -> All Programs -> Sun Microsystems -> Java EE 5 SDK -> Start Default Server
Now, you can verify whether your server is up by typing:
http://127.0.0.1:8080/
You will be able to see the Sun Java System Application Server 9.1_01 (build b09d-fcs) welcome page.
You can also bring up the admin console by typing the following URL:
http://localhost:4848
Sometimes, you will also find it easy to start your server by going to the following path and typing the following command:
cd %J2EE_HOME%lib
asadmin-pause start-domain domain1
Here, J2EE_HOME points to the root folder where you have deployed your Java EE Server.

The server and client files are kept in the folder ch03�1_JaxWSJavaEEServersrc and are explained here:
HelloWebService is again an annotated java class. The annotations have the same meaning as in the earlier sample.
@WebService
public class HelloWebService{
private static int times;
public HelloWebService(){
System.out.println("Inside HelloWebService.HelloWebService...");
}
public String hello(String param){
System.out.println("Inside HelloWebService.hello... - " +
(++times));
return "Return From Server : Hello " + param;
}
}
The code for the client is very simple and is shown here:
public class Client{
@WebServiceRef(wsdlLocation = "http://localhost:8080/
HelloWebService/HelloWebServiceService?WSDL")
static HelloWebServiceService service;
public static void main(String[] args){
Client client = new Client();
client.test();
}
public void test(){
try{
HelloWebService helloWebServicePort =
service.getHelloWebServicePort();
String ret =
helloWebServicePort.hello(System.getProperty( "user.name"));
System.out.println("Hello result = " + ret);
}
catch(Exception e){
e.printStackTrace();
}
}
}
Here, we use the javax.xml.ws.WebServiceRef annotation to declare a reference to the deployed web service. @WebServiceRef uses the wsdlLocation element to specify the URI of the HelloWebService's WSDL file. Then, the client gets a proxy to the remote web service and invokes the web service method.
Again, to keep things simple, we will not do standard packaging in this sample. Instead, compile the web service class directly into the autodeploy directory of the Java EE Server, %J2EE_HOME% domainsdomain1autodeploy.
We can do the following steps in a single ant command:
Build the Server and Client
Deploy the Server into default domain
Run the client to send web service request to the server
For this, assuming your Java EE server is up and running, execute the following command:
cd ch03�1_JaxWSJavaEEServer ant
The following figure shows what you can see in the console. Here, the client first sends a request to the server and any response returned by the server is then printed out in the client side console.

The WSDL for the deployed web service would be available in the URL http://localhost:8080/HelloWebService/HelloWebServiceService?WSDL
Apache Axis is an implementation of the SOAP ("Simple Object Access Protocol") submission to W3C. Axis is a reliable and stable base to implement Java Web services, and there are many companies who use Axis for web services support in their products. Moreover, there is a very active user community too for Axis. Axis comes in two forms. for example, Axis 1.x and Axis 2. Axis 2 architecture is recent as compared to the predecessor, and is a redesign of Axis 1.x supporting SOAP 1.2, SOAP1.2, REST and more. There are many production deployments in 1.x code base too. For our discussion, we will use Axis 1.3, which you can download from the URL http://ws.apache.org/axis/java/releases.html.
There are two approaches commonly adopted for defining and implementing web services, Contract-first and Contract-last. In the Contract-first approach, we start with a web service contract, which is a WSDL file. We use tools to generate java artifacts out of the WSDL file. These generated artifacts includes java interfaces and implementation classes as well as any other web services plumbing related code. Whereas in the Contract-last approach, you start with the Java code, and let the WSDL be generated from that.
Even though, the approach to be adopted depends on many factors including the context in which you are defining your web services, the Contract-first approach is preferred in normal circumstances. But one practical difficulty in the Contract-first approach is that creating a WSDL is not a trivial process and hence we may not be able to do that easily without some special tool support. To deal with this difficulty, there is a mixed approach which we can follow, whose steps are as follows:
Create the web service interface (Java interface) alone first
Generate WSDL out of this interface
Now follow the normal steps which you follow in the Contract-first approach
We will follow this mixed approach in our samples. Hence, you will be able to adopt the samples here to follow either the Contract-first or the Contract-last approach by doing simple changes to the build scripts.
We will use Axis 1.3, which is freely downloadable from the URL http://ws.apache.org/axis/java/releases.html. Unzip the installation to a suitable location in your hard drive and change the axis.home path in examples.PROPERTIES to point to this location.
Different from the previous samples in this chapter, we will now build and package the web services files as a standard web archive (.war). We would then require a web server to deploy the web archive. We will use Apache Tomcat 6.x, which you can again download freely from the URL http://tomcat.apache.org/.
We will implement the server in a Contract-first approach, but since we don't want to hand code the WSDL, let's start with a Java interface. All the required files for this sample are placed in the folder ch03�2_Axissrc. Let's look into these files one by one.
IHelloWeb is a simple Java interface, which defines a business method as shown here:
public interface IHelloWeb{
public String hello(String param);
}
In the Contract-first approach, we start from a WSDL. As WSDL is language and platform neutral, we are sure that the client and server implemented in the Contract-first approach will be able to interoperate. But in our sample, we can start with a Java interface and then generate WSDL. So, in order to make sure that this generated WSDL is also compliant to interoperable standards, you need to pay attention to the parameters and return types of the method declaration in the java interface. Before you generate the WSDL make sure that the types in this Java interface can be interpreted as standard, portable types in the WSDL too.
Now we need to implement the web service. HelloWebService class will just do that.
public class HelloWebService implements IHelloWeb{
private static int times;
public HelloWebService(){
System.out.println("Inside HelloWebService.HelloWebService...");
}
public String hello(String param){
System.out.println("Inside HelloWebService.hello... - " +
(++times));
return "Return From Server";
}
}
Now, instead of creating the web service implementation class from scratch, we can generate an implementation template class. Into this template, you can manually add your business logic. OK, that is the method for your production deployments, but for this sample, you don't need to do these manual steps. Instead, we will try to do everything automatic using a smart ant build file.
The build.xml file is important, since it takes you step by step, starting from a Java interface through implementing business logic, and then packaging as a standard web archive. So, we will reproduce the entire build file here.
<?xml version="1.0" ?>
<project default="all">
<property file="../examples.properties"/>
<property name="build" value="build"/>
<property name="dist" value="dist"/>
<property name="lib" value="lib"/>
<property name="src" value="src"/>
<property name="gensrc" value="gensrc"/>
<property name="config" value="config"/>
<property name="webapp.name" value="AxisEndToEnd"/>
<property name="service.name" value="HelloWebService"/>
<property name="wsdl" value="HelloWebService.wsdl"/>
<property name="interface.package"
value="com.binildas.apache.axis.AxisEndToEnd"/>
<property name="interface.path"
value="com/binildas/apache/axis/AxisEndToEnd"/>
<property name="interface.class" value="IHelloWeb"/>
<property name="implement.package"
value="com.binildas.apache.axis.AxisEndToEnd"/>
<property name="implement.path"
value="com/binildas/apache/axis/AxisEndToEnd"/>
<property name="implement.class" value="HelloWebService"/>
<path id="classpath">
<pathelement path="./build"/>
<fileset dir="${axis.home}/lib">
<include name="*.jar"/>
</fileset>
</path>
<target name="all" depends=" deploy, compileclient">
</target>
<target name="clean">
<delete dir="${build}"/>
<delete dir="${dist}"/>
<delete dir="${lib}"/>
<delete dir="${gensrc}"/>
</target>
<target name="init">
<mkdir dir="${build}"/>
<mkdir dir="${dist}"/>
<mkdir dir="${lib}"/>
<mkdir dir="${gensrc}"/>
</target>
<target name="copy">
<copy todir="${lib}">
<fileset dir="${axis.home}/lib">
<include name="*.jar"/>
</fileset>
</copy>
</target>
<target name="precompile" depends="clean, init">
<javac srcdir="${src}" destdir="build" classpathref="classpath">
<exclude name="**/*Client*.java"/>
</javac>
</target>
<target name="java2wsdl" depends="precompile">
<java classname="org.apache.axis.wsdl.Java2WSDL" fork="true"
failonerror="true">
<arg value="-o"/>
<arg value="${wsdl}"/>
<arg value="-lhttp://localhost:8080/${webapp.name}/
services/${service.name}"/>
<arg value="${interface.package}.${interface.class}"/>
<classpath>
<path refid="classpath"/>
<pathelement location="${build}"/>
</classpath>
</java>
</target>
<target name="wsdl2java" depends="java2wsdl">
<java classname="org.apache.axis.wsdl.WSDL2Java" fork="true"
failonerror="true">
<arg value="-o"/>
<arg value="${gensrc}"/>
<arg value="-s"/>
<arg value="-S"/>
<arg value="no"/>
<arg value="-c"/>
<arg value="${implement.package}.${implement.class}"/>
<arg value="${wsdl}"/>
<classpath>
<path refid="classpath"/>
<pathelement location="${build}"/>
</classpath>
</java>
</target>
<target name="implement" depends="wsdl2java">
<delete>
<fileset dir="${gensrc}/${implement.path}"
includes="${implement.class}.java"/>
</delete>
<copy todir="${gensrc}/${implement.path}" overwrite="ture">
<fileset dir="${src}/${implement.path}">
<include name="${implement.class}.java"/>
</fileset>
</copy>
</target>
<target name="compile" depends="implement">
<javac srcdir="${gensrc}" destdir="build"
classpathref="classpath"/>
</target>
<target name="compileclient">
<javac srcdir="${src}" destdir="build" classpathref="classpath">
<include name="**/*Client*.java"/>
</javac>
</target>
<target name="deploy" depends="compile, copy">
<move todir="${config}" flatten="yes">
<fileset dir="${gensrc}">
<include name="**/*.wsdd"/>
</fileset>
</move>
<java classname="org.apache.axis.utils.Admin" fork="true"
failonerror="true" dir="config">
<arg value="server"/>
<arg file="config/deploy.wsdd" />
<classpath>
<path refid="classpath"/>
<pathelement location="build"/>
</classpath>
</java>
<war destfile="dist/${webapp.name}.war" webxml="config/web.xml">
<webinf dir="config">
<include name="server-config.wsdd"/>
</webinf>
<lib dir="lib"/>
<classes dir="build"/>
</war>
<delete dir="${lib}"/>
</target>
</project>
Let us now understand the implementation of the web service step by step. We will execute the following ant targets, in the same order.
clean:This will delete all temporary folders and any generated files in the previous build.init:This will create a few, new folders.precompile:In this step, the aim is to compile the interface class.java2wsdl:Thejava2wsdlwill generate the WSDL from the precompiled java interface. You can look at the URL http://ws.apache.org/axis/java/reference.html to get an understanding of the options available in this step.wsdl2java:Now, we start our Contract-first process. As we have the WSDL, we will usewsdl2javatools to create web service artifacts including the implementation template class. These generated files are placed in a folder, for example,gensrc. This step will also generatedeploy.wsddandundeploy.wsdd, two files which will help us generate server side deployment configurations later.implement:As mentioned previously, to avoid the manual process of adding code to the generated implementation template, we already have a Java file with the same name as the generated implementation template, which contains the same Java class,HelloWebService, with the business code implemented. So we will overwrite the generated file with the file already present, which in effect is equivalent to adding business code to the generated file.compile:We will now compile all the generated files, including the web service implementation class containing the business logic.copy:This will bring all required axis libraries to a staging directory for example,libin our codebase, so that it is easy to package them into the web archive.deploy:In this step, we will use theorg.apache.axis.utils.Adminclass to generate the deployment configuration file,server-config.wsdd, takingdeploy.wsddas the input. We then create a standard web archive, which can be readily deployed into your favorite web server.compileclient:As a last step, we will compile the Client code too.
The RpcClient makes use of auto generated client side stub classes to invoke the remote web service in an RPC style.
public class RpcClient{
private static String wsdlUrl = "http://localhost:8080/ AxisEndToEnd/services/HelloWebService?WSDL";
private static String namespaceURI = "http://AxisEndToEnd.axis. apache.binildas.com";
private static String localPart = "IHelloWebService";
protected void executeClient(String[] args)throws Exception{
IHelloWebService iHelloWebService = null;
IHelloWeb iHelloWeb = null;
if(args.length == 3){
iHelloWebService = new IHelloWebServiceLocator(args[0],
new QName(args[1], args[2]));
}
else{
iHelloWebService = new IHelloWebServiceLocator(wsdlUrl,
new QName(namespaceURI, localPart));
}
iHelloWeb = iHelloWebService.getHelloWebService();
log("Response From Server : " + iHelloWeb.hello("Binil"));
}
public static void main(String[] args)throws Exception{
RpcClient client = new RpcClient();
client.executeClient(args);
}
}
We have provided one more client code called CallClient, which will use Axis and SOAP APIs to invoke the web service in a document oriented manner.
public class CallClient {
public static String wsURL =
"http://localhost:8080/AxisEndToEnd/services/HelloWebService?WSDL";
public static String action = "HelloWebService";
//SOAP Request - Not shown fully
public static String msg = "<?xml version="1.0"
encoding="UTF-8"?><soapenv:Envelope ...>";
public static void test() throws Exception{
InputStream input = new ByteArrayInputStream(msg.getBytes());
Service service = new Service();
Call call = (Call) service.createCall();
SOAPEnvelope soapEnvelope = new SOAPEnvelope(input);
call.setTargetEndpointAddress( new URL(wsURL) );
if (action != null) {
call.setUseSOAPAction( true );
call.setSOAPActionURI( action );
}
soapEnvelope = call.invoke( soapEnvelope );
System.out.println( "Response:
" + soapEnvelope.toString() );
}
public static void main(String args[]) throws Exception{
CallClient callClient = new CallClient();
if(args.length > 0){
wsURL = args[0];
}
if(args.length > 1){
action = args[1];
}
callClient.test();
}
}
The document oriented web service request has not been fully shown in the code. But you can look at the source code to view it fully.
The previous build.xml was a bit lengthy, and we again agree that the 10 steps mentioned earlier to implement the web service are not trivial ones for a novice user to execute. But believe it; we are going to do all those things with just one ant command. So, save the above build.xml file so that you can re-use them in your projects too.
To build the server side code, execute the following commands:
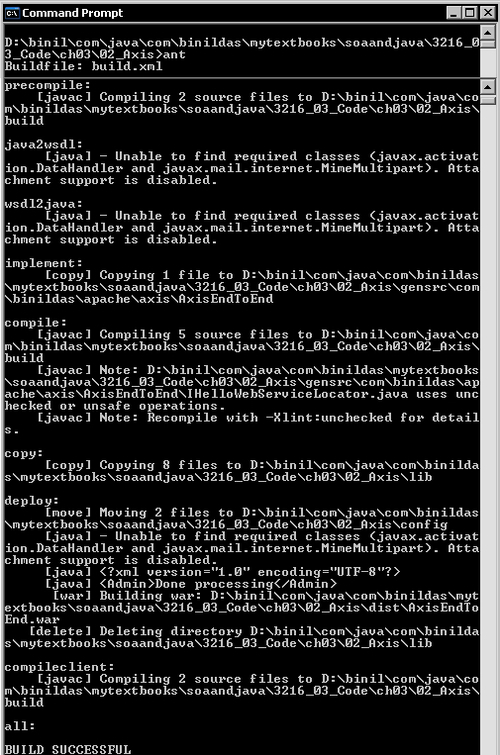
cd ch03�2_Axis ant
The following figure shows the step-by-step execution of the build:
At the end of the build, we will have the deployable web archive (AxisEndToEnd.war) in the following location:
ch03�2_Axisdist
You can now transfer this archive to the webapps folder of your web server and restart your server. Assuming the deployment went fine, the WSDL for the web service will be available now at the URL http://localhost:8080/AxisEndToEnd/services/HelloWebService?WSDL.
You can now execute the client code to test your web service. Since we have provided two versions of client code, there are two options for you to test the web service.
To execute the RpcClient, execute the following commands:
cd ch03�2_Axis ant runrpc
The following figure shows the RpcClient execution console where it prints out any response received from the server:

To execute the CallClient, execute the following commands:
cd ch03�2_Axis ant runcall
The following figure shows the RpcClient execution console where it prints out any response received from the server:

Spring has good support for Remoting. The main Remoting protocols Spring supports are RMI, HTTP-based Remoting (using org.springframework.remoting.httpinvoker.HttpInvokerServiceExporter), Hessian, Burlap, Spring support for SOAP, and Spring-WS (Web Services). Since this chapter is concentrating on web service implementations, let us look more into Spring support for SOAP and WS.
Spring-WS is available as a download different from core Spring from the site. Spring-WS support Contract-first style of WS development. Hence, the developers should be ready with the contract (WSDL) first to implement WS in Spring. This may not be trivial for every developer, especially for those who cannot create a WSDL by hand. The other alternative is to use some tools to author the contract, and then use Spring-WS for implementation.
We have already seen how to develop WS in Axis. Now, what we need more from Spring are its features such as:
Dependency Injection
Object Wiring
And for the reasons mentioned earlier, we also need a mechanism to generate or author the WSDL. Hence, to make the full process smooth and straightforward, we can use a mixed approach — using both Axis and Spring together so that we get best of both the worlds. We will see how to do that in this section.
Since, we have already seen how to deploy an Axis web service, let us build on that to integrate Spring with the sample.
Spring provides org.springframework.remoting.jaxrpc.ServletEndpointSupport, which is a convenience base class for JAX-RPC servlet endpoint implementations. It provides a reference to the current Spring application context, so that we can do bean lookup or resource loading.
We will use the Server side codebase we have used for Axis sample with slight variations. Hence, the code is repeated in this section. The server side code artifacts are placed in the following folder ch03�3_SpringWebServicesrc.
IHello is a simple business interface, with a single method hello. Since we want to share this interface with clients too, we have placed this interface alone in a common folder that is ch03�3_SpringCommonsrc.
public interface IHello{
String hello(String param);
}
Let us have an interface different from IHello to IHelloWeb, as our web service interface. So, we shall generate our contract out of this interface only.
public interface IHelloWeb extends IHello{
}
Different from our Axis sample, HelloWebService here extends ServletEndpointSupport, so that we get a reference to the current Spring application context.
public class HelloWebService extends ServletEndpointSupport implements IHelloWeb{
private IHello iHello;
public HelloWebService(){
System.out.println("Inside HelloWebService.HelloWebService...");
}
protected void onInit() {
System.out.println("Inside HelloWebService.onInit...");
this.iHello = (IHello) getWebApplicationContext().getBean("hello");
}
public void setHello(IHello iHello){
this.iHello = iHello;
}
public String hello(String param){
System.out.println("Inside HelloWebService.hello...");
return iHello.hello(param);
}
}
Here in the onInit method, we get a reference to Spring context to resolve the bean with the name, hello. This bean refers to a different business bean, where we implement our business code which is explained next.
Hello is a spring bean, which we configure in the applicationContext.xml. This bean implements the business method.
public class Hello implements IHello{
public Hello(){
System.out.println("Inside Hello.Hello...");
}
public String hello(String param){
System.out.println("Inside Hello.hello...");
return "Hello " + param;
}
}
The applicationContext.xml will have definitions of all Spring beans, and is placed in the folder ch03�3_SpringWebServiceconfig.
<?xml version="1.0" encoding="UTF-8"?>
<!DOCTYPE beans PUBLIC "-//SPRING//DTD BEAN//EN" "http://www.springframework.org/dtd/spring-beans.dtd">
<beans>
<bean id="hello" class="com.binildas.apache.axis.AxisSpring.Hello">
</bean>
</beans>
The web.xml placed in ch03�3_SpringWebServiceconfig will explain how we can hook the Spring context to the current web application context. When we package the web archive, we need to place the applicationContext.xml in the path specified in the web.xml (/WEB-INF/).
<?xml version="1.0" encoding="ISO-8859-1"?>
<!DOCTYPE web-app PUBLIC "-//Sun Microsystems, Inc.//DTD Web
Application 2.3//EN" "http://java.sun.com/dtd/web-app_2_3.dtd">
<web-app>
<listener>
<listener-class>
org.springframework.web.context.ContextLoaderListener
</listener-class>
</listener>
<context-param>
<param-name>contextConfigLocation</param-name>
<param-value>
/WEB-INF/applicationContext.xml
</param-value>
</context-param>
<servlet>
<servlet-name>AxisServlet</servlet-name>
<display-name>Apache-Axis Servlet</display-name>
<servlet-class>
org.apache.axis.transport.http.AxisServlet
</servlet-class>
<load-on-startup>1</load-on-startup>
</servlet>
<servlet-mapping>
<servlet-name>AxisServlet</servlet-name>
<url-pattern>/services/*</url-pattern>
</servlet-mapping>
</web-app>
Let us code the client too using Spring features, in a simple manner. Look at the code to know how we can do that.
public class Client{
private ApplicationContext ctx;
private ClientObject clientObject;
public Client(){
String[] paths = {"/applicationContextClient.xml"};
ctx = new ClassPathXmlApplicationContext(paths);
clientObject = (ClientObject) ctx.getBean("clientObject");
}
public void finalize()throws Throwable{
super.finalize();
clientObject = null;
ctx = null;
}
private void test1(){
log(clientObject.hello("Binil"));
}
public static void main(String[] args)throws Exception{
Client client = new Client();
client.test1();
}
}
The Client makes use of another spring bean, ClientObject. We wire this bean in a second Spring configuration file, applicationContextClient.xml.
The ClientObject is just a helper bean.
public class ClientObject{
private IHello helloService;
public void setHelloService(IHello helloService) {
this.helloService = helloService;
}
public String hello(String param) {
return helloService.hello(param);
}
}
We inject a proxy to the remote web service into this bean. So, any calls can be delegated to the web service. The proxy configuration and wiring is done in applicationContextClient.xml.
In applicationContextClient.xml, we configure both the ClientObject bean and a proxy to the remote web service. To configure the proxy, you define a JaxRpcPortProxyFactoryBean so that the proxy will implement the remote interface. As you have chosen Axis to implement your Spring-based web service, we will use Axis itself for the client side invocation too. So you must specify org.apache.axis.client.ServiceFactory as the service factory class to use. Then you also define other parameters for the JaxRpcPortProxyFactoryBean as shown in following code listing:
<?xml version="1.0" encoding="UTF-8"?>
<!DOCTYPE beans PUBLIC "-//SPRING//DTD BEAN//EN"
"http://www.springframework.org/dtd/spring-beans.dtd">
<beans>
<bean id="helloService" class="org.springframework.remoting.jaxrpc.JaxRpcPortProxyFactoryBean">
<property name="serviceFactoryClass">
<value>org.apache.axis.client.ServiceFactory</value>
</property>
<property name="serviceInterface"
value="com.binildas.apache.axis.AxisSpring.IHello"/>
<property name="wsdlDocumentUrl"
value="http://localhost:8080/AxisSpring/
services/HelloWebService?wsdl"/>
<property name="namespaceUri"
value="http://AxisSpring.axis.apache.binildas.com"/>
<property name="serviceName" value="IHelloWebService"/>
<property name="portName" value="HelloWebService"/>
</bean>
<bean id="clientObject"
class="com.binildas.apache.axis.AxisSpring.ClientObject">
<property name="helloService" ref="helloService"/>
</bean>
</beans>
To build the server side code, execute the following commands:
cd ch03�3_Spring ant
The above command will build both the server and the client codebase. At the end of the build, we will have the deployable web archive (AxisSpring.war) in the following location:
ch03�3_SpringWebServicedist
You can now transfer this archive to the webapps folder of your web server and restart your server. Assuming the deployment went fine, the WSDL for the web service will be available now at the URL http://localhost:8080/AxisSpring/services/HelloWebService?wsdl.
You can now execute the clients' code to test your web service. To execute the Client, execute the following commands:
cd ch03�3_Spring ant run
The following figure shows the client side screenshot:

XFire is a new generation Java SOAP framework. XFire API is easy to use, and supports standards. Hence XFire makes SOA development much easier and straightforward. XFire is also highly performance oriented, since it is built on a low memory StAX (Streaming API for XML) model. Currently, XFire is available in version 2.0 under the name CXF.
You have already seen implementing web services in Axis and Spring, by creating standard web archives and deploying them into web servers. Now, we will do a similar exercise here, but in a relatively lightweight manner, using XFire. Here, we assume you have already downloaded XFire 1.2.2 version from the URL http://xfire.codehaus.org/Download, and have extracted it to the folder which you can refer to in your examples.PROPERTIES file as xfire.home.
For our XFire sample, we have all the code organized in the folder ch03�4_XFiresrc. We will now look at them, one by one.
As usual, IHello is a simple Java business interface, defining a single method sayHello.
public interface IHello{
String sayHello(String name);
}
HelloServiceImpl is our web service implementation class, implementing IHello interface.
public class HelloServiceImpl implements IHello{
private static long times = 0L;
public HelloServiceImpl(){
System.out.println("HelloServiceImpl.HelloServiceImpl()...");
}
public String sayHello(String name){
System.out.println("HelloServiceImpl.sayHello (" + (++times) + ")");
return "HelloServiceImpl.sayHello : HELLO! You just said:" + name;
}
}
For XFire web services, we need to set up org.codehaus.xfire.transport.http.XFireConfigurableServlet as the Servlet. We then route all URL requests of pattern /services/ to XFireConfigurableServlet as shown in the web.xml.
<?xml version="1.0" encoding="ISO-8859-1"?>
<!DOCTYPE web-app
PUBLIC "-//Sun Microsystems, Inc.//DTD Web Application 2.3//EN"
"http://java.sun.com/dtd/web-app_2_3.dtd">
<web-app>
<servlet>
<servlet-name>XFireServlet</servlet-name>
<display-name>XFire Servlet</display-name>
<servlet-class>
org.codehaus.xfire.transport.http.XFireConfigurableServlet
</servlet-class>
</servlet>
<servlet-mapping>
<servlet-name>XFireServlet</servlet-name>
<url-pattern>/servlet/XFireServlet/*</url-pattern>
</servlet-mapping>
<servlet-mapping>
<servlet-name>XFireServlet</servlet-name>
<url-pattern>/services/*</url-pattern>
</servlet-mapping>
</web-app>
The services.xml is the main XFire configuration file. Let us look into the sample file and understand it in detail.
<beans xmlns="http://xfire.codehaus.org/config/1.0">
<service>
<name>Hello</name>
<namespace>http://xfire.binildas.com</namespace>
<serviceClass>com.binildas.xfire.IHello</serviceClass>
<implementationClass>
com.binildas.xfire.HelloServiceImpl
</implementationClass>
</service>
</beans>
The name element is required and denotes the name of the service as exposed to the world. The optional namespace element specifies the target namespace for the service. The serviceClass denotes the name of the object you wish to make into a service, whereas the implementationClass denotes the implementation which you wish to use when the service is invoked.
To build the server side code, execute the following commands:
cd ch03�4_XFire ant
The above command will build both the server and the client codebase. At the end of the build, we will have the deployable web archive (HelloXFire.war) in the following location:
ch03�4_XFiredist
You can now transfer this archive to the webapps folder of your web server and restart your server. Assuming the deployment went fine, the WSDL for the web service will be available now at the URL http://localhost:8080/HelloXFire/services/Hello?wsdl>.
You can now execute the clients' code to test your web service. To execute the Client code, execute the following commands:
cd ch03�4_XFire ant run
The following figure shows the client side screenshot:

In this chapter, we concentrated on major web services implementation available in the Java world, and while doing all this we covered the following:
JAX-WS 2.0: JAX-WS 2.0 is the reference implementation of the Java API for XML web services (JAX-WS) specification. We have seen samples in JAX-WS which can be deployed in Java EE Application Server or into Java SE 6.
Apache Axis: Axis is Apache open-source web service implementation with many production deployments. We have seen a full-service deployment, where we package the code artifacts into a standard web archive and then deploy them into Apache Tomcat web server.
Spring: Spring provides dependency injection and bean wiring along with other features, and we can develop web services using Spring core or Sring-WS. The sample, in this chapter, uses Spring core to enhance the Axis web service sample.
Xfire: Xfire is a new generation Java SOAP framework, which is easier and straightforward for developing web services. The Xfire sample provided, demonstrates how easy it is to build and deploy web services using Xfire.