
Learning Objectives
By the end of this chapter, you will be able to:
- Create a Kubernetes cluster with Minikube
- Install the Kubeless framework on Kubernetes
- Create, update, call, and delete Kubeless functions
- List, describe, debug, and monitor Kubeless functions
- Create HTTP and PubSub triggers for Kubeless functions
In this chapter, we will first learn about the Kubeless architecture. Then, we'll create our first Kubeless function, deploy it, and invoke it. You'll also learn how to debug a Kubeless function in the case of a failure.
Introduction to Kubeless
Kubeless is an open source and Kubernetes-native serverless framework that runs on top of Kubernetes. This allows software developers to deploy code into a Kubernetes cluster without worrying about the underlying infrastructure. Kubeless is a project by Bitnami, who is a provider of packaged applications for any platform. Bitnami provides software installers for over 130 applications, which allow you to quickly and efficiently deploy these software applications to any platform.
Kubeless functions support multiple programming languages, including Python, PHP, Ruby, Node.js, Golang, Java, .NET, Ballerina, and custom runtimes. These functions can be invoked with HTTP(S) calls as well as event triggers with Kafka or NATS messaging systems. Kubeless also supports Kinesis triggers to associate functions with the AWS Kinesis service, which is a managed data-streaming service by AWS. Kubeless functions can even be invoked at specified intervals using scheduled triggers.
Kubeless comes with its own Command-Line Interface (CLI) named kubeless, which is similar to the kubectl CLI offered by Kubernetes. We can create, deploy, list, and delete Kubeless functions using this kubeless CLI. Kubeless also has a graphical user interface, which makes the management of the functions much easier.
In this chapter, we will create our first serverless function on Kubernetes using Kubeless. Then, we will invoke this function with multiple mechanisms including HTTP, and PubSub triggers. Once we are familiar with the basics of Kubeless, we will create a more advanced function that can post messages to Slack.
Kubeless Architecture
The Kubeless framework is an extension of the Kubernetes framework, leveraging native Kubernetes concepts such as Custom Resource Definitions (CRDs) and custom controllers. Since Kubeless is built on top of Kubernetes, it can take advantage of all the great features available in Kubernetes, such as self-healing, autoscaling, load balancing, and service discovery.
Note
Custom resources are extensions of the Kubernetes API. You can find more about Kubernetes' custom resources in the official Kubernetes documentation at https://kubernetes.io/docs/concepts/extend-kubernetes/api-extension/custom-resources/.
Let's take a look at the Kubernetes architecture in order to understand the core concepts behind it:

Figure 7.1: Kubeless architecture diagram
The preceding diagram is similar to the standard Kubernetes architecture with Kubernetes masters and nodes. There can be one or more Kubernetes masters that are responsible for overall decision-making in the cluster. Kubernetes nodes are used to host the Kubernetes pods. These pods contain the functions written by the software developers. The source code of the functions will be injected into the pods by the controller using ConfigMaps.
These pods will be managed by the Kubeless controller. During the Kubeless framework installation process, it will launch an in-cluster controller that will continuously watch for function resources. When a function is being deployed, this controller will create relevant services, deployments, and pods with the provided runtime.
The Kubeless framework has three core concepts:
- Functions
- Triggers
- Runtimes
Functions represent the code blocks executed by the Kubeless framework. During the installation, a CRD named functions.kubeless.io will be created to represent the Kubeless functions.
Triggers represent the invocation mechanism of the function. A Kubeless function will be invoked whenever it receives a trigger. A single trigger can be associated with one or many functions. Functions deployed on Kubeless can be triggered using five possible mechanisms:
- HTTP trigger: This executes through HTTP(S)-based invocations such as HTTP GET or POST requests.
- CronJob trigger: This executes through a predefined schedule.
- Kafka trigger: This executes when a message gets published to the Kafka topics.
- NATS trigger: This executes when a message gets published to the NATS topics.
- Kinesis trigger: This executes when records get published to AWS Kinesis data streams.
Runtimes represent different programming languages that can be used to write and execute Kubeless functions. A single programming language will be further divided into multiple runtimes based on the version. As an example, Python 2.7, Python 3.4, Python 3.6, and Python 3.7 are the runtimes supporting the Python programming language. Kubeless supports runtimes in both the stable and incubator stage. A runtime is considered stable once it meets certain technical requirements specified by Kubeless. Incubator runtimes are considered to be in the development stage. Once the specified technical requirements are fulfilled, runtime maintainers can create a "pull" request in the Kubeless GitHub repository to move the runtime from the incubator stage to the stable stage. At the time of writing this book, Ballerina, .NET, Golang, Java, Node.js, PHP, and Python runtimes are available in the stable stage and JVM and Vertx runtimes are available in the incubator stage.
Note
The following document defines the technical requirements for a stable runtime: https://github.com/kubeless/runtimes/blob/master/DEVELOPER_GUIDE.md#runtime-image-requirements.
Creating a Kubernetes Cluster
We need to have a working Kubernetes cluster in order to install the Kubeless framework. You can create your own Kubernetes cluster using tools such as Minikube, Kubeadm, and Kops. You can also create a Kubernetes cluster using the managed Kubernetes cluster services provided by public cloud providers such as Google Kubernetes Engine (GKE), Microsoft's Azure Kubernetes Service (AKS), and Amazon Elastic Kubernetes Service (Amazon EKS). In the following sections, we will create our own Kubernetes cluster using Minikube.
Creating a Kubernetes Cluster with Minikube
First, we are going to create our Kubernetes cluster with Minikube. Minikube is a tool that will install and run Kubernetes locally on your PC. This will create a single-node Kubernetes cluster inside a Virtual Machine (VM). Minikube is used by the software developers who want to try Kubernetes locally, but it is not recommended for running production-grade Kubernetes clusters. We will begin creating our Kubernetes cluster by performing the following steps:
- Install VirtualBox.
Since Minikube is running as a VM, we need to install a hypervisor to support the VMs. We will be installing Oracle VirtualBox, which is a free virtualization software developed by Oracle Corporation.
Note
VirtualBox can be installed on Ubuntu 18.04 with the APT package manager by executing the following command in the terminal:
$ sudo apt install virtualbox -y
- Execute the virtualbox command to start Oracle VM VirtualBox Manager, as shown in the following screenshot:
$ virtualbox

Figure 7.2: Oracle VM VirtualBox Manager
- Install minikube.
Now, we are going to install Minikube version 1.2.0, which is the latest version available at the time of writing this book. First, download the minikube binaries to your local machine:
$ curl -Lo minikube https://storage.googleapis.com/minikube/releases/v1.2.0/minikube-linux-amd64
The output will be as follows:

Figure 7.3: Downloading the Minikube binaries
- Then, add execution permission to the minikube binary:
$ chmod +x minikube
The output is as follows:

Figure 7.4: Adding execution permissions to Minikube binaries
- Finally, move the Minikube binary to the /usr/local/bin/ path location:
$ sudo mv minikube /usr/local/bin/
The result is shown in the following screenshot:

Figure 7.5: Moving the Minikube binaries to the path
- Verify the installation:
$ minikube version
The result is shown in the following screenshot:

Figure 7.6: Verifying the Minikube version
- Start the Minikube cluster with the minikube start command:
$ minikube start
This will create a VM for Minikube in VirtualBox, as follows:

Figure 7.7: Starting Minikube
Now, in the VirtualBox Manager window, you can see a VM named minikube in the running state:

Figure 7.8: Oracle VirtualBox with the Minikube VM
- Install kubectl.
Now, we are going to install kubectl version 1.15.0, which is the latest version available at the time of writing this book. First, download the kubectl binaries to your local machine:
$ curl -LO https://storage.googleapis.com/kubernetes-release/release/v1.15.0/bin/linux/amd64/kubectl
This will show the following output:

Figure 7.9: Downloading the kubectl binaries
- Then, add execution permissions to the Minikube binary:
$ chmod +x kubectl
The following screenshot shows the result:

Figure 7.10: Adding execution permissions to the kubectl binaries
- Finally, move the Minikube binary to the /usr/local/bin/ path location:
$ sudo mv kubectl /usr/local/bin/kubectl
The output is as follows:

Figure 7.11: Moving the kubectl binaries to the path
- Verify the installation:
$ kubectl version
The following will be shown on the screen:

Figure 7.12: Verifying the kubectl version
- Verify that the kubectl CLI is correctly pointed to the Minikube cluster:
$ kubectl get pods
You should see the following output:
Figure 7.13: Verifying that kubectl is pointed to the Minikube cluster
Installing Kubeless
Once the Minikube Kubernetes environment is ready, we can install Kubeless on top of the Kubernetes cluster. Installing Kubeless consists of installing three components:
- The Kubeless framework
- The Kubeless CLI
- The Kubeless UI
The Kubeless framework will install all the extensions on top of Kubernetes to support Kubeless features. This includes CRDs, custom controllers, and deployments. The Kubeless CLI is used to interact with the Kubeless framework for tasks such as deploying functions, invoking functions, and creating triggers. The Kubeless UI is a GUI for the Kubeless framework, which will help you to view, edit, and run functions.
Installing the Kubeless Framework
We are going to install Kubeless version 1.0.3, which is the latest available release at the time of writing this book.
First, we need to create the kubeless namespace using kubectl create namespace. This is the default namespace used by Kubeless to store all its objects:
$ kubectl create namespace kubeless
The result is as follows:

Figure 7.14: Creating the kubeless namespace
In the next step, we will install the Kubeless framework. We will be using one of the YAML manifests provided by Kubeless to install the framework. There are multiple yaml files provided by Kubeless and we have to choose the correct yaml file based on the Kubernetes environment (for example, rbac, non-rbac, or openshift):
$ kubectl create -f https://github.com/kubeless/kubeless/releases/download/v1.0.3/kubeless-v1.0.3.yaml
The screen will display the following:

Figure 7.15: Installing the Kubeless framework
The preceding step will create multiple Kubernetes objects in the kubeless namespace. This will create a function object as a Custom Resource Definition and Kubeless controller as a deployment. You can verify that these objects are up and running by executing the following commands:
$ kubectl get pods -n kubeless
$ kubectl get deployment -n kubeless
$ kubectl get customresourcedefinition
You will see the following on your screen:
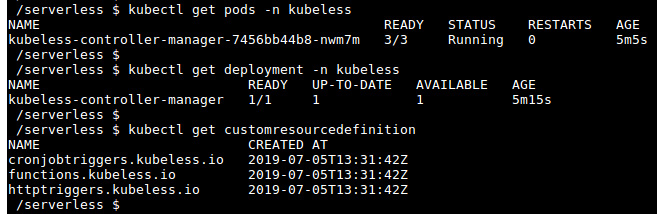
Figure 7.16: Verifying the Kubeless installation
Now, we have completed the installation of the Kubeless framework successfully. In the next section, we will install the Kubeless CLI.
Installing the Kubeless CLI
Kubeless CLI is the command-line interface for running commands against the Kubeless framework. kubeless function is the most common one because it allows you to perform tasks such as deploying, calling, updating, or deleting a function. Additionally, you can list and describe the functions. Checking the logs or metrics is also supported through the kubeless function command. You can also manage Kubeless triggers, topics, and autoscaling from the Kubeless CLI.
Once you have successfully installed the Kubeless framework, the next step is to install the Kubeless CLI. We are going to use Kubeless CLI version 1.0.3, which is the same version as the Kubeless framework we installed in the previous section.
First, we need to download the Kubeless CLI zip file:
$ curl -OL https://github.com/kubeless/kubeless/releases/download/v1.0.3/kubeless_linux-amd64.zip
The result is as follows:

Figure 7.17: Downloading the Kubeless binaries
Next, we will extract the zip file:
$ unzip kubeless_linux-amd64.zip
To understand this better, refer to the following output:

Figure 7.18: Extracting the Kubeless binaries
Then, move the Kubeless executable to the /usr/local/bin/ path location:
$ sudo mv bundles/kubeless_linux-amd64/kubeless /usr/local/bin/
The following is what you'll see on your screen:
Figure 7.19: Moving the Kubeless binaries to the path
Now, we have successfully installed the Kubeless CLI. We can verify this by running the following command:
$ kubeless version
Refer to the following screenshot:
Figure 7.20: Verifying the Kubeless version
The Kubeless UI
The Kubeless UI is the GUI for Kubeless. It allows you to create, edit, delete, and execute Kubeless functions with an easy-to-use UI. Execute the following command to install the Kubeless UI in the Kubernetes cluster:
$ kubectl create -f https://raw.githubusercontent.com/kubeless/kubeless-ui/master/k8s.yaml
This will give you the following output:

Figure 7.21: Installing the Kubeless UI
Once the installation is successful, execute the following command to open the Kubeless UI in a browser window. You can reload the browser window if the Kubeless UI doesn't show up, since creating the service can take a few minutes:
$ minikube service ui --namespace kubeless
This is shown as follows:

Figure 7.22: The Kubeless GUI
We've just completed the installation of the Kubeless UI, which can be used to create, edit, delete, and execute Kubeless functions that are similar to the Kubeless CLI.
Kubeless Functions
Once Kubeless is successfully installed, you can now forget about the underlying infrastructure, including VMs and containers, and focus only on your function logic. Kubeless functions are code snippets written in one of the supported languages. As we discussed previously, Kubeless supports multiple programming languages and versions. You can execute the kubeless get-server-config command to get a list of language runtimes supported by your Kubeless version:
$ kubeless get-server-config
The result is shown in the following screenshot:

Figure 7.23: Kubeless server configuration
In the following sections, we are going to create, deploy, list, invoke, update, and delete a Kubeless function.
Creating a Kubeless Function
Every Kubeless function, regardless of the language runtime, has the same format. It receives two arguments as input and returns a string or object as the response. The first argument of the function is an event, which includes all the information about the event source such as the event ID, event time, and event type. The data field inside the event object contains the body of the function request. The second argument of the function is named context, which contains general information about the function, such as its name, timeout, runtime, and memory limits.
The following is a sample Python function that returns the text Welcome to Kubeless World as the response:
def main(event, context):
return "Welcome to Kubeless World"
You can save the file as hello.py.
Deploying the Kubeless Function
Once the function is ready, you can deploy it to the Kubeless framework. You can use the kubeless function deploy command to register the function with the Kubeless framework. In order to deploy a function, you need to provide few pieces of information, including the function name, the runtime of the function, the file that contains the function source code, and the method name to be executed when the function is invoked:
kubeless function deploy hello --runtime python3.7
--from-file hello.py
--handler hello.main
The output is as follows:

Figure 7.24: Deploying a Kubeless function
Let's break this command up into a few pieces in order to understand what each part of the command does:
- kubeless function deploy hello: This tells Kubeless to register a new function named hello. We can use this name to invoke this function later.
- --runtime python3.7: This tells Kubeless to use the Python 3.7 runtime to run this function.
- --from-file hello.py: This tells Kubeless to use the code available in the hello.py file to create the hello function. If you are not in the current file path when executing the command, you need to specify the full file path.
- --handler hello.main: This specifies the name of the code file and the method to execute when this function is invoked. This should be in the format of <file-name>.<function-name>. In our case, the filename is hello and the function name inside the file is main.
You can find the other options that are available when deploying a function by executing the kubeless function deploy --help command.
Listing the Kubeless Function
Once you deploy the function, you can verify that the function is deployed successfully by listing the functions with the kubeless function list command. You should see the details of all the registered functions as follows:
$ kubeless function list
The following screenshot reflects the result:

Figure 7.25: Listing the Kubeless functions with the Kubeless CLI
Note
The same can be achieved using the kubeless function ls command.
If you wish to obtain more detailed information about a specific function, you can use the kubeless function describe command:
$ kubeless function describe hello
It produces the following output:

Figure 7.26: Describing a Kubeless function
Since a Kubeless function is created as a Kubernetes object (that is, a custom resource), you can also use the Kubectl CLI to get the information about the available functions. The following is the output from the kubectl get functions command:
$ kubectl get functions
You will get the following output:

Figure 7.27: Listing the Kubeless functions with the kubectl CLI
Invoking the Kubeless Function
Now it's time to invoke our hello function. You can use the kubeless function call method to invoke the Kubeless function. The hello function will return the text Welcome to Kubeless World as the response:
$ kubeless function call hello
The output will be as follows:
Figure 7.28: Invoking a Kubeless function with the kubeless CLI
Congratulations! You have successfully executed your first Kubeless function.
You can also invoke Kubeless functions with the Kubeless UI. Once you open the Kubeless UI, you can see the list of functions available on the left-hand side. You can click on the hello function to open it. Then, click on the Run function button to execute the function. You can see the expected response of Welcome to Kubeless World underneath the Response section:
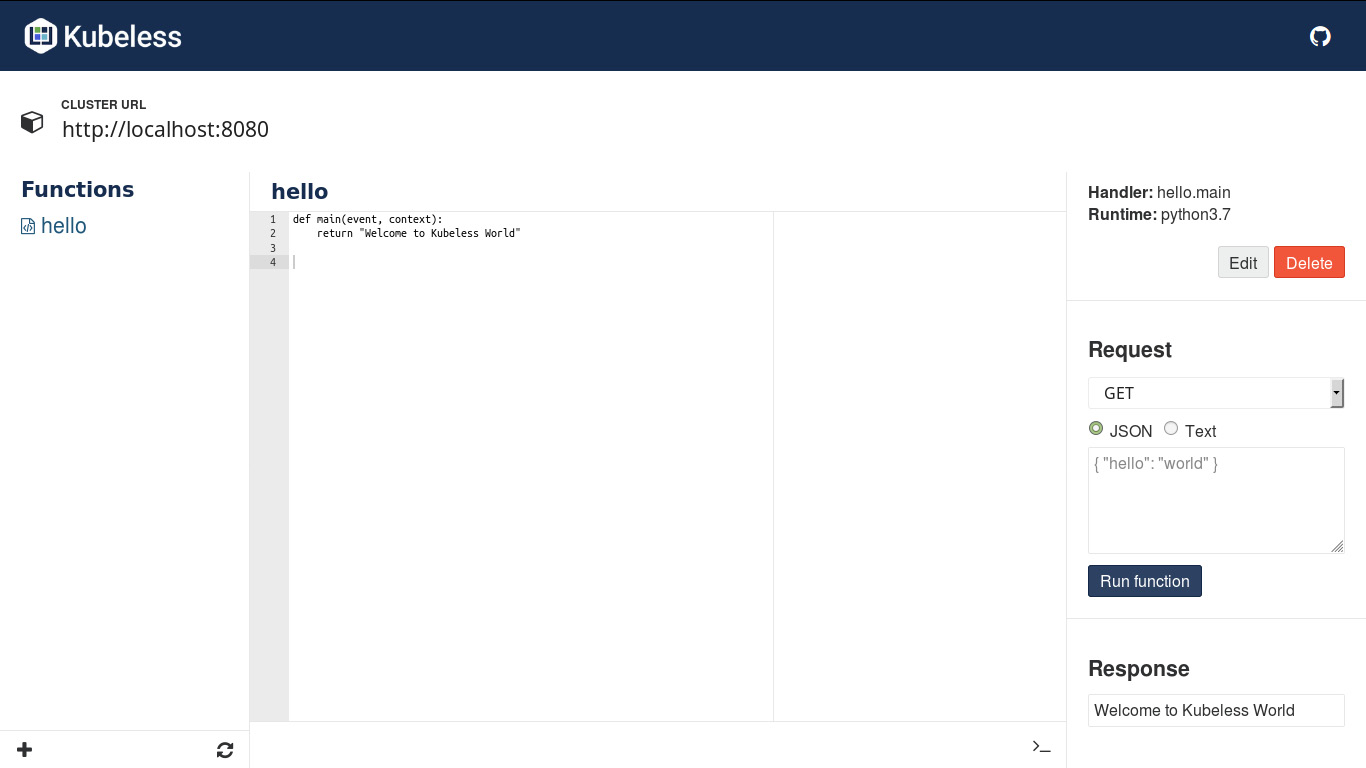
Figure 7.29: Invoking a Kubeless function with the Kubeless UI
Note
Kubeless functions can also be updated or deleted using the Kubeless UI.
Updating the Kubeless Function
After successfully invoking our hello function, we are now going to update it to say hello to anyone. You can update the hello.py file as follows:
def main(event, context):
name = event['data']['name']
return "Hello " + name
You can then execute the kubeless function update command to update the hello function that we created earlier:
$ kubeless function update hello --from-file hello.py
This will give the following output:

Figure 7.30: Updating a Kubeless function with the Kubeless CLI
Now you have to pass the required data when invoking the hello function:
$ kubeless function call hello --data '{"name":"Kubeless World!"}'
This is the output of the preceding code:

Figure 7.31: Invoking updated Kubeless functions
You should be able to see Hello Kubeless World! as the output of the preceding command.
Deleting the Kubeless Function
If you want to delete the function, you can execute the kubeless function delete command:
$ kubeless function delete hello
This renders the following:
Figure 7.32: Deleting the kubeless function
Once the function is deleted, try listing the function again. It should throw an error, as follows:
$ kubeless function list hello
We would see the following result:
Figure 7.33: Verifying the deletion of the kubeless function
The preceding kubeless function delete command will delete not only the kubeless function, but, while creating the Kubeless function, the framework creates Kubernetes objects such as pods and deployment. Those objects will also be deleted when we delete the kubeless function. You can verify this with the following command:
$ kubectl get pods -l function=hello
You can see the result as follows:

Figure 7.34: Verifying the deletion
Now we have learned how to create, deploy, list, invoke, update, and delete Kubeless functions. Let's move on to an exercise about creating your first Kubeless function.
Exercise 21: Creating Your First Kubeless Function
In this exercise, we will create, deploy, invoke, and later delete a Kubeless function. Perform the following steps to complete the exercise:
Note
The code files for this exercise can be found at https://github.com/TrainingByPackt/Serverless-Architectures-with-Kubernetes/tree/master/Lesson07/Exercise21.
- Create a file with a sample hello function:
$ cat <<EOF >my-function.py
def main(event, context):
return "Welcome to Serverless Architectures with Kubernetes"
EOF
This will render the following output:

Figure 7.35: Creating the my-function.py file
- Create the lesson-7 namespace and deploy the my-function.py file created previously:
$ kubectl create namespace lesson-7
$ kubeless function deploy my-function --runtime python3.7
--from-file my-function.py
--handler my-function.main
--namespace lesson-7
The output is as follows:

Figure 7.36: Deploying my-function
- Verify whether my-function has been deployed correctly:
$ kubeless function list my-function --namespace lesson-7
The output rendered is as follows:

Figure 7.37: Verifying my-function has successfully deployed
- Invoke my-function with the kubeless CLI:
$ kubeless function call my-function --namespace lesson-7
It will look like this:

Figure 7.38: Invoking my-function with the Kubeless CLI
- Delete my-function and the lesson-7 namespace:
$ kubeless function delete my-function --namespace lesson-7
$ kubectl delete namespace lesson-7
The following is what we get:
Figure 7.39: Deleting my-function with the Kubeless CLI
In this exercise, first, we created a simple Python function, which returned the Welcome to Serverless Architectures with Kubernetes string as the output and deployed it to Kubeless. Then, we listed the function to make sure it was created successfully. Then, we invoked the my-function and successfully returned the expected response of Welcome to Serverless Architectures with Kubernetes. Finally, we did the cleanup by deleting the function.
Kubeless HTTP Triggers
In the previous sections, we discussed how to invoke Kubeless functions using the Kubeless CLI. In this section, we are going to demonstrate how to expose these functions to everyone by creating HTTP triggers.
HTTP triggers are used to execute a Kubeless function through HTTP(S)-based invocations such as HTTP GET or POST requests. When a function is deployed, Kubeless will create a Kubernetes service associated with the function with the ClusterIP as the service type; however, these services are not publicly accessible. In order to make the function publicly available, we need to create a Kubeless HTTP trigger. This will expose the Kubeless functions to everyone by using Kubernetes ingress rules.
In order to run the HTTP trigger, your Kubernetes cluster must have a running ingress controller. Once the ingress controller is running in the Kubernetes cluster, you can use the kubeless trigger http create command to create an HTTP trigger:
$ kubeless trigger http create <trigger-name> --function-name <function-name>
--function-name flag is used to specify the name of the function that will be associated with the HTTP trigger.
Note
There is a number of ingress controller add-ons available for Kubernetes, including NGINX, Kong, Traefik, F5, Contour, and more. You can find them at https://kubernetes.io/docs/concepts/services-networking/ingress-controllers/.
Exercise 22: Creating an HTTP Trigger for a Kubeless Function
In this exercise, we will first enable the ingress plugin for Minikube. Then, we will create a function to be executed with HTTP triggers. Finally, we will create an HTTP trigger and invoke this function with the HTTP trigger.
Note
The code files for this exercise can be found at https://github.com/TrainingByPackt/Serverless-Architectures-with-Kubernetes/tree/master/Lesson07/Exercise22.
Perform the following steps to complete the exercise:
- First, we need to enable the ingress add-on in our Minikube cluster:
$ minikube addons enable ingress
This shows the following output:

Figure 7.40: Enabling the Minikube add-on
- After a couple of minutes, you should be able to see that the nginx-ingress-controller container has been created in the kube-system namespace, which is the namespace for the object created by the Kubernetes system:
$ kubectl get pod -n kube-system -l app.kubernetes.io/name=nginx-ingress-controller
It shows the following:

Figure 7.41: Listing the nginx-ingress-controller pod
- Once the nginx-ingress-controller container is in a running state, we will create the function to be executed with the HTTP trigger. Create a Python file named greetings.py with the following content:
import datetime as dt
def main(event, context):
currentHour = dt.datetime.now().hour
greetingMessage = ''
if currentHour < 12:
greetingMessage = 'Hello, Good morning!'
elif currentHour < 18:
greetingMessage = 'Hello, Good afternoon!'
else:
greetingMessage = 'Hello, Good evening!'
return greetingMessage
- Create the lesson-7 namespace and deploy the greetings.py created earlier:
$ kubectl create namespace lesson-7
$ kubeless function deploy greetings --runtime python3.7
--from-file greetings.py
--handler greetings.main
--namespace lesson-7
Refer to the following output:

Figure 7.42: Executing the function with an HTTP trigger
- Invoke the function and verify that the function is providing the expected output:
$ kubeless function call greetings --namespace lesson-7
Once invoked, the screen will display the following:

Figure 7.43: Output for function
- Now we can create the http trigger for the hello function:
$ kubeless trigger http create greetings
--function-name greetings
--namespace lesson-7
The result is as follows:

Figure 7.44: Creating the HTTP trigger
- List the http triggers; you should be able to see the http trigger for the hello function:
$ kubeless trigger http list --namespace lesson-7
The list will look something like this:

Figure 7.45: Listing the HTTP triggers
- This will create an ingress object in the Kubernetes layer. We can list the ingress objects with the kubectl CLI:
$ kubectl get ingress --namespace lesson-7
This will return the following:

Figure 7.46: Listing ingress objects
- You can see the hostname with the .nip.io domain, which we can use to access the greetings function over HTTP.
In this case, the hostname is greetings.192.168.99.100.nip.io. Once you open this hostname in a web browser, you should be able to see the greeting message in the browser window (note that your output may be different depending on your local time):

Figure 7.47: Invoking the function with the HTTP GET request
Kubeless PubSub Triggers
Kubeless functions can be invoked by sending input messages to topics in messaging systems. This method is known as a PubSub mechanism. Currently, Kubeless supports two messaging systems, namely, Kafka and NATS.
In order to create PubSub triggers in Kubeless, we need to have a running Kafka cluster or NATS cluster. Once the Kafka or NATS cluster is ready, we can use kubeless trigger kafka create to create a Kafka trigger or kubeless trigger nats create to create a NATS trigger and associate our PubSub function with the new trigger:
$ kubeless trigger <trigger-type> create <trigger-name>
--function-selector <label-query>
--trigger-topic <topic-name>
Let's discuss what each piece of the command does:
- kubeless trigger <trigger-type> create <trigger-name>: This tells Kubeless to create a PubSub trigger with the provided name and trigger type. Valid trigger types are kafka and nats.
- --function-selector <label-query>: This tells us which function should be associated with this trigger. Kubernetes labels are used to define this relationship (for example, --function-selector key1=value1,key2=value2).
- --trigger-topic <topic-name>: The Kafka broker will listen to this topic and the function will be triggered when a message is published to it.
The topic is where messages from the producers get published. The Kubeless CLI allows us to create topics using the kubeless topic command. This allows us to create, delete, list topics, and publish messages to topics easily.
Exercise 23: Creating a PubSub Trigger for a Kubeless Function
In this exercise, we will first create a Kafka and Zookeeper cluster within our Minikube environment. Once the Kafka and Zookeeper clusters are ready, we will create a function to be executed with PubSub triggers. Next, we will create the PubSub topic. Publishing messages to the created topic will execute the Kubeless function. Perform the following steps to complete the exercise.
Let's invoke a Kubeless function with the PubSub mechanism using Kafka:
- First, we are going to deploy Kafka and Zookeeper to our Kubernetes cluster:
$ kubectl create -f https://github.com/kubeless/kafka-trigger/releases/download/v1.0.2/kafka-zookeeper-v1.0.2.yaml
The output will look like the following:

Figure 7.48: Installing Kafka and Zookeeper
- Verify that two statefulset named kafka and zoo are running in the kubeless namespace for Kafka and Zookeeper:
$ kubectl get statefulset -n kubeless
$ kubectl get services -n kubeless
$ kubectl get deployment -n kubeless
The following output is seen:

Figure 7.49: Verifying the Kafka and Zookeeper installation
- Once our Kafka and Zookeeper deployment is ready, we can create and deploy the function to be triggered by PubSub triggers. Create a file named pubsub.py and add the following content:
def main(event, context):
return "Invoked with Kubeless PubSub Trigger"
- Let's deploy our function now:
$ kubeless function deploy pubsub --runtime python3.7
--from-file pubsub.py
--handler pubsub.main
The deployment will yield the following:

Figure 7.50: Deploying the pubsub function
- Once the function is deployed, we can verify the function is successful by listing the function:
$ kubeless function list pubsub
The listed function will be as follows:

Figure 7.51: Verifying the pubsub function
- Now, let's create the kafka trigger with the kubeless trigger kafka create command and associate our pubsub function with the new trigger:
$ kubeless trigger kafka create my-trigger
--function-selector function=pubsub
--trigger-topic pubsub-topic
It will look as follows:

Figure 7.52: Creating the kafka trigger for the pubsub function
- Now we need a Kubeless topic to publish the messages. Let's create a topic with the kubeless topic create command. We need to make sure that the topic name is similar to the one we provided as the --trigger-topic while creating the kafka trigger in the previous step:
$ kubeless topic create pubsub-topic
- Okay. Now it's time to test our pubsub function by publishing events to pubsub-topic:
$ kubeless topic publish --topic pubsub-topic --data "My first message"
- Check the logs function to verify whether the pubsub function is successfully invoked:
$ kubectl logs -l function=pubsub
You should see the published message in the output logs:
...
My first message
...
To understand this better, check out the following output:
Figure 7.53: Logs of the pubsub function
Monitoring a Kubeless Function
When we have successfully deployed our Kubeless function, we then need to monitor our function. This can be achieved with the kubeless function top command. This command will provide us with the following information:
- NAME: The name of the Kubeless function
- NAMESPACE: The namespace of the function
- METHOD: The HTTP method type (for example, GET/POST) when invoking the function
- TOTAL_CALLS: The total number of invocations
- TOTAL_FAILURES: The number of function failures
- TOTAL_DURATION_SECONDS: The total number of seconds this function has executed
- AVG_DURATION_SECONDS: The average number of seconds this function has executed
- MESSAGE: Any other messages
The following is the kubeless function top output for the hello function:
$ kubeless function top hello
The output will be as follows:

Figure 7.54: Viewing the metrics for the hello function
Now that we've monitored the function, it's time to move toward debugging it.
Debugging a Kubeless Function
A Kubeless function can fail at different stages of the function life cycle (for example, from deployment time to function execution time) due to a number of reasons. In this section, we are going to debug a function to identify the cause of failure.
In order to demonstrate multiple error scenarios, first, we are going to create a sample function with the following code block in the debug.py file:
def main(event, context)
name = event['data']['name']
return "Hello " + name
Error Scenario 01
Now, let's try to deploy this function using the kubeless function deploy command:
$ kubeless function deploy debug --runtime python
--from-file debug.py
--handler debug.main
This will result in Invalid runtime error and Kubeless will display the supported runtimes. Upon further inspection, we can see that there is a typo in the --runtime parameter of the kubeless function deploy command.
The resulting output would look like this:

Figure 7.55: Deploying the debug function – error
Let's correct this typo and rerun the kubeless function deploy command with the python3.7 runtime:
$ kubeless function deploy debug --runtime python3.7
--from-file debug.py
--handler debug.main
This time, the function will be successfully deployed into the Kubeless environment. It should look like the following:

Figure 7.56: Deploying the debug function – successful
Error Scenario 02
Now, let's check the status of the function using the kubeless function ls command:
$ kubeless function ls debug
To understand this better, refer to the following output:

Figure 7.57: Listing the debug function
You can see that the status is 0/1 NOT READY. Now, let's check the status of the debug pod using the kubectl get pods command:
$ kubectl get pods -l function=debug
Now, refer to the following screenshot for the output:
Figure 7.58: Listing the debug function pods
Here, debug pod is in CrashLoopBackOff status. This error commonly occurs due to either a syntax error in the function or the dependencies that we specify.
On closer inspection, we could identify that a colon (:) to mark the end of the function header is missing.
Let's correct this and update our function.
Open the debug.py file and add a colon at the end of the function header:
def main(event, context):
name = event['data']['name']
return "Hello " + name
We will now execute the kubeless function update command to update the function with the new code file:
$ kubeless function update debug --from-file debug.py
The output is as follows:

Figure 7.59: Updating the debug function
When you execute the kubeless function ls debug again, you should be able to see that the function is now ready with the 1/1 READY status:

Figure 7.60: Listing the debug function
Error Scenario 03
Let's create an example error scenario with our hello function. For this, you can call the hello function by replacing the key name of the data section with username:
$ kubeless function call debug --data '{"username":"Kubeless"}'
Now, let's see how it looks on the screen:

Figure 7.61: Invoking the debug function – error
In order to find the possible cause for this failure, we need to check the function logs. You can execute the kubeless function logs command to view the logs of the hello function:
$ kubeless function logs debug
The output would look as follows:

Figure 7.62: Checking the debug function logs
The first few lines of the output show lines similar to the following code block, which are internal health checks. As per the logs, we can see that all the calls to the /healthz endpoint have been successful with the 200 HTTP success response code:
10.56.0.1 - - [03/Jul/2019:13:36:17 +0000] "GET /healthz HTTP/1.1" 200 2 "" "kube-probe/1.12+" 0/120
Next, you can see a stack trace of the error messages, as follows, with the possible cause being the KeyError: 'name' error. The function was expecting a 'name' key, which was not found during the function execution:
Traceback (most recent call last):
File "/usr/local/lib/python3.7/dist-packages/bottle.py", line 862, in _handle
return route.call(**args)
File "/usr/local/lib/python3.7/dist-packages/bottle.py", line 1740, in wrapper
rv = callback(*a, **ka)
File "/kubeless.py", line 86, in handler
raise res
KeyError: 'name'
The last line of the error message indicates that HTTP error 500 was returned for the function call:
10.56.0.1 - - [03/Jul/2019:13:37:29 +0000] "POST / HTTP/1.1" 500 739 "" "kubeless/v0.0.0 (linux/amd64) kubernetes/$Format" 0/10944
Note
HTTP 500 is the error code returned by the HTTP protocol, which indicates an Internal Server Error. This means that the server was unable to fulfill the request due to unexpected conditions.
Apart from kubeless function logs, you can also use the kubectl logs command, which will return a similar output. You need to pass the -l parameter, which indicates a label, in order to only get the logs for a specific function:
$ kubectl logs -l function=hello
The following will be the output:

Figure 7.63: Checking the debug function logs
Use the kubectl get functions --show-labels command to see the labels associated with the Kubeless functions.
This will yield the following:
Figure 7.64: Listing the function labels
Let's correct our mistake and pass the correct argument to the debug function:
$ kubeless function call debug --data '{"name":"Kubeless"}'
Now our function has run successfully and has generated Hello Kubeless as its output:
Figure 7.65: Invoking the debug function – successful
Serverless Plugin for Kubeless
The Serverless Framework is a general framework for deploying serverless applications across different serverless providers. The serverless plugin for Kubeless supports deploying Kubeless functions. Apart from the plugin for Kubeless, the Serverless Framework supports serverless applications such as AWS Lambda, Azure Functions, Google Cloud Functions, Apache OpenWhisk, and Kubeless.
In this section, we will install the serverless framework and create a Kubeless function using the CLI provided by the serverless framework.
Before we start installing the serverless framework, we need to have Node.js version 6.5.0 or later installed as a prerequisite. So, first, let's install Node.js:
$ curl -sL https://deb.nodesource.com/setup_12.x | sudo -E bash -
$ sudo apt-get install nodejs -y
The output is as follows:

Figure 7.66: Node.js version 6.5.0 installation
Once installed, verify the Node.js version by executing the following command:
$ nodejs -v
Here is the output:
Figure 7.67: Node.js version verification
Once the Node.js installation is successful, we will then install the Serverless Framework by executing the following command:
$ sudo npm install -g serverless
Next, we will verify the serverless version:
$ serverless -v
Check the output, as follows:
Figure 7.68: Serverless version verification
We have successfully completed the installation of the Serverless Framework. We can now start creating functions with it.
We can use the serverless create command to create a basic service from a template. Let's create a project named my-kubeless-project, as follows:
$ serverless create --template kubeless-python --path my-kubeless-project
Let's break the command into pieces in order to understand it:
- --template kubeless-python: Currently, two templates are available for the Kubeless framework. kubeless-python creates a Python function and kubeless-nodejs creates a Node.js function.
- --path my-kubeless-project: This defines that this function should be created under the my-kubeless-project directory. Take a look at the output to understand it better:

Figure 7.69: Creation of my-kubeless-project
This command will create a directory named my-kubeless-project and several files within this directory. First, let's move to the my-kubeless-project directory by executing the following command:
$ cd my-kubeless-project
The following files are in the my-kubeless-project directory:
- handler.py
- serverless.yml
- package.json
The handler.py file contains a sample Python function, as follows. This is a simple function that returns a JSON object and the status code of 200:
import json
def hello(event, context):
body = {
"message": "Go Serverless v1.0! Your function executed successfully!",
"input": event['data']
}
response = {
"statusCode": 200,
"body": json.dumps(body)
}
return response
It also creates a serverless.yml file, which tells the serverless framework to execute the hello function inside the handler.py file. In the provider section, it is mentioned that this is a Kubeless function with a python2.7 runtime. In the plugins section, it defines the custom plugins required, such as the serverless-kubeless plugin:
# Welcome to Serverless!
#
# For full config options, check the kubeless plugin docs:
# https://github.com/serverless/serverless-kubeless
#
# For documentation on kubeless itself:
# http://kubeless.io
# Update the service name below with your own service name
service: my-kubeless-project
# Please ensure the serverless-kubeless provider plugin is installed globally.
# $ npm install -g serverless-kubeless
#
# ...before installing project dependencies to register this provider.
# $ npm install
provider:
name: kubeless
runtime: python2.7
plugins:
- serverless-kubeless
functions:
hello:
handler: handler.hello
Finally, the package.json file contains the npm packaging information, such as dependencies:
{
"name": "my-kubeless-project",
"version": "1.0.0",
"description": "Sample Kubeless Python serverless framework service.",
"dependencies": {
"serverless-kubeless": "^0.4.0"
},
"scripts": {
"test": "echo "Error: no test specified" && exit 1"
},
"keywords": [
"serverless",
"kubeless"
],
"author": "The Kubeless Authors",
"license": "Apache-2.0"
}
You can update these files as required to match your business requirements. We are not going to change these files in this example.
Now, we are going to execute the npm install command, which installs all npm dependencies, such as the kubeless-serverless plugin:
$ npm install
The output for this is as follows:

Figure 7.70: Installing the npm dependencies
Once the dependencies are ready, let's deploy the service:
$ serverless deploy -v
Deploying the service provides us with the following output:

Figure 7.71: Deploying the service
Then, we can deploy the function using the following command:
$ serverless deploy function -f hello
The following screenshot shows the output:

Figure 7.72: Deploying the function
When the function is successfully deployed, we can invoke the function with the serverless invoke command:
$ serverless invoke --function hello -l
Invoking the function renders the following output:

Figure 7.73: Invoking the function
You can also use the kubeless function call command to invoke this function:
$ kubeless function call hello
Doing this will provide the following output:

Figure 7.74: Using the kubeless function call to invoke the function
Once you are done with the function, use serverless remove to delete the function:
$ serverless remove
Here is the output of the preceding code:
Figure 7.75: Deleting the function
Note
Execute the serverless logs -f hello command if you encounter any errors while invoking the function.
Activity 7: Publishing Messages to Slack with Kubeless
Imagine that you need a Slackbot to post messages to your Slack channel. This Slackbot should be able to post messages to a specific Slack channel using the incoming webhook integration method. This bot will print a success message if posting the message to Slack was successful; otherwise, it will print an error message if there were any errors while sending the message to Slack. In this activity, we will be creating a Kubeless function that can post messages to a specific Slack channel.
As a prerequisite to this activity, we need to have a Slack workspace with incoming webhook integration. Execute the following steps to create a Slack workspace and integrate the incoming webhook:
Solution-Slack Setup
- Create a Slack workspace.
- Visit https://slack.com/create to create a workspace. Enter your email address and then click on Create.
- You should receive a six-digit confirmation code to the email that you entered on the previous page. Enter the received code on the workspace.
- Add suitable names for our workspace and Slack channel.
- You will be asked to fill in email IDs for others who are collaborating on the same project. You can either skip this section or fill in the details and then continue.
- Now that your Slack channel is ready, click on See Your Channel in Slack.
- Once clicked, we should see our channel.
- Now we are going to add the Incoming Webhook app to our Slack. From the left menu, select Add apps under the Apps section.
- Enter Incoming Webhooks in the search field and then click on Install for Incoming Webhook app.
- Click on Add Configuration.
- Click on Add Incoming WebHooks Integration.
- Save the webhook URL. We will need this when we are writing the Kubeless function.
Note
The detailed steps on creating a Slack workspace with incoming webhook integration, along with the corresponding screenshots, are available on page 422.
Now we are ready to start the activity. Execute the following steps to complete this activity:
Activity Solution
- Create a function in any language (supported by Kubeless) that can post messages to Slack. In this activity, we will write a Python function that performs the following steps.
- Use the requests library as a dependency.
- Send a POST request to the incoming webhook (created in step 2) with an input message.
- Print the response of the post request,
- Deploy the function to the Kubeless framework.
- Invoke the function.
- Go to your Slack workspace and verify that the message was successfully posted to the Slack channel. The final output should look like this:

Figure 7.76: Verifying whether the message was successfully posted
Note
The solution to the activity can be found on page 422.
Summary
In this chapter, we learned how to deploy a single-node Kubernetes cluster with Minikube. Then, we installed the Kubeless framework, Kubeless CLI, and Kubeless UI on top of our Minikube cluster. Once the Kubernetes cluster and Kubeless framework were ready, we created our first Kubeless function with Python and deployed it to Kubeless. Then, we discussed multiple ways of invoking Kubeless functions, namely with the Kubeless CLI, the Kubeless UI, HTTP triggers, scheduled triggers, and PubSub triggers. Next, we discussed how to debug common error scenarios that we encounter while deploying Kubeless functions. Then, we discussed how we can use the serverless framework to deploy a Kubeless function. Finally, in the activity, we learned how we can use a Kubeless function to send messages to a Slack channel.
In the next chapter, we shall introduce OpenWhisk, and cover OpenWhisk actions and triggers.