6
Deploying a Fargate Windows-Based Task
In this chapter, we will learn about serverless Windows containers powered by AWS Fargate. First, we will dive deep into how Fargate works, followed by its benefits and Windows use cases. Next, we will understand how Fargate Windows-based tasks behave differently from Linux and what needs to be considered when planning serverless Windows containers. By the end, we will deploy a Fargate Windows-based task into the existing ECS cluster we provisioned in Chapter 4. This chapter will cover the following topics:
- AWS Fargate overview
- Planning for serverless Windows containers
- AWS Fargate Windows-based task use cases
- Scheduling a Fargate Windows-based task definition with Terraform
Technical requirements
In the Scheduling a Fargate Windows-based task definition with Terraform section, you will need to have the following technologies installed and have expertise in them:
- The AWS CLI
- The Terraform CLI
- An IAM user account attached with AmazonECS_FullAccess and IAMFullAccess managed policies
- Terraform development expertise
You can find the source code used in this chapter in this book’s GitHub repository: https://github.com/PacktPublishing/Running-Windows-Containers-on-AWS/tree/main/ecs-fargate-windows.
Important note
It is strongly recommended that you use an AWS test account to perform the activities described in this book and never use it against your production environment.
AWS Fargate overview
AWS Fargate is a purpose-built pay-as-you-go serverless compute engine that allows you to run containers. By running Windows containers on Fargate, you can focus on building and improving your applications instead of managing and operationalizing ECS Windows container instances, such as patching, monitoring, hardening, capacity planning, and scaling. When scheduling your Fargate Windows-based task, under the hood, AWS launches a new EC2 Windows per task in a controlled environment and exposes it in your account through an ENI:
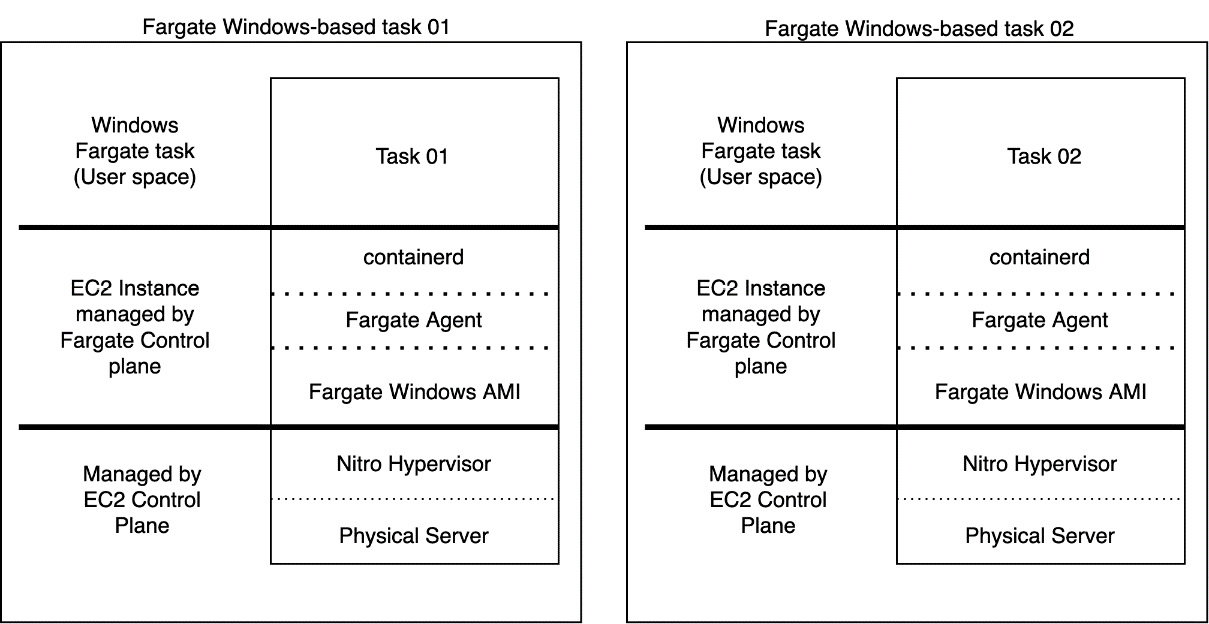
Figure 6.1 – Fargate Windows-based task architecture
Did you realize that each task runs on a separate EC2 Windows instance? Each task provides kernel isolation by default, without the need to use Hyper-V isolation mode on Windows containers, improving container performance and reducing resource consumption on the host. Let’s dive deep into process isolation and Hyper-V isolation mode, which are the options available to run Windows containers natively, and how Fargate differs from these two.
Process isolation mode
Process isolation is the default and only mode supported on EC2 Windows-based tasks. With process isolation mode, multiple containers run on the same ECS Windows container instance, sharing the same kernel, but isolated by namespaces and resource groups:

Figure 6.2 – EC2 Windows-based task with process isolation
When running Windows containers with process isolation, these are some of the namespaces that are isolated on a per-container basis:
- The filesystem
- Network ports
- The Object Manager namespace
- The process and thread ID space
- The registry
Hyper-V isolation mode
Hyper-V isolation mode provides kernel isolation on a per-container basis. This provides an additional security layer as each container within the same host runs inside its highly optimized Windows virtual machine. The downside is that part of the compute resource available in the host is spent on these highly optimized Windows virtual machines:

Figure 6.3 – Windows containers with Hyper-V isolation
This mode isn’t supported on Amazon ECS, but here is where Fargate comes in – that is, when kernel isolation and high performance are required without the nested virtualization performance penalty. As mentioned earlier, each Fargate task is an entirely new EC2 Windows instance.
Important note
Hyper-V isolation mode isn’t supported on Amazon ECS; the explanation in the previous sections was just for learning purposes.
Planning for serverless Windows containers
When planning for serverless Windows containers with AWS Fargate, we need to understand how Fargate behaves with Windows, such as regarding task start-up, pull time, and limitations; these will define whether Fargate Windows-based tasks are a go or no-go solution for you. So, let’s dive deep into each aspect of it.
Fargate Windows-based task start-up time
To understand the Fargate Windows-based task start-up time, we need to understand Windows System Preparation (Sysprep) and AWS Windows faster launching.
Sysprep is a process on Windows that removes PC-specific information from the registry, such as the security identifier (SID). The SID uniquely identifies any entity in a Windows-based network, including users, groups, computer accounts, and more. The process of removing these pieces of information is called generalizing, and it is used during Windows OS image creation.
When planning to deploy Windows Server at scale, companies use OS-prepared images so that they can quickly launch virtual machines in any environment – be it the cloud, on-premises, VMware, Hyper-V, or elsewhere. When these OS-prepared images launch the Windows virtual machine, Sysprep kicks in and starts the process of randomly creating SIDs that were previously removed during the OS image creation. Therefore, Sysprep’s time to create and assign this PC-specific information, including SIDs, may take several minutes.
AWS Windows faster launching is an AWS secret sauce that drastically eliminates the several minutes implied by the Sysprep process, allowing customers to launch an EC2 Windows up to 65% faster than a standard Windows launch. This feature is enabled per AMI basis, and you can choose how many EC2 Windows instances you will launch during an hour, so the AWS EC2 control plane can be prepared when it's time to scale out.
As we learned in the previous section, each Fargate Windows-based task is a new EC2 Windows instance, under the hood. So, each Fargate Windows-based task must deal with the Windows start-up boot time (the Sysprep process). Then, it is fine-tuned with AWS Windows faster launching in the Fargate control plane to come up with a new EC2 Windows instance as quickly as possible to accommodate your task.
Important note
Remember, it wouldn’t be fair to compare the start-up boot time with Fargate Linux-based tasks since each OS behaves differently. Also, it doesn’t add any value comparing both, as we won’t address any Windows-specific needs with a Linux-based task.
Fargate Windows-based task image pull time
Most Windows container applications are .NET Framework-based, meaning a chain of container image layers needs to be available if you wish to have the required libraries for your application. The sum of these layers usually results in a 5 GB container image size on average.
When launching a Fargate Windows-based task, AWS already caches windows/servercore:ltsc2019 and windows/nanoserver:ltsc2019 as part of the Fargate AMI. Assuming we will launch a task to run an ASP.NET Framework application, this would be the pull and extraction process:

Figure 6.4 – AWS Fargate image-pulling process
It is common to hear customers complaining about Fargate Windows-based tasks taking more than 6 minutes to reach Running status. Still, as we can see, this is mostly due to external framework layers that need to be pulled and extracted. Due to the Windows container image sizes, a wait of 6 minutes or more is to be expected. This drives us to the next section, which explores whether Fargate Windows-based tasks are the right choice for your workload based on what we have learned so far.
AWS Fargate Windows-based task use cases
Architecting a solution to run on Fargate Windows-based tasks requires us to go through simple questions to identify whether Fargate is the right solution for the application:
- Does my application need to be quickly available?: Usually, we assume containers must start quickly, which is one of the beauties of the technology. However, we must understand how this application affects the business. Can my business afford a wait time of 6 minutes or more to start an application? Maybe for an external-facing core application, it can’t, but how about an intranet or an internal application that doesn’t directly affect your business revenue? Please don’t assume that a containerized application must be highly available and start as quickly as possible without understanding how it impacts your business. Ultimately, it is all about the business needs; without considering those, the choice of technology will be redundant.
If it can afford the start-up time implied by the Fargate Windows-based task, it still may be an option; otherwise, use an EC2 Windows-based task that can cache images and start your containers in a matter of seconds.
- Does the application require Active Directory integration?: At the time of writing, Fargate Windows-based tasks don’t support Active Directory integration, a standard authentication method on Windows-based networks. If this is a requirement for your application, the Fargate Windows task isn’t the right choice for this application, and you should pursue the EC2 Windows-based task implementation.
- Does the application require persistent storage?: At the time of writing, Fargate Windows-based tasks don’t support Amazon FSx for Windows File Server or Amazon EBS as persistent storage. However, some applications locally save data output for further processing. If this is a requirement for your application, you have the option to implement an AWS SDK as part of your application to save the data output to an Amazon S3 bucket or elsewhere. Otherwise, the Fargate Windows-based task isn’t the right choice for this application.
Scheduling a Fargate Windows-based task definition with Terraform
In Chapter 5, Deploying an EC2 Windows-Based Task, in the Scheduling an EC2 Windows-based task with Terraform section, we created an EC2-based task definition, ECS service, an Auto Scaling group, and an application load balancer (ALB) to handle the traffic.
In this chapter, we will see how easy it is to accomplish the same results using Fargate Windows-based tasks. Some configurations were removed or changed compared to the Terraform code shown in Chapter 5, as we don’t rely on managing EC2 instances or Auto Scaling groups. It is simpler!
Important note
You will see code snippets for the remainder of this section. The full Terraform code for this chapter can be found at https://github.com/PacktPublishing/Running-Windows-Containers-on-AWS/tree/main/ecs-fargate-windows.
Deploying a Fargate Windows-based task definition
In this first step, we will create the Fargate Windows-based task definition, which hosts a default IIS sample application. You may notice I’m using many variables to make the code more dynamic. You can check the values in the variables.tf file in this book’s GitHub repository:
resource "aws_ecs_task_definition" "fargate_task_definition_iis" {
  family                   = var.fargate_task_definition_name
  requires_compatibilities = ["FARGATE"]
  network_mode             = "awsvpc"
  cpu                      = var.fargate_task_definition_cpu
  memory                   = var.fargate_task_definition_memory
  execution_role_arn       = aws_iam_role.ecsTaskExecutionRole.arn
  task_role_arn            = aws_iam_role.ecsTaskExecutionRole.arn
  container_definitions = jsonencode([{
    name      = "iis_fargate"
    image     = "${var.fargate_task_definition_image}"
    essential = true
    portMappings = [{
      protocol      = "tcp"
      containerPort = 80
      hostPort      = 80
    }]
    }]
  )
  runtime_platform {
    operating_system_family = "WINDOWS_SERVER_2019_CORE"
    cpu_architecture        = "X86_64"
  }
}
Something that differs from the previous EC2 Windows-based task is that Fargate uses awsvpc, so we need to add the proper porting mappings. Then, we also need to add a runtime_platform, which can be either WINDOWS_SERVER_2019_CORE or WINDOWS_SERVER_2019_FULL.
Deploying an ECS service
Now, we will create an ECS service to host the Fargate Windows-based task. This service will ensure we have at least one task always running:
resource "aws_ecs_service" "ecs_fargate" {
  name                   = var.ecs_service_name
  cluster                = aws_ecs_cluster.ecs_windows_cluster.id
  task_definition        = aws_ecs_task_definition.fargate_task_definition_iis.id
  desired_count          = var.desired_task_count
  enable_execute_command = true
  scheduling_strategy    = "REPLICA"
  launch_type            = "FARGATE"
  network_configuration {
    subnets          = data.aws_subnets.private_subnets.ids
    security_groups  = [aws_security_group.ecs_fargate_task_ingress.id]
    assign_public_ip = false
  }
  load_balancer {
    target_group_arn = aws_lb_target_group.ecs_alb_target_group.arn
    container_name   = "iis_fargate"
    container_port   = 80
  }
}
Again, what differs from the EC2 Windows-based task is that we need to add the network configuration block as part of the ECS service because there is no Auto Scaling group that we commonly use to inform what subnets the EC2 instances will be deployed to.
Deploying an ALB
We will deploy the ALB, the target group, and the listeners. But, first, let’s start by deploying the ALB:
resource "aws_lb" "ecs_alb" {
  name                   = var.alb_name
  internal               = false
  load_balancer_type     = "application"
  security_groups        = [aws_security_group.alb_ingress.id]
  subnets                = data.aws_subnets.public_subnets.ids
  idle_timeout           = 60
  enable_http2           = true
  desync_mitigation_mode = "defensive"
}
Then, we must deploy the target group. We had to change target_type from instance to IP to support the Fargate task:
resource "aws_lb_target_group" "ecs_alb_target_group" {
  name                          = var.alb_target_group_name
  target_type                   = "ip"
  port                          = 80
  protocol                      = "HTTP"
  vpc_id                        = data.aws_vpc.vpc_id.id
  load_balancing_algorithm_type = "round_robin"
  health_check {
    path                = "/"
    protocol            = "HTTP"
    healthy_threshold   = 5
    unhealthy_threshold = 2
    timeout             = 5
    interval            = 30
    matcher             = 200
  }
}
Finally, let’s deploy the ALB Target Group listener:
resource "aws_alb_listener" "ecs_alb_listener" {
  load_balancer_arn = aws_lb.ecs_alb.arn
  port              = 80
  protocol          = "HTTP"
  default_action {
    type             = "forward"
    target_group_arn = aws_lb_target_group.ecs_alb_target_group.arn
  }
}
At this point, if you reach the ALB FQDN, you should see the following web page:

Figure 6.5 – Default IIS website
This is the same result as we had in the previous chapter.
Following what we learned, we deployed a new Amazon ECS cluster with a Fargate Windows-based task, an ALB, and a Target Group/Listener:

Figure 6.6 – Amazon ECS service deploying two Fargate tasks
I encourage you to compare the diagram from Chapter 5 with this one and enjoy the serverless life without Windows Server patching, hardening, backup, auto-scaling to manage, and more.
Summary
In this chapter, we started learning about AWS Fargate and planning for serverless Windows containers; then, we identified simple questions that will guide you through EC2 or Fargate tasks. Finally, we went through some code snippets on deploying Fargate Windows-based tasks and exposing them to the internet through an ALB.
This chapter closes the Amazon Elastic Container Service (ECS) for Windows containers topic. I hope you have enjoyed this book so far; we have learned a lot by exploring technical aspects that are not even publicly addressed when talking about Windows containers.
Now, it is time to shift gears and learn about Amazon Elastic Kubernetes Service (EKS) for Windows containers. See you there.