
11
IPL BOOTKITS: ROVNIX AND CARBERP

Distribution of Rovnix, the first known bootkit to infect the IPL code of the active partition on a bootable hard drive, began at the end of 2011. Security products at that time had already evolved to monitor the MBR, as discussed in Chapter 10, to protect against bootkits such as TDL4 and Olmasco. The appearance of Rovnix in the wild was therefore a challenge for security software. Because Rovnix went further in the boot process and infected the IPL code that executed after the VBR code (see Chapter 5), it stayed under the radar for a few months until the security industry managed to catch up.
In this chapter, we’ll focus on the technical details of the Rovnix bootkit framework by studying how it infects target systems and bypasses the Kernel-Mode Signing Policy to load the malicious kernel-mode driver. We’ll pay special attention to the malicious IPL code, and we’ll debug it using VMware and the IDA Pro GDB, as discussed in Chapter 9. Finally, we’ll see an implementation of Rovnix in the wild: the Carberp banking trojan, which used a modification of Rovnix to persist on victims’ machines.
Rovnix’s Evolution
Rovnix was first advertised on a private underground forum, shown in Figure 11-1, as a new Ring0 bundle with extensive functionality.

Figure 11-1: Rovnix advertisement on a private underground forum
It had a modular architecture that made it very attractive for malware developers and distributors. It seems likely that its developers were more focused on selling the framework than on distributing and using the malware.
Since its first appearance in the wild, Rovnix has gone through multiple iterations. This chapter will focus on the latest generation at the time of this writing, but we’ll touch on the earlier versions to give you an idea of its development.
The first iterations of Rovnix used a simple IPL infector to inject a payload into the user-mode address space of the boot processes. The malicious IPL code was the same in all early iterations, so the security industry was able to quickly develop detection methods using simple static signatures.
The next versions of Rovnix rendered these detection methods ineffectual by implementing polymorphic malicious IPL code. Rovnix also added another new feature: a hidden filesystem to secretly store its configuration data, payload modules, and so on. Inspired by TDL4-like bootkits, Rovnix also began implementing functionality that monitored read and write requests to the infected hard drive, making it harder to remove the malware from the system.
A later iteration added a hidden communication channel to allow Rovnix to exchange data with remote C&C servers and bypass the traffic monitoring performed by personal firewalls and Host Intrusion Prevention Systems.
At this point, we’ll turn our attention to the latest known modifications of Rovnix (also known as Win32/Rovnix.D) at the time of this writing and discuss its features in detail.
The Bootkit Architecture
First we’ll consider the Rovnix architecture from a high-level point of view. Figure 11-2 shows the main components of Rovnix and how they relate.

Figure 11-2: Rovnix architecture
At the heart of Rovnix lies a malicious kernel-mode driver, the main purpose of which is to inject payload modules into processes in the system. Rovnix can hold multiple payloads for injection into different processes. An example of such a payload is a banking trojan that creates fake transactions, like the Carberp trojan discussed later in this chapter. Rovnix has a default payload module hardcoded into the malicious kernel-mode driver, but it is capable of downloading additional modules from remote C&C servers through the hidden network channel (discussed in “The Hidden Communication Channel” on page 169). The kernel-mode driver also implements hidden storage to store downloaded payloads and configuration information (covered in detail in “The Hidden Filesystem” on page 167).
Infecting the System
Let’s continue our analysis of Rovnix by dissecting its infection algorithm, depicted in Figure 11-3.

Figure 11-3: Rovnix dropper infection algorithm
Rovnix first checks if the system has already been infected by accessing the system registry key HKLMSoftwareClassesCLSID<XXXXXXXX-XXXX-XXXX-XXXX-XXXXXXXXXXXX>, where X is generated from the filesystem volume serial number. If this registry key exists, it means the system is already infected with Rovnix, so the malware terminates and deletes itself from the system.
If the system is not already infected, Rovnix queries the version of the operating system. To gain low-level access to the hard drive, the malware requires administrator privileges. In Windows XP, the regular user is granted administrator rights by default, so if the OS is XP, Rovnix can proceed as a regular user without having to check privileges.
However, in Windows Vista, Microsoft introduced a new security feature—User Account Control (UAC)—that demotes the privileges of applications running under the administrator account, so if the OS is Vista or above, Rovnix has to check administrative privileges. If the dropper is running without administrative privileges, Rovnix tries to elevate the privileges by relaunching itself with the ShellExecuteEx API using the runas command. The dropper’s manifest contains a requireAdministrator property, so runas attempts to execute the dropper with elevated privileges. On systems with UAC enabled, a dialog displays, asking the user whether they authorize the program to run with administrator privileges. If the user chooses Yes, the malware starts with elevated privileges and infects the system. If the user chooses No, the malware will not be executed. If there is no UAC on a system or if UAC is disabled, the malware just runs with the privileges of the current account.
Once it has the required privileges, Rovnix gains low-level access to the hard drive by using the native API functions ZwOpenFile, ZwReadFile, and ZwWriteFile.
First the malware calls ZwOpenFile using ??PhysicalDrive0 as a filename, which returns a handle corresponding to the hard drive. Rovnix then uses the returned handle with the ZwReadFile and ZwWriteFile routines to read data from and write data to the hard drive.
To infect the system, the malware scans the partition table in the MBR of the hard drive, and then reads the IPL of the active partition and reduces its size with the aPlib compression library. Next, Rovnix creates a new malicious IPL by prepending the compressed legitimate IPL with malicious loader code, as shown in Figure 11-4.

Figure 11-4: Hard drive layout before and after Rovnix infection
After modifying the IPL, Rovnix writes a malicious kernel-mode driver at the end of the hard drive to be loaded by the malicious IPL code during system start-up. The malware reserves some space at the end of the hard drive for the hidden filesystem, which we’ll describe later in the chapter.
Finally, Rovnix creates the system registry key to mark the system as infected and initiates a restart by calling ExitWindowsEx Win32 API with the parameters EWX_REBOOT | EWX_FORCE.
Post-Infection Boot Process and IPL
Once Rovnix infects the machine and forces a reboot, the BIOS boot code carries on as usual, loading and executing the bootable hard drive’s unmodified MBR. The MBR finds an active partition on the hard drive and executes the legitimate, unmodified VBR. The VBR then loads and executes the infected IPL code.
Implementing the Polymorphic Decryptor
The infected IPL begins with a small decryptor whose purpose is to decrypt the rest of the malicious IPL code and execute it (Figure 11-5). The fact that the decryptor is polymorphic means that each instance of Rovnix comes with custom decryptor code.

Figure 11-5: Layout of the infected IPL
Let’s take a look at how the decryptor is implemented. We’ll give a general description of the decryption algorithm before analyzing the actual polymorphic code. The decryptor follows this process to decrypt the content of the malicious IPL:
- Allocate a memory buffer to store decrypted code.
- Initialize the decryption key and decryption counters—the offset and size of the encrypted data, respectively.
- Decrypt the IPL code into the allocated buffer.
- Initialize registers before executing the decrypted code.
- Transfer control to the decrypted code.
In order to customize the decryption routine, Rovnix randomly splits it into basic blocks (sets of continuous instructions with no branches), each of which contains a small number of assembly instructions for the routine. Rovnix then shuffles the basic blocks and reorders them randomly, connecting them using jmp instructions, as shown in Figure 11-6. The result is a custom decryption code for every instance of Rovnix.

Figure 11-6: Generation of polymorphic decryptor
This polymorphic mechanism is actually quite simple compared to some other code obfuscation techniques employed in modern malware, but because the byte pattern of the routine changes with every instance of Rovnix, it’s sufficient for avoiding detection by security software that uses static signatures.
Polymorphism is not invulnerable, though, and one of the most common approaches to defeating it is software emulation. In emulation, security software applies behavioral patterns to detect malware.
Decrypting the Rovnix Bootloader with VMware and IDA Pro
Let’s take a look at the actual implementation of the decryption routine using a VMware virtual machine and IDA Pro. All the necessary information on how to set up VMware with IDA Pro can be found in Chapter 9. In this demonstration, we’ll use a VMware image preinfected with the Win32/Rovnix.D bootkit, which you can download from https://nostarch.com/rootkits as the file bootkit_files.zip.
Our goal is to obtain the decrypted malicious IPL code using dynamic analysis. We’ll walk you through the debugging process, skipping quickly through the MBR and VBR steps to focus on analyzing the polymorphic IPL decryptor.
Observing the MBR and VBR Code
Flip back to “Combining VMware GDB with IDA” on page 126 and follow the steps there to decrypt the MBR from bootkit_files.zip. You’ll find the MBR code located at address 0000:7c00h. In Figure 11-7, the address 0000:7c00h is denoted as MEMORY:7c00h because IDA Pro displays the segment name (in our case, MEMORY) instead of the segment base address 0000h. Because Rovnix infects the IPL code and not the MBR, the MBR code shown in the debugger is legitimate and we won’t dig into it very deeply.

Figure 11-7: The beginning of the MBR code
This routine code relocates the MBR to another memory address to recycle the memory located at 0000:7c00h, in order to read and store the VBR of the active partition. Register si ➋ is initialized with the value 7C1h, which corresponds to the source address, and register di ➌ is initialized with the value 61Bh, the destination address. Register cx ➍ is initialized with 1E5h, the number of bytes to copy, and the rep movsb instruction ➎ copies the bytes. The retf instruction ➏ transfers control to the copied code.
At this point, the instruction pointer register ip points at address 0000:7c00h ➊. Execute each instruction in the listing by pressing F8 until you reach the last retf instruction ➏. Once retf is executed, control is transferred to the code that has just been copied to address 0000:061Bh—namely, the main MBR routine, whose purpose is to find the active partition in the MBR’s partition table and load its very first sector, the VBR.
The VBR also remains unchanged, so we’ll proceed to the next step by setting up a breakpoint right at the end of the routine. The retf instruction located at address 0000:069Ah transfers control directly to the VBR code of the active partition, so we’ll put the breakpoint at the retf instruction (highlighted in Figure 11-8). Move your cursor to this address and press F2 to toggle the breakpoint. If you see a dialog upon pressing F2, just click OK to use the default values.

Figure 11-8: Setting a breakpoint at the end of the MBR code
Once you’ve set the breakpoint, press F9 to continue the analysis up to the breakpoint. This will execute the main MBR routine. When execution reaches the breakpoint, the VBR is already read into memory and we can get to it by executing the retf (F8) instruction.
The VBR code starts with a jmp instruction, which transfers control to the routine that reads the IPL into memory and executes it. The disassembly of the routine is shown in Figure 11-9. To go directly to the malicious IPL code, set a breakpoint at the last instruction of the VBR routine at address 0000:7C7Ah ➊ and press F9 again to release control. Once execution reaches the breakpoint, the debugger breaks on the retf instruction. Execute this instruction with F8 to get to the malicious IPL code.

Figure 11-9: VBR code
Dissecting the IPL Polymorphic Decryptor
The malicious IPL code starts with a series of instructions, in basic blocks, that initialize the registers before executing the decryptor. These are followed by a call instruction that transfers control to the IPL decryptor.
The code in the first basic block of the decryptor (Listing 11-1) obtains the base address of the malicious IPL in memory ➊ and stores it on the stack ➋. The jmp instruction at ➌ transfers control to the second basic block (recall Figure 11-6).
MEMORY:D984 pop ax
MEMORY:D985 sub ax, 0Eh ➊
MEMORY:D988 push cs
MEMORY:D989 push ax ➋
MEMORY:D98A push ds
MEMORY:D98B jmp short loc_D9A0 ➌
Listing 11-1: Basic block 1 of the polymorphic decryptor
The second and the third basic blocks both implement a single step of the decryption algorithm—memory allocation—and so are shown together in Listing 11-2.
; Basic Block #2
MEMORY:D9A0 push es
MEMORY:D9A1 pusha
MEMORY:D9A2 mov di, 13h
MEMORY:D9A5 push 40h ; '@'
MEMORY:D9A7 pop ds
MEMORY:D9A8 jmp short loc_D95D
--snip--
; Basic Block #3
MEMORY:D95D mov cx, [di]
MEMORY:D95F sub ecx, 3 ➊
MEMORY:D963 mov [di], cx
MEMORY:D965 shl cx, 6
MEMORY:D968 push cs
MEMORY:D98B jmp short loc_D98F ➋
Listing 11-2: Basic blocks 2 and 3 of the polymorphic decryptor
The code allocates 3KB of memory (see Chapter 5 on memory allocation in real mode) and stores the address of the memory in the cx register. The allocated memory will be used to store the decrypted malicious IPL code. The code then reads the total amount of available memory in real execution mode from address 0040:0013h and decrements the value by 3KB ➊. The jmp instruction at ➋ transfers control to the next basic block.
Basic blocks 4 through 8, shown in Listing 11-3, implement the decryption key and decryption counter initializations, as well as the decryption loop.
; Basic Block #4
MEMORY:D98F pop ds
MEMORY:D990 mov bx, sp
MEMORY:D992 mov bp, 4D4h
MEMORY:D995 jmp short loc_D954
--snip--
; Basic Block #5
MEMORY:D954 push ax
MEMORY:D955 push cx
MEMORY:D956 add ax, 0Eh
➊ MEMORY:D959 mov si, ax
MEMORY:D95B jmp short loc_D96B
--snip--
; Basic Block #6
MEMORY:D96B add bp, ax
MEMORY:D96D xor di, di
➋ MEMORY:D96F pop es
MEMORY:D970 jmp short loc_D93E
--snip--
; Basic Block #7
➌ MEMORY:D93E mov dx, 0FCE8h
MEMORY:D941 cld
➍ MEMORY:D942 mov cx, 4C3h
MEMORY:D945 loc_D945:
➎ MEMORY:D945 mov ax, [si]
➏ MEMORY:D947 xor ax, dx
MEMORY:D949 jmp short loc_D972
--snip--
; Basic Block #8
➐ MEMORY:D972 mov es:[di], ax
MEMORY:D975 add si, 2
MEMORY:D978 add di, 2
MEMORY:D97B loop loc_D945
MEMORY:D97D pop di
MEMORY:D97E mov ax, 25Eh
MEMORY:D981 push es
➑ MEMORY:D982 jmp short loc_D94B
Listing 11-3: Basic blocks 4 through 8 of the polymorphic decryptor
At address 0000:D959h, the si register is initialized with the address of the encrypted data ➊. Instructions at ➋ initialize the es and di registers with the address of the buffer allocated to store the decrypted data. The dx register at address 0000:D93Eh ➌ is initialized with the decryption key 0FCE8h, and the cx register is initialized with the number of XOR operations to execute ➍ in the decryption loop. On every XOR operation, 2 bytes of encrypted data are XORed with the decryption key, so the value in the cx register is equal to number_of_bytes_to_decrypt divided by 2.
The instructions in the decryption loop read 2 bytes from the source ➎, XOR them with the key ➏, and write the result in the destination buffer ➐. Once the decryption step is complete, a jmp instruction ➑ transfers control to the next basic block.
Basic blocks 9 through 11 implement register initialization and transfer control to the decrypted code (Listing 11-4).
; Basic Block #9
MEMORY:D94B push ds
MEMORY:D94C pop es
MEMORY:D94D mov cx, 4D4h
MEMORY:D950 add ax, cx
MEMORY:D952 jmp short loc_D997
--snip--
; Basic Block #10
MEMORY:D997 mov si, 4B2h
➊ MEMORY:D99A push ax
MEMORY:D99B push cx
MEMORY:D99C add si, bp
MEMORY:D99E jmp short loc_D98D
--snip--
; Basic Block #11
MEMORY:D98D pop bp
➋ MEMORY:D98E retf
Listing 11-4: Basic blocks 9 through 11 of the polymorphic decryptor
Instructions at ➊ store the decrypted IPL code that will execute after decryption on the stack address, and retf ➋ pops this address from the stack and transfers control to it.
To obtain the decrypted IPL code, we need to determine the address of the buffer for the decrypted data. To do so, we set up a breakpoint at address 0000:D970h right after instruction ➋ in Listing 11-3 and release control, as shown in Figure 11-10.

Figure 11-10: Setting up a breakpoint in IDA Pro
Next, we’ll set up a breakpoint at address 0000:D98Eh (➋ in Listing 11-4), the last instruction of the polymorphic decryptor, and let the rest of the decryptor code run. Once the debugger breaks at this address, we execute the last retf instruction, which brings us directly to the decrypted code at address 9EC0:0732h.
At this point, the malicious IPL code is decrypted in memory and is available for further analysis. Note that, after decryption, the first routine of the malicious IPL is located not at the very beginning of the decrypted buffer at address 9EC0:0000h, but at offset 732h, due to the layout of the malicious IPL. If you want to dump the contents of the buffer from memory into a file on disk for static analysis, you should start dumping at address 9EC0:0000h, where the buffer starts.
Taking Control by Patching the Windows Bootloader
The main purpose of Rovnix’s IPL code is to load a malicious kernel-mode driver. The malicious boot code works in close collaboration with the OS bootloader components and follows the execution flow from the very beginning of the boot process, through the processor’s execution-mode switching, until the OS kernel is loaded. The loader relies heavily on the platform-debugging facilities and binary representations of the OS bootloader components.
Once the decrypted malicious IPL code is executed, it hooks the INT 13h handler so it can monitor all the data being read from the hard drive and set up further hooks in OS bootloader components. The malicious IPL then decompresses and returns control to the original IPL code to resume the normal boot process.
Figure 11-11 depicts the steps Rovnix takes to interfere with the boot process and compromise the OS kernel. We’ve covered the steps up to the fourth box, so we’ll resume our description of the bootkit functionality from the “Load bootmgr” step at ➊.

Figure 11-11: Boot process of Rovnix IPL code
Once it has hooked the INT 13h handler, Rovnix monitors all data being read from the hard drive and looks for a certain byte pattern corresponding to the bootmgr of the OS. When Rovnix finds the matching pattern, it modifies the bootmgr ➋ to enable it to detect the switching of the processor from real to protected mode, which is a standard step in the boot process. This execution-mode switching changes the translation of the virtual address to physical and, as a result, changes the layout of the virtual memory, which would dislodge Rovnix. Therefore, in order to propagate itself through the switch and keep control of the boot process, Rovnix hooks bootmgr by patching it with a jmp instruction, allowing Rovnix to receive control right before the OS switches the execution mode.
Before moving on, we’ll explore how Rovnix hides its hooks and then look at how exactly it persists through the mode switching.
Abusing the Debugging Interface to Hide Hooks
One thing that makes Rovnix even more interesting than other bootkits is the stealth of its control hooks. It hooks the INT 1h handler ➌ to be able to receive control at specific moments during OS kernel initialization, and it abuses debugging registers dr0 through dr7 to set up hooks that avoid detection by leaving the code being hooked unaltered. The INT 1h handler is responsible for handling debugging events, such as tracing and setting hardware breakpoints, using the dr0 through dr7 registers.
The eight debugging registers, dr0 through dr7, provide hardware-based debugging support on Intel x86 and x64 platforms. The first four, dr0 through dr3, are used to specify the linear addresses of breakpoints. The dr7 register lets you selectively specify and enable the conditions for triggering breakpoints; for instance, you can use it to set up a breakpoint that triggers upon code execution or memory access (read/write) at a specific address. The dr6 register is a status register that allows you to determine which debug condition has occurred—that is, which breakpoint has been triggered. The dr41 and dr5 registers are reserved and not used. Once a hardware breakpoint is triggered, INT 1h is executed to determine which debug condition has occurred and respond accordingly to dispatch it.
This is the functionality that enables the Rovnix bootkit to set up stealthy hooks without patching code. Rovnix sets the dr0 through dr4 registers to their intended hook location and enables hardware breakpoints for each register by setting a corresponding bitmask in the dr7 register.
Abusing the Interrupt Descriptor Table to Persist Through Boot
In addition to abusing the debugging facilities of the platform, the first iterations of Rovnix used an interesting technique to survive the processor’s switch from real to protected mode. Before execution switches to protected mode, bootmgr initializes important system structures, such as the Global Descriptor Table and Interrupt Descriptor Table (IDT). The latter is filled with descriptors of interrupt handlers.
Rovnix copies the malicious IPL code over the second half of the IDT, which is not being used by the system at the moment. Given that each descriptor is 8 bytes and there are 256 descriptors in the table, this provides Rovnix with 1KB of IDT memory, sufficient to store its malicious code. The IDT is in protected mode, so storing its code in the IDT ensures that Rovnix will persist across the mode switching, and the IDT address can be easily obtained via the sidt instruction. The overall layout of the IDT after Rovnix’s modifications is shown in Figure 11-12.

Figure 11-12: How Rovnix abuses the IDT to propagate through execution-mode switching
Loading the Malicious Kernel-Mode Driver
After hooking the INT 1h handler, Rovnix proceeds with hooking other OS bootloader components, such as winload.exe and the OS kernel image (ntoskrnl.exe, for instance). Rovnix waits while the bootmgr code loads winload.exe and then hooks the BlImgAllocateImageBuffer routine (see ➍ in Figure 11-11) to allocate a buffer for an executable image by setting up a hardware breakpoint at its starting address. This technique allocates memory to hold the malicious kernel-mode driver.
The malware also hooks the OslArchTransferToKernel routine in winload.exe. This routine transfers control from winload.exe to the kernel’s entry point KiSystemStartup, which starts kernel initialization. By hooking OslArchTransferToKernel, Rovnix gets control right before KiSystemStartup is called, and it takes this opportunity to inject the malicious kernel-mode driver.
The routine KiSystemStartup takes the single parameter KeLoaderBlock, which is a pointer to LOADER_PARAMETER_BLOCK—an undocumented structure initialized by winload.exe that contains important system information, such as boot options and loaded modules. The structure is shown in Listing 11-5.
typedef struct _LOADER_PARAMETER_BLOCK
{
LIST_ENTRY LoadOrderListHead;
LIST_ENTRY MemoryDescriptorListHead;
➊ LIST_ENTRY BootDriverListHead;
ULONG KernelStack;
ULONG Prcb;
ULONG Process;
ULONG Thread;
ULONG RegistryLength;
PVOID RegistryBase;
PCONFIGURATION_COMPONENT_DATA ConfigurationRoot;
CHAR * ArcBootDeviceName;
CHAR * ArcHalDeviceName;
CHAR * NtBootPathName;
CHAR * NtHalPathName;
CHAR * LoadOptions;
PNLS_DATA_BLOCK NlsData;
PARC_DISK_INFORMATION ArcDiskInformation;
PVOID OemFontFile;
_SETUP_LOADER_BLOCK * SetupLoaderBlock;
PLOADER_PARAMETER_EXTENSION Extension;
BYTE u[12];
FIRMWARE_INFORMATION_LOADER_BLOCK FirmwareInformation;
} LOADER_PARAMETER_BLOCK, *PLOADER_PARAMETER_BLOCK;
Listing 11-5: The LOADER_PARAMETER_BLOCK description
Rovnix is interested in the field BootDriverListHead ➊, which contains the head of a list of special data structures corresponding to boot-mode drivers. These drivers are loaded by winload.exe at the same time that the kernel image is loaded. However, the DriverEntry routine that initializes the drivers isn’t called until after the OS kernel image receives control. The OS kernel initialization code traverses records in BootDriverListHead and calls the DriverEntry routine of the corresponding driver.
Once the OslArchTransferToKernel hook is triggered, Rovnix obtains the address of the KeLoaderBlock structure from the stack and inserts a record corresponding to the malicious driver into the boot driver list using the BootDriverListHead field. Now the malicious driver is loaded into memory as if it were a kernel-mode driver with a legitimate digital signature. Next, Rovnix transfers control to the KiSystemStartup routine, which resumes the boot process and starts kernel initialization (➎ in Figure 11-11).
At some point during initialization, the kernel traverses the list of boot drivers in KeLoaderBlock and calls their initialization routines, including that of the malicious driver (Figure 11-13). This is how the DriverEntry routine of the malicious kernel-mode driver is executed.

Figure 11-13: A malicious Rovnix driver inserted into BootDriverList
Kernel-Mode Driver Functionality
The main function of the malicious driver is to inject the payload, stored in the driver’s binary and compressed with aPlib as discussed earlier, into target processes in the system—primarily into explorer.exe and browsers.
Injecting the Payload Module
The payload module contains the code JFA in its signature, so to extract it, Rovnix looks for the JFA signature in a free space between the section table of the driver and its first section. This signature signifies the beginning of the configuration data block, an example of which is displayed in Listing 11-6.
typedef struct _PAYLOAD_CONFIGURATION_BLOCK
{
DWORD Signature; // "JFA�"
DWORD PayloadRva; // RVA of the payload start
DWORD PayloadSize; // Size of the payload
DWORD NumberOfProcessNames; // Number of NULL-terminated strings in ProcessNames
char ProcessNames[0]; // Array of NULL-terminated process names to inject payload
} PAYLOAD_CONFIGURATION_BLOCK, *PPAYLOAD_CONFIGURATION_BLOCK;
Listing 11-6: PAYLOAD_CONFIGURATION_BLOCK structure describing payload configuration
The fields PayloadRva and PayloadSize specify the coordinates of the compressed payload image in the kernel-mode driver. The ProcessNames array contains names of the processes to inject the payload into. The number of entries in the array is specified by NumberOfProcessNames. Figure 11-14 shows an example of such a data block taken from a real-world malicious kernel-mode driver. As you can see, the payload is to be injected into explorer.exe and the browsers iexplore.exe, firefox.exe, and chrome.exe.
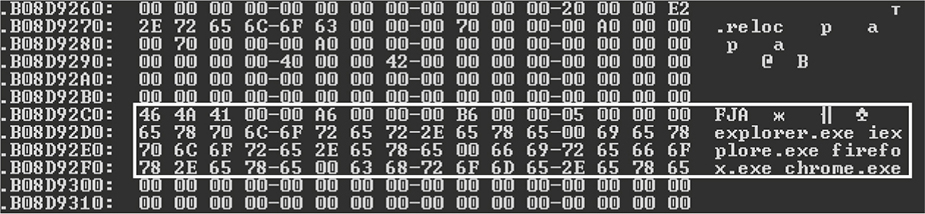
Figure 11-14: A payload configuration block
Rovnix first decompresses the payload into a memory buffer. Then it employs a conventional technique frequently used by rootkits to inject the payload, consisting of the following steps:
- Register CreateProcessNotifyRoutine and LoadImageNotifyRoutine using the standard documented kernel-mode API. This permits Rovnix to gain control each time a new process is created or a new image is loaded into the address of a target process.
- Monitor the new processes in the system and look for the target process, identified by the image name.
- As soon as the target process is loaded, map the payload into its address space and queue an asynchronous procedure call (APC), which transfers control to the payload.
Let’s examine this technique in more detail. The CreateProcessNotify routine allows Rovnix to install a special handler that’s triggered every time a new process is created on the system. This way, the malware is able to detect when a target process is launched. However, because the malicious create-process handler is triggered at the very beginning of process creation, when all the necessary system structures are already initialized but before the executable file of the target process is loaded into its address space, the malware isn’t able to inject the payload at this point.
The second routine, LoadImageNotifyRoutine, allows Rovnix to set up a handler that’s triggered every time an executable module (.exe file, DLL library, and so forth) is loaded or unloaded on the system. This handler monitors the main executable image and notifies Rovnix once the image is loaded in the target process’s address space, at which point Rovnix injects the payload and executes it by creating an APC.
Stealth Self-Defense Mechanisms
The kernel-mode driver implements the same defensive mechanisms as the TDL4 bootkit: it hooks the IRP_MJ_INTERNAL_CONTROL handler of the hard disk miniport DRIVER_OBJECT. This handler is the lowest-level hardware-independent interface with access to data stored on the hard drive, providing the malware with a reliable way of controlling data being read from and written to the hard drive.
This way, Rovnix can intercept all the read/write requests and protect critical areas from being read or overwritten. To be specific, it protects:
- The infected IPL code
- The stored kernel-mode driver
- The hidden filesystem partition
Listing 11-7 presents the pseudocode of the IRP_MJ_INTERNAL_CONTROL hook routine, which determines whether to block or authorize an I/O operation depending on which part of the hard drive is being read or written to.
int __stdcall NewIrpMjInternalHandler(PDEVICE_OBJECT DeviceObject, PIRP Irp)
{
UCHAR ScsiCommand;
NTSTATUS Status;
unsigned __int64 Lba;
PVOID pTransferBuffer;
➊ if ( DeviceObject != g_DiskDevObj )
return OriginalIrpMjInternalHandler(DeviceObject, Irp);
➋ ScsiCommand = GetSrbParameters(_Irp, &Lba, &DeviceObject, &pTransferBuffer,
Irp);
if ( ScsiCommand == 0x2A || ScsiCommand == 0x3B )
{
// SCSI write commands
➌ if ( CheckSrbParams(Lba, DeviceObject)
{
Status = STATUS_ACCESS_DENIED;
➍ Irp->IoStatus.Status = STATUS_ACCESS_DENIED;
IofCompleteRequest(Irp, 0);
} else
{
return OriginalIrpMjInternalHandler(DeviceObject, Irp);
}
} else if ( ScsiCommand == 0x28 || ScsiCommand == 0x3C)
{
// SCSI read commands
if ( CheckSrbParams(Lba, DeviceObject)
{
➎ Status = SetCompletionRoutine(DeviceObject, Irp, Lba,
DeviceObject, pTransferBuffer, Irp);
} else
{
return OriginalIrpMjInternalHandler(DeviceObject, Irp);
}
}
if ( Status == STATUS_REQUEST_NOT_ACCEPTED )
return OriginalIrpMjInternalHandler(DeviceObject, Irp);
return Status;
}
Listing 11-7: The pseudocode of a malicious IRP_MJ_INTERNAL_CONTROL handler
First the code checks whether the I/O request is addressed to the hard drive device object ➊. If so, the malware checks whether the operation is a read or write operation and which region of the hard drive is being accessed ➋. The routine CheckSrbParams ➌ returns TRUE when regions protected by the bootkit are being accessed. If someone tries to write data to the region protected by the bootkit, the code rejects the I/O operation and returns STATUS_ACCESS_DENIED ➍. If someone tries to read from the bootkit-protected region, the malware sets a malicious completion routine ➎ and passes the I/O request down to the hard drive device object for completing the read operation. Once the read operation finishes, the malicious completion routine is triggered and wipes the buffer containing the read data by writing zeros into it. This way, the malware protects its data on the hard drive.
The Hidden Filesystem
Another significant feature of Rovnix is its hidden filesystem (FS) partition (that is, one not visible to the operating system) that’s used to secretly store configuration data and additional payload modules. Implementation of hidden storage isn’t a new bootkit technique—it’s been used by other rootkits such as TDL4 and Olmasco—but Rovnix has a slightly different implementation.
To physically store its hidden partition, Rovnix occupies space either at the beginning or end of the hard drive, depending on where there’s enough free space; if there are 0x7D0 (2,000 in decimal, almost 1MB) or more free sectors before the first partition, Rovnix places the hidden partition right after the MBR sector and extends it over the entirety of the free 0x7D0 sectors. If there isn’t enough space at the beginning of the hard drive, Rovnix tries to place the hidden partition at its end. To access the data stored in the hidden partition, Rovnix uses the original IRP_MJ_INTERNAL_CONTROL handler, hooked as explained in the previous section.
Formatting the Partition as a Virtual FAT System
Once Rovnix has allocated space for the hidden partition, it formats it as a Virtual File Allocation Table (VFAT) filesystem—a modification of the FAT filesystem capable of storing files with long Unicode filenames (up to 256 bytes). The original FAT filesystem imposes limitations on filename lengths of 8 + 3, meaning up to eight characters for a filename and three characters for an extension name.
Encrypting the Hidden Filesystem
To protect the data in the hidden filesystem, Rovnix implements partition-transparent encryption with the RC6 encryption algorithm in Electronic Code Book (ECB) mode and a key length of 128 bits. In ECB mode, the data to be encrypted is split into blocks of equal lengths, each of which is encrypted with the same key independently of the other blocks. The key is stored in the last 16 bytes of the very first sector of the hidden partition, as shown in Figure 11-15, and is used to encrypt and decrypt the whole partition.

Figure 11-15: Encryption key location in the first sector of the hidden partition
Accessing the Hidden Filesystem
To make the hidden filesystem accessible to the payload modules, Rovnix creates a special object called a symbolic link. Loosely speaking, the symbolic link is an alternative name for a hidden storage device object that can be used by modules in user-mode processes. Rovnix generates the string DosDevices<XXXXXXXX-XXXX-XXXX-XXXX-XXXXXXXXXXXX>, where X is a randomly generated hexadecimal number, from 0 to F, that’s used as the symbolic link name for the hidden storage.
One advantage of the hidden filesystem is that it may be accessed as a regular filesystem through the standard Win32 API functions provided by the operating system, such as CreateFile, CloseFile, ReadFile, or WriteFile. For instance, to create the file file_to_create in the root directory of the hidden filesystem, a malicious payload calls CreateFile, passing the symbolic link string DosDevices<%XXXXXXXX-XXXX-XXXX-XXXX-XXXXXXXXXXXX>file_to_create as a filename parameter. Once the payload module issues this call, the operating system redirects the request to the malicious kernel-mode driver responsible for handling requests for the hidden filesystem.
Figure 11-16 shows how the malicious driver implements the filesystem driver functionality. Once it receives an I/O request from the payload, Rovnix dispatches the request using the hooked hard drive handler to perform read and write operations for the hidden filesystem located on the hard drive.

Figure 11-16: Architecture of the Rovnix hidden storage filesystem
In this scenario, the operating system and the malicious hidden filesystem coexist on the same hard drive, but the operating system isn’t aware of the hard drive region used to store the hidden data.
The malicious hidden filesystem potentially could alter legitimate data being stored on the operating system’s filesystem, but the chances of that are low due to the hidden filesystem’s placement at the beginning or end of the hard drive.
The Hidden Communication Channel
Rovnix has further stealth tricks up its sleeve. The Rovnix kernel-mode driver implements a TCP/IP protocol stack to communicate secretly with remote C&C servers. The network interfaces provided by the OS are frequently hooked by security software in order to monitor and control network traffic passing through the network. Instead of relying on these network interfaces and risk detection by the security software, Rovnix uses its own custom implementation of network protocols, independent of the operating system, to download payload modules from C&C servers.
To be able to send and receive data over this network, the Rovnix kernel-mode driver implements a complete network stack, including the following interfaces:
- Microsoft Network Driver Interface Specification (NDIS) miniport interface to send data packets using a physical network Ethernet interface
- Transport Driver Interface for TCP/IP network protocols
- Socket interface
- HTTP protocol to communicate with remote C&C servers
As shown in Figure 11-17, the NDIS miniport layer is responsible for communicating with the network interface card to send and receive network packets. The Transport Driver Interface provides a TCP/IP interface for the upper-level socket interface, which in turn is used by Rovnix’s HTTP protocol to transmit data.

Figure 11-17: Architecture of Rovnix custom network stack implementation
Rovnix’s creators didn’t develop this hidden network communication system from scratch—such an implementation requires thousands of lines of code and thus is prone to errors. Instead, they based their implementation on an open source, lightweight TCP/IP network library called lwIP. The lwIP library is a small, independent implementation of the TCP/IP protocol suite with a focus on reducing resource usage while still delivering a full-scale TCP/IP stack. According to its website, lwIP has a footprint of tens of kilobytes of RAM and around 40KB of code, which fits the bootkit perfectly.
Features like the hidden communication channel allow Rovnix to bypass local network monitoring security software. Since Rovnix comes with its own network protocol stack, network security software is unaware of—and thus unable to monitor—its communications over the network. From the very top of the protocol layer down to the very bottom of the NDIS miniport driver, Rovnix uses only its own network components, making it a very stealthy bootkit.
Case History: The Carberp Connection
One real-world example of Rovnix being used in the wild is in the Carberp trojan malware, developed by the most prominent cybercrime group in Russia. Carberp was used to allow a banking trojan to persist on the victim’s system.2 We’ll look at a few aspects of Carberp and how it was developed from the Rovnix bootkit.
Development of Carberp
In November 2011, we noticed that one of the C&C servers set up by the cybercrime group behind Carberp started distributing a dropper with a bootkit based on the Rovnix framework. We started tracking the Carberp trojan and found that during this period, its distribution was very limited.
Two things in our analysis suggested that the bot was working in test mode and therefore being actively developed. The first clue was an abundance of debugging and tracing information relating to the bot’s installation and the binary’s behavior. The second, which we discovered by gaining access to logfiles from the bot C&C server, was that masses of information on failures in installation were being sent back to the C&C. Figure 11-18 shows an example of the kind of information Carberp was reporting.

Figure 11-18: An example of Rovnix dropper logs
The ID column specifies a unique identifier of a Rovnix instance; the status column contains information on whether the victim’s system has been successfully compromised. The infection algorithm was split into a number of steps, and information was reported to the C&C server directly after each step. The step column provides information on which step is being executed, and the info column contains a description of any error encountered during installation. By looking at the step and info columns, operators of the botnet could determine at which step and for what reason the infection failed.
The version of Rovnix that Carberp used contained a lot of debugging strings and sent a lot of verbose messages to the C&C. Figure 11-19 shows examples of the kind of strings it might send. This information was extremely useful to us in analyzing this threat and understanding its functionality. The debugging information left in the binary revealed the names of the routines implemented in the binary and their purpose. It documented the logic of the code. Using this data, we could more easily reconstruct the context of the malicious code.

Figure 11-19: Debug strings left by developers in the Rovnix dropper
Dropper Enhancements
The framework of Rovnix used in Carberp was pretty much the same as the bootkit we described in the beginning of the chapter, with the only significant change appearing in the dropper. In “Infecting the System” on page 150, we mentioned that Rovnix tries to elevate its privileges by using the ShellExecuteEx Win32 API to achieve administrator rights on the victim’s machine. In Carberp’s version of Rovnix, the dropper exploited the following vulnerabilities in the system to elevate privileges:
MS10-073 in the win32k.sys module This vulnerability was originally used by the Stuxnet worm and exploits the incorrect handling of a specially crafted keyboard layout file.
MS10-092 in Windows Task Scheduler This vulnerability was also first discovered in Stuxnet and exploits the integrity verification mechanism in Windows Scheduler.
MS11-011 in the win32k.sys module This vulnerability results in a stack-based buffer overflow in win32k.sys!RtlQueryRegistryValues routine.
.NET Runtime Optimization vulnerability This is a vulnerability in the Microsoft .NET Runtime Optimization Service that results in execution of malicious code with SYSTEM privileges.
Yet another interesting feature of the Carberp installer is that it removed various hooks from the list of system routines, shown in Listing 11-8, just before installing the trojan or bootkit onto the system. These routines are common hook targets for security software, such as sandboxes and host intrusion prevention and protection systems. By unhooking these functions, the malware increased its ability to evade detection.
ntdll!ZwSetContextThread
ntdll!ZwGetContextThread
ntdll!ZwUnmapViewOfSection
ntdll!ZwMapViewOfSection
ntdll!ZwAllocateVirtualMemory
ntdll!ZwWriteVirtualMemory
ntdll!ZwProtectVirtualMemory
ntdll!ZwCreateThread
ntdll!ZwOpenProcess
ntdll!ZwQueueApcThread
ntdll!ZwTerminateProcess
ntdll!ZwTerminateThread
ntdll!ZwResumeThread
ntdll!ZwQueryDirectoryFile
ntdll!ZwCreateProcess
ntdll!ZwCreateProcessEx
ntdll!ZwCreateFile
ntdll!ZwDeviceIoControlFile
ntdll!ZwClose
ntdll!ZwSetInformationProcess
kernel32!CreateRemoteThread
kernel32!WriteProcessMemory
kernel32!VirtualProtectEx
kernel32!VirtualAllocEx
kernel32!SetThreadContext
kernel32!CreateProcessInternalA
kernel32!CreateProcessInternalW
kernel32!CreateFileA
kernel32!CreateFileW
kernel32!CopyFileA
kernel32!CopyFileW
kernel32!CopyFileExW
ws2_32!connect
ws2_32!send
ws2_32!recv
ws2_32!gethostbyname
Listing 11-8: List of routines unhooked by the Rovnix dropper
The bootkit and kernel-mode driver sections of the Carberp’s Rovnix modification remain the same as in the original version of the bootkit. After successful installation onto the system, the malicious IPL code loaded the kernel-mode driver, and the driver injected its Carberp trojan payload into the system processes.
Leaked Source Code
In June 2013, the source code for Carberp and Rovnix was leaked to the public. The complete archive was made available for download and contained all the necessary source code for attackers to build their own Rovnix bootkit. Despite this, we haven’t seen as many custom modifications of Rovnix and Carberp in the wild as we might expect, which we assume is due to the complexity of this bootkit technology.
Conclusion
This chapter provided a detailed technical analysis of Rovnix in the continuous bootkit arms race facing the security industry. Once security software caught up with contemporary bootkits infecting the MBR, Rovnix presented another infection vector, the IPL, triggering another round of evolution in antivirus technology. Due to its IPL infection approach, and its implementation of hidden storage and hidden network communication channels, Rovnix is one of the most complex bootkits seen in the wild. These features make it a dangerous weapon in the hands of cybercriminals, as confirmed by the Carberp case.
In this chapter we devoted special attention to dissecting Rovnix’s IPL code using VMware and IDA Pro, demonstrating the practical usage of these tools in the context of bootkit analysis. You can download all the necessary data to repeat the steps, or to conduct your own in-depth investigation into Rovnix’s IPL code, from https://nostarch.com/rootkits/.