
Setting Up Users and Groups
In Unix systems—including Linux—each file and process (a process is an activity started by a program) is owned. The owner of a file or process has the primary right to control it. These rights can be overridden only by the superuser, called root.
Each file has both an owner and a group owner. These owners can set the permissions on a file so that no one else can access it.
You may find it interesting to discover that there are users (and groups of users) on your Linux system who are not human. These include:
daemon, which is both an owner and a group of owners of system software processes
bin, who often owns the directories that contain system commands and executables
sys, whose group members own such things as swap files and memory images
nobody, who is the owner of software that doesn't need—or shouldn't have—special permissions
It's standard practice to set up these nonhuman users so that their accounts cannot be logged onto by placing an asterisk in the password field for the account.
Organizing human users in groups helps with the process of ensuring that people have an organized place to store their data, have their own initialization files, and have the right level of access privileges. Users and groups can be configured manually by editing the appropriate configuration files, as I'll show you in Chapter 11.
Fortunately, under Gnome you can add and edit user and group information using the Linux Desktop Configuration tool.
To add a user:
1. | |
2. | Open the control panel by selecting Control Panel from the System menu fly-out on the Gnome main menu. |
3. | Click the System Configuration button to open the Linux Configuration tool. |
4. | Scroll down the hierarchical list in the left pane until you see User Accounts. |
5. | Click Users to expand the left pane. |
6. | Select User Accounts under Normal. The Users Accounts tab will open on the right (Figure 6.13). Figure 6.13. The Users Accounts tab is used to add or edit users.
|
7. | Click Add. The User Account Creation tab will open (Figure 6.14). Figure 6.14. The User Account Creation tab is used to specify information for a new user.
|
8. | At a minimum, you must enter a logon ID and a full name. |
9. | Right-click the down arrow next to the group box to select a group for the new user from a list of available groups. |
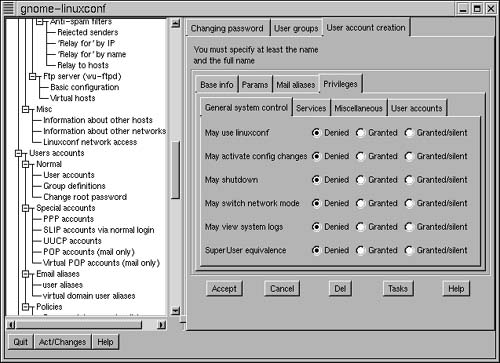
10. | Click the Privileges tab to display the list of privileges that will be granted to the new User (Figure 6.15). Figure 6.15. You can set the privileges that will be available to a new user on the Privileges tab.
|
11. | Make your selection of privileges. |
12. | Click OK to accept the new user. |
13. | Click OK. The Changing Password tab will open (Figure 6.16). Figure 6.16. You must specify a password for each new user.
|
14. | Enter a password for the new user in the New UNIX Password box. |
15. | Click OK. Your new user will now appear in the list of user accounts (Figure 6.17). Figure 6.17. Successfully added new users will appear in the list of user accounts.
|
16. | Open File Manager to verify that a home directory has been added for the new user (Figure 6.18). Figure 6.18. The location of home directories for new users can be established on a per-user or group basis.
|


Tip
Be very careful about granting root-equivalence privileges on a multiuser system.
Tip
You can edit user information by clicking the user ID in the User Accounts list.
Tip
You can specify the location of the home directories for new users, or these can be established on the basis of the group to which a user belongs (see the next section).
To add a group:
1. | With the Linux Desktop Configuration tool open to User Accounts, select the User Groups tab (Figure 6.19). Figure 6.19. The Users Group tab is used to add or edit groups.
|
2. | Click Add. The Group Specification tab will open (Figure 6.20). Figure 6.20. The Group Specification tab is used to provide information about new groups.
|
3. | Enter a name for the group in the Group Name box. |
4. | Click Directories. The Directories tab will open (Figure 6.21). Figure 6.21. If Different Directory for Each Members is checked, then a home directory for each group member—based on the group member's name—will be created off the home base directory.
|
5. | To establish a home directory based on each user's name, check Different Directory for Each Member. |
6. | Enter a home directory for the group of users. |
7. | Click Accept. If the home directory you specified does not exist, you will be asked if you want to create it. |


Tip
You can edit group information by clicking the user ID in the User Groups list.
Tip
Be very cautious when editing or deleting nonhuman users or groups. These may be an important part of your system configuration.
To change the root password:
1. | With the Linux Desktop Configuration tool open to User Accounts, select Change Root Password (Figure 6.22). Figure 6.22. Select Change Root Password to change your root password.
|
2. | Enter the new password in the Password box. |
3. | Passwords must be a minimum of six characters. If your password contains a dictionary word, a message will appear stating that it is not a good Unix password. It's your choice to use it anyway. Enter the password again to confirm it. |
