
7
Adding, Patching, and Managing Software
Maintaining a system’s software to solve security issues, apply fixes, and keep the system up to date is an essential task in systems management. In this chapter, we will review how the Red Hat Subscription Management system works, how to ensure that packages are verified, and other software management tasks to keep the system fresh.
Going a bit more into the details, in this chapter, we will go over how the subscription system works and how to use your developer subscription for self-training or installing a personal server. We will also check how to manage the software origins, also known as repositories, that your system will use. That includes learning the role of signatures in package management, to ensure the software installed is the software Red Hat provides. We will also learn about key tasks such as adding and removing packages and package groups, using different software versions with modularity, and reviewing and rolling back changes.
To simplify expanding your knowledge, enabling you to prepare your own labs, we will see how to have a full local copy of all the Red Hat Enterprise Linux (RHEL) repositories on your system.
And last but not least, we need to understand Red Hat Package Manager (RPM), now changed to RPM Package Manager, by learning the basics of how the internals of package management work.
In summary, we will cover the following topics in this chapter:
- RHEL subscription registration and management
- Managing repositories and signatures with Yum/DNF
- Doing software installations, updates, and rollbacks with Yum/DNF
- Creating and syncing repositories with createrepo and reposync
- Understanding RPM internals
Now, let’s start managing the software in our systems.
RHEL subscription registration and management
RHEL is a fully open source operating system, which means that all the source code used to build it is available to access, modify, redistribute, and learn from. Pre-built binaries are, on the other hand, delivered as a service, and accessible via a subscription. As seen in Chapter 1, Getting RHEL Up and Running, we can have, for our own personal use, a developer subscription. That subscription provides access to ISO images, but also to the updated, signed packages that are part of RHEL 9. These are the exact same bits that are used in production by so many companies worldwide.
Let’s see how to use that subscription with our own system.
First, let’s take a look at the Red Hat Customer Portal at https://access.redhat.com and click LOG IN:

Figure 7.1 – Log in to the Red Hat Customer Portal
Once we click on LOG IN, we will be redirected to the Single Sign-On (SSO) page for all the Red Hat services. There, we will need to use the username we created in Chapter 1, Getting RHEL Up and Running. In the following screenshot, we are using student as an example:

Figure 7.2 – Entering our username in Red Hat single sign-on
Now it’s time to type our password to log in:

Figure 7.3 – Entering our password in Red Hat single sign-on
Once logged in, we shall go to the Red Hat subscriptions page by clicking on the My Subscriptions link in the top bar:

Figure 7.4 – Accessing the subscriptions page in the Red Hat customer portal
The subscriptions page will look like this for a user with one physical machine subscribed:

Figure 7.5 – Subscription page example in the Red Hat customer portal
Tip
The Red Hat Developer Subscription was updated in January 2021 to support up to 16 systems. You can use your account for more than one single system to simulate larger production-like deployments.
Now let’s register our new system:
[root@rhel-instance ~]# subscription-manager register
Registering to: subscription.rhsm.redhat.com:443/subscription
Username: student
Password:
The system has been registered with ID: 2f230fd7-d529-4591-
af3e-d6a25cf9537e
The registered system name is: rhel-instance.example.com
With this, our system will be registered in the Red Hat Content Delivery Network (CDN) but will still not have a subscription assigned.
Let’s go to the subscriptions page and refresh to see the new system there. We will click on View all Systems to continue:
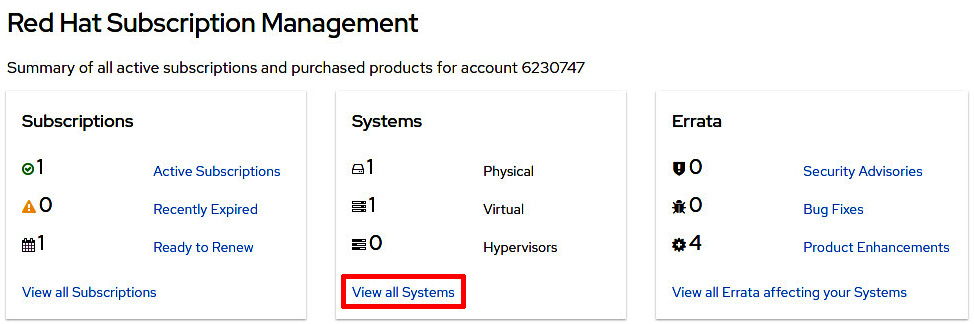
Figure 7.6 – Subscriptions page with the new subscribed system
We can see our new system on the page, rhel9.example.com, with the question mark next to it to show it does not have a subscription attached to it. Let’s click on the name of the system to see the details:

Figure 7.7 – Subscription page with the new subscribed system
Once on the specific system page, we see all the details for the system. We click on Subscriptions to see the attached ones:

Figure 7.8 – Subscriptions page with the new subscribed system’s details
We can see on the page that there are no attached subscriptions for this system:

Figure 7.9 – Subscriptions page with the new subscribed system, with no subscription attached
Let’s attach a subscription to our system using subscription-manager attach:
[root@rhel-instance ~]# subscription-manager attach --auto
Installed Product Current Status:
Product Name: Red Hat Enterprise Linux for x86_64
Status: Subscribed
The result of the command shows that the system is now registered and has a subscription attached to it for Red Hat Enterprise Linux for x86_64. Let’s refresh the Subscriptions page to ensure the subscription attachment runs properly:

Figure 7.10 – Subscriptions page with the new subscribed system, with one subscription attached
With this, we know for sure that the system is properly registered and subscribed to the Red Hat CDN and it’s ready to access all the software, patches, and updates available from it.
Also, in the system, we can see that a new file with the information on the software repositories, or repos for short, has been created:
[root@rhel-instance ~]# ls -l /etc/yum.repos.d/redhat.repo
-rw-r--r--. 1 root root 61372 Apr 13 00:56 /etc/yum.repos.d/redhat.repo
Now we know how to manage available subscriptions and assign them to a running system so it has access to the software binaries built by Red Hat. Let’s learn more about how to use the provided repositories in the next section.
Managing repositories and signatures with yum/dnf
RHEL, like many other Linux distributions, has a mechanism to provide software based on repos. These contain a list of software packages (which could be end user applications such as Firefox, or components for them such as GTK3), a list of dependencies between the packages, and other useful metadata.
Once we finish subscribing the system, we can take a look at the repositories available in the system using yum or dnf:
[root@rhel-instance ~]# yum repolist
Updating Subscription Management repositories.
repo id repo name
rhel-8-for-x86_64-appstream-rpms Red Hat Enterprise Linux 9 for x86_64 - AppStream (RPMs)
rhel-8-for-x86_64-baseos-rpms Red Hat Enterprise Linux 9 for x86_64 - BaseOS (RPMs)
[root@rhel-instance ~]# dnf repolist
Updating Subscription Management repositories.
repo id repo name
rhel-9-for-x86_64-appstream-rpms Red Hat Enterprise Linux 9 for x86_64 - AppStream (RPMs)
rhel-9-for-x86_64-baseos-rpms Red Hat Enterprise Linux 9 for x86_64 - BaseOS (RPMs)
As you can see, the output of yum and dnf is exactly the same. As a matter of fact, dnf is the evolution of yum, and in RHEL 9 the yum command is just a symbolic link to dnf:
[root@rhel-instance ~]# which yum
/usr/bin/yum
[root@rhel-instance ~]# ll /usr/bin/yum
lrwxrwxrwx. 1 root root 5 Ago 9 2021 /usr/bin/yum -> dnf-3
[root@rhel-instance ~]# which dnf
/usr/bin/dnf
[root@rhel-instance ~]# ll /usr/bin/dnf
lrwxrwxrwx. 1 root root 5 Ago 9 2021 /usr/bin/dnf -> dnf-3
They both can be used indistinctively in RHEL 9. From now on, we will use dnf only, but remember, if you prefer yum, feel free to use it.
Tip
YUM used to be an acronym for Yellowdog Updater Modified, a project that started as a Linux distribution for Macs called Yellowdog. DNF stands for Dandified YUM.
Now let’s take a look at the repository definition created during the subscription attachment, /etc/yum.repos.d/redhat.repo. We can edit the file and go to the entry of the BaseOS repository shown above rhel-9-for-x86_64-baseos-rpms:
[rhel-9-for-x86_64-baseos-rpms]
name = Red Hat Enterprise Linux 9 for x86_64 - BaseOS (RPMs)
baseurl = https://cdn.redhat.com/content/dist/rhel9/$releasever/x86_64/baseos/os
enabled = 1
gpgcheck = 1
gpgkey = file:///etc/pki/rpm-gpg/RPM-GPG-KEY-redhat-release
sslverify = 1
sslcacert = /etc/rhsm/ca/redhat-uep.pem
sslclientkey = /etc/pki/entitlement/2021426601576593026-key.pem
sslclientcert = /etc/pki/entitlement/2021426601576593026.pem
metadata_expire = 86400
As you can see, every section in the file starts with the name of the section between brackets – in the previous case, [rhel-9-for-x86_64-baseos-rpms]. Now let’s check all the entries under this section:
- name: A long descriptive name for the repository. It’s the one displayed when we listed the repos in the previous example.
- baseurl: The main resource the packages will be obtained from. In this case, it is a single HTTPS source. It contains the $releasever variable that will be substituted before being accessed. Other methods are NFS, HTTP, and FTP.
- enabled: A variable to provide a simple way to have repositories enabled or disabled on the system. When set to 1, it will be enabled, and when set to 0 it will be disabled.
- gpgcheck: A mechanism to verify packages. When set to 1, it will be enabled and all the packages installed in the system with dnf / yum will be verified using their gpg signatures against a provided key.
- gpgkey: A key to verify, using gpg, the downloaded packages.
- sslverify: A mechanism to verify the machine subscription to the CDN. Enabled when set to 1, and disabled when set to 0.
- sslcacert: A certificate used as a certificate authority to validate client certificates.
- sslclient key: A client key used to habilitate the client certificate.
- sslclientcert: The client certificate that the machine will use to identify itself against the CDN.
- metadata_expire: The time in seconds after which to consider the retrieved metadata as expired. The default, as shown here, is 24 hours.
- enabled_metadata: An option to enable other tools (not dnf) to use the metadata as downloaded in this repository.
The minimal required options to have a running repository are: name, baseurl, and gpgcheck, having this last one set to 0.
Important Note
Although it is possible to change the configuration of the repositories by editing the files, the best way to modify the Red Hat provided repos is by using commands that will be shown in this chapter. That’s because the redhat.repo file will be overwritten by the subscription manager when refreshing data.
By running dnf repolist, we obtained the list of repositories enabled in the system. What if we want to see all the repositories, the ones enabled and the ones disabled? That can be done by running dnf repolist --all:
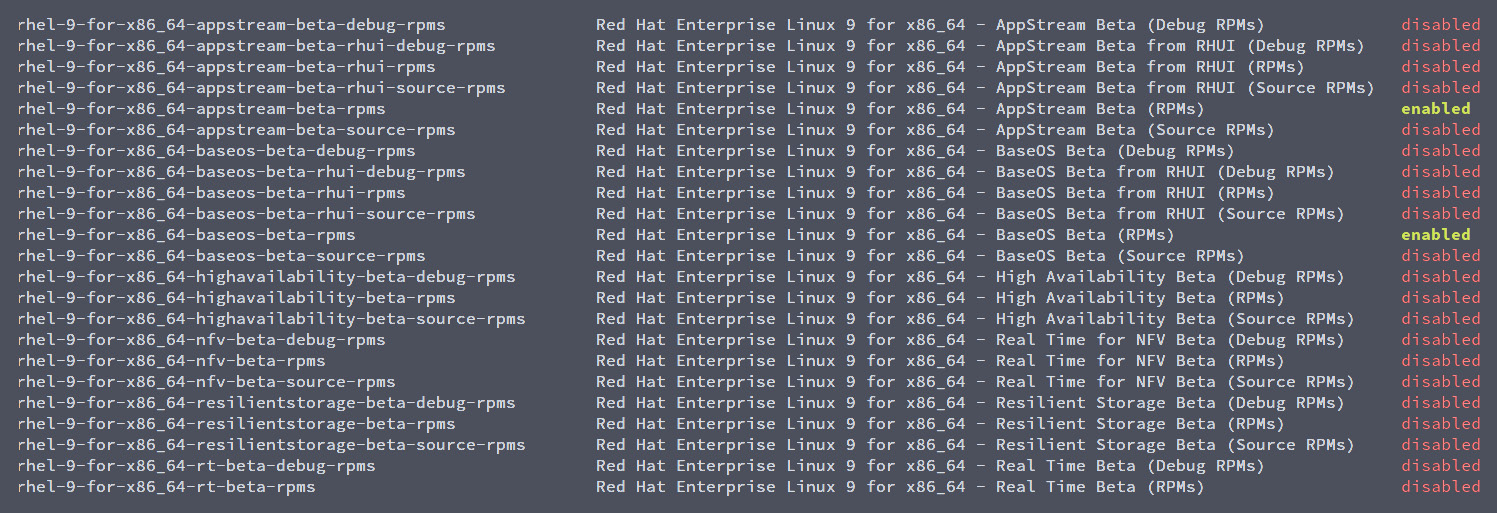
Figure 7.11 – Partial output of dnf repolist –all
The list is very extensive. It includes the repositories with the binaries as used in many production cases, from SAP to managing systems with Satellite. We can filter it with grep to search for supplementary:
[root@rhel-instance ~]# dnf repolist --all | grep supplementary
rhel-9-for-x86_64-supplementary-debug-rpms disabled
rhel-9-for-x86_64-supplementary-eus-debug-rpms disabled
rhel-9-for-x86_64-supplementary-eus-rpms disabled
rhel-9-for-x86_64-supplementary-eus-source-rpms disabled
rhel-9-for-x86_64-supplementary-rpms disabled
rhel-9-for-x86_64-supplementary-source-rpms disabled
There are four different types of channels here:
- Regular channels: For example, rhel-9-for-x86_64-supplementary-rpms, which contains the packages, also known as rpms, ready to be installed on the system. These apply during the standard maintenance period.
- Extended update support: For example, rhel-9-for-x86_64-supplementary-eus-rpms, which contains eus in the name. These provide packages with backports to be able to keep the same minor version for a longer time. Don’t use them unless it is required by a third-party vendor.
- Source channels: For example, rhel-9-for-x86_64-supplementary-source-rpms, which contains source in the name. They provide the source used to build the packages delivered in regular and extended updated support channels.
- Debug channels: For example, rhel-9-for-x86_64-supplementary-debug-rpms, containing debug in the name. These include the debugging information generated when building a package and are useful for in-deep troubleshooting of issues.
We can enable rhel-9-for-x86_64-supplementary-rpms by using the config-manager option of dnf, running the following:
[root@rhel-instance ~]# dnf config-manager --enable rhel-9-for-x86_64-supplementary-rpms
Updating Subscription Management repositories.
[root@rhel-instance ~]# dnf repolist
Updating Subscription Management repositories.
repo id repo name
rhel-9-for-x86_64-appstream-rpms Red Hat Enterprise Linux 9 for x86_64 - AppStream (RPMs)
rhel-9-for-x86_64-baseos-rpms Red Hat Enterprise Linux 9 for x86_64 - BaseOS (RPMs)
rhel-9-for-x86_64-supplementary-rpms Red Hat Enterprise Linux 9 for x86_64 - Supplementary (RPMs)
The repository is now enabled. You may want to try to enable and disable other repositories to practice.
Let’s now try to add a repository for which we know only its URL, such as the EPEL repo. This repo contains Extra Packages for Enterprise Linux, and is specifically built for Linux, but not supported by Red Hat. As it is a well-known repo, it is replicated around the world and there is a local mirror at http://mirror.uv.es/mirror/fedora-epel/9/Everything/x86_64/ (you can find your local one in the mirror list here: https://admin.fedoraproject.org/mirrormanager/mirrors/EPEL). Now we can add this repo using dnf config-manager:
[root@rhel-instance ~]# dnf config-manager --add-repo="http://mirror.uv.es/mirror/fedora-epel/9/Everything/x86_64/"
Updating Subscription Management repositories.
Adding repo from: http://mirror.uv.es/mirror/fedora-epel/9/Everything/x86_64/
[root@rhel-instance ~]# dnf repolist
Updating Subscription Management repositories.
repo id repo name
mirror.uv.es_mirror_fedora-epel_9_Everything_x86_64_ created by dnf config-manager from http://mirror.uv.es/mirror/fedora-epel/9/Everything/x86_64/
rhel-9-for-x86_64-appstream-rpms Red Hat Enterprise Linux 9 for x86_64 - AppStream (RPMs)
rhel-9-for-x86_64-baseos-rpms Red Hat Enterprise Linux 9 for x86_64 - BaseOS (RPMs)
rhel-9-for-x86_64-supplementary-rpms Red Hat Enterprise Linux 9 for x86_64 - Supplementary (RPMs)
We can inspect the newly created file – /etc/yum.repos.d/mirror.uv.es_mirror_fedora-epel_9_Everything_x86_64_.repo:
[mirror.uv.es_mirror_fedora-epel_9_Everything_x86_64_]
name=created by dnf config-manager from http://mirror.uv.es/mirror/fedora-epel/9/Everything/x86_64/
baseurl=http://mirror.uv.es/mirror/fedora-epel/9/Everything/x86_64/
enabled=1
You may have realized that there is an option missing in this repo, however, let’s move ahead. We can search for a package available in EPEL, such as, for example, screen:
[root@rhel-instance ~]# dnf info screen
Updating Subscription Management repositories.
created by dnf config-manager from http://mirror.uv.es/mirror/fedor 18 MB/s | 8.9 MB 00:00
Last metadata expiration check: 0:00:02 ago on Wed Apr 13 01:18:28 2022.
Available Packages
Name : screen
Version : 4.8.0
Release : 6.el9
Architecture : x86_64
Size : 649 k
Source : screen-4.8.0-6.el9.src.rpm
Repository : mirror.uv.es_mirror_fedora-epel_9_Everything_x86_64_
Summary : A screen manager that supports multiple logins on one terminal
URL : http://www.gnu.org/software/screen
License : GPLv3+
Description : The screen utility allows you to have multiple logins on just one
: terminal. Screen is useful for users who telnet into a machine or are
: connected via a dumb terminal, but want to use more than just one
: login.
:
: Install the screen package if you need a screen manager that can
: support multiple logins on one terminal.
The package is found, now let’s try to install it:
[root@rhel-instance ~]# dnf install screen
Updating Subscription Management repositories.
You have enabled checking of packages via GPG keys. This is a good thing.
However, you do not have any GPG public keys installed. You need to download the keys for packages you wish to install and install them.
You can do that by running the command:
rpm --import public.gpg.key
Alternatively you can specify the url to the key you would like to use for a repository in the 'gpgkey' option in a repository section and DNF will install it for you.
For more information contact your distribution or package provider.
[omitted]
Important Note
If the error you get differs from the output shown above, it might be because of the cache and it can be cleared using the dnf clean packages command.
As we can see there is an error trying to install from this source, as it required the gpgcheck and gpgkey entries to be configured to have a properly secured repo (as gpg ensures that the content delivered is the same as the content created).
We can obtain gpgkey from the same mirror, at the URL http://mirror.uv.es/mirror/fedora-epel/RPM-GPG-KEY-EPEL-9, and drop it where dnf will search for it, /etc/pki/rpm-gpg/:
[root@rhel-instance ~]# curl -s http://mirror.uv.es/mirror/fedora-epel/RPM-GPG-KEY-EPEL-9 > /etc/pki/rpm-gpg/RPM-GPG-KEY-EPEL-9
[root@rhel-instance ~]# head –n 1 /etc/pki/rpm-gpg/RPM-GPG-KEY-EPEL-9
-----BEGIN PGP PUBLIC KEY BLOCK-----
Now let’s modify the file /etc/yum.repos.d/mirror.uv.es_mirror_fedora-epel_9_Everything_x86_64_.repo to look like this:
[mirror.uv.es_mirror_fedora-epel_9_Everything_x86_64_]
name=created by dnf config-manager from http://mirror.uv.es/mirror/fedora-epel/9/Everything/x86_64/
baseurl=http://mirror.uv.es/mirror/fedora-epel/9/Everything/x86_64/
enabled=1
gpgcheck=1
gpgkey=file:///etc/pki/rpm-gpg/RPM-GPG-KEY-EPEL-9
You can see we added both the gpgcheck and gpgkey entries in the file. Let’s try installing the screen package again:
[root@rhel-instance ~]# dnf install screen
Updating Subscription Management repositories.
created by dnf config-manager from http://mirror.uv.es/mirror/fedora-epel/9/Everything/x86_64/ 78 kB/s | 4.7 kB 00:00
Dependencies resolved.
============================================================Package Architecture Version Repository Size
===========================================================
Installing:
screen x86_64 4.8.0-6.el9 mirror.uv.es_mirror_fedora-epel_9_Everything_x86_64_ 649 k
[omitted]
Running transaction
Preparing : 1/1
Running scriptlet: screen-4.8.0-6.el9.x86_64 1/1
Installing : screen-4.8.06.el9.x86_64 1/1
Running scriptlet: screen-4.8.0-6.el9.x86_64 1/1
Verifying : screen-4.8.0-6.el9.x86_64 1/1
Installed products updated.
Installed:
screen-4.8.0-6.el9.x86_64
Complete!
You’ll notice that there is a step in which it asks you to confirm that the gpg key fingerprint is correct: FF8A D134 4597 106E CE81 3B91 8A38 72BF 3228 467C. To do so, you can go to the Fedora security page, as the Fedora project manages EPEL, and check. The URL for that page is https://getfedora.org/security/:

Figure 7.12 – Partial capture of the Fedora security page with an EPEL 9 gpg fingerprint
As you can see, it is correct. We have just verified that the signature we are using has the same fingerprint as announced by the project managing it, and now all the packages downloaded from this repo will be verified with it to avoid package tampering (which is someone changing the content before you receive it).
Let’s review the commands that we used, which dnf provides to manage repos:

Table 7.1 – dnf commands and parameters to manage repos
Now that we know how to securely manage repositories in RHEL, let’s start adding more packages to our system, updating them, and undoing installations if we need to.
Doing software installations, updates, and rollbacks with YUM/DNF
In the previous section, we saw how to install a package. During the process, we saw a confirmation request to ensure that we were sure that we wanted to include new software in the system. Let’s now install software with dnf install, but using the –y option to answer yes to all questions that the command will issue:
[root@rhel-instance ~]# dnf install zip –y
[omitted]
Installed:
zip-3.0-33.el9.x86_64
Complete!
As you can see, the zip package was installed, without asking questions. We also notice that dnf finds the dependent packages, resolves the dependencies, and installs all that is needed for a package to run. This way, the system is kept in a coherent status, making it more reliable and predictable.
We can see which packages are ready to be updated using the dnf check-update command:
[root@rhel-instance ~]# dnf check-update
Updating Subscription Management repositories.
Last metadata expiration check: 0:06:39 ago on Wed Apr 13 01:23:21 2022.
NetworkManager.x86_64 1:1.36.0-3.el9_0 rhel-9-for-x86_64-baseos-rpms
NetworkManager-configserver.noarch 1:1.36.0-3.el9_0 rhel-9-for-x86_64-baseos-rpms
NetworkManager-libnm.x86_64 1:1.36.0-3.el9_0 rhel-9-for-x86_64-baseos-rpms
NetworkManager-team.x86_64 1:1.36.0-3.el9_0 rhel-9-for-x86_64-baseos-rpms
[root@rhel-instance ~]# dnf update NetworkManager –y
[omitted]
Upgraded:
NetworkManager-1:1.36.0-3.el9_0.x86_64
NetworkManager-libnm-1:1.36.0-3.el9_0.x86_64
NetworkManager-team-1:1.36.0-3.el9_0.x86_64
NetworkManager-tui-1:1.36.0-3.el9_0.x86_64
jansson-2.14-1.el9.x86_64
Installed:
NetworkManager-initscripts-updown-1:1.36.0-3.el9_0.noarch
Complete!
To update everything, just run dnf update without specifying the package:

Figure 7.13 – Partial capture of RHEL updating with dnf/yum
The result of running dnf update in the system is the following:
Installed:
kernel-5.14.0-70.5.1.el9_0.x86_64
kernel-core-5.14.0-70.5.1.el9_0.x86_64
kernel-modules-5.14.0-70.5.1.el9_0.x86_64
Complete!
These were examples of packages upgraded in a system. Your system, depending on the time you last upgraded it and the newly released packages, may have a different output.
Important Note
The kernel is the most important part of the system. It enables hardware access and all the basic functions of the operating system. That’s why, instead of upgrading it, a new version is installed. The system keeps the previous two versions just in case the system becomes unbootable, and one of them can be selected to run easily.
We can search the packages available with the dnf search command:
[root@rhel-instance ~]# dnf search wget
Updating Subscription Management repositories.
Last metadata expiration check: 3:52:23 ago on Wed Apr 13 08:37:34 2022.
============== Name Exactly Matched: wget =========
wget.x86_64 : A utility for retrieving files using the HTTP or FTP protocols
We can obtain extended information about a package, installed or not, with dnf info:
[root@rhel-instance ~]# dnf info wget
Updating Subscription Management repositories.
Last metadata expiration check: 3:53:13 ago on Wed Apr 13 08:37:34 2022.
Installed Packages
Name : wget
Version : 1.21.1
Release : 6.el9
Architecture : x86_64
Size : 3.1 M
Source : wget-1.21.1-6.el9.src.rpm
Repository : @System
From repo : AppStream
Summary : A utility for retrieving files using the HTTP or FTP protocols
URL : http://www.gnu.org/software/wget/
License : GPLv3+
Description : GNU Wget is a file retrieval utility which can use either the HTTP or
: FTP protocols. Wget features include the ability to work in the
: background while you are logged out, recursive retrieval of
: directories, file name wildcard matching, remote file timestamp
: storage and comparison, use of Rest with FTP servers and Range with
: HTTP servers to retrieve files over slow or unstable connections,
: support for Proxy servers, and configurability.
We can also remove an installed package with dnf remove:
[root@rhel-instance ~]# dnf remove screen –y
[omitted]
Removed: screen-4.8.0-6.el9.x86_64
Sometimes you want to install some packages that come together to perform a specific task, and that’s what package groups are for. Let’s get a list of the groups first with dnf grouplist:
[root@rhel-instance ~]# dnf grouplist | grep Tools
RPM Development Tools
Console Internet Tools
Security Tools
System Tools
Development Tools
Graphical Administration Tools
You may run it without | grep Tools to see the full list.
Let’s install the System Tools group with dnf groupinstall:
[root@rhel-instance ~]# dnf groupinstall "System Tools"
Updating Subscription Management repositories.
Last metadata expiration check: 3:56:12 ago on Wed Apr 13 08:37:34 2022.
Dependencies resolved.
The entire output of the preceding command is shown in the following screenshot:

Figure 7.14 – Partial capture of RHEL installing a group dnf/yum
Once the preinstallation completes, we can see that we will install 31 packages:
Install 31 Packages
Total download size: 24 M
Is this ok [y/N]:y
Replying with y will perform the installation (note that the –y option works here too, assuming yes to all questions).
We can check the history of all the installation transactions with dnf history:

Figure 7.15 – Partial capture of RHEL dnf/yum history
It’s easy to obtain specific info from each transaction specifying the number of it with dnf history:
[root@rhel-instance ~]# dnf history info 3
Updating Subscription Management repositories.
Transaction ID : 3
Begin time : Wed Apr 13 01:29:25 2022
Begin rpmdb : 604:ec03dbdf42251e063bf93ed3743b6cfd23622988
End time : Wed Apr 13 01:29:25 2022 (0 seconds)
End rpmdb : 604:97bafed2c0622d1ca789b1b6314e6353d512c339
User : root <root>
Return-Code : Success
Releasever : 9
Command Line : install zip -y
Comment :
Packages Altered:
Upgrade zip-3.0-33.el9.x86_64 @rhel-9-for-x86_64-baseos-rpms
Upgraded zip-3.0-30.el9.x86_64 @@System
More interestingly, we can roll back to one of the previous points marked with dnf history rollback. To make it faster, install the wget package (remove it if it already exists) and then roll back to the previous number:
[root@rhel-instance ~]# dnf install wget
[omitted]
[root@rhel-instance ~]# dnf history
Updating Subscription Management repositories.
ID| Command line| Date and time | Action(s) | Altered
-----------------------------------------------------------
10 | install wget | 2022-04-13 12:44 | Install | 1
9 | remove wget | 2022-04-13 12:44 | Removed | 1
8 | install vim | 2022-04-13 12:40 | Upgrade | 2
[omitted]
The preceding command rolls back everything after transaction number 8 and will leave the OS as it was after transaction 8 was complete:
[root@rhel-instance ~]# dnf history rollback 8
[omitted]
Installed: wget-1.21.1-7.el9.x86_64
Complete!
We can also undo a single transaction with yum history undo. Let’s see it with this transaction:
[root@rhel-instance ~]# dnf history undo 10 –y
[omitted]
Removed:
wget-1.21.1-7.el9.x86_64
Complete!
Let’s review the most important transactions done with dnf:

Table 7.2 – dnf commands to manage transactions and packages
The following table shows a summary of the most important dnf parameters to manage the history actions:

Table 7.3 – dnf commands to list and manage the history
Modularity enables the possibility to have different versions of the same package on the system. It is all managed with dnf so there is no need to install extra software:
Important Note
The modules are enabled by RHEL 9.1. If you are using RHEL 9.0, the following command won’t return any module.
[root@rhel-instance ~]# dnf module list
Updating Subscription Management repositories.
Last metadata expiration check: 3:32:45 ago on Wed 31 Aug 2022 12:46:57 PM CEST.
Red Hat Enterprise Linux 9.1 AppStream BETA for x86_64 - (RPMs)
Name Stream Profiles Summary maven 3.8 common [d] Java project management and project comp rehension tool
nodejs 18 common [d], development Javascript runtime, minimal, s2i
php 8.1 common [d], devel, mini PHP scripting language mal
ruby 3.1 common [d] An interpreter of object-oriented scripting language
Hint: [d]efault, [e]nabled, [x]disabled, [i]nstalled
Tip
The dnf module list command, without specifying any package, will show the full list of modules. Try it!
As you can see, we have three different versions of the PostgreSQL database available in RHEL 9, which are 9.6, 10, and 12. None of them are enabled and the default one is version 10.
Let’s enable version 8.1 of PHP using dnf module:
[root@rhel-instance ~]# dnf module enable php
[omitted]
Enabling module streams: php 8.1
[omitted]
Is this ok [y/N]: y
[root@rhel-instance ~]# dnf module list php
The output of the preceding command can be seen in the following screenshot:
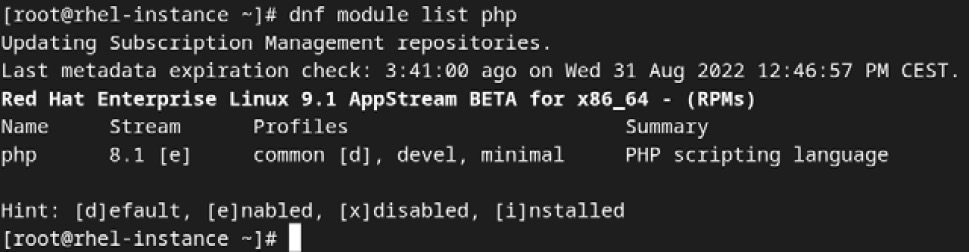
Figure 7.16 – Capture of the PostgreSQL module list
From now on, Yum will install, update, and maintain version 8.1 of PHP on this system. Let’s install it:
[root@rhel-instance ~]# dnf install php -y
[omitted]
Installed:
apr-1.7.0-11.el9.x86_64
apr-util-1.6.1-20.el9.x86_64 apr-util-bdb-1.6.1-20.el9.x86_64
apr-util-openssl-1.6.1-20.el9.x86_64
In the previous example, version 8.1 was installed.
We can remove the PostgreSQL package and reset the module status to go back to the initial point:
[root@rhel-instance ~]# dnf remove php -y
[omitted]
Removing:
apr-1.7.0-11.el9.x86_64
apr-util-1.6.1-20.el9.x86_64
[omitted]
Complete!
[root@rhel-instance ~]# dnf module reset php
[omitted]
Complete!
[root@rhel-instance ~]# dnf module list php
Updating Subscription Management repositories.
Last metadata expiration check: 1:23:21 ago on dom 14 feb 2021 19:25:32 CET.
Red Hat Enterprise Linux 9.1 AppStream for x86_64 – AppStream (RPMs)
Name Stream Profiles Summary
php 8.1 [e] common [d], devel, minimal PHP scripting language
Hint: [d]efault, [e]nabled, [x]disabled, [i]nstalled
Let’s review the commands shown in this section for modularity:

Table 7.4 – dnf commands and parameters
Tip
For more info on modularity, go to the system’s manual page by running man dnf.modularity.
Now that we have learned how to handle software transactions in RHEL, let’s go ahead with how to create and handle local repositories.
Creating and syncing repositories with createrepo and reposync
It’s common that we receive an RPM file and keep it in a repository that we can use on our machine (and sometimes share it with other machines with a web server of an NFS share). It’s also common that when we start building our own RPMs, we distribute them and, to do so, we need to create a repository. To do that, we can use the createrepo tool.
First, let’s create a folder in /var/tmp for repos:
[root@rhel-instance ~]# cd /var/tmp/
[root@rhel-instance tmp]# mkdir repos
[root@rhel-instance tmp]# cd repos/
Then, let’s create a folder for Slack, a common tool to communicate with your team, and download the RPM package:
[root@rhel-instance repos]# mkdir slack
[root@rhel-instance repos]# cd slack/
[root@rhel-instance repos]# curl -s -O https://downloads.slack-edge.com/releases/linux/4.25.0/prod/x64/slack-4.25.0-0.1.fc21.x86_64.rpm
[root@rhel-instance slack]# ls -l
total 70620
-rw-r--r--. 1 root root 72314252 Apr 13 19:03 slack-4.25.0-0.1.fc21.x86_64.rpm
Now we have a repository with an RPM file. We could have one with as many RPMs as we want, but we will continue with only this single package.
Let’s install the createrepo tool:
[root@rhel-instance slack]# dnf install -y createrepo
[omitted]
Installed:
createrepo_c-0.17.7-4.el9_0.x86_64 createrepo_c-libs-0.17.7-4.el9_0.x86_64
Complete!
And now we could simply run it to create a repository in the current folder with the following command:
[root@rhel-instance slack]# createrepo .
Directory walk started
Directory walk done - 1 packages
Temporary output repo path: ./.repodata/
Preparing sqlite DBs
Pool started (with 5 workers)
Pool finished
[root@rhel-instance slack]# ls -l
total 62656
total 70624
drwxr-xr-x. 2 root root 4096 Apr 13 19:04 repodata
-rw-r--r--. 1 root root 72314252 Apr 13 19:03 slack-4.25.0-0.1.fc21.x86_64.rpm
We see that the repodata folder has been created. In it, we can find the repomd.xml file that defines the repository content and also the recently created index files:
[root@rhel-instance slack]# ls repodata/
14288f14d67dd571bc34ce3ecd735a68ed8231a3954672eecbd59accbb3c2608-filelists.xml.gz
62ba8d6a9a1f41181f57bda494a8da7c80774b2be5abb645dd63376879276955-primary.sqlite.bz2
875605b939be5476644ce5d0ddd814b015f7c733ba7d9d9dd5432558b53db1d7-other.sqlite.bz2
b034107c628a1af32ce6f138ce06c2507a38407915825fa3300fbaa0ce095ccc-filelists.sqlite.bz2
e381ab772c9a99fb9064d76eca11746d82ea76c46293612c9f206b39e7e6c921-other.xml.gz
fc5d85aa39dc97d7153ba206d7502c1966cae0d88c15d9ce24015d69f59cf77f-primary.xml.gz
repomd.xml
Now we can add the repository to the system. We could do it without gpg signatures, setting the gpgcheck variable to 0 but, to have better security, let’s do it with the gpg signature. By searching the slack page, we find the signature and download it to the /etc/pki/rpm-gpg directory:
[root@rhel-instance slack]# curl https://slack.com/gpg/slack_pubkey_2019.gpg -o /etc/pki/rpm-gpg/RPM-GPG-KEY-SLACK
Then, we add the repository to the system by creating the file /etc/yum.repos.d/local-slack.repo with the following content:
[local-slack-repo]
name=Local Slack Repository
baseurl=file:///var/tmp/repos/slack
enabled=1
gpgcheck=1
gpgkey=file:///etc/pki/rpm-gpg/RPM-GPG-KEY-SLACK
And now we can try searching slack. To install Slack, it would require that the package group Server with a GUI is installed and also that the EPEL repository is installed and enabled, however, for the purpose of this exercise, we can continue without its installation. We can run the search by running dnf search slack:
[root@rhel-instance slack]# # dnf search slack
Updating Subscription Management repositories.
Last metadata expiration check: 0:02:36 ago on Wed Apr 13 13:10:07 2022.
====== Name & Summary Matched: slack ============
slack.x86_64 : Slack Desktop
Once a new version of Slack appears, we can download it to the same folder, and regenerate the repository index by running createrepo again. This way, all the systems using this repository will update slack when they run yum update. It’s a good way to keep all systems standardized and in the same version. For advanced features when managing RPM repositories, please check Red Hat Satellite.
Sometimes we want to have a local replica of the repositories in our system. To do that, we can use the reposync tool.
First, we install reposync, which comes in the yum-utils package:
[root@rhel-instance ~]# dnf install yum-utils -y
[omitted]
Installed:
yum-utils-4.0.24-4.el9_0.noarch
Complete!
Tip
If you try to install the dnf-utils package, the same yum-utils package will be installed.
Now it’s time to disable all repos provided by Red Hat except rhel-9-for-x86_64-baseos-rpms, which can be done with the following command:
[root@rhel-instance ~]# subscription-manager repos --disable="*"
[root@rhel-instance ~]# subscription-manager repos --enable="rhel-9-for-x86_64-baseos-rpms"
Time to check the change:
[root@rhel-instance ~]# dnf repolist
Updating Subscription Management repositories.
repo id repo name
rhel-9-for-x86_64-baseos-rpms Red Hat Enterprise Linux 9 for x86_64 - BaseOS (RPMs)
local-slack-repo Local Slack Repository
mirror.uv.es_mirror_fedora-epel_9_Everything_x86_64_ created by dnf config-manager from http://mirror.uv.es/mirror/fedora-epel/9/Everything/x86_64/
We can also disable the other repos, but this time we will do it in a different way, renaming them to something that doesn’t end with .repo:
[root@rhel-instance ~]# mv /etc/yum.repos.d/local-slack.repo /etc/yum.repos.d/local-slack.repo_disabled
[root@rhel-instance ~]# mv /etc/yum.repos.d/mirror.uv.es_mirror_fedora-epel_9_Everything_x86_64_.repo /etc/yum.repos.d/mirror.uv.es_mirror_fedora-epel_9_Everything_x86_64_.repo_disabled
[root@rhel-instance ~]# dnf repolist
Updating Subscription Management repositories.
repo id repo name
rhel-9-for-x86_64-baseos-rpms Red Hat Enterprise Linux 9 for x86_64 - BaseOS(RPMs)
Now we can run reposync with some options:
[root@rhel-instance ~]# cd /var/tmp/repos
[root@rhel-instance repos]# reposync --newest-only --download-metadata --destdir /var/tmp/repos
Updating Subscription Management repositories.
[omitted]
(1137/1139): samba-libs-4.15.5-105.el9_0.x86_64.rpm 352 kB/s | 107 kB 00:00
(1138/1139): grub2-efi-x64-modules-2.06-27.el9_0.noarch.rpm 805 kB/s | 1.1 MB 00:01
(1139/1139): glibc-langpack-ro-2.34-28.el9_0.x86_64.rpm 533 kB/s | 483 kB 00:00
[root@rhel-instance repos]# ls
rhel-9-for-x86_64-baseos-rpms slack
[root@rhel-instance repos]# ls rhel-9-for-x86_64-baseos-rpms/
Packages repodata
[root@rhel-instance repos]# ls rhel-9-for-x86_64-baseos-rpms/repodata/
0c625572996074ed6222993172444ac83ad60a6132d1fdd5f0978c342c8b0935-filelists.xml.gz
11f262d81fac509a4ac8d8ddaccb3fdc924445a769ff6b7dad977caf112d2301-updateinfo.xml.gz
1d8ae930-bdbc-443a-857c-bbf32dc44512
1f6c95265723ea0480714d4e5005a5b7330adca989a1fb40704235e0e0c29880-filelists.sqlite.bz2
52420e103dc1497dd802721146871a2e4700761b8bc8a308eaa48938fce556f8-primary.xml.gz
bceb83ebd1751392966aef17b680651d165467a16141d0c1923f8e9fa121abe5-other.sqlite.bz2
c3e9411464f827d2bbad2d3e517ad1eedb8598bf2e7aedf02b46cb87c06ac8d3-other.xml.gz
dc9cdc0c049addd83d60ac5e0edf3b20be010c1c3ac609b4e8b5e6fec3ee273d-comps.xml
e23e942c6db0f83fa07023cc435692e9582fcd53943200a457de0aedc8d5b699-primary.sqlite.bz2
repomd.xml
This will download the latest packages for the enabled channels. Let’s review the options:
- --newest-only: Red Hat repositories keep all the versions of the packages since the first release. This will download only the latest version.
- --download-metadata: To be sure that we download a fully functional repo, and we do not need to run createrepo on it, we can use this option, which will retrieve all metadata in a source repository.
- --destdir /var/tmp/repos: Sets the destination directory for the downloaded files. It will also create a directory for each repo configured so the specified directory will be the parent of them all.
With this replicated repository, we can also work in isolated environments. It could be very convenient to prepare test environments. For advanced repo management features, please remember to try Red Hat Satellite.
After learning the basics of repositories and how to use them to manage software, let’s dive into the technology behind it, the Red Hat Package Manager, or RPM.
Understanding RPM internals
Linux distributions tend to have their own package manager, from Debian with .deb to Pacman in Arch Linux and other more exotic mechanisms. The intention of package managers is to keep software installed on the system, update it, patch it, keep dependencies, and maintain an internal database of what is installed on the system. RPM is used by distributions such as Fedora, openSUSE, CentOS, Oracle Linux, and, of course, RHEL.
To handle RPMs, the rpm command is available on the system, however, since the introduction of yum/dnf, it is hardly ever used in system administration, and is not included in RHCSA.
RPMs contain the following:
- The files to be installed on the system, stored in CPIO format and compressed
- Information on permissions and the assigned owner and group for each file
- The dependencies required and provided by each package, along with, conflicts with other packages
- Install, uninstall, and upgrade scripts to be applied in any of those phases
- A signature to ensure the package was not modified
To learn a bit about it, we will show some simple useful commands.
Commands to check packages include the following:
- rpm –qa: Lists all the installed packages on the system
- rpm –qf <filename>: Shows which package installed the mentioned filename
- rpm –ql <packagefile>: Lists the files included in a downloaded package (interesting to check previously downloaded packages)
Commands to install, upgrade, and remove include the following:
- rpm –i <packagefile>: Installs the list of provided packages, not fetching dependencies
- rpm –U <packagefile>: Upgrades a package to the downloaded one. Checks dependencies but doesn’t manage them
- rpm –e <packagename>: Removes the packages specified, although it won’t remove dependencies
If you want to understand how the dependency management system works in yum/dnf, try installing packages with rpm –i.
Tip
You can also check the following Red Hat Customer Portal solution to learn about how to download RPM packages manually from the Customer Portal: https://access.redhat.com/solutions/6996
It is important to know that all the databases of installed packages are located in /var/lib/rpm and can be managed with the rpmdb command.
Nowadays, having to work with the rpm command usually means having a low-level issue, so it’s better to try to break a test system before having to use it in real life.
With this, we’ve completed our look at software management in RHEL systems.
Summary
In this chapter, we have gone through the admin parts of software management in a RHEL 9 system, from subscriptions to installation, to modularity, and other miscellaneous tips.
All the system patching, updating, and management in RHEL relies on yum/dnf and simplifies managing dependencies, installing the right versions of software, and distributing it in isolated environments. This is one of the tasks more common for system administrators and should be understood completely.
For the Red Hat Certified Engineer level, a more in-depth look will be required, including creating RPM packages, which are very useful to manage, maintain, and distribute internally produced software in your own environments leveraging the experience and tools that Red Hat provides.
Now that our systems are up to date, let’s move on to learn how to manage them remotely in the upcoming chapter.