
Now that you can access your GPS device, let's work on accessing the data programmatically. Your project should now have the GPS device connected and have access to query the data via the serial port. In this section, you will create a program to use this data to discover where you are and then you can determine what to do with that information.
If you've completed the previous section, you should be able to receive the raw data from the GPS unit. Now you want to be able to do something with this data, for example, find your current location and altitude and then decide whether your target location is to the west, east, north, or south.
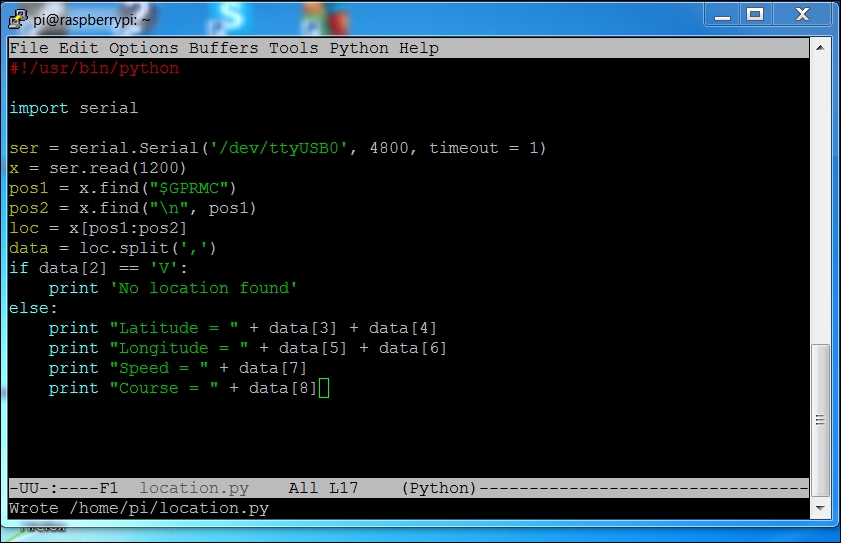
First, get the information from the raw data. As noted previously, our position and speed is in the $GPMRC output of our GPS device. We will first write a program to simply parse out a couple of pieces of information from that data. So open a new file (you can name it location.py) and edit it as shown in the following screenshot:
The code lines are explained as follows:
#!/usr/bin/Python– As always, this line simply makes this file available for you to execute from the command line.import serial– You again import theseriallibrary. This will allow you to interface the USB GPS sensor with the GPS system.if __name__=="__main__":– The main part of your program is then defined using this line.ser = serial.Serial('/dev/ttyUSB0', 4800, timeout = 1)– The first command sets up the serial port to use the/dev/ttyUSB0device, which is your GPS sensor using a baud rate of 4800 and a timeout value of one second.x = ser.read(500)– The next command then reads a set of values from the USB port. In this case, you read 500 values, which includes a fairly complete set of your GPS data.pos1 = x.find("$GPRMC")– This will find the first occurrence of$GPRMCand set the valuepos1to that position. In this case, you want to isolate the$GPRMCresponse line.pos2 = x.find(" ", pos1)– This will find the end of this line.loc = x[pos1:pos2]– The variablelocwill now hold the path including all the information you are interested in.data = loc.split(',')– This will break your comma-separated line into an array of values.if data[2] == 'V':– You now check to see whether or not the data is valid. If not, the next line simply prints out that you did not find a valid location.else:– If the data is valid, the next few lines print out the various pieces of data.
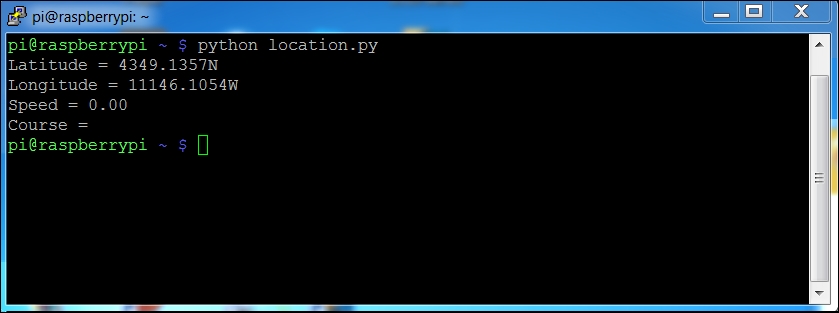
The following screenshot is an example showing the result that appeared when my device was able to find its location:
Once you have the data, you can do some interesting things with it. For example, you might want to figure out the distance from and direction to another waypoint. There is a piece of code at http://code.activestate.com/recipes/577594-GPS-distance-and-bearing-between-two-GPS-points/ that you can use to find the distances from and bearings to other waypoints based on your current location. You can easily add this code to your location.py program to update your robot on the distances and bearings to other waypoints.
Now your robot knows where it is and the direction it needs to go to get to other locations! There is another way to configure your GPS device that may make it a bit easier to access the data from other programs; it is using a set of functionality held in the gpsd library. To install this capability, type sudo apt-get install gpsd gpsd-clients and this will install the gpsd software. For a tutorial on this software, use http://wiki.ros.org/gpsd_client/Tutorials/Getting%20Started%20with%20gpsd_client. This software works by starting a background program (called a daemon) that communicates with your GPS device. We can then just query that program to get the GPS data. To start the process, type sudo gpsd /dev/ttyUSB0 -F /var/run/gpsd.sock. You can run the program by typing cgps. The following screenshot shows a sample result:
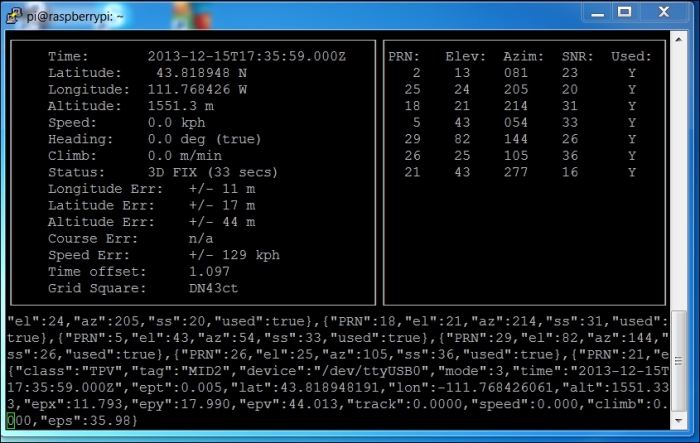
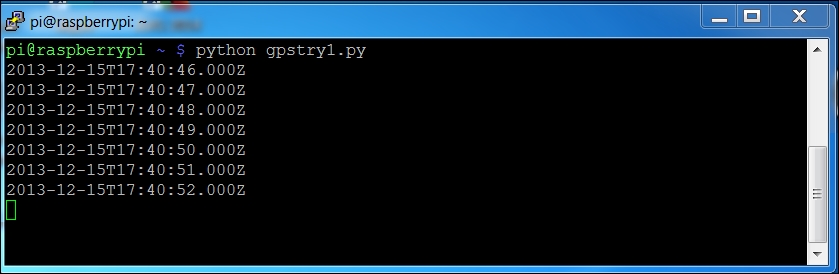
The previous screenshot displays both the formatted and some of the raw data that is being received from the GPS sensor. If you get a timeout error when attempting to run this program, type sudo killall gpsd to kill all running instances of the daemon and then type sudo gpsd /dev/ttyUSB0 -F /var/run/gpsd.sock again. You can also access this information from a program. To do this, edit a new file called gpstry1.py. The code will look as shown in the following screenshot:

The following are the details of your code:
#!/usr/bin/Python– As always, this line simply makes this file available for you to execute from the command line.import gps– In this case, you import thegpslibrary. This will allow you to access thegpsdfunctionality.session = gps.gps("localhost", "2947")– This opens a communication path between thegpsdfunctionality and our program. It also opens port 2947, which is assigned to thegpsdfunctionality, on the localhost.session.stream(GPS.WATCH_ENABLE | GPS.WATCH_NEWSTYLE)– This tells the system to look for new GPS data as it becomes available.while True:– This simply loops and processes information until you ask the system to stop (it can be stopped by pressing Ctrl + C).report = session.next()– When a report is ready, it is saved in thereportvariable.if report['class'] == 'TPV':– This line checks to see if the report will give you the type of report that you need.if hasattr(report, 'time'):– This line makes sure that the report holds time data.print report.time– This prints the time data. I use this in my example because the time data is always returned, even if the GPS is not able to see enough satellites to return position data. To see other possible attributes, visit www.catb.org/gpsd/gpsd_json.html for details.
Once you have created the program, you can run it by typing python gpstry1.py. The following screenshot shows what the output you get after running the program should look like:
One cool way to display positional information is using a graphical display including a map of your current position. There are several map applications that can interface with your GPS to indicate your location on a map.
One map application that works well is GpsPrune. To get this application, type sudo apt-get install gpsprune. To run this command, you'll need to be in a graphical environment, so you'll need to run it either with a display and keyboard attached or using vncserver. You'll also need to store your data so that the program can import it. To do this, let's amend our location.py program to save the data to a file. First, copy the program by typing cp location.py gpsdata.py. Now edit the program to make it look as shown in the following screenshot:

There are the following two changes you need to make:
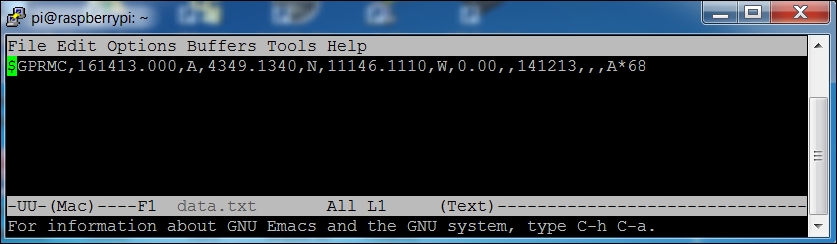
Now run the program by typing python gspdata.py. After the program is run, you should see a new data file called data.txt. You can view the contents of the file by typing emacs data.txt. You should see the result as shown in the following screenshot:
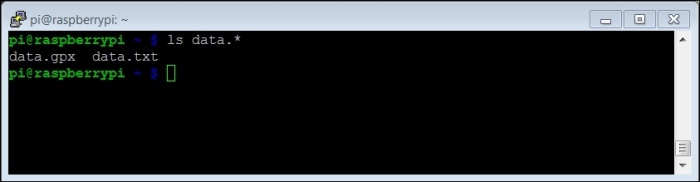
You can look at the data in the GpsPrune application. First, you need to convert your NMEA-formatted data to a data format that GpsPrune can understand. To do this, type gpsbabel -i NMEA -f data.txt -o GPX -F data.gpx. Type an ls data.* command and you should see the files as shown in the following screenshot:
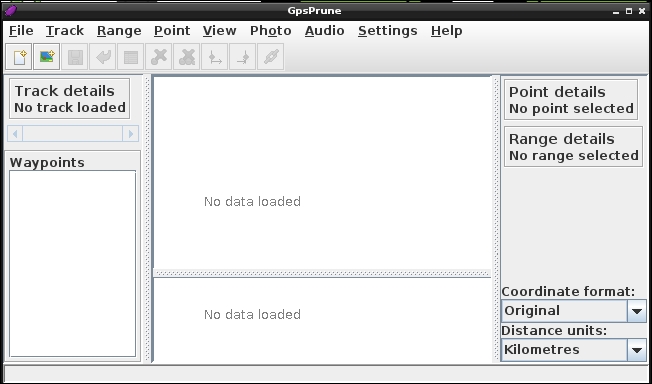
Now run the program by typing gpsprune in a terminal window. The application will open as shown in the following screenshot:
Turn on the map function by navigating to View | Show map as shown in the following screenshot:

Now open your file by navigating to File | Open and then selecting your filename with the .gpx file extension. The window shown in the following screenshot should open:

You may need to zoom out to see your location, but it should be there on the map. You could also capture multiple locations and then display them as routes. But you might want something a bit simpler; a program that allows you to enter a waypoint and display a map that shows both the waypoint and your current location. You can do this with the skills you learned in Chapter 4, Adding Vision to Raspberry Pi.
Let's start with the code in location.py. Make a copy by typing cp location.py viewlocation.py. Now, make the changes shown in the following screenshot:

The following are the details of the changes:
import cv2 as cv– You'll be using the OpenCV library to draw the images, so you need to import it using this command.rx = 1– This variable will hold the x pixel value of your location.ry = 1– This variable will hold the y pixel value of your location.xmax = 460– This is the maximum x pixel value in the map you created.ymax = 360– This is the maximum y pixel value in the map you created.xlongmin = 11145.67532– This is the minimum longitude value in the map you created.xlongmax = 11147.18679– This is the maximum longitude value in the map you created.ylatmin = 4348.84551– This is the minimum latitude value in the map you created.ylatmax = 4349.68896– This is the maximum latitude value in the map you created.while True:– This loops through the program, drawing the map and the position each time you get a new position from the GPS system.image = cv.LoadImage("map.jpg", cv.CV_LOAD_IMAGE_COLOR)– This creates a new data structure calledimage, and initializes it with the map image.latact = float(data[3])– This command turns the string that is the latitude into a float value.longact = float(data[5])– This command turns the string that is the longitude into a float value.rx = xmax - int((longact - xlongmin)/(xlongmax - xlongmin) * xmax)– This calculates the x value in pixels by taking the ratio of the range from the actual longitude value to the minimum longitude value divided by the total longitude range.ry = ymax - int((latact - ylatmin)/(ylatmax - ylatmin) * ymax)– This calculates the y value in pixels by taking the ratio of the range from the actual latitude value to the minimum latitude value divided by the total latitude range.t1 = rx,ry– This creates a point value that holds the x and y values of your position.br = rx + 5, ry + 5– You'll want to draw a rectangle so you can see the created point; this draws a rectangle value that is 5 x 5 in size.cv.Rectangle(image, t1, br, (0, 255, 0), 3)– This adds the drawn rectangle to the map image.cv.ShowImage("Map", image)– This shows the map with the rectangle in a window.if cv.WaitKey(2) == 27:– TheWaitKeyobject displays the image and also checks to see whether or not the Esc key has been pressed. If it has been pressed, it will execute the next statement.break– This closes the loop and the program.
You'll also need to build a map to be displayed. You'll need to know the coordinates of the corners of your map. I used GpsPrune to build a map. I first removed the point that was plotted by opening the file. Then, I selected a point in the bottom-right corner. The following is a screenshot of the application:

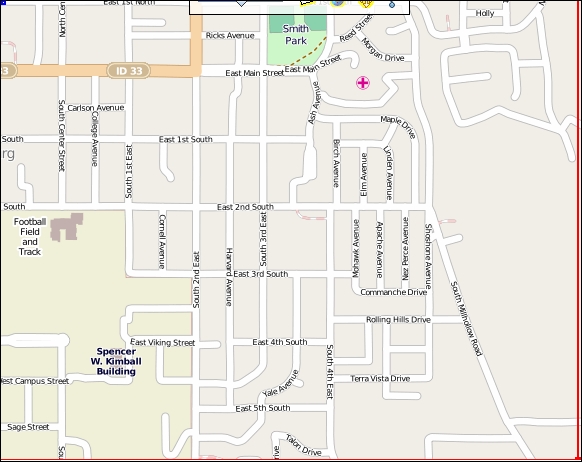
Make sure the Coordinate format dropdown is set to Deg-min. Notice the Latitude and Longitude values in the upper-right corner, which in this case are 43°48.84551' and 111°45.67532'. Now add another point in the upper-left corner, as shown in the following screenshot:

In this case, the Latitude value is 43°49.68896' and the Longitude value is 111°47.18679'. These are the corners of your map. Now take a screenshot of the map and use a program to crop the map at those two corners, as shown in the following screenshot:
For this example, I was using the VNC Viewer application on my PC to run GpsPrune on Raspberry Pi. This made it easy to take a screenshot by pressing Ctrl + Print Screen and then import the image to the Paint application. I then cropped the image and saved it as map.png. The following screenshot shows the view of the image as seen in the Paint application:
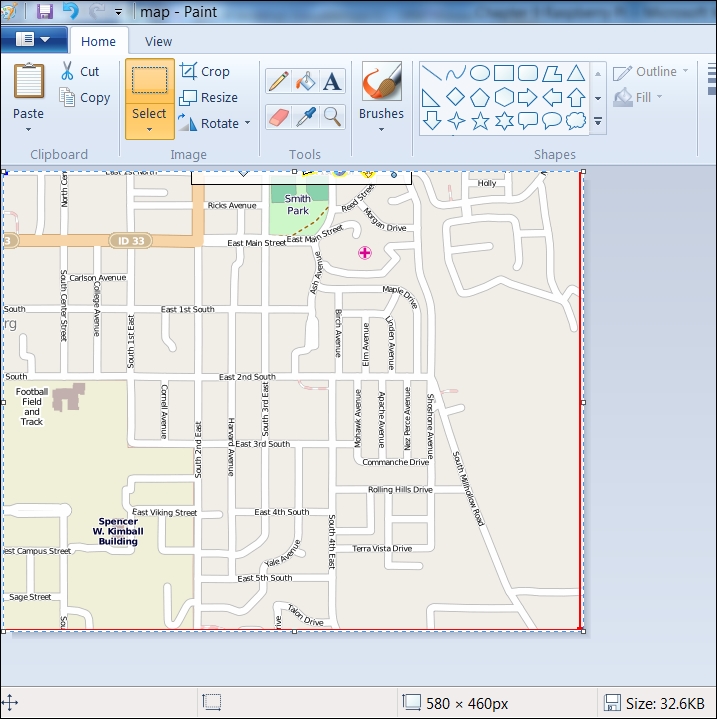
Note the resolution of the picture shown at the bottom of the page in the previous screenshot; this is important for your program. I then moved the resolution of the picture to Raspberry Pi using WinSCP, which we detailed in Chapter 1, Getting Started with Raspberry Pi.
Now that I have my file and Python code ready, I can now run the program using python viewlocation.py. The output of this operation appears as shown in the following screenshot:
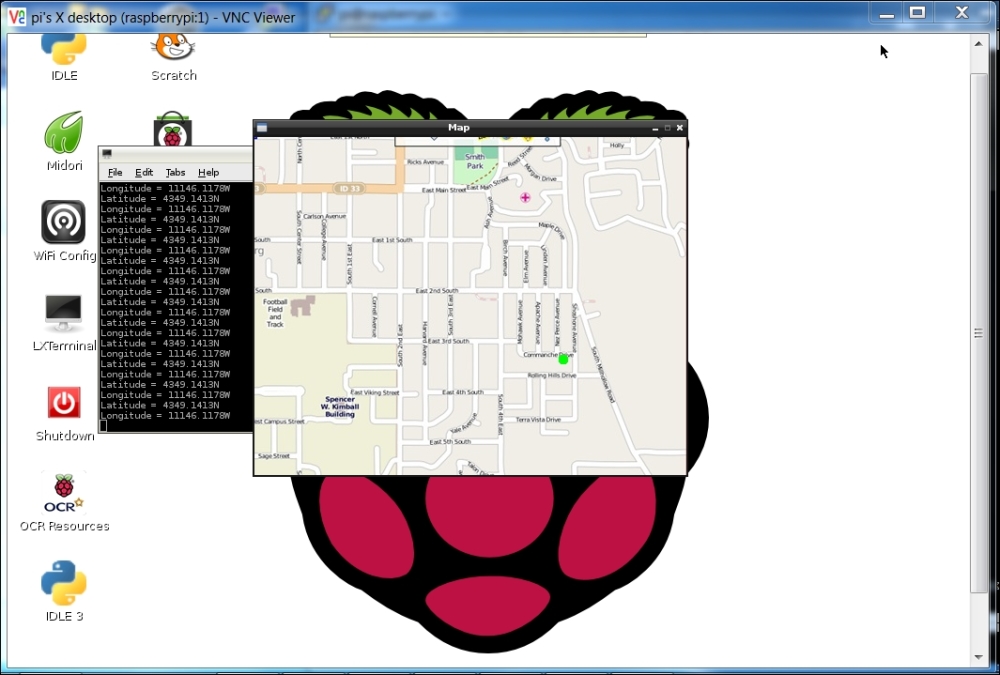
Now you can view your location via a map; it is marked by the green dot. As you move around, so will the green dot move on the screen.