
3
Coding, Testing, and Documentation: the Virtuous Cycle
We write software because we want it to do something useful. But how do we know that the code does what we want it to? The obvious answer is that we test it. Sometimes we run a piece of code we've just written and look at what it does, to see if it is doing the right thing. There's often a lot of code, though, and there are a lot of things we want to ensure are working—and continue to work as we add new features.
Thankfully, most languages come with a way to automate testing your code, and Python is no exception. When we create tests along with the code we are writing, it will increase the likelihood of spotting an error. Bugs in our code cost time, and can cost a company money. Bugs are also impossible to eliminate completely—the best we can do is take reasonable steps to prevent as many as we can.
Writing tests helps to provide a clearer idea of what software is meant to do. Take, for example, a function that is meant to return the five highest numbers in a list:
def filter(some_numbers):
    some_numbers.sort()
    return some_numbers[-5:]
It's a very simple function, so it probably does what we want. Or does it? The .sort() method works in place instead of returning a new value, so we've changed the order of the variable that we passed in as an argument; this can have unintended consequences in other areas of the program. The function also doesn't check to see that it's returning numbers, so what should be done if there are other objects in the list? If there are not enough numbers to return five of them, is that acceptable, or should the function raise an error?
By writing tests, we get a clear idea not just about what we want the function to do, but also how it should behave in different situations: We keep working towards the objective, but instead of thinking about "How to win" we think about "How to avoid losing."
Test-Driven Development (TDD) is an approach where you write tests alongside the code you are creating and use the tests to guide what the code should do—and to demonstrate that it works as you expect. It will not always improve the quality of your project, but it will catch a lot of errors before they can cause damage, helping to make your team more agile. Developers who need to fix a bug or refactor a part of the application can do so with fewer concerns that they have broken something, and more easily show their team that the work is suitable.
Behavior-Driven Development (BDD) is another approach that can work well in combination with TDD. Using this method, tests describe the desired behavior of the software from a higher-level point of view and are often presented in more human-friendly language. A developer can write code to describe what happens when a test uses phrases such as "the user searches for" and "results are shown for," allowing the people writing the tests to focus on what should happen; for example:
Scenario: Basic DuckDuckGo Search
    When the user searches for "panda"
    Then results are shown for "panda"
Some good examples of BDD tests are available at: https://github.com/AndyLPK247/behavior-driven-python
Writing tests is time-consuming at first, but in the long term, it is often the best approach to ensure a project is stable as it grows in size and scope. Of course, it's always possible to write bad tests and end up with poor results or create a test suite that is horrible to maintain and takes too long to run. The best tools and processes in the world won't prevent a careless developer from producing bad software.

Figure 3.1: The best tools on offer still won't prevent complacent developers from producing bad software… Credit to: https://xkcd.com/303/
A good set of tests should demonstrate that the software does what we intend it to do and that it should fail in a predictable and fixable way. That means that if you give it invalid data, or a dependency it relies on has broken, the behavior of the code is predictable.
Writing tests is also a good way to get some perspective on your code. Does the API you've designed make sense? Do things fit well together? And when the team gains more people or reorganizes, tests are a good source of information about the state of the code, detailing what its intentions are. The specific needs the software fulfils often change over time as well, meaning that significant refactoring—not just rewriting but changing the architecture—is often needed.
Documentation is a crucial part of a project, although it's often the first area to fall behind. After a while, it becomes rare to see a project's documentation fully up to date with the state of the code, unless some dedicated people work on it. It can be an immense source of frustration for developers to find out that the code examples in the documentation are broken after some refactoring. But there are ways to mitigate these issues; for instance, code extracts in the documentation could be part of the test suite to make sure they work.
In any case, no matter how much energy you expend on tests and documentation, there is one golden rule: testing, documenting, and coding your projects should be done continuously. In other words, updating the tests and documentation is part of the process to update the code. We can make this process easier, as we shall see.
After providing a few general tips on how to test code in Python, this chapter focuses on what testing and documentation tools can be used in the context of building microservices with Quart, and how to set up continuous integration with some popular online services.
The chapter is organized into five parts:
- The different types of tests
- Using pytest and tox
- Developer documentation
- Version control
- Continuous integration
Different kinds of tests
There are many kinds of tests, and it can be confusing sometimes to know what is being spoken about. For instance, when people refer to functional tests, they may be referring to different kinds of tests depending on the project's nature. In microservice land, we can classify tests into these five distinct goals:
- Unit tests: These make sure a class or a function works as expected in isolation.
- Functional tests: Verify that the microservice does what it says from the consumer's point of view, and behaves correctly, even upon receiving bad requests.
- Integration tests: Verify how a microservice integrates with all its network dependencies.
- Load tests: Measure the microservice performances.
- End-to-end tests: Verify that the whole system works—from initial request to final action—through all its components.
We will dive deeper into the details in the following sections.
Unit tests
Unit tests are the simplest and most self-contained tests to add to a project. The "unit" being tested is a small component of the code; for example, a single unit test might examine a single function, several unit tests might run a battery of tests against that function, and a whole suite of tests might run against the module that the function is in.
Python's standard library comes with everything needed to write unit tests. In most projects, there are functions and classes that can be tested in isolation, and projects based on Quart are no different.
Testing in isolation in Python usually means that you instantiate a class or call a function with specific arguments and verify that you get the expected result. If you have a function that gets given a large data structure and searches for a particular value within it, then that can be easily tested on its own as it is given everything it needs. However, when the class or function calls another piece of code that is not built in Python or its standard library, it is not in isolation anymore.
In some cases, it will be useful to mock those calls to achieve isolation. Mocking means replacing a piece of code with a fake version which will return the value you need for the test, but fake the behavior that the real code performs. An example might be a function which queries a database and formats the data before returning it. In our unit test suite, we probably don't want to run a real database, but we can mock the database query so that it returns a predictable value, and make sure that our function does the right thing with what it gives us.
Mocking comes with its own risks, because it's easy to implement a different behavior in your mocks and end up with some code that works with your tests but not the real thing. That problem often occurs when you update your project's dependencies, or an external service changes what it sends, and your mocks are not updated to reflect the new behaviors.
So, limiting the usage of mocks to the three following use cases is good practice:
- I/O operations: When the code performs calls to third-party services or a resource (socket, files, and so on), and you can't run them from within your tests.
- CPU-intensive operations: When the call computes something that would make the test suite too slow.
- Specific behaviors to reproduce: When you want to write a test to try out your code under specific behaviors (for example, a network error or changing the date or time by mocking the date time and time modules).
Clean code techniques can help make our unit tests much more straightforward by trying to reduce the number of functions that have side effects and gathering all your I/O operations to the highest level possible. Consider the following scenario, where we are reading some data about superheroes from the Mozilla Developer Network's documentation about JSON (https://developer.mozilla.org/en-US/docs/Learn/JavaScript/Objects/JSON):
import requests
def query_url(url):
    response = requests.get(url)
    response.raise_for_status()
    return response.json()
def get_hero_names(filter=None):
    url = "https://mdn.github.io/learning-area/javascript/oojs/json/superheroes.json"
    json_body = query_url(url)
    for member in json_body.get("members", []):
        if filter(member):
            yield member["name"]
def format_heroes_over(age=0):
    hero_names = get_hero_names(filter=lambda hero: hero.get("age", 0) > age)
    formatted_text = ""
    for hero in hero_names:
        formatted_text += f"{hero} is over {age}
"
    return formatted_text
if __name__ == "__main__":
    print(format_heroes_over(age=30))
In order to test the function that constructs the string, or the one that filters the names, we need to create a fake connection to the web. This means several of our functions are relying on mocked connections. Instead, we could write:
# requests_example2.py
import requests
def query_url(url):
    response = requests.get(url)
    response.raise_for_status()
    return response.json()
def get_hero_names(hero_data, hero_filter=None):
    for member in hero_data.get("members", []):
        if hero_filter is None or hero_filter(member):
            yield member
def render_hero_message(heroes, age):
    formatted_text = ""
    for hero in heroes:
        formatted_text += f"{hero['name']} is over {age}
"
    return formatted_text
def render_heroes_over(age=0):
    url = "https://mdn.github.io/learning-area/javascript/oojs/json/superheroes.json"
    json_body = query_url(url)
    relevant_heroes = get_hero_names(
        json_body, hero_filter=lambda hero: hero.get("age", 0) > age
    )
    return render_hero_message(relevant_heroes, age)
if __name__ == "__main__":
    print(render_heroes_over(age=30))
By rearranging our code this way, the network connection query is "higher up"—we encounter it first. We can write tests to examine and filter the results without ever creating a mocked connection, and it means we can use them in isolation in our code—perhaps we get the same data from a cache instead of the web, or receive it from a client who already has it. Our code is more flexible now, and simpler to test.
Of course, this is a somewhat contrived example, but the principle means that we are arranging our code so that there are functions with well-defined inputs and outputs, and that makes it easier to test. It's an important lesson from the world of functional programming languages, such as Lisp and Haskell, where functions are closer to mathematical functions.
What might the tests look like? Here is a class using unittest that will perform some basic checks, including setting up any prerequisites that our tests have in a method called setUp, and cleaning up after ourselves if we add a method called tearDown. If this was a real service, we might also want to consider other situations, such as what get_hero_names does with no filter, or a filter that returns no results or throws an error. The following example uses request_mock, which is a handy library to mock request-based network calls (see http://requests-mock.readthedocs.io):
import unittest
from unittest import mock
import requests_mock
import requests_example2  # Our previous example code
class TestHeroCode(unittest.TestCase):
    def setUp(self):
        self.fake_heroes = {
            "members": [
                {"name": "Age 20 Hero", "age": 20},
                {"name": "Age 30 Hero", "age": 30},
                {"name": "Age 40 Hero", "age": 40},
            ]
        }
    def test_get_hero_names_age_filter(self):
        result = list(
            requests_example2.get_hero_names(
                self.fake_heroes, filter=lambda x: x.get("age", 0) > 30
            )
        )
        self.assertEqual(result, [{"name": "Age 40 Hero", "age": 40}])
    @requests_mock.mock()
    def test_display_heroes_over(self, mocker):
        mocker.get(requests_mock.ANY, json=self.fake_heroes)
        rendered_text = requests_example2.render_heroes_over(age=30)
        self.assertEqual(rendered_text, "Age 40 Hero is over 30
")
if __name__ == "__main__":
    unittest.main()
You should keep an eye on all your mocks as the project grows, and make sure they are not the only kind of tests that cover a particular feature. For instance, if the Bugzilla project comes up with a new structure for its REST API, and the server your project uses is updated, your tests will happily pass with your broken code until the mocks reflect the new behavior.
How many tests and how good the test coverage is will depend on what your application is for. Unless your microservice is critical to your business, there is no need to have tests for all the failures you can come up with on day one. In a microservice project unit tests are not a priority, and aiming at 100% test coverage (where every line of your code is called somewhere in your tests) in your unit tests will add a lot of maintenance work for little benefit.
It is better to focus on building a robust set of functional tests.
Functional tests
Functional tests for a microservice project are all the tests that interact with the published API by sending HTTP requests, and asserting that the HTTP responses are the expected ones. These differ from unit tests because they focus more on the behavior of a microservice, or a smaller part of a larger service.
This definition is broad enough to include any test that can call the application, from fuzzing tests (where gibberish is sent to your app and you see what happens) to penetration tests (you try to break the app security), and so on. The key part of a functional test is to investigate whether the software's behavior meets its requirements. As developers, the two most important kinds of functional tests we should focus on are the following:
- Tests that verify that the application does what it was built for
- Tests that ensure an abnormal behavior that was fixed is not happening anymore
The way those scenarios are organized in the test class is up to the developers, but the general pattern is to create an instance of the application in the test class and then interact with it.
In that context, the network layer is not used, and the application is called directly by the tests; the same request-response cycle happens, so it is realistic enough. However, we would still mock out any network calls happening within the application.
Quart includes a QuartClient class to build requests, which can be created directly from the app object using its test_client() method. The following is an example of a test against the quart_basic app we showed in Chapter 2, Discovering Quart, which sends back a JSON body on /api/:
import unittest
import json
from quart_basic import app as tested_app
class TestApp(unittest.IsolatedAsyncioTestCase):
    async def test_help(self):
        # creating a QuartClient instance to interact with the app
        app = tested_app.test_client()
        # calling /api/ endpoint
        hello = await app.get("/api")
        # asserting the body
        body = json.loads(str(await hello.get_data(), "utf8"))
        self.assertEqual(body["Hello"], "World!")
if __name__ == "__main__":
    unittest.main()
The QuartClient class has one method per HTTP method and sends back Response objects that can be used to assert the results. In the preceding example, we used .get(), and since it is asynchronous code, we had to await the call and the request to get_data(), as well as tell the unittest module that we were running asynchronous tests.
There is a testing flag in the Quart class which you can use to propagate exceptions to the test, but some prefer not to use it by default to get back from the app what a real client would get—for instance, to make sure the body of 5xx or 4xx errors is converted to JSON for API consistency.
In the following example, the /api/ call produces an exception, and we have error handlers for internal server errors and missing pages:
# quart_error.py
from quart import Quart

app = Quart(__name__)

text_404 = (
    "The requested URL was not found on the server.  "
    "If you entered the URL manually please check your "
    "spelling and try again."
)

@app.errorhandler(500)
def error_handling_500(error):
    return {"Error": str(error)}, 500
@app.errorhandler(404)
def error_handling_404(error):
    return {"Error": str(error), "description": text_404}, 404

@app.route("/api")
def my_microservice():
    raise TypeError("This is a testing exception.")

if __name__ == "__main__":
    app.run()
With our tests, we are making sure the client gets a proper 500 with a structured JSON body in test_raise(). The test_proper_404() test method does the same tests on a non-existent path, and uses the asynchronous versions of the TestCase class along with its setup and teardown methods:
# test_quart_error.py
import unittest
import json
from quart_error import app as tested_app, text_404
class TestApp(unittest.IsolatedAsyncioTestCase):
    async def asyncSetUp(self):
        # Create a client to interact with the app
        self.app = tested_app.test_client()
    async def test_raise(self):
        # This won't raise a Python exception but return a 500
        hello = await self.app.get("/api")
        self.assertEqual(hello.status_code, 500)
    async def test_proper_404(self):
        # Call a non-existing endpoint
        hello = await self.app.get("/dwdwqqwdwqd")
        # It's not there
        self.assertEqual(hello.status_code, 404)
        # but we still get a nice JSON body
        body = json.loads(str(await hello.get_data(), "utf8"))
        self.assertEqual(hello.status_code, 404)
        self.assertEqual(body["Error"], "404 Not Found: The requested URL was not found on the server. If you entered the URL manually please check your spelling and try again.")
        self.assertEqual(body["description"], text_404)
if __name__ == "__main__":
    unittest.main()
An alternative to the QuartClient method is WebTest (https://docs.pylonsproject.org/projects/webtest/), which offers a few more features out of the box. This will be covered later in this chapter. Also see the following for further details: (http://webtest.pythonpaste.org)
Integration tests
Unit tests and functional tests focus on testing your service code without calling other network resources, and so no other microservices in your application, or third-party services such as databases, need to be available. For the sake of speed, isolation, and simplicity, network calls are mocked.
Integration tests are functional tests without any mocking and should be able to run on a real deployment of your application. For example, if your service interacts with Redis and RabbitMQ, they will be called by your service as normal when the integration tests are run. The benefit is that it avoids falling into the problems that were described earlier when mocking network interactions.
You will be sure that your application works in a production execution context only if you try it in a fully integrated, realistic scenario.
The caveat is that running tests against an actual deployment makes it harder to set up test data, or to clean up whatever data was produced from within the service during the test. Patching the application behavior to reproduce a service's response is also a difficult task.
Good configuration management software can help significantly with integration tests, as having an Ansible playbook or Puppet configuration can mean deploying all these components is as simple as running a command. We will discuss this more in Chapter 10, Deploying on AWS, when we discuss deployment.
Integration tests can also be run on a development or staging deployment of your service. With many developers pushing changes, this may cause contention on this limited resource, but it can be simpler—and less costly—to run all the integration tests while simulating the real environment that closely.
You can use whatever tool you want to write your integration test. A bash script with curl might sometimes be enough on some microservices, while others might require careful orchestration.
It's better for integration tests to be written in Python, and be part of your project's collection of tests. To do this, a Python script that uses requests to call your microservice can do the trick. If you provide a client library for your microservice, this can be a good place to do its integration tests as well.
What differentiates integration tests from functional tests is mostly the fact that real services are being called. We discover the consequences of real interactions with databases, message queues, and other dependencies that the service possesses. What if we could write functional tests that can either be run on a local Quart application or against an actual deployment? This is possible with WebTest, as we will find out later in this chapter.
Load tests
The goal of a load test is to understand how your service performs under stress. Learning where it starts to fail under high load will tell you how to best plan for future eventualities, as well as distribute the workload your application currently has. The first version of your service may well be fast enough for the situation it finds itself in, but understanding its limitations will help you determine how you want to deploy it, and if its design is future-proof in the case of an increased load.
The information from load tests will, alongside numbers collected from the production service, allow you to balance your service's throughput with the number of queries it can reasonably respond to simultaneously, the amount of work that needs doing for a response, how long queries wait for a response, and how much the service will cost—this is known as capacity management.
A good load test can also point you to changes that can be made to remove a bottleneck, such as changing the way writes are made to a database so that they no longer require an exclusive lock.
The real problem is that programmers have spent far too much time worrying about efficiency in the wrong places and at the wrong times; premature optimization is the root of all evil (or at least most of it) in programming.—Donald Knuth, The Art of Computer Programming
It's a common mistake to spend a lot of time on making each microservice as fast as possible, before we even know what the critical path is and what it is best to improve. Taking measurements before making changes allows us to see exactly what the benefits are of each change, and helps us prioritize our time and effort.
Writing load tests can help you answer the following questions:
- How many users can one instance of my service serve when I deploy it on this machine?
- What is the average response time when there are 10, 100, or 1,000 concurrent requests? Can I handle that much concurrency?
- When my service is under stress, is it running out of RAM or is it mainly CPU-bound? Is it waiting on another service?
- Can I add other instances of the same service and scale horizontally?
- If my microservice calls other services, can I use pools of connectors, or do I have to serialize all the interactions through a single connection?
- Can my service run for multiple days at a time without degradation?
- Is my service working properly after a usage peak?
Depending on the kind of load you want to achieve, there are many tools available, from simple command-line tools to heavier distributed load systems. For performing a simple load test that does not require any specific scenario, Salvo is an Apache Bench (AB) equivalent written in Python, which can be used to apply load to your endpoints: https://github.com/tarekziade/salvo.
In the following example, Salvo simulates 10 concurrent connections, each making 100 sequential requests against a Quart web server on the /api/ endpoint:
$ salvo http://127.0.0.1:5000/api  --concurrency 10 –-requests 100
-------- Server info --------
Server Software: hypercorn-h11
-------- Running 100 queries - concurrency 10 --------
[================================================================>.] 99%
-------- Results --------
Successful calls   		 1000
Total time     			 13.3234 s
Average        			 0.0133 s
Fastest        			 0.0038 s
Slowest        			 0.0225 s
Amplitude      			 0.0187 s
Standard deviation 		 0.002573
Requests Per Second    		 75.06
Requests Per Minute    		 4503.35
-------- Status codes --------
Code 200     			 1000 times.
Want to build a more powerful load test ? Try Molotov !
Bye!
These numbers don't mean much, as they will vary a lot depending on the deployment, and from where you run them. For instance, if your Flask application is served behind nginx with several workers, then the load will be distributed, some of the overhead will be handled by nginx, and for a complete picture we should test the entire service.
But this small test alone can often catch problems early on, in particular when your code is opening socket connections itself. If something is wrong in the microservice design, these tools make it easier to detect by highlighting unexpected responses, or causing the application to break in ways the developer was not expecting.
Salvo is based on Molotov (https://molotov.readthedocs.io/en/stable/) which requires a bit more work to set up, but has more features, such as allowing interactive scenarios with sets of queries and expected responses. In the following example, each function is a possible scenario that gets picked by Molotov to run against the server:
# molotov_example.py
# Run:
# molotov molotov_example.py --processes 10 --workers 200 --duration 60
import json
from molotov import scenario
@scenario(weight=40)
async def scenario_one(session):
    async with session.get("http://localhost:5000/api") as resp:
        res = await resp.json()
        assert res["Hello"] == "World!"
        assert resp.status == 200
@scenario(weight=60)
async def scenario_two(session):
    async with session.get("http://localhost:5000/api") as resp:
        assert resp.status == 200
Both tools will give you some metrics, but they are not very accurate because of the network and client CPU variance on the box they are launched from. A load test will stress the resources of the machine running the test, and that will impact the metrics.
When performing a load test, server-side metrics allow greater visibility into your application. At the Quart level, you can use the Flask extension Flask Profiler (https://github.com/muatik/flask-profiler), which collects the amount of time each request takes and offers a dashboard that will let you browse the collected times, as shown in Figure 3.2.

Figure 3.2: Flask Profiler enables the time taken for requests to be tracked, showing them in a graphical format
For a production service, it is best to use tools such as Prometheus (https://prometheus.io/), InfluxDB (https://www.influxdata.com/), or use one of your cloud hosting provider's built-in tools, such as AWS CloudWatch.
End-to-end tests
An end-to-end test will check that the whole system works as expected from the end-user point of view. The test needs to behave like a real client, and call the system through the same User Interface (UI).
Depending on the type of application you are creating, a simple HTTP client might not be enough to simulate a real user. For instance, if the visible part of the system through which users are interacting is a web application with HTML pages that gets rendered on a client side, you will need to use a tool like Selenium (https://www.selenium.dev/). It will automate your browser in order to make sure that the client requests every CSS and JavaScript file and then renders every page accordingly.
JavaScript frameworks now do a lot of work on the client side to produce pages. Some of them have completely removed the server-side rendering of templates, and simply fetch data from the server to generate the HTML page by manipulating the Document Object Model (DOM) through the browser APIs. Calls to the server, in that case, consist of getting all the static JavaScript files needed for rendering a given URL, plus the data.
Writing end-to-end tests is outside the scope of this book, but you can refer to Selenium Testing Tools Cookbook to learn more about this.
The following points summarize what we've learned in this section:
- Functional tests are the most important tests to write for a web service, and it is easy to carry out in Quart by instantiating the app in the tests and interacting with it.
- Unit tests are a good complement, but avoid misusing mocks.
- Integration tests are like functional tests but run against a real deployment.
- Load tests are useful to learn about your microservice bottlenecks and plan for the next steps of development.
- End-to-end tests require using the same UI that the client would normally use.
Knowing when you will need to write integration, load, or end-to-end tests depends on how your project is managed—but both unit and functional tests should be written every time you change something. Ideally, each change you make in your code should include a new test or modify an existing one. Unit tests can be written using standard Python, thanks to the excellent unittest package included in the standard library—we will see later how the pytest (http://docs.pytest.org) library adds extra features on top of it.
For functional tests, we shall look in the next section at pytest.
Using pytest and tox
So far, all the tests we have written use unittest classes and unittest.main() to run them. As your project grows, you will have more and more test modules around.
To automatically discover and run all the tests in a project, the unittest package introduced a Test Discovery feature in Python 3.2, which finds and runs tests, given a few options. This feature has been around for a while in projects like Nose (https://nose.readthedocs.io) and pytest, and that was what inspired the test discovery feature in the unittest package in the standard library.
Which runner to use is a matter of taste, and as long as you stick to writing your tests in TestCase classes, your tests will be compatible with all of them.
That said, the pytest project is very popular in the Python community, and since it offers extensions, people have started to write useful tools around it. Its runner is also quite efficient, as it starts to run the tests while they are still discovered in the background, making it a little faster than the others. Its output in the console is also beautiful and bright. To use it in your project, you can simply install the pytest package with pip, and use the provided pytest command line. In the following example, the pytest command runs all the modules that start with test_:
$ pytest test_*
======================= test session starts ========================
platform darwin -- Python 3.8.5, pytest-6.2.1, py-1.10.0, pluggy-0.13.1
rootdir: /Users/simon/github/PythonMicroservices/CodeSamples/Chapter3
plugins: requests-mock-1.8.0
collected 9 items
test_quart_basic.py .                                         [ 11%]
test_quart_error.py ..                                        [ 33%]
test_requests_example2.py ..                                  [ 55%]
test_requests_example2_full.py ....                           [100%]
======================= 9 passed in 0.20s ==========================
The pytest package comes with a lot of extensions, which are listed at http://plugincompat.herokuapp.com/.
The code samples in this book have been formatted with Black, which is also available as a pytest extension. Other useful extensions are pytest-cov (https://github.com/pytest-dev/pytest-cov) and pytest-flake8 (https://github.com/tholo/pytest-flake8).
The first one uses the coverage tool (https://coverage.readthedocs.io) to display the test coverage of your project, and the second one runs the Flake8 (https://gitlab.com/pycqa/flake8) linter to make sure that your code is following the PEP8 style, and avoids a variety of other problems. Here is an invocation example with some deliberate style issues:
$ pytest --flake8 --black
======================= test session starts =======================
platform darwin -- Python 3.8.5, pytest-6.2.1, py-1.10.0, pluggy-0.13.1
rootdir: /Users/simon/github/PythonMicroservices/CodeSamples/Chapter3
plugins: flake8-1.0.7, requests-mock-1.8.0, black-0.3.12, cov-2.10.1
collected 29 items
molotov_example1.py ss                                         [  6%]
quart_basic.py ss                                              [ 13%]
quart_error.py ss                                              [ 20%]
quart_profiled.py ss                                           [ 27%]
requests_example1.py ss                                        [ 34%]
requests_example2.py FF                                        [ 41%]
test_quart_basic.py ss.                                        [ 51%]
test_quart_error.py ss..                                       [ 65%]
test_requests_example2.py ss..                                 [ 79%]
test_requests_example2_full.py ss....                          [100%]
======================= FAILURES =======================
_____________________ Black format check ________________________
--- /Users/simon/github/PythonMicroservices/CodeSamples/Chapter3/requests_example2.py    2020-12-29 11:56:56.653870 +0000
+++ /Users/simon/github/PythonMicroservices/CodeSamples/Chapter3/requests_example2.py    2020-12-29 11:56:58.595337 +0000
@@ -24,11 +24,11 @@
 def render_heroes_over(age=0):
 	url = "https://mdn.github.io/learning-area/javascript/oojs/json/superheroes.json"
 	json_body = query_url(url)
 	relevant_heroes = get_hero_names(
-    	json_body, filter =lambda hero: hero.get("age", 0) > age
+    	json_body, filter=lambda hero: hero.get("age", 0) > age
 	)
 	return render_hero_message(relevant_heroes, age)
 if __name__ == "__main__":
__________________________ FLAKE8-check __________________________
/Users/simon/github/PythonMicroservices/CodeSamples/Chapter3/requests_example2.py:26:80: E501 line too long (85 > 79 characters)
/Users/simon/github/PythonMicroservices/CodeSamples/Chapter3/requests_example2.py:29:26: E251 unexpected spaces around keyword / parameter equals
----------------------- Captured log call --------------------------
WARNING  flake8.options.manager:manager.py:207 option --max-complexity: please update from optparse string `type=` to argparse callable `type=` -- this will be an error in the future
WARNING  flake8.checker:checker.py:119 The multiprocessing module is not available. Ignoring --jobs arguments.
===================== short test summary info =======================
FAILED requests_example2.py::BLACK
FAILED requests_example2.py::FLAKE8
============= 2 failed, 9 passed, 18 skipped in 0.51s ===============
Another useful tool that can be used in conjunction with pytest is tox (http://tox.readthedocs.io). If your projects need to run on several versions of Python or in several different environments, tox can automate the creation of these separate environments to run your tests.
Once you have installed tox (using the pip install tox command), it requires a configuration file called tox.ini in the root directory of your project. Tox assumes that your project is a Python package and therefore has a setup.py file in the root directory alongside the tox.ini file, but that's the only requirement. The tox.ini file contains the command lines to run the tests along with the Python versions that it should be run against:
    [tox]
    envlist = py38,py39

    [testenv]
    deps = pytest
       pytest-cov
       pytest-flake8

    commands =  pytest --cov=quart_basic --flake8 test_*
When tox is executed by calling the tox command, it will create a separate environment for each Python version, deploy your package and its dependencies in it, and run the tests in it using the pytest command.
You can run a single environment with tox -e, which is very handy when you want to run the tests in parallel using automated tools. For instance, tox -e py38 will just run pytest under Python 3.8.
Even if you support a single Python version, using tox will ensure that your project can be installed in a current Python environment and that you have correctly described all the dependencies. We will use tox in our worked example in later chapters.
Developer documentation
So far, we've looked at the different kinds of tests a microservice can have, and we've mentioned that the documentation should evolve with the code. We are talking here about developer documentation. This includes everything a developer should know about your microservices project, most notably:
- How it is designed.
- How to install it.
- How to run the tests.
- What are the exposed APIs and what data moves in and out?
People go to documentation to get their questions answered. There are Who, What, Where, When, Why, and How questions, such as:
- Who should use this software?
- What does this software do?
- Where can it be deployed?
- When is using it helpful?
- Why does it work this way?
- How do I install and configure it?
Good documentation describes why decisions were made so that people—including yourself—returning to the code can decide whether a decision made in the past is worth following, or whether the situation has moved on and decisions need to be revisited. A developer reading the documentation should come away with a clear idea of the answers to Why questions, and information about the more difficult How questions.
It is rare that each line of code or function needs to be mentioned in a separate document. Instead, the source code should have comments in it that help a developer navigate and understand what they are reading. Functions should have docstring comments that explain their purpose, arguments, and return values, unless they are truly short and obvious. These are easier to keep up to date when the code is changed and avoid the need to tightly couple the documentation and the implementation—a design principle that works here as well as when designing the software itself.
Tools for documentation
The Sphinx tool (http://www.sphinx-doc.org/), which was developed by Georg Brandl to document Python itself, became the standard in the Python community. Sphinx treats documents like source code by separating the content from the layout. The usual way to use Sphinx is to have a docs directory in the project that contains the unprocessed content for the documentation, and then to generate the HTML files using Sphinx's command-line utility.
Producing an HTML output with Sphinx makes an excellent static website, which can be published on the web; the tool adds index pages, a small JavaScript-based search engine, and navigation features.
The content of the documentation must be written in reStructuredText (reST), which is the standard markup language in the Python community. A reST file is a simple text file with a non-intrusive syntax to mark section headers, links, text styles, and so on. Sphinx adds a few extensions and summarizes reST usage in this document: https://www.sphinx-doc.org/en/master/usage/restructuredtext/basics.html
Markdown (https://daringfireball.net/projects/markdown/) is another popular markup language used in the open-source community, and you may have encountered it if you have updated README files on GitHub. Markdown and reST are similar enough that moving between the two should be straightforward. This can be quite useful, as Sphinx has limited support for Markdown.
When you start a project with Sphinx using sphinx-quickstart, it generates a source tree with an index.rst file, which is the landing page of your documentation. From there, calling sphinx-build on it will create your documentation. As an example, if you want to generate HTML documentation, you can add a docs environment in your tox.ini file, and let the tool build the documentation for you as follows:
    [tox]
    envlist = py39,docs
    ...

    [testenv:docs]
    basepython=python
    deps =
        -rrequirements.txt
        sphinx
    commands=
        sphinx-build -W -b html docs/source docs/build
Running tox -e docs will generate your documentation.
Showing code examples in Sphinx can be done by pasting your code in a literal block prefixed by using a :: marker or a code-block directive. In HTML, Sphinx will render it using the Pygments (http://pygments.org/) syntax highlighter:
Quart Application
=============
Below is the first example of a **Quart** app in the official documentation:
.. code-block:: python

    from quart import Quart
    app = Quart(__name__)

    @app.route("/")
    async def hello():
        return "Hello World!"

    if __name__ == "__main__":
        app.run()
That snippet is a fully working app!
Adding code snippets in your documentation is helpful to readers, but does mean that they may get overlooked when the code changes and they no longer work. To avoid this deprecation, one approach is to have every code snippet displayed in your documentation extracted from the code itself. To do this, you can document your modules, classes, and functions with their docstrings, and use the Autodoc Sphinx extension: https://www.sphinx-doc.org/en/master/usage/extensions/autodoc.html
This will grab docstrings to inject them in the documentation and is also how Python documents its standard library at: https://docs.python.org/3/library/index.html
In the following example, the autofunction directive will catch the docstring from the index function that is located in the myservice/views/home.py module:
APIS
====

**myservice** includes one view that's linked to the root path:

.. autofunction :: myservice.views.home.index
When rendered in HTML, the page will display as shown in Figure 3.3.

Figure 3.3: The above code, as it is rendered in HTML
The other option is to use a literalinclude directive, which will let you include source code directly. When the file is a Python module, it can be included in the test suite to make sure it works. The following is a full example of project documentation using Sphinx:
Myservice
=========

 **myservice** is a simple JSON Quart application.

The application is created with :func:`create_app`:
.. literalinclude:: ../../myservice/app.py

The :file:`settings.ini` file which is passed to :func:`create_app`
contains options for running the Quart app, like the DEBUG flag:
.. literalinclude:: ../../myservice/settings.ini
   :language: ini
Blueprint are imported from :mod:`myservice.views` and one
Blueprint and view example was provided in :file:`myservice/views/home.py`:

.. literalinclude:: ../../myservice/views/home.py
   :name: home.py
   :emphasize-lines: 13
Views can return simple data structures, as we've been using in our example code so far. In that case, they will be converted into a JSON response. When rendered in HTML, the page will display as shown in Figure 3.4.
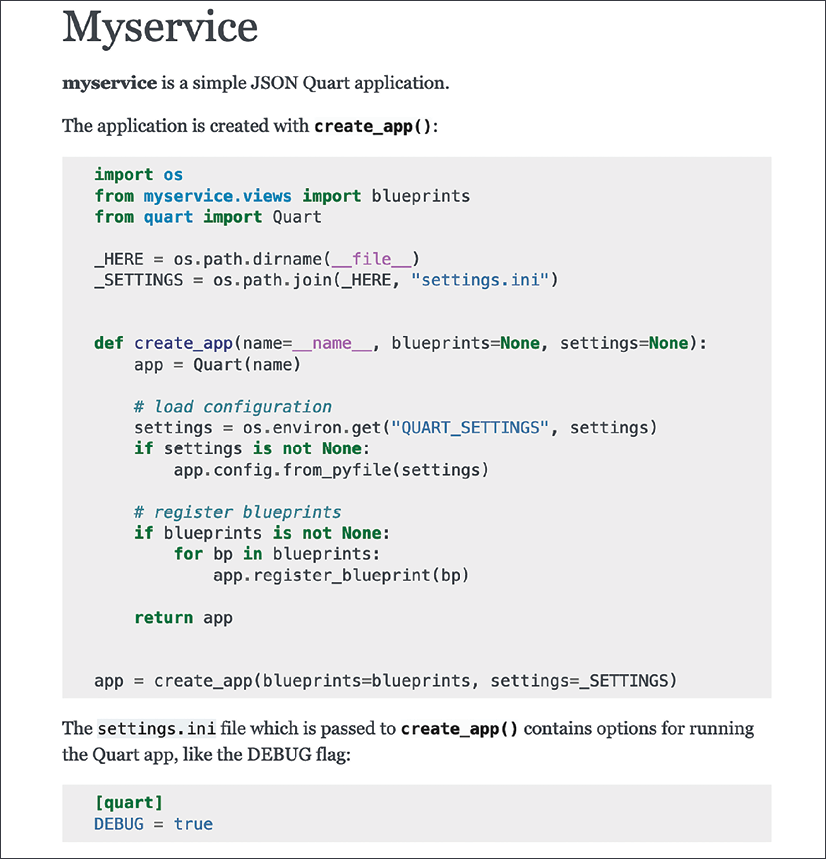
Figure 3.4: Documentation rendered with Sphinx
Of course, using Autodoc and literalinclude will not fix your processes or design documents—maintaining proper documentation is hard and developers often prioritize changes to the code above changes to the documentation.
It is an easy position to understand, as the code furthers the needs of the organization, but there will be consequences if it is not done. Anything that can be done to automate part of this documentation work is great.
In Chapter 4, Designing Jeeves, we will see how we can use Sphinx to document the microservice HTTP APIs by using OpenAPI and the Sphinx extension to support it.
The following points summarize this section:
- Sphinx is a powerful tool to document your project.
- Treating your documentation as source code will facilitate its maintenance.
- Tox can be used to rebuild the documentation when something changes.
- If your documentation points to your code, it will be easier to maintain.
Version control
Many of us have worked on projects where we want to keep a copy of something "just in case." This can be homework from school, a project document for work, or, if you're particularly organized, some planning notes for something at home. Often, when we make a lot of changes, we end up with copies of the file with different names that may make sense at the time but quickly get out of control:
myplan.txt
myplan.original.txt
myplan.before_feedback.txt
myplan.final.reviewed.final2.suggestions.txt
This situation gets even more chaotic when multiple people are working on a project. This is where version control really shines. Using a Version Control System (VCS) means that each project is kept as a repository of all its files, and every change you commit is kept forever, unless you work really hard to remove it from the repository's history. Accidentally deleted an important paragraph or a useful bit of Python code? It will be in the version control history, so it can easily be recovered. Have more than one person working on something? These tools make it easy to track, compare, and merge changes.
There are many version control systems out there, such as Git, Mercurial, and Subversion. The examples from this book will all work with Git, as we are taking advantage of the features available on GitHub, a popular hosted service for version control—and for our needs, we will be using a free-tier account. If you would like to experiment with the code examples, it is a good idea to sign up for an account at https://github.com/.
Many other services exist that do similar things, with a slightly different set of features or workflows that are possible. For example, GitLab (http://gitlab.com) and Bitbucket (https://bitbucket.org/) are both excellent services for hosting a Git repository. Other version control software, such as Mercurial and Subversion mentioned above, are also popular choices, and you will see them (and others) in use in organizations around the world.
Hosted services generally offer a wide range of features in addition to the core version control, such as issue tracking, project management, and our next topic: CI/CD systems.
Continuous Integration and Continuous Deployment
Tox can automate many testing steps for your project: running tests on various different Python versions; verifying coverage and code styles; building documentation, and so on. This is still something you would need to run by hand, and would also need to be maintained across several different versions of Python—a task made easier with tools such as pyenv (https://github.com/pyenv/pyenv), although still involving some work to keep organized.
A Continuous Integration (CI) system solves this issue by listening for changes in your version control system for the right time to run the commands you decide on, and will often take care of the different environments for you. As an example, if you needed to make a change to an open-source project hosted on GitHub, you would be able to clone the repository. You would then have a complete copy of it on your own computer, including all of its history. You then make the change you need, commit it to your own copy's history, and make a Pull Request (PR) on GitHub, essentially asking the person who has the original copy of the repository to pull in your changes; allowing random people uncontrolled access is not a good idea!
You know the code you have written is good, but how does this project owner know? They might receive dozens of these requests each week, or each day. If they connect a CI system, they can set things up so that each time someone submits a PR, or a change is merged into their copy, the tests they want to run are done automatically. They can also deploy their software this way by letting the system know what commands to run to automatically build and release a package, update some published documentation, or copy code out to running servers and set up the new version of the software. This is known as Continuous Deployment (CD).
We mentioned integration tests earlier, and now we are discussing CI; it's important to remember that CI/CD systems run whatever commands you tell them to. They don't have to be integration tests—there doesn't have to be any integration at all—but they are immensely useful services for testing your code in the way that you want, without having to worry about forgetting or testing many different versions.
GitHub Actions
Many CI systems integrate with popular version control services and so there are many options to run your tests, such as CircleCI and Jenkins. For more complex requirements, there are also options such as Taskcluster (https://taskcluster.net/) which is used to build the Firefox web browser and needs to be built on half a dozen platforms and run tens of thousands of tests. However, GitHub comes with its own offering built in, and so to keep things clear, we will be using GitHub Actions for the examples in this book.
Most of the services run in a similar way, so it's worth covering how it happens. Once a CI system is connected to your project, it will look for some configuration in your repository. GitHub Actions looks for files in a directory called github/workflows, CircleCI looks for a file named .circleci/config.yml, and so on. Let's look at an example using GitHub Actions:
# .github/workflows/python.yml
---
name: Python package
on: [push]
jobs:
  build:
    runs-on: ubuntu-latest
    strategy:
      matrix:
        python: [3.7, 3.8, 3.9]
    steps:
      - uses: actions/checkout@v2
      - name: Setup Python ${{ matrix.python }}
        uses: actions/setup-python@v2
        with:
          python-version: ${{ matrix.python }}
      - name: Install Tox and any other packages
        run: pip install tox
      - name: Run Tox
        # Run tox using the version of Python in `PATH`
        run: tox -e py
We see that, thanks to on: [push], this will be run every time the repository receives a new change—and this includes a pull request, so we can see whether the tests pass for anyone wanting to give us new code.
The workflow has been told to run three times, using the selection of Python versions listed in the strategy, and for each Python version it will run the steps shown: checking out a copy of the push; setting up Python; installing tox; running tox.
Many different commands or services can be connected in CI/CD pipelines to let us examine code quality, formatting, check for outdated dependencies, building packages, and deploying our service. We will look at documentation control and code test coverage as examples.
Documentation
There are many good options for hosting documentation. GitHub even includes a built-in documentation service called GitHub Pages, although to keep ourselves in line with other Python projects, and to provide examples of using an external service, we will be using ReadTheDocs (RTD) (https://docs.readthedocs.io ) for our example microservice. Whichever option you choose, a GitHub action or other CI integration can be set up to ensure your documentation is updated whenever a change is made.
Using this approach, your documentation will be in ReStructuredText (.rst) or Markdown (.md) files, which are very easy to create and are a useful format for reading across many different platforms with different accessibility needs. Pages and RTD will create HTML from these documents that are suitable for displaying on the web, and you can apply themes and templates to them to make the resulting web pages appear however you would like.
RTD comes with easy support for different versions of your software so that readers can change views between the documentation for, say, versions 1 and 2. This is very useful when you are maintaining different versions, such as just after a new release, or migrating takes some users a long time. The versioning feature scans git tags and lets you build and publish your documentation per tag and decide which one is the default.
Coveralls
Once a project has tests, a natural question to ask is, "How much of this code is tested?" The answer to this question can be provided through another popular service called Coveralls (https://coveralls.io/). This service displays your test code coverage in a nice web UI and can be connected to your repository through its CI configuration.

Figure 3.5: A Coveralls report about test coverage
Every time you change your project and GitHub Actions triggers a build, it will, in turn, cause Coveralls to display an excellent summary of the coverage and how it evolves over time, similar to that shown in Figure 3.5.
Badges
Once you start to add services to your project, it is good practice to use badges in your project's README so the community can see at once the status for each one of them with links to the service. For example, add this README.rst file in your repository:
microservice-skeleton
=====================

This project is a template for building microservices with Quart.

.. image:: https://coveralls.io/repos/github/PythonMicroservices/microservice-skeleton/badge.svg?branch=main
   :target: https://coveralls.io/github/PythonMicroservices/microservice-skeleton?branch=main

.. image:: https://github.com/PythonMicroservices/microservice-skeleton/workflows/Python%20Testing/badge.svg
.. image:: https://readthedocs.org/projects/microservice/badge/?version=latest
   :target: https://microservice.readthedocs.io
The preceding file will be displayed as shown in Figure 3.6 in GitHub on your project's landing page, demonstrating three different status badges.

Figure 3.6: GitHub project status badges
Summary
In this chapter, we have covered the different kinds of tests that can be written for your projects. Functional tests are those that you will write more often, with WebTest being a great tool to use for such a purpose. To run the tests, pytest combined with Tox will make your life easier.
We also covered some tips on writing good documentation and ensuring that the tests are run in an automated way. Last, but not least, if you host your project on GitHub, you can set up a whole CI system for free, thanks to GitHub Actions. From there, numerous free services can be hooked to complement the tools available, like Coveralls. You can also automatically build and publish your documentation on ReadTheDocs.
If you want to look at how everything fits together, the microservice project published on GitHub uses GitHub Actions, ReadTheDocs, and coveralls.io to do so: https://github.com/PythonMicroservices/microservice-skeleton/
Now that we've covered how a Quart project can be continuously developed, tested, and documented, we can look at how to design a full microservices-based project. The next chapter will go through the design of such an application.