
After we have prepared the code to classify movie reviews in the previous subsection, let's discuss the basics of the Flask web framework to develop our web application. After Armin Ronacher's initial release of Flask in 2010, the framework has gained huge popularity over the years and examples of popular applications that make use of Flask include LinkedIn and Pinterest. Since Flask is written in Python, it provides us Python programmers with a convenient interface for embedding existing Python code such as our movie classifier.
Note
Flask is also known as microframework, which means that its core is kept lean and simple but can be easily extended with other libraries. Although the learning curve of the lightweight Flask API is not nearly as steep as those of other popular Python web frameworks, such as Django, I encourage you to take a look at the official Flask documentation at http://flask.pocoo.org/docs/0.10/ to learn more about its functionality.
If the Flask library is not already installed in your current Python environment, you can simply install it via pip from your terminal (at the time of writing, the latest stable release was Version 0.10.1):
pip install flask
In this subsection, we will develop a very simple web application to become more familiar with the Flask API before we implement our movie classifier. First, we create a directory tree:
1st_flask_app_1/
    app.py
    templates/
        first_app.html
The app.py file will contain the main code that will be executed by the Python interpreter to run the Flask web application. The templates directory is the directory in which Flask will look for static HTML files for rendering in the web browser. Let's now take a look at the contents of app.py:
from flask import Flask, render_template

app = Flask(__name__)

@app.route('/')
def index():
    return render_template('first_app.html')

if __name__ == '__main__':
    app.run()
In this case, we run our application as a single module, thus we initialized a new Flask instance with the argument __name__ to let Flask know that it can find the HTML template folder (templates) in the same directory where it is located. Next, we used the route decorator (@app.route('/')) to specify the URL that should trigger the execution of the index function. Here, our index function simply renders the HTML file first_app.html, which is located in the templates folder. Lastly, we used the run function to only run the application on the server when this script is directly executed by the Python interpreter, which we ensured using the if statement with __name__ == '__main__'.
Now, let's take a look at the contents of the first_app.html file. If you are not familiar with the HTML syntax yet, I recommend you visit http://www.w3schools.com/html/default.asp for useful tutorials for learning the basics of HTML.
<!doctype html>
<html>
  <head>
    <title>First app</title>
  </head>
  <body>
  <div>Hi, this is my first Flask web app!</div>
  </body>
</html>
Here, we have simply filled an empty HTML template file with a div element (a block level element) that contains the sentence: Hi, this is my first Flask web app!. Conveniently, Flask allows us to run our apps locally, which is useful for developing and testing web applications before we deploy them on a public web server. Now, let's start our web application by executing the command from the terminal inside the 1st_flask_app_1 directory:
python3 app.py
We should now see a line such as the following displayed in the terminal:
* Running on http://127.0.0.1:5000/
This line contains the address of our local server. We can now enter this address in our web browser to see the web application in action. If everything has executed correctly, we should now see a simple website with the content: Hi, this is my first Flask web app!.
In this subsection, we will extend our simple Flask web application with HTML form elements to learn how to collect data from a user using the WTForms library (https://wtforms.readthedocs.org/en/latest/), which can be installed via pip:
pip install wtforms
This web app will prompt a user to type in his or her name into a text field, as shown in the following screenshot:

After the submission button (Say Hello) has been clicked and the form is validated, a new HTML page will be rendered to display the user's name.
The new directory structure that we need to set up for this application looks like this:
1st_flask_app_2/
    app.py
    static/
        style.css
    templates/
        _formhelpers.html
        first_app.html
        hello.html
The following are the contents of our modified app.py file:
from flask import Flask, render_template, request
from wtforms import Form, TextAreaField, validators

app = Flask(__name__)

class HelloForm(Form):
    sayhello = TextAreaField('',[validators.DataRequired()])

@app.route('/')
def index():
    form = HelloForm(request.form)
    return render_template('first_app.html', form=form)

@app.route('/hello', methods=['POST'])
def hello():
    form = HelloForm(request.form)
    if request.method == 'POST' and form.validate():
        name = request.form['sayhello']
        return render_template('hello.html', name=name)
    return render_template('first_app.html', form=form)

if __name__ == '__main__':
    app.run(debug=True)
Using wtforms, we extended the index function with a text field that we will embed in our start page using the TextAreaField class, which automatically checks whether a user has provided valid input text or not. Furthermore, we defined a new function, hello, which will render an HTML page hello.html if the form has been validated. Here, we used the POST method to transport the form data to the server in the message body. Finally, by setting the argument debug=True inside the app.run method, we further activated Flask's debugger. This is a useful feature for developing new web applications.
Now, we will implement a generic macro in the file _formhelpers.html via the Jinja2 templating engine, which we will later import in our first_app.html file to render the text field:
{% macro render_field(field) %}
  <dt>{{ field.label }}
  <dd>{{ field(**kwargs)|safe }}
  {% if field.errors %}
    <ul class=errors>
    {% for error in field.errors %}
      <li>{{ error }}</li>
    {% endfor %}
    </ul>
  {% endif %}
  </dd>
{% endmacro %}
An in-depth discussion about the Jinja2 templating language is beyond the scope of this book. However, you can find a comprehensive documentation of the Jinja2 syntax at http://jinja.pocoo.org.
Next, we set up a simple Cascading Style Sheets (CSS) file, style.css, to demonstrate how the look and feel of HTML documents can be modified. We have to save the following CSS file, which will simply double the font size of our HTML body elements, in a subdirectory called static, which is the default directory where Flask looks for static files such as CSS. The code is as follows:
body {
  font-size: 2em;
}
The following are the contents of the modified first_app.html file that will now render a text form where a user can enter a name:
<!doctype html>
<html>
  <head>
    <title>First app</title>
  <link rel="stylesheet" href="{{ url_for('static', filename='style.css') }}">
  </head>
  <body>

{% from "_formhelpers.html" import render_field %}

<div>What's your name?</div>
<form method=post action="/hello">
  <dl>
    {{ render_field(form.sayhello) }}
  </dl>
  <input type=submit value='Say Hello' name='submit_btn'>
</form>
  </body>
</html>
In the header section of first_app.html, we loaded the CSS file. It should now alter the size of all text elements in the HTML body. In the HTML body section, we imported the form macro from _formhelpers.html and we rendered the sayhello form that we specified in the app.py file. Furthermore, we added a button to the same form element so that a user can submit the text field entry.
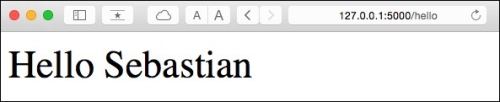
Lastly, we create a hello.html file that will be rendered via the line return render_template('hello.html', name=name) inside the hello function, which we defined in the app.py script to display the text that a user submitted via the text field. The code is as follows:
<!doctype html>
<html>
  <head>
    <title>First app</title>
  <link rel="stylesheet" href="{{ url_for('static', filename='style.css') }}">
  </head>
  <body>

<div>Hello {{ name }}</div>
  </body>
</html>
Having set up our modified Flask web application, we can run it locally by executing the following command from the app's main directory and we can view the result in our web browser at http://127.0.0.1:5000/:
python3 app.py
Note
If you are new to web development, some of those concepts may seem very complicated at first sight. In that case, I encourage you to simply set up the preceding files in a directory on your hard drive and examine them closely. You will see that the Flask web framework is actually pretty straightforward and much simpler than it might initially appear! Also, for more help, don't forget to look at the excellent Flask documentation and examples at http://flask.pocoo.org/docs/0.10/.