We could create any custom graphics we like by creating a custom widget and by reimplementing its paint event. This approach is very helpful when we are trying to create some small graphics like drawing graphs or for drawing basic shapes. In order to create animations and more complex graphics we will take help from the PySide's graphics view classes:
The graphic view classes can be used by first creating a scene represented by a QGraphicsScene object. Scenes can be associated with the QGraphicsView object to represent or view on the screen. Items that are represented by the QGraphicsItem object can be added to the scene. A scene is created, items are added, and visualized in that order. QGraphicsView can be triggered to visualize a whole scene or only a part of it by changing the bounding rectangle values. The interactions can happen by using the mouse or a keyboard. The graphics view translates the mouse and key events into scene events represented by QGraphicsSceneEvent and forwarding them to the visualized scene. The custom scene interactions are achieved by re-implementing the mouse and key event handlers. The most interesting feature of the graphics views is that we can apply transformations to them, for example, scaling and rotation. This can be done without changing the original scene's items.
class MyView(QGraphicsView):
def __init__(self):
QGraphicsView.__init__(self)
self.myScene = QGraphicsScene(self)
self.myItem = QGraphicsEllipseItem(-20, -10, 50, 20)
self.myScene.addItem(self.myItem)
self.setScene(self.myScene)
self.timeLine = QTimeLine(1000)
self.timeLine.setFrameRange(0, 100)
self.animate = QGraphicsItemAnimation()
self.animate.setItem(self.myItem)
self.animate.setTimeLine(self.timeLine)
self.animate.setPosAt(0, QPointF(0, -10))
self.animate.setRotationAt(1, 360)
self.setWindowTitle("A Simple Animation")
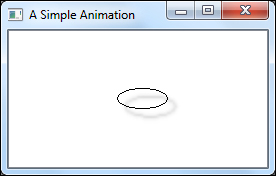
self.timeLine.start()This program will create an animated ellipse as its output. As discussed, we have created scene, added items to it, and showed it via the view class. The animation is supported by the QGraphicsAnimationItem() object. Many more complex animations can be built on top of this but explaining those is out of the scope of this book. You can explore by yourself to create more QGrapicsView objects and create complex animations.
The PySide.QtGui.QGraphicsEffect class serves as the base class for the graphical effects on an application. With the help of effects, we can alter the appearance of elements. The graphical effects objects operate between the sources, say, for example, a pix map item and the destination, the viewport, and render the respective effects for the image. The various graphical effects that Qt provides are:
All these classes are inherited from the base class QGraphicsEffect. The following code excerpt shows an example of adding effects to the items:
    self.effect = QGraphicsDropShadowEffect(self)
    self.effect.setBlurRadius(8)
    self.myItem.setGraphicsEffect(self.effect)
    self.myItem.setZValue(1)
When this effect is added, you will notice a shadow in the animated ellipse as shown in the following screenshot. Similarly, other effects can be added to the items.