
A status bar is a horizontal information area that is usually found at the bottom of windows in a GUI. Its primary job is to display information about the current status of the window. A status bar can also be divided into sections, each showing different information to the users.
In PySide, a status bar can be added to the QMainWindow class by calling the QMainWindow.setStatusBar(statusbar) function. It takes the input parameter object of type PySide.QtGui.QStatusBar. The property of the status bar is defined by this class, and an object of this class is returned to set a status bar. Setting this parameter to 0 will remove the status bar from the main window. A status bar can show information that can fall into any of the following three categories:
- Temporary: This is mainly used to explain tooltip texts, menu entries, and so on. It temporarily occupies the enter status bar.
- Normal: This is used to display the current window information, page and line numbers, and so on. It is normally hidden by temporary messages and occupies a part of the status bar.
- Permanent: This usually occupies a small space, and it is used to indicate important mode information, the Caps Lock indicator, spell check information, line number in code editors, and so on.
At any give point of time, the current status bar object of type QStatusBar can be retrieved using the QMainWindow.statusBar() function. This object can then be used in a similar way to setting temporary messages on the status bar by calling the QStatusBar.showMessage(text[, timeout=0]) function. If a timeout is set, the message will be cleared after the expiry of the specified time in milliseconds. If there is no timeout, you can clear the message by calling the QStatusBar.clearMessage() function.
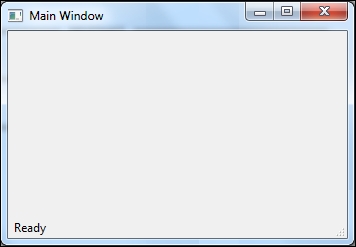
To make this evident, we create a method called CreateStatusBar(), which has the following code snippet:
  def CreateStatusBar(self):
    """ Function to create Status Bar
    """
    self.myStatusBar = QStatusBar()
    self.myStatusBar.showMessage('Ready', 2000)
    self.setStatusBar(self.myStatusBar)
Now, call this function from the initGUI function to set a status bar on the main window. On executing this code, we can see a status bar appearing on the main window that will expire after two seconds, which is the timeout that we have set. If you have left the timeout option or set it as 0, the message will appear in the status bar until another message is called on to overwrite it or until we close the application. The output window will be as given in the following screenshot.
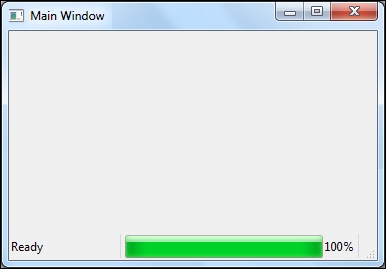
It is also possible to set a widget in the status bar in addition to the text messages. A widget, such as QProgressBar, can be added to the status bar to indicate the progress of a particular action on the main window. The PySide.QtGui.QProgressBar widget provides a horizontal or vertical progress bar. The progress bar is used to provide the user with an indication of the progress of an operation and to reassure them that the application is still running. We shall now take a look at a program that implements this. Make the changes to the previous program, explained as follows:
The setMinimum(minimum) and setMaximum(maximum) functions of PySide.QtGui.QProgressBar takes an integer value as the value to set the minimum and maximum possible step values. When you give it the current step value later, it will display the percentage of steps that have been completed. The percentage is calculated by dividing the progress, as follows:
[PySide.QtGui.QProgressBar.value() -PySide.QtGui.QProgressBar.minimum()] /
[PySide.QtGui.QProgressBar.maximum() - PySide.QtGui.QProgressBar.minimum()]
  def createProgressBar(self):
...
    self.progressBar = QProgressBar()
    self.progressBar.setMinimum(0)
    self.progressBar.setMaximum(100)
...
As explained, we will now add widgets to the status bar. For this purpose, we have created two widgets, namely, self.statusLabel and self.progressBar, of type QLabel and QProgressBar respectively. The following code creates the status bar and adds these widgets to it:
  def CreateStatusBar(self):
    """ Function to create the status bar
    """
    self.myStatusBar = QStatusBar()
    self.myStatusBar.addWidget(self.statusLabel, 1)
    self.myStatusBar.addWidget(self.progressBar, 2)
    self.setStatusBar(self.myStatusBar)
The PySide.QtGui.QStatusBar.addWidget(QWidget * widget[, int stretch=0]) function takes two arguments.
The number defines the ratio of the status bar that the widget can use. By setting the progress bar's stretch factor to 2, we ensure that it takes two-thirds of the total area of the status bar.
After adding the widgets to the status bar, we write the following function to show its working state. This function will show the label as Showing Progress until the progress bar at the right proceeds to completion. On progress reaching 100, the status label changes to Ready:
  def ShowProgress(self,progress):
   """ Function to show progress
   """
  self.progressBar.setValue(progress)
        if progress == 100:
            self.statusLabel.setText('Ready')
            return
Now, modify the code in the main block, as shown in the following, and execute the program. You can now see that the status bar has a working progress bar widget along with a label:
....
        mainWindow = MainWindow()
        mainWindow.CreateStatusBar()
        mainWindow.show()
        mainWindow.ShowProgress()
        myApp.exec_()
....
Tip
Downloading the example code
You can download the example code files from your account at http://www.packtpub.com for all the Packt Publishing books you have purchased. If you purchased this book elsewhere, you can visit http://www.packtpub.com/support and register to have the files e-mailed directly to you.
After making the changes, execute the program and you will see an output window, as shown in the following screenshot:
In the systems that use the command-line interface, the user may be presented with a list of commands that will be displayed as help text to the user. The users can then choose from the list to perform their desired action. In GUI systems, this is replaced with a set of text and symbols to represent choices. By clicking on the text/symbol, the user executes their desired action. This collection is called a menu.
A menu bar is a region of a screen or application that consists of a list of pull-down menu items. A common use of the menu bar is to provide convenient access to various operations, such as opening a new or an existing file, saving the file, printing options, manipulating data, providing help windows, closing the application, and so on. In this section, we introduce the concept of adding a menu bar to our application. Before that, we define the central widget of the application, which will aid the usage of menus.
As we have seen earlier, the central area of the QMainWindow can be occupied by any kind of widget. This widget can be any of the following:
- A standard
Qtwidget, such asQTextEditorQGraphicsView - A custom widget created using primary widgets
- A plain
QWidgetwith a layout manager, which acts as a parent for many other widgets - Multiple widgets with a
QSplitter, which arranges the widgets horizontally or vertically - MDI area, which acts as a parent for other MDI windows
In our example, we use QTextEdit as the central widget. The PySide.QtGui.QTextEdit class provides a widget that is used to edit and display both plain and rich text formats and also displays images, lists, and tables. QTextEdit is an advanced WYSIWYG viewer/editor using HTML style tags. The rich text support in Qt is designed to provide a fast, portable, and efficient way to add reasonable online help facilities to applications, and to provide a basis for rich text editors. The QTextEdit can be used as both a display widget and an editor. For our purposes, we use it as an editor.
The following piece of code sets the QTextEdit as the central widget. On calling this function from the initGUI function, a text editor will be set at the central space of our application. The output is shown in the screenshot after the information box containing the code excerpt:
  def SetupComponents(self):
    """ Setting the central widget
        """
        textEdit = QTextEdit()
		        self.setCentralWidget(textEdit)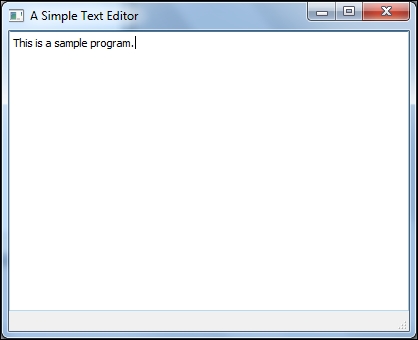
We will now add the menu bar to our application. We use the PySide.QtGui.QMenuBar class to create a menu bar. This class provides a horizontal menu bar to which the menu items can be added. You don't have to set a layout for the menu bar. Different platforms use different layouts for the menu bar. In a Windows system, the menu bar is usually anchored at the top of a window under the title bar. In the Macintosh system, the menu bar is usually anchored at the top of the screen. Linux systems have both these display formats depending on the GUI style. QMenuBar automatically sets its own geometry to the top of the parent widget and changes it appropriately whenever the parent is resized.
In the main window style applications, we use the PySide.QtGui.QMainWindow.menuBar() function to create a menu bar. This function will return an empty menu bar, which has QMainWindow as its parent. In the Mac application, if you want all to share a single common menu bar, use PySide.QtGui.QMenuBar and don't use a function to create it, because the menu bar that is created this way will have QMainWindow as its parent with no parent by directly instantiating the QMenuBar class. The menu bar can also be set in the main window using the PySide.QtGui.QMainWindow.setMenuBar(menubar) function, which takes a menu bar object as its parameter.
Once the menu bar is set, a menu list can be added to it. The PySide.QtGui.QMenu class provides a menu widget for use in menu bars, context menus, and other pop-up menus. A menu widget is a selection menu, which can be either a pull-down menu in a menu bar or it can be a context menu. Pull-down menus are shown by the menu bar when the user clicks on the respective item or presses the specified shortcut key. Context menus are invoked by some special keyboard key or by right-clicking on it.
In the menu bar, we add menus with the QMenuBar.addMenu(menu) function. For the example application, we add three menus namely, File, Edit, and About. Inside each of these menus, we create two actions, each that connects to a specified slot. As defined, a menu consists of a list of action items when triggered by a click or a keyboard shortcut key combination. The PySide.QtGui.QAction class provides an abstract user interface action that can be inserted into widgets. Actions are common for a combination of menu items, toolbars, and keyboard shortcuts. So, we create an action and attach it to different components that are expected to perform the same functionality. Usually, when an action is created, it should be added to the relevant menu and toolbar, and then connected to the slot that will perform the action. Actions are added to the menus with the QMenu.addAction(), QMenu.addActions(), and QMenu.insertAction() functions. An action is rendered vertically under the menu, and can have a text label, an optional icon drawn on the left, and a shortcut key sequence.
The following example demonstrates the creation of the menu bar in the main window application. This program is a shortened version of what we will be developing as a fully working Simple Text Editor application at the end of this chapter:
# Import required modules
import sys
from PySide.QtGui import QApplication, QMainWindow, QStatusBar, QTextEdit,
QAction, QIcon, QKeySequence
class MainWindow(QMainWindow):
""" Our Main Window class
"""
def __init__(self):
""" Constructor Function
"""
super(MainWindow,self).__init__()
self.initGUI()
def initGUI(self):
self.setWindowTitle("A Simple Text Editor")
self.setWindowIcon(QIcon('appicon.png'))
self.setGeometry(300, 250, 400, 300)
self.SetupComponents()
self.show()
def SetupComponents(self):
""" Function to setup status bar, central widget, menu bar
"""
self.myStatusBar = QStatusBar()
self.setStatusBar(self.myStatusBar)
self.myStatusBar.showMessage('Ready', 10000)
self.textEdit = QTextEdit()
self.setCentralWidget(self.textEdit)
self.CreateActions()
self.CreateMenus()
self.fileMenu.addAction(self.newAction)
self.fileMenu.addSeparator()
self.fileMenu.addAction(self.exitAction)
self.editMenu.addAction(self.copyAction)
self.fileMenu.addSeparator()
self.editMenu.addAction(self.pasteAction)
self.helpMenu.addAction(self.aboutAction)
# Slots called when the menu actions are triggered
def newFile(self):
self.textEdit.setText('')
def exitFile(self):
self.close()
def aboutHelp(self):
QMessageBox.about(self, "About Simple Text Editor",
"This example demonstrates the use "
"of Menu Bar")
def CreateActions(self):
""" Function to create actions for menus
"""
self.newAction = QAction( QIcon('new.png'), '&New',
  self, shortcut=QKeySequence.New,
  statusTip="Create a New File",
  triggered=self.newFile)
self.exitAction = QAction( QIcon('exit.png'), 'E&xit',
self, shortcut="Ctrl+Q",
statusTip="Exit the Application",
triggered=self.exitFile)
self.copyAction = QAction( QIcon('copy.png'), 'C&opy',
self, shortcut="Ctrl+C",
statusTip="Copy",
triggered=self.textEdit.copy)
self.pasteAction = QAction( QIcon('paste.png'), '&Paste',
self, shortcut="Ctrl+V",
statusTip="Paste",
triggered=self.textEdit.paste)
self.aboutAction = QAction( QIcon('about.png'), 'A&bout',
self, statusTip="Displays info about text editor",
triggered=self.aboutHelp)
# Actual menu bar item creation
def CreateMenus(self):
""" Function to create actual menu bar
"""
self.fileMenu = self.menuBar().addMenu("&File")
self.editMenu = self.menuBar().addMenu("&Edit")
self.helpMenu = self.menuBar().addMenu("&Help")
if __name__ == '__main__':
# Exception Handling
try:
#QApplication.setStyle('plastique')
myApp = QApplication(sys.argv)
mainWindow = MainWindow()
myApp.exec_()
sys.exit(0)
except NameError:
print("Name Error:", sys.exc_info()[1])
except SystemExit:
print("Closing Window...")
except Exception:
print(sys.exc_info()[1])In the preceding example, the actions are created in the CreateActions() function. Each of the menu items is created as a separate action:
self.newAction = QAction( QIcon('new.png'), '&New',
self, shortcut=QKeySequence.New,
statusTip="Create a New File",
triggered=self.newFile)
The New item under the File menu has the action instantiated as the preceding code snippet. Its parameters are explained as follows:
- The first parameter is the Icon that will be displayed to the left of the menu item.
- The next parameter is the name that has to be displayed. The
&character represents that the letter followed by it should be underlined, and it can be accessed by pressing the Alt + <letter> combination as in many other window applications. - The third parameter implies the parent, which is the main window here.
- The fourth and fifth keyword parameters represent the shortcut key combination for easy access of the menu item and the status tip that has to be displayed on highlighting the menu item, respectively. The shortcut key can be either a predefined combination by the
PySide.QtGui.QKeySequenceclass or a valid combination as given by the user. ThePySide.QtGui.QKeySequenceclass encapsulates a key sequence that is used by shortcuts. It defines a combination of keys that can be used by different operating system platforms. - The last parameter defines the slot that has to be called when the menu item is triggered, which can be a logical group of code executing the desired functionality. We define the other actions similar to this.
Once the actions are created, we add these actions to the menu items. The top-level menu bar is created in the CreateMenus() function and the actions of the menu items are added, as follows:
self.fileMenu.addAction(self.newAction)
The menu items can be grouped by adding a separator between the items, which is done as given in the following code line:
self.fileMenu.addSeparator()
Execute the program and witness how menus work.